You can choose expensive, exquisite tiles, the best adhesive mixtures, quickly and efficiently lay tiles on the walls, but if you do it incorrectly finishing, all the work will go down the drain.
Often the final result largely depends on the final touches, so grouting the tile joints in the bathroom with your own hands is a responsible and scrupulous step. Thanks to skillful technology, it is possible to create a stable structure with stunningly correct geometry and impeccable appearance.
The purpose of the mortar for filling tile joints is clear: it protects the walls (or floor), as well as adhesive composition from exposure to moisture and mechanical damage. The correct grouting process transforms individual fragments(tiles, border, decor) into a complete coating, making the bathroom walls aesthetically attractive.
There is a so-called seamless tile, which completely lacks a side chamfer. Ideally smooth edges require tight installation, without the use of seams and, accordingly, grouting materials.
However, most often these are collectible designer tiles or porcelain tiles, which are very expensive and require professionalism during installation, so ordinary tiles are used for tiling bathrooms in typical city apartments and country cottages.
The talented Polish designer Maciej Zien is the author of many collections of seamless ceramic tiles, one of which, Piccadilly London, is built on the contrast of colors, shapes and textures
Which grout will lie smoothly, last longer and not require immediate repairs? High quality material must have the following properties:
- uniformity - do not contain clots and inclusions, so as not to create unevenness or air bubbles that provoke destruction of the layer;
- elasticity - well-connected particles of the solution facilitate quick and easy application;
- strength that appears after completion of work and allows you to care for the seams without destroying them;
- hydrophobicity, repelling moisture.
And of course, the grout must match the color scheme of the selected tile - match in shade or, on the contrary, create an expressive contrast, which happens much less often.

Clear geometry of the seams, emphasized by contrasting grout, and zoning with orange decorative tiles transforms your bathroom into a beautiful one modern premises where you can have a good time
Stages of grouting tile joints
Many people think that grouting is very easy - just apply the compound to the seams, remove the excess and that’s it, the job is done. However, during the embedding process, technical nuances often arise that affect the final result. Let's try to sort it out final stage step by step and identify the tricky and complex aspects of such an important process.
Step #1 – prepare tools and materials
The advantage of doing it yourself is that you don’t need to buy expensive tools and materials. Everything is relatively cheap and is sold in construction supermarkets. So, for work you will need:
- a set of rubber spatulas for applying grout and distributing it along the seams;
- several buckets or special containers for mixing the solution;
- construction knife and paint brush for cleaning tile joints;
- several household sponges for wet cleaning;
- protective accessories – mask and rubber gloves (for aggressive solutions).
Since the process will not last long, it is better to prepare tools and equipment in advance.
A large quantity is also required clean water– for the bathroom this is not a problem if the water supply is not blocked due to construction work. The materials you will need are ready-made grout in jars or a dry mixture for preparing the solution, which is usually sold in small bags.

Spatulas for applying and deepening the grout differ from metal tools for plastering walls: they are made of elastic rubber, which is convenient for distributing the composition along the seam without damaging the integrity of the tiles
Step #2 – preparation of seams and mortar
After the glue has completely dried (time may vary - from 8 hours to 2 days), you can cook work surface and dilute the dry mixture with water if you have not purchased a ready-made solution.
The gaps between adjacent tiles must be completely cleaned of glue residues with a knife, and then sweep out small fragments and dust. paint brush. The cleaner the surface being treated, the smoother the grout will lie and the more firmly it will “adhere” to the edges of the tile and the wall.

Preparing joints when laying new tiles takes much less time than grouting old joints with cracked and darkened mortar
Before grouting the joints on ceramic tiles, prepare a solution. Take a clean container and pour it in warm water(20-25ºС), add the dry mixture from the pack and stir thoroughly.
If you don’t have a special mixer attachment for your drill, a regular wooden stick will do. The main thing is that there are no lumps in the solution. After preparing the mixture, you should immediately begin the application process.

When preparing grout, you need to compare two important factors: application time and drying time. If you are working slowly, it is better to cook several small portions at a time
Step #3 – applying grout
At this stage, inexperienced home tilers make a small mistake: they begin to fill the seams between the tiles “dry”. Professionals recommend moistening the seam with water before applying the composition for better adhesion. Apply water with a paint brush, preferably a round, large sponge or spray bottle.
You can play it safe and use an antiseptic primer instead of water to prevent the appearance of fungus or mold.

If you decide to moisturize the joint space with a primer, do not buy a special composition for this purpose. The solution you used to prepare the walls for tiles is perfect.
When applying the solution, pay attention to the movements of the spatula - they should go perpendicular to the seam. The grout should be applied quickly but carefully, pressing inward a little so that it fills the entire joint space.
You can run the sharp end of the spatula along the application line and once again go through transverse strokes.

To ensure that there is no waste left inside the tile joint, the strokes should be tightly overlapped one on top of the other, especially carefully at the intersections of lines
Step #4 – dry and wet cleaning
Even with very careful application of the composition, streaks and marks remain on the edges of the tiles. How to grout tiles correctly, leaving a minimum of marks? Even during the process of processing the seams, you can remove excess: after several transverse strokes, run the spatula lengthwise, collecting excess solution.
Then, even before it dries completely, you should take a dry cloth or damp sponge and carefully wipe off the remaining solution.
However, be careful: when pressing with a sponge, part of the grout can be squeezed out of the joint, so use only transverse movements.

The more careful and precise your movements are in the process of applying the solution, the less time you will spend cleaning the tiles later.
A damp sponge is preferable for another reason: by removing excess solution, it smoothes the seams, making them smooth and aesthetically attractive. You should not be distracted while working, because the grout mixture dries quickly, and removing it in a dried state is quite difficult.
Get ready for the fact that after the first cleaning you will have to wipe the entire tile several times with a damp cloth - traces of grout, especially gypsum, are very persistent.
The nuances of working with floor tiles
The tile joints on the floor are filled in exactly the same way as on the walls, but there are several nuances that make the work easier. For example, there is a method that allows you to quickly treat a floor with smooth tiles. Instead of a regular sponge, take a hand-held construction float with a rubber pad and fill the seams at arm's length with wide, sweeping movements. The solution will spread evenly and fill the voids tightly if you make it more liquid.

The grater can also be effectively used for the next step - removing grout residues by attaching a porous foam sponge instead of a rubber pad.
This method is not suitable if the texture of the tile is embossed, has protrusions or scars. The grout will fill the depressions in the ceramic, which is an additional labor-intensive cleaning job.
Having processed ceramic cladding, do not forget to fill the seams around sockets, pipes, plumbing equipment and heated towel rail mounts with mortar.
Once again about the types of grouting materials
On the shelves of construction supermarkets you can find a variety of materials for filling tile joints. Domestic and foreign manufacturers offer products of different composition and consistency: dry mixtures, ready-made solutions of medium viscosity, dense pastes. Let's look at how aggregates differ and which ones are better suited for grouting yourself.
The basis for the most common type of dry mixes is cement - similar products can be found from every manufacturer. Some cement compositions contain sand, others are diluted with other fillers. Sand mixtures It is worth using if the width of the seams reaches 4 cm or higher, that is, they are absolutely not suitable for bathrooms. Cement-sand mortars are used for exterior decoration facades, device garden paths, construction work in the yard.

You can prepare cement grout yourself, using cement and fine sand as a base, taken in equal parts, and a little latex additives for elasticity.
For grouting tile joints in bathrooms, toilets and kitchens, compositions made from Portland cement mixed with lime are used. Fine grinding of the components guarantees an even, uniform layer during application. Polymer-cement solutions are diluted not with water, but with a latex-based composition. There are two types of mixtures: colored and light, intended for mixing with coloring pigment during the preparation process.
The second type of solution is prepared based on resins. Even professionals rarely get to work with epoxy material, which consists of two components and is prepared immediately before application. The thick mass must be applied quickly and very carefully. When hardened, the grout material becomes equal in strength to ceramic tiles and lasts for at least 50 years.
Epoxy mixtures are used for joints wider than 6 mm, but are sometimes used for finishing bathrooms. Designers add gold or silver powder to the powder and get a luxurious frame for ceramic tiles.

Epoxy grout, bright, with the addition of metal powder, looks flawless and presentable only when the edges of the tile or mosaic are perfectly smooth
The most resistant material is considered to be a filler made from furan resin. It is as expensive as epoxy, and has another feature - it is exclusively black. Despite its high performance and exceptional wear resistance, furanol is rarely used.
Sometimes silicone filler - sealant - is used to treat joints, difficult areas or places where tiles adjoin a sink (bathtub). It is sold in plastic syringe tubes and is squeezed directly into the seam using a construction gun.
The sealant has elasticity and antiseptic properties, but over time it can change its shade: white or transparent material turns yellow from exposure to water and light.

Especially for glass mosaics and ceramic tiles, water-repellent polyurethane grout based on aqueous dispersion is produced by the famous Italian company Litocol
The most convenient filler for beginning tilers is polyurethane grout, which is sold ready-made in buckets of various sizes. It is universal, that is, suitable for sealing joints when laying both tiles and mosaics. The width of the seam can be different - from 1 mm to 5 mm.
The polyurethane composition of the mixture is easy to apply, hardens quickly and does not cause problems during further maintenance.
What should be the optimal seam width?
The appearance of the tile depends not only on the color or texture, but also on the width of the joints, which surround each element on all sides and affect the visual perception. The opinion that wide seams suppress the tiles is wrong.
On the contrary, too narrow seams interfere with full visual perception, and they are also dangerous from a functional point of view: grout hardly gets into them, so it is difficult to judge their integrity and tightness.

When calculating the width of the tile joints, take into account two important factors: ease of application of the solution and preservation of such properties of the grout as waterproofness and strength
The disadvantage of too wide seams is their weak resistance external factors. The grout cracks, crumbles and requires constant updating. For this reason in cement mixtures for wide joints add sand. The average dimensions of the sides of bathroom tiles are from 10 to 33 cm, a suitable joint width is 3-4 mm.
How to prevent cracking?
Cement grout cracks more often than others. There are several reasons for rapid destruction: the consistency of the solution is too liquid, unstable wooden base, impact hot water or incorrect ratio of components. If repairs are not carried out in time, water will regularly get under the tiles, which can lead to the appearance of mold.
You can unstitch and clean the seams, fill them with mortar again, but where is the guarantee that this will last?

Sometimes, even during the process of applying the mass, cracks begin to appear. This means that the prepared solution is not thick enough, and to correct the situation it is necessary to rub dry powder directly into the cracks formed.
It is better to prevent cracking by listening to the advice of experts. It is necessary that the solution is homogeneous, of medium viscosity, and the seam is well cleaned and wide enough. When diluting the mixture yourself, you need to let it sit for 5-6 minutes after stirring, and then stir it again. It is not recommended to ventilate the room during drying or use hot water inside it.
And finally main advice: Follow the instructions on the packaging. There you can find information about correct application mortar, joint width and drying period.
Ceramic tiles - beautiful finishing material. Possessing a huge number of advantages, it has been and remains one of the materials that is always very popular. Of course, this is a very beautiful surface finishing option, which, however, can be quite easily spoiled by carelessly executed seams. So how to properly grout the seams between floor tiles?
Grout mixtures are intended for filling joints between tiles. They are divided into the following groups according to their composition:
- Cement-sand grouts
- Polymer cement mixtures
- Epoxy compounds
- Epoxy-cement grouts
- Polymer mixtures
So, cement-sand grout mixtures are used for decorative jointing between tiles indoors, characterized by gentle operating conditions, for example, moderate air humidity. In this case, it is important and necessary that the base is not subject to deformation and is durable, brick or concrete. Such grouts are made from white cement, where clean fine-grained sand is added.
Polymer-cement grouts are suitable for the same conditions as the previous ones; they are also made from white cement, but in this case polymer additives are used to give the composition strength and moisture resistance, and to avoid defects such as the formation of cracks.
Epoxy and epoxy-cement mixtures are used for internal and external cladding work. Due to special chemical properties they can easily withstand the harshest operating conditions, such as exposure to aggressive environments, deformable bases, and high humidity.
Polymer compositions are made on the basis of silicone. They are used for “seamless” laying of stone or porcelain tiles, which are subsequently polished. The high elasticity of polymer grouts ensures their resistance to sudden temperature changes, which is why they are often used when tiling rooms where heated floors are laid under tiles. Polymer mixtures are injected into the seams using a special syringe, which is commercially called “suture filler”.
When choosing grout, pay attention to how it is chemical composition, as well as the following factors:
- Cladding material
- Compatibility of the mixture with the adhesive you use when laying tiles
- Coating operating conditions
- Width of spaces between tiles
- Facing color
Let's look at these options in more detail.
Cladding material
The vast majority of such mixtures are intended for a wide range of facing materials. An exception may be grouts for those types that tend to be included in chemical reaction with some of the components of the grouting compositions and change color (dolomite, shell rock, marble). Epoxy mixtures, for example, are used to fill joints between tiles in materials such as glass or porcelain tiles (that is, with low water absorption).
- Compatibility of the mixture with the adhesive
As a rule, the tile manufacturers themselves recommend which adhesive is most compatible with which grout mixture. For example, cement grout correlates well with cement-sand mortar. This, by the way, is a very important parameter, and should not be neglected, since some have the habit of taking materials that are in stock or in the first store they come across, without paying attention to whether they are compatible with each other. Although almost any hardware store usually offers a wide range of grouts.
- Coating operating conditions
So, when choosing a grout mixture, it is important to take into account such points as: whether floor or wall tiles are being laid, on exterior or internal lining we are talking about what the temperature and chemical conditions, characteristic of a given room.
The scope of application of the composition is usually indicated on the packaging. Accordingly, for floor tiles you should select a grout designed specifically for this option.
- Width of tile joints
The maximum permissible joint width is indicated on the packaging of the mixture itself.

The principle is as follows: the wider the seams, the more susceptible they are to aggressive factors, that is, the grouting composition should also be more durable, flexible and moisture-resistant.
There are mixtures that can be used in the range of 2-20 mm, they are called universal.
- Facing color
The seams should be slightly darker than the main background of the tile. In this way, the strict geometry of the tile is emphasized and dirt in the seams themselves is masked, that is, a kind of coating that is characteristic of damp rooms and places where there is a lot of tobacco smoke.
When the seams are rubbed with a white mixture, after a certain period of time a yellowish coating appears on it, and it does not always respond to household detergents. If they are sealed with dark fugue, then you will wash them no more than once every 2 or 3 months. Grouting compounds, at their core, are a mixture of cement and various mineral additives, which gradually fade over time. Therefore, the darker the color of the grout, the longer the period your seams will retain their original appearance.
But, of course, for many, the color of the grout is more an aesthetic category than a practical one. So, quite often the composition is selected in accordance with the artistic concept and color facing material. Today there are no restrictions on the choice of grout with a given color.
The most popular grout mixtures
Cement mixtures are among the most inexpensive and popular. But they are susceptible to the effects of aggressive liquids and high humidity: they quickly develop a characteristic coating. Therefore, manufacturers do not recommend using them, for example, for kitchens.
This does not apply to cement compositions with polymer additives. They can be used in any conditions. To ensure that the spaces between the tiles do not deform, crack or crumble under the influence of water or high pressure, you should choose grout reinforced with artificial components.
Resin mixtures are very durable, but, of course, they are more expensive than cement ones. Such grouts do not fade for a long time, are not susceptible to the appearance of fungus, withstand the influence of aggressive detergents and are famous for their smooth surface.
The resin grout consists of a paste and an active substance; they are mixed immediately before work. The process regulator is poured into a container with the base of the mixture and mixed with an industrial mixer until a uniform, thick mass is obtained. Be careful and remember that chemically reacted grout can only be used for an hour. So, even before starting work, you need to calculate the approximate amount of mixture that you will need for one approach. Without violating certain proportions, mix the components, and then get to work.
How to rub seams?
During the grouting process, a small elastic rubber spatula 6-8 cm thick can be very useful to you. But before starting work, you should thoroughly clean the seams. An ordinary, sharply sharpened awl is quite suitable here. Be careful not to damage the glaze with the hard edge of the tool. You can also take special kits designed specifically for cleaning and grouting.
After cleaning, the spaces between the tiles should be thoroughly rinsed with a sponge soaked in water. After making sure that there is no excess glue left between the seams, you can dilute the mixture.
As a rule, 0.4-0.6 kg of grout is sufficient. Let's break it all down large quantities water using a paint mixer, it won't take much time. When you get the consistency of village sour cream, you should wait 5 minutes, mix thoroughly - and the composition is ready! Immediately before grouting, you can once again moisten the seams with a sponge on a surface area of 1-1.5 sq.m. Now get started.
15-20 minutes is enough to treat 2-3 square meters of floor. After this, use a damp, not wet, sponge to carefully go over each of the seams. In this case, they turn out smooth, even, of the same depth and width. Remember that ideal seams are always slightly recessed relative to the plane of the tile itself, which emphasizes its geometry.
You can also form a seam using a special spatula, which is a piece of thick rubber cord. Although a piece of regular white antenna cable will do, round pen spatula, plastic lighter, etc. Such options are suitable if the edges of the tiles are smooth and they are laid correctly. If the edge of the tile is sharp or the glaze along the edges is uneven, grouting with such a spatula can ruin the whole picture, because the seams are deep and the sharp edge of the tile becomes visible. Here you should use a sponge. In any case, perfect seams can be achieved, but it must be said that this work is not easy and requires special skill.
After grouting, it takes 10-12 hours for the composition to harden, then the entire tile must be washed with a sponge, removing excess composition from the surface. When the tile dries, use a soft cloth to thoroughly wipe it again. If you do everything correctly and carefully, your floor will look simply amazing.
How to clean old grout?
Sometimes situations arise when the initial grout becomes not very presentable over time. appearance, somewhere it spills out and exposes the seams. What to do? There are two options - either partially wipe over the problem areas, or do it all over again with a better and more modern mixture. Of course, it’s easier to restore crumbling areas if the grout you used last time remains. But if not, then do it all over again.
At the same time, the most time-consuming and important part of this event will be cleaning the old grout. To be honest, this is a job worth entrusting to a professional tiler, since if you clean it yourself, you will likely damage the glazed edges of the tiles, which means ruining the entire tile.
Fortunately, today there are many compounds and removers on the market designed to soften old grout in joints containing mortar acetic acid. But if you want, try softening the seams with plain water, but this will not be as productive.
When you treat an area of 0.5-1 square meters with a similar wash. m, then proceed directly to cleaning. Here again, a sharpened awl or a special scraper will do. The main thing in such jewelry work is to act slowly and very carefully. After cleaning, each area should be brushed with a dry brush, thereby removing dust and small particles. This is really painstaking work that requires much more effort than grouting the joints itself.
After the entire surface is ready, you can begin the new seam treatment, which was already mentioned above. Just try in this case to use a mixture that is more resistant to external influences.
In order for you to have beautiful floors, tiles and tile joints must look neat and aesthetically pleasing, so try to tiling the surface exactly following the recommendations of specialists.
To receive not only quality after renovation, but also a pleasant appearance of ceramic-trimmed surfaces is an understandable desire of apartment owners. Not only the appearance and overall aesthetics of the room, but also the service life of the coating as a whole will depend on how to grout the seams on the tiles on the floor. Therefore, it is worth approaching the choice of the type of joint filler and processing technique with attention to all details.
What does grout do?
Joint filler plays several roles.
- Protects the coating base (adhesive composition) from destruction due to moisture.
- Floor tile grout prevents debris from accumulating.
- Joint filler, matched to the color of the surface, in contrast, matching the surrounding walls - will allow you to achieve the desired aesthetics.
- Grout for floor tiles, as well as for wall tiles, is used as a damper. During seasonal temperature surges, the pavement configuration changes, including the distance between separate elements styling
- The mixture for filling joints has partial vapor permeability. Moisture can circulate naturally.
- Grout for tiles on the bathroom floor plays the role of an anti-fungal and anti-mold agent.
The list can go on. For example, mention that floor tile grout acts as an effective connector, improving the overall distribution of mass over the surface when walking. But it is already clear that you need to grout the seams carefully and correctly, guaranteeing a good result.
Types of grout mixtures
Based on the type of main component, joint filler is divided into several classes. Correctly chosen grouting of tile joints on the floor or walls will create a wear-resistant and durable filling that will last as long as the main coating. Based on the type of main ingredient, the compositions are divided into:
- cement based on Portland cement. The mixture is very common; within the class there are grouts with the addition of various components that give the joints moisture resistance, special strength or increase the degree of viscosity;
- By choosing silicone grout for tile joints on the floor or walls, you can guarantee waterproofing and completely neutralize vapor penetration. This is especially important in bathrooms and toilets, as well as rooms with high humidity;
- Epoxy compounds have complex characteristics. The created seam is durable, has low moisture permeability, and does not allow fungus and mold to grow in it - a good option for a bathroom. Grouting floor tiles made from an epoxy mixture will last a long time, since the composition forms a durable structure that is not subject to cracks.
- Latex composition is used very often. According to its main characteristics, it is similar to a cement-containing mixture, but it is plastic and easier to work with. In addition, latex grout for floor tiles or other surfaces comes in a variety of colors.
Tools you will need for the job
When considering the question of how to grout tiles on a floor or wall, it is worthwhile to dwell in detail on the tools used. The final result and its quality depend on their choice.
To quickly and easily carry out work on filling the joints between tiles on a horizontal or vertical surface, you will need:
- device for jointing. This can be a plastic or wooden stick, sharpened on one side;
- a container or container for mixing a solution, a small volume - we will discuss later why the composition for grouting between tiles on a floor or wall is prepared in small portions;
- rubber spatula, the size is selected based on the geometry of the ceramic elements: the smaller the dimensions, the more modest the width of the spatula should be;
- large foam sponge, brush;
- large bucket for water;
- construction mortar mixer or drill with an appropriate attachment.
From extremely useful tools You can note the bag for processing seams. Based on its design, it is easy to understand how to grout tiles on a floor or wall quickly and efficiently. The bag looks like a culinary syringe. It has a spout and a solution container.
The process of filling seams looks like this:
- the spout is placed in the gap between the tiles and pressed in with force;
- by squeezing the bag the solution is squeezed out;
- By moving the spout, you can quickly go through the seams, working at good speed.
The order of how to grout seams on tiles on a floor or wall using a bag is as follows: first go through the horizontal lines, then the vertical ones. When squeezing out, excess solution inevitably forms. Grouting floor tiles or wall covering It will go faster if you let the mixture set for 30 minutes - then the partially hardened composition is removed more carefully.
How to prepare the mixture
After considering how to choose grout for certain conditions, you can move on to the question of its preparation. You will need to follow several rules:
- There is no need to prepare a large portion of the solution - it sets quickly enough both inside the seams and in the container. Remove excess and clean the surface of the coating before the grout hardens.
- Thorough mixing allows you to obtain a plastic and easy-to-use mass. But you need to make sure that there are no air bubbles in the solution.
Based on the basic rules, we will formulate a procedure for using tile grout. It is like this:
- pour a little of the prepared mixture from the packaging into the container;
- using construction mixer or a drill attachment, adding water and kneading the solution;
- During such processing, air enters the composition. Therefore, you need to pause for about 5-8 minutes between adding a portion of water and kneading to get rid of them.
The process continues until the mixture becomes slightly thicker than sour cream, but does not crumble into lumps like cottage cheese. When mixing completely manually, there is no need to pause for the solution to settle. In this case, you will have to ensure that the mixture is uniform in both color and consistency.

Surface preparation
It is important not only to know how to use tile grout, but also how to prepare the base, since the durability of the grout and its appearance depend on this. Before you start you will need:
- thoroughly clean the space between the tiles from mortar and debris, forming cracks of uniform depth;
- treat the future seam with an antifungal agent;
- wet the seam in depth with water, using a small amount of liquid.
ABOUT last stage It's worth talking in more detail. Ceramic tiles with a matte surface have the ability to draw moisture out of the grout. This can lead to cracking and spalling.
Therefore, when working with glazed ceramics, it is enough to moisten the seam with a small amount of water, and in the case of matte tiles, you will need to use a brush and a spray bottle to treat not only the gap, but also the side part of the laying element, capturing the front surface.
You need to work quickly with matte tiles to prevent the solution from drying out. During work, parts of the seams of the installation being processed, if necessary, are additionally sprayed from a spray bottle. If it is clear that the solution dries very quickly, it is also sprayed with a small amount of water to achieve partial hardening within 30 minutes.
Seam filling
Let's look at how to use tile grout for its intended purpose. The technology for filling seams looks like this:
- if you are processing a laying of small tiles, it is more convenient to work rubber spatula. They take a small amount of putty and forcefully press it into the seam until it is filled;
- when working on laying large tiles, for example, on the floor, you can use a construction rubbing trowel, plastic or wooden. A lot of solution is poured onto it at once, it is pressed with force into the seam remaining on the tool - it is moved to the edge and the process is repeated in the next section. You need to move the trowel at an angle of 30 degrees relative to the direction of the gap.
During work, the grout may sag into the seam. Then the process of pressing the solution is repeated and this is done until the composition confidently fills the gap between the tiles.
A special note on processing volumes. In one stage it is recommended to mash no more than 1-2 square meters area. This ensures that the putty will not have time to set and you can carefully and accurately process the seams
Formation of the seam surface
There is a common proverb: repairmen are divided into only two types, some create a grout with a smooth surface almost flush with the tile, others create grout with a concave bottom, the rest of the divisions are far-fetched. Let's look at how to get the job done in both ways.
- To make a seam with a smooth surface, use a foam sponge. The first pass with plywood, a board, flat-pointed plastic or wooden stick remove excess grout. The second, foam rubber, is used to evenly deepen the seam, leaving it even. This kind of work requires skill - the solution accumulates on the sponge and makes it difficult to control the quality of the treatment.
- To make a seam with a concave surface, it is convenient to use a piece of cable insulation with a diameter close to or larger than the width of the gap. They are carried along the line of putty, pressing the mark. Then use a sponge to remove excess solution from the sides. This technique allows you to get a good result even with little skill.
The main requirement is that the surface of the tile must be higher than that of the grout layer. Different seam configurations allow, among other things, to form and complement the overall aesthetics of the coating.

Surface cleaning
There are opinions that it is necessary to clean the tiles after 24 hours from the moment the joints are grouted. In this case, it is recommended to use solvents, mustard powder, polishing attachments for drill. These are understandable requirements, since within 24 hours the solution will completely harden and will be extremely difficult to remove.
You can clean the tiles 2-3 hours after grouting. You need to work carefully, without much pressure and excessive moisture. In this case, clean, soft rags and sponges are used, which must be constantly rinsed and squeezed vigorously. After the tiles are cleaned, the seams are sprayed with an extremely small amount of water, from a spray bottle, from a great distance.
Once again, it is worth emphasizing: if cleaning the tiles is carried out a couple of hours after grouting, it is highly not recommended to apply pressure to the partially hardened seam. Its surface may be damaged. Also, it is important not to use a lot of moisture so that the solution does not flow.
Another tip is implemented the next day. It is necessary to carefully examine the condition of the seams and, if necessary, repeat the grouting process. Or simply treat them with an antifungal agent. There is no comment on the quality that can be achieved with attention to detail.
Video on how to choose grout, prepare it and what tools you need:
The joints between the tiles must be grouted correctly. To do this, you should find out what consistency the solution should be, how and when to remove excess solution, etc. These nuances are precisely revealed in this article. Once you familiarize yourself with them, you will definitely do everything right.
Tools and materials required for grouting tiles:
- grout for seams;
- paper tape;
- metal spatula;
- rubber spatula;
- sponge, ice scraper;
- bucket, clean rags.
Grouting ceramic tiles
Selecting a shade
Please pay attention Special attention the right choice grout colors. How often, when you come to visit someone, do you notice a discrepancy between the tiles and the joints between them? To prevent this from happening to you, take a piece of tile and go to a building materials store. Choose a suitable shade according to your taste.
Note: The color of the dry grout is 99 percent identical to the color of the finished joint between the tiles.
It is not recommended to make white joints on the floor in the kitchen or bathroom - they will soon turn gray. Instead, pick bright hues grout to match the color of the tiles. If you plan to highlight the seams, use contrasting shades. Otherwise, buy grout that is the exact color of the tile.
Surface preparation
Prepare the surface thoroughly. Otherwise, you will not achieve maximum results. Pay attention to any remaining adhesive in the grooves between the tiles. They will prevent you from doing the job perfectly. They should be removed.

First of all, use a damp sponge to remove all remaining adhesive from the surface of the tile. Then start cleaning the gaps between the tiles.
Remove and remove all plastic crosses that were used to cover the floor or. This can be done using thin-nose pliers or the edge of a metal spatula. Do not damage the edges of the tiles.

Note: Do not use the same cross stitches twice or thrice to adhere tiles. This is not something to skimp on.

After removing the crosses, you should start removing the glue from the grooves between the tiles. To do this, use a metal spatula. The free spaces between the ceramic tiles will allow you to apply grout throughout the entire space between the tiles.

Remove all loose adhesive residues from the surface of the tile and from the seams with a vacuum cleaner.

Use paper tape to protect all surfaces adjacent to the tiles, for example, door frames, wooden floors, etc. Such manipulations will save you a lot of time and effort when washing dried grout.

Only after completing the preparatory procedures can you begin to prepare the solution.
Preparation of the solution
Note: Try not to use tile putty from untrusted manufacturers. The product should not be cheap - this will affect the hardening time of the solution, its plasticity and ease of use.
To mix the solution in the bucket, you will need a narrow metal spatula. To grout joints, two tools can be used, shown in the photo on the sides of a metal spatula. In this case, a rubber spatula will be used.

Pour into the bucket required amount water (see instructions on the grout package). Stir with a spatula, gradually adding the dry mixture. Allow the mixture to “ripen” for several minutes before final mixing to activate its adhesive functions.

Note: To avoid breathing dust while grouting tiles, use a respiratory mask.
Mix the mixture well so that not a single lump remains. In the photo you can see the correctly prepared consistency of the grout - it should not slide off the trowel in a lump, but it should not flow down it like water. Otherwise, the grout will not be strong.

Applying grout
Before applying the grout, thoroughly moisten the surface of the tiles near the seams. This can be done with a damp sponge.

Start applying grout from the corner of the room opposite the entrance and move gradually towards the entrance.

Only in this sequence will you and the corridor remain clean.
To avoid using too much tile grout, use only a small amount of the mixture at a time. So, use a metal spatula to spread some of the mixture evenly onto the end of a rubber spatula. Using a rubber spatula, start filling the seams at an angle of 30-45 degrees.

Walk over the same place several times until the space between the tiles is completely filled.

You will have to work with patience so that everything turns out neatly. As you will see, this is not at all difficult to do. Gradually move towards the exit from the room.
Remove excess grout from the surface of the ceramic tiles, holding the rubber spatula almost vertically. At this point, you will appreciate the usefulness of the paper tape you pasted earlier. If you had not sealed the objects close to the tiles, it would have taken a long time to clean them. Anyone who has had a one-on-one encounter with dried grout knows what we are talking about and how difficult it is to clean it from any surface.
Cleaning up excess grout
20 minutes after finishing applying grout to the entire floor surface, remove excess grout.
Note: Make sure to complete this procedure on time. Otherwise, to get the perfect look for your tile joints, you will have to spend a lot of money on various products. Typically, wait 20 minutes after applying grout and then wipe off excess grout from the tile surface with a clean, dry cloth.
Recesses in tile joints
Note: If you are grouting flush with the tile, skip this step and move on to rinsing off the grout with a wet sponge.
5 minutes after applying the grout, take a piece of the tube and remove excess from the seams.
The grout performs several functions at once: it provides waterproofing of seams, prevents the appearance of mold, hides minor laying defects and uneven edges of the tile itself. In addition, it is the grout that gives the cladding a neat, finished look and emphasizes the color and texture of the tile. Let's look at how to grout the tiles on the floor, and what composition is needed for this.
Grouts are available in the form of a ready-made mixture or dry powder, which must be diluted to a paste immediately before processing the joints. The basis of the grout is cement or resin, as a result of which the compositions differ in their characteristics and scope of application.
There are two types of such grout - sand-cement based and Portland cement based. The first type is the simplest and cheapest grout, designed for wide joints (more than 5 mm). The composition may have different grain sizes, depending on the fraction of sand used. This type of grout is short-lived, crumbles when cleaned, and cannot withstand prolonged exposure to water. In addition, it cannot be used on glazed tiles, since the sharp grains of sand leave many small scratches on the surface.

The second type is a mixture of cement and various additives that promote the plasticity of the mixture and slow down its setting. It is intended for seams with a width of 3-5 mm. To dilute the dry mixture, use water or liquid latex, which increases the hydrophobic properties of the grout. This grout is easy to apply, fills joints efficiently, and can be used on glazed tiles.

Grout for tile joints - consistency
Advantages of cement composition:
- very affordable price;
- simplicity and ease of application;
- if replacement is necessary, the old grout can be removed from the seams without much effort.
Flaws:
- susceptibility to cracking;
- insufficient moisture resistance;
- lack of resistance to chemically aggressive substances;
- limited color range.

Resin based grout
This grout is called two-component because it is mixed with a hardener before use. The base is furan or epoxy resin: the first type is used in the industrial field, the second is suitable for both industrial and domestic use.
Epoxy grout has good moisture resistance and chemical resistance. Seams treated with this composition are easier to clean from dirt, do not become saturated with water, do not crumble, and retain their original color for a very long time. By the way, the color range of epoxy grouts is much richer and brighter than that of cement grouts, which is due to the presence of special pigments in the composition.


Advantages:
- resistance to temperature changes and negative influences;
- resistance to abrasion;
- plastic;
- dirt-repellent properties;
- Fade resistance.
Flaws:
- high price;
- difficulty of application.


Choice of grout
Grouting affects the overall perception of the cladding, and the wrong choice of composition can completely ruin the impression. To avoid mistakes, you should select the grout taking into account the type of tile surface, the width of the joints, color range finishing. The following recommendations will help you decide:
- For tiles and glass mosaics, it is recommended to use translucent epoxy compounds. After drying, they do not show through the tiles, unlike other mixtures;
- for tiles with a relief or untreated surface, additional purchase is required protective composition which prevents the grout from penetrating into the pores;
- Cement grouts are chosen for wide joints (5-15 mm), epoxy grouts for narrow joints (1-5 mm). As a rule, on the grout packaging, manufacturers always indicate the permissible joint width for a specific type of mixture;
- For bathrooms, kitchens and bathrooms it is worth buying epoxy grouts, for dry rooms - cement ones.

As for color, there are also rules here. You can make colored grout yourself by adding a coloring pigment to the mixture, but in this case it is difficult to achieve the desired shade. In addition, if the composition is not mixed well, the seams after grouting will be colored unevenly, which is immediately noticeable. It is best to buy a ready-made color mixture: every hardware store offers available samples on special fans or layouts.

The color of the grout is of great importance. To emphasize the geometry of the tile, you need to choose a composition that is contrasting in color, that is, choose a dark grout for light tiles, and light grout for dark ones. Bright colored grouts give the cladding a fresh and elegant look, but at the same time highlight the slightest installation errors. But muted pastel colors add restraint and smooth out defects.

To ensure that the color of the seams harmonizes with the finish, it is recommended to choose the color of the grout according to the darkest or lightest shade that is present in the tile pattern. If the cladding is black and white, the seams should be gray. In general, gray is a universal color, it suits any tile, so if you can’t decide, choose it and you won’t go wrong.

It is not recommended to use white grout for floor tiles: the slightest dirt is clearly visible on white joints, so you will have to clean them much more often. In addition, over time, such grout acquires a yellowish tint, and the seams have a less attractive appearance. The best option For floor tiles, grout compounds are used in all shades of brown and gray.


To increase the decorativeness of tile joints, special additives are produced - mother-of-pearl, luminescent, as well as silver and gold chips. All of them are designed for epoxy grout, and mixing with cement composition desired effect does not give. These additives are sold separately and before grouting are simply mixed with the working composition until smooth. The treated seams look very impressive, and, depending on the type of additive, they can shimmer in the light with brilliant sparks, cast like mother-of-pearl, bronze, platinum, or glow in the dark.


Table. Popular brands of grout mixtures
| Name | Description |
|---|---|
| A popular cement-based composition with the addition of organic, polymer and mineral components. Intended for processing joints with a width of 1-6 mm, used on cladding made of ceramics, glass and natural stone. When applied, it is characterized by high plasticity, easily penetrates into all voids, and firmly adheres to the surface. After hardening, it is characterized by minimal shrinkage, excellent resistance to mechanical stress, resistance to fading, and low water absorption. Available in powder form, packaged in bags of 5 and 2 kg. Available in 32 different colors |
| Cement-polymer composition with improved characteristics. Designed for joints 2-20 mm, suitable for ceramics, natural stone, agglomerates, marble and glass mosaics. The mixture is easy to apply, dries quickly, and can be easily removed from the surface. After hardening, it provides color fastness, dirt- and water-repellent properties, and resistance to abrasion and stress. Available in powder form, packaged in bags of 5 and 2 kg |
| Epoxy composition with mineral fillers. Designed for seams up to 10 mm wide. Suitable for all types of tiles, porcelain stoneware, natural stone. After hardening, the grout is resistant to chemical detergents, water, ultraviolet radiation, and intense mechanical stress. Available in the form of a paste, which must be mixed with a hardener before application. Packaged in plastic buckets of 5 kg, gray color |
| It is made on the basis of cement, intended for processing joints up to 10 mm wide in rooms with high level humidity. Contains antifungal additives, is easy to apply, and after curing forms an ideal smooth surface. The seams do not crack for a long time, withstand intense loads well, and do not fade. The grout is resistant to temperature changes, so it can be used on heated floors. The color range includes more than 30 shades |
| It is made on the basis of cement, intended for joints with a width of 1-5 mm. When properly diluted, the mixture has good plasticity, is convenient to apply and easy to clean from the surface of the tile. The main feature of this grout is the absence of streaks on the tiles after washing. The hardened composition provides the seams with durability and color uniformity, reliable protection from moisture penetration. Axton grout also tolerates temperature fluctuations well and can be used to process the seams of tiles laid on heated floors |


Width of grout joints
The width of the joints also affects the overall perception of the cladding and the quality of the grout. For square and rectangular tiles, the optimal joint width is 1.5-3 mm, for tiles irregular shape seams can be increased to 12 mm. The wider the seam, the higher the likelihood of cracking under the influence of intense loads on the floor, so making seams wider than 12 mm is undesirable. In addition, with large joint widths, grout consumption unnecessarily increases.
At the same time, joints less than 1.5 mm wide are difficult to fill, especially if a thick epoxy mixture is used. And poor-quality filling promotes moisture penetration to the ends of the tiles, accumulation of dirt, and the development of mold. It is also difficult to clean seams that are too narrow, and over time the cladding takes on a sloppy appearance.


How to rub seams correctly
The grouting process is quite simple and consists of three main stages: preparing the joints, applying the grout mixture, and cleaning the surface. Let's look at each of them in detail.
To process the seams you will need:
- rubber and narrow metal spatula;
- container for mixing grout;
- construction mixer;
- dry grout;
- a bucket of clean water;
- sponge or soft cloth.
You can start grouting a day after finishing the floor, provided that the tiles are laid with glue. If the installation was carried out using cement mortar, grouting should be done no earlier than a week or 10 days later, depending on the temperature and humidity conditions in the room. The grouting itself is carried out at temperatures from +5 °C to +35 °C and humidity no more than 70%. It is also necessary to exclude drafts and forced floor heating so that the mixture dries naturally. Only if these conditions are met will the seams be as strong and durable as possible.
Step 1. The surface of the tile is cleaned of dirt using a damp sponge, and the remaining mortar is removed with a rubber spatula.

Step 2. Clean the seams of glue to half the thickness of the tile. This can be done using a plastic cross, a corner of a spatula, or any other suitable object. The main thing is not to damage the edges and decorative layer of the tile. Finally, wipe the surface with a clean, dry cloth.

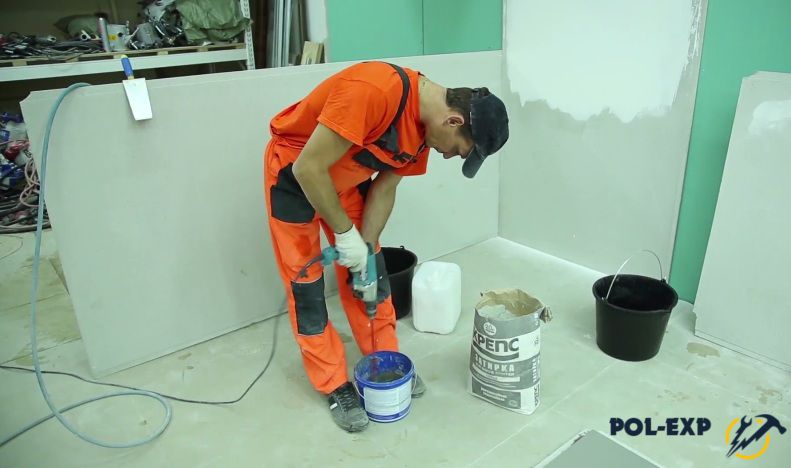
Step 3. Mix the grout solution. Pour water into the container, then add the dry mixture and mix until smooth using a mixer. The ratio of water to powder differs for different brands of grout, so be sure to look for the proportions in the instructions on the package. These proportions must be strictly observed, otherwise delamination of the solution, cracks in the seams when drying, and other defects are possible.

Add the dry mixture to the water according to the instructions on the package.
Advice. There is no need to prepare a lot of solution at once, since it sets quite quickly and after hardening is unsuitable for work. It is better to knead in small portions, which you have time to fully work out.
Step 4. The solution is allowed to stand for about 5 minutes, then vigorously mixed again with a mixer for 1-2 minutes. This will allow you to achieve maximum homogeneity of the composition, which will facilitate its application and improve the quality of filling the seams.

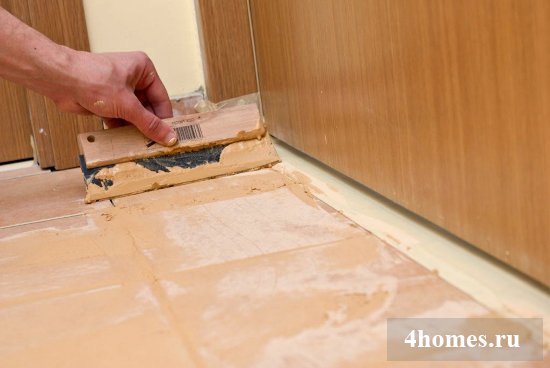
Step 5. Scoop up the solution with a rubber spatula and apply it across the seam with short movements, rubbing the mixture inward. Excess composition is removed with longitudinal movements, holding the spatula at an angle to the surface.


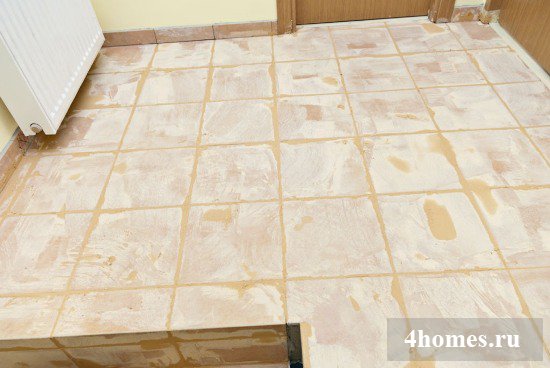
Step 6. After 20 minutes have passed after grouting, you can begin the initial cleaning of the tiles. To begin with, use a rubber spatula to clean off the frozen crumbs of the mortar along the seams and sweep them away from the surface. As you work, try not to catch the seams themselves so as not to leave indentations.

Step 7 Take a damp, clean sponge and use short circular movements to erase the grout marks. You cannot rub in one place for a long time, so as not to remove excess at the joints. After sponging, wipe the tiles with a clean, slightly damp cloth.

Advice. For effective cleaning, the sponge should be washed as often as possible in plenty of water. A dirty sponge will only leave streaks, and it will take longer to clean up.
After cleaning, you need to carefully inspect all the seams: if voids and depressions are found, you should again knead a little grout and seal the defects separately. If the tiles are unglazed and the grout is difficult to clean in places, a special cleaner will come to the rescue. Such products are sold in all construction stores and are relatively inexpensive. Since the cleaner is a chemically aggressive substance, you must wear gloves when working with it.


Video - How to grout tile floors