Design ideas for the interior can really surprise. There are many creative solutions on how to create an amazing thing from simple scrap materials, for example, some furniture from boxes. A lot can be done with your own hands.
Old unnecessary boxes usually accumulate in huge quantities at the dacha or on the balcony. It’s a shame to throw them away, but there’s no point in storing them either. Similar material can be used with great benefit, if you come up with pieces of furniture that will add convenience and decorate any room.

Tables, cabinets, and shelves fit best into a rustic style. WITH minimal costs you can make a functional room. To work, you only need the boxes themselves, self-tapping screws, as well as furniture fittings and the desire to create.
Unique furniture by no means has to be expensive. Any person who has imagination and can do something with his own hands can easily create the interior of his dreams literally from scrap materials.
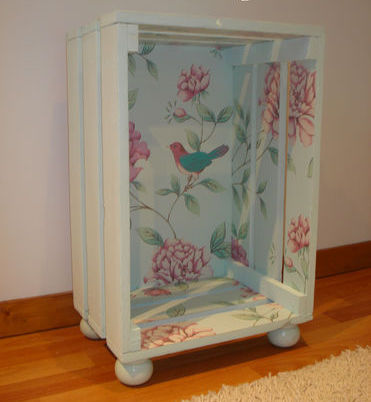
Wardrobe
A dressing room is every woman's dream. However, standard cabinets for this room are expensive, and when made to order, the price turns out to be sky-high. The issue of storing clothes and shoes for the whole family is especially acute, because it is important to think through as much as possible. convenient option, which would still look attractive.

Furniture made from old drawers can easily be both beautiful and functional. Many people limit themselves to small interior details to begin with, but some risk making this particular project the basis of the room.
First of all, you need to understand what can be done. There are practically no restrictions with this material. If there is a shortage of boxes, it is easy to put them together yourself from unnecessary boards.
When you don't want to do it anymore simple crafts, you can take on the dressing room project. In your storage space you need to have plenty small lockers. This will help you sort your clothes and shoes and always keep them in perfect condition.

A dressing room can be strict, when single-color wooden boxes are simply stacked on top of each other along the wall, or very unusual, when assembled in a checkerboard pattern or individual modules are installed. Furniture from wooden boxes easy to paint in any shade.
The most important thing when assembling such a large-scale project as a dressing room is to show your imagination and realize all your wishes. Additionally, you can add furniture fittings, upholstery back wall Decorate the drawers with a beautiful fabric or otherwise.
Rest zone
A relaxation area is a must in every home. At least a small corner in which you can relax, chat with the whole family, or meet a guest over a cup of tea. It is necessary to think over an interior that would calm and relax, providing an opportunity to escape from problems. When choosing furniture for this corner, you should not focus on sophistication; it is better to add simplicity and a little creativity. This option is easy to do yourself.

When choosing a product to make with your own hands, you need to realistically assess your strengths. If there is no specific experience and practice in this matter, then it is better to make a table from boxes. Such work will require a minimum of time and skills, as well as a small amount of materials.

A coffee table made from drawers requires only four drawers; you will additionally need to cut out 4 legs. They are located in such a way that the open part is on the outside; in the future it will serve as a substitute for a bedside table; newspapers, books and much more can be placed there. In order for the table to look holistic, it is necessary to compare wide and narrow edges; a semblance of a checkerboard pattern will allow you to create an excellent model. The hole in the middle is occupied by a pot of flowers or other beautiful addition.

He makes furniture from boxes with his own hands very quickly. It is somewhat more difficult to give it a designer look. For the tea table the best option Simply coat it with varnish to protect it from moisture and place it on four legs. If desired, you can use wheels instead of them, then the furniture will be mobile.
Additionally, for the recreation area you can make bookshelf. In this case, the boxes are simply mounted one on top of the other and secured with self-tapping screws. Books, photo frames, and figurines are placed in the resulting shelves.
Decorative elements
In order for the apartment to feel cozy and comfortable, it is necessary not only to properly furnish it and make repairs, but also to think through the pleasant, beautiful little things that characterize the owners and create a great mood for them. An example would be decorative shelves, stands, various paintings and figurines.

Do-it-yourself items for interior decoration are often made from wooden boxes. A shelf painted in a bright color or an original box on wheels for children's toys will add zest to any room. Each person can come up with their own design. Perhaps this will be an antique option, coated with natural varnish and preserved natural color trees, sometimes they decide to add bright colors and use colors, and some line the drawers with fabric, in which case they look very nice and homey.
Advantages
Making your own furniture from wooden boxes attracts... Lately many. Country style is coming back into fashion, and skilled men prefer to create something special with their own hands rather than purchasing standard options in stores. There are several main advantages to this solution:
- Economical. To create it, we use things that almost everyone has in their home and no one needs. They get a second life.
- Creation. There is an opportunity to show your imagination and realize all your wishes.
- Simplicity; to make furniture from wooden boxes you do not need to have special skills and tools; anyone can easily cope with this task.
- Eco-friendly, wood natural material, so there are never any issues of toxicity or other health hazards with it.

If you look around, everyone has material at hand. All that remains is to come up with an idea and start bringing it to life. This process brings pleasure, because it is very pleasant when a unique designer item comes out of your hands. All guests will definitely appreciate such furniture, and the owners themselves will find it extremely convenient to use it.
Everyone should try themselves as a craftsman and create furniture from wooden boxes with their own hands, which will completely suit them.
- Tables made from boxes
- Wooden table on a carved leg
- Final stages of finishing
Ready-made factory furniture is not always diverse, and the cost of unusual and high-quality models is sometimes high. Why not try making your own furniture? If you are not sure about own strength, then you can start with a simple coffee table. Making a table with your own hands is not so difficult; you can use not only ordinary wood, but also wooden boxes. The structure can then be treated with varnish or stain. The result is an unusual and durable model.
In order to make a beautiful table, you don’t need to buy expensive materials at all; you can make it from ordinary boxes.
Tables made from boxes
How to make a table from wooden boxes left over from vegetables or wine? To make it you will need 4 drawers, furniture wheels, fastening metal corners, screws for woodworking, stain of the selected color, clear varnish and brushes.
Ready-made drawers make the work much easier, since there is no need to assemble individual parts of the table from boards.
In fact, the job is only to fasten individual elements together, and then install the wheels.

If the interior of the room is bright, then such a table can be painted acrylic paint red, yellow or other color.
- First, a frame is made for the future coffee table, and the wheels will be attached to it. To make the frame, take an ordinary board with dimensions of 40*100 mm. The shape of the table will be square, which means the frame should have the same shape. The boards are knocked together, nails and screws are used for fastening. In the middle of the structure you need to attach a fifth board, it will act as a reinforcement;
- Now you can start installing the boxes on the frame of the structure; they will be connected with self-tapping screws. The fastening corners are mounted at the bottom and at the top; it is necessary not only to fasten the boxes to the frame, but also to each other in order to obtain a stable and reliable design. First, it is recommended to connect the boxes together, then install them on the frame;
- The next step is the installation of furniture wheels. You cannot take ones that are too small, as they may not withstand the weight; medium-sized ones made of rubber or special plastic that do not leave scratches on the floor are best suited;
- The final stage of finishing is reduced to grinding the surface. This can be done manually; regular sandpaper is used for cleaning. After cleaning, the entire structure is covered with stain of the selected color and then varnished. This type of work will not pose any difficulties if the distance between the individual boards is sufficient so that the interior can be painted after assembly. If the stain has dried, the structure can be coated with several layers of varnish. But what if the space between the boards is too small? Then inner surface boxes should be painted before installation, at the same time it is recommended to varnish the wood. This will avoid difficulties when everything is already collected and it is difficult to get inside.
If the interior is bright or you need to add a bright spot to it, then such a table can be safely painted with acrylic paint in red, light green, yellow or another color. You can even depict any design, geometric patterns on the surface. After the paint has dried, you can attach a glass tabletop to the front surface, which can be solid or consist of 4 parts.
Return to contents
Wooden table on a carved leg

Drawing of a coffee table.
If there lathe and skills to work with it, then you can start making a beautiful coffee table that will stand on a carved leg and have a round tabletop.
To work, in addition to a lathe, you also need to prepare a milling machine, clamps, and a grinding machine. Materials used:
- wooden beam 50*50 mm;
- boards with a thickness of 25 mm, a width of 45 mm, 10-15 mm;
- special wood glue.
First you need to start making the legs for the future table. In this case round table top will not be large, so one support will be enough. To make the legs, a timber is used, its 2 parts are glued together. Why exactly 2 beams? Using just one will not provide the strength you need for your countertop. The future shape of the leg will be similar to a baluster for a staircase. A lathe is used to process wood. When making a leg, it is advisable to make a thickening at the base; the shape should not be too thin. After the workpiece receives the desired shape, it is necessary to sand its surface.
Now we need to prepare the central leg for attaching the side supports, there will be 4 of them. Eyelets are cut out at the base, each 1 cm deep. You need to cut the side supports only from a solid board; you cannot glue it together, so you should immediately select the thickness and width of the required value. On a milling machine, the workpieces are given a semicircular shape, then they are ground.
In the upper part of the central leg it is necessary to cut special through holes for the cross. It is made of boards with a width of 45 mm and a thickness of 19 mm. The length in this case depends on what parameters the tabletop will have. All ends of the cross will rest against the underframe, creating a reliable foundation. The manufactured cross is placed in the prepared hole and glued.
Now you can make a base for the future carved table. Boards with a thickness of 20 mm and a width of 45 mm are taken. They are cut into equal parts and then assembled into a hexagonal shape. After sanding, carefully glue the workpieces with wood glue and leave to dry. For the underframe, it is recommended to make a decorative edging; just glue rounded wooden planks along the contour. The finished base must be fastened to the crosspiece with self-tapping screws with a length of 65 mm.
The tabletop will be round; you can use a furniture board. It is best to take 2 of these panels with a thickness of 300 mm; they must be carefully glued together, then mark in the form of a circle and carefully cut out the future tabletop. The part is sanded, after which its edges are processed milling machine. To attach the tabletop to the leg, you need to use so-called crackers. They will be screwed to the tabletop with self-tapping screws.
To make it, just connect 4 ordinary wooden boxes. They can be painted, simply coated with varnish or wood impregnation to highlight the natural color and texture. By the way, the table will also come with shelves for storage, and if you attach wheels to it, it can be moved around the apartment.
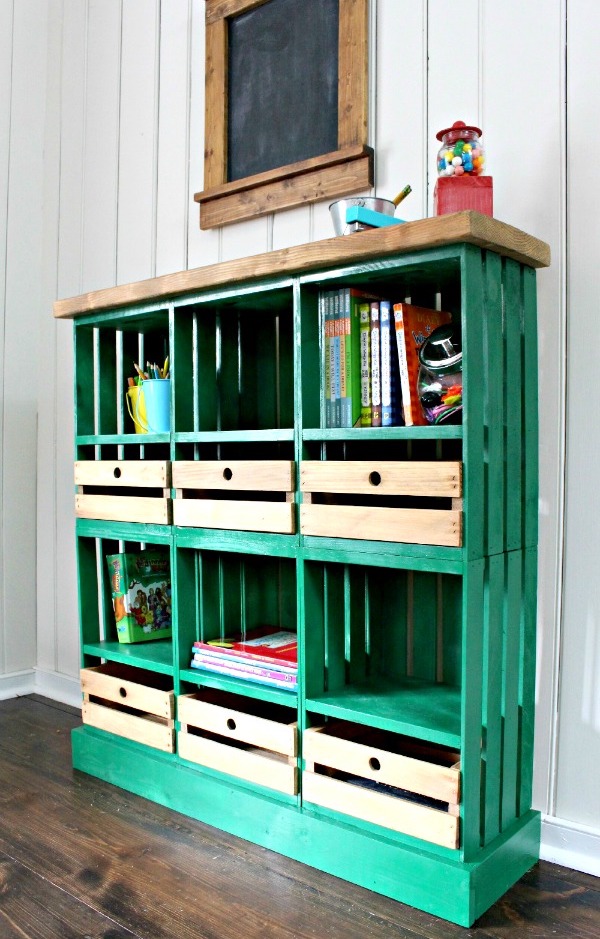
2 Rack with storage drawers
Such a rack can be placed in any room: living room, hallway, children's room. It will fit perfectly into, especially Scandinavian and loft. To repeat this experiment, we need boxes different sizes and tabletops for the base and top of the shelving. You can paint it any color, and you don’t have to put the same wooden boxes inside; you can use any boxes or baskets.
3
This shelf can also be used as a bench. It is enough to connect 3 drawers, put them on legs and attach the tabletop. And choose the color according to your taste and desire.

4 Shelf for books and storage
Another example of a nice shelving unit, only this time the owners decided to stack the drawers like a puzzle: one horizontally, the other vertically. The rack can be painted with colored paint or varnished.

5 Bedside table
One wooden box made this cute little nightstand with storage. The box needs to be painted, but inside... In principle, the design of such a bedside table can be anything: depending on whether you paint the drawer and use prints.
6 Pouf
Wooden box pouf? Easily! It is enough to strengthen the corners with metal plates and reinforce the top of the box before making a soft seat - this will increase its strength and you can sit without fear of ending up on the floor or breaking the structure.

7 Shelves for storage in the hallway
This idea couldn’t be easier to implement - take several ordinary boxes, paint them and attach them to the wall in any order. Ready! On such shelves you can also store the necessary accessories in the hallway.

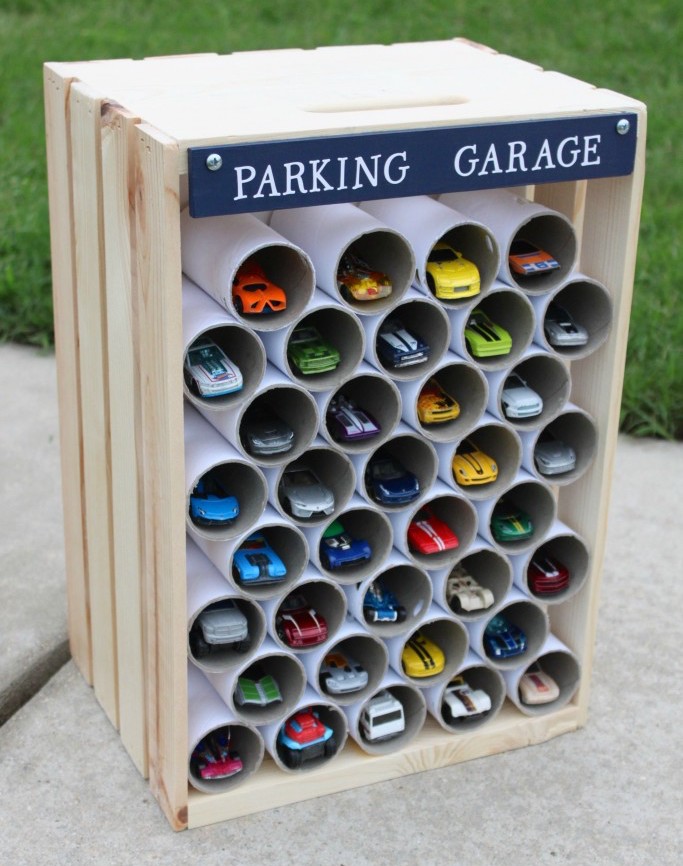
8 Children's "garage" for toy cars
Inventive parents can make such a garage for children toy cars. To do this you will need one wooden box and cardboard sleeves - you can from paper towels. Divide them into several parts and fold them like a checkerboard inside the box. Can be secured with glue. The child will definitely like it.
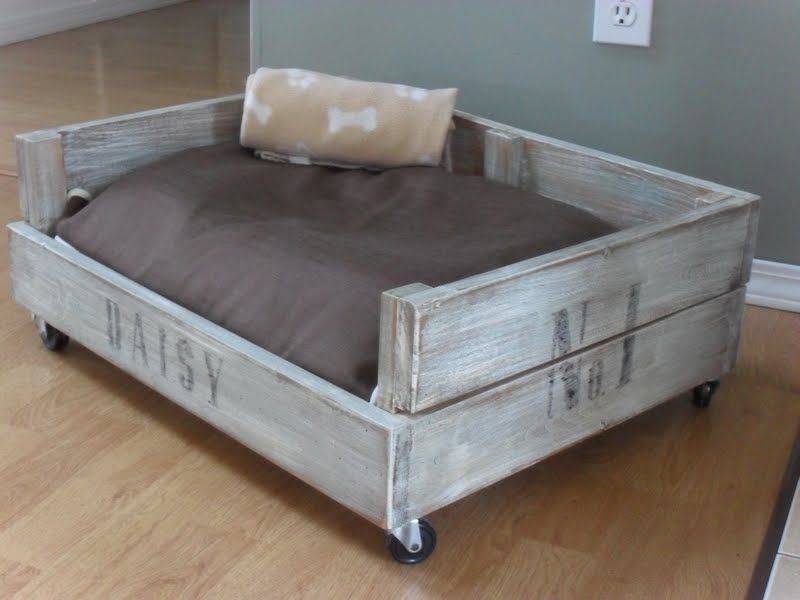
9 Pet couch
One box, 4 wheels and a soft blanket are all you need for your pet's personal couch. Suitable for a cat or small dog.
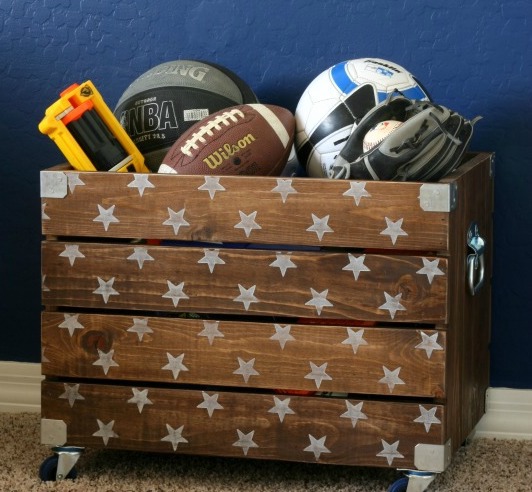
10
There is nothing complicated about this idea either. The main thing is to come up with a design for the box and attach wheels to it for convenience.
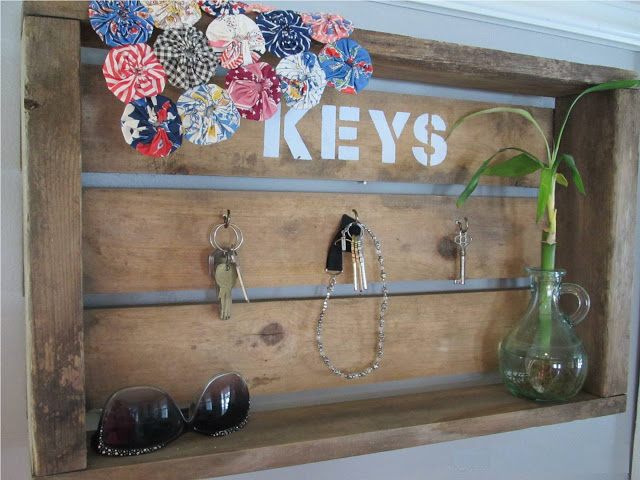
11
In the hallway, a mini-shelf for important little things and keys. And it can be made from a wooden box. Attach nails or hooks inside on which you can hang a bunch of keys, and experiment with the design: paint, varnish or label the box.
12 Table for player
Look at this wonderful table in. Of course, it is not at all necessary to use it for a player and records, but in this design it looks very stylish. But everything is much simpler than it seems: an ordinary box was painted and attached to metal legs.

13 Wine cabinet
From a wooden box and a beam, which was sawn, painted and criss-crossed to the box, a very stylish wine cabinet was created. It will truly decorate any kitchen modern style, as well as in country or Provence aesthetics. Take note.
Beautiful, stylish furniture is an integral part modern interior. But nevertheless, it does not necessarily have to be too expensive. Moreover, many interior styles involve the use unusual materials to create original furniture. These can be pipes, pallets and even the simplest boxes. They are easy to use and do not require a lot of money and time. 


DIY drawer rack
Perhaps the most ideal material for creating an original shelving unit with your own hands is simple wooden boxes. Unlike classic version, they have a number of advantages. Firstly, they are quite cheap, so everyone can try to implement such an idea. Secondly, this is an environmentally friendly material that can be used in any room and even in a children's room. But still, it must be cleaned of dust and snags. In addition, drawers allow you to create a fairly large structure, which is ideal for storing things.


As for style, such furniture looks best in an interior with country, loft or rustic elements. After all, it is for them that simplicity and use are most characteristic natural materials. Therefore, the tree in this case is perfect option for creating shelving and other furniture.
A rack of wooden boxes is often used as a partition. Due to this, you can create zoning of the room and visually place accents.
 To make such a design with your own hands, we will prepare the following materials:
- wooden boxes;
- sandpaper or sanding machine;
- dye white(optional);
- brush;
- screws;
- screwdriver;
- rag or napkin.
First of all, you need to clean all the drawers from dust and dirt. If necessary, use a damp cloth or tissue. Only after this we begin surface treatment. sandpaper or grinder. This is necessary in order to remove all unevenness, roughness and snags. Therefore, do not skip this step under any circumstances.

If desired, paint the entire surface of the boxes with white paint and leave until completely dry.

We connect the structural elements together using a screwdriver. Please note that the boxes can be directed in different directions. Due to this, the rack turns out to be even more original and functional. In addition, it can be used on each side of the room.

 By the way, designers often leave drawers unpainted. In their opinion, the obvious disadvantages of wood in the form of scratches and unevenness are actually advantages. After all, they give the furniture a special charm.


 Such racks are very convenient to use, so they are placed in the most different rooms. Most often, of course, such wooden structures can be seen in the living room. Since they are open, decorative elements, plants or books look great in them. In general, all the little things that help create a cozy atmosphere.


 Wooden shelving is also used in the bathroom. This great option for storing towels and various accessories for body and face care.


In the kitchen, shelving is a little less common. This is often due to the fact that everything in this room should be as functional as possible. But if the size of the kitchen allows it, then we recommend that you still try to make such a design from boxes. It is ideal for a variety of glasses, dishes and decorative items.


If desired, you can install a rack small size to the hallway. It will look no less stylish than a regular shoe rack or closet. 


Ottoman and shoe box
IN small apartments The hallway needs to be organized as functionally as possible. Therefore, we propose to do very unusual design. That is, connect a pouf and a shoe stand together. This will significantly save space and allow you to organize it correctly.

To work you will need the following:
- wooden box;
- a piece of thick fabric;
- sandpaper;
- filler;
- plywood sheet;
- wheels – 4 pcs. (if desired);
- screwdriver;
- bolts;
- acrylic paint;
- brush;
- construction stapler.
Cut the plywood to the required size. We attach a piece of fabric on both sides using construction stapler. We fill the space with filler, distributing it evenly. We fasten the fabric on the remaining sides. This will be the seat for the future ottoman.


Be sure to sand the wooden box. This will help get rid of various surface irregularities and snags. Only after this we paint the box with a suitable color paint. It is not necessary to do this at all. If you like natural wood, then simply treat the surface with varnish.

After the surface has completely dried, attach the wheels to one of the sides of the box. We use bolts and a screwdriver for this. 
We attach the soft blank to the surface of the box and, if desired, decorate it with buttons. A beautiful, unusual ottoman with a shelf for shoes is ready.

Box for small items or toys
Of course, boxes are great for creating furniture. But nevertheless, they can be used for their intended purpose. To make them more original, we suggest adding unusual elements and decorating them.

Let's prepare the following:
- boxes;
- wheels;
- sandpaper;
- white paint;
- brush;
- wood glue;
- bolts;
- screwdriver;
- chalk board.
First, we sand the entire surface of the drawers with sandpaper. Only after this we apply paint and leave them until completely dry.

We attach the wheels to the bottom of the boxes using a screwdriver and bolts. Turn the structure over and glue it to the side chalk board. The result is simple, but at the same time original box for toys and various small items.

Furniture from boxes in the interior


 Simple wooden boxes are an excellent base for creating amazing interior items and functional furniture. Experiment, get inspired by ideas and create unique designs that will decorate your home.
A coffee table is always a flight of fancy. There are virtually no restrictions on how it should look coffee table, what design, shape, height, dimensions it should have. This greatly simplifies the task, the main thing is that this piece of furniture fits harmoniously into overall design premises. However, many people want the coffee table to be an original, exclusive, unique element of the interior. You don't have to search long for this. finished goods in stores, you can pluck up the courage and make a table with your own hands. Many questions may arise: how to make a coffee table yourself, what materials to use, what shape to choose and others. In this article we will present several instructions for making coffee tables to choose from without spending a lot of effort, energy and finances.
The most popular materials for coffee tables are considered to be wood and glass. Of course, there are plastic tables, and metal ones, and with stone elements, but still classic and charming natural wood tip the scales to the side wooden products. Glass coffee tables look advantageous in high-tech or other style rooms that involve the use of interior items in light colors. That is why we will consider only glass and wooden models tables. Coffee table height depends on the interior into which it will have to fit. For example, with low sofas and armchairs, coffee tables with a height of 25 - 30 cm to 50 cm will look advantageous. If there is furniture around standard sizes, then the table should be of such a height that it is comfortable to use - so that you do not have to bend too low or stretch too high while sitting on the sofa. Standard height coffee table - 50 - 65 cm. Tables with a height of more than 70 cm are considered high and are not suitable for all interiors, only where they will be used while standing. In the examples discussed below there will be tables from the first two categories, as well as one model that can be made of any height, including more than 70 cm.

The easiest coffee table to make can rightfully be called a table made from wooden boxes. Such a table can be made from old or new ready-made wine boxes, but if they are not there, and there is no opportunity to purchase either, then you can make it from wooden slats or plywood. For example, suitable wooden boards width from 7 to 20 cm and thickness from 15 to 20 mm. If you want to make it from plywood, please note that it must be sanded, 30 cm wide and 60 cm long. In addition wooden materials You will need screws, mounting angles, furniture wheels, stain and varnish.
Option 1. Coffee table from ready-made drawers.

Ready-made wine boxes are good because they make the task much easier; in fact, it’s enough to install them correctly, fasten them together and put them on wheels:
- The first step is to make a frame for the table. It will create additional support and increase the strength of the structure. It will also be possible to attach wheels to the frame so that the table can be moved around the room. To make the frame you will need a beam or board 40x100 mm. Since the shape of the coffee table will be square, the frame should consist of 4 beams knocked together into a square, and a 5th beam should be fixed in the middle, as shown in the figure.

- The dimensions of the frame must exactly match the external dimensions future table. Cut two long boards and two short boards. We lay long boards parallel to each other, insert short boards between them, resting their ends against the transverse boards. You should get an even figure. Then we lubricate the ends of the short boards with glue and press them against the long boards. Then, from the inside of the resulting square, we fasten the boards together using corners and self-tapping screws. We also glue the fifth board inside the square and secure it with self-tapping screws.

- We put drawers into the design of the future table. We connect them together with self-tapping screws. The side walls of the drawers must be screwed to the bottom slats of the adjacent drawer. There must be at least two fasteners for the side wall - one at the top and the other at the bottom.
- We install the boxes on the frame and fasten them to it with self-tapping screws.

- We attach furniture wheels of a suitable size to the frame.
- We prepare a mixture for painting the table if we want to make it darker. If a light coffee table is also suitable, then it is enough to open it with varnish. After painting, the surface of the table must be sanded, including from the inside.
- We varnish the coffee table and leave it to dry. The number of layers of varnish depends on what effect we want to achieve. The more layers, the more glossy the surface and the less visible the wood structure.
Instead of varnish, you can use satin polyurethane, then the surface of the wood will be satin.
Option 2. Coffee table “drawers” made of plywood.

Such a table can be made completely from start to finish, spending only the purchase of 2 sheets of sanded plywood, self-tapping screws, wood glue or PVA glue. For greater strength and similarity to real wooden boxes, the thickness of the plywood should be 15 - 20 mm. The price for such a coffee table will be lower than for a table made of wooden boards. So let's get started:
- First, we cut narrow plywood side walls boxes, they must be solid. For 4 drawers there should be 8 walls 400 mm high and 300 mm wide. The cut should be even, so it is better to use a jigsaw.

- We sand the edges of the side walls of the drawers and remove burrs.
- Since the wide side walls of the drawers and their bottoms are slats that are located with gaps, the next step is to make sections or slats for the walls of the drawers. We cut the plywood into strips 100 mm wide and 600 mm long. The gaps between the slats have a purely decorative function, so if you have chosen other sizes for the drawers, then calculate the location of the sections and the optimal distance between them (5 - 10 mm).

- For each long side wall of a box with a width of 300 mm, 3 sections are required, 95 mm wide and 600 mm long. If you do not plan to make gaps, then you can use 100 mm wide strips. In total, 4 drawers require 24 such strips.
- For the bottom section of each box with a width of 400 mm, 4 sections with a width of 95 - 100 mm and a length of 600 mm are required. For 4 drawers you need 12 bottom strips.
- On all planks, on the narrow side, we drill two holes with a diameter of 4 mm for fastening to the side walls.
- The next stage is assembling the boxes. We coat the ends of the side plywood walls with wood glue or PVA glue. Then we attach the strips to them, screwing them with self-tapping screws. We recess the heads of the screws into the wood so that they can be hidden with finishing.

- Each box must have the following dimensions: height 300 mm, width 400 mm, length 600 mm. By installing these drawers into a shape, as in the photo, we get an extravagant table. We connect the boxes together with self-tapping screws, tightening the narrow side walls with the walls of the adjacent box.
- To make the structure even more durable, we make a square frame for it from a wooden beam or board, as described in the previous version.

- The free space in the middle, between the drawers, can be left as it is, or it can be made less deep. To do this, a piece is cut out of plywood that follows the dimensions of the hole, then the piece is inserted into the free space and secured at approximately half the height of the box. Now you can pour some decorative material on top or place a vase.
- We cover all the screw caps with furniture mastic or putty. Then we sand the surface of the boxes.
- We open the plywood with varnish (alkyd or polyurethane) in several layers.

The coffee table is ready. Please note that the planks can use more than thin plywood, for example, 6 - 10 mm thick. The product will not be very durable, but will look more like boxes.
DIY wooden carved coffee table
This instruction will be useful for those who have a lathe, milling machine, grinder, clamps and other tools in their arsenal. The materials you will need are wooden beams 50x50 mm and wooden boards 25 mm thick and 45 mm to 10 - 15 cm wide, Titebond-2 wood glue.
Making a table leg
Since we decided to make the coffee table round, we only need one leg. To make it, we take a 50x50 mm beam and glue it lengthwise together. To do this you will need Titebond-2 wood glue and clamps or clamps. Please note that you should not use one beam for the leg. required thickness, the product will be more durable if you glue two beams of smaller thickness into one.
- The leg for the coffee table will have a carved shape, reminiscent of balusters for stairs. We give the glued blank the required profile on a lathe.

- We sand the surface of the table leg.
- We cut out the eyes in the legs to secure the supports - the side legs. It is best to make the eyes in the square part of the leg, one on each side. The depth of the lugs is about 1 cm.

- The side legs are cut only from a solid board of the required width and thickness; gluing is not allowed, and there should be no knots or cracks. We cut out 4 blanks and carefully polish them. We mill the edges with a semicircular cutter.

- The side legs should fit snugly into the eyes of the main vertical leg. If the shape is chosen correctly, then there will be no need to cut spikes on the side legs; the entire side leg will be a spike.
- In the upper part of the riser - the vertical leg, we use a cutter to select through holes for the cross.

- We make a cross from boards 45 mm wide, 19 mm thick, the length depends on the size of the tabletop. The ends of the cross should rest against the future underframe.

- Glue the cross into the hole in the upper part of the vertical leg.
The leg is almost ready, so let’s move on to the underframe.
Making the base and attaching it to the leg

A hexagonal shaped base is perfect for a round coffee table. To make it we will use wooden boards 20 mm thick and 45 mm wide.
- We cut the workpieces so that they form a strong hexagon.
- Carefully sand the surface and glue the pieces together.
- To make a decorative edging for the underframe, we glue wooden planks with rounded edges along the contour of the underframe.
- We fasten the base to the cross using self-tapping screws 65 mm long.
Making a round tabletop

The next stage is a round tabletop. To make it you will need a furniture panel. In this case, the tabletop was glued together from two furniture panels 300 mm wide. The most difficult thing is to cut out an even circle. To do this, you need to determine the center of the future tabletop, fix a nail in it, and put something like a compass on the nail. For example, a piece of plywood of the required length will do. During cutting, the cutter rests against the edge of the plywood, and the circle turns out smooth.
The round tabletop for the coffee table is carefully sanded and the edge is processed with a router.
Coffee table assembly and surface treatment

Do not attach the tabletop directly to the tabletop. During thermal deformations, it can crack along the seam. Therefore, so-called crackers are used for fixing. First we make crackers, as shown in the photo. Then we cut out holes for them in the crosspiece using a milling cutter.

We install the tabletop on the base and the leg with the cross. For convenience, we turn the structure over and align the arrangement of the elements. Then we insert the crackers into the holes in the crosspiece and screw the crackers to the tabletop with self-tapping screws.

The coffee table is ready - all that remains is to open it with varnish. To do this, the surface of the entire product is sanded again, then stain is applied, and after it dries, it is sanded again, since it is necessary to remove the raised lint. Now you can open it with varnish. After the varnish has dried under normal conditions, the table can be used.
DIY coffee tables made from wooden Euro pallets

Wooden coffee tables come in a wide variety of configurations and sizes. And recently, tables made from pallets have become especially popular. Costs for materials are minimal, and the final result depends only on the imagination of the person making the table. In this case, the whole secret is in the finishing. The choice of color, pattern, decor completely changes the appearance of the table. And there is a hidden advantage in this - it is enough to update the finish of the coffee table from the pallet, and it already matches the new interior design.

So, first of all, the wooden pallet must be thoroughly sanded, removing burrs. Then open it with varnish or paint it in a single color (white, green, blue). Please note that the entire pallet must be painted: from above, from below, and where it seems to you that no one can see. You can also apply a drawing.

After processing, you only need to attach furniture wheels of the appropriate size to the pallet. 4 wheels are attached to the corners of the pallet with screws.

Further decor of a coffee table made from a pallet depends on the wishes and imagination of the owner. Inside the pallet you can arrange books with beautiful catchy covers or albums. If you want to put pebbles or other decorative stones, then the pallet needs to be modified. To do this, even before attaching the furniture wheels to the bottom of the pallet, it is necessary to secure a sheet of plywood exactly to the size of the pallet. It will also have to be painted or varnished so that it does not stand out against the general background.

Now our pallet has a bottom, so you can fill it inside decorative materials, which will be visible through the cracks in top cover- pallet table top.

For those who love glass coffee tables, the design can be further refined by placing wooden pallet glass tabletop and securing it with Velcro/suction cups or using special nails. On such a table it is no longer scary to place a cup of coffee without a tray, a vase of flowers, and it is easier to care for. Even if something accidentally spills, the glass is easy to clean and wipe off.

The next simple version of a coffee table that combines wooden and glass elements is a table made of logs. It is unlikely that you will be able to buy a log in a regular store, so you will have to go to a sawmill and choose a suitable log. Make sure that the wood is not affected by bugs or mold. It is advisable to cut the log to the required height there, at the sawmill, since it is difficult to do this at home.

After purchasing a block of wood, its surface is sanded, and then it is completely covered with varnish, stain or oil. Sometimes the blocks are painted in a dark bronze color or another shade that matches the interior design.
After the varnish or paint has dried, a round glass tabletop is attached to the block using special suction cups or nails. The resulting coffee table will resemble a mushroom with a transparent cap.
DIY glass coffee table
As you probably already noticed, glass elements Coffee tables are mainly table tops. Legs can be made from any suitable material- wood, metal, plastic. For example, you can purchase ready-made metal legs in a store furniture fittings, order a tabletop of the required size and assemble a glass coffee table at home.


The legs and glass top are usually secured using special suction cups or nails. And even a model wooden table on one curly leg, the manufacturing instructions for which are described above, may well have a glass tabletop rather than a wooden one.
To make the product look beautiful, it will be necessary to sand the crosspiece and the base, and also secure the tabletop not with crackers, but with glass bolts or metal corners. It is also possible to secure the glass tabletop with transparent glue, the excess of which must be carefully removed.
Please note that a glass tabletop is heavier than a wooden one, so it must be supported by a strong base and leg. Also, the design of the coffee table itself can be such that the glass will be firmly held on it without additional fastening. For example, if there is a niche under the glass in which it fits.
Do-it-yourself coffee table - easy to make yourself, using scrap materials or buying accessories from furniture store. The work is dust-free and takes no more than 2 days. Make a wooden coffee table with carved legs only possible with the help of special turning carpentry equipment.