Julia Pyatnitsa
How to sew simple Roman blinds?
Are your windows of such a size that it is difficult to fit standard store curtains? Dont be upset! It’s better to stock up on tips on how to sew curtains at home to get unique items decor that suits your home.
Types of curtains
Despite the fact that there is one basic principle on how to sew curtains, their methods differ somewhat depending on how they are attached to the cornice.
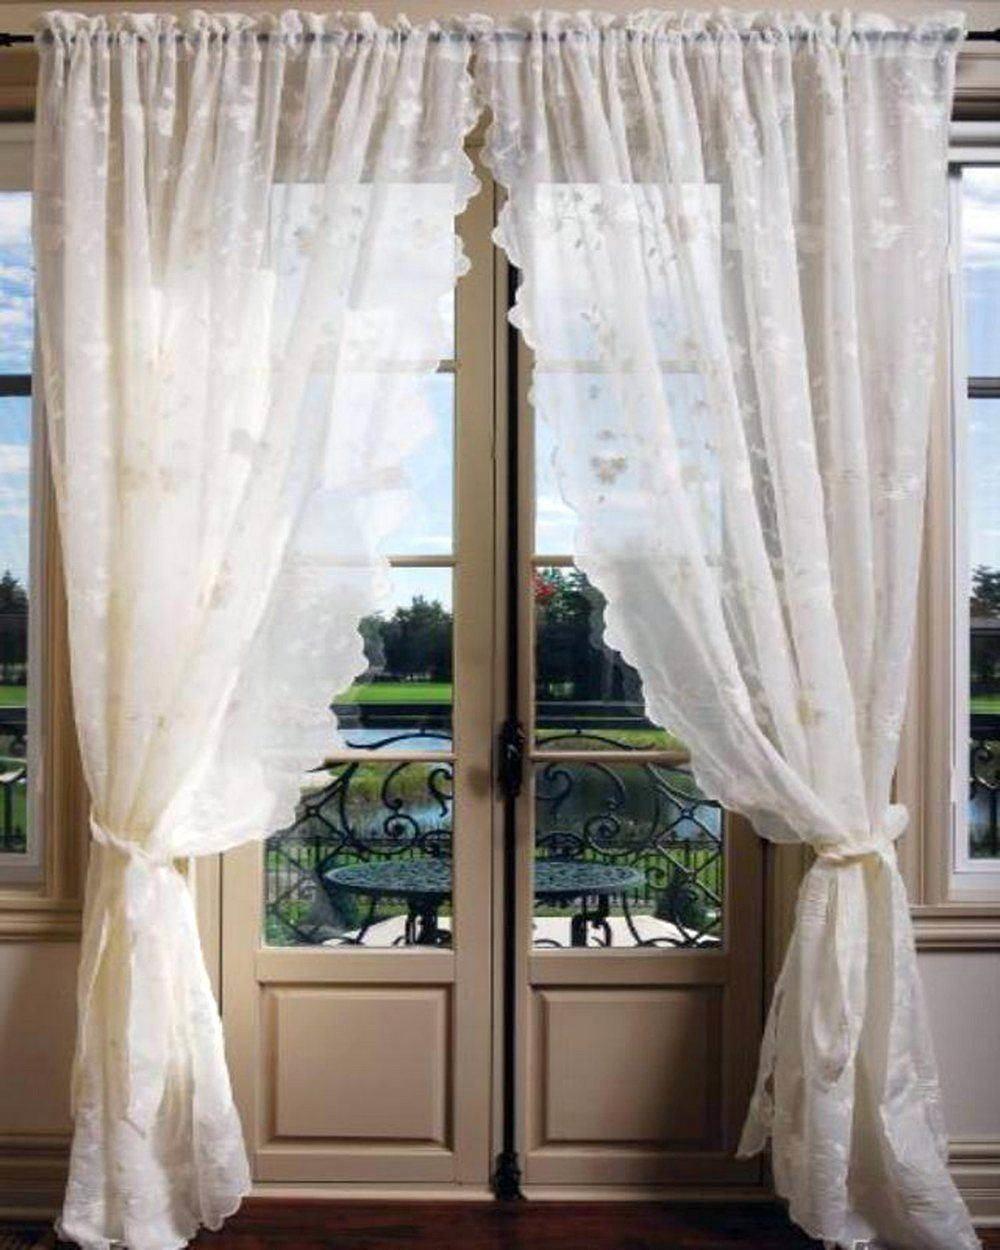
Simple curtain
A classic type of curtain that is easier to sew than others.
All you need is to prepare a piece of fabric the right size and finish it around the edges.
Loops and ties
Making a curtain with loops and ties is as easy as sewing a classic one.

If you want the product to stay on the eaves and not fall off, sew loops along the top edge, both with Velcro and solid ones. But curtains with decorative ties are easier to attach and remove.
Kuliska
Interesting design solution allows you to firmly hook the curtain onto the rod and protect it from falling - especially if you have cats at home.

Fold the top edge of the product, forming a wide loop along the entire length, and stitch. The curtain can be hung in place using the clips.
Eyelets
Thanks to this method of fastening, the product acquires soft waves. At the top of the curtain, make several holes at the same distance from each other. Machine them or insert metal rings.

Now you can choose any clamps that suit your interior for fastening.
Simple curtains: master class
Before you start sewing simple curtains, learn how to correctly determine the size of the future product.
The diagram shows the parameters for the fabric: the length of the curtains corresponds to the length of the cornice. The width of the canvas should be equal to the length of the future product from the place of fastening (cornice or hooks on it).

- On the reverse side of the fabric, draw a pattern for the product with double seam allowances - for a double hem.

- Cut out the workpiece, cutting off the factory edges - they tighten the fabric.
- Smooth the product with an iron - smooth fabric is easier to handle than with wrinkles and creases. In addition, this way you reduce the likelihood of sewing uneven side seams.
- Fold 1 seam allowance over the side and iron.

- Turn up the seam allowance a second time and start sewing - sew the seams with a simple machine stitch.

- Iron the finished edge.

- Immediately after ironing, walk along the edge with a cold object - glass, for example - this action will additionally smooth out the fabric after machine stitching.

On at this stage The product can already be used by hanging it using special clips or clothespins. If you want to attach the curtain with hooks, sew curtain braid with ready-made slots along the top of the product.
To learn how to sew classic curtains with loops, watch the following video tutorial.
Depending on your wishes, the loops can be sewn solid with both ends sewn in or with Velcro fastener at one end. These curtains can be used to decorate windows, doorways, or be used as a screen to delimit the space of small bedrooms.
DIY Roman blinds
This type of curtain is perfect for decorating windows in the kitchen, living room or bathroom of a private home, as well as an office.

To sew Roman curtains, you will need materials such as adhesive tape, 7-8 twigs made of wood, metal about 3 centimeters shorter than the width of the product, plastic rings - 3 for each pin, 3 long identical cords, 2 strips - for hanging and weights, hooks, nails.
- You need to sew a Roman style curtain starting with cutting. Measure the window opening and add seam allowances to get the width of the piece. The length will be equal to the length of the window or 5-10 centimeters below the window sill.

- You can use the following table to determine the number of folds and the distance between them, guided by the future length of the item.

- Cut out the product according to the finished parameters. With a simple pencil or use soap to mark the places where the pins and rings will be inserted.
- Cut out a piece of fabric. Process the edges of the curtains according to the same principle as in the previous master class.
- Secure the wooden cornice beam into window opening or above it - depending on how you want to decorate the window.
- Attach Velcro tape to the finished plank. Attach the second sticky part to the top edge of the curtain - this way you can easily remove the items for washing.

- Fold and stitch the bottom of the curtain, forming a loop into which you need to insert a weight strip.
- On the wrong side of the product, sew a wide braid at the levels where the gathering twigs will be located.
- Sew 3 rings to each braid. They need to be fastened so that all the rings of one row are clearly above each other.

- Attach the curtain to the beam using adhesive tape. Starting with the top ring, thread 1 cord through each ring - you should have 3. Secure the cords by tying them in knots on the bottom rings.

- Bring all the laces to one side of the curtain, threading them through the top fasteners.
The curtain must hang completely straightened, only then can you tie a knot of 3 cords at the top. Attach the lifting mechanism part to window frame or in the opening, wrap the cord around it and tie the knot again. Trim the uneven ends of the cord. With its help you will adjust the lifting height and the size of the folds of the Roman blind.
To learn more about how to sew a product of this type, watch the video.
Remember that all the twigs must be removed before washing the curtain, otherwise the material from which they are made will deteriorate: the iron in the water oxidizes, and the wood swells.
To learn how to sew high-quality curtains like a real professional, use the secrets of the work of experienced specialists. They will show you little tricks of pattern, design and sewing.
- To sew a curtain for the bedroom, use light-proof fabrics, such as blackout, which will help you protect yourself from bright light and get more sleep in the early morning.
- After each action, check the products for creases and dents and remove them with an iron. It is possible to sew using wrinkled material, but this increases the chance of getting lopsided seams and fabric.
- When working on a pattern, consider the properties of each fabric. Some materials are stretchy, so the finished product may become shorter after the first wash or, conversely, stretch.
Curtains can be assembled by draping folds using clips, pins and clothespins. Make such a clip yourself, decorating it with an artificial flower made of cold porcelain, paper, and beads.
Take it for yourself and tell your friends!
Read also on our website:
show more
The best curtains are those that you made with your own hands, with love and attention to every detail. And if the cut of the curtains can be the simplest, then elegant decorations can balance the image.
Of course, style is decisive, but you shouldn’t discount some fashion trends. It is enough to collect information about which curtains will dominate interior fashion in the 2018 season.

Fashionable curtains 2018:
- Bright monochromatic curtains in a neutral interior. This is very fashionable already this year, and next year this trend will only develop. For example, a calm interior in pastel colors and bright blue curtains.
- Large flowers. This means not just a large drawing, but a very large one. For example, huge delicate poppies on white curtains. In this way, the result may not even be curtains, but a whole installation.
- Floral print. It has already gone beyond the Provence style and is conquering other interiors. small flower on a rich background, or a variegated flower on a neutral background - such curtains will be relevant in 2018.

The main thing is that the curtains are appropriate in a particular interior. If the style is minimalist, then avoid patterns and brightness; if Provence, then avoid strict geometry; if loft, then no complexity.
New curtains for 2018: art.Gavana style (video)
How to beautifully sew a curtain in Provencal style
Curtains in the Provencal style are coziness in a square, and you can sew them yourself. If you are not ready for such style transformations in the living room, you can start with the kitchen. Moreover, it is not necessary that the kitchen be in Provencal style; it is also possible classic version, and country, and cuisine without a clearly defined style.
So, you will need:
- Textile. Natural fabrics, as always, are held in high esteem, and for a Provençal curtain this is the only acceptable option. Cotton will work fine. As for the print, small floral – you couldn’t imagine anything better.
- Accessories. In this regard, you are lucky, since you won’t have to spend much. Buy several satin ribbons to match the fabric and light fringe.
- Tools. Chalk, scissors, measuring tape, pins, pattern paper.
When purchasing fabric, take it with a reserve, 15 percent more than the estimated quantity. An important point, especially for beginner seamstresses - good tool will make the workflow quick and easy. So the scissors should have rubber rings and be sharp enough.
Don’t be too lazy to sketch the curtains so you don’t go astray.
Textile composition in Provence (video)
Beautiful window: curtains in Provencal style
Let's say you decide to sew rectangular curtains, consisting of two halves. This is the standard option. Usually, the width of each half is 80 cm, but this is not strictly necessary, because windows can be non-standard.
The strip in the middle between the halves is 20 cm, based on this, you will need 3 m of fabric, and this is just the minimum.
Tips for sewing Provençal curtains:
- After the measuring stage comes the cutting stage, cutting is done on the desktop;
- The paper needs to be folded in half, then draw the outline of the future curtains in half the size, and a pattern is made along the contours;
- Make allowances for the seams, and only then cut;
- For a machine seam, an allowance of 1 cm is enough; for clothespins, take an allowance of at least 5 cm;
- After cutting the fabric, it needs to be ironed.

After finishing the edges, you can start decorating. Where you plan to have fringe, sew this decorative element. Lace and braid, if they are also to decorate the curtains, are also sewn on at this stage.
The beauty of Provençal curtains is that they can be tied gracefully.
How to beautifully tie Provencal curtains
Firstly, you can make cute tiebacks for such curtains. And they are already hooked onto the holder hooks.
Curtain ties in Provence style:
- As flower bouquet Moreover, flowers can be made from satin ribbons;
- In the form of decorative white ropes with tassels;
- In the form of rectangular stripes and the same fabric as curtains;
- In the form of lace garters;
- In the form of cuddle toys.

Cuddle toys are generally trendy. It would be ideal if you sew clothes for the bunny who is hugging the curtain from the same fabric that was used for the curtains. Then the whole image of the outfit for the window will be unusually harmonious and touching.
But not only tiebacks help tie curtains. If you don't want to focus on the hooks, you need to arm yourself with invisible helpers, like regular pins. More precisely, not quite ordinary, but larger, standard, and a little more interesting in appearance. Although their task is to be invisible, they can be visible here and there, so you should not forget about the decorative nature of the pins. The main thing is that it securely holds the curtain in the position you intended.
Beautiful sets of curtains with bedspreads (video)
Beautiful curtains have the main feature of harmony, appropriateness, restraint, and the absence of unnecessary details. And if you can’t find such an option on the store counter, then sewing them yourself will be a pleasant task. Good fabric, consistent style and elegant decor - and your window will be elegant and cozy!
Beautiful curtains (photo)


Textile window decoration is not as difficult a question as it initially seems. When designing beautiful curtains, you should think about the color, pattern, fabric, style. In addition, they must be combined with the overall interior of the room. Sewing curtains yourself is not difficult if you have sewing skills. The most important thing is correct selection color range, sketches, ready-made patterns and the exact amount of fabric. It’s better, before sewing curtains with your own hands, you should watch a master class from specialists.
To sew curtains, you need to know the step-by-step execution of the work. The curtain is made in several stages.
To create any curtains, you should follow this sequence:
- We sew the curtains ourselves - stage two: choosing a model, depending on the room and its design;
- We sew curtains - stage three: measuring the window (with a tape measure you should measure the length of the cornice and the height of future curtains);
- Scaled creation of curtain sketches;
- We sew the curtains ourselves - stage four: determining the amount of fabric for curtains, if planned - for a lambrequin (you can watch a master class on making curtains to understand how to correctly make calculations and choose fabric);
- We sew curtains - stage five: creating patterns for curtains and lambrequins;
- We sew the curtains ourselves - stage six: cutting woven fabrics;
- We sew the curtains ourselves - stage seven: processing the cut out parts;
- Eighth stage: connecting the curtains with the lambrequin;
- Ninth stage: production of decorative elements - tiebacks and other decorations.
After watching a master class on making curtains with your own hands, you can be convinced that cutting and sewing is not a complicated procedure.
Sketches of curtains
The cut of the curtains depends on the correctly created sketch. How to correctly create sketches of curtains with your own hands and calculate the amount of fabric for a certain model - these are the most important and important questions. To calculate the amount of fabric, you should measure the width of the cornice, multiply it by two + 5-6 cm. In the event that two canvases are planned that will hang, then the width of each canvas will be equal to the width of the cornice + 5 cm.

When calculating the height, you should take into account the processing allowance for the upper and lower parts of the canvases. Another quite a few important factor– you need to add 20 cm to the height number in case the curtain “shrinks” when washed.
A master class on creating sketches and sewing curtains can be seen in the video.
Curtain bracket
The brackets must match the design of the room, the shape of the window opening and the curtains. First of all, a curtain rod with a bracket is a functional accessory.
There is quite a wide variety of cornices with brackets:
- Profile;
- Metal;
- Forged;
- Round;
- Strings.

Profile cornices with brackets are equipped with plastic fittings, bend to any radius, and are light weight. Used for windows in the form of arches. Such a cornice can be single-track or multi-track. Attached to the surface using plastic brackets. The cornice can withstand light weight. The brackets have different lengths, this helps to secure a profile cornice with a certain overhang to the wall.
Metal curtain rods with brackets are more durable and can support heavy fabric. These accessories are great for classic style rooms. But such products do not look good with lambrequins.
Forged cornices are mainly made to order. The brackets add a special charm to the cornice, as they are also made by forging.
Round cornices with brackets are the most popular and versatile option.
A string cornice, equipped with brackets, contains a string that is attached with a baguette. Disadvantages include low load-bearing capacity.
It is better to install any of the curtain rods on windows with 3-4 brackets, especially if the curtains are heavy and the set contains tulle, thick curtains and a lambrequin.
It is better to install the brackets outside the edges of the window opening. This will make it possible to move the curtains and open the window completely.
The optimal distance between the brackets is 1.5 m. In this case, they will securely hold the cornice and the rods will not sag.
When choosing a bracket, you should first think about the weight of the curtains and choose one that suits the interior fastening material. Remember that it must match the interior.
For classic interior baguette cornices with brackets are suitable. The minimalist style is combined with a string cornice. They go perfectly with Roman or Japanese types of curtains aluminum profiles. If the decoration of the space contains stone natural materials, then forged cornices with brackets - perfect option. For a room with low ceilings, the brackets are installed under the ceiling. This will make the ceiling appear higher. For visual increase length of the window, the brackets are installed 15-20 cm away from the window opening.
Fillet knitting pattern for curtains
Fillet knitting is called imitation lace. Fillet knitting patterns for curtains resemble single-color cross stitch patterns.

The initial stage of knitting with your own hands is chains of air loops. The number of loops in one cell is 3 (one for the column, two for the bottom area of the cell). Loin curtains are not always woven from the first row. Some cases involve casting on the centerline and then knitting into the top and bottom. Do-it-yourself fillet curtains can have different shape, color. The edges are very shaped like teeth and waves. Such products are great for the garden.
What is fillet crochet (video)
Curtains from curtain scraps
How to sew curtains from scraps? You should never throw away remaining curtains that have been damaged over time. From them you can sew stylish, imperial window decorations with your own hands, which, by the way, are now at the peak of fashion.

To make a curtain from scraps, you will need scissors, a tape measure, and a ribbon. Having decided on the size and shape of the curtains, you can begin to work. The pieces are sewn together with double seams so that the curtains do not “creep” over time. Use braid to decorate and hide the seams.
First, you need to measure the width and height of the window itself to find out what size the future curtain will be. Take 3 pieces of fabric and connect them together like this: first on one side, then carefully turn them out and connect them with reverse side. In the future, decorate the patches sewn together with beads and seed beads.
Many experts offer to watch a master class on sewing curtains from scraps with your own hands.
How to trim a curtain evenly
Open the curtains - one of important points. To cut and trim a curtain evenly, you should know some rules. The canvas is folded in half, and the edges of the edge are marked with cuts. Then you need to carefully fold the canvas in half again lengthwise. Very carefully smooth the fabric with your hands, aligning the middle and edge. Make a cut at the bend.

Without lifting the canvas, fold it in half. Using a long ruler, connect the cuts on the edges with the central part and draw a line with chalk or soap. Cut this line with scissors.
How to sew curtains with your own hands (video)
Thus, cut the entire canvas into the necessary pieces. When cutting, it is important to set aside the required length and align along the edge, then the curtains will always turn out even.
Examples of do-it-yourself curtains (photo)


Having decided to decorate the kitchen interior with original interior elements, first of all you need to pay attention to the choice of curtains. Having the most basic knowledge about sewing, you can make this interior detail with your own hands. The pattern will allow you to sew something truly original and beautiful product, which is impossible would be better suited general design of the kitchen.
Preparing for work
On preparatory stage work, selecting fabric for making curtains with your own hands. Ready product must be fully compatible with color design and the overall style of the room.
If the walls are covered with wallpaper with flowers or a large number of colorful details, then the patterns kitchen curtains you need to make it yourself from plain fabric.
For a small kitchen with insufficient natural light, light curtains in light shades are suitable.
It is also quite important to pay attention to the style of the model, since a correctly selected shape will help correct the shortcomings of the room. For example, you can visually increase the space of a room or harmonize the existing layout.
Choosing curtain colors
The color can be very varied. It may be similar to the tone of furniture and wallpaper, or it may not be combined with anything at all. When choosing a range for a product, it is worth considering general design interior design in order to sew suitable curtains with your own hands. Patterns should also take into account the texture of the fabric and its pattern so that the curtains fit well into the interior.
It is important, if the dimensions of the kitchen are quite small, to visually increase its size by using light shades of material when working on curtain patterns with your own hands. You can choose a shade to match the color of the walls, and fabric with large patterns. Small parts will make the room untidy. It can be a large stripe or checkered pattern, as well as floral motifs.
During meals, no details should distract attention or irritate the psyche. That's why perfect flowers For making curtain patterns with your own hands, pastel, warm and slightly blurry tones are considered.
Functionality of curtains
Before you start working on a product, you need to determine what capabilities the sewn products should have. beautiful curtains with your own hands. Curtain patterns for a south-facing window should be made from thick materials. They will be able to protect the room from scorching heat. sun rays sun kitchen if necessary.
Thick fabric should also be used for sewing and cutting out curtains with your own hands for the windows of the first floor. In the evening, you will want to use them to shield yourself from the curious glances of people passing by.
In the daytime, curtains made of light fabrics will also provide protection from the sun's rays: tulle, organza, veils, etc. Patterning curtains with your own hands from light fabrics will create the effect of light diffusion and ensure the comfort of staying indoors. This material should flow a little, and its color should match the tone of the kitchen furniture.
Curtain type
Quite popular in Lately steel Roman blinds. They are quite simple in their own way general appearance, but functional. It is quite easy to sew such curtains with your own hands. Patterns and photos of such a product can be easily found in a wide variety of sources. Roman blinds harmonize well with curtains or drapes.
Japanese panels are at the peak of fashion.

They are also quite economical, not required for cutting and sewing such curtains with your own hands a large number of material. At the same time, they are very functional. They are very similar to blinds, but their production involves sewing two fabric panels from 40 to 80 cm wide. You can choose quite a variety of designs to decorate your kitchen interior. Photos and patterns for such DIY curtains are widely available in various sources.
A more romantic design option kitchen interior- sew curtains with your own hands, the patterns of which are made in cafe style.

This style usually involves the presence of a lambrequin at the top of the product. A transverse thread or strip is hung in the middle of the window, to which short curtains are attached. Their patterns are quite easy to make with your own hands. This type of curtain is more suitable for rooms with little natural light.
Curtains are also one of the popular options for decorating a kitchen window. They are made of thin fabrics that drape during the sewing process. It is good to combine blinds with light airy curtains.
Curtains with eyelets are quite original and harmonious in the interior of the kitchen. They'll fit modern interior or a minimalist style of room decoration. This option allows you to show off the beauty of the fabric. Sewing curtains with your own hands, the patterns of which involve the use of eyelets, is ideal for the kitchen.
Curtain length
It is allowed to use the same length as room curtains to make patterns for kitchen curtains with your own hands. However, it is more convenient when the curtains for such a room are a little shorter.
Usually the length is chosen in accordance with the window sill or 15 cm above or below it. This ensures the functionality of the window sill and allows you to place furniture near the window.
If there is no furniture near the window, you can make patterns for beautiful long curtains with your own hands. This option is also ideal for a large room. It would be appropriate to apply to long curtains various options draperies, as well as lambrequins. This will add a festive feel to the room.
In a small room with a small window, short curtains with ribbon holders on the sides will look good.
Sewing simple models
The simplest option for making curtains for the kitchen involves sewing curtains with your own hands, for which you don’t even need patterns. You just need to calculate the height and width of the window, and also decide on the length of the curtain itself.

To prevent unexpected changes in the size of the material later, for example after washing, new fabric should be moistened with water and ironed before cutting.

Fabric cutting should be done on the floor. It should be put front side up. The bottom of the product should be aligned using a perpendicular line relative to the side of the material. The bottom of the fabric is cut off.
Then the length of the curtain is measured and the top of the canvas is cut off. The edges of the material are folded and hemmed. In the upper wrong part you need to sew a ribbon with cornice loops. You can complement the product with decorative elements.
Sewing curtains in patchwork style
Patterning and sewing curtains with your own hands in patchwork style involves making fabric from multi-colored patches. It's quite cheap and beautiful. Scraps of old fabrics are washed and ironed. Sewing curtains with your own hands, the pieces of which are cut using a stencil, involves sewing all the elements into a single fabric.
It is better to select fabrics of the same type. Their elements can be sewn together in the form of squares or diamonds.
The reverse side of such a product does not look particularly aesthetically pleasing. Therefore, it is recommended to sew lining fabric to the back of the curtain.
Sewing curtains with lambrequin
The design assumes the presence of curtains, tulle and lambrequin. This style is considered both classic and modern at the same time.
It will be quite simple to cut out curtains and tulle. Sewing the lambrequin will require more attention. This element can be made as an addition to thick curtains, coming from the cornice, and as an independent element in combination with cafe-style curtains.
To facilitate the process of caring for the lambrequin, on which steam settles during cooking, it should be made in the form of a simple structure with a minimum of folds.
Sewing a lambrequin
To make the pattern uniform, do-it-yourself short curtain patterns are made from the center of the material. The length of the product is calculated taking into account allowances totaling 3 cm. If this is not provided, the lambrequin will turn out short.
A product blank is cut from the adhesive-based gasket. There are no allowances for seams here. The interfacing is applied to the fabric and ironed to bond it to the base material.
Next, 1.5 cm are measured for allowances and cutting is carried out. All sides of the product, except the top edge, are stitched. A report is cut out of cardboard and inserted inside the sewn lambrequin. Everything is ironed and the top is stitched. The edge is folded over and sewn with a hidden seam.
One part of the Velcro is sewn to the lambrequin, and the second to the cornice. The finished curtain part is hung on them.
Sewing curtains with eyelets
The beautiful, even, wavy folds of the curtain material on the eyelets will appeal to many. These curtains are very easy to use. To sew them, you need to consistently perform several stages of sewing them.

I - Curtain height.
II - Width of material taking into account the width of the window.
Initially, you should adjust the fabric to the required size of the cornice. To do this, a horizontal thread is pulled at the required height. The edges of the fabric are folded and sewn on a machine.
Making curtains with your own hands, the patterns of which use eyelets, involves cutting out the fastening tape. Its width is 25 cm. At the required height, a line is drawn, to which the middle of the grommet strip is applied. Then the tape is ironed and, bent in half, passed along the edge with an iron.
The curtain is inserted approximately 2 cm inside the cuff. The edge of the product is stitched and ironed.
Then the slots for the eyelets are cut in the form of circles. To do this, 4 cm is retreated from the top edge, and appropriate markings are made. The slots are made by adding 2 mm to the circumference.
Installing grommets will not be a lot of work. On the lower and upper sides, the circles are connected to each other.
Making Roman blinds
Sewing curtains with your own hands, the patterns of which are not complicated, also includes making Roman curtains. The sequence of work goes through certain stages.

I - Window width.
II - The width of the curtain bend is 25 cm.
III - Window height.
Initially, a pattern is made on the main and lining material. 25 cm is retreated from the bottom edge and a horizontal line is drawn. 6 cm is removed from it, and a place for the curtain is marked. And so on to the top.
Longitudinal sections are folded into the lining and ironed. The drawstrings are secured with pins and stitched. The back side of the curtain is matched with the lining. A seam is sewn over the wings.
The top edge is processed. To do this, it is folded 2 cm and applied to adhesive tape with loops. Sewn.
The bottom of the product is folded 4 cm and also stitched, preferably with a hidden seam.
Wooden rods for the mold are cut 2 cm less than the width of the product. The strip is inserted into the drawstring and the side parts of the material are sewn up. Rings are sewn to each of them, departing about 10 cm from the edge. A nylon cord is pulled through them.
Accessories for curtains
Patterning curtains with your own hands requires the presence of additional parts of the product. Light curtains will need tape holders to prevent them from fluttering too much when the wind blows.
You can decorate the cornice with small decorated elements. A variety of themed decorations are used, dedicated to a specific time of year or holiday.
A tablecloth made of the same material as the curtains in the kitchen will look stylish.
Having considered the many options for styles of kitchen curtains, as well as the rules for choosing suitable models, you can safely get to work. Patterning curtains with your own hands will help you create a variety of styles and shapes of such an element of the kitchen interior.
Home textile designers call key point any interior, and therefore it is advised to take it very seriously. Curtains and curtains - the largest specimens home textiles. And you can't go wrong with them. They should be selected taking into account the overall color scheme, style and purpose of the room. However, some women do not take risks and order the design and production of curtains to professionals. Unfortunately, the cost of window treatments is very high. And many housewives who, after renovation, only have to make the final touch, have no choice but to do it themselves. This means that there are hours ahead of choosing a style and color scheme, shopping for fabrics, purchasing related materials and - the magic of creativity.
Five simple options for sewing the top hem
If you are planning to sew the curtains yourself, then check out the five options for processing the top edge. They are all easy to cut and sew. Curtains with such a top from these five options are universal; they will look great in any room - from the kitchen to the nursery.
Simple top
The upper edge, as well as the lower and side edges, are folded, ironed and stitched. Curtains with such a top are most often hung with clothespins or hand-sewn loops. Using this type of processing of the upper edge, you can quickly sew. By the way, do not sew long curtains: today kitchen fashion dictates a shortened style.

Braid
This option is chosen by women who are thinking about the question: “How to sew so that the gathers and folds are the same?” Laces stretched through a special braid can create a wide variety of shapes of smooth and clear folds. You just need to sew a braid to the four folded and hemmed edges, and even a child can be trusted to pull the lace.

Loops
Curtains with straps look simple, but tasteful. And sewing them on is no more difficult than straps on a dress, except maybe there are more in number. The easiest way is to sew the loops directly to the hem of the top (from the wrong side), but it will be much more beautiful and stronger if the edge of the loop is inside the finishing seam.

Secret hinges
This version of the curtain top has its own charm. The main difficulty is to calculate the size of the loops. It all depends on the diameter of the cornice and the density of the fabric. Take your time, calculate it again before sewing the curtains. Make the cut with your own hands. And start sewing.

Eyelets
The peculiarity of curtains with grommets - plastic or metal rings - are ideal vertical folds. Choose this option with confidence - sewing them is not as difficult as it seems. Cutting even holes and snapping two parts of eyelets together takes five minutes per ring.

When choosing a curtain style, consider general style Houses. Curtains with beloved lambrequins are one of the elements of modernism, so in a room where high-tech reigns, they will look, at least, strange. In addition, each style has its own “favorite” fabrics. So, classics are heavy, dense curtains, and country, for example, are light and natural curtains. Before doing it yourself, make sure that the selected style and fabric will not conflict overall design interior