(or you can go to the first photo in the left menu). But, in addition to the installation of the bathhouse and the erection of a roof over it, in 2011 we managed to hold a number of events in the house itself. Completing the set-up process new apartment, we will devote the whole next 2012 year to "bringing to mind" the house and, if possible, the baths. This article will talk about the features of grinding the walls of a log house (in this case, the wooden walls of a house).
When you communicate with construction companies at the stage of designing and manufacturing a log house, somehow you can’t even imagine all the burden of problems for the further construction of a house or a bath that you will have to take on your shoulders in the future. And this situation is certainly true not only for log houses and baths, but also for any suburban construction.
But when all these problems begin to arise, you begin to appreciate the charm of human relationships, because in one company they will simply turn away from you as soon as you have paid the last payment, while in others they will be happy to help and answer questions even several years after completion construction of a log house. I am very pleased that the company "Rus Log" belongs to the second category, in fact, that is why I ordered a bath from them this year, and for the same reason I am writing these lines.
Having filled the "bumps" in the construction of the house, and now also the baths, I understand that other developers will also face these problems. Therefore, let our experience and the advice that we received from the specialists of "Rus ..." become available to other clients of this company, and simply to connoisseurs of wooden chopped houses and baths.
So, our today's story is devoted to grinding the walls of the house. Well, to be more precise, this year we sanded and painted internal walls in the house, as well as internal and external walls in the log cabin of the bath. We will tell you about the polishing of the bath and its coloring. in separate articles (see links), there we will briefly dwell on the features relating specifically to the work on the bath. We will also talk about painting the walls of the house in a separate article, this issue was also not as simple as we thought before.
Photo of the living room in 2011 after sanding the walls.
How our walls look after grinding can be seen in the previous photo. Of course, the house began to be perceived in a completely different way. The only thing, my main mistake is that it was necessary to engage in grinding before installing floors and ceilings, but we will dwell on this in more detail a little later. And now let's go through all that difficult path together, which led to such beauty.
Note from autumn 2013. It is always interesting to look ahead a little in order to understand, but actually "for the sake of what all this was started." In the next photo you can see how the living room began to look after grinding and painting the walls. Well, at the same time, and after a number of other events (from the fireplace and underfloor heating, to tiles and doors).

Photo of the same living room, but taken in the fall of 2013.
The initiative is punishable or "come on guys"
At first glance, you can’t say that sanding the walls of a log house is a hard job that requires skill, strength and endurance. When about two years ago I found out approximately how much grinding would cost me home from the inside, then I said: yes, what kind of nonsense is this, I can do just fine myself. Think - drive and drive grinder. I was also "motivated" by my good friend and senior comrade, let's call him Yu.V., since I did not ask for his consent to this publication. He at one time (being a teacher, having two higher educations, a PhD and an associate professor) built country house for your father in law. In short, in addition to a refined mind and a rather sharp tongue, which many were afraid of, he also had golden hands.
Of course, at work we often discussed the construction of my and his dachas. And once he asked me, what did I actually do in the country with my own hands, because you need to put your soul and heart into the house. So, I say, my wife and I seem to have developed the project in agony, I myself planned and bred the electrician, perhaps that’s all. And he told me - well, can't you yourself be able to sand the walls, and indeed, I thought, why not. By the way, Yu.V. he was very unlucky with the builders, he also built a log house, but he ordered it through mutual friends, and they let him down.

Hard men's work - grinding the walls of the log house
No sooner said than done. I already knew at that time that they were grinding log walls angle grinder, in the common people - grinder. Entering the big hardware store, I asked to show me all the nozzles for the grinder. Having chosen two, in my opinion, the most suitable ones, I asked them to choose disks for them. I also already knew that wheels with a grain size of 80 are used for grinding. I especially liked the German attachment with Velcro, it was, of course, a little expensive (about 1000 rubles), but, in my opinion, very convenient.
Arriving at the dacha, I dropped everything and rushed to try my acquisitions in action. I had the good sense to start from an "invisible" place. In the bathroom on the first floor, I chose the wall where the shower cabin will stand. The very first attempt at polishing showed that it was far from being so easy.. The grinder was simply pulled out of my hands and thrown from side to side, from under the circle on a new skin, sparks began to fly in all directions, because of this, bullies arose, I could not make a smooth strip, everything turned out to be some kind of waves.
But the most unpleasant surprise was waiting for me when I tried to grind the log at the horizontal junction between the crowns. My vaunted German nozzle with its upper (i.e., back to the skin) part left a thick black streak on a nearby log. Another thing that struck me unpleasantly was that the 80s disks wore out at a very incredible rate. Brought packaging discs melted before our eyes. I tried the second nozzle in the case, where the grinding disc was fixed with a bolt. As it turned out later, this was already closer to the truth, but even here it was very difficult to grind logs in cuts and at joints. I reinstalled the German Velcro attachment, but in my disappointment I forgot to attach the sanding disc itself. When I began to guide the grinder along the log, I immediately felt that something was wrong. And then it dawned on me that “it was not about the reel ...” and I myself ditched the nozzle for almost a thousand rubles. This was the last "dot over i" and I finally realized that everyone should mind their own business.

Later, watching the work of the guys and talking with them, I realized some of my mistakes. First, you need another (second) nozzle. Secondly, the new disk must first be slightly grinded off on the auxiliary section of the log (usually in openings for interior doors, what will be covered with casing boxes in the future) - at the same time, the largest grains fly off and the disk will not “cut” the log and spark. Thirdly, I realized that the grinder should be moved not with the movement of the hands, but with the shoulders and forearms, then the smoothness and parallelism of the movement will be achieved, respectively, the log will turn out to be even and without “waves”. The last recommendation will be clear to volleyball and tennis players. In volleyball, when receiving the ball with two hands from below, you also need to “work” with your shoulders and torso, and not bend your arms at the elbows, otherwise the ball will fly in an unpredictable direction. Similarly, in tennis, when receiving the ball with a racket held with two hands, similar work of the whole body is also required, and not just the hands.
We digress a little. In short, even if I knew all this in theory, in practice it would still turn out to be hard work. But it was still necessary to scrape with a chisel upper layer wood in the corners. In short, then I clearly decided for myself that I needed to do something around the house or the bathhouse, but I needed to do what I was good at.
By the way, to be objective, I was not the only one who had such a “crazy” thought. WITH light hand employees of "Rus" I met and maintain friendly relations with Maxim Marinin, our famous figure skater and just a wonderful person (editor's note, more about the bathhouse built by Maxim Marinin is described).
Since we are in approximately the same state with him, in the sense of being dragged into the construction process, we periodically exchange interesting and useful information on various aspects of construction. So, once Maxim wrote that he had bought a good grinder (not a grinder, but a specialized grinder) and plans to grind the log cabin of the bath on his own. He, like me, was alarmed by the cost of this work - at first glance, it seems overpriced. I told him my above-described story and recommended nevertheless to give it at the mercy of specialists, and to do something more familiar myself. But Maxim, as determined as I am, decided to try everything on his own experience. The result turned out to be similar, we both realized that “Caesar is Caesar’s”, and it’s better to earn money in the usual way for yourself – it will be more efficient.
Tools and consumables for grinding
Before bringing the builders to the country, I took care of buying grinding discs. The question turned out to be rather non-trivial. But first, a few words about the process itself. The main plane of the chopped walls is cleaned with a grinder with a nozzle on which a grinding disk is bolted. But there are places where the grinder does not reach - these are the corners of cuts, walls near the ceiling or near the floor (if you, like me, have already installed the floor). There you have to work manually - with a chisel. The photo below shows two such corners of the cuts. The upper corner has already been cleaned with a chisel, but the lower one has not, circles are clearly visible where the disk could get.

Work with a chisel in the corners of cuts. A layer of wood has been manually removed in the upper corner, but not yet in the lower corner.
It is clear that grinders, nozzles and chisels are the concern of builders, but I advise you to take care of grinding discs separately so that unpleasant incidents do not happen.

Grinding discs left "packs". The photo on the left shows in blue a mark on the grain size of the disc (60)
The best option is if the builders take over the "extraction" of grinding discs, it is more difficult if you have to do this (for example, buy more). The fact is that these disks require a very large number. Offhand, it took us about two and a half boxes for the house and the bathhouse. Each box contains 8 packs, each pack contains 25 discs. In total, there are 200 discs in a box, in total it took about 500-600 discs. As the builders told me, it takes from 1 to 3 discs per square meter of wall, so count. By the way, you need to calculate the area, and hence the amount of work, and therefore your costs, correctly. Masters use the so-called height factor. The fact is that your walls are uneven, but with rounded crowns. Therefore, several control measurements are made, a tape measure is taken, and all the bends of the crowns are wrapped around the tape. It turns out that with a ceiling height of, say, 2.5 meters, the actual height of the wall is about 3 meters. This was news to me, but not to you now.
Let's get back to disks. If you go to a hardware hypermarket and try to buy that many discs there, you'll find it cheaper to cover the walls with gold leaf. Of course, I had to buy several dozens of discs on the fly, especially with an increased diameter (150 mm), to be honest, this is not a cheap deal.
So what to do? There is a way out: contact the "domestic manufacturer"! The thing is that the supermarkets mostly sell imported products, and the specialists of Rusya Log recommended to buy discs from the Luga Abrasive Plant - they are several times cheaper, and the quality is not much inferior to imports. It is clear that not everyone will be able to “hit the road” to Luga, look for this plant, etc. It will be optimal here if the builders organize it. I am grateful to the leadership of "Rus ..." that I had no problems with this. Moreover, usually large construction companies, like Log Rus, buy these discs in bulk (wholesale means several dozen boxes, i.e. thousands of discs), which costs them much less than if you came to the factory yourself. Unfortunately, more precisely to my sincere amazement, the Luga plant has neither a representative office nor even a sales outlet in St. Petersburg, which is a pity.
And one more aspect concerning disks is their grain. For final grinding discs with grit 80 or 60 are used(See the circled numbers in the photo above). Of course, the result of using sandpaper 80 is more pleasant to the touch, but most likely it will have to be sanded already in the second layer, and the first time you will go through a coarser sandpaper. In the house we made the 80th, and in the bathhouse the 60th, but already in one layer. In principle, it feels almost imperceptible, especially after painting. By the way, looking ahead, I’ll say that after the first layer of water-based varnish, you will have to sand the walls again, this time just by hand, without a grinder, because. it is water varnish that lifts all the pile formed on the surface. But we will talk about this in more detail in a separate article.
In addition to 60 and 80s, builders use sanding discs grit 40- for grinding the ends of logs, of course, this skin will take much less. I repeat - what ideal all these problems should be taken over by the builders so that you do not have to leave your work and business to rush around St. Petersburg and the Leningrad region in search of certain grinding discs.

Grinding at home: the first and unsuccessful attempt or the role of recommendations
So, by the middle of summer, I had a paradoxical situation, that there seems to be money for construction and there are builders for individual work, but I can’t start work. The fact is that at that time I was kept by grinding the walls in the house. I could not install casings and internal architraves on windows (the specifics of our windows are described) without grinding the walls. For the same reason, I could not lay plumbing communications around the house, make warm floors, etc., respectively. But the most important thing is the fireplace. The fireplace is a “separate song”. It was designed for us according to the author's project based on the Swedish Keddy fireplace cassette. We decided to make the lining of the fireplace from soapstone, it was ordered in the winter and by the summer it was finally ready. The installation of the fireplace, as you understand, was also held by grinding. And the fireplace itself held the insulation of the roof of the house (by the way, we did not have time to make the roof this year and postponed it to 2012).
I called Denis Migachev, Gen. director of "Rus" and asked if his "fighters" could polish my house, and at the same time a bathhouse. He replied that, unfortunately, all the brigades were busy and were on the road, that at best the nearest brigade would be free in 3-4 weeks. I did not want to wait so long, the summer is passing. We called a call among our acquaintances and one distant friend of a friend said that he has in mind people who have experience in grinding walls wooden houses. At that time, I did not yet know all the intricacies of grinding and considered that with this laborious, but in principle a simple matter, and this team will cope.
The following Friday, I went and picked up two "specialists" from the previous facility and brought them to my dacha. The guys were from Ukraine, I organized their whole life, we walked around the house and examined all the walls. Andrey, he was their eldest, said that discs would be needed to grind the logs adjacent to the floor and ceiling larger diameter(150 mm) which I should have bought.
Half a Saturday I ran around the shops in search of these discs - all to no avail, with Velcro - please, but there were simply no such clamps. Desperate, I again called my "magic wand" Denis Migachev. He immediately said - you need to go to the Castorama store, and indeed, there I took all the available disks of the size I needed to zero, by the way, the price tag “bited”, each disk cost 50-70 rubles. Denis also scolded me that I did not wait for his guys, because here he unequivocally guaranteed the quality. I had to apologize and refer to the unacceptable, as it seemed to me then, delay in time.
Arriving home, I called my grinders, “reported” that their request had been fulfilled - the disks had been bought. And this Andrei answered me and said that, in fact, they had already moved out of the dacha, they were not interested in work and the conditions did not suit them. I was just taken aback by what I heard and slowly sat down on a chair. Wait, I say, I am inclined to dialogue, if there are problems - voice it, if this is really the case, I am ready to raise the price of the work. He answered me that the house is old (although the log house is only 3 years old), it is very difficult to skin, you have to first go through a coarse-grained skin, and then again - 80-coy. I hung up and began to come to my senses. In my 45 years, no one has ever done this to me. Well, find the courage in yourself and tell the customer that you are not interested, but say it to his face, and like this, leaving someone else's trusted house, to run away like a rat from a sinking ship - it was incomprehensible to me. When I came to my senses, I called this Andrey again and already calmly “put him in his place”, explaining that “adult boys” don’t do this, and that if I find even the slightest problem in my country house, then I will find him with a friend at throughout the Leningrad region. In fact, I was not dissembling, if this became a matter of principle, then thanks to the connections of the wife, we would be able to “ruin the life” of these guys, we just usually don’t want to waste time and get our hands dirty on such people. My principle is to draw conclusions, forget and move on. So we did. The next day we arrived at the dacha, found the keys to the gate and the house in the place indicated by the unfortunate builders, checked that everything was in order and in place. They began to think what to do next - time goes by.
Second attempt - with a guaranteed result
As you understand, my next call was again to Denis, I told him the story that had happened and asked him to reserve his builders for me, we had nowhere to go, so we were ready to wait. Denis promised to speed up the process, and indeed, after three days they removed a specialist named Adrian from the facility, called his cousin Ivan, a novice true specialist, to help him, but Adrian promised to organize the learning process “in the course of the play” and guaranteed that everything would be on the highest level. It was supposed that in a week or two a couple more guys would come, but later we refused this, because the pace of the builders' work, and most importantly the quality, satisfied me.
The main task that I set for the grinders was to quickly sand and paint the house, first of all, those rooms where there would be a fireplace and a chimney (on the second floor). In the second turn, I decided to polish the inside and the bathhouse in order to “close the topic”. Looking ahead, I note that later we decided to polish the bathhouse outside as well, “to walk, so walk”, although, of course, additional justifications appeared for this step.
Work has begun. The guys started from the second floor, so that the dust would not settle on the work already done. I will say right away - the dust, of course, was “unmeasured”. To clean the walls from dust, it is convenient to use ordinary brooms and a vacuum cleaner. Without a vacuum cleaner, of course, it is difficult, especially later - when you need to clean the corners and joints of logs before painting. I still had a “technical” vacuum cleaner, which we bought when renovating an apartment, here it served again.

Grinding is mountains of garbage... ... or fertilizer, depending on how you look :)
Based on the results of the work of the first “Uh brigade”, I realized that it is necessary to protect the mechanisms plastic windows and roof membrane. Therefore, I bought several packs of film (it is thin, but there is thicker - the second is better) - it is usually used to cover furniture and floors during repairs. First of all, I asked the guys to close all the window openings with foil and staple the entire roof on the second floor (now we only have tiles and a waterproof membrane from the roofing cake in the house), the rest internal roofing we planned to do after installing the fireplace, sanding and painting the walls.
And so the work began to boil. I will say right away that it was a long process, in total the guys worked for me for almost a month and a half. But during this time, the house was polished from the inside, the bathhouse was polished on both sides, all this was painted three times with varnish, and inside the premises - after the first layer of varnish, the pile that appeared was also manually cleaned with sandpaper.
Watching their work, I studied the technology of grinding for the sake of interest. Let's focus on the most important points this process. Grinding walls from a gun carriage can be divided into three components: processing the upper and lower edges of the log, as well as processing the flat part of the log. For round logs, everything is somewhat more complicated, where you have to smoothly go around all the roundness of the wood. The described steps are illustrated in the following three photos.

Processing the bottom edge of the log

Grinding the upper edge of the carriage log

Wall plane processing
Particular problems were delivered by sections of the walls under the ceiling and near the floor. Therefore, once again I remind you of my recommendation: the log house should be sanded BEFORE installing windows, installing ceilings and floors. The main thing is that the log house was under the roof. Here, the presence of a lag is welcome, it is convenient to temporarily throw boards on them - this is what happened to me in the bath.
By the way, let's talk about one more recommendation that came to light in the course of work. Of course it's better to grind new log house than already settled. In addition to the mentioned windows and floors, the process of solidification of wood also comes into play here. Accordingly, the consumption of skins on such a log house will be slightly higher. True, belated grinding also showed advantages, we will talk about this in more detail in a future section on warming the log house after shrinkage.
Let's get back to the difficult areas. The floors were a little easier. We plan to arrange underfloor heating on both floors, heated by a heat pump, so the floor level will still be raised by 5-8 cm. This allowed us not to “fight” for the lower edges of the walls. But with the walls near the ceiling of the first floor, I really had to suffer. While we plan to do on the first floor stretch ceiling(they hide the unevenness of the wall logs well), they will only be 2-3 cm from the existing draft OSB ceiling, so grinding the upper parts of the walls was fundamental. Several times my workers shrugged and said that they would not be able to sand this or that section of the wall. We understood that, of course, this can be done with a chisel, but this is absolutely hard labor.
I am an optimist and an engineer in my life, so every time I reassured Adrian and every time we found a solution. These solutions were born "in pain", therefore, given that they may be useful to you, we will give them briefly.

Grinding hard-to-reach places under the ceiling, in some places I had to modify the tool, be smart or just work with a chisel
"Know-how" that appeared as a result of brainstorming:
- the guys cut off the rubber attachment holding the sanding disc and the grinding disc itself. Thus, from a disk with a diameter of 125 mm, we obtained a disk with a diameter of 70-80 mm, which made it possible to work in many hard-to-reach places Oh;
- somewhere I closed my eyes to the “waves” on the surface of the crowns, because I understood that this zone could be polished only with short vertical movements;
- without hesitation, I allowed the guys to “scratch” the draft ceiling, because it didn’t work out otherwise;
- where it was completely tight, I had to work only with a chisel, but there were only two such places left, and then small ones.
By the way, my experiments with the grinder came in handy. In one of these cases, the emotional Adrian said in his hearts that he couldn’t get in there. And I look and think, why do you need to make movements from top to bottom, and if you turn the grinder over and start working from the bottom up. Adrian in response tells me, yes, it’s impossible, the grinder will simply fly out of my hands. Let's try, I said. Do not believe me, in front of the "amazed public" I managed to carefully clean up the previously inaccessible area. Damn, "skill does not drink away," even I thought.
Of course, one cannot fail to mention one more rather laborious stage of work - cleaning the surface of the logs in the corners of the cuts with chisels. The photo below shows this operation close-up from various angles. In the photo - Adrian himself. His brother, Ivan, out of natural modesty, tried to avoid the lens, but I did not insist.

Time-consuming work of manually cleaning the corners of cuts where the grinding disc does not reach.

The same work in the corners of the cuts, but close-up.
On the right side of the photo above, it is clearly seen that the crowns were not completely polished - the guys then processed the veneers for window and door openings separately. This was due to the fact that most of the windows were covered with foil at that time.
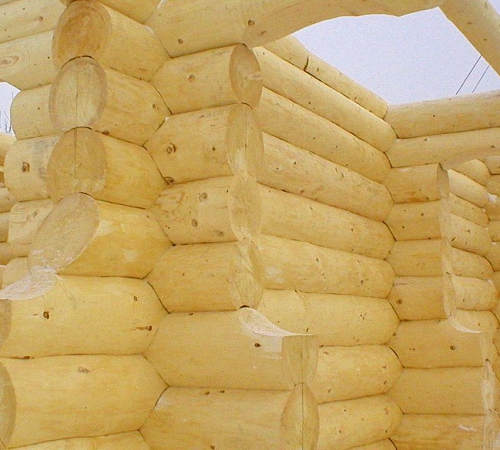
The next photo shows a close-up of a round log wall. Disk marks are clearly visible. This is what the wall looked like after going through a coarse sandpaper with a grain of 40.

Polished wall - close-up. Disk marks are visible. This wall was sanded twice, first with 40 and then with 80. The photo shows the result of rough grinding.
As a result of the work done on polishing the house, the living room simply “played”. To be honest, my wife and I do not regret the money spent on grinding, because it essentially replaces the traditionally expensive final wall decoration. Once one of our friends, having visited our house, asked, what will you sheathe the walls from the inside with? My wife and I looked at him like “Lenin at the bourgeoisie” and said, what are you, for the sake of these wooden walls, everything, in fact, was started!

As a result of grinding, the house began to look like "like new"
In conclusion of this article, albeit a little looking ahead, we will show how the same room began to look, but already with painted walls and installed fireplace . The upper decorative grate is still missing on the fireplace, so the air duct pipes are visible.

Photo of the living room after painting the walls with varnish on water based and installation of a fireplace with soapstone lining.
Do not be surprised that the podium of the fireplace is raised above the floor - this is intended, since insulation will be laid on the subfloor of DSP boards, and then in the screed of the underfloor heating pipe. According to our plans, the level tiles just should reach the level of the podium of the fireplace.
To take a closer look at the walls, here is a photo of the chimney against the background of the wall of the attic floor. In general, we were satisfied with the quality of grinding and painting.

Photo of the wall of the second floor, on the left - the fireplace chimney (finishing artificial stone)
Ask a question or get a free project calculation according to your sketch |
Grinding - compulsory work after the construction of the shed. Its main purpose is to level wood material, remove all roughness, mold, rot spots and other defects from it. This work must also be carried out before painting, varnishing or treating the wall with any other finishing materials.
A sanded wall provides good adhesion of the paint to the surface, and the result will look much more aesthetically pleasing. How to polish the logs of the log house?
Selection of tools for processing logs
Choosing a tool for grinding a log house is not difficult, since dozens of various brands of grinders from domestic and foreign manufacturers are on sale today. To completely sand the log house, you must purchase the following set of equipment:

- If we are talking about a log house from a bar, the belt grinder will be the most convenient solution. It allows you to quickly process flat surfaces, modern models additionally supplied with a bag in which dust and flying small sawdust are collected. It is important that the machine is not excessively heavy, otherwise it will be inconvenient to work with it.
- If you have to process a log house from a log, you will have to work with semicircular surfaces. The most convenient tool for this will be an angle grinder - an angle grinder, which is often called a grinder in everyday life. In this case, special nozzles are put on it for grinding the log house - these are disks equipped with a coating of sandpaper laid in the form of petals.
Sufficient power - 850 W, stronger tools are not required. The device must be light and ergonomic, otherwise, after a few hours of work, the hands will be very tired.
- You will also need sandpaper of a high fraction, and it is better to purchase a large amount. Any equipment will not help to complete the work, many areas will have to be processed only manually. These are end joints and various hard-to-reach places that the grinder cannot reach.
What is the best way to grind a log house? When choosing a power tool, it is better to pay attention to products widely famous brands: this is DeWalt, Bosch, a fairly reliable tool is offered by the domestic company Interskol.
You should not save when choosing, as a cheap Chinese grinder can simply fail after an hour of hard work. The right tool will allow you to quickly cope with the work, and there will be no problems and unforeseen breakdowns.
The technology of polishing a log house from logs using a grinder
Bulgarian for grinding a log house - the most handy tool, which has a fairly high performance, but all the work will take many hours. It is important to remember that a sanded log must be painted or otherwise treated as soon as possible, otherwise the wood will quickly darken and the likelihood of fungus increases.
Sanding starts only after the wood has dried to the end. Grinding a wet log is practically useless, since a flat surface will not work.
How to grind a log house with a grinder? To work, you need to prepare nozzles with grains of different sizes in advance: during the initial processing, the logs are polished with sandpaper with large grains (40), later it will be possible to move on to finer grinding by choosing sandpaper with finer grains.
The abrasive material is very quickly erased and clogged with dust, so it will have to be replaced periodically. Some important rules, which will help to cope with grinding more effectively:
- Before starting work, you should take care of personal protective equipment: when processing wood, dust and small sawdust will fly in all directions, so goggles and a respirator mask will be required. Hands must be protected by a sleeve, and work gloves will also be required.
- If there is a lot of work to be done, it is better to divide it into several parts. Otherwise, the logs of the log house will have time to darken even before the work is completed, after which they will need to be sanded again. It is better to process one area, and then immediately coat the wood with a protective compound.
This is especially important if the work is carried out unprofessionally, as it will take more time, and it is worth taking care of the timely protection of the material.
- The work is carried out in several stages: initially, you need to process the coarsest places with a nozzle with a large sandpaper: the remnants of the bark are removed, all irregularities are removed. After that, you can proceed to grout processing with sandpaper, and the final part of the work is done manually.
Particular attention should be paid to the grooves. To grind them, you can use a special flat nozzle on the grinder, but such work requires special skills, and it is better for beginners to do it manually.
If the work is being done for the first time, the master must handle the grinder very carefully. High rotation speed requires precise movements, otherwise the sanding will be uneven. If you press too hard on the wood, a noticeable depression will immediately appear in it.
Further processing of the log house
When choosing how to grind a log house, you must immediately prepare the material for further processing of logs. It includes the obligatory application of a layer of antiseptic - a substance that prevents putrefactive processes. An antiseptic can be priming and tinting, and wood can also be treated with bleach to give it a pleasant tone.
Wood must also be treated with flame retardants - substances that prevent fire. For a wooden house the most important factor security.
A carefully polished and processed log house will look very beautiful, and thanks to special treatment it will be reliably protected from various adverse effects. Skillful handling of tools and compliance with safety precautions will allow you to quickly cope with the work without force majeure, and the result will be quite worthy.
Grinding a log house is a monotonous, dusty job that requires constant attention and the ability to deftly handle power tools. Entrust this work to us. The guys in the team are specialists, they know how to grind a log house correctly and will be able to please you with the quality.
We are engaged in polishing log cabins in the Smolensk, Moscow region, Leningrad region.
With complex work (grinding, painting, caulking) and large volumes of work, we travel to other areas of the Central Region.
Grinding cost 1 square meter log house walls from 250 rubles.
It is worth sanding the log house correctly and efficiently 250 rubles per square meter of treated surface. This is the price of polishing the LOG to a height of 2 meters from the surface of the ground or floor. To grind a wall above two meters, you need to install scaffolding or work from the stairs. Accordingly, the work will cost a little more. The cost of polishing a log house above two meters from the floor from 300 rubles square meter.
The cost of grinding work in cramped conditions (niches, rooms less than 2 sq.m.) is negotiated on the spot.
| log cabin self made grain 80 |
250 R. m\sq |
| log house from OCB grain 80 |
250 R. m\sq |
| log cabin grain 80 |
250 r m\kv |
| polishing prof. timber |
300 r sq.m. |
| fine polishing grain 100 |
120 square meters |
|
end grinding |
100 r m\pog |
| peeling off an old log house grain 36-40 |
300 r m\kv |
| sanding painted logs | 300 r m\kv |
| grinding beams, rafters, crossbars | 300 r m. |
| floorboard lining, blockhouse |
from 300 r m\kv |
The cost of polishing a log house is indicated for one pass. Usually this is enough.
If you need to process something additionally, then we can always agree on the price of grinding.
Grinding a log house at home correctly
With the right approach to the grinding of the log house, one pass should be understood as grinding the log house with an angle grinder with a nozzle with a grain of 80. This is quite enough for logs from the side of the street. Of course, if you look closely, you can see very small horizontal ribs from the grinder pass, but they are removed in the second pass. The second pass is carried out by an eccentric machine on which a disk with a grain of 80 is installed.
If we agree on grinding your log house indoors, then it makes sense to start immediately with the passage of an angle grinder (grinder) with an 80 disc to remove all irregularities and give the log a single tone. And remove the nuances with an orbital wheel with a 120 disk, for painting or varnishing.
We polish:
- houses, hand-cut baths
- log cabins
- round log cabins
- walls sheathed with clapboard, blockhouse, timber imitation
- floors and ceilings
- we work: Moscow, Smolensk, St. Petersburg
Why grind a log house
 At its core" log sanding"It's preparation wooden surface to coating. And than better preparation, the better your log house will be painted. Look at the photo you can clearly see the difference. After the second pass. Can you imagine the beauty after coloring?
Take a closer look at the logs or timber from which your house is built. You will see the remnants of the bark, resinousness, small scuffs and villi. If you do not polish the log house, these nuances will lead to:
- paint or varnish will not lie on the tree evenly and beautifully
- under a layer of paint there will not be a surface with the same density, somewhere the paint will be absorbed more strongly, somewhere weaker. When the coating dries, the heterogeneity will become clearly visible, you will begin to tint
- paint consumption will increase by about 20%
- all the villi and scuffs on the log will also need to be painted over on both sides, and there are quite a few of them
- the service life of the protective and decorative coating will be reduced by 50%
- due to the difference in the thickness of the coating, the sun, wind and frost will very quickly, literally next year, make gaps in the paint, an uncovered tree will begin to darken
Here are three main reasons why sanding is a must.
 But in addition to these frightening factors), there is also an aesthetic side. During grinding, the texture of the wood appears, all construction dirt is removed and annual rings become clearly visible. The tree opens up, you can see the fibers of the wood. Toning impregnation or colorless varnish applied after sanding will highlight and emphasize all the true beauty of a wooden structure.
As a specialist, it seems obvious to me that it is better to invest money and polish the log house from the very beginning than to regret it, paint the log house with an expensive composition, and the next year, observing the shabby facade, still do the sanding and paint again. Miser pays twice).
We consider the area of \u200b\u200bgrinding the log house
Let's say you need to grind a log house of a house 6 by 8, 3 meters high. Add the length of all sides 6 + 6 + 8 + 8 = 28 and multiply by a height of 3 m. It turned out 84 sq.m. Taking into account the average roundness of the logs, we apply the coefficient 1.2, i.e. 84 x 1.2 = 102 sq.m
Multiply the result obtained by the cost of polishing the log house 250 rubles. The amount won't scare you.
The process of polishing a log house is quite laborious, but it is quite feasible at home. In order to perform high-quality grinding, it is necessary to have special equipment, as well as initial skills in working with it. Self-polishing a log house will help save material resources, while obtaining a high-quality result. We will learn more about how to properly sand a log house from a rounded log.
Sanding logs is not a mandatory process at all. However, after its implementation, the wooden surface acquires a more attractive appearance, it becomes resistant to external stimuli.
Most often, polishing the bath is necessary to get rid of the upper, dark layer of wood. In addition, with the help of grinding, it is possible to partially or completely remove the fungus. Further, by covering the wood with a special protective agent, it is possible to extend its service life by several more years.

In order for the grinding process to go quickly and efficiently, it is necessary to choose the right equipment. Most often, for these purposes, a grinder is used, on which a special nozzle is installed or grinding machine.
When choosing a grinder, pay attention to compact, small and lightweight models with a minimum set of functions. Also, the device should be distinguished by the presence of a function of smooth switching of operating modes. It is more convenient to perform grinding using two grinders, one of which has a fine and the second coarse abrasive. However, it is quite realistic to do the job with one device.
Choose plastic nozzles for abrasive elements, since rubber ones are left on a wooden surface dark spots. Please note that prolonged use of the tool and the constant replacement of nozzles leads to its excessive heating. Therefore, if you work with only one grinder, then pause in its work. The initial sanding of the bath is done using a 40-60 grit abrasive. With the help of this abrasive it is possible to process about five meters of a log.
Please note that for grinding their log house coniferous trees, you will need to purchase more abrasive. Since these types of wood are different high content resins in their composition, this leads to premature deterioration of abrasive nozzles.

Secondary processing of bath logs is carried out using abrasives with a grain size of 110 units.
Please note that round logs are sanded exclusively with an eccentric sander. And with the help of a grinder, it is possible to grind the timber. However, please note that the power of the grinder is quite high, and pressing too hard will damage the wooden surface.
Before sanding the log house, it is necessary to carry out a series of preparatory work. The work is done before the installation of windows, since this type of work is distinguished by the allocation a large number dust and dirt. If the wood has a high moisture content, then it is necessary to wait for it to dry. Since sanding wet wood will be of poor quality. It is preferable to carry out the work after the roof has been installed.
Before starting work, inspect the surface of the log house for defects. If there are places where the surface of the wood has peeled off, then it must be smeared with glue and wait for it to dry.

How to sand a log house: instructions
Start sanding the log house from the bottom of it, gradually moving towards the top. The grinding process involves the following actions:
1. Grinding with a grinder to a coarse-grained nozzle.
2. Processing grooves with a grinder, the size of the disk should be 1-2 cm over size the instrument itself. If you choose a large nozzle, then the tool may jam and cause injury.
3. The corner sections of the log house are processed with a chisel. This process is carried out either at the beginning of work or after the completion of the first grinding.
4. For grinding the ends, use only a coarse abrasive. To reduce the pile on the ends, use a soldering iron or a hammer.
5. Before further finishing, inspect the wood for gray spots. If they are present on the surface, apply bleach to them. Remember to remove dust with a vacuum cleaner and a damp cloth.
6. In order not to leave deep marks on the surface of the wood, do not use the grinder or grinder at too high a speed.

- apply a layer of primer, use a brush or spray gun;
- in order to emphasize the structure of the tree, bleach and paint the surface;
- apply a layer of protective impregnation.

How to sand a log house with your own hands: internal grinding
When performing internal grinding of a log house, there are several options for performing this process. If earlier the bath was amenable to grinding, then to update its upper layer, it is enough to use a coarse abrasive.
If no further wall cladding is planned, then the process of grinding them should be of high quality and lengthy. It is preferable to perform primary grinding before installing the finishing floors and ceiling ceiling. The work process is as follows:
- removal of a rough layer of wood bark, for this a grinder or grinder is used;
- using a grinder, process the groove and corner areas;
- sand the wood with fine abrasive materials;
- for grinding the joints of logs and the most inaccessible places, use a hand tool, this process is laborious and requires high labor costs.

After sanding one wall, remove dust from its surface and apply protective compound antiseptic action. This process is repeated each time after grinding is performed.
When applying an antiseptic to the wall, make sure that there are no caulks on it. Use sealant to remove them. For execution finishing, do the following:
1. Apply a protective layer of antiseptic. With it, it will be possible to prevent the development of mold and fungus on the walls.
2. After the antiseptic dries, treat the walls with a glazing solution. Thus, it will be possible to improve the aesthetic appeal of the room.
3. Treat the end sections with an acrylic composition with moisture resistant characteristics. After it is completely dry, apply another layer of the solution.
4. To improve the fire resistance of wood, apply a flame retardant to it.
How to quickly sand a log house: abrasive blasting
Another fairly simple option for grinding is the use of abrasive blasting technology. To perform grinding, you will need a special apparatus that ejects sand under pressure. He, in turn, cleans the wood from dirt and mold. This method of wood processing is non-contact. However, wood, after processing, is particularly smooth and has an excellent texture.
The process of performing such grinding is easy and efficient, and the quality is impeccable. With the help of sandblasting, it is possible to create a certain natural texture on the tree. Appearance wood, after processing, is distinguished by exclusivity and high cost.
Benefits of using the sandblasting method:
- grinding wood of different structure and type;
- sanding wood with any contamination;
- the ability to highlight the fabulous texture of the tree;
- high speed of work;
- grinding in the most inaccessible places;
- the duration of the operation of the tree increases due to the fact that its upper layer is compacted;
- ease of doing the job.

This grinding method is characterized by a high speed of execution. There are no scratches and chips on the surface of the wood, and there is an excellent texture of the wood. In addition, it is possible to get rid of lint and additional elements degrading the quality of the wood. There is no need to grind the surface, after sandblasting. This process is quite easy to perform even for a beginner. The only thing that is required is the availability of special equipment and sand for work.
Therefore, when answering the question of how to polish the logs of a log house, first of all, pay attention to this processing method.
If you do not have the time and energy to perform grinding, we recommend entrusting this process to professionals. When answering the question of how much it costs to polish a log house, it is necessary to take into account many factors, such as the quality of the wood, the size of the log house, the complexity of the work, etc.
The average cost of polishing one square meter of a log house is about 450 rubles. This process is quite expensive, however, in this way, you will save time and get a quality result from professionals.
When choosing a tool for self-processing wood, pay attention to grinders that have a dust bag. Thus, the work will be easier, and after its completion there will be no need for cleaning.
To process semicircular logs, belt grinders will not be able to; for these purposes, special equipment will be required. It is possible to use a grinder, but it must be equipped with a nozzle with special petals that will help grind hard-to-reach places. Optimal value grinder power is up to 1 kW. The use of more powerful equipment is fraught with the fact that on the second day your hands will be very sore, due to the severity of the instrument.
If you want perfect smooth surface, then sand the log house only after it has completely dried. Otherwise, worn fragments will be present on the wood.

There are four main ways to process wood with a grinder and abrasive materials:
- draft method - involves peeling the bark;
- medium processing option this stage small irregularities are removed from the tree;
- thin processing option involves final grinding;
- sanding wood before painting.
Please note that the abrasive wears out very quickly, and when doing the work yourself, you will have to change nozzles very often. To clean the nozzle from resin and dust, use a brush and thinner in the form of white spirit. However, in this case, to high performance work is harder to achieve.
The speed of the work is determined by such factors as previous grinding experience, equipment power, quality of nozzles, the amount of resin in the composition of the tree. Average duration grinding of one linear meter is about two minutes, with a log height of 300 mm.
Put on a respirator, goggles and gloves before you start sanding. Since in the process of work dust is released, which should not get into the eyes or respiratory tract.
Immediately after grinding the log house, it is covered with special compounds. If mold or fungus is present on the logs, then special bleaches are used to remove them. Next, you should protect the tree with the help of antiseptic glazing compounds.
To apply the composition, use a brush, and even better spray. Thus, it will be possible to evenly cover the surface. After applying paint or varnish to the surface of the wood, the pile begins to rise, to remove it, sand the surface again.

External polishing of the log house helps to restore the natural shade to the wood, which is lost under the influence of ultraviolet radiation. If you do not polish the log house before applying antiseptics to its surface, then you will not be able to achieve the optimal effectiveness of their impact.
Sanding the log house allows you to get rid of the top layer of mold and fungus, which appears from excessive moisture. In addition, with the help of grinding it is possible to remove all the bumps, dirt from the walls. At the same time, they acquire a pleasant color, excellent texture and a smooth surface. Sanding walls significantly increases the life of wood. In addition, with the help of grinding, it is possible to restore a tree that has previously lost its color.
Sand log house video:
Wooden buildings have undeniable advantages. Wood absorbs moisture or dries out, regulating indoor humidity levels. The tree breathes, thanks to which it happens natural ventilation, Wood retains heat, is an excellent sound insulator. But if you do not take care of the log house, do not help it, it may lose some useful features.
Why is it necessary to grind a log house
Experts insist on grinding. But not everyone listens to such recommendations, believing that the procedure is needed only to improve the appearance of the building. But in vain.
Grinding of the log house is carried out after the completion of construction, or after the final shrinkage of the house. The procedure is time-consuming, requiring good physical preparation. It is immediately worth emphasizing the need to use protective equipment, dust, wood particles can damage the skin, eyes, and respiratory tract.
Grinding must be equipped with personal protective equipment. These are wide glasses with tight-fitting sidewalls, a respirator, headphones and gloves.
The purpose of grinding is to remove the top darkened layer of wood, remove irregularities, smooth out flaws. The appearance of the building is noticeably improved, the natural golden color with a natural pattern is restored, technological traces of processing from curved cuts, traces of a planer are removed. Logs or beams are given a beautiful geometric shape, rounded or otherwise.

Wood gets rid of harmful microflora, processing will save you from mold and fungal growths in the future. The bast layer that has lost its quality is removed by 2-3 cm, the bark is removed, the places where bacteria can multiply and rot can form are cleaned.
Important! The main purpose of sanding is to prepare for the final protective coating. Leveled walls take less paintwork materials, surface adhesion improves, wood absorbs impregnation better.
Treatment with flame retardants, antiseptics preserves wood from negative impacts environment improves its properties. Sanded logs with protective coating- a guarantee of durability, strength, high performance characteristics of the structure.
A rounded log sometimes has polished areas that appear due to a violation of processing technologies, these places repel impregnation, quickly deteriorate, which can lead to infection of neighboring logs with putrefactive formations. Careful polishing eliminates this problem.

What tools are better to arm yourself with for grinding a log house
It is not difficult to acquire the necessary tools for the procedure today. Arm yourself with:
- grinder;
- cutting machine;
- chisel.
Modern technology certainly makes things easier. You need to learn how to use a grinder by adjusting the pressure force. Excessive efforts can lead to marriage, you can’t make mistakes so as not to spoil the appearance of the building. The grinder grinds the corners and interventional depressions, the recesses are processed manually, with a chisel. It is better to use a chisel 20cm wide.
Important! When choosing tools, you should pay attention to weight, so as not to put too much stress on your hands, power. Tools with low power will heat up, significantly reducing productivity. quality tool release Makita, Bosh, DeWalt, the domestic Interskol is also worthy of attention. The technology is high quality and durable.

For a log house, you need a belt sander, its use will provide a flat surface. Equipped with a special dust bag, the machine will facilitate subsequent cleaning of the premises. I will round the surface of the logs with a belt machine to grind, it is difficult, a grinder and special nozzles will come in handy here. Correct power cutting machine 600-900 W. Nozzles with varying degrees of graininess. Initially, a coarse nozzle (40) is used, then a nozzle 80-100 is taken. Disc 125mm, RPM 10-12K, preference should be given to a machine with a rear air intake and a long cord that provides freedom of action.
Important! For work, it is more convenient to use two machines, so as not to overheat and not change nozzles, first work with a nozzle with a large grain, then with a fine one. It is more convenient to use plastic nozzles, flexible plastic with an abrasive layer, leaves no marks and lasts longer.
Grinding process technology
The technological cycle of grinding consists of three stages:
- draft;
- main;
- finish.
Draft work is peeling off the surface, the main stage is to smooth out irregularities, for finishing treatment with special substances that support the health of wood is required.
The grinding process takes time and skill. In 2-3 minutes, 30 cm of timber can be processed. Forced use slows down the process hand tool in places where the machine does not reach. The processing speed largely depends on the complexity of the architecture and the resin content of the tree. Frequent change of nozzles is required, they become clogged, they should be cleaned with white spirit and a metal brush.

It is better to break large surfaces into sections, each section should be ground in three stages with a final treatment with impregnating compounds. If you do not immediately saturate the area, it will quickly darken and the work will have to be done again.
Sanding round logs
An eccentric grinder will help to make the surface smooth and even; working as a grinder requires certain skills, without which you can make grooves and grooves. The disc lock option in the eccentric machine will get rid of such misunderstandings. It is necessary to use discs with abrasive 30-60 for primary processing and 100-120 for finishing. The required power of the machine is 200-300 watts.
Grinding of corners and interventional joints
Grooves and corners are ground with a cutting machine. The nozzle should be taken smaller than the disk size. The recesses are ground with a chisel. Some advise starting from the corners, someone thinks that they should end. There is no fundamental difference. important immediately after final grinding treat the surface with protective compounds.
Edge grinding
To process the end of the log, you will need a grinder with an abrasive of 40. It does not require finishing grinding, it is impossible to achieve perfect smoothness. But the treatment with soils and other compounds requires enhanced. The ends of the logs are especially susceptible to getting wet.
Sanding inside the house is no different. If additional wall decoration is not planned, processing should be carried out with the greatest care.
The processing of glued or profiled timber is easier, the surface is even, it is enough to remove the top layer that has changed color. Prefabricated timber, as a rule, is treated with flame retardants and antiseptics. This treatment will last for a year or two. However, then you have to work hard to return the timber to its original qualities.

Proper processing of timber after grinding
Proper wood processing increases the durability of the structure, eliminates wood damage, and reduces the cost of subsequent maintenance and repairs. It is better not to save on the acquisition of funds. High-quality compounds purchased in reputable stores guarantee reliable protection of wood from natural aggressions, rotting, fungus and mold. When purchasing protective mixtures, you should pay attention to the warranty period.

Impregnation is applied manually, with a brush, spray. To improve the aesthetic qualities, many use impregnations with coloring pigments. For correct processing required:
- antiseptics;
- flame retardants;
- glazing compounds.
Antiseptics block mold, rotting, fire retardants increase resistance to fire, glazing compounds make the surface more beautiful.
Important! It is preferable to purchase Valtti Pohjuste antiseptic from Tikkurila, Neomid 440, Neomid Bio Color. Antiseptic Valtti Color favorably emphasizes the woody texture. The funds are not cheap, but worth the money spent.

Consumption of compositions is approximately 1 liter per 1 m² of sanded surface. For washing hands and brushes use white spirit.
Grinding milestone in the construction of a log house. You can do it yourself, you can invite experts. The cost of work is 300-400 rubles per 1 m². Grinding a large house is an expensive undertaking, there are no big difficulties in the work, the choice is yours.


