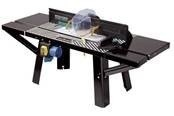
I made this table from 18 mm. plywood. It is thick enough to make the structure very durable. To strengthen the structural elements, I used a metal corner with a cross section of 40X40 mm.
The tabletop has dimensions of 800x500 mm. A hole is cut in the center to the size of the router sole. The sides are attached to the tabletop at the corners using self-tapping screws. The bottom sidewalls are also connected using corners and self-tapping screws. 4 holes of 10 mm are drilled in the tabletop. and driven nuts for fastening the combs are installed. The right side has a fork and a switch for convenient starting of the router. The "Start" button on the router itself is locked.

The milling cutter base is screwed to a 2 mm thick steel plate. and size 200X200 mm. A recess is made in the tabletop and the plate is placed flush on top, attached to the tabletop with self-tapping screws. A hole with a diameter of 50 mm is cut in the center of the plate.

A car jack is used to raise and lower the router. It is attached to the base of the table with self-tapping screws. The handle has been replaced with a homemade flywheel for smoother adjustment. The jack is not attached to the router in any way.

The guide ruler is also made of plywood. Assembled with Moment Joiner glue and reinforced with self-tapping screws. In the middle part of the line there is a box with a hole for attaching the vacuum cleaner pipe. Adjustment grooves are cut out on the sides of the ruler. 10 mm bolts are inserted into the tabletop, the ruler is attached to the bolts using eye nuts.

The combs are cut from fir and serve to press the workpiece more tightly against the guide. Grooves are cut into the comb for moving along the tabletop. To secure the combs to the tabletop, bolts with bushings are used.


To prevent the workpiece from moving up and down, a special spring stop is made of plywood. It is attached to the guide ruler using wing nuts.

That's the whole structure. You can see more details about this table in my film.
One of the main assistants of a carpenter is a wood router. This hand tool indispensable when it is necessary in a wooden blank:
- cut a groove;
- make a groove;
- make a tenon connection;
- process edges, etc.
However, when performing some carpentry work, it is not always convenient to use this tool due to the fact that you need to simultaneously hold the workpiece and operate the router. Therefore, many craftsmen resort to tricks by making a milling table for hand router. With a table that is a reliable addition to your milling tool, you can achieve wooden elements the quality and accuracy are in no way inferior to joinery products made in professional furniture workshops on milling machines.
Homemade table for a manual router significantly increases tool productivity and facilitates processing work wooden products. It is not difficult to make such equipment, and, in addition, unlike a standard milling table produced by various manufacturers, this table will have the dimensions, design and options chosen directly by the craftsman who makes it.
To perform any engineering work, and equipment manufacturing is one of these, it is necessary to draw up a sketch of the future machine. On it you need to indicate your vision of the project indicating the actual dimensions. Based on the sketch, you can easily select materials for the manufacture of the future structure, their quantity, determine the construction budget and stock up on the tools necessary for processing machine parts.
Option 1. Instructions for making a table for a manual router
Materials for making a milling table
To build a milling table you will need:
- 4 square bars;
- chipboard and plywood scraps, the dimensions of which are determined when constructing the table drawing;
- hardware (nuts, bolts, screws, hinges, etc.);
- jack;
- metallic profile;
- six-millimeter steel plate;
- aluminum guides;
- movable carriage-support (guide from the saw);
- manual frezer.
Drawing of a homemade milling table (option 1)

In any case, before you start making any such table, the drawing must be completed indicating all dimensions and determining the location of the working elements relative to each other.
Step by step assembly
Let us consider in detail each step in the manufacture and fastening of each element of a homemade milling table.

1st step. To make a stationary base for the table, you will need bars and chipboard cuttings, from which we twist the legs and further strengthen the rigidity with the help of horizontal connecting panels made of plywood. In the right side part we cut a hole for the start button, which will be connected to the hand router.

2nd step. The table top is made of chipboard. We make it liftable together with a router, for which we install hinges and make an additional support base from 15 mm plywood.


3rd step. To move the workpiece smoothly along the table, for example, to cut a groove in it, a moving carriage-stop is used. We cut a groove in the tabletop for the guides of the movable stop and install a metal profile into it. You can use a guide from an old saw as a stop carriage.

4th step. We also make the longitudinal stop from chipboard and make it movable to adjust the gaps around the cutter. To ensure mobility, we cut perpendicular grooves in the upper part of the stop and fasten the stop to the tabletop with clamps. We cut a small groove in the middle to suck out chips and other milling waste.

5th step. From thin plywood we make a box with a hole for connecting a vacuum cleaner hose, which will remove dust and shavings formed during the milling process. We fasten the box behind the perpendicular stop.

6th step. We take a six-millimeter steel plate and screw it to the tabletop flush with the surface. During the fastening process, we make sure that its edges do not protrude above the tabletop, otherwise the parts being processed will cling to them. A manual router will be attached to the plate from below.

7th step. We attach the router by the aluminum base to the bottom of the plate using bolts, but do not forget to pre-drill holes for the bolts in the base. Attaching the hand tool to a removable plate rather than directly to the table saves routing depth and allows for easy cutter changes.

8th step. We are building a router lift. To do this, we use a car jack, which allows us to change the height of the cutter with maximum accuracy.


9th step. We remove the handles from the router and instead screw in aluminum guides, which we connect to the jack mechanism.

Design and video of a homemade milling table for a manual router
Before you start making a milling table, you need to accurately determine its design features. This article provides instructions on how to make a simple router table. For other details of the first assembly option, see the video below.
We check the reliability of fastening of all elements - and the milling table is ready with your own hands!
We offer several more models of wood milling machines made by yourself for your taste.
Option 2. Another milling table and other assembly features
We offer a table design for a router with a detailed analysis of its components.
Materials and tools.
In order to make a table for a manual router with your own hands, you will need the following materials:
- metal corner or pipe (for the frame);
- aluminum guide;
- axles for attaching the router;
- putty, primer and paint for metal;
- self-tapping screws; furniture bolts 6 x 60 mm;
- Hexagonal adjusting bolts with nuts – 4 pcs. ;
- Finnish moisture-resistant laminated plywood, 18 mm thick (you can use another material);
- boards or plywood scraps (for making a rip fence).
The following tools are also required:
- welding machine (for metal frame table);
- drill and drill bits;
- screwdriver;
- jigsaw;
- milling cutter;
- spatula, brushes, rags.
Basic drawings


Design features of the milling table
An existing workbench can be adapted for a milling machine. But it is more expedient, to eliminate the influence of strong vibration during operation of the cutter, to make separate design, ensuring the stability of the table.
The main loads during equipment operation are transferred to the base. Therefore, the frame must be reliable and stable. The bed is understood as a fixed base on which the router is located. It takes all the loads and is a structure in the form of a table with a fixed lid. It can be made from a metal pipe, angle, channel, wood, chipboard.


It is necessary to take into account that the router itself is attached to the tabletop from below, which means that there needs to be empty space there.

The router is attached to the table through a high-strength and rigid plate to perform installation work. It is preferable to make it from metal, textolite or tongue and groove board.

The base of the router has threaded mounting holes for mounting. If there are no threaded holes, threading is done independently. If the task is impossible, secure the milling device using special clamps.

Start the work by using a milling cutter to select the shape and thickness of the mounting plate. To make it easier, straight corners on the mounting plate must be rounded with a file. A recess in the table top ensures that the plate is positioned flush with the tabletop.

Make a hole in the center of the plate for the tool to exit, drill holes for attaching the plate to the table. The next step is to drill holes to attach the milling device; keep in mind that the fasteners must be countersunk.


How to make a work surface and base

Making the base of the future milling table begins with the frame. For ease of work, the table cover should protrude 100-200 mm from the front part. Special attention When designing the frame of the bed, pay attention to the installation height work surface. This size is decisive for the convenience of working at the machine. According to ergonomic requirements, it should be 850-900 mm, depending on the person’s height. For convenient operation of the future milling machine You can install height adjusters at the bottom of the support. This will allow, if necessary, to change the height of the table; if the floor is uneven, it will help to align the tabletop.
It will be useful as a working surface for a future machine kitchen countertop Soviet times. Most often it is made of 36 mm chipboard sheet, covered with plastic. Wood-based material will reduce the vibrations that occur during the milling process, and plastic covering will provide excellent movement over the surface of the workpiece. If you don’t have an old countertop, use MDF or laminated chipboard with a thickness of at least 16 mm.

Choose a place for the future milling machine in your workshop; the dimensions and type of future design depend on this. This may be an aggregate machine located on the side of the circular saw, desktop version, or maybe stand-alone stationary machine.
If the use of a milling machine is not regular, reduced to one-time work from time to time, it is enough to make a small compact table.
You can make a milling machine yourself. It is a structure that fits on standard table. To work you will need a chipboard and two boards. Fasten two boards parallel to a sheet of chipboard. Attach one of them to the tabletop with bolts; it will serve as a guide and as a stop. Use the second one as a limiting stop. Cut a hole in the table top to accommodate the router. Attach the router to the table top using clamps. The compact milling machine is ready.
If you have a lot of free space in your workshop, then make a full-fledged stationary milling machine. It will be more convenient to work on it than on the desktop version
Option 3. Cheap homemade router table
The sketch is ready. Materials have been purchased. The tool, laid out in its place in the workshop, is waiting for the moment to serve its owner. The master is also serious and is not going to grab everything at once. He will sort everything out and do everything step by step.
Stage No. 1.


Start by making the frame of the future machine. You can use the following method for making a frame. profile pipe Using a grinder, cut the 25×25 to size, then weld the blanks intended for the frame on which the working surface will be located. Weld a pipe on one side along which the parallel stop will subsequently move. Weld 4 supports to the frame.
To fix the table cover, frame the perimeter of the frame with a corner, then it will sit in the recess.
Use the second method of making a frame. It implies additional supports for the working surface. Weld stops for milling equipment in the middle of the table. The size between them must match convenient fastening milling cutter.
For structural stability, connect the lower supports with jumpers at a height of 200 mm from the floor.
Stage No. 2.
Paint the resulting structure. Why prepare surfaces: clean metal pipes and degrease with solvent, then prime. If there is a need to putty surfaces, apply a special putty mixture and apply primer. After complete drying, paint with PF-115 enamel.
Stage No. 3.

Cut the work surface according internal size frame, install it tightly in the corners. Then drill holes in the upper frame for fastening the table cover. Mark the tabletop itself, drill and securely connect it to the frame using furniture bolts. Table dimensions 850×600×900.
Stage No. 4.


Step back 200-250 mm from the edge and cut a T-shaped guide along the length of the working surface.
Stage No. 5.

Trim half of the milling axes. This will make it possible to almost double the distance from the sole to the guide axis, which in turn will expand the range of capabilities of the tool.
Stage No. 6.
Remove the sole from the milling equipment, mark holes in the middle of the working surface of the table for its fastening and drill them. Drill a hole in the middle of the table cover for the device. On both sides of it, drill holes for attaching the clamps of the router axes.
Stage No. 7.
On the underside of the tabletop, make a hole for the base of the router.

On both sides of the hole drilled through the hole, make grooves for installing the router axes. The size of the groove and the axis must match.


Along the edges of the grooves, use a Faustner drill (picture above) to drill holes for the hexagon adjustment bolts.


Stage No. 8.
Cut two pieces of pipe to fit the width of the large groove and drill holes in the center for the permanent bolts. They will serve as clamps for the axes of the milling device. Screw the nuts onto the bolts.

Stage No. 9.
Install hexagon bolts and nuts on both sides of the axles to adjust the plane of the milling equipment.

Stage No. 10.
Now make a rip fence. Take a small piece of plywood and cut a groove in it so that it can move along the pipe that was previously welded for this purpose. Using a jigsaw, cut three strips of identical size, where its length is equal to the sum of the length of the table and the width of the guide pipe, and four plates for them in the form of stiffeners.
On strip No. 1, make a semicircular hole to remove wood waste. It should coincide with the slot in the working surface of the table. In strip #2, cut a square hole in the same location.
Cut strip No. 3 of plywood into equal parts. Attach one to the back of the square hole strip with bolts or guides. The plywood halves should move in opposite directions. Install an aluminum guide along the upper edge of this strip.

Stage No. 11.
Fasten plates No. 1 and No. 2 together with the sides with half holes. Fasten two stiffening ribs along the edge of the resulting hole and two on the sides at a distance of 70-100 mm from the edge.
Cut a square of plywood to the size of the distance between the ribs, cut a hole in it the diameter of the vacuum cleaner hose. Attach the square to the stiffeners.

Stage No. 12.
Secure the rip fence with clamps. This is done to make it easier to move the stop. If it is intended only for a milling machine, then secure it with brackets with grooves for movement.
Stage No. 13.
Weld a bolt to a 6 mm thick metal strip. Make the clamps from wood with two grooves for two bolts.


Stage No. 14.
Install milling equipment: insert the cut axles into the side holes of the device, put nuts on them and secure the device with pipe clamps.

Stage No. 15.


Turn the table over and use the hex key to lift up the router.
To make it easier to lift the router, it is advisable to install a lift based on a jack.
Option 4. Milling machine based on a desk

A milling machine based on a desk is considered economical and convenient option solutions. The list of photo drawings contains a table with specifications of parts by size and recommended material.

Part sizes and materials


In search of a worthy answer to the discomfort that arises when working with manual milling tool, owners of home carpentry eventually come to the need to purchase a convenient milling table.
VovroKsyu User FORUMHOUSE
I've been thinking about the table for a long time. Especially after manually performing the reservation 22 m of fence.
The purchase option can be expensive; the dimensions of a machine assembled in a production environment do not correspond to the size of a small home workshop. The optimal solution in this case would be self-assembly milling table.
Those who want to make a homemade milling machine will find it in the corresponding section of FORUMHOUSE.
How to make a milling table

A homemade milling table is the simplest. The main working unit in it is a manual milling machine. Working with hand-held power tools involves moving the working cutter along the surface of a stationary workpiece (which is not always convenient). Milling table for hand tools allows you to change the processing method and mill in a lightweight way: the hand tool is fixed on the work table, and the workpiece is easily fed to the cutter by hand.

A homemade milling table is the simplest wood processing. The main working unit in it is a manual milling machine. Working with hand-held power tools involves moving the working cutter along the surface of a stationary workpiece (which is not always convenient). A milling table for hand tools allows you to change the processing method and mill in a lightweight way: the hand tool is fixed on the work table, and the workpiece is easily fed to the cutter by hand.
A milling table for a manual router consists of basic and additional elements. Additional items are not required, but their use makes it as easy as possible a lot of work masters, to make the design of the device safer, and the functionality closer to the capabilities of serial installations.
Universal milling table:main structural elements
The main elements of the milling table are indicated in the figure.
Aib User FORUMHOUSE, Moscow.
I really needed a mobile milling table. I welded the frame, painted and assembled the structure.


The dimensions of the milling table depend on the dimensions of the parts being processed, as well as on the height of the craftsman himself. The length and width should be slightly less than the tabletop, and the height of the bed is 850...900 mm, which corresponds to the most comfortable conditions for working while standing. The homemade legs can be made adjustable, which will allow you to compensate for uneven floors or change the height of the bed.

Tabletop for router
The dimensions of the tabletop depend on the size of the parts being processed.

dauto User FORUMHOUSE
In a home workshop, a small table of 500x500 mm is sufficient.
For processing relatively long parts (for profiling edges on door frames) you will need a tabletop of appropriate sizes. Let's look at the drawing:

For the manufacture of the frame, wood-based materials are most often used, which can effectively dampen vibrations. This could be a countertop made of chipboard, which is used in the manufacture kitchen furniture or a sheet of thick plywood. Here, for example, is a countertop made from chipboard scraps formed after installing a kitchen sink.


Krott64 User FORUMHOUSE
With this tabletop scrap, after some simple modifications, you can do some pretty decent things.

Some people make countertops from metal, others from edged boards, but, as practice shows, chipboard and plywood are always a priority.

Orfo74 User FORUMHOUSE
If I do it, then from laminated plywood(I have one like this on my trailer). I have already traveled hundreds of thousands of kilometers under the heat and below zero. Neither salt nor rain spoiled it. And it can still be used, but you need to assemble it either in 2 layers, or make the bottom out of simple plywood.
To make a countertop, you cannot use material that has defects on its surface (knotty boards, etc.).
Mounting plate for hand router
To the mounting plate using threaded connections a hand router is attached. Therefore, its production must be taken with full responsibility. The material from which the plate will be made must be strong enough so that the router does not tear out during operation (the consequences can be imagined). This can be a rectangle made of metal or plywood sheet(but metal is more reliable).

AlekX User FORUMHOUSE
A powerful car has a lot of dope. And if she gets thrown out of the table while working–it won't seem like much.

Dgusepe User FORUMHOUSE
The legs can be made of wood, but it is advisable to make the tabletop from 3 mm metal. For maximum cutter lift.
The length and width of the mounting plate must correspond to the dimensions of the base of the hand router, with which the power tool will be attached to the table.


Longitudinal workpiece stop
The longitudinal stop can be made from a regular sheet of chipboard or from an edged board. The stop must be made movable to ensure the possibility of adjusting the horizontal reach of the cutter. For more precise adjustment, you can attach measuring rulers to the sides of the tabletop.

The design of the locking mechanism, which allows you to secure the longitudinal stop in the required position, is extremely simple. It can consist of two slats with through longitudinal grooves and from two threaded fasteners with wings.
Instead of slats, you can use two metal corners, which will last longer and will not deform under the action of clamps.

To prevent dust and chips from interfering with work, it is advisable to equip the longitudinal stop with a dust collector, to which a chip extractor or a small carpenter's vacuum cleaner is connected.

The longitudinal stop can be made double, which significantly expands the functionality of the milling table.
Superkuzen User FORUMHOUSE
The monolithic stop makes it impossible to carry out a lot of operations performed on the milling table, that is, it makes the table of little functionality.
The milling table can serve as a small jointer, if an adjustable difference between the working planes is organized between the two halves of the longitudinal stop. This design allows you to move one half of the stop relative to the other, setting one stop flush with the cutter using thin wooden plates. Adjustment plates are placed under the non-working surface of the stop.

Manual milling machine
From technical characteristics hand tools (power, number of revolutions per minute, etc.) will directly depend on the performance of the milling table. You should choose a router for a milling table based on the expected load. Additional functionality of the machine will be for the master additional advantage. If you don’t yet have a manual milling cutter, then choose a tool with an adjustable cutter rotation speed and the ability to set the processing depth (plunge-beam milling machines). Very easy to use machines with spindle lock (for easy replacement cutting tool), as well as devices with soft start and quick spindle stop.
We looked at the main elements of a milling table, which will allow the owner to perform the simplest milling operations. In order to expand the functionality of the device, make it universal and increase operational safety, it is necessary to ensure that additional accessories. Let's look at the most common of them.
Longitudinal guide for movable milling carriage
Using a longitudinal guide built into the surface of the table top, you can attach a variety of devices to the milling table: an angular stop with a protractor, a perpendicular stop, etc.

The longitudinal guide may have different designs, but most often it is an aluminum C-shaped profile into which bolts and wing nuts are inserted. This design allows you to quickly install what you need on the milling table. this moment device


By the way, using the C-shaped profile, you can also attach a longitudinal adjustable stop to the tabletop.

Vertical clamp
The upper clamp increases safety when working with a homemade router and increases processing accuracy. Its fastening can be implemented using the type of clamps for a movable carriage.

If you are planning to make a milling table with your own hands, a video about setting up a universal carpentry workshop for personal use will help you with this.
Lift for router
The vertical reach of the cutter very often has to be adjusted. To make this adjustment, there is a milling elevator– an adjustable stop that allows you to maintain the milling machine at a given height and, if necessary, quickly change this height.
It is advisable to use a milling elevator in conjunction with milling machines submersible type. Their design initially has guides for adjusting the reach of the cutter (unlike machines with a fixed motor).
Lift lift for homemade router may have different designs.
Car jack lift
You can use an old car jack to create a lifting mechanism.

leon42 User FORUMHOUSE
The elevator can be made from a car jack: there is a shelf under the router, and we attach the jack to the shelf. We turn the jack - the router rises or lowers.

For convenience, the jack handle can be pulled out behind side wall beds. This will make adjustments much easier.
Threaded rod lift
Blackk User FORUMHOUSE
The angle with the threaded rod is screwed to the protrusion on the router, to which the measuring pin is normally attached. The corner for the threaded rod is threaded. By rotating the pin, we seem to screw into the corner and pull the entire router up along the guides. Accordingly, when rotating backwards, we lower the router.

The mechanism consists of a wooden wedge (item 1), in which a through hole under the screw (item 2). Thanks to metal plates (item 3), attached to the sides of the wedge and having threaded holes, the wedge moves in a horizontal plane, raising or lowering the milling machine. The handle of the lifting mechanism is brought to lateral surface beds. To reduce the load during lifting, the router is equipped with a homemade roller (item 4).
Turning the router table on and off
All necessary equipment for the electrical part of the milling table is already provided in the design milling machine. The only thing you can add to what you already have is electrical diagram– this is a remote switch and an emergency shutdown button (after all, no one has yet canceled the safety rules during operation).
You can use a very ordinary switch for the router. As for the possibility of quick shutdown: it can be implemented by installing an emergency button with a locking mechanism on the table (in which the unlocking is carried out by turning).

Table assembly
Basic and auxiliary elements milling table we have listed. Each master can determine the order of assembling the device for himself. The only point to pay attention to is the manufacture and installation of the mounting plate.
After a plate of a suitable size is cut from a steel (or plywood) sheet, it is necessary to drill holes in it for attaching the milling machine, a hole for the cutter (its diameter must correspond to the diameter of the hole in the base of the router) and mounting holes(for attaching the plate to the tabletop).

What tools should you have in your carpentry or furniture workshop? And a video about the design of a homemade milling table and the features of power carpentry tools will help you find answers to questions regarding equipment that is extremely rarely used in a small home workshop.
The modern range of processing power tools will satisfy the needs of any craftsman. In this case, you can always turn a hand tool into a stationary machine.
The most popular tool for a woodworker is, of course, a router. A hand router can do most of the work, but when large workpieces are processed, technical difficulties arise.
Purchasing a milling machine for home use It’s too expensive an undertaking, so craftsmen try to make a table for a router with their own hands.
A homemade table allows you to manipulate the workpiece being processed while the router itself is rigidly fixed to the tabletop. The power tool is mounted from below and protrudes above the table level.
Homemade do-it-yourself milling table from wooden blocks
How to make a table for a hand router
The main condition is a massive structure that will be reliable during vibrations and will withstand the weight of a workpiece of any size.
IMPORTANT! Since working with a router is extremely dangerous, a table falling can cause injury. To make the structure more stable, it is advisable to equip the table legs with height adjusters. Then you can install the machine on an uneven surface.
The countertop should be made of a smooth, wear-resistant material, for example, a coating for kitchen work surfaces. The legs and frame of the table can be made from timber with a thickness of at least 40 mm, or from plywood 10-12 mm. The space under the tabletop should provide easy access to the router for maintenance and changing the router. Or the top part is made hinged, like a piano lid.
Since a homemade milling table is a critical piece of equipment, before starting work you need to draw detailed drawing.
Security:
- The milling cutter start button is made remote. It is advisable to close it with a lid to prevent spontaneous activation. But the emergency de-energization button, on the contrary, should be easily accessible;
- It is advisable to close the cutter with an automatic folding flap, as in circular saws;
- There should be no objects, protruding parts of the interior, steps or wires around the table. While working, you can trip and get injured;
- The electrical wiring is laid in corrugation and securely attached to inner surface table;
- Replacement of cutters is carried out only on a de-energized electrical appliance, with complete disconnection from the network;
- It is advisable to provide for the possibility of removing chips from the working area.
IMPORTANT! There should be no sagging power wires inside the structure.
In addition to clogging your work area, sawdust can get into the router's vent (since it's under the table) or between the tabletop and the workpiece. This may cause the workpiece to slip.
How to install a router plate into a table
The most important part of the design, affecting the quality of work, is the plate (or sole) of a hand router. Since when installed in a table, it is no longer a supporting unit, it is necessary to consider reliable fastening and controlled vertical movement of the cutter.

Plate for mounting the router
Mounting the power tool to a plate instead of a table allows it to be easily removed for maintenance or changing attachments.
Hand milling machines, thanks affordable price, are popular among home woodworkers. However, working on a simple workbench according to the principle: fixed workpiece, moving tool, is inconvenient and dangerous.
The industry produces tables for carpentry work, on which you can install a plane, circular saw, or router.
The device is reliable and convenient, but its cost is comparable to a power tool. Therefore, many craftsmen make such workbenches with their own hands. Since the presence of a tool makes it possible to make a table for a router with high quality, such homemade products look and function no worse than factory ones.

The general design principle is as follows: a smooth tabletop is made from hard material(so that it doesn’t wear out so quickly), on which the router base plate is attached. The instrument itself is placed upside down. A guide for the workpiece being processed is fixed on the working surface.
Bench-type workbench

The most simple design, which does not require free space. It can be stored at home in disassembled form, and installed on any table if necessary to get the job done. The advantage is compactness. Disadvantages: low stability, and limitations on the size of the processed parts.

This is a full-fledged workbench without legs. Dimensions allow processing of any workpieces with high precision. At the same time, it is convenient to store the table in a vertical position. However, an installation site is required to make it operational. On regular table The device cannot be installed - the router suspended from below will interfere. Usually the workbench is temporarily placed on extendable table, or remove the tabletop and install the panel on a frame with legs.
To save space, another option is suitable: the workbench is mounted on one side on the wall, with folding supports underneath it.

Separate table for router
The design can combine several functions: a workbench, a chest of drawers for storing tools and materials, and the milling table itself.

The advantages are obvious: versatility, stability, safety. There is only one drawback: a permanently allocated space is required. Therefore, this option is only suitable for a workshop; you cannot place a workbench on a loggia.
How to make a table for a router with your own hands?
For example, consider a full-fledged workbench with a chest of drawers for placing equipment. Of course, before starting work, you need to sketch out a drawing (according to the dimensions of your hand router) and make a list of materials:
- Boards or wooden blocks for making a frame.
- Chipboard sheets or solid wood panels for side panels and drawers.
- Hardboard sheet (fibreboard), or thin plywood for partitions.
- Two sheets of plywood 18-25 mm thick, or a finished kitchen countertop.
- Screws, bolts, confirmat, steel angles for assembly.
- Measuring tools: tape measure, ruler, angle.
- PVA glue.
Woodworking tool: Circular Saw, drill, plane, keys, screwdrivers.
We are preparing the supporting structure of the bed. Before tightening the screws, coat all connections with glue.

We assemble the frame for flat surface. We check the geometry: everything should be parallel and perpendicular.

We install partitions (they will act as stiffeners) and assemble the box for the router. The box is needed to prevent shavings and sawdust from being scattered around the room. In the future, a bell can be adapted to it construction vacuum cleaner, for waste removal.

We install the main element - the working plane. It can be made from two sheets of plywood by gluing them together. To prevent vibrations, the thickness of the table should be at least 5 cm.
You can use a ready-made kitchen surface (available commercially) furniture stores). The main thing that upper layer was strong and smooth.

A steel plate for fastening is installed on the tabletop, flush with the surface. base plate milling cutter. Also, it is advisable to embed profiles into the table to fix the guides.

It is advisable to fill all free niches with boxes in which equipment and devices for fixing workpieces will be stored. Some boxes are replaced with stands for cutters: holes are drilled in the thick bottom of the board according to the diameter of the shanks, and the cutters will not touch each other.

To ensure safety, it is advisable to install a safety cover in the working area, as on industrial models.

A cutter sticking out of a table is a serious danger. If your hand slips from the workpiece, you may get injured. Another way to ensure safe work is a foot pedal switch. A simple circuit is assembled: a socket is installed between the power cord of the electric router and the common network cable, which is turned off with a pedal. Approaching the workbench, you press the pedal and the motor turns on. After completion of work, or emergency situation– the foot is removed from the pedal and the router stops.
The finished table looks aesthetically pleasing and allows you to properly organize work area, even in confined spaces.

Lift for hand router
In normal operation, the operator of a manual milling machine lowers the shaft with the cutter using the tool handles. We are talking about using the device without a machine. When the router is suspended upside down from the tabletop, the router is in what is called parking mode. A mechanism is required to lift the machine into the working position.
If there are several options:
- Fixing screw rod. Installed using a threaded rod required depth cutter penetration. If necessary, it can be changed.

- Lever mechanism. Allows you to more quickly change the height of the tool, even during operation. Expands the capabilities of the machine: in a sense, the router becomes three-dimensional.

- Helical trapezoid. Many craftsmen use a regular car jack as a lift. You raise the cutter strictly to the required height. It is convenient, and the position fixation is quite accurate.
The considered option includes all the nuances of manufacturing a table for a router. You can use the method 100%, or adopt only the necessary technologies.