Natural wood in the form of solid or veneer different varieties, as a result of high aesthetic and operational properties, have been widely used for many decades for interior decoration of residential buildings and apartments. However, for one reason or another, the use of this material is inappropriate, and sometimes even impossible. In such cases, experts finishing work perform an absolutely realistic imitation of wood from polymer clay, decorative plaster or even paint. In this article, we will look at all three methods. After reading this article, you will know exactly how to make a tree imitation and what tools you will need for this.
Imitation of wood texture with plaster
A real master plasterer can reproduce with the help of simple tools and plaster structure and texture of any finishing material, and even expensive types of wood. Decorative plaster under the tree is one of the favorite solutions of designers. At first glance, the work may seem very complicated, but if you look at it, everything is very simple.
Imitation under a tree with the help of decorative plaster involves the creation of:
- wood texture different varieties in longitudinal section
- cross section texture
- structure of a tree eaten by a beetle - wood borer
- tree bark stylization
- petrified wood structures.
The material, set of tools and technique for implementing the work depend on the chosen design.
For such work, any plaster composition is suitable:
- cement - sand
- cement - lime
- plaster
- acrylic
- silicone.
In order to get an imitation of the bark of a tree or the texture of a bark beetle, it is worth purchasing ready-made structural plaster, in which there is a coarse-grained filler. With this material, you will get a particularly embossed pattern.
It is very convenient to use ready-made masses of acrylic and silicone. Such compositions do not harden for a long time, in comparison with lime or gypsum compositions, which means that you can correct the work if flaws are found.
To perform the work you will need the following tools:
- spatulas, different sizes and shapes. You will need both metal and rubber, comb with a straight blade, flexible and rigid
- doctor blade spatulas with different notches on the blade
- trowel
- rollers with relief patterns on the surface
- brushes with hard bristles.
The Japanese rubber spatula is very easy to use and interesting, one surface of which is designed to create a relief of a longitudinal cut, the second - to create knots and annual rings.
However, it is not necessary to purchase expensive professional tools if you have a small area for processing. Expensive embossed rollers can be replaced with simple paint rollers by wrapping them with improvised materials - threads, adhesive tape, plastic wrap, foil. Uneven folds will give a relief pattern that is very similar to a longitudinal cut of wood.
Before starting work, you should definitely try on a piece of cardboard - apply plaster and make the desired relief.
The order of work on creating a wood texture using plaster is something like this:
- cover a small piece of wall with plaster using a trowel made of of stainless steel, smooth until a layer 3-6 mm thick is obtained. A spatula will help you smooth the surface as much as possible.
- using any object: a hard shoe brush, a special brush with hard bristles or a professional rubber roller, apply wavy furrows. In this case, the pressure on the tool must be uneven. Furrows can be directed vertically, horizontally or at an angle. The tool must be cleaned after each penetration. Allow the plaster to dry a little before each subsequent operation.
- now you can rub the wall with a smooth hard trowel parallel to the relief to form a glossy surface and dry for 30 minutes
- spread the primer prepared and tinted to the desired shade along the wall with a roller or brush. It is the brush that will help the primer penetrate into all the grooves of the relief. The wall must be left to dry, according to the instructions on the primer package.
- cover with a final coat of paint, dry
- using a special spatula, smooth the surface.
The steps listed above will help you decorate an entire wall or a small panel.
Advantages of plaster:
- does not burn
- she is easy to work with
- does not take up room space
- its price is several times less than wood panels.
Wood imitation with polymer clay
Polymer clay is a moderately soft plastic material based on polyvinyl chloride, which polymerizes at temperatures from 100 to 130 ° C, with the loss of its plastic properties. This material very similar to plasticine. You can buy it in small bars, and the number of shades is simply huge. In addition, it is worth noting that the price of this material is more than affordable.
How to work with polymer clay next:
The main advantage of this method is the fact that such an imitation of a wooden beam or a longitudinal cut of natural wood makes it possible to obtain the desired color and internal texture of the material without additional paint application.
Do-it-yourself wood imitation can be done using a method that was used back in the Roman Empire and was very popular at the end of the 19th century. For a long time, only high-class craftsmen could perform this work. But in last years this method is gaining popularity again, due to the appearance of a special instrument - a rocker. The imitation of the structure of a tree with this tool is particularly realistic.
To create a finish that mimics the texture of wood, you need to apply a glaze of a thicker paint on the first coat of a low gloss latex enamel paint. With a rocker, stretch over the wet glaze, moving the rocker back and forth. This way you will get elongated oval marks that imitate wood patterns.
Try this technique on a large sheet of cardboard first until you get a more realistic picture. In addition, you can check the final top coat before you use this technique for a serious project.
To create the impression of a wooden parquet, you need to apply a grid of squares with a side of 10 or 20 cm on the first layer. You can center the pattern or start in one corner with a whole square. Close through one squares in the grid and cover in turn in the horizontal and vertical directions.
For work you will need:
- artificial bristle brush, sponge applicator or paint roller. With these tools you will apply the first layer
- artificial bristle brush for icing
- woodgrain rocker
- soft natural bristle brush
- pencil, ruler, masking tape, small spatula. These tools will help you apply a decorative coating that imitates parquet.
- low gloss latex enamel paint. You will apply it with the first layer
- artistic acrylic paint. In addition, latex paint for glaze is suitable.
- thickener for acrylic paint
- rag
- semi-matt or high gloss clear top coat. Suitable for this and a transparent aerosol acrylic sealant.
The final shade of the coating will depend on the combined action of the first layer and the glaze layer. For this, it is important that the first layer is lighter, and the glaze covering it is of a darker shade. The following shades are perfect for the first layer:
- natural sienna
- red iron oxide
- burnt sienna
- burnt umber
- beige shades.
As a glaze, you should use:
- burnt umber
- black
- red iron oxide
- burnt sienna.
 The composition of the glaze for coating:
- 2 parts art acrylic paint or latex paint desired gloss
- 1 part thickener for acrylic paint.
Work order:
- apply the first coat of a low gloss latex enamel paint of the selected shade. For this work, use a brush or applicator with a sponge. Wait for the paint to dry
- mix frosting for application decorative coating. A sponge applicator or a brush with artificial bristles will help you apply an even layer of glaze over the first layer. Work on small areas of the surface
- now you need to run a rocker over the wet glaze to create an imitation of the woody texture of the tree. Work slowly and carefully. This work must be repeated to create subsequent rows, changing the distance between the oval traces. Use a dry cloth to wipe off any glaze that has accumulated on the instrument, if necessary. Optionally, on some rows, run over the glaze not with the rocker itself, but with the side with the comb or grooves. Thus, you get continuously stretching wood fibers.
- until the glaze is completely dry, it is necessary to treat the surface with a dry soft brush with natural bristles (7-10 cm wide). Gently stroke the brush in the direction of the wood grain to soften the resulting finish. Remove excess glaze from the brush if necessary. Wait for the glaze to dry.
There are a huge number of options for creating such a coating. It all depends on your imagination.
Wood stucco is a budgetary way of internal and exterior finish, with which you can get the original coating. Using the usual solution and improvised tools, they form a relief surface resembling a tree bark, a transverse or longitudinal saw cut of a tree, a boarded or paneled surface.

Why imitate wood from plaster
Natural wood is one of the most popular finishing materials, but the cost good varieties its high enough, and therefore, with a limited budget, you have to look for alternatives. As possible solution wood stucco is used:
- It is suitable for almost any surface.
- Can be operated in various conditions, including street.
- The material covers small areas or walls completely.
- Panels or boards create a noticeable load on walls and partitions, while the final layer of mortar 2-3 mm thick slightly increases the total weight of the structure.
- Another argument in favor of such a solution is the possibility of surface restoration. It is enough to remove the damaged area of the plaster, reapply the gypsum mortar and paint it.
The disadvantages include less than that of a tree, the strength of the coating. In addition, when viewed from a close distance, you can see that plaster was used for the decoration, and not wood.

Inserts "under the tree" on the facade of the house
What materials are used
As the main material, plaster of any kind is used: cement, ordinary gypsum, acrylic, silicone.
Expert opinion
Alexander Guryanov
Plasterer and decorator
The type of mortar should be selected taking into account the operating conditions: for facades, cement plaster or moisture-resistant putty is required, for the interior - gypsum or silicone.
Also useful:
- deep penetration primer for wall preparation;
- trowel for applying plaster;
- masking tape to distinguish between working and not working surface;
- clothes brush to create a rough texture;
- coarse sandpaper for grouting;
- for painting plaster, you will need a mixing container, water-based paint, primer, colors on water based, wallpaper paste.
Drawing tools
The composition is applied to the walls using a trowel and a spatula, and a variety of tools or improvised means are used to create a relief:
 Plastic notched trowels different sizes
 Figured rubber spatula "wood texture"
  Mastakhin
  Roll, texture "bark"
To create a pattern on plaster using these tools, you need to have some experience. If it is not there, it is advisable to practice in advance by applying the solution to a piece of plasterboard or plywood. In the absence of skills, you can use special devices that greatly simplify the task, for example, a rubber roller with a saw cut pattern.
On its working surface there are arcuate ribs that give the plaster the desired relief.
How to make a do-it-yourself wood spatula
It is not charming to buy special spatulas, especially if you only need to process small areas. Can do necessary fixtures from ordinary plastic or improvised means.
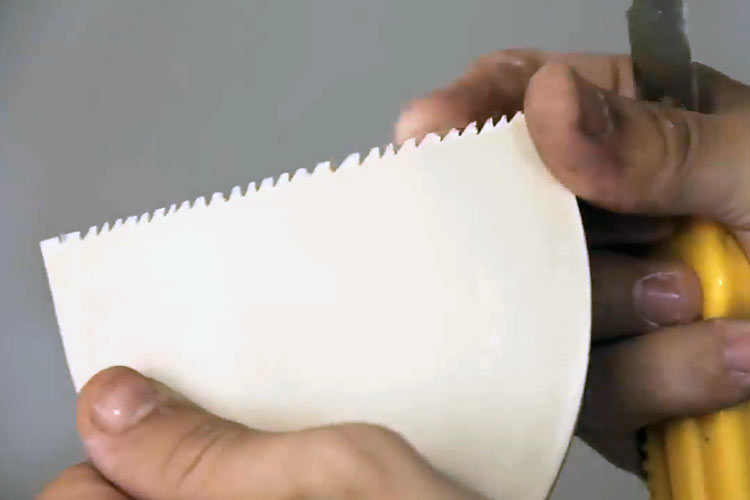
Cut out notches with a knife
To cut a tool from plastic cover from a container of paint or putty, you need to draw the contours of the spatula and cut it out with sharp scissors. In total, 3 parts of different sizes are required:
- wide, on which large notches are formed with a clerical knife;
- medium, small cloves are cut out on it;
- narrow, its working edge is left smooth.
Using a knife, you can also form notches on finished plastic spatulas.
Instead of a spatula, rollers are also used. So that they leave a mark on the surface that looks like a tree pattern or bark, they are wrapped with threads of different thicknesses in an arbitrary direction,
Technique of imitation of a wooden surface
They work by mentally dividing the surface into small sections: the solution quickly hardens, and so that it does not have time to seize, the wall is treated in parts.
- The finished plaster is applied using a metal spatula or trowel, and the layer thickness is evened out with it.
- Sweep over a smooth surface with a clothes brush, the bristles will leave tiny grooves imitating wood fibers. The movements should be light, you should not put pressure on the brush. The direction of the grooves can be strictly vertical or with slight bends. In the process, the solution will stick to the bristles, you need to wash it off with water, otherwise the adhering mass will leave major damage on the next contact with the wall.
- Next, using a wide plastic spatula, they give the surface a wood structure: they drive the tools from top to bottom, leaving smooth wavy lines. With a small spatula without notches, applying it at a slight angle to the wall, draw knots in a circular motion. When the relief is created, with a wide metal spatula, without pressure, slightly smooth the surface, move on to the next section.
- After the entire wall is covered with plaster, leave it to dry completely. Then rubbed sandpaper to remove excess mortar and smooth out roughness.
The video below shows the entire process.
Texture "tree bark"
Imitation of tree bark with plaster in terms of execution technique differs from creating the texture of wood cuts. But it's just as easy:
- Plaster a section of the wall in an even layer.
- A relief rubber roller is rolled over the entire surface from top to bottom. You can use a homemade roller wrapped with rope.
- The resulting texture is slightly smoothed with a spatula or trowel.
How to do this is shown in the video tutorial:
Painting plaster
To highlight the texture of the wood, the plaster is covered with a translucent composition. Here is a recipe for an inexpensive paint composition:
- pour a small amount of primer;
- add water-based color (you can mix several colors to get the desired shade);
- pour in the same ordinary white water-based paint;
- pour some dry wallpaper paste.
Thoroughly mix the solution after adding each component. Using a wide brush, cover the putty with paint, remove the excess composition with a rubber spatula.
You can stop at this stage, but in order to fully develop the pattern and obtain a complex beautiful color, it is recommended to apply several more layers of paint in different shades.
 Painted house facade
Understanding all the advantages and benefits of such a finishing material as decorative plaster, you involuntarily begin to think about the variety of choices and the various effects that you can create with it. We will focus on imitation wood. In this case, a durable finish will imitate natural material, and few people can immediately understand that in front of him is not a tree. Of course, if all the work is carried out competently. If we talk about the price, then it is clear that wooden panels much more expensive than plaster.
Pattern options
Decorative wood effect plaster is used by those who like to create an atmosphere of comfort and natural environment with the help of modern materials. At first, it may seem that imitating a tree is extremely difficult. So it is, but only at the beginning, if you have not held a spatula in your hands before. With practice comes ease of use. It should be noted right away that wood imitation can be carried out in several directions at once.
- Creating a tree bark effect
- Imitation of the surface of a tree that has been damaged by woodworms
- Creating the effect of stacked boards
- Using a saw cut pattern, the so-called transverse pattern
- Making a panel with a repetition of the wood texture


In each of these five cases, different techniques, tools and the decorative plaster itself are used. Therefore, you need to decide in advance on the option you like. Of course, in some cases it will be extremely difficult to cope on your own, so if you are applying decorative plaster with your own hands for the first time, then it is better not to try to create complex drawings. In any case, you first need to practice, because not only the technique of applying the solution will be important, but also the correct finishing.
Therefore, you need to not only try your hand at working with the solution, but also choose the right color to get the desired color. Gel or paint in a bucket may have the desired shade, but once applied to the wall, the color will become less saturated and may not be what you want.
Choosing the Right Material
Not every material is suitable for creating decorative wood-like plaster. You need to understand that although commercial mixes are usually ready to use, not all of them are suitable for creating a wood effect. We can go two ways, using structural and textured materials.
What is the advantage of structural decoration? This material already incorporates small pebbles, thanks to which it is possible to create a coating with grooves. You have probably heard about the "bark beetle" - this is the most popular representative structural solutions. With the help of such plaster, it is easy to create the effect of a tree, if you work correctly with tools and use right size factions.
The technique itself is very simple: we apply the solution to the wall, let it dry a little, draw it vertically or horizontally with a grater. The pattern will be created thanks to the small pebbles that are present in the solution. Such material is best suited for creating the effect of bark or simulating the work of woodworms.
Textured plasters, although more difficult in terms of creating various patterns, but these same patterns are much brighter and more beautiful than in the case of structural mixtures. The textured base itself is a smooth material that is laid out on an ideal surface. flat wall. Creating the desired effect on such a smooth surface is carried out using special tools. The application technique is also extremely important.
Spatula to create a wood effect
Using a special spatula, you can create a wood effect on the surface of the applied textured decorative plaster. The principle of operation of this tool is very simple - the solution is not smoothed, but irregularities are created on it. The surface of the spatula has arcuate ribs, due to which decorative wood-like plaster is made.
 Myself curly tool made of rubber and small size. The main thing is to touch the tool to the still raw solution in order to form the desired pattern. It should be carried out along the surface from the bottom up with a slight pressure. Moreover, the surface of the spatula is not even, but has a bulge. This is done on purpose so that while holding it on the wall, you can press the spatula against the plaster. different parts. This allows you to create the desired pattern.
Working with this spatula is no more difficult than with a regular one, and the drawing itself is created without any problems. After evenly processing the wall with overlapping strokes with such a spatula, you will get an imitation of a cut of wood. After that, it will only be necessary to paint.
Other tools
By and large, any tool will do to create a tree effect. True, it must be selected depending on the chosen decorative plaster. Some even make their own device. It is advisable to get a couple of spatulas (the shape of the blade does not play a role) from bending stainless steel. They will help you get the job done. All other tools are included in the standard set required for decorative wall plastering.
Video on creating a texture "under the tree"
We create the effect of a tree with our own hands
In the end, I would like to consider at least one of the options for how decorative wood-like plaster is created in more detail. Otherwise, the topic would not have been fully disclosed. Although there is an option with the video above, but it was work on professional level. We are interested in showing how everyone can achieve the effect of a tree with their own hands. Consider the procedure step by step.
- We apply textured plaster with a stainless steel spatula to the wall. We carefully level everything so that the surface is smooth (not perfect, but we don’t need pits and hills). The layer of the applied solution should be 3-5 mm.
- We take an ordinary brush for clothes and draw it smoothly over the surface from top to bottom, with light pressure. This is how we create grooves. You can brush both straight vertical lines and wavy ones. It is advisable to combine both options. You can also make lines by holding the brush perpendicular to the floor. In this case, the drawing will not be of the same type. After each wiring, the brush should be cleaned of the solution remaining on it. Let dry for 10-20 minutes.
- The dried mass on the wall with the grooves that we recently made should be rubbed with a smooth spatula. The spatula itself should be cleaned regularly during grouting. The movements are again vertical - from top to bottom or from bottom to top. This is done in order to give the picture a glossy surface. Let's dry.
- We tint the gel base in the shade of the tree. We apply it on the wall with a brush (you can use a roller or swab). The movements, again, must be vertical so that the brush moves along the veins. In this case, the gel best enters the grooves. Let's dry.
- Using a Japanese spatula with longitudinal movements from top to bottom, we smooth the surface. That's all.
Imitation of wood using paint.
In the interior, wood always comes first as a finishing material. Wood products have always been expensive on the market. building materials. In the article we will look at how to make your room under a tree using inexpensive materials and equipment.
1. The building materials market sells different kinds tools from which a variety of spatulas, brushes, combs and so on is provided. We buy in the store such combs as in the photo. 
2. To imitate wood, we use panels such as MDF and various types of paints. The first layer on the MDF we apply two layers of matte paint. Apply the tone that suits you, from black to light brown. Mix two paints in equal proportions, light acrylic and water-based paint, which is subsequently applied to MDF in one layer. 
3. With a comb tool, at an angle of 45 degrees, we apply furrows along the entire sheet of MDF. 
4. With the help of a special brush, we begin to make an imitation of wood. 
5. To make the look of boards on MDF, we do it in stages. We pass with a comb not the entire canvas, but the part that you want to take “under the board”. Then we pass along this surface with a brush and after that we proceed to the next strip. 
Figured rubber spatula with a pattern of saw cut wood
The figured spatula "wood texture" is used to create a pattern of imitation of wood fibers on decorative plaster (Multidecor legnato effect). In addition to the main purpose of decorative rubber spatula- imitation of a saw cut of a tree, a figured spatula is used to create a variety of patterns when applying decorative textured plasters. back side spatula is used to create on decorative paint line drawings.
Bookshelves
1. Summer has come and I wanted some updates in the interior. One wall in my room was finished with decorative plaster. I got a little tired of the color and I decided to repaint it. But bookshelves on this wall they looked somehow very dull: dark brown Soviet standard shelves (here they are, in this photo, though on another wall with wallpaper). And without thinking twice, I decided to update them too. 
2. and this is what they have become (this is already on the wall with plaster) 
3. side view 
4. I'll tell you how you can change furniture from chipboard to furniture from planed boards of any breed at home and without much difficulty. I came up with "bleached oak" for myself (may the wood experts forgive me for the inconsistency of the texture pattern with the chosen name :)))
So, I took good quality acrylic paint paint (so as not to varnish later and calmly wipe the dust) - it was the same paint that I repainted the wall. The paint was "sand-dusty" color (sand-gray can also be called ). I roll up the surface with a roller. 
5. Next, we need such a tool - a special spatula to simulate the texture of wood - sold in construction stores. 
6. With this spatula I draw in the selected direction over the raw paint, periodically pressing forward and then backward, as if on waves; the pattern depends on the number of such "waves". 
7. So I draw the entire surface (in 1 minute!) 
8. That's what happened. Thus, I paint on every surface, including on narrow front ends. I decided not to paint the shelf inside. 
9. Then I take a lighter paint (almost white, a little
Can imitate rich patterns and colors natural wood using a method that was used in the Roman Empire and was especially popular at the end of the 19th century. For a long time considered accessible only to high-class craftsmen, this method has now revived again, because. new tools appeared, such as a rocker to simulate the texture of wood. The method of imitating the texture of wood is suitable for applying a finish coat on any flat surface.
To create a finish that mimics the texture of wood, glaze of a thicker paint is applied to the first layer of low gloss latex enamel paint. The rocker side of the wood texture tool is dragged across the wet glaze, rocking the rocker back and forth. Simultaneous wiggling of the tool creates elongated oval marks that mimic the characteristic wood grain of pine and other trees.
Familiarize yourself with this technique as you practice applying a wood grain finish to a large sheet of cardboard until you achieve a realistic painting. It will also help you check the resulting finish before you apply this technique to a real project.
![]()
To give the impression of wood parquet, apply a grid of 10 or 20 cm squares on the first layer. You can either center the design or start in one corner with a whole square. Cover one square at a time in the grid and coat alternately in the horizontal and vertical direction.
TOOLS AND MATERIALS
- Synthetic bristle brush, sponge applicator or paint roller for the first coat
- Artificial bristle brush - optional for applying glaze
- Rocker to simulate the texture of wood
- Soft natural bristle brush 7-10 cm wide
- Pencil, ruler, masking tape, narrow spatula - for applying a decorative coating that imitates a parquet floor
- Low gloss latex enamel paint - to be applied as a first coat
- Art acrylic paint or latex paint - for glaze
- thickener for acrylic paint
- rags
- Cardboard - for practice with coating
- Semi-gloss or high gloss clear top coat or clear spray acrylic sealant

The final color of the coating, imitating the structure of a tree, depends on the joint action of the first layer and the glaze layer. The first layer should be lighter, and the glaze of a darker color closes it. Suitable colors for the first layer are: natural sienna, red iron oxide, burnt sienna, burnt umber and beige tones. For glaze good colors considered: burnt umber, black, red iron oxide, burnt sienna. Since different stains are commonly used when working with wood, it is not necessary to repeat both the texture and color of all trees.
GLAZE FOR APPLICATION OF A COATING THAT IMITATES THE TEXTURE OF WOOD
Mix the following ingredients:
2 parts art acrylic paint or latex paint of desired gloss
1 part acrylic paint thickener
Apply the first coat of low gloss latex enamel paint in the desired color, making strokes in the desired direction. Use a brush or sponge applicator; For large surfaces, use a paint roller. Let the paint dry


Mix the glaze for a decorative finish. Using an applicator with a sponge or artificial bristle brush, apply an even layer of glaze over the first layer, treating a small area at a time.

Run a rocker over wet glaze to imitation wood texture; rocker movement is done slowly to get desired effect. Start from one corner; the work is done in one continuous movement, while simultaneously with the movement of the rocker, it is rocked back and forth (photo above). As can be seen from this figure, the position of the rocker determines what traces of it remain, imitating the texture of the tree.

Repeat step 3 for subsequent rows, changing the distance between the oval marks. With a dry rag, wipe off the glaze that has accumulated on the tool when necessary. On some rows, run across the icing instead of the rocker itself with the combed or grooved side. Thus, the type of coating will change and an imitation of continuously stretching wood fibers will be performed.

Before the glaze is completely dry, work the surface with a dry soft natural bristle brush (7-10 cm wide). Move the brush lightly in the direction of the wood grain to soften the resulting finish. Clean the brush of excess glaze as needed. Let the glaze dry. If desired, you can apply a clear top coat or a clear spray acrylic sealant.
parquet imitation
Apply the first coat of low gloss latex enamel paint with a brush or paint roller. Let the paint dry. Measure and draw with a ruler and pencil on the first layer a grid. Center the grid, or start at one corner with a whole square.
 parquet look
  parquet look
Stick the masking tape on the squares through one. With a narrow spatula, as shown in the figure, cut the masking tape diagonally at the corners. Press the tape firmly around the edges so that the icing does not run under it. Mix the glaze for a decorative finish.
Apply frosting to open squares; brush movements should be made in a horizontal direction. To create an imitation of straight wood grains in individual squares, stretch the rocker horizontally over the wet glaze. In the rest of the squares, rock the rocker horizontally, changing the location of the oval marks. Only work on a few squares at a time as the frosting dries quickly.
 parquet look
  parquet look
  parquet look
Before the glaze is completely dry, work the surface with a dry soft natural bristle brush (7-10 cm wide). Move the brush lightly in the direction of the wood grain to soften the resulting finish. Clean the brush of excess glaze as needed.
Let the paint dry and then remove the masking tape. Apply new strips of masking tape to the coated squares. Apply frosting to open squares; brush movements are made in the vertical direction. Repeat steps 3 and 4 working in the vertical direction. Let the paint dry and then remove the masking tape. If desired, you can apply a clear top coat or a clear spray acrylic sealer.
Variations of coatings that imitate the texture of wood
Choosing colors certain color for the first coat and for the glaze, you can create finishes that resemble typical wood grains such as cherry, honey oak, and walnut.

For decorative floor covering imitating cherry wood, a dark reddish first layer and a burnt umber glaze are used.

wood look honey oak is done by applying a light tan first coat and a golden tan glaze.

The walnut coloring is done with a dark golden first layer and a burnt umber glaze.


