Wall shelves are able to harmoniously complement the design of the room. The range of their purpose is very wide. Depending on the location and application options, they choose the material for their manufacture and think over the design. What features should be taken into account before you start creating a wall shelf with your own hands, and what are the main stages of the process, let's get acquainted in detail.
Variety of wall structures
The main purpose of the wall shelf is to accommodate many small items, while organically combining the functions of storage and interior decoration. Depending on this, the option of installing a furniture structure is determined. There may be several of them:
- The most common way of placement is to make a wall form, when the product is attached to the wall, at the bottom of which other pieces of furniture (sofa, bed or table) are often located.
- A kind of highlight among wall structures can be a do-it-yourself hinged shelf. The key difference lies in the method of fastening: instead of traditional brackets and loops, ropes, chains and straps are used.
- Depending on the organization of the living space, from time to time it becomes necessary to make corner shelf. Moreover, in addition to the common way of using internal areas, sometimes they harmoniously use outer corner rooms.


A little imagination, and you can make a wall shelf design with your own hands in various variations. The following models are widely used:
- The ease of manufacture with your own hands is distinguished by the console - a shelf fixed perpendicular to the wall.
- If desired, the design is supplemented with side walls and the back is closed.
- To create a kind of rack with your own hands, it is enough to combine several single consoles together.
- Recently, combined specimens with an extraordinary arrangement of horizontal and vertical walls have gained wide popularity.
- Numerous decorative models of wall shelves are original. Their main function is to create an exclusive design element in accordance with the chosen style.
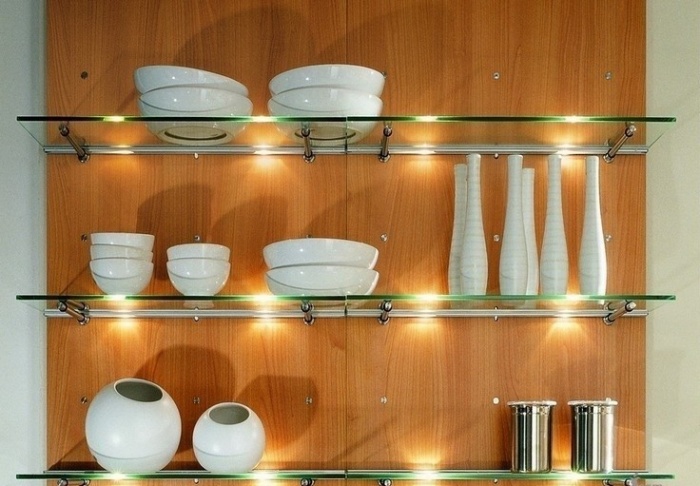
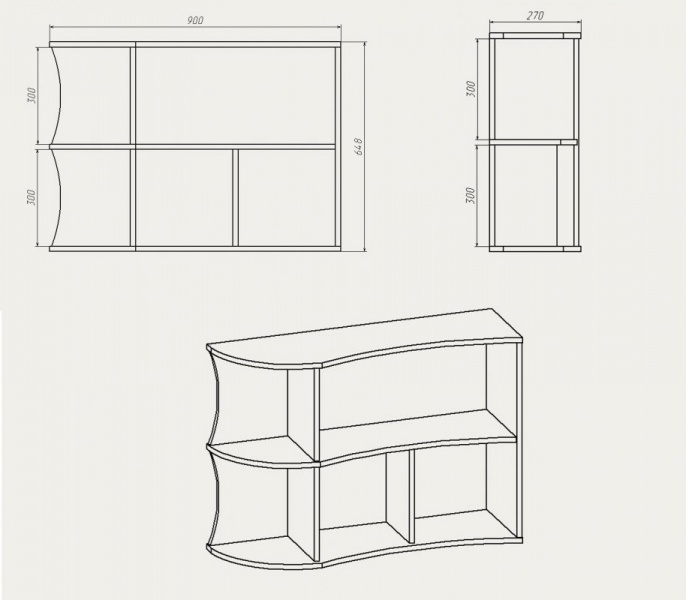
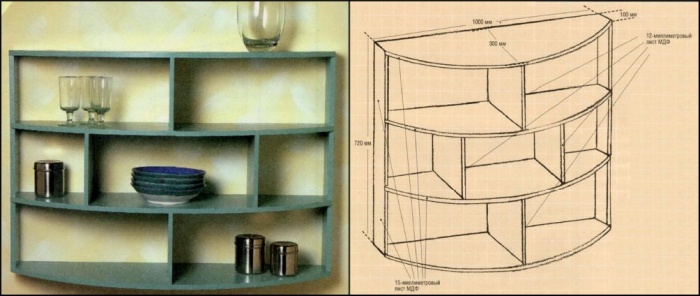
Occasionally, the facade of a do-it-yourself structure is supplemented with glass. This is practical when storing items that do not have a decorative function. A small part of the designs of wall shelves that you can decorate with your own hands is shown in the drawings below:


The nuances of the choice of material in the design
No construction work is complete without a preliminary plan.
Remark ! Before you start designing a shelf with your own hands, you need to decide on the material for the base.
When choosing it, take into account the place where the furniture structure and its main functions will be installed. The scope of wall shelves is as follows:
- Book lovers and students will definitely need bookshelves based on wood and its derivatives.
- For storing jars of spices or decorative items in the kitchen (which are original plates or exclusive mugs), apply narrow shelves equipped with low sides. In this case, it is most appropriate to use wood for manufacturing, although, depending on the chosen design, glass specimens can also look harmonious.
- The arrangement of the bathroom is not complete without the installation of glass shelves, complemented by chrome elements. This is due to the basic requirement for the material - it must have high level moisture resistance.
- Universal shelves allow you to show your imagination with the choice of material during self-production. They are intended for setting flowers or various souvenirs, and the base is selected taking into account overall design rooms. It could be a classic tree durable metal, complemented by forged elements or glass, creating the effect of lightness.

Mounting options
Mount type plays important role when designing wall construction shelves. Having studied the options for fixing, it will be easier for you to determine the most suitable method.
Classic loops
The traditional fastening of wall shelves is the use of hinges. They are optimally suited for products made of wood and its derivatives. Important condition The material must be of sufficient thickness. The whole process takes place in several stages:
- The hinges are fixed on the side of the furniture structure with self-tapping screws.
- After measuring the distance between the holes, the required segment is marked on the wall.
Attention ! Compliance with the horizontal line is important point when fixing the wall shelf.
- At the indicated point, holes of the required diameter are drilled, designed to insert the dowel.
- A self-tapping screw with a neat hat is screwed into the clogged dowel, on which a shelf is hung.

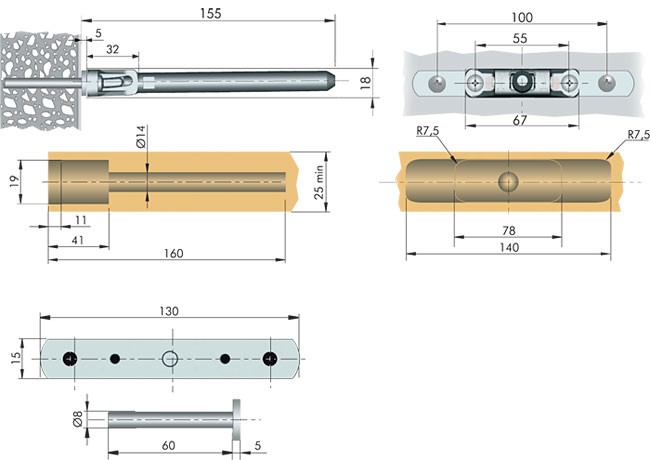
Fixing glass shelves
The use of loops is not suitable for all materials. Installation of wall-mounted glass shelves is carried out using special fasteners for fragile items. Fasteners are made of two parts and are often supplemented with elastic gaskets, a glass shelf is inserted between them. The lower part of the device for reliable fixation of the wall structure is equipped with a clamping screw.
A common model for mounting a glass shelf is an instance called a pelican, capable of holding a wall structure with a thickness of 8 to 34 mm. In addition to glass, it can be used to fasten other materials with similar dimensions.

Concealed mounting and decorative brackets
Simplicity and originality concealed installation wall shelf. In this case, the fastener is completely masked. The essence of this method is as follows:
- at the end of the wooden structure, a recess is prepared for the pin and the body of the fastener;
- the mensol holder is fixed to the wall, after which a shelf is put on it.


Wall shelves with decorative brackets allow you to create an individual design of the room. They can be made in a production way or belong to exclusive copies. Photos of wall shelves decorated with hand-made brackets are presented below:


Manufacturing process
Depending on the chosen design and material, the process self-manufacturing wall shelf has its own characteristics.
Tree
If you want to make an original wooden wall shelf with your own hands, you will need:
- Base material. In addition to natural wood, you can take MDF, chipboard or GVL, this will greatly facilitate the surface treatment process.
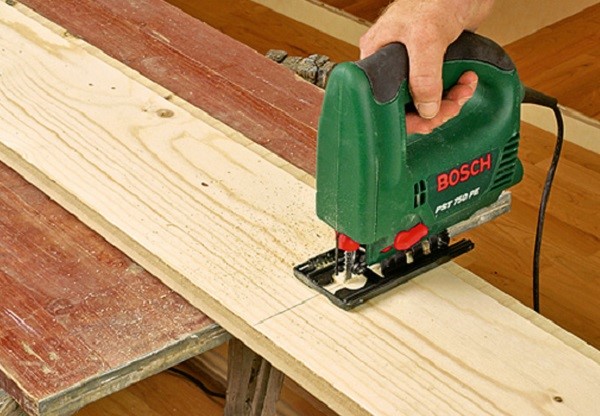
- An electric jigsaw that can replace a hacksaw.
- Drill and grinder.
- Line with a pencil.
- Building level.
- Wood glue or liquid nails.
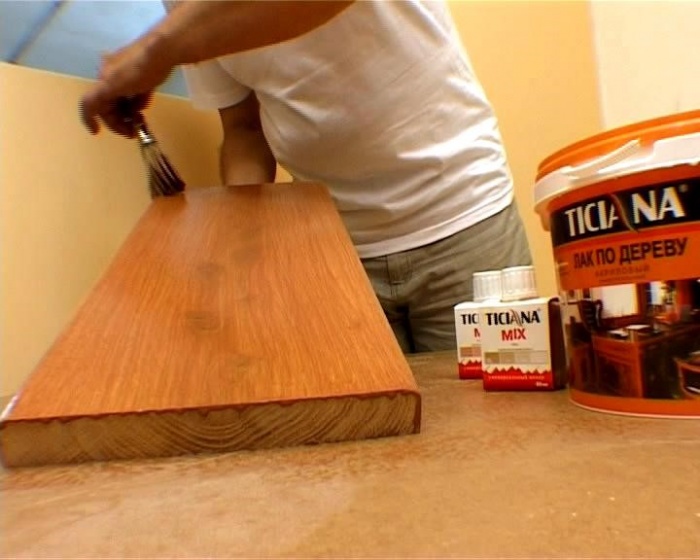
- Lacquer or stain.
- Brackets, dowels and screws.
The whole process of DIY wall shelf production is simple. After drawing up a plan or taking as a basis finished project, the dimensions of the structure are transferred to the material. Cutting wood base better with a jigsaw for a perfectly even cut.
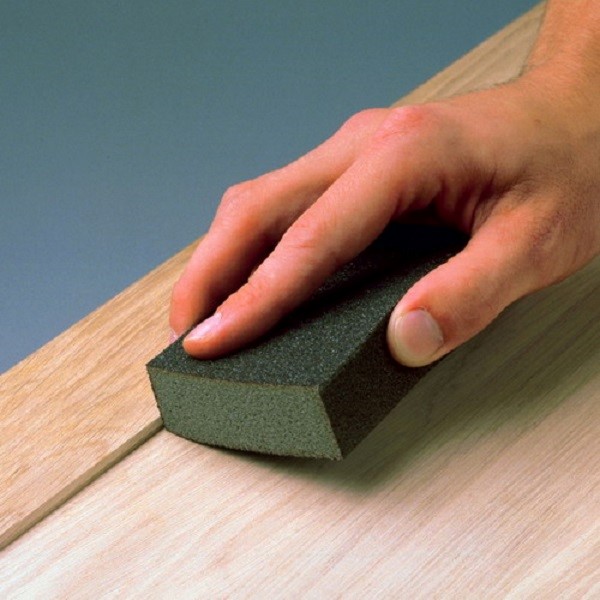
All elements of the wooden shelf are carefully polished; in the presence of significant defects, I use putty for wood. On initial stage need sandpaper number 40, get perfect smooth surface will allow sanding paper under Nos. 80 and 120.
Connect the parts of the wall structure liquid nails or wood glue.
Mounting marks are made on the shelf and wall. The brackets are connected to the shelf, and a recess is made in the wall with a drill, after which the dowels are inserted.

On final stage screws are screwed in and the wall shelf is suspended.


Glass
Premises with small area it is better to equip with glass wall shelves that form an atmosphere of lightness and visually increase the space. If the experience of working with glass is not enough, it is better to turn to specialists who, at the same time as cutting fragile material, will perform high-quality processing of sections. The following steps for mounting a wall shelf are within the power of anyone who can hold a tool in their hands and are similar to the procedure for attaching a wooden structure:
- Using the level, mark the attachment points on the wall.
- The Pelican design needs two dowels.
- After removing the decorative trim, you will find holes where you need to screw the fasteners.
- The decorative overlay is put in place and the glass is inserted.
- At the final stage, the screw is tightened.
This completes the installation of the glass wall structure.


Conclusion
A competent combination of a wall shelf with other details of the situation will create a harmonious design of the room, which is distinguished by individuality.
Books long and firmly occupied a place in the apartments and houses of people who consider themselves educated and modern.
In addition, placing orderly rows of gilded book volume covers is a good way to make the interior of the room exquisite and stylish.
Ideal way to store books bookcases And on shelves. This is how thousands of volumes are stored in libraries.
A beautiful shelf for books can be hung in the children's room, in the living room, in the office. The original place for storing books -.
Bookshelves - suspended structures designed for storage books. They consist of a base, side posts, top and back covers(not necessary). Shelves are open closed type, single or multi-level.
Closed shelves have doors, usually glass, multi-level options include several "floors" to store books.
What are they made from?
Shelves for books can be made from a variety of materials, including improvised ( plastic bottles, old boxes, belts and others), however greatest the following have spread:
- natural wood. It makes no sense to paint the advantages of this, proven for centuries, universal raw material for the production of furniture. Bookshelves made of wood, as well as other pieces of furniture, tables, beds: all these products are characterized by high material strength;
- Plywood. These are thin glued together wooden plates- veneer. The direction of annual rings in each next layer of veneer is turned to 90 degrees, it makes the plywood more durable. The outer layers of the veneer can be made from more valuable species, which gives a special texture pattern to the plywood;
- chipboard(chipboard). Produced from waste wood - shavings, which are pressed together with the addition of glue - synthetic resins. Chipboard surface is not distinguished by beauty, therefore her veneer veneer, paper or plastic.
Shelves for books hang up on the wall or place shelves with books on the floor next to the wall, which saves a lot of space. In addition, you can make a small shelf and combine it with the bed. This design looks very stylish and fresh.
Making a bookshelf on the wall
Option one
 For work need:
- planed smooth boards with a thickness 18-25mm, width 25-30 cm. The type of wood is not significant, but preference should be given to solid deciduous species - oak, beech, ash. If you have boards on hand softwood, select least resinous;
- Two metal suspension;
- Electric drill with drills for wood diameter 2 And 10 mm;
- Screwdriver or screwdriver;
- screws 40 x 3 mm with countersunk head 22 pcs;
- Corks wooden diameter 10 mm - 6 pcs;
- Carpenter's saw;
- Sanding paper grit P150 - P180;
- Joiner's glue;
- Marking tool - pencils, square, ruler, you can use a thickness gauge;
- Varnish furniture, brush for application.
Stages of work
The manufacturing process can be divided into stages:

- Material preparation. Mark and saw off two boards for the side posts, three boards for the bases and covers to the dimensions of the drawing. Mark and drill in boards through holes drill 2 mm. With a 10 mm drill to a depth of 5 - 7 mm, drill nests for decorative corks;
- Using a screwdriver or screwdriver collect shelf, starting from the middle board. When assembling Special attention give perpendicularity boards;
- Apply to the inner surface 10 mm nests glue, insert and press the plugs into them. Remove excess glue with a rag;
- Screw the awnings. Options 2 : open and secret. For the second option at the end of the racks, you need a drill 10 mm drill two or three holes about 3-5 mm;

- brush apply on furniture shelf varnish. After the first layer has dried, sandpaper along the fibers delete raised pile. Apply a second coat of varnish, working with the brush along the fibers.
Adviсe:
- If failed to purchase special decorative plugs, then you can do this: nests with a diameter 10 mm do not drill, but when screwing in the heads of the screws slightly drown in a tree. Then apply putty to the screwing points, which should be sanded after drying;
- To simulate more dark rocks wood, use wood stain. The simplest stain is an aqueous solution of magnesium permanganate (potassium permanganate). However, over time, such a stain brightens.
Second production option
 Is different connection of elements in the shelf - on dowels instead of screws. For implementation, it is necessary to purchase at a building materials store instead of screws 40x3 mm, dowels (diameter 8 mm), 18 pieces.
Holes for dowels drilled out:
- In the middle of the racks top cover and the base - through and through;
- in the middle shelf - to the depth of the length of the dowel minus the thickness of the board.
Assembly carried out on wood glue using wooden hammer - mallets. Glue can also be applied to the joined ends of the boards. Decorative corks are not needed with this method. It is better to score dowels not to the end, but leaving 1 mm over the board to sand then level the surface. Before the glue dries, the shelf is pulled together with clamps.
Everything that is well put together is never lost and quickly found. To this folk wisdom, one can add that proper storage things saves space and decorates the interior.
All these arguments are an excellent reason to make a homemade rack and give a decisive battle to home chaos and disorder. Its design is so simple that it will not become a stumbling block for a beginner. A couple of vertical frame-racks with crossbars, shelves made of boards, plywood or chipboard - these are all the elements of a standard shelving system.
Since there are many places for installing shelving (in the house, basement, veranda, garage), many options for their designs have been developed.
In our review, we will consider the most interesting of them and give practical advice about how quickly and minimal cost construct such a structure.
Original shelving options
Anyone who believes that the rack is a rough frame with shelves is deeply mistaken. Indeed, for the basement and garage, you can not really fantasize. Strength, durability and functionality - this is the main slogan for these premises.
For home interior On the contrary, I want to do something special and non-trivial. Therefore, do-it-yourself craftsmen spare no time and effort to capture our imagination. A couple of oak planks and some glass bottles- that's all you need to create an original design.

Despite the simplicity, the strength of such a rack is quite high. You can store not only books on it, but also use it to display a collection of wines.
Anyone who has dealt with high shelf structures knows that without a good ladder it is impossible to get to their upper tier. And why not use the shelves as steps - a resourceful person thought and created just such an original system.

The classic frame shelving rests on the floor, and to install the rope shelving, you only need two hooks in the wall. Of course, it will not be possible to store heavy cans with conservation on it, but it is perfect for books, photographs and souvenirs.

You can make a rack with your own hands so that others appreciate your creative nature using steel water pipes and fittings. This design looks perfect in an interior designed in industrial style. In addition, it is quite appropriate in an ordinary apartment.
pay attention to original way shelf installation. They are mounted on racks according to the principle of a children's "pyramid" tier by tier.

This rack does not have rear support legs. The high rigidity of the steel pipe, reinforced with tees, makes it possible to abandon them. This design can be placed anywhere: in the apartment, on the veranda, in the attic or cellar.

The algorithm for manufacturing such a rack consists of the following operations:
- We cut a bar for racks and crossbars according to the dimensions of the drawing.
- Having laid the racks on a flat horizontal surface, we connect them with the crossbars (we use a hammer and nails or a screwdriver and self-tapping screws).
- We fix the resulting support frames to the walls of the room through metal plates.
- We cut the shelves from the OSB board.
- We mount the shelves in the frame and fix them with self-tapping screws.

You can see the easiest option for assembling the sidewalls of the rack in photo No. 8. We note right away that the nail connection is not the most reliable, since it does not hold wood as firmly as self-tapping screws or confirmations.

Photo No. 9 A small wooden rack-rack, consisting of two sidewalls
A more aesthetically pleasing shelving frame has the crossbars flush with the uprights, as shown in Wiring Diagram #3.

If the step of the support frames is small (50-60 cm), then you can do without installing a longitudinal bar. It will be fully replaced by an OSB board with a thickness of 18-20 mm. At a small span, it has enough rigidity to withstand a lot of weight without deflection.
If you bought a thin slab or three-layer plywood, then longitudinal bar on each tier of the rack will have to be installed. He will tie the frames and will serve as a side support for the shelves. To increase the spatial rigidity of such a structure, several diagonal screeds from bars can be fixed on its back wall.
if you have welding machine then make a rack of metal profile, will be easier than wood. If there is no welding, then you will have to take an electric drill, metal drills, stock up on bolts and nuts.

The sequence of manufacturing a metal rack from a corner or a profile pipe is not fundamentally different from installation wooden frame. Here, too, frames are first made, which are then leveled in vertical plane and fixed to the wall. When using a thick chipboard or board 30-40 mm thick for shelves, the rack can not be connected with a longitudinal profile.
In this case, the shelves rest directly on the crossbars of the frames and are attached to them with metal screws. If the structure will carry a serious load, then the longitudinal stiffening belt under the shelves will not be superfluous.
Note that working with profile pipe more convenient and easier than with a corner. Keep this in mind when buying metal. The optimal cross-sectional size for a square tubular profile in terms of price and strength is 25x25 mm, wall 2 mm. It is better to buy a corner equal to the size of 40x40 mm.

A lightweight version of the design can be made using metal support brackets. They are fastened with dowels to the wall, and on top they put shelves made of boards or OSB boards.
This solution allows you to save space under the rack for the installation of large items.
Do-it-yourself wooden shelves are constructed with simple and combined, open and complemented doors. Comfortable in processing wood allows you to make angular, vertical or horizontal blocks. natural material emphasized with varnishes or painted to match the wall panels, decor elements.
Similar articles:
Types of wooden shelves
Shelves are classified according to the method of installation into the following types:
- suspended;
- wall;
- floor;
- removable;
- stationary;
- corner, etc.
Wall structures are mounted above pieces of furniture (table, chairs, sofas). Blocks are separate elements decor or included in the overall composition. For condiments and dishes, a wall shelf can be created from 2 or more modules.
Hanging products should be light, often serve as decorative items. beautiful designs antique fastened with steel pipes, braided belts, chains, strong ropes as well as brackets. Suspended structures vertically fixed on the ceiling surface, do not have side walls.
Corner structures are attached with self-tapping screws to adjacent wall panels. Blocks can be located separately or be part of furniture wall. Can be completed with corner shelving internal surfaces headset and external walls.
Floor shelves are capacious, can be transformed into a vertical or horizontal position. Designs are optimal for small apartments.
In semi-antique interiors curly wall shelves (modes) are used. The blocks are combined into a single composition, placed in living rooms, corridors. The advantage of mods lies in the ergonomic use of space.
Shelves vary design features subdivided into closed and open. The former are used to store kitchen utensils, as well as cereals, herbs and spices. Editions, recipe books, collectible dishes are placed under glass. Wine shelves for collection varieties can also be closed.
Open coasters are designed for spices in sealed jars, indoor plants, designer plates, vases, souvenirs, etc. Shelves made of plywood are easy to use and ergonomic.
The design of the structures also differs in accordance with the design of the room. The interior of a particular style dwelling requires appropriate pieces of furniture.
Rooms in the classical and Provencal directions will be complemented by laconic wooden structures. Natural textures are emphasized with transparent or translucent varnish, decorated with carved ornaments, artificially aged. Shelves in Provence-style rooms are decorated with decoupage technique or painted in pastel shades.
High-tech rooms are decorated with shelves of soft colors, laconic geometric shapes. LED lighting is allowed. Wooden structures complemented by transparent glass, metal inserts.
Shelving in the modern direction should be with rounded edges, non-standard curved configurations. Shelves are complemented with carved fragments or floral ornaments.
In country-style rooms, shelves with a minimal finish, painted or decorated by brushing, are preferred. Designs from pallets, boxes, boxes are acceptable.
Romantic style is emphasized by designs with forging elements, complemented by engraving and patterns.
The shabby chic room is decorated with shelves painted in light shades. The designs are often modular, consisting of several compact hinged units.
Choice of wood and necessary tools
Wood is practical, versatile, easy to process. For shelves, novice craftsmen are recommended varieties of wood with a soft structure (pine, aspen, alder, linden).
When selecting, a material with an even outer layer, without deformations, is required. The boards must be qualitatively dried, without cracks, voids, knots, mold damage.
Stands are also created from wood derivatives (chipboard, chipboard). Shelves made of plywood are economical, durable, do not require special processing.
The work will require tools:
- roulette;
- table saw;
- sandpaper;
- screwdriver;
- hacksaw or jigsaw;
- grinding machine;
- electric drill;
- construction level;
- fasteners (nails, screws, brackets, dowels);
- glue;
- varnish or paint.
For safety reasons, goggles and gloves are required.
What are the shelves attached to?
Long-term operation of wooden shelves is provided by fasteners that are responsible for the ergonomics and functionality of the design.
There are several types of fasteners:
- dowels and anchors;
- staples;
- belts;
- hooks, etc.
Strong fixing fasteners are the most reliable. Shelves are attached to the wall panel with dowels, anchors, which give strength to the structure. The method is optimal for structures for heavy objects. The disadvantage of fastening lies in the complex dismantling process, requiring additional cosmetic repairs premises.
Suspended structures are attached to the ceiling or to the wall with their own hands using belts, strong ropes, harnesses, ropes, etc. The mount performs not only functional tasks, but is also a designer decoration of the interior.
Brackets for shelves of removable type are hung on wall panel with staples and hooks.
Wall modules are equipped with extension method. First, the lower tier is formed, then the upper blocks are attached to the lower ones on holders or removable elements. You can change the width and height of elements.
Hinged blocks are fastened with standard loops, brackets. For structures, light woods, MDF boards are recommended. The shelves are screwed with screws, which are located in the side sections.
Step-by-step instructions for making a simple rectangular shelf
A step-by-step guide to making a rectangular shelf includes several steps:
- processing of raw materials;
- marking wood boards;
- sawing;
- grinding;
- varnishing or staining;
- assembly;
- fastening the structure to the wall.
Before creating a wooden shelf, you need to prepare a sketch, take measurements, calculate the weight of things for storage. It is necessary to calculate the indicators:
- width;
- length;
- height.
Depending on the weight of the items, boards with a thickness of 20-40 mm are required.
Dimensional characteristics are transferred to the surface of the boards. Materials are fixed with clamps and sawn according to the scheme and patterns with a hacksaw. wooden details must be sanded to prevent cracks and chips. The material for some shelves (in showers, kitchens) must have moisture-resistant characteristics, so it is necessary to impregnate the elements.
Then the places for fastenings on the boards are marked. After marking the points, holes are drilled with an electric drill (keep the openings horizontal).
Finishing includes rounding of sharp surfaces, engraving, carving ornaments. With the help of a burning device, you can make original patterns on surfaces. Depending on the design solution surfaces can be primed, varnished.
It is allowed to preserve the natural texture of wood with the help of stain or special wax. Paints for natural raw materials are recommended tempera or acrylic. Work is carried out on outdoors or in a ventilated area.
Assembly
The work is completed with the assembly of parts. Horizontal long boards are connected to short vertical parts with self-tapping screws. At the ends of the boards, 2 fasteners are needed.
Modules designed for massive objects are connected with 3-4 self-tapping screws and are supplemented with mounting brackets for strength. The vertical parts can be reinforced with short boards by placing them vertically between 2 bases. Additional supports serve as partitions, preventing the deformation of long shelves under massive objects.
Bookshelves have not lost their popularity. They save space and space, and can be placed on the wall in a way that suits the wearer. In addition, the presence of a bookshelf in the room suggests that reading people live here. Modern bookshelves not only perform their main function, they are an important part of the interior of the room and are able to emphasize its design.
It is not difficult to make a bookshelf yourself: it is enough to have minimal carpentry skills and show a little imagination.
DIY book shelf ideas


Necessary materials and tools
To create a wooden shelf in classical style you will need:
- a board about 20 cm wide and about 2 cm thick;
- Fiberboard (plywood) 4-5 mm thick;
- drill;
- fine-toothed hacksaw or electric jigsaw;
- self-tapping screws;
- crosshead screwdriver;
- square;
- sandpaper;
- furniture screws;
- plugs.
Instead of wood for the manufacture of shelves, you can use chipboard, MDF, plastic and other materials.
Stages of making a bookshelf
Once all the materials and tools are prepared, you can get to work.
Consider the step-by-step process of making a shelf:
- First of all, you need to prepare workplace, tools and all necessary materials.
- Then they take measurements, and make a drawing of the future shelf.
- After that, you can proceed to sawing the main material. The easiest way is to order it in a specialized store or at the place of purchase of the material. Or do it yourself at home with a fine-toothed hacksaw or jigsaw. A square is applied to the side of the board and a line is drawn across the entire width at a right angle. In the same way, using a square, the line continues around the entire axis of the board. As a result, its ends should match. This will be the cut edge line.
- Carefully cut the board along the lines obtained. At the same time, make sure that the hacksaw goes strictly along the line. This saw cut is nothing more than the end face of the part.
- From the end, measure a distance equal to the height of the future shelf and carefully saw off the part - side wall. The same is done with the second part. The ends of all saw cuts are treated with sandpaper so that they are even and do not have roughness.
- Coming from desired length shelves subtract twice the thickness of the side walls and make a file. This will be the top and bottom of the future shelf. Their ends should also be treated with sandpaper.
- Now, a distance equal to ½ of the thickness of the board is measured from the ends of the side parts, and a horizontal line is drawn across its entire width. At a distance of 5 cm from the sides, on the lines obtained (lower and upper), marks are made - these are the centers of the fastener holes.
- Using a drill, through holes are made at the marks. Moreover, the diameter of the drill should be slightly smaller than the diameter of the screw.
- From the ends of the upper and lower parts of the shelves, the centers of the holes are marked and they are drilled to the depth of the screw minus the thickness of the board.
- Using a screwdriver, the side parts of the shelf are assembled with horizontal ones. On this work on the manufacture of the shelf can be completed.
- If the shelf is planned to be made with a back wall, it is applied to a sheet of plywood or fiberboard and circled around the contour with a pencil. After that, the workpiece is cut out. To make the shelf look more aesthetic, back wall It is recommended to paste over with self-adhesive paper or film. From the back side, the back wall is screwed to the shelf with self-tapping screws (or nailed with small carnations).

bookshelf blueprint

A wooden shelf can be stained, varnished, decoupage or craquelure. You can also attach doors (wooden, glass or plastic) to the shelves - they will protect books from dust.


This is the simplest version of the classic wooden shelf. They can also be made multi-tiered, asymmetric. You can show your imagination and create something original and exclusive.
Now it is fashionable, and other furniture, made of chipboard, which bribes with its low cost. But this material contains highly toxic compounds that are harmful to human health.

If you decide to make a shelf from such material, then it is recommended to paste over its ends with a melamine edge. This is done with an iron: the edge is applied to the pre-treated end surface and ironed with a hot iron, after which the excess edges of the edge are cut off with a clerical knife.

As a result, the shelf will take on a more aesthetic appearance, and the edge will prevent the release of toxic substances into the surrounding space.


