Today we will make movable “real estate”, . If kids take part in the construction process, that’s great! I will definitely mention the advantages of each craft. But such a characteristic as the availability of the main material is common to all “buildings”.
How to do
pitched roof, thanks to the upper flaps of the large four-valve cardboard box?
Here's a simple way:

All that remains is to cut out the windows and door. Paste everything beautiful paper. Choose the decoration of the house at your discretion. You can take the same one as on photo , you can come up with something of your own.
Source
Cozy corner for games
Now you can buy any house. But it’s much more interesting to do it yourself. Especially when the idea is too simple, as in this craft. And there is one more plus! The structure is taking shape! Need more space? Or has the baby stopped liking the corner? It can be easily and simply removed.
Making:


Construction of parts - drawings and diagrams of a children's house
The difference between this craft and the previous one is that it consists of separate cut out pieces of cardboard. Therefore they are used big boxes.
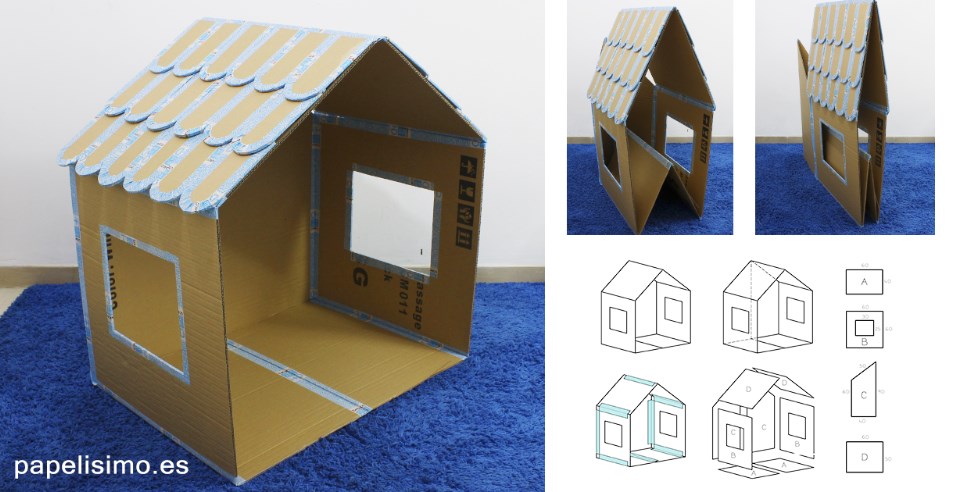
We will need: 
- 2 rectangles measuring 40 by 60 cm. This is the floor;
- 2 – 60×60. Side walls;
- 2 – 60×50. Roof;
- 2 parts measuring 40(bottom)×60(side)×50(top)×90(side). Back wall;
- 36 parts 20 by 10 cm. Roof tiles. (there are a lot of details, so if convenient, use templates ).

Making:

Such a house is easy to assemble and hide, and if necessary, take it out.
Form and ideas
The shape of the house depends only on the wishes of your baby. Cardboard allows you to make any design, even round ones. You just need to stock up on hot glue, tape and a utility knife. And how easy it is to dispose of the toy later! I burned it and that’s it, there’s no trash in the house!


Another simple MK with step-by-step photos:
Castle for princesses
Houses may be different. For example, if you have a princess, she definitely needs a real castle!
pay attention to video
, what a huge box is needed for this design. But you can use several smaller boxes. Just connect them first, and then model the “lock”.
We work:
- We secure all seams with tape. Special attention We pay attention to the bottom and top of the box.
- We cut out the jagged parapet on top.
- We make semicircular windows in the front of the castle, and heart-shaped windows on the sides.
- Gates in a castle are different from doors. To make them, cut a hole with an arch on top. But don't cut off at the bottom. We thread the ribbon under the gate. We pass the tape into the lock so that by pulling it, you can close the gate.
- Cover with fabric self-adhesive film or wallpaper the walls of a princess's palace.
More ideas for castles - pictures can be enlarged by clicking on them.


All children dream of toy houses, which they clumsily try to build from what they have at hand. And sometimes parents don’t even realize that there is material in the house from which they can make a wonderful house for children’s games - this is ordinary cardboard. Without much effort from waste material You may end up with a beautiful and comfortable home - a favorite place for children to play.


By decorating the house, children will develop their imagination. A toy house can be for them spaceship or a princess's castle, taking them on an amazing adventure. By tidying up their toy home, children will learn how to clean up the house. Secluded in a house, they can organize a secret society or tell each other horror stories.
Making a cardboard house with your own hands is not difficult. Children must be involved in the construction process. It's very interesting and exciting! By helping in construction, children will gain their first architectural knowledge and skills.
Materials and tools
A do-it-yourself cardboard house will not require large financial investments. Materials and tools for construction can be found in the household of any family:
- Carton boxes different sizes, glue gun.
- Scissors, sharp knife, pencils, markers, markers, tape.
- Acrylic or watercolor paints, gouache, glitter and various decorations.
Operating procedure
The sequence of building a cardboard house with your own hands can be different, depending on what kind of architectural structure you want to create. But the general algorithm can be outlined as follows:
- Find a sketch or diagram on the Internet, print it out and start acting. If you experienced master, you can draw a sketch of the house yourself.
- According to the diagram, cut out the parts and glue them in the required sequence with tape.
- Together you can have fun decorating your building.
Useful tips
- It will be great if your boxes contain corrugated cardboard.
- Cardboard cutting should only be carried out by adults.
- For the stability of the house, it is advisable to find cardboard pipes. You can ask for them in a store that sells the product in rolls. If you can't find it, make pipes out of cardboard. To do this, simply roll it up.
- Try to make the door of the house open outward so that the children have more space to play.
- Don't throw away small cardboard boxes. You can use them to make a wonderful doll castle for a princess or a garage for cars.
There are many options for handmade cardboard houses. You yourself can come up with something interesting. We offer several master classes and original ideas for making houses that you can easily build with your children.
DIY folding cardboard house - master class

We will need: a large cardboard box, scissors, a sharp knife, tape.
Step one: cut off the top of the large box as shown in the diagram. We put the cut parts aside. Tape the side seams of the box with tape.
Step two: turn the box over and connect its parts in the places indicated by the yellow arrow in the diagram. We make a roof from the cut parts, connecting the parts with tape in the places indicated by the arrows. Attach the roof to the side parts.
Step three: cut the cardboard in the place indicated by the yellow dotted lines in the diagram. We connect the parts indicated by the yellow arrows.


A comfortable and functional house is ready. You can take it apart, play with it, and put it back together at any time.
Cardboard house with a door - master class

We will need: a large cardboard box, a sharp knife, tape, acrylic paints or gouache.
Operating procedure:
- We cut out the roof and side parts of the house from cardboard according to the diagram.
- We assemble the house and tape the joints of the side seams with tape.
- Glue the roof and cut out the door on three sides, as shown in the picture.
- The window can be cut out or drawn.
DIY cardboard mill - master class

We will need: a large cardboard box, a knife, tape, wooden stick, screw, rope, acrylic paints.


Operating procedure:
- Fold the box as shown in the diagram. We cut out triangular gables on the sides, and make holes for the window and pipe on the roof.
- Using the pattern we make a cardboard tube.
- We screw a screw into the tip of a wooden stick and attach it to the roof with a rope.
- According to the diagram, we make a screw and attach it to a stick together with the screw so that it rotates.
- We cut out two triangular windows at the end and attach the pipe.
- We paint the mill with bright colors.
DIY Barbie house - master class

We will need: two small cardboard boxes, a knife, tape, glue, acrylic paints, colored paper.

Operating procedure:
- We take two boxes, cut out two windows on the side and glue them together, as shown in the first picture.
- We glue the shelves, the back wall and the roof made from two pieces of cardboard.
- Cut it out beautiful windows, then paint the resulting house with paints or paste it with colored paper.
Cardboard house for a cat - master class
You can make a wonderful cat house for your pet out of cardboard with your own hands.

We will need: two not very large boxes, a knife, tape, glue.
Operating procedure:
- We make two small houses according to the size of the cat according to the diagram given in the second lesson. Only one of the houses should be without a roof; there is no need to make doors.
- We cut out the windows as shown in the diagram and glue one house to the other. We hope your kitty enjoys her new home.
Interesting ideas for DIY cardboard houses


- A cottage with a starry sky can be made from cardboard boxes with skillful hands.
- Amazingly beautiful doll houses are made from cardboard if they are covered with bright fabric.
- The extraordinary architectural cardboard structures are simply amazing.
- A transformable dollhouse can be made from cardboard according to the attached diagram.

We hope that our lessons, ideas and tips will help you create wonderful toy houses. You will certainly receive a joyful mood and indescribable emotions as a result of your creativity.
Need unusual gift wrapping? Do you need a craft in the form of an architectural structure? If you like to do creative things with children, you can make a cardboard house together. The execution technologies will be similar, but choose the size and design in accordance with your individual idea.
Beautiful houses: options and ideas
A cardboard house can be made in the following options:
- A play structure for children of such a size that they can go inside (an alternative to expensive plastic complexes).
- A small architectural form for dolls with a removable or missing front wall and a detailed interior of the rooms.
- Craft on New Year theme, for example, the house of Santa Claus.
- Gift box of unusual shape.
As you can see, there are several possibilities. Choose suitable option. Make children's play more interesting and educational using accessible means.

What you need
To make a house from you need to prepare the following:
- Cardboard (corrugated for frame, decorative for decoration).
- Part templates, diagrams and developments.
- Pencil.
- Ruler.
- Eraser.
- Scissors.
- Glue or heat gun.
- for registration.
- Textile.
- Paints.
- Brushes.
- Markers.
- Suitable decoration elements (pebbles, flowers, beads, seed beads).
The set and quantity of materials will depend on what kind of house you will be making and for what purposes. A growth structure requires a strong frame, and thin cardboard or thick paper. The packaging design can be completely designed on a computer or a ready-made template can be printed. Big house you'll have to do it by hand.

How to make a diagram
If you want to make a small cardboard house with your own hands, it is better to use a ready-made template that can be printed directly on a sheet for the product. It would be better to draw a blank on thick cardboard. It is easy to build a small house like a box from a whole sheet of cardboard with fold lines.

If you are going to make a large sized house for children, it is better to cut out all the parts separately, although if the size of the material allows, it is easy to make a blank in the form of a development, as for a box. The diagram is quite suitable as a sample small house. It is enough to increase the size of the constituent elements proportionally. If you have a large box of the right size, it's good to use it. Then you just need to cut out the doors, windows, possibly strengthen the structure, build a roof on top (a gable roof is more convenient) and, of course, decorate the frame.
Manufacturing technology
This section contains the general sequence of steps. Each specific case will have its own nuances. So, to make a cardboard house with your own hands, work as follows:
- Prepare the base material and draw on it a diagram of the house or its component parts.
- Cut out the elements.
- If there are fold lines on the workpieces, draw along them with the corner of a ruler or other similar object. So, you will make grooves that will help you fold the thick cardboard evenly and neatly along the line.
- Make the folds.
- Tape the seams.
- If inside the house there are supposed interior partitions, glue them in using a hot glue gun (hot glue can be applied to the ends of cardboard blanks) or regular glue. In the second case, it is better to use additional connecting parts in the form of strips bent in half. One edge is like this paper tape will go on the right joining wall, the other on the left.
When the entire structure is assembled, start decorating. Internal walls, especially if the joining elements are visible, it is better to cover decorative paper or cloth. It is enough to paint the outer walls of the house.

Although you can lay out the lower part from pebbles or appliqué elements (paper parts). In a word, arrange all the decor at your discretion. The main thing is that it is appropriate, and it is important to securely fasten it so that during the game the house does not immediately lose its attractive appearance.
made of cardboard
The technology for manufacturing the frame will be similar to that already described. The only difference is that the facade wall is either not made at all, or is made to open like a door on hinges. This can be done on tapes or cardboard strips. When creating a plaything, it is important to make it in proportions suitable for the dolls, commensurate with them, so that they fit there and feel comfortable (sitting, standing).

Particular attention is paid to the organization and design of the internal space. Be sure to create several partition walls between rooms. They will also serve as a supporting structure. It is important to make furniture (or place purchased doll furniture). Pay attention to the wall decoration. If you think through everything properly, the house will turn out to be very realistic, and the design process itself will turn into an interesting activity for young craftswomen.
New Year's houses made of cardboard
This option will have some features. If you are just creating a craft for a competition or interior decoration, it is enough to make it using a cardboard box. Such a product may not be opening, but the design (windows, doors) will be drawn or made in the form of an appliqué.
If you want to make gift wrapping like a cardboard house, the design of the product should be such that there is an opening part. It should be convenient to remove the contents of the gift, and the packaging should not be deformed. The roof of the house box can be removed, one of the roof slopes can be opened, and the base can be removed or moved.

So, do it beautiful house You can make it from cardboard with your own hands both for play purposes in a natural size that is comfortable for a child, and as a souvenir gift (packaging or doll house).
Every girl dreams of a house for her dolls. Now there are a huge number of them on store shelves. But such pleasure is not cheap, and the assortment is the same.
We offer to please your child with a handmade gift. This will allow you not only to save money, but also to make the house one of a kind.

In addition, this will be a wonderful pastime for the whole family during leisure time.

There are many special training programs for making doll houses with your own hands. You can use a wide variety of Construction Materials: boards, plywood, chipboard, laminate, cardboard, etc.

As a rule, the front wall on dollhouses is not made, or it is made removable or opening so that your child can put dolls there, change the decor in the rooms, and tidy up.

Choose the material - and we will teach you how to make a dollhouse with your own hands!
Dollhouses made of plywood and laminate
These are the most popular materials. A distinctive feature from their “brothers” is stability and longevity. It is easy to decorate both outside and inside. But making such a house requires male strength.

If you try, such a house will be indistinguishable from the store version.

Diagrams and drawings can be found on the Internet, but if you have technical inclinations, you can try to draw it yourself. There are also photos of finished dollhouses on the Internet.

To make a house we will need:

- thicker plywood (from 7 mm);
- electric jigsaw;
- glue;
- self-adhesive floor;
- pieces of wallpaper;
- tape measure or ruler;
- pen;
- scheme;
- a little imagination and patience.

Let’s get to work, having first decided on the dimensions of the dollhouse (they will depend on the dimensions of the “tenants”):

- we cut out the walls of the future house from plywood or laminate;
- we cut out windows and doors in them;
- we glue the walls together; it is also fashionable to use construction nails or staples;
- we make a roof, it can be either flat or sloping. To give real look you can use corrugated cardboard and then paint it;
- We fasten the resulting structure to the foundation - a sheet larger than the house itself. On an unused area you can make flower beds, sidewalks, a platform, and a parking lot;
- we glue wallpaper and lay floors;
- furnish the house with furniture;
- you can also add curtains made from pieces of fabric, bedspreads, rugs, etc.
Dollhouses made of plasterboard
Many household parents, after renovations, leave the remaining building materials to gather dust on the balcony in the hope that they will come in handy someday. Their time has come! Drywall can make an excellent dollhouse.

The good thing about a house made from this material is that it is very light and easy to assemble. But, at the same time, it will need to be handled more carefully - it will be quite fragile.

The layout of such a house is no different from a product made of plywood or laminate. But assembling such a house is much easier, and there are many more layout options - with the help of partitions you can divide the rooms between each other.

Foam houses
To assemble such a house we will need:

Note!

- sheet foam;
- glue;
- canape sticks;
- rulers;
- bamboo sticks;
- cardboard;
- pieces of wallpaper and fabric;
- dye;
- sponge for washing dishes;

Pieces of plinth for the ceiling
Let's get started:

- make a diagram;
- cut out walls from foam plastic;
- we make doors and windows in them;
- we connect the walls using toothpicks, then glue the walls together;
- to make the roof stronger, we first install bamboo sticks on top of the walls, and only then glue the roof to the walls;
- we make a ladder from wooden rulers or the same polystyrene foam;
- You can also use toothpicks for railings;
- in addition, if desired, you can also make a balcony, massandra or even a terrace from polystyrene foam;
- painting the house;
- We decorate the house inside as in the previous description.
Houses made from bookshelves and cabinets
House from old furniture it won’t be difficult to do - after all, the walls are already ready.

All that remains is to cut windows and doors in them, and think about what to make the roof out of, if necessary.

It can also be made from the materials described above. We arrange the furniture, let the cat in - happy housewarming!

Cardboard houses
For this design we will need:
Note!


- cardboard;
- house detail templates;
- scissors and stationery knife;
- gouache or watercolor paints.

We are building a house:

- if you have big piece cardboard, then we do not cut it, but bend it in places according to the diagram, and then glue its component parts together.
- we install interior partitions made of cardboard; they will serve not only to delimit space, but also to hold together the frame structure.
- Let's get started with renovations and furnishings!

House made of boxes
The simplest and fastest option. It is enough to select the required number of boxes (depending on the number of rooms), fasten them together using a stapler, having previously placed them on their sides so that the top of the box serves as an exit.
This will allow you to open the front wall at the right time to rearrange, tidy up, etc.

We cut out windows and doors. Let's start designing the frame.

Note!

House made from paper folders
It requires four folders. We cover them from the inside with wallpaper or printed sheets with decorative items and household appliances in a plane.

We cut out windows in the folders, install the folders vertically, and fasten them with the help of clips that are included with each folder. Your house is ready.

Fabric house
This option is good because it takes up virtually no space and can even be folded up.

Using a thick piece of fabric, we make the back wall - it will serve as the foundation. We sew a rectangular base for the house. We make pockets to which the cardboard for the floors will then be attached. We attach ribbons to both corners of the pockets.

All that remains is to sew the pockets with a rectangular base on one edge so that the ribbons end up with reverse side. Floors using tapes and sew the tapes with back wall. Let's decorate the house and start playing!

You can make houses from other materials - the main thing is to show your imagination! A wonderful gift it will also be suitable for a boy - after all, you can build a garage, parking lot, etc.
Photo of a dollhouse with your own hands


A special atmosphere reigns in the house where a cat lives. Pets may have different personalities, but they all add variety to a previously regular life.
Often cats become attached to one place, spending a lot of time there. Accordingly, they leave scraps of fur, sharpen their claws, and play. In such cases, the question arises of creating a separate sleeping place, own house.
You can buy one like this at a pet store. In this case you will have to spend money. Or you can make your own cat house from a cardboard box.
Types of cat houses
Here is a gallery of ideas from home craftsmen:
You can explore the range of cat houses on the market and choose the best design for your pet.
Most often, cat owners choose the following models:
- Various beds. Suitable for calm animals that most time spent observing.
- Booth house. Suitable for pets who like to spend time in solitude. It's easy to make from a cardboard box.
- Hammock bed. Can be located in any free place - under a chair, stairs, etc.
- Game complexes. Suitable for families with two or more cats. They may consist of several houses, passages, scratching posts and hammocks. Their parameters and content depend on the desires and capabilities of the owner.

We create a house for a cat. What do you need to know?
Dimensions. Cardboard houses must correspond to the parameters of the animals. For a pet with average parameters, a cubic design will be suitable, the width of which will be about 40 centimeters. A hole 15–20 centimeters wide is sufficient for entry. If the entrance is very wide, the animal will feel unprotected. The basic rule is that the pet must fit freely in the house, lying on its side.
Important! Siamese and Bengal cats love to sit on their hind legs. It's better to do it for them cardboard house with your own hands in the form of a wigwam. Its height should be at least 60 - 70 centimeters.
Benefits of a self-made cardboard house:
- Saving money.
- A self-created product will be in harmony with the interior of the room.
- An additional reason to please your pet.
- Minimum investment of time and effort.
- There is no need to throw away empty boxes.

- We cut out rectangles from a cardboard box measuring 50 x 40 centimeters. For Siamese and Bengal cats, cut out pieces measuring 50 x 60 cm. A total of three rectangles are needed. This will be the base and two side parts.
- We cover the rectangles inside and outside with upholstery fabric.
- We connect the two parts to each other at an angle of 60 degrees. We attach the third part to them. We fasten the entire structure with PVA glue. We get a house in the form of a triangular prism.
- We cover the bottom of the house with padding polyester or other soft bedding.
- We install the house near the radiator to make the cat warm and comfortable.
We decorate self-made homes for pets like this:
- We cover it with fabric, which we select in accordance with general style interior
- Cover with paper white. Then we decorate it to our liking.
- We wallpaper it to match the walls of the apartment.
- We decorate the house with soft toys in the form of mice, birds, other animals and insects.

You can install a scratching post next to the house so that your pet can sharpen its claws. This way you will protect your furniture from damage.
Precautionary measures:
- It is prohibited to use a stapler as a fixing material. Cats sometimes chew cardboard. A pet may accidentally swallow a stapler or injure its mucous membrane.
- Do not use adhesives with a strong odor. PVA glue is optimal. It does not emit strong odors and dries quickly.
- It is forbidden to use boxes found on the street. Stray cats and dogs could live in them. There is no guarantee that they were healthy.
- Tight boxes should not be used. The cat will want to stay awake in a place where it is uncomfortable.
- It is forbidden to hang a cardboard cat house. The product may fall and the animal may be injured.
A self-built cardboard house for a cat will save money on the family budget and the nerves of the owners. After all pet will not look for a place to lie in the wrong place.