The modern market is saturated different kind construction tools and fixtures. Take, for example, a pit drill: today you can easily find a device whose cost is quite affordable, and the declared characteristics completely suit the buyer. It would seem that there is nothing easier: buy and use. But one should not always rush into such an acquisition. The fact is that budget equipment in practice does not always meet the needs of the buyer, or even is not at all capable of fulfilling the functions assigned to it: the drill is in no hurry to enter the ground even with strong pressure, the engine speed drops from a heavy load, etc.
Buy a powerful and expensive device for a small amount of construction or garden work– is not always appropriate. Renting is also not cheap. Therefore, craftsmen strive to use the equipment already at their disposal to create compact drilling rigs.
Earth drill from a drill
In most cases, a mechanized hole drill is a power plant ( powerful drill or gasoline engine), which, using a simple mechanical drive, is connected to a conventional hand drill. The drill can be made independently.
 Drill from a drill with your own hands.
On sale you can find a ready-made drill of serial execution.

skyle FORUMHOUSE user
Many say that they just bought such an auger and fixed it to him a powerful low-speed electric drill.

Engine Specifications
Recommendations regarding the number of revolutions of the power plant and its other characteristics deserve separate consideration. Let's start with the fact that the power plant can be connected to the drill both directly and through an additional gearbox. Everyone determines the need to use a reducer for himself. As practice shows, if the rated power of the drill is 2 kW, then there is no need to use a gearbox (especially if the installation does not have a special bed, and you have to hold it with your hands during operation).

jumper_at_home FORUMHOUSE user
At first, a gearbox was planned, but after field tests with a “drill-auger” scheme, it was decided to abandon the gearbox. The moment is such that she does not notice the operator at all (if you drill with your hands).
The power indicator - 2 kW - was taken by us not by chance. It is these drills that are most often used by the participants of our forum in the manufacture of mechanized hole drills.

Tri.Dr.E FORUMHOUSE user
There is experience in the construction of a columnar foundation with a grillage. I used a 2 kW drill and an auger designed for a pit diameter of 30 cm (the diameter of the drill is somewhere around 29.3 cm). For deeper drilling, I used an extension cord from a regular steel pipe. The soil in my place is not sugar: earth, then clay, then some kind of lens with beach sand, then again clay with sand, and then blue clay (at a depth - 1.8 - 1.9 m).
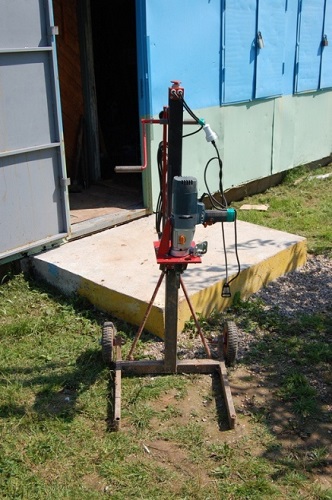
In order to make holes of the required depth in the ground, the user had to build a compact drilling rig (with a bed, a winch and other accessories).

But now we are talking about the power of the power unit, and from the description presented it is easy to understand what a drill with a rated power of 2 kW is capable of (even without a gearbox).
A bit of theory
If we consider the relationship between the power of the drill (or gasoline engine) and the torque on the drill shaft, then it is determined by the following relationship:
- N - power (W).
- M is torque (Nm).
- n is the number of revolutions (rpm).
- 9549 is a special coefficient.
Theoretically, the torque on the working shaft of such an installation at 500 rpm should be 38 Nm (64 Nm at 300 rpm). But to calculate the torque, it is always necessary to take into account losses, which are determined by the efficiency of the device. The thing is that most manufacturers of power tools indicate only the power consumption of their devices, and the output power (on the working shaft) is 1/3 ... 1/4 less than consumed. Accordingly, less torque. A drill with a power of 2 kW at 300 rpm will create a torque on the spindle that is not 64 Nm, but approximately 48 Nm.
When choosing a power unit for your yamobur, you can consider devices with a power consumption of less than 2 kW. But then you will seriously have to think about introducing a reduction gear into the design of the drilling rig.

uvl77 FORUMHOUSE user
Regarding the gearbox: the gearbox is good, because it allows you to proportionally change the number of revolutions and torque without changing the power. That is, by reducing the number of revolutions through the gearbox, we proportionally increase the torque. And the power in this case remains a generalized characteristic (constant).
Focusing on the torque that a 2 kW drill creates (without an additional gearbox), you can choose the right device for your hole drill. In other words, knowing the power of the drill, the number of revolutions of its spindle and gear ratio gearbox used, you can calculate the torque value that you will receive at the output of the power plant. But it should be understood that the number of revolutions of the drill cannot be greatly reduced.

uvl77 FORUMHOUSE user
The optimal speed during drilling is from 60...100 to 200...300 rpm. Modedepends on the type of soil, drilling method, type of drilling nozzles, well diameter, etc.
The above quotation mentions drilling methods. There are all two of them: continuous drilling and drilling with constant removal of soil. For continuous drilling, the rig must provide a large amount of torque.
During drilling with constant soil removal, the auger, which has drilled into the soil to a certain depth, rises to the surface. In this case, the loosened soil located on the working blades of the auger is also removed outside.
The operation is repeated until the drilling rig reaches the target depth. The process is laborious, but it does not require high torques.
As we have already said, when choosing a power unit for a drilling rig, it is better to focus on a low-speed drill with a power of 2 kW (that is, the torque that it transmits to the working shaft). Judging by the numerous reviews from FORUMHOUSE users, these devices have proved themselves quite well. Power gasoline engines must also meet the specified indicator.
Gearboxes for yamobur and their varieties
The assembly of any mechanism in most cases is characterized by the use of improvised materials, fixtures and components that have been idle for a long time, because they were not worthy of use. The experience of our users suggests that a mechanical reduction gear can be made from a wide variety of parts: from spare parts for a moped that has served its age, from a simple chain or worm gear, from a suitable gearbox of unknown origin, accidentally lying around on old shelf in the garage, etc.
When equipping a drilling rig with a gearbox, the main thing is not to forget about the optimal speed of the drill and that it is necessary to provide sufficient torque on its working shaft.

mechanic020 FORUMHOUSE user
I had a broken moped lying around, and I took it from him rear gear. I sawed off the gearbox with a turbine (rear part aluminum housing with a gearbox), then through the gear transmission fixed to this gearbox, an electric motor from an old electric saw with a power of 2 kW. The engine with the gearbox gave a ratio of 13:1 (the output turned out to be about 300 rpm).

About the chain drive: with a certain amount of ingenuity, you can, without much effort, build a completely reliable hole drill with sufficient power. The presented idea is not new, and many successfully apply it in practice (if necessary).

jumper_at_home FORUMHOUSE user
There is no gearbox, although it was planned to be made from the VAZ 2101 timing chain and its own sprockets. The gear ratio is 1: 2. Tests have shown that it is not needed. Is it possible to use it on very hard soils, but we don’t have such.
The use of the above mechanisms requires a non-standard approach to the assembly of the drilling rig. If you have a small serial gearbox available (or the ability to purchase it inexpensively), then the task becomes much easier. Here, for example, is a photo of the gearbox posted by the user melomandk.


Melomandk FORUMHOUSE user
Here is a gearbox I found. That's just the gear ratio is large - equal to or even slightly more than 1:40. Dimensions (on the body) - somewhere around 15 x 15 cm.
As it turned out, the device has quite suitable parameters.

di grise FORUMHOUSE user
My yamobur is based on just such a gearbox. So far I'm very pleased. The engine is a grinder (3000 rpm at the output). The power of the grinder is 2 kW. I did not try to drill clay, but I took a hard rammed earth with inclusions of crushed stone and rotten roots. The diameter of the auger is 160 mm, the knives on it are homemade - from the spring.
bed
If there is a lot of work, if you need to drill deeply, and it is very difficult to hold the installation in your hands, then the existing equipment can be fixed in a special frame.

The design of homemade beds, as well as for mechanical reduction gears, can be very diverse. But there are structural elements that are used in the vast majority of cases.
lifting mechanism
Can be used as a lifting device chain drive installed inside the center pillar. Raising and lowering is carried out either with an additional electric motor or with a handle (as in the photo from the user jumper_at_home).


jumper_at_home FORUMHOUSE user
The maximum depth was 1.8 m (auger + extension). It didn't need to be deeper. Homemade winch - 2 gears and a chain from a motorcycle.
In order for the plate with the main electric motor to move freely along the vertical pipe, four rollers can be installed on the carriage.


Another design of the lift involves the use of a steel cable and a winch with an additional electric motor.


mechanic020 FORUMHOUSE user
The main electric motor of the drill drives up and down the square tube. It moves due to the winch (which I already had). This winch is needed in order to pull the drill with soil from the well.
For comfort mechanic020 made a control panel that controls the winch and the rotation of the drill during operation.

The drill, together with soil adhering to it, can create quite large loads on the winch. At great depths, it will work on the principle of a piston, creating a vacuum under itself and exacerbating the situation when lifting up. Therefore, the more powerful the winch is used, the better.

DmitryEvg FORUMHOUSE user
My winch is designed for 250 kg (500 through the chain hoist). Power - 1kW.
Bottom support for bed
The lower bed support can be equipped with two wheels (for easy movement within the construction site). If everything is done correctly, then the installation will be transferred from the transport position to the working one by simply tilting the bed.


It is advisable to install adjusting screws on the supporting elements of the frame, which will help to set the drill in accordance with the vertical level before starting work.

Materials for the manufacture of the bed are selected for reasons of strength. Not everyone can perform a complex design calculation on their own, but anyone can use the experience of our portal participants.
Yes, user Tri.Dr.E made a bed from a corner 50 * 50 * 5. Vertical supports and top cross bar made of two corners of the specified size fastened together.

User jumper_at_home laid in the design of the bed different metallic profile with a wall thickness of at least 3 mm. The platform for the power plant was made by him from a steel sheet 10 mm thick.
And here is a photo of the installation, which was created by the user PwrWW"from what was" (as he himself says).


PwrWW FORUMHOUSE user
The most difficult thing was to find two even solid three-meter pipes with a diameter of 60 mm. If they didn't exist, I would buy profile pipe by 80 or 100 mm. Below I used a piece of channel 80 and a corner from scrap metal. I also found 4 p-shaped plates of suitable length among the scrap.
Ideally, the carriage should be made in such a way that, if necessary, the operator of the drilling rig can stand on it. It is especially important to observe this condition on hard ground.
jumper_at_home FORUMHOUSE user
Here is what was used to protect the drill from turning: a steel stop angle - 6 mm, screwed to the hole for the handle, which is on the body of the drill. Everything is bolted together with a sufficient plane of surfaces. If you want even more reliable, provide a clamp for the landing groove on the drill end switch.

mechanical drive
The design of a mechanical drive that connects a drill or other engine to the working shaft of an earthen drill does not differ in particular complexity. To create it, an adapter is enough, which is inserted into the drill chuck (Morse cone, etc.) and a cylindrical sleeve, one end is welded to the adapter with bark, and the other is put on the drill shaft. In order to increase the depth of the drilled hole, removable knees made of the same material as the drill rod can be inserted between the drill and the drill.
In order to prevent damage when the working body is jammed, the drive and the drill should be connected using a special protective pin. The hairpin is made of a metal bar - 4 ... 8 mm. It is better to test the installation with a stud having a minimum diameter (4 mm).

Almost a pro FORUMHOUSE user
Imagine if your drill hits a stone and jams. I have a 4 mm nail as a shear stud, and it has never been cut off. But, if an obstacle is encountered, then it does not give away in the hands.
Homemade drill
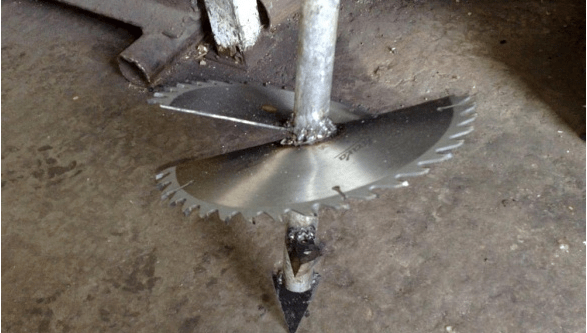
As we have already said, the working body of the installation (drill) can be purchased at a specialized store, but it is quite possible to make it yourself. Here, for example, is a homemade drill with removable blades.

To make it, we need a thick-walled pipe of a suitable diameter (30 mm), as well as material for the blades and for their base. The bases to which the blades will be screwed can be made of thick sheet metal(6…10 mm). The blades themselves should be made of high-strength spring steel (Art. 65G). If you need a garden drill large diameter, then you can use ordinary springs from a truck.
For the manufacture of blades, you can use disks from a circular saw.

The diameter of the drill should be 5 mm larger than the diameter of the holes to be drilled.
We present to your attention a sketch drawing of the product.

Discarding the top handle, we get exactly what we need.
The design of a homemade drill must comply with the following parameters:
- The angle between the cutting blades (between the blades) can vary from 25° to 30°.
- The front edge of the blade is sharpened at an angle of 45°…60°.
- It is desirable to weld a thick metal drill to the lower end of the drill, thanks to which the installation will be easier to enter into dense soil.
 How garden drill fasten in a drill.
Fans of fishing in the winter season have long appreciated the benefits of using an ice screw. Both professional and novice anglers know how easy it is to drill holes in ice with this device. Naturally, you can use the ice pick in the old fashioned way, breaking through the ice, but it will greatly facilitate the process of an electric ice drill made at home. Moreover, if you have drawings and a desire, you can quickly and easily make an ice drill from a screwdriver with your own hands.
Advantages of a homemade electric ice drill
automated homemade device made from a screwdriver has many advantages over products bought in a store. The main advantages include:
- self-connection of an electric drive is much cheaper than buying a factory product;
- the manufacturing process requires a minimum Supplies and a standard set of tools;
- the improvement of a conventional drill takes place at home, without the involvement of third-party specialists.
 The result of efforts home master will become an excellent automated device for drilling ice of any thickness, which will turn into an indispensable assistant to the angler on winter fishing.
In order for a do-it-yourself ice drilling product to cope with the tasks, it is important to choose the right screwdriver model with high power ratings. Using a weak tool will cause problems when drilling a hole in a thick layer of ice.
Given that the ice ax must be mobile, you need to buy a power tool with battery. Also, the electric drive must have maximum physical strength and reliability. It must withstand various loads, mechanical shocks and other troubles that happen while fishing.
A power tool for a homemade ice drill must meet the following specifications:


An excellent product is a powerful Bosch ice drill screwdriver. You can also use a good Japanese power tool trademark Makita. Although it all depends on the financial capabilities and preferences of the angler. The main thing is that the product is suitable for power and battery capacity.
Types of battery
Today, a stand-alone electric screwdriver that can be used to self-manufacturing electric ice drill, equipped with different batteries. At the same time, the following batteries are popular:
- The lithium-ion battery is lightweight, fast charging, but is afraid of low temperatures. Plus, this battery is expensive.
- The nickel-cadmium battery is heavy, but is able to operate at extremely low temperatures, which is important for winter fishing.
Experienced anglers always take two batteries with them on the ice. To prevent the battery from draining quickly, it is better to store it under a jacket in a specially made pocket or case. The presence of two batteries allows you to significantly extend the autonomy of the screwdriver.
Electric screwdriver substitutes
Naturally, to create an electric drill for drilling ice, not only an electric screwdriver is suitable . Home craftsmen can easily adapt other tools:
- electric drill;
- electric wrench;
- chainsaw.
 The latter option is convenient in that it runs on gasoline, and not on a rechargeable battery. However, without a special tool and a lathe, it is very difficult to make an ice drill from a chainsaw at home.
It is important to understand that not any ice drill model can be attached to screwdrivers. This is due to the peculiarity of domestic products, which, when drilling ice, rotate in the direction of unwinding the power tool chuck. This brings a lot of inconvenience to winter fishing. Of course, you can additionally use a reduction gear, but not every home craftsman can make it.
Therefore, when manufacturing an automatic ice drill, it is better to give preference to imported models. Ideal for any Mora model, which easily adapts to an electric tool. For them, all the necessary adapters can be bought at the store, which will allow you to attach the cartridge to the auger with high quality.
The Tonar model deserves special attention. The manufacturing company is engaged in the production of removable screws with cutting heads, which are easy to connect to a cordless screwdriver. And to drill through thick ice, you can adapt a store-bought extension cord.
Features of the manufacture of the screw part
Most fishermen are accustomed to making their own accessories. This is due to the fact that not everyone can afford to buy a quality device in a store, and even more so if it is mechanized. For the manufacture of such a product, you will need to prepare spare parts from the following list:
- Metal pipe of suitable diameter.
- Metal plates for the manufacture of auger.
- Quality steel knives.

To connect all individual elements electric welding is required. After all the parts are welded, they are cleaned with a grinder. The resulting product is painted for corrosion protection. Given the complexity of such work, you will need to contact a specialist. So it's better to buy ready product in the shop.
cutting part
Every fisherman dreams of comfort while fishing.. It is important to remember that the quality of ice drilling depends on the following parameters:
- Blade hardening. In modern models of drills, blades with hardness values from 30 to 70 units are used.
- The quality of the cutting blade. The knife has two cutting edges. The speed of ice drilling depends on the quality of sharpening of the latter.
The choice of steel in the manufacture of an electric ice drill with your own hands is important if all its parts, except for the electric drive, are made independently. If you buy a finished model in a store, you can ignore this parameter. For the manufacture of the cutting part is used the following materials:
- Hard special steel grade P18 or similar. It is important to pay attention to the hardness of the material, its shape and the quality of sharpening.
- Titanium plated metal. Blades with this coating have a maximum service life.
Do-it-yourself adapter preparation
It is important to remember that the manufacture of the adapter depends on the characteristics of the drill. If you use the Swedish drill Mora, then an adapter for an ice drill for a screwdriver of the following type is suitable:
- for the standard model, a product with a diameter of 1.8 cm is required;
- if the Mora Nova model is used, the diameter of the adapter must be 2.2 cm.
To prevent the auger from turning in the screwdriver sleeve, the adapter must have a hex work surface. And to prevent accidental loss, a special stop is installed.
There are also adapters with handles. They are easier to use while drilling ice. Higashi's 1.8 cm adapter model works well with all Swedish drills and some domestic products.
Assembly of individual elements
Having dealt with all the elements that make up the device, you can begin to assemble an ice screw with your own hands at home. This is a simple process if the elements discussed earlier are prepared:
- auger part of the drill;
- electric screwdriver;
- adapter of the appropriate diameter.
The cartridge is connected to the auger with an adapter. This completes the assembly of the automated ice drill.
Tool care rules
Whatever ice drill based on a screwdriver is made, so that it works as long as possible, it is important to properly care for it. To do this, you should adhere to the following rules:

As you can see, making an ice screw with your own hands is a fairly simple process. The main thing is to correctly select the adapter, screwdriver and cutting part of the product. By combining all the components into a single design, you get indispensable assistant on winter fishing. Such a tool will allow you to drill a hole in the ice of any thickness in a few minutes.
When building a house and arranging a site, it is often necessary to do round holes in the ground. They are needed when constructing a fence - for installing pillars, when building gazebos, installing arches and other light utility structures. The same holes, but larger diameter and depths are required at the device. Make these holes with a motorized or manual drill. They are available in stores in sufficient quantities, but many prefer homemade products: they are often more productive and reliable than factory products. In addition, you can make a drill with your own hands of any design, and there are a lot of them.
Designs and application
Easier-to-make garden earth drills. Depending on the type of soil on which drilling is carried out, their design is slightly modified. This is the beauty of homemade drills - they can be "sharpened" for specific conditions and it's not just about size - the blades can be made removable, bolted, but also in design features. Yes, ordinary drills in the store are inexpensive, but they are “universal”. Works well on "light" soils. On loams, clays, marl, etc. they are ineffective.
Making a garden drill
A garden drill is the simplest but most effective design. It consists of:

This is the basic design, and there are many improvements to it. But first, let's talk about what a dredger can be made of.
materials
As already mentioned, the rod is most often made from a round or square pipe. Diameter - from 3/4' to 1.5', profiled pipe can be taken from 20 * 20 mm to 35 * 35 mm.
Knives-blades can be made from:

It's easier to make blades from saw blade. In this case, the cutting edges are already prepared. It will be possible to further sharpen the side edges to make the ground easier to cut.
Piku-drill is made from different materials - there are a lot of its designs. They make just a sharpened rod. Then you need a piece of a bar of large diameter. The second option is to make something like a drill out of a strip. And also a combination of the two.
Pika - one of the tip options
And finally, about the pen. It is more convenient if it is made of a round pipe. Its diameter can be selected according to the coverage of the palms. The main requirement is that you should be comfortable.
Knives and the method of fastening
First of all, you need to decide whether you are making a drill with your own hands with removable or stationary blades. If the blades are removable, weld shelves made of thick steel at one end of the rod. Shelves are made at an angle - so that the planes of the knives are separated at an angle of 25-30 °.
After the shelves are welded, two or three holes are made in them - for fasteners. Then the same holes will need to be made in the blades, and installed on bolts of a solid diameter.

On one rod, you can have several sets of cutting blades - for pits of different diameters
Holes will have to be cut in the center of the disks themselves - so that they fit snugly against the rod, but this operation is also required for the monolithic version - with welded blades.
Sheet steel
If you are going to make the blades from sheet steel, cut out a template from paper, follow it with a circle of steel. Drill a hole in the center - it will be necessary to insert and weld the rod into it. Circle or square - depending on the selected rod. The dimensions of the hole are slightly larger than the dimensions of the rod.

It is also necessary to spread the edges by 25-30 degrees. In this case, drilling efficiency will be maximum. If you work on dense soils (clay, loam with a predominance of clay), the blades under load can reduce. To avoid this, stops are added from a corner or a thick strip of steel.

The blades bend due to the fact that the steel is not hardened, but it is almost impossible to find it in the sheet, and if it is possible, then it is unlikely to be bent.
From saw blade
If you have an old saw blade of a suitable diameter, you have found almost perfect option. They use hardened steel, and it is elastic and durable. But such a disk cannot be bent, therefore it is sawn in half and these halves are bred at the required angle.

Such a homemade drill for earthworks shows pretty high performance. Even used discs have a well-ground edge. And to make drilling even easier, they also sharpen the drill on the sides with their own hands.
Modifications
In dense soils, it can be difficult to cut the soil with large blades. In this case, several blades are welded onto the rod. different size. From below, near the peak, the smallest ones are welded, above, retreating a few centimeters - large ones. There can be three such tiers, a maximum of four. The entire cutting part should not be more than 50 cm, otherwise it is very difficult to work physically.

If a drill is needed for shallow pits - for installing poles, etc., then this design is optimal - it has a relatively small weight, it is easy to work with. The process of work is this - they lowered it into the hole, turned it several times - pulled it out, poured out the soil stuck between the blades. But if you need to drill deep pits, you will be tormented by dragging a small amount of soil from the depth. For such cases, a box for collecting soil is welded over the blades.

And all these are handmade drills. All of them are highly efficient - it is much easier to work than purchased ones.
Auger drill
Auger drill from behind a large number turns creates significant resistance, that is, it is much more difficult to work with them than with a garden drill. But augers are used mainly in the presence of a mechanized drive - when they are made - to water, underground probes for heat pump and so on.

For making homemade auger drill you will need several metal discs. The number of discs is equal to the number of turns. The disks are cut out the same, in them, in the center, a hole is cut for the rod, as well as the same sector - so that they can be welded.

The discs are welded on one side, then, slightly stretching the resulting accordion, the seam is welded on the other side. Rings are welded on the outer discs. Welded discs are put on the rod, the lower edge is welded.


Drill for piles TISE
In the author's version, the TISE drill is blades with a land receiver and a folding wider knife, which forms an extension at the bottom of the pile. But working with such a projectile is inconvenient - the folding knife greatly interferes. Therefore, in some designs it is made removable, but in general, it is recommended to drill the pits themselves with an ordinary garden drill, and to expand it, make a separately folding knife with a land receiver. This makes the job easier and faster.

Do-it-yourself drill for TISE piles - one of the options
A cut-off shovel acts as a knife, and the land receiver is made from a can of herring. The knife is fixed movably, when lowered into the pit, it is pulled up by a nylon cable tied to the end. Having reached the bottom, the cable is loosened, the blade begins to cut the sides of the pit, forming the necessary expansion.
In the photo below - the second version of a home-made drill for TISE piles. The design is more complex, but also more efficient. The plow-blade is made from a piece of spring, sharpened and welded to the hinged structure with bolted connections.

The dredger is from an old propane tank. The earth is collected from below, because the receiver is made with a rounded bottom. It has two holes, their edges are sharpened.

This projectile works well even on dense clay. True, to reduce friction, the well must constantly be moistened with water.
Blueprints
A self-made drill is good because its design is “sharpened” for the owner. In the manufacturing process, everyone makes their own changes, then many more refine the product. But it can be difficult to do without basic drawings. This engraving contains several drawings with the dimensions of various drills. As you understand, the dimensions are conditional, they can and should be changed, adjusting to the dimensions of the required wells.
For planting plants, making a serious design does not make sense. In this case, you can make a garden drill from a shovel. They choose a high-quality shovel made of good steel, apply markings, as shown in the drawing. According to the markup, it will be necessary to cut out two small fragments, saw the lower part in the middle to a depth of 30 cm (pictured).

If the ground is soft, the conventional design does not work very well. For such cases, there is a special drill with an elongated cutting part. It is a kind of glass with slits on the sides. The cuts are equipped with cutting edges. They are best made from well-hardened steel.

This drawing shows an interesting design of the handle - it can be rearranged as the length of the rod increases.
Basic drawings of auger and garden drill
Both of these units work well, but the garden one often has to be removed, and the auger is harder to rotate. Choose according to your own preferences.


Garden drill drawing
Video materials
During pouring concrete mortar each layer is compacted. This is done manually by punching the mixture laid in layers with rods of different materials (metal, wood). All work can be done much faster with the help of special devices - vibrators. But the factory vibrating plate purchased for home use, is not always an economically viable option, because it is expensive. To work for her several times, and then leave her to just lie does not make any sense. In this case, you can make a vibrator for concrete from a perforator with your own hands. Homemade will speed up the tamping process and improve the quality of the work.
To implement the project in practice, you will need the following materials and tools:
- metal (steel) plate of the required dimensions, thickness from 50 to 70 mm;
- an iron bar or reinforcement (rectangular or circular) of such length that it is possible to reach the bottom of the exposed formwork structure when pouring concrete;
- perforator;
- an old drill or a pike, a spatula, a chisel, even a crown;
- grinder with discs for metal;
- welding machine with electrodes;
- ruler or tape measure;
- marker.
The minimum power of the perforator should be 1.5 kW - only such a tool will provide the required performance without overheating.
One side of the rod with a cross section of 15-20 mm is processed so that it can be inserted into the perforator cartridge. A stainless steel plate is welded to the second side. This requires special electrodes.
It is better that the rod also be from of stainless steel. Concrete is an aggressive environment. Ordinary metal is heavily affected chemical substances, and also wears out mechanically faster.
The sequence for manufacturing a tamping nozzle is as follows:
- a grinder cuts a rectangle of the required dimensions from a steel sheet, and a piece from a round or rectangular rod desired length;
- weld the plate to either end of the rod;

- cut off with a small margin seat borax;

- weld it to the rod.

If you do not use an old drill, then you will need to make a special adapter for a punch chuck, or use machine tools to carve a seat on the free end of the rod. It is easiest to immediately use a drill of the desired length. On the basis of a perforator, more complex devices can also be made, for example, with a flexible shaft, which will additionally mix the working solution.
Homemade rammer for concrete small sizes(the simplest manufacturing option) is presented in the video.
Owners of cottages or private houses are often faced with the need to dig holes for fence posts or pile supports. Used for earth drilling hand tool, and equipped with an electric or fuel drive (for example, gasoline). In the first case, the work will take a longer time, and will also require large labor costs. Buying or renting powerful devices is not cheap, so craftsmen figured out how to make a homemade hole drill from a puncher.
But home-made devices, in comparison with factory counterparts, have the following cons:
- they can only drill relatively shallow holes of small diameter;
- they are not suitable for working on hard ground.
Structurally homemade devices consist of three parts:
- perforator;
- conventional earth auger;
- adapter or reducer.
The last 2 parts of the device can be made by hand. For sale even special nozzle (auger) for drilling, which is attached to a powerful puncher or drill. A working tool made in this way is shown in the photo below.

An important point is the amount of power and the number of revolutions of the perforator, which will be used in conjunction with the drilling device. Optimal value first parameter for hand model homemade yamobur is 2 kW. It should be taken into account that, depending on the number of revolutions, the drill can be connected directly to the punch chuck or through a gearbox. For models with a power of 2 kW, the latter is not needed.
Optimal for drilling is the number of revolutions of the working nozzle from 60 to 300 per minute. This value depends on the properties of the soil in the area.
Drilling is performed in two ways:
- continuous;
- with periodic soil extraction.
In the first case, you will need a more powerful tool (with more torque).
Algorithm for making a homemade drill
To make a drill for holes with your own hands, you will need, in addition to a puncher, such tools and materials:
- angle grinder;
- a welding machine with a brand of electrodes corresponding to the metal used;
- electric drill;
- unnecessary perforator drill;
- metal reinforcement or rod for the manufacture of rods;
- material for the cutting part;
- cable and sockets to make a simple extension cord.
The work of converting a perforator into a device that can be used to drill holes in the ground is directly in the creation of nozzles. All work is performed in the following sequence:
- cut off a piece of the desired length from a rod or tube using a grinder (about a meter is enough if the power of the tool is 2 kW);
- knives are attached to the lower end (connection methods and design features of the cutting part are discussed below);
- cut off from the drill its base, designed to install this nozzle in a perforator cartridge;
- weld the cut fragment to the tube.
The simplest version is ready for use in work. If you do not use the base from the old perforation drill, then you will need to grind a seat from the rod for the tool chuck or for the adapter used.
In addition to the manual model, you can make like a stationary drilling rig, possible variant which is shown in the photo below.
To provide power to a homemade yamobur, you will need to purchase or make your own extension cord.
The operation of the created device is shown in the video.
Manufacturing of the cutting part
Used as knives:
- discs from circular saws suitable diameter;
- ready-made augers from factory motor-drills or agricultural machinery;
- a metal sheet from which circles of the required diameter are cut out, sharpening them and bending them as needed.
The cutting part can be made removable (bolted) or fixed (welded to the rod). Both options are shown in the photos below.

Cutting part design must meet the following parameters:
- be larger in diameter (5 mm is enough) than given parameter at the created holes;
- it is necessary that the angle between the blades is 25-30 degrees;
- the front (cutting) part of the knives should be sharpened at an angle of 45°-60°.
It is desirable to make the tip of the drill from a drill designed for drilling metal, so that the tool enters the soil mass more easily.
At its core, converting a perforator into a vibrator or an earthen drill consists in making a nozzle that is appropriate in terms of functionality and size. Difficulties can arise only if you independently prepare a seat on the rods for a cartridge or adapter. In general, the manufacture of the considered options will not require much time and effort.
A hard-working person always has a lot to do both at home, in the workshop, and on the garden plot. But you never know where you may need a completely simple device - a modern embodiment in metal of the principle of "Archimedean screw"!
Of course, like many other things, the designated tool, even on a gasoline engine, can now be bought at a specialized store. But for a real master, who also knows how to count his money, there is no problem in how to make a drill with your own hands.
It is enough to assemble this device of high quality and convenient for operation in order to understand how much the horizon of possibilities of a person who wishes to make his living space as comfortable and functional as possible will expand.
Hand drill for the earth, its design and purpose
As already mentioned, the drill is perhaps the simplest mechanism that converts a person’s muscular effort or an engine impulse (if we are talking about a motorized version) into the rotational-translational movement of a large “drill” (Fig. 1).
The simplicity and reliability of this device emphasizes the minimum number of its components.

Figure 1. Earth drill - a device designed for drilling holes in the ground.
If you do not take into account some additional details, then conceptually it consists of only three elements - a metal (sometimes wooden, which is worse) pole (rack) or a pipe attached to it at one end of the auger and a rotary handle (lever) attached to the other sides.
The auger, which forms a classic Archimedean screw, can have a number of additional blades for improved penetration of a particular soil mass, and the handle-lever can be made in the form of a T-shaped crossbar, a cross-shaped design, or in any other form that seems most acceptable to the customer For effective work with a storm.
This device is widely used in geological exploration and construction work, in gardening and during men's leisure activities such as winter ice fishing. It will greatly help a person who needs to dig several planting holes in the garden, make in the yard drainage wells, make a number of recesses for mounting piles, etc.
Depending on these and other purposes of using the tool, all drills may differ from each other in size and have different auger configurations. However, they all operate on the same principle.
Materials and tools necessary for the manufacture of the drill

Before proceeding directly to work, you should stock up on all necessary materials and tools. The master will need:
- line segment gas pipe(for the manufacture of a vertical rack);
- a fragment of sheet steel of high strength (for the production of propeller blades);
- a piece of smooth reinforcement (metal rod) with a diameter of 16-20 mm (for making a handle);
- apparatus for welding;
- welding clamp;
- lathe;
- emery circle;
- electric drill;
- a set of drills for metal;
- angle grinder (grinder) with a disc for metal;
- gas key;
- mounting vice.
How to make a drill: sequence of operations
The manufacture of a drill (Fig. 2) begins with the production of its blade. For this purpose, a steel sheet is taken, from which round blanks are cut. They are made in such a way that the diameter of the circle is about 5-6 mm larger than the diameter of the planned well in the ground. Enough for a standard drill minimum quantity in 2 disks.

Figure 2. Drawing of an earthen drill.
Then in round blanks drilled center holes. For convenient mounting on a rack, their diameter should exceed the diameter metal pipe- the future rack - by about 1-2 mm.
The next step is to designate the points where the disks will be attached to the rack. At these points, holes should be drilled in the pipe. For attaching discs to lathe metal bushings are made. They also make radial threaded holes. The bushings bolted to the post will attach the detachable auger blades to the post.
Further, with a grinder with a cutting wheel, small sectors are cut from the edge to the center in the blanks of the blades. After that, with the help of a vice and gas wrenches, the edges of the cuts are gently stretched in opposite directions. As a result, each circle should get a spiral look. To complete the preparation stage of the blades, the lower edges of their cutouts are sharpened at an angle of 50-60 degrees.
Let's go to the counter. So that the drill can easily enter the mass to be processed, at its end, where the screw will be formed, a metal drill is welded by welding. The tip itself for this purpose is sharpened at an angle of sharpening of 20-30 degrees.
The final phase in the manufacture of a hand drill is the installation of a lever handle, which will carry out the axial rotation of the entire device. To fix it on the rack, a special sleeve is used, previously machined on a lathe. The handle must be removable, since when drilling to great depths, you will probably need to extend the stand more than once with additional elbows. The manufacture of these knees should be taken care of separately.
Do-it-yourself drill: other design options

Figure 3. A - a diagram of a drill with an auger of a recycled grain harvester, B - a diagram of a drill with a pan-shaped container, C - a diagram of a drill with auger blades made from used disks.
Along with the described standard drill, it is possible to offer some other options for the manufacture of hand-held drilling fixtures, which use elements of well-known designs that have already been in use.
In particular, it is possible to make a drill, in which an auger is used, which once stood on a recycled combine harvester (Fig. 3, a). At the bottom of the auger, the diameter of which is approximately 130-150 mm, closer to the end of the rack, an auxiliary blade is mounted, made up of two old cultivator paws. They should be welded to the rack in such a way that the angle between them and the plane perpendicular to the rack axis is 25-30 degrees.
It is possible to manufacture a drill using a container shaped like a pan (Fig. 3, b). The specified element is mounted on the rack through a hole drilled in the center of the bottom of the container. The stand at the bottom ends with a drill with a diameter of up to 25-30 mm. Two knives are attached to the container body from opposite sides. Slots up to 40 mm wide are made in front of both knives in the bottom of the pan - through them, during the rotation of the drill, the waste soil will flow into the container and accumulate there. When filling the container, the drill is removed from the recess, the contents are poured out and lowered into the well again.
The third option, the simplest one, is a drill, in which the auger blades will be used disks, previously cut into two equal hemispheres (Fig. 3, c). These parts are welded to the metal post at their center point. Moreover, improvised blades must be attached to the rack in the same place, at a distance of at least 900 mm from the lever handle.
To impart the properties of an effective drill screw to the said semicircles, their planes must be inclined in opposite directions with respect to each other, while the angle between both planes is set at least 30 degrees. This option, despite all its simplicity, it has a very high operating efficiency - such a drill can drill a meter well with a diameter of about 15 cm in 10 minutes.
A few points to consider when making a drill

To make the drill not only of high quality, but also practical in the widest possible range of applications, a clear understanding of a number of important factors and following the relevant recommendations will help. In conclusion, they deserve special attention.
For example, in the production of a universal hand drill, which can perform operations of various purposes and volumes, it is recommended to provide that the auger blades are not welded tightly to the rack, but are removable. This circumstance, as well as the presence of a whole set of round blades of different diameters and configurations, will surely make this tool a truly multifunctional device, useful in many situations.
It is known from practice that 9- and 12-cm drill blades are best suited for drilling holes for top dressing and planting seedlings of plants, wells for determining the level ground water, pits for the installation of greenhouses and installation of underground utility tunnels. Blades with a diameter of 17 and 25 cm will best suit those who plant plants with taproots, fill the supports of various fences, fences and other small outdoor structures, arrange compost pits building wells.


