Every home craftsman can make a carpentry workbench with his own hands. It takes a lot of time for this work, but the benefits of a well-equipped workplace cover both labor costs and investments in building material. In this article you will find complete information on the independent construction of workbenches for carpentry.
Carpentry workbench - workplace optimization
A comfortable work surface is useful to any master. A carpenter needs a well-equipped work area more than other specialists. After all, he will have to deal with large-sized workpieces, the length of which reaches 3 meters, and in this case he cannot do without a well-designed workspace. Even a simplified folding workbench allows you to process timber or boards and assemble products from the resulting blanks. A large tabletop with stops makes it possible to fix the lumber in any position, processing not only the surfaces, but also the edges of the timber or board. A special vise will help fix the workpiece during sawing, drilling or joining several elements.
In addition, you can store parts of future products, tools and all sorts of household trifles in drawers and on the shelves of the workbench. Moreover, not only a carpentry version made of wood, but also a metal workbench, assembled on the basis of steel corners, can be turned into a convenient storage. At the same time, a master who is not too familiar with construction can make a carpentry workbench with his own hands, streamlining and optimizing the space in the working room. To do this, you will need general drawings or an understanding of the design of the workbench, Construction Materials and step by step assembly instructions. You can find all of this below.
Varieties and arrangement of workbenches for carpenters
In modern carpentry only three workbench designs are used. Firstly, the mobile version is a portable design that can be installed even on a balcony. This model is also useful for those masters who wish to receive universal workbench for metalwork and carpentry. The main advantage of this option is small size, the main disadvantage is a small storage area. You can't put all the tools in such a table.
Secondly, a stationary workbench is an option for a full-fledged workshop. To accommodate this model, you need a spacious room, but it will fit into large garage. This workbench can be both wooden and steel - it is possible to assemble any structure, because it does not need to be moved. The main advantage of the model is its wide functionality, multiplied by an extensive storage space. The main disadvantage is the size and the need for a large amount of building materials.

Third, modular design- Workbenches of this type occupy an intermediate position between stationary and mobile options. The model structure allows you to build up and shorten carpenter's table, legs and other elements. Therefore, the main advantage this option- a combination of optimal dimensions and functionality. And the main disadvantage is the complicated design. Building a modular metal workbench with your own hands is not so easy, and you may have problems with wood.
As a result, the optimal model for self construction it is the stationary version that should be recognized, since the mobile one does not provide all the benefits, and the modular one is too complicated during assembly. At the same time, regardless of belonging to one of the varieties, any workbench contains the following structural elements:
- Support (frame, frame) - a system of vertical and horizontal beams that hold the tabletop, workpieces and tools.
- Work surface (tabletop) - in the language of professionals, this element is called a workbench. It makes all the necessary grooves and recesses for the stops, which are useful for fixing the workpieces being processed. Therefore, such a board must be massive and reliable.
- The front vise and box are essentially huge clamping blocks that compete with clamps. They fix the workpieces at an angle to the plane of the desktop, pressing them against the side edges of the tabletop. Moreover, a folding workbench has only one vice, and a stationary one has at least a couple of clamping blocks.
- Shelves are storage areas that are located under the countertop.
And all these parts, with the exception of some parts of the clamping block made of metal (screws and nuts), are assembled from wood, which simplifies the selection of structural materials for building a workbench.
What materials are needed for assembly - getting ready to work
You will be able to build a carpentry or locksmith workbench with your own hands only if you get the following materials:
- Plywood sheet with a thickness of 18-20 millimeters and overall dimensions of 2.5 × 1.25 meters. And try to choose a perfectly flat sheet, without bubbles and dips on the surface - it will go to the countertop.
- Bar 10 × 10 and 6 × 6 centimeters. The frame will be assembled from these elements, therefore, we need about 4 meters of "ten" (for legs and crossbars) and at least three meters of "six" (for strengthening elements). At the same time, try to choose a timber without knots and cracks.
- Boards 2 meters long - they will come in handy during the assembly of the countertop. And upon completion of them you can.

In addition, we will need the following tools: a drill with a pen and conventional drills, a circular saw(disk), clamps, glue Moment(on wood), square, level, bolts with nuts and furniture screws with corrosion protection. After all these materials and tools are purchased and brought to the place of placement and assembly, you can build a workbench out of wood with your own hands, based on our step-by-step instructions.
Do-it-yourself assembly - step by step instructions
Before you do, try to read this instruction from beginning to end, scrolling through all the assembly steps described below in your head. If you understand the whole procedure, then making a workbench on your own will take you a minimum of personal time. Moreover, our step-by-step instructions are designed for people with minimal experience in carpentry. Well, the assembly process itself is as follows.

At the first stage, we assemble the table. To do this, shorten the plywood sheet to 1.52 meters circular saw and divide into two parts. As a result, two blanks with dimensions of 1.52 × 0.61 meters remain in the hands of the master. They will serve as the basis for the countertop. And the rest of 0.98 × 1.25 will be useful to us in the future. The next step is gluing the array of the workbench table from two plywood blanks. To do this, you need to lubricate their surfaces with glue and, having folded the plywood boards, tighten them with clamps, and a 30-kilogram load can be placed on the central part. Moreover, three 1.5-meter boards must be placed under the clamps, providing a snug fit when placed along the long edge of the sheet.
In addition, it is necessary to take into account the fact that when gluing plywood sheets must be connected by convex sides (when superimposed on each other), otherwise the entire array will turn into an arc, which is undesirable. Next, we move on to reinforcing the 36mm glued array. To do this, we need to cut strips 15 centimeters wide from the remnants of the plywood panel and glue them around the perimeter, with reverse side countertops. The end result should be a 54mm thick table made up of three 18mm layers of plywood. Moreover, the amplifier strips will play the role of stiffeners.
After that, we cut the array to the dimensions of 1.5 × 0.6 meters. This step will allow you to trim the ends, eliminating the overlays and protrusions that formed during the assembly of the countertop from three layers of plywood. The trimming itself is carried out with a circular saw at a low tool feed. The circular paper must be driven very slowly over the plywood, otherwise you will get torn edges. The next stage is the assembly of the vertical elements of the bed. To do this, we saw a beam of 10 × 10 centimeters into four segments 0.9 meters long. We get vertical supports. And as prolegs (lower screed between vertical beams) and tsarg (upper screed) we will use a 6 × 6 cm beam, cutting out the corresponding grooves in the legs. The attachment points of the prolegs and the tsarg should be smeared with glue and reinforced with bolts or self-tapping screws.
Next, we must install the vertical supports at the location of the workbench and assemble the entire frame by pulling them together using horizontal longitudinal ties. They can be made from a beam of 6 × 6 centimeters, fixed in a spike or overlap, on bolts or self-tapping screws.
We will lay shelves from 1.5-meter boards on the lower screeds, and a countertop on the upper ones. Therefore, before attaching the screeds, we must track the vertical and horizontal of the assembled frame. Otherwise, the table will be tilted. The tabletop is fastened to the frame with 8 mm self-tapping screws, the heads of which must be sunk into the holes drilled pen drill. Before fastening, the table is pulled to the upper longitudinal screeds and drawers with clamps.
This completes the assembly of the table, and we can proceed to the installation of the vise. Moreover, not everyone can make a carpentry vise for a workbench with their own hands. Therefore, we suggest that beginners pay attention to ready-made models, the installation of which takes place in the following sequence: we fasten a fixed vise jaw to the end of the table, and fix a threaded element on it. We pass two threaded guides through the holes in the movable sponge, screw them into the fixed sponge. We insert the handles into the heads of the guides, by rotating which you can move the movable part of the vise to the stationary one.
Once the vise assembly is completed, you can use the workbench as you wish. Moreover, round or rectangular holes for stops can be cut into the countertop as needed, positioning them as you like.
The locksmith's workbench is a desktop with a wide range of purposes. It allows you to carry out locksmith, repair, electro installation work, processing various materials. A workbench should be in any home workshop. Masters prefer to design it with their own hands to make it as convenient as possible for themselves.
Components of the device
A good locksmith workbench is a table with a solid metal surface. Wood is not allowed as the main material: it is easily soiled with machine oil or other lubricants. Since metal products are processed on the locksmith's table, therefore, in wooden tabletop chips will be constantly delayed. However, boards are sometimes used in combination with steel or other similar material. This combination allows you to simplify and reduce the cost of assembly, without much loss in strength.
Attention! In addition to locksmith tables, there are carpentry, which are engaged in wood processing. These workbenches are not as strong, but they are easier to build. It is not recommended to make metal parts on them.
The design of the workbench for metal work resembles an ordinary desk, as you can see in the photo. On the table should also be:
- Drawers and shelves for storing equipment and consumables (can be located above or below the countertop, in a cabinet or just like that).
- Force shield to hang the tool.
- Vice.

Metal workbench
The workbench itself should be under a roof in a workshop, garage or other similar room. You have to think over the location of the parts in the case in advance and reflect in the drawing, based on your own convenience and the size of the room. It is more comfortable to work on a large workbench. But often the dimensions of the workshops limit this parameter.
Advice. Optimal Height table - the distance from the floor to the elbow of the lowered arm.
Materials and equipment for mounting the workbench
The table must have the following properties:
- strength;
- support frame stability;
- reliability.
A prerequisite for the correct and safe operation of a locksmith workbench is good lighting. For him, first of all, you need sockets that will be located near the workplace. The lamp is made stationary by hanging it on the wall or fixing it on the workbench itself. The second option is more practical, because it eliminates unnecessary difficulties when moving the table.
Consumables and tools for assembling a metal workbench:
- 2mm steel sheet for countertop;
- edged board (thickness - 50 mm, desired width - 250 mm);
- a pipe with a diameter of 40-50 mm or a corner 4 mm thick for the base and legs;
- Bulgarian;
- welder;
- electric drill;

- nuts and screws;
- file and hammer;
- paints with a brush.
The device of a locksmith's workbench is a rigid metal base (made of corners or a square pipe). To decorate the countertop, it is better to use a 50 mm beam. A steel plate up to 6 mm thick is stuffed on top of it. To fasten all metal parts, use welding, but you can also screw in bolts.
Mounting the frame of the workbench and the base for the tabletop
Before proceeding directly to the assembly, carefully look at the prepared drawing. Once again, make sure that the dimensions of the future workbench fit into the dimensions of the room where your metalwork tool(garage, shed or workshop). The installation of the table begins with the creation of the frame:
- From the corner cut 4 legs of the same size.
- Connect them at the top with horizontal bars of the same material. Use welding. The result should be a rectangle (top view) of the given size.
- Additionally, make a stiffness line by once again fastening the legs in the same way with horizontal jumpers at a height of about 15 cm from the floor.
- If you have a cabinet with drawers on the side under the cover of the workbench, then weld a couple of additional supports for it.

After that, you can start assembling the countertop:
- make holes for bolting along the perimeter of the horizontal metal crossbars;
- cut the boards to the length of the table;
- lay them to each other without cracks and gaps, secure in this position;
- make holes in the wood to match the holes in the corner.
Advice. On the top side of the boards, the holes should have extensions. The bolt heads will go deep into them to wooden surface the table top remained flat.
The final stage of assembly of the workbench
The tabletop will be ready after metal plating. To do this, simply cut a fragment of the required size from the prepared sheet and fix it to the wood base using self-tapping screws. Please note that after screwing them in, burrs may remain on the metal. They should simply be filed with a file.
If you have provided boxes or shelves in the design of the workbench, use the simple technology for their manufacture. As a material, ordinary 15 mm plywood is suitable. The boxes are assembled with screws. One accounts for about 15-20 pieces. Shelves are easier to attach to the corner, but for boxes you will have to additionally buy guide strips - skids. They are welded to the frame.

The same plywood can be sheathed on the sides of the table and make a screen on its back side. For greater stability, the masters recommend attaching rectangles or pieces of a corner to the bottom of the supports. Will help in this matter welding machine. If necessary, screw a vise to the workbench. Finally, treat all steel structural members with metal paint to avoid rust.
Making a workbench for metal work is not very easy, but it is quite possible if you approach the matter responsibly. But you will be convinced that not a single purchased table can be compared in quality with a hand-assembled product.
It's no secret that well-equipped workplace- the key to the successful implementation of locksmith, electromechanical or installation work. The main subject in the garage or workshop, around which everything is arranged work zone, is a workbench. This desktop must have the necessary functionality, be durable and reliable. Purchase finished product in the distribution network can result in a tidy sum, so it is better to make it yourself. This will make it possible not only to save money, but also to get a garage table in strict accordance with the requests for functionality and placement.
Workbench with your own hands. How to do?
Below we will tell you how to make a wooden or metal workbench with your own hands. The presented designs do not require the use of any scarce parts or the use of expensive equipment, and during the installation process, you can get by with minimal carpentry and locksmith skills.
Making a workbench with your own hands (from wood)
Manufacturing carpentry workbench with your own hands has a lot of advantages, which are that you can pre-arrange the locations of the vise and other devices, think over the number and location drawers etc.
Necessary tools and materials
To make your own workbench, you need to prepare the following tools:
- electric jigsaw or a hacksaw;
- electric drill and a set of drills for wood and metal;
- joiner's square;
- roulette;
- bubble level;
- set of wrenches.
- When stocking up on materials, be sure to pay attention that the wooden parts do not have cracks and knots. To get started, you will need:
- bars for support legs 100x100 mm;
- two plywood sheets with a thickness of at least 20 mm (OSB can be used). In this case, one sheet will go to the table top, and the other to the bottom shelf.
- boards 50x150 mm, from which the frame will be mounted;
- bolts (it is best to use furniture ones, with a square part that prevents them from rotating in wooden parts);
- washers and nuts;
- self-tapping screws.
To facilitate assembly and avoid mistakes when cutting material, it is better to make drawings of a workbench and indicate the dimensions of each part on it.

DIY workbench drawings
Workbench with your own hands. Step-by-step instruction
First of all, you need to make upper frame underframe. To do this, in accordance with the drawing, boards of the desired length are sawn off.

Using self-tapping screws, long and short parts are fastened in such a way as to obtain a rectangular frame. After that, measure the distance to its middle along the long side, where the spacer bar is installed. In its capacity, the same board 50x150 mm is used, which is attached to the frame from both ends with self-tapping screws.

Workbench made of wood with your own hands. Photo
Support legs a workbench is made from 6 identical bars. For their fastening to the upper frame, long bolts with nuts and washers are used. To mount the support, the bar is placed in the corner of the frame and two holes are drilled. through holes through the leg and side board. Then the connections are tightened using bolts with nuts.

To achieve the necessary rigidity of the structure, the lower boards are mounted. By the way, these same details will serve as the basis bottom shelf. To do this, in full accordance with the drawings of the workbench, saw off 4 wooden parts with a section of 50x150 mm.

To fix the bottom boards, measure 30 cm from the edge of each support. At this height, one piece is attached to the three rear legs of the structure, and from the front board is attached between the middle and side supports on the side where it will be installed additional shelf.


Two short boards are mounted at the same height on the sides of the workbench.

Using an electric jigsaw or hacksaw, parts are cut from OSB sheets or plywood for countertops. It is fixed flush to the top of the desktop with self-tapping screws. To protect the surface of the workbench from damage, a layer of hardboard is laid on top of the plywood, which, as it wears out, can be easily replaced with new material. To install the bottom shelf, measure the distance from the middle to the extreme legs. The material is cut to this size and with a jigsaw or a hacksaw in its corners cutouts are made under support legs. The fastening of the shield to the lower base is carried out similarly to the installation of the table top.

To obtain the stability of the frame structure, when attaching the supports and assembling the frame of the bench workbench, be sure to use joiner's square. After installing the workbench, bubble level check its horizontal position. If necessary, the level can be changed by placing small segments thin plywood under the legs.

Workbench with your own hands. Step-by-step instruction
After the assembly is completed, the workbench is impregnated with a special protective composition, varnished or painted.

Small workbench for home DIY
The design of the locksmith workbench proposed below will greatly facilitate locksmith and installation work not only in a small garage, but also on a balcony, in a corner of a utility room, etc. With all the functionality and convenience of a full-size desktop, it won't take up a lot of space and can fit a variety of tools and accessories in its drawers.
table top small workbench It is made of two sheets of plywood glued together with a thickness of at least 18 mm and has dimensions of 1500x600 mm. To strengthen the table top, it has an additional thickening at the edges with two layers of plywood sheet, which gives a thickness of 72 mm.
Considering that 18 mm thick plywood is not the cheapest material (the cost of one sheet is about 1000 rubles), you can save a little if you buy a full-size sheet with dimensions of 2440x1220 mm. Unfortunately, this material is not enough to make a reinforcing strip, which is located around the perimeter of the lid, so you will have to additionally look for a small piece of plywood sheet. Otherwise, the design of the countertop will have to be changed.

Starting to build a small carpentry workbench with your own hands, prepare the following tools and materials:
- a rule with a length of at least 2 m;
- Circular Saw;
- joiner's square;
- notched trowel with a tooth size of 2x2 or 3x3 mm. Can buy finished tool or make it yourself using a grinder;
- screwdriver or a set of screwdrivers;
- spanners;
- good wood glue, for example, "Moment Joiner"
- plywood 18mm thick;
- wooden beam 40x60 mm;
- self-tapping screws;
- bolts, nuts, washers.
In addition, for the independent manufacture of a workbench, you need to acquire good carpentry clamps, without which it will be problematic to glue plywood sheets. If quality tool it is not possible to purchase, you can use inexpensive Chinese clamps, which will need twice the amount.
The process of making a workbench with your own hands begins with lids, on which a strip 1520 mm long is cut from a sheet of plywood 2440 mm long. Sawing this part, they get elements measuring 1520x610 mm to reinforce the sides of the lid. Then the rule checks the plane plywood sheets, in order to orient them with a convex surface inward when gluing.
The next step will require maximum concentration and accuracy - within a couple of minutes you need to evenly distribute wood glue on the surface of one sheet of plywood. If you feel that a lack of experience will not give you the opportunity to cope with this work in such a short time, then use PVA furniture glue to connect wooden parts. It has no time limits and allows the application of a simple paint brush. Having prepared the clamps and boards in advance to distribute the load over the entire plane, lay the bottom sheet on three boards, and after applying the adhesive, cover it with the top plywood shield.

Having installed the pressure boards on top, tighten the structure with clamps, constantly controlling the flatness with the help of the rule. The place in the center of the tabletop cannot be pressed with a clamp, so it is left unloaded.

When gluing a shield from several sheets of plywood, you can do without clamps if you put the structure on flat surface and evenly press over the entire plane with some kind of load. After the glue dries, the clamps or the load are removed and proceed to the next step in the manufacture of the workbench with their own hands.

So that the tabletop has a strict geometric shape, when cutting it parquet you have to be very careful. A rule can be used as a guide rail for a saw. When cutting the tabletop to dimensions of 1500x600 mm, maintain 90 ° angles using a carpenter's square or using the factory corners left when cutting plywood as a template. Dissolve the remaining scraps of the plywood shield into strips 150 mm wide. You will need them to reinforce the tabletop around the perimeter, so glue them around the entire edge of the tabletop in two layers. In this case, the upper strips should overlap the joints of the lower pieces of plywood.

For the manufacture of underframe use a bar with a section of 40x60 mm. At the same time, the tsargs and prolegs are made of solid lumber, and the supports are glued from two segments and one whole beam. The height of the workbench is chosen taking into account your height, since when using it there should be no inconvenience and discomfort. In our case, the height of the workbench from the floor to the top surface of the tabletop is 900 mm.
Next, glue the legs and assemble two frames. In this case, it is important to observe the perpendicularity of the connections, since when deviating from right angle the geometry of the structure will be broken. It will be easier to achieve this condition if, even at the trimming stage, the angles of all parts are strictly at 90 °. In our workbench, the frame width is 900 mm and the height of the support legs is 830 mm. The gap from the floor to the bottom prong should be 150 mm.

After the glue has dried, the frames are mounted on the countertop and fastened with clamps. Then the legs are set strictly at an angle of 90 degrees to the bottom surface of the plywood shield and another set of prolegs and tsargs are cut out. For fixing the structure to the tabletop, self-tapping screws 8x120 mm are used.

You can increase the stability of the workbench if the prolegs and drawers are additionally fastened with the same self-tapping screws. By choosing a recess for the head of the hardware with a pen drill, they ensure the aesthetics of the joints.

The workbench is almost ready. If desired, a box for storing tools can be made in its underframe.

Do-it-yourself metal workbench for the garage
A workbench made of steel has the necessary strength and reliability that are required when working with metal products. Such a desktop can add functionality to any garage or workshop.
Materials and tools
To start making a workbench in the garage with your own hands, you should acquire the following locksmith tools:
- angle grinder with cutting and grinding discs;
- welding machine;
- building level;
- electric jigsaw;
- drill with a set of drills;
- screwdriver;
- measuring tool.

Do-it-yourself metal workbench drawings
Some of the materials that are needed for the workbench can be found in the garage, and the missing parts can be bought in the construction market. You will need:
- steel corners 50x50x4 and 40x40x2;
- profile pipe 60x40x2;
- steel strip 40x4 mm;
- steel sheets 2200x750x2 mm;
- boards 50 mm thick;
- 15mm plywood and drawer rails;
- metal screws and bolts.
Also, prepare the paint and rust converter to make the product look aesthetically pleasing and the metal to be protected from moisture.
Step-by-step instructions for making a metal workbench
cutting material. A profile pipe is cut into the frame. The steel corner is used to strengthen the structure and edging the table top. The metal strip is needed as guides for the side panels and for the manufacture of drawer brackets.
Frame welding. From pipes 2200 and 750 mm long, connected in pairs, a rectangular tabletop frame is mounted. At the same time, it is taken into account that on top of the frame it will be necessary to weld the corners into which the boards are laid. working surface. To strengthen the frame, segments are welded every 400 mm steel pipes as stiffeners.

How to make a workbench with your own hands from metal. Photo
Support legs 900 mm long are mounted along the edges of the table by welding, which are reinforced at the bottom with jumpers from a corner or profile pipe.

On both sides, the frames of the drawers of the workbench are welded to the legs.

Corners for edging are installed on the frame of the tabletop, after which they are fixed with a welding joint.

From a corner with a length of 2200 mm and 4 corners with a length of 950 m, a crate of a power vertical panel for a tool is equipped.

The finished frame is strengthened steel bar brackets, which are welded to its sidewalls. For strengthening, 24 elements are required. Additionally, it is required to drill holes in each strip for mounting the side and rear plywood walls.

Plywood is cut into pieces for the manufacture of boxes, after which they are assembled using self-tapping screws. The number of boxes and their location depends on the specific needs and personal preferences of the owner.

After assembling the drawers, metal strips with holes for attaching the slide are welded to the sidewalls of the frame.

All welds and sharp corners go through a grinder with a roughing wheel installed, and the rusty sections of rolled metal are cleaned with a metal brush nozzle.
The metal frame is treated with an anti-corrosion compound and painted with weather-resistant paint.
The boards are cut along the length of the countertop and placed in a frame from a corner. To prevent rotting and damage to wood by insects, the boards are treated antiseptic composition.

The lumber is placed in a prepared bed, leaving gaps of 2-3 mm between the wood and the metal to allow the wood to expand when it swells. After that, the boards are screwed with self-tapping screws.

The upper steel sheet is treated on both sides with a rust converter, and after drying, it is attached to a wooden table top with self-tapping screws.

They paint the drawers of the table and install them on the rails, and also attach the side and back plywood sheathing.

After the workbench is made, install a vice and more necessary equipment, attach hooks to accommodate the tool.

What is a workbench
The workbench is a table designed for work related to the manufacture and installation of products made of wood, metal and other materials. Often, workbenches are additionally equipped with equipment for fastening workpieces, drawers and shelves for storing tools and accessories. Depending on the intended purpose, carpentry and locksmith workbenches for working with wood and metal are distinguished, respectively. Work tables for workshops and garages can be single or multiple. Workbenches designed for one workplace have a width of up to 0.8 m and a length of up to 1.5 m. The dimensions of multi-seat locksmith tables increase according to the number of people working behind them. The distance of the working surface from the floor is usually 0.8 - 0.9 m, however, there are also designs with adjustable height. Workbenches are most often made of metal or wood, and their countertops are covered with sheets of plywood, hardboard, galvanized sheet, boards and other materials.
Now you can buy almost everything. The same applies to garage equipment - the simplest, small locksmith table will cost about 6,000 rubles. In principle, there are many models, and you can always choose something.
However, they have a very significant minus, which makes one think about abandoning the purchase and making a locksmith workbench with their own hands - dimensions and performance. According to them, the product you like may not be suitable for that segment of the workshop, barn or garage, which is reserved for its installation. How and from what to equip the workplace of a home locksmith, we will consider.
Determine the location of the workbench
Since he will be assembled with his own hands, then it makes no sense to start a large-scale redevelopment, especially in a room that has been in operation for a long time and is always filled with something extremely necessary for the owner (and from the point of view of his wife, rubbish). IN self-manufacturing a locksmith's workbench is attractive not only in terms of saving money, but also in the ability to draw up drawings of a workbench at your discretion, “adjusting” the dimensions to the room, and choosing the design that is most convenient for you. And not vice versa - move everything that is in the garage for the sake of installing one table.

On many thematic sites and forums, the emphasis is on the location of the electric / shield in the workshop. And the appropriate advice is to “attach” to it. Say, then you don’t have to pull a separate thread to the workbench. How relevant this is for a person who is able to make something with his own hands, the reader will decide for himself.
But the author believes that it is inappropriate to focus on this. Lay a couple of meters power cable- not a problem, and the cost of such a segment will not seem high. Especially since you can find something suitable in old stocks; if not their own, then a neighbor's.
Draw a diagram of the workbench (according to the free area in the home workshop)

Table type - with or without cabinets. First, how many do you need? With two, the workbench will turn out to be more massive, but its stability will be maximum. In addition, the number of shelves or drawers that can be mounted will increase.

Table top length
Usually, homemade workbench is assembled based on the work of 1 person - the owner himself. Optimal (but not mandatory) dimensions (in cm): length - 220, width - 75 (± 5), height - 0.85 - 0.9. Although, according to the last parameter, one should focus, first of all, on one's own growth.

The purpose of the workbench
A do-it-yourself table, although it is called a locksmith, is desirable to make it universal, because it is not known in advance what types of work will have to be done and what exactly to process on it. For domestic use – best option. Therefore, the legs, and especially the tabletop, must be reinforced. Moreover, a vise, e / emery, are usually placed on a workbench.

What to foresee:
- Protective sides (from the sides). Then you don’t have to look for nuts and screws all over the floor, which is often what many of us periodically do. It is advisable to make the side of one of the sides shorter, and mount the table top so that it extends from this edge beyond the frame of the workbench. Very handy when you have to cut or cut something.
- Back panel. The author did just that. For her, I took a sheet of thick getinaks, on which I placed all the necessary controls to turn on / off the line (automatic), lighting devices (switches). There are also sockets for connecting an electric / tool (electric / drill, angle grinder, and so on).
On a note
When mounted on a workbench, electric / grindstone ( drilling machine or other equipment) it is necessary to provide for the possibility of its emergency stop using the pedal. The procedure for compiling such a scheme is a different topic, but the author considers it necessary to indicate this.
Prepare materials
Small range:
- Pipe or corner - for the legs of the workbench. Regarding the latter, it should be noted that it is hardly worth taking less than 45 mm. Over time, such legs, as well as the frame, are deformed.
- Sheet metal - on the countertop. Considering the shock loads that this part of the structure experiences during plumbing work, it is not advisable to take less than 4 mm.
- or corner - for the frame.
- Multilayer plywood, chipboard, OSV or something similar - for shelves. Although some can be made in metal. As a rule, they are located below and are intended for storing massive parts or blanks.

- To the bottom of all legs should be welded "pyataki".
- The assembly of the locksmith table can be carried out both by welding and by means of bolted connections. Both methods have both advantages and disadvantages. But from personal experience the author still recommends using a welding machine. Firstly, the design of the workbench will be much more reliable. Secondly, the master will save himself from the “pleasure” of long and tedious drilling of thick metal and constantly sharpening drills.
- Even in the manufacture of a two-pedestal table, it is advisable to mount a bench. The interpretation of this term is different. The author means the whole metal shelf, which is located at the bottom of the workbench, under the tabletop, and serves not only to place heavy objects on it, but also to ensure greater stability of the structure.
The author considers it unnecessary to give any additional recommendations on the procedure for making a workbench. Explaining to a skilled person how to remove scale, grind corners, process a weld and similar elementary things is just a waste of time. If the general algorithm of actions is clear, then assembling a locksmith workbench with your own hands is not a problem.
If a man likes to work with his hands, then he cannot do without a metal workbench, so any craftsman dreams of making a metal workbench with his own hands. Usually it is installed in the garage, utility room or at the cottage. The workbench itself is made in the form of a tabletop on a metal frame. This large product can be a real achievement in the independent production of tools. If you have a good command of the tools, as well as ingenuity and patience, then you can easily cope with this task.
The concept of a metal workbench
The workbench is called heavy durable table on which metal or wood can be processed. This tool was invented in Germany to facilitate work in workshops. The design of the workbench can be very different, it depends on the individual taste and the nature of the work performed, made of wood or metal. With the help of a metal workbench, locksmith, installation and electrical work is carried out in workshops, repair shops and service stations.
You need to know that workbenches can be metalwork and carpentry. Carpentry workbenches are easier to make, but can only work with wooden details. In the carpentry version, the cover is made of wood or treated with linoleum. If you try to work a metal part on a carpenter's workbench, its coating will quickly absorb oil, and metal chips will constantly get stuck there. Carpentry workbenches are made of wood, so they are not as stable as metal ones.

For a garage, a locksmith's workbench is usually used, on which you can work with metal parts. The table designed for such work has a metal cover. A metal workbench can also process wooden blanks, therefore it is a kind of universal one, which cannot be said about carpentry. When working with metal, the stability of the structure is important, since significant efforts are expended for its processing, which create great pressure on the tabletop.
Metal workbenches can be single and multi-seat. Single tables are designed for one person, multi-seat tables can be used by several people at the same time. The multi-seat option is convenient to use in school workshops, but not in production. One master can perform precise work, while the other is sawing something at the same time, so the stability and result of the work may be violated. The workbench should be well matched to the master. In this case, the work will be done professionally.
Design and principle of operation
The classic metal workbench has a table, a lid, and a benchtop that is usually made from softwood. locksmith workbench has a durable metal carcass and a lid, which is endowed with tripartite sides. Metal tables are made from a thick sheet of plywood or MDF, which is additionally covered with a steel sheet. Tabletop metal workbench sharp corners does not, which prevents the occurrence of injury to the locksmith through negligence.
The drawers of the metal workbench for storing large inventory, which are located under the tabletop, are equipped with guides that prevent them from accidentally falling. Also, such desktops can be equipped with a protective screen, which is flat shield that is attached to back wall table. It prevents wall contamination and allows you to place the necessary tools in the immediate vicinity of your own workplace.
The legs are characterized by a large surface area and high strength, they are additionally fastened together at the bottom. At the joints, there can be a shelf for storing various components, varnishes, materials and large tools. As a rule, a metal workbench is equipped with two vices, a special stop device and a clamping screw.

Today, workbenches are used with special holes in the tabletop, which are designed for various stops and clamps. Also, for the maintenance of tools, different compartments and shelves are provided on the desktop. Tables are additionally equipped with such equipment as perforated panels, fluorescent lamps, sockets, tool holders.
Metal workbenches can work with iron and wood. They perform various operations - grinding, sawing, turning, cutting, etc. On regular table so many tools cannot fit, besides, it must be very strong, and it will not be possible to bend the sheet of iron. For this, metal workbenches are needed, which are made of high-quality steel.
A workbench with a screen and bedside tables will be able to store various screwdrivers, keys, various pencils, blueprints, sandpaper, hammers, nails, small parts etc. Such a device is very convenient for work, it allows the master to perform his work very accurately without spending much effort. That is why many masters decide to make it on their own.
Choosing a metal workbench
When buying a metal workbench, you need to use some recommendations. The indisputable advantage of modern workbenches is the ability to quickly assemble and disassemble, because in this case, transportation and installation metal workbenches requires minimal cost and effort, thereby reducing the cost of acquiring the equipment you need.
The main part in the design of the workbench is the cover, where the vise is installed. Do not forget that the vise can be mounted across and along the bench, which allows you to manipulate products in both directions. The greater the thickness of the cover, the more comfortable and convenient the metal workbench will be in operation. The average value of the thickness is most often 60 - 70 millimeters.

Remember that different models of metal workbenches have a worktop of different strength. Some workbenches are designed for loads up to 200 kilograms, others - for loads up to 300 kilograms, others can withstand up to 700 kilograms. It is customary to select a model based on ergonomics and the availability of free space. After that, you should decide on the desired number of pedestals that are functionally suitable for your workbench.
The metal workbench under itself can be equipped in different ways, this is only at the discretion of the buyer. There can be all kinds of lockers for keeping tools. However, remember that such cabinets at the same time give the work surface even more stability, as they fill the space under the workbench. Next, you can think about purchasing additional devices for the workbench, screen, tool holders, trays, or ask how to make a metal workbench.
Drawing of a metal workbench
Before proceeding with the manufacture of a metal workbench at home, it is necessary to make a drawing of it and accurately calculate the dimensions of all construction blanks - countertops, legs and shelves. First you need to decide on the height. To do this, the hands go down, and the palms are parallel to the floor. The distance between the palms and the floor will be the height of the workplace.
It is also necessary to calculate the dimensions of the metal workbench. It is worth noting that the longer the countertop, the more convenient it is to work on it. For a table top, a width of about 50-60 centimeters and a length of 1.5 meters will suffice. The tabletop can be made of sheet steel or wood, which is subsequently upholstered with metal.
The frame can be made from metal corners or a profile pipe. Do not forget to provide additional crossbars between the legs for reliability. Instead of spacers, you can build a convenient shelf below, on which you can place varnishes, various tools, paints and details. Keep in mind that a good workbench needs to be very strong, so think about how to attach the legs to the floor in advance.

Do not forget about light sources and sockets, which should be located next to the metal workbench. After that, you can calculate required amount material and proceed to the manufacture of a metal workbench. Many masters neglect this stage and adjust the details to each other already in the process of work.
But this approach is unprofessional, because it is at the design stage that you can take a look at the entire structure and change it a little. Try to do everything carefully, fine-tune and grind parts, work well on sharp metal edges. In this case, the workbench will work for a long time and smoothly.
Preparation for work
Take a close look at your drawing of a metal workbench and once again make sure that you are completely satisfied with the intended option. Think carefully about the size of the tool so that it fits on the working area. Of course, a large workbench is much more convenient, but with a small area, a small tabletop with one shelf will do.
Making a metal workbench without shelves is extremely reckless - you still have to put the tools somewhere. Modern workbenches have a protective screen, which is usually located at the back of the desktop. On protective screen you can make holders that will store different devices. If you want to make drawers, they must be equipped with special mechanisms that will allow the drawers to slide out completely.
In order for the structure to hold firmly, it is recommended to make it from metal, for cutting which a grinder is usually used. For the manufacture of the frame, you can use metal corners with a thickness of 3 centimeters and a size of 40x40 or metal profiles with a section of 30x50 millimeters. You will also need a metal strip to attach the desktop to the main frame.

For the manufacture of countertops, you can use dry boards fifty millimeters thick and one hundred or one hundred and fifty millimeters wide. They are also useful for installing niches that can accommodate tools. Table tops can be upholstered metal sheets, and can be completely fulfilled from them. All-metal workbenches are more durable due to the thick sheet that can withstand the most strong blows and does not deform.
Prepare 2 mm thick galvanized metal in advance, this is necessary to cover the wood on the desktop. Strips of the same metal will come in handy to create bumpers that will protect against sparks when working with metal. The length of one strip should match the length of the workplace, and the length of the other two - the width.
Making a metal workbench
For the future frame of a metal workbench, it is necessary to cut the parts according to the right size and connect them together by welding. If you are not going to install additional shelves, reinforce the structure with stiffeners from the same corner. They should be welded at a height of ten centimeters from the floor and ten centimeters down from the countertop. Don't forget to do the same in the center of the future desktop. To make the frame more stable, weld square metal plates on the future legs of the metal workbench with your own hands.
When you assemble the main structure, you can start creating the desktop frame. From metal corners 50x50, it is necessary to weld a frame, the length of which should be twenty centimeters more sizes designs. This is necessary to secure the vice. After that, in the place where the desktop is attached to the main structure of the tool, strips of metal are welded, and on them - a structure of corners. Protective screens are also welded to the structure.
In the attached tabletop and corner (which is fixed to the frame for rigidity), it is necessary to drill holes to which the boards will be attached. Usually they are fixed with self-tapping screws with a countersunk washer. Next, the tabletop is covered sheet metal, which is also fixed with self-tapping screws in advance drilled holes. You can paint the shelves or treat them with a bio-flame retardant. 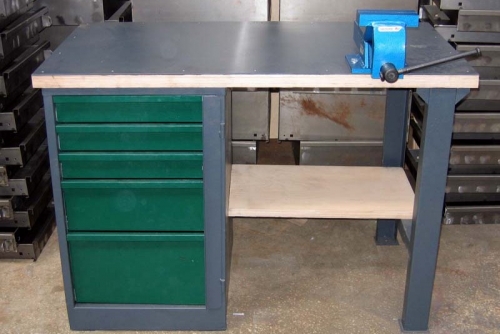
For convenient operation the part must be firmly fixed. To do this, you can use a vice, which consists of two parallel jaws and fixes all the processed elements. When clamping the jaws, the part is fixed. The clamp can be adjusted with a screw, the rotation of which is provided by a long convenient lever.
For a metal workbench, you need to make a metal vise. Remember that the vise must be very securely screwed to the table, so during operation, make sure that the connection is strong. If the workbench is large enough, two vices can be attached to it. Some are fixed from the right end of the tool, and others - in the left corner of the front of the table.
In order not to encounter rust on the workbench and extend its life, the structure can be treated with a special paint for metal, which can protect the tool from corrosion. We hope that these simple recommendations help you create a comfortable and high-quality workbench!
Workbench under the "desk"
In order for the workbench to be stable and withstand relatively large loads, it is made with a solid massive base, which is called a workbench. If your space is too small, you can make a simplified workbench, make it a little smaller, or adapt it to fit an old utility table.
Very often, a metal workbench is disguised as a table with a folding tabletop that covers the top of the workbench. In this case, the table cabinets can be used to store tools. But the usual table structure needs to be strengthened so that the tool can withstand heavy loads. Most tables are about 18-25 millimeters thick, so it is impossible to work with massive parts on them.
In this case, an additional plate is glued to the countertop so that it protrudes from the edges of the desktop by about 50 centimeters. This will allow you to fix clamps, a vice and other devices on it. If necessary, you can strengthen the legs of the table from the outside or inside. To do this, you can use wooden planks or metal corners.
The table tends to loosen over time, so it is better to put it in a corner and attach it to the floor or wall. This can be done with metal corners. Noise may be generated during operation, so you can put felt or other material under the feet. soft material so as not to disturb the neighbors if you work at home. Craft a workbench from desk you can, but keep in mind that to work with massive parts it will have to be well strengthened, so it is much easier to make a metal workbench again.
The use of a metal workbench at home is associated with certain features that relate to the implementation of safety precautions and careful care for such a tool. When operating the table, follow the rules below:
- Be sure to read the safety instructions before starting work. Find and read the instructions for use of the tools you use. If you use the tool correctly, you can protect yourself from injury and keep the workbench in good condition. If you have never used a metal workbench, see how experienced professionals do it.
- You already know what exists different kinds workbenches, so a lot will depend on the purpose of the tool. Remember that you should not process metal blanks on a wooden workbench, as this can lead to sad consequences. For this purpose, you have made a metal workbench.
- When working with a workbench, be sure to use a vise that can secure the part well on both sides. As a rule, the vise on the front of the table moves, while the back ones remain stationary.
- When working with a tool, be sure to use the necessary mount, for this you can even use a special device. The metal workbench must have solid foundation, since the structures being repaired can be very heavy - up to 500 kilograms.
- Each workbench should have bedside tables that will help keep the workplace tidy. There are workbenches with adjustable table height, which will allow you to do the job better. A trash pocket can be installed on the side of the workbench to help keep the workshop clean.
- After finishing the work, do not forget to clean up the workplace well. To avoid a short circuit in the wiring, all electrical appliances must be turned off. Before starting work, you should also clean the surface of the workbench from dust and dirt. Make sure that the tool does not get water, glue or other elements.
- The screws should be fully tightened, but without excessive pressure. If the structure is unstable, it must be re-strengthened.

Thus, every master who dreams of his own workshop can install special furniture there, which will be intended for work and tools. One of the most important pieces of furniture is the workbench. The stores offer a large selection of metal workbenches of various prices, but you can also make it yourself. This approach will create for you the most convenient workplace, where it will be easy and comfortable to work.


