Tiles acting as a material for finishing ceilings have one significant drawback - the presence of noticeable seams, which cannot be eliminated or at least well camouflaged. But she has an alternative, which stands out favorably with a number of advantages. It's seamless ceiling tiles, which has successfully found its niche among materials for finishing apartments, houses, office and other premises.
Types of seamless tiles
This material is slabs made of expanded polystyrene (belonging to the class of foam plastics), with a thickness of 3.5 to 15 millimeters. The shape of the tile can be different (not just square), and the surface has a pattern that folds into patterns when laid. Also, seamless polystyrene foam tiles can reproduce the texture of wood carving, stucco or artistic plaster. The edges are made in such a way that when laid at the joints, the seams are practically invisible (they can only be seen at a very short distance).

There are the following technologies for manufacturing such tiles.
- Pressing– a mass of foamed polystyrene on a stamping press turns into a slab of a certain shape and pattern. Material thickness – 5 millimeters, area (for most brands) – 0.25 square meter for one tile. Tiles made using this technology have the lowest cost.

- Injection processing– expanded polystyrene is sintered in a mold under the influence of high temperatures. The result is thick (8 to 15 millimeters) and durable sheets. Tiles made using this technology have a large selection of patterns and textures.

- Extrusion– polystyrene granules are mixed with foaming agents at high temperature and pressure. The resulting mass is formed into strips, which are covered with a special film and cut into separate slabs. Thanks to the film this finishing material can imitate metal, wood, plaster or stone in texture and color. Extruded seamless tiles are very thin (from 3 to 5 mm) and durable, but also more expensive than other types.
Prices for ceiling tiles
ceiling tiles

Based on their shape, seamless ceiling tiles can be divided into two categories.
- With straight edges. Square tiles with a pattern applied to them using the technologies described above. The dimensions of each individual piece and its edges are made very precisely to ensure that the tiles fit tightly together with the smallest possible gap that will not be visible from the outside.
- With complex edges. This category features various “designer” brands of wavy edge ceiling tiles. When combined together, they form an aesthetically attractive pattern that gives the room uniqueness.

Advantages and disadvantages of tiles
Why are seamless foam tiles so popular? This question can be answered by citing full list her merits.

Important! When cleaning seamless tile finishes, do not use household chemicals, containing various solvents - they can easily damage the foam.

But in addition to its advantages, any material also has its disadvantages.
- Fragility – when working with expanded polystyrene panels, you should be extremely careful.
- Lack of vapor permeability - seamless tiles do not allow air to pass through. For city apartments with concrete floors this is not critical, but for country cottages with wooden floors and thermal insulation a big problem– if air exchange is disrupted, it can accumulate above the ceiling excess moisture.
- When exposed to high temperatures, polystyrene foam tiles may partially peel off from the ceiling. To prevent this, you should take a responsible approach to choosing and purchasing glue.
- The finishing does not burn in a fire, but it emits a lot of smoke and a certain amount of substances harmful to humans.

Rules for choosing tiles
The first step to a beautiful and durable ceiling is choosing a quality finish. This fully applies to seamless ceiling tiles. There are several signs of a well-made and high-quality material.
First, pay attention to the back surface of the ceiling tiles. It should be perfectly smooth, without any depressions or swellings. Their presence indicates a violation of the material manufacturing technology, which means that the tile may have other defects that cannot be immediately noticed.

Second, carefully inspect all the edges of the ceiling tiles. There should be no chips or other damage, otherwise they will be visible at the junctions of the panels with each other.
Advice! Be sure to try connecting two or more tiles together, especially if they have wavy edges. Check that there are no visible seams between them.
Thirdly, check the patterns and, in general, the entire outer side of the seamless tiles - there should be no depressions, inclusions or other defects. When connecting several panels, an even pattern without displacement should be obtained.
Fourth, take one of the tiles and carefully lift it, holding one of the corners. Good material In this case, it should not break or bend too much.
Prices for seamless ceiling tiles
seamless ceiling tiles

By checking several slabs from the packages you purchase based on the characteristics outlined above, you can fully verify the high quality of the material.
Table. Popular brands of seamless ceiling tiles.
| Name | Type | Dimensions, mm | Manufacturer |
|---|---|---|---|
| Extruded | 500 to 500 | VTM Holding |
| Extruded | 500 to 500 | MartinPlast |
| Pressed | 500 to 500 | Korikov |
| Injection | 500 to 500 | Marbet Sp.zo.o |


Now let's move on to the next step - making a list the right tools and purchasing glue, which will be used to lay seamless tiles on the ceiling.
How to choose the right tile adhesive
The quality of the glue directly determines the service life of the ceiling tile, how well it will adhere to the ceiling when the temperature or humidity inside the room changes. When choosing, you should consider the following nuances.

Advice! Adhesives from the Moment Montazh, Bustilat and Titan brands are suitable for laying seamless ceiling tiles. Regular PVA glue is also suitable. In addition, today you can purchase many compounds designed specifically for foam ceiling tiles.

Required Tools
To install seamless ceiling tiles you will need the following equipment.
- Level - to determine how level the rough ceiling is, and to control the correct installation of foam boards.
- Long ruler, square and tape measure - for various measurements.
- Large stationery knife with a replaceable blade - for cutting ceiling tiles. It is used in cases where it is not possible to lay the entire slab along the edges of the room.
- Spatula - if the glue is packaged not in a tube, but in a bucket, then the tool is necessary for applying the composition to the tiles. Replaceable with a brush or roller.
- Pencil or marker - for marking the location of the tiles. It would be a good idea to take a few sheets of paper to make any notes or sketches.
- Stepladder or table.


Preparatory work
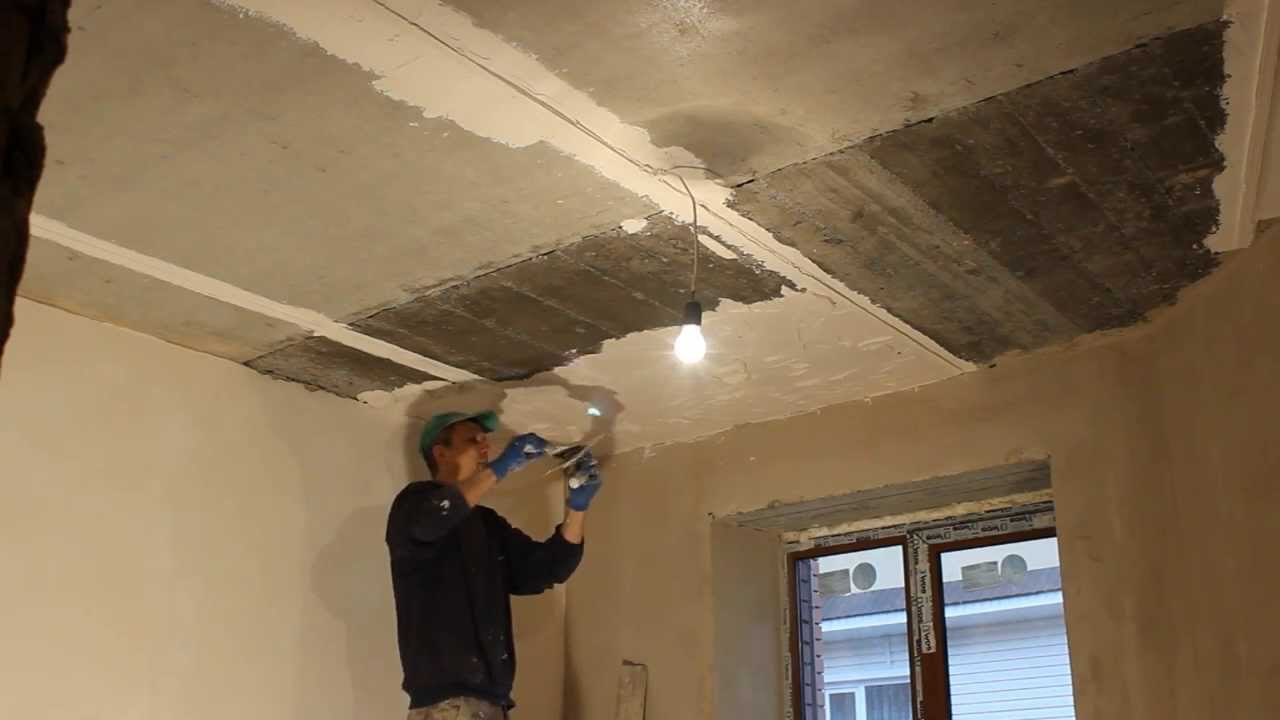
Before starting installation foam tiles The ceiling surface needs to be prepared. The main thing in this matter is to completely get rid of the remnants of the old finish. Depending on its type, cleaning methods differ.

Tip! If the layer of plaster does not chip off or collapse when lightly tapped with the handle of a spatula (or other tool) and does not have large differences in height, this layer of finishing can be left and the seamless ceiling tiles can be glued directly onto it.
Step-by-step description of preparatory work.
Gluing process
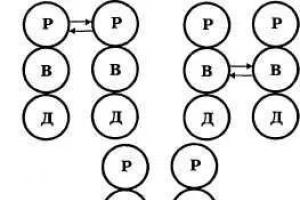
First, you should make a plan for how the tiles will be placed in the room. Use a tape measure to measure the length and width of the room, keeping in mind that two opposite walls may have slight differences in size. Draw up a preliminary sketch on a piece of paper to calculate the required number of tiles and their approximate location. The most commonly used installation schemes are presented in the figures below.


Now you need to transfer the markings to the ceiling. To do this, use a ruler, square, pencil or marker. In this case, it is necessary to divide the room into four parts, diagonally or along the middle of opposite walls. This is done using tensioned threads.

Advice! Regardless of the installation method, some of the slabs will have to be cut using a stationery knife. Keep a reserve of several copies, as seamless ceiling tiles often break.
After marking the ceiling is completed, you can begin laying the slabs. The process goes as follows.
Prices for ceiling tile adhesive
ceiling tile adhesive

Step 1. Unpack the finishing material and leave it in the room for several hours - the temperature of the ceiling and tiles should be the same so that the latter does not deform after installation.
Step 2. Apply glue to the back of the tile, in the center and along the edges. If necessary, spread the glue with a spatula.

Step 3. If the glue has a liquid consistency, wait a while (you can find out by reading the instructions for the composition).
Step 4. Press the tile to the area marked on the ceiling, apply some force (but not excessive, otherwise the material may break). The first four are stacked first foam panels in the center of the room, one for the previously marked parts of the room.


Step 5. Wait a while for the adhesive on the tiles to adhere to the ceiling. Before doing this, adjust the position of the tiles so that they lie flat.
Step 6. Repeat the above steps with the next tile, attach it to the ceiling and join it to the previous one. There should be no gaps between them. Remove excess glue immediately, because when it dries, this will be difficult to do.
Step 7 Install all remaining solid seamless tiles.
Prices for ceiling panels

Step 8 Place cut pieces of tiles along the edges of the room.
Step 9 Treat the board joints with acrylic sealant. Do not use silicone compounds - they turn yellow over time.
Seamless ceiling tiles are an inexpensive and visually attractive finishing material. With a responsible attitude to the selection of materials and installation technology, you will receive beautiful ceiling, the finishing of which will last for many years.
Video - Seamless tiles for the ceiling in the nursery
Seamless ceiling tiles, capable of creating stunning imitations of surfaces completely covered with stucco, are the result of a synthesis of innovative construction technologies and creativity of designers. The interior with its use acquires a special uniqueness - such decoration can compare in luxury with the design of palaces or, conversely, embody the most creative modern ideas organization of space.
Seamless ceiling tiles - features and types
This is a finishing material, the seams between the elements of which are almost invisible after gluing it to the ceiling surface, which is achieved due to:
- Constant thickness of the tiles and the absence of any restrictive parts at the edges;
- Often, the borders of seamless tiles have a zigzag or broken configuration - such joints are less noticeable to the human eye than straight ones.
The material is produced using hot stamping from foamed polystyrene. The size of the tiles is 500x500 mm. Products for creating a seamless surface are produced with a variety of patterns, textures that imitate natural materials, relief images, color inserts. A wide range of tile design solutions allows it to be used for visual correction of spaces and creating illusions. The cost of the material varies depending on its technical characteristics, color, texture, presence of relief and imitations.
The following types of products exist:
- Pressed models 5-7 mm thick;
- Injection tiles (9-14 mm) are less fragile, correct form and the presence of relief;
- Extruded products for seamless coating, despite the thickness of 3 mm, have for the longest period operation and safety margin;
- Tiles with laminated surface.

Pros and cons of seamless tile ceilings
The material can be used for interior decoration for various purposes– from housing to public buildings. Seamless surfaces look especially impressive when decorating large spaces. It is necessary to take into account that the brighter and higher the room, the more invisible the joints between the tiles.
In addition to excellent decorative qualities, seamless tiles have a number of advantages in installation and operation of the coating:
- There is no need for particularly thorough preparation of the base surface, unlike, for example, painting;
- High heat and sound insulation qualities of a seamless coating;
- Light weight of tiles, which does not require the construction of an additional frame;
- High moisture resistance;
- Seamless coating allows you to mask minor defects in the base surface;
Attention! In order to hide significant unevenness in the ceiling, it is sufficient to use a thick adhesive composition for seamless tiles with minimal shrinkage, such as liquid nails.
- The ability to do the installation yourself - no specialized construction skills are required;
- Ease of filling and painting tiles;
- Affordability.
The disadvantages of decorating the surface with seamless tiles with your own hands include the inability to hide the joints when low ceilings and excellent lighting. Another disadvantage is that the porous structure of the material is difficult to clean from soot and grease, so its use in kitchens is impractical.
How to glue seamless ceiling tiles
Often, seamless tiles, with the appropriate design solution, are supplemented with moldings, rosettes and other elements, which can be purchased simultaneously with the panels themselves. The decor is used at the junction of walls, installation of lighting fixtures, for the purpose of functional zoning of the room.
To install seamless ceiling tiles, you will need the following tools:
- Ruler made of wood or metal;
- Stationery knife;
- Square for drawing;
- Simple pencil;
- Building level;
- Rope;
- Ladder.
Solvent-based adhesive is not used for polystyrene foam tiles - such compositions corrode the surface of the material. You can use a special mastic for adhesive ceilings - it is applied in a layer of 1-1.5 cm. The retail chain offers compositions of the brands “Power”, “Dragon”, “Moment Installation”, “Master”, “Eco-carry” for the installation of seamless tiles , "Eltitans", "Titan".
Advice! The consistency of the adhesive affects the speed at which seamless tiles stick to the surface - after applying the liquid composition, it is advisable to leave the element in the air for a while before applying it to the ceiling.
Preparatory stage of work
Before applying seamless tiles yourself, you must carefully remove them from the ceiling. old finishing, having previously removed it from lighting. The paint is peeling off wire brush and special compounds. The whitewash is washed off until concrete surface ceilings The wallpaper is removed with a spatula. The wiring needs to be insulated. Irregularities of about 5 mm must be leveled out. On base surface A primer is applied under the tile to improve adhesion.
Important! For bases with a porous or granular structure, it is recommended to use deep penetration primers; for cement and concrete – standard compounds with adhesive properties.
Before gluing seamless ceiling tiles yourself, its packaging must be printed 2-3 hours before the start of work so that the material can adapt to humidity and temperature conditions premises where installation will take place. At the same time, the ceiling is marked.
Before purchasing a material, you need to determine it required amount. There is a simple way to calculate the number of tiles - after deciding what the laying pattern will be, draw its plan to scale:
- Ordinary sticker;
- With a shift of half a tile;
- Diagonal laying;
- Non-standard design solutions laying tiles.
The layout of the tiles is drawn from the center of the room to its borders. After the required number of products has been calculated from the drawing, a margin of 10-15% (minimum 3 tiles) must be added to the resulting amount. You can also use the ceiling tile calculator to calculate.

Marking a seamless ceiling is done using a pencil and rope. First, the center of the room is determined by the diagonals of the room. From the found point in the planned directions, half the size of the tile is laid out. The entire drawing is then reproduced on the base surface.
Technology for installing seamless tiles on the ceiling
Attention! When laying tiles, to obtain the desired effect, it is necessary to carefully control the density of the joints of the elements.
The sequence of how to glue seamless ceiling tiles with your own hands:
- The adhesive composition is applied to the back side of the panel, not completely over the entire surface, but only to the middle and edges, and, if necessary, dries a little;
- The first tile is laid at the intersection of the diagonals of the room or the location where the chandelier is installed;
- After placing the panel exactly along the marked lines, it is pressed tightly against the ceiling surface with such pressure as not to damage the element itself;
- The remaining tiles are glued one at a time from the first, strictly following the marked placement pattern;
Advice! The panels can be fixed together with masking tape - this will prevent them from coming apart during drying.
- Remains of the adhesive protruding from the seams between the tiles are immediately removed - after drying this is very difficult to do;
- To create full visibility of a seamless coating, the joints can be filled with acrylic sealant to match the tile - silicone compounds may turn yellow during use.
Before purchasing material, you must first decide on the interior design concept, color and design of the ceiling, complete its diagram and calculate the required number of panels.
When purchasing seamless ceiling tiles, you need to pay attention to the following technical characteristics:
- The surface of the panel must be smooth, there must be no depressions, sagging, or cracks - these defects indicate a violation of the production technology;
- To assess the strength of the products, it is necessary to take them by the corner and hold them horizontally - the tiles should not bend or break;
- The reverse side of the material should not have air voids or foreign inclusions;
- The edges of the tiles must be perfectly smooth and free of chips and defects.

Creating a unique designer ceiling It is quite accessible on your own without special construction skills. You just need to show imagination and some creativity, carefully calculate and select the tiles, and then carefully carry out the work, strictly following the instructions.
Polystyrene ceiling panels are an inexpensive and practical alternative to suspended ceilings. Polystyrene is a thermoplastic polymer that easily takes the desired shape. It is used to make tiles with a variety of reliefs: abstract patterns, imitation wood, marble or fabric.
Ceiling panels not only look impressive, but also have soundproofing properties and are not subject to rotting, as well as the appearance of mold or mildew. Please note: they should not be placed at a distance of less than 30 cm from heating devices and lamps, as the polystyrene may melt. Do not allow direct contact with the ceiling surface. sun rays: This can cause it to take on a yellow tint.
Ceiling tiles can be injected or extruded. In the first case, the material is poured into a special mold and exposed to high temperature. The result is a fairly durable moisture- and heat-resistant product. Extruded tiles are made by simultaneous molding and pressing. Thanks to its high density, low porosity and water-repellent impregnations, it is considered the most durable and moisture-resistant option.
Ceiling panels are easy to install even without special skills. All you need is glue and a knife to cut the tiles. You can buy everything you need for ceiling decoration in our hypermarkets at an affordable price.
The category also has other useful products that you should pay attention to.
Seamless ceiling tiles allow you to create a relief coating, spending a minimum of finance and energy. At the same time, the surface acquires a presentable and sophisticated appearance. The main thing is to choose the right materials, skillfully perform the work, and the result will please you only with positive emotions.
Features of seamless tiles
Correctly glued ceiling tiles without seams forms a monolithic surface with difficult to distinguish transitions from one component part to another. Thanks to this characteristic feature, such a building material is especially loved by interior designers, because... she looks fine better surfaces, which are lined with traditional tiles.
There is still a joint between the tiles, but structurally it is practically invisible
Seamless ceiling tiles have the following characteristics:
- manufacturing material – foamed polystyrene, which is processed mainly by hot stamping;
- standard thickness - 5 mm;
- standard panel size is 50x50 cm;
- packaged mainly in packages of 8 pieces, which is 2 m2;
- the outlines of the contours can be very different (smooth, wavy, etc.), while the panels are made in such a way as to simplify the selection of the pattern in the future and make these joints little or invisible;
- a wide range of textures, stucco moldings, color range and imitation wood or stone, providing extensive possibilities for the designer’s imagination.
It is worth mentioning some technical features seamless ceiling tiles made of polystyrene foam. On the construction market you can purchase panels from both domestic and foreign manufacturers different types. The price range between them is small, but they can vary significantly in quality.
The results of a sample study of polystyrene panels are presented in the table:
| Trademark | NMC sa | Decoplast | Format | Marbet | NMS | Lagom format |
| Tile type | Extruded | Injection | Stamped | |||
| Manufacturer | CJSC “Timbex” | VTM Holding LLC | LLC “Format” | Marbet Sp.zo.o | IP “Korikov Yu.N.” | CJSC PF “Lagom” |
| A country | Russia | Russia | Russia | Poland | Russia | Russia |
| Declared sizes | 50×50 | 50×50 | 50×50 | 50×50 | 50×50 | 50×50 |
| Moisture resistance | for wet rooms | washable | washable | doesn't wash | doesn't wash | doesn't wash |
| Fire safetyDegree of toxicity of combustion productsSmoke generating ability | moderately burning, moderate, high | normal burning, moderate, high | low burning, moderate, high | moderately burning, moderate, high | ||
Having analyzed the main indicators, we can say with confidence that expanded polystyrene does not have sufficient environmental characteristics. According to research results, some samples of polystyrene panels have a high content harmful substance styrene released into the air, especially when in contact with fats.
Due to low safety indicators, seamless ceiling tiles are not recommended for ceilings in rooms with high temperatures
Therefore, if you purchase such panels for finishing, it is better extruded, more consistent with sanitary and hygienic standards.
Interior Design
Seamless tiles look attractive in any interior, transforming the room beyond recognition. But due to specific conditions, such as high humidity and temperature, experts do not recommend mounting it on the ceiling in the bathroom and kitchen.
As noted above, the range of textures, color palette and the texture of such panels is truly rich. Therefore, it is more practical to talk about the compatibility of color and decorative elements to achieve the desired result.
Especially it concerns small rooms, in the design of which, the main goal is to visually increase the space.
This can be done in the following ways:
- use mirrored wall and ceiling panels, wardrobes with sliding mirror surfaces. They seem to expand the visually material boundaries of the room;
- cover the walls with wallpaper in light, monochromatic shades and vice versa, a large pattern on the wallpaper narrows the room;
- the vertical direction of the pattern on the wallpaper visually adds height to the room, in contrast, borders “fix” the height;
- painting the ceiling with dark colors reduces the size and creates the false impression that the ceiling is low, on the contrary, bright hues as if they were “raising” the ceiling;
- rich red shades create an electrifying, energetic atmosphere, such colors create the illusion of a low ceiling;
- yellow shades create a calming, cheerful atmosphere;
- Blue shades are best combined with warm colors.
 Well-chosen elegant stucco molding looks quite interesting in the interior. It is better to paint such a ceiling in light colors, giving rigor and sophistication at the same time.
A variety of colors and textures, as well as the ability to decorate ceiling covering aristocratic stucco molding makes it possible to decorate the room in any style direction, which is an obvious advantage of ceiling tiles without seams.
With full catalog building materials, including seamless ceiling tiles, can be found in the Leroy Marlene hypermarket network, in addition, on the company’s website you can find all necessary information about the features of working with panels without seams.
Installation features
The installation of the panels itself is not difficult. Exist different ways, how to glue seamless ceiling tiles, but the most common types of masonry are diagonal and parallel.
Ceiling preparation
Before performing the main work, you should carefully prepare the surface, because the final result largely depends on this:
- clean the surface of old materials, i.e. remove old wallpaper with a spatula, clean off the paint with a brush, rinse off the whitewash to the base;
- remove the lamps and insulate the wires;
- Cover the ceiling with several layers of primer.
Ceiling primer greatly promotes further adhesion to the tiles
You can do without priming, but in this case, low adhesion is observed. Sometimes additional leveling is required, especially if there are depressions or sagging concrete on the surface of more than 5 mm. Minor defects do not need to be repaired.
Once completed preparatory work, you can proceed directly to installation.
Installation features
Experts recommend that before installation, keep the seamless tiles in a dry room to remove residual moisture, otherwise, directly on the ceiling, it may shrink and cracks may form on the panels.
- apply markings by drawing diagonally with a pencil or marker and connecting the marks on opposite sides;
- It is better to start gluing from the center (the point of intersection of the diagonals) or from the place where the chandelier will subsequently be mounted;
- Lubricate the part with glue specially designed for polystyrene foam and attach it to the ceiling. It is better to apply the glue pointwise in all corners, especially if the panel thickness is small;
- hold the panel for a few minutes, being careful not to apply too much pressure. Otherwise, dents may form;
- This is how we install all the seamless tiles on the ceiling, focusing on the markings;
- It is better to remove excess glue immediately when it hardens; in the future, this is practically impossible to do.
It is good to secure the glued rows of tile panels with construction tape so that the parts do not move apart when the glue polymerizes.

Finishing work
The final work consists of processing the tile joints. For these purposes, experts recommend using white acrylic sealants. Silicone options are not suitable because... turn yellow over time. Myself installation is not so much labor-intensive as it is energy-consuming.
Seamless ceiling tile price
Seamless ceiling tiles are the golden mean. Its cost is slightly higher than traditional whitewashing, but lower stretch ceiling, although according to appearance is not much inferior.
The price of seamless ceiling tiles made of polystyrene foam, on average, ranges from $0.75 to $1.7 per 1 m2, from polystyrene foam - $1.2 - $2.7, you can buy it at any hardware store.
Advantages: low price, ease of installation, wide selection. Disadvantages: low environmental friendliness, labor-intensive process.
More information about installing seamless tiles on the ceiling can be seen in the video:
Finishing the ceiling with slab elements involves subsequent sealing of the seams - the work takes a long time and is not always done efficiently. To avoid this, seamless ceiling tiles are suitable - the material is laid end-to-end and the result is an even coating without visible gaps. In all other respects, the finish does not differ from the standard one, it is just as easy to install, does not require maintenance, and can be quickly updated and replaced. Let's consider the types of tiles, the possibilities of their use and installation techniques.
Types of seamless ceiling tiles
The finishing is produced in the form of polystyrene plates with a thickness of 3.5-15 mm, of various shapes and sizes. Manufacturers offer products of geometric shapes, with a smooth or patterned front side, and curly edges. The color range of products is also varied, so the owner can choose materials according to his own taste and preferences. Peculiarity decorative material– a one-piece coating that has no seams.
Seamless ceiling tiles differ according to production technology:
- Pressed. These are seamless ceiling tiles that are stamped into molds with a textured pattern. Can imitate stucco, antique plaster, etc. Size up to 0.25 m2, element thickness 5 mm, price from $0.3 (23 rubles).
- Injection. The finish is higher in quality and more expensive in price. Produced by sintering raw materials at high temperatures, has increased strength and practicality. Thickness 5-15 mm, varied texture, available in different shades, material cost from $0.9 (80 rubles).
- Extruded. During the production process, polystyrene granules are mixed with strength additives and sintered under pressure. Then the finished form is covered with protective tape and cut into elements. Drawing front side may be different, with imitation natural stone, wood, leather. The thickness is 3-5 mm, but extruded tiles have the highest strength. Price from $1.5 (115 rubles).
On sale there are elements with smooth edges that, when joined, lie close together without a gap and complex edges - these are curly collections, in finished form representing a patterned covering.
Advantages and disadvantages of foam seamless tiles
The material has many advantages:
- Sound and heat insulation. Thanks to its porous structure, polystyrene foam hides excess noise well and does not let heat out of the house.
- Long service life. In the absence of mechanical impacts on the ceiling, the tiles will withstand 10 years without loss of quality indicators.
- Maintainability. The elements are easy to replace, and to make the ceiling look fresh again, it can be repainted with a suitable composition.
- Budgeting. High quality tiles Seamless ceiling, the price of which is no more than $1.5 (115 rubles), is cheaper than any material, but is not inferior to coatings in durability and aesthetics.
- A light weight. This property is especially necessary when finishing ceilings in houses with dilapidated floors.
- Moisture resistance. Polystyrene foam does not absorb moisture, so the finish can be installed in bathrooms and in open spaces. However, there is a nuance - it is better to avoid direct contact with jets, but the tiles will not deteriorate from condensation.

Separately, it is worth mentioning the small thickness of the products - this useful quality when finishing low-height ceilings. But you should know that the installation is carried out on a base base, so the ceiling will have to be leveled.
There are also disadvantages:
- Polystyrene foam is considered a flammable material. You should either eliminate the possibility of fire or choose extruded tiles that do not spread fire.
- Fragility. During the process of gluing the elements, you should not put pressure on them so as not to deform the decor.
- You need to choose high-quality glue. To improve the adhesion of tiles to the ceiling, mixtures with high adhesion properties are suitable, this is especially important for areas with high temperatures - with constant exposure to heat, the cladding may begin to move away from the base base.
On a note! Polystyrene foam does not allow moisture and air to pass through, so excess moisture may form in the room under the ceiling. It is necessary to arrange ventilation so as not to create the effect of a thermos. Tiles can be laid on a base with defects up to 2 mm.
In order for a seamless ceiling to meet quality requirements, you need to choose the right tile:
- the reverse side of the sheet must be flat - this is the key to a high-quality connection to the ceiling;
- the smoother the edges, the more seamless the ceiling will be; when choosing, you need to combine two elements and inspect the evenness of the borders;
- if there are chips and defects not included in the drawing, it is better not to buy the collection;
- to check flexibility and quality, lift the tile by one corner - a good product will not break, but will bend.
When checking the quality, we must not forget about the cost; if you come across seamless ceiling tiles, the price of which is excessively low, the products may not be made in a factory-made environment; they will not last long.
Seamless tile laying technique

Installation of the finish is not difficult - the shape is stable, the dimensions are standard, so even a novice master can handle the work. And when lung condition weights of elements, no need to call help. The adhesive composition is selected depending on the type of finish, the preferences of the owner and the material of the base ceiling.
Rules for calculating the quantity of materials
A package of tiles measuring 500x500 mm contains 8 pieces, this is enough to cover 2 m2 of ceiling. Now you need to measure the surface area of the finish, divide by the area of one tile and determine the volume of purchase.
Important! When choosing a unique collection, beginners should take the product with a reserve. During operation, fragile elements often break; renovation may be required during operation; excess tiles will not cause damage.
If you want to add originality to the ceiling without seams, buy tiles of different colors and textures - here you just need to choose a harmonious combination of elements. Seamless ceilings with built-in decor in the form of foam rosettes and panels look aesthetically pleasing.
Selection of adhesive composition and preparation of the base ceiling
A high-quality tile adhesive should not contain aggressive solvents, but it is important that it has a sufficient pot life. It should also be taken into account that the foam can be translucent, so it is better not to use yellow adhesive mixtures. PVA glue, Bustilat, liquid nails and Moment Installation are suitable.
Advice! The normal consistency of the glue is creamy. This mixture is easy to apply, gives time to correct the position of the finish and dries quickly enough, so you don’t have to hold the decor against the ceiling for a long time.
Preparing the foundation will take time, but it will necessary stage works:
- Clean the base surface from old decor. Not only paint and wallpaper are removed, but also lime – foam plastic does not stick to whitewash. Whitewash and wallpaper can be washed away, soaked, and a special wash can be used for paint.
- Assess the evenness of the ceiling. If the errors are no more than 2 mm, you can do without alignment. More serious defects should be filled and leveled.
- Be sure to coat the ceiling with primer. The deep penetration composition is applied after the ceiling has been cleaned and leveled. The primer is applied in 2 layers, and first you need to dry the first layer, then apply the second.
- Antiseptic treatment will help reduce the risk of mold formation. The composition is applied to a dry base before priming, then the ceiling is also dried.

If there is a thick layer of plaster on the ceiling that is already peeling off or cracking, remove all layers before concrete base. Thin finishing slabs will not withstand even minimal pressure; if further cracking occurs, the ceiling will collapse.
Advice! If large differences in height need to be repaired, the starting putty is applied in several layers, taking into account the total layer thickness of no more than 4-5 mm. A thicker layer is needed - plaster is used. Finishing putty should not be thicker than 2 mm - this is the final stage of leveling.
Materials and tools
To do the work yourself, you will need:
- tile;
- ceiling plinth;
- glue;
- Ruler and pencil;
- sharp knife;
- containers for glue, putty;
- primer;
- antiseptic composition;
- roller;
- putty knife.
Since the work will be carried out on the ceiling, without durable table not enough. It’s better to take a table to lay out all the tools and materials on it. A pre-compiled layout diagram will facilitate the process of determining the volume of purchased material and subsequent work.
Laying tiles on the ceiling
The main difficulty may arise when marking the ceiling plane. If the walls in the room are uneven, then laying along the walls is not used; it is easier to lay from the center of the ceiling. Preliminary marking will help determine the design and eliminate waste of material. The markings are first made on a sheet of paper, where the diagram is drawn taking into account the dimensions of the ceiling and tiles, and then you can transfer the drawing to the ceiling using a tape measure or pencil.

The installation algorithm is as follows:
- Decide on the starting point for work - from the center, provided that a solid element is laid out, from the corner - when choosing a pattern along the wall.
- Allow the materials to sit in a warm room for at least 1 day. This is necessary to set the temperature and straighten the tiles. The packaging should be removed, the packs should not be placed on edge, or stacked high.
- Transfer the markings to the ceiling. It is convenient to work if you stretch the threads over the entire surface area and lay the tiles in such cells.
- Prepare an adhesive solution. Spread the back side of the finish; if the mass is thick, spread it with a spatula; if it’s liquid, let it set a little.
- Press the trim to the ceiling, hold it and evaluate the evenness of the layout - while the glue remains viable, the position of the element can still be adjusted.
Important! Fragile material should not be bent. Press tightly, but without obvious effort, so as not to spoil the decor.
If the calculation of the material turns out to be incorrect, there is no way to purchase additional tiles, you should choose simple diagram displays - from the center of the room. To do this, you need to find a central point, join the tile elements there and continue laying them out in even rows, leaving gaps at the walls. These gaps can then be covered with decorative skirting boards if they are no more than 3 cm wide.
After finishing the work, the joints of the decorative slats must be treated with sealant. For work you need to take acrylic, not silicone sealant– the latter turns yellow during operation. All that remains is to fix the ceiling moldings; the ceiling finishing work is completed.
Simplicity of installation sometimes brings its own difficulties; advice from experts will help you cope:
- when choosing patterned or textured tiles, you need to carefully trim the elements - a minimal distance from the edge will help align the parts without damaging the pattern;
- When laying out slabs in regular rows, cutting is done at an angle of 45 degrees;
- excess glue must be removed immediately by blotting the drop with a clean napkin;
- diagonal laying starts from the center of the room - build a diagonal from a point, lay 4 tiles along it, and then continue laying in accordance with the diagram;
- The glue takes at least 2 days to dry, so the room should be protected from drafts and you should not start painting the decor immediately after laying it out.
The decor with a textured front surface is always complemented by arrows on back side details. This is how the manufacturer indicates where the drawing should “look”; it is better to pay attention to the arrows so as not to start redoing it later.
How much does a seamless ceiling from craftsmen cost?
The price depends on the volume and complexity of the work. If you only need to lay tiles, then the cost starts from $5-7 (350 rubles) per 1 m2. If it is necessary to level ceilings, carry out work at high altitudes, or the need to lay out collection tiles, another 15-20% should be added to the estimate.