All summer residents who have wheels face the same problem: how to cover your iron horse standing on the site from bad weather and other natural tricks (well, for example, from pine resin)?
The question only at first glance seems insignificant. And indeed, to understand what is more profitable - to purchase a cover-awning, shelter with metal frame and polycarbonate sheets, or to build a more serious building - it will not work right away. At the same time, someone still refers to the lack of finances, someone - to the lack of construction experience, and someone - to the lack of free space.
I also went through all these stages and in practice came to the conclusion that it is best to build on suburban area canopy (with a frame made of timber and a roof of any suitable materials), which over time can be transformed into:
- a) light garage;
- b) insulated garage with a viewing hole;
- c) a utility room for storing agricultural machinery, equipment and firewood, with the possibility of arranging a cellar there as well.
At the same time, the costs for the construction of this structure are minimal, and it itself is quite simple, and any summer resident who has his hands in place can handle it. I have such a garage-pencil case turned out to be 3 × 6 m in size (the most optimal solution). I spent on it about 0.9 cubic meters of lumber and 14 asbestos-cement sheets of roofing slate. Then (a year later) he put up the gate and sheathed the walls. What happened is clearly visible in the photo.
The procedure for the construction of a garage-pencil case- Assemble frames 1; 2; Z and Z on the ground.
- Install supports under the frame along axes 1-1 (A, B, C) and 2-2 (A, B, C).
- Install and close with temporary bevels of frames 1 and 2.
- Mount and bolt to frames 1 and 2 frames 3 and 3'.
- Install rafters (section 75 × 100 mm, pitch -667 mm).
- Cover the roof with roofing materials.
That's all - the canopy is ready! Simple design, and most importantly - reliable and stable. After that, it remains only to install the gate (when the strength and time appear for this) and sheathe the walls (I personally used sheets flat slate size 300×150 cm). And, of course, you need to carry out fire protection wooden structures. And then the entire garage-pencil case will be assembled.
Do-it-yourself drawings for making a pencil case garage


- To insulate the garage, you will need to lay rolled sheets on the roof thermal insulation materials, which should be fixed on a solid board crate, and on the walls from the outside, mount expanded polystyrene 75 mm thick, and inside they should be upholstered with PLP slabs 8 mm thick.
- When changing the width of the garage to 350 cm (no more), you need to adjust the dimensions of frames 1 and 2, and also make the cross section of the rafters 150 × 75 mm.
- Device viewing hole or cellars should be carried out, retreating inward 50 cm from the axes of the building.
Like many other pleasant innovations, the shell appeared after 1991, when serious changes in legislation made it possible to equate such a design with simple awnings, eliminating the need to draw up paperwork for it. Thanks to this, in a short time, shells have become megapopular.
Compact, lightweight, they appeared in all cities and towns, and this was done without any coordination with officials, which was a joy for motorists, because it's no secret to anyone that one walk through the infinity of bureaucrats' offices can lead even the most patient person out of patience What can we say about spending.
But ... a lot has changed and not in better side since 2006, when the new authorities thought about who else to get a pretty penny, another.
The decision came quickly: you need to make the owners of shells pay, of which there are thousands of thousands.
In 2006, a decree of the Government of the Russian Federation was announced, according to which, the owner of the shell garage is obliged to redeem the land on which the structure stands.
"Noble" officials even offered their own price - 300-360 thousand rubles. for the site, otherwise, the garage can be demolished as an illegal building. Of course, such a decision became resonant in the society of motorists, but ...
Therefore, before putting a shell, think over the further course of events. It is best to put it on your own land, in private ownership, then no legal issues will spoil your mood.
So, the advantages of a garage-pencil case are the following:
- protection of the car from vandals, rain, sunlight;
- creation of a place for a warehouse of inventory, working tools;
- ease of construction;
- economy.
There are several points of cons:
- unpretentious appearance;
- since 2006, the problem has been the ownership of the site on which the pencil case stands;
- also remember that you can not put a shell on manholes or on the way to passing special equipment (fire, ambulance, etc.).
We talked about history, laws, pros and cons, now let's get down to the main issue: construction technology. But first, you need to prepare a site for future shells.
Site preparationInstallation of the pencil case does not take much time. But, as with the installation of a permanent garage, it is very important to prepare the site. First, it is necessary to clear the site of debris and level it, and then pour it with rubble and tamp it well.
To make the ride more comfortable, it is possible to make a convenient descent with the help of reinforcement filled with concrete. The site is ready, now we are preparing the necessary materials and drawings of the shell garage with our own hands.
Do-it-yourself garage pencil case - drawings: 

We will need:
- drill with a drill for 12;
- screwdriver;
- 90° corner;
- roulette;
- Bulgarian;
- welding;
- electrodes;
- discs for grinding and cutting.
From the materials you will need to prepare:
- metal profile 50x50 mm marking not lower than C20;
- fasteners (bolts, screws and nuts);
- door hinges;
- Styrofoam;
- adhesive composition "liquid nails".
How to install a garage pencil case (shell) - step by step instructions:
Shell Garage Dimensions: 
Pencil case garage assembly:
We assemble the standard design of a pencil case 2.5 m high, with an area of 3x6 m. The slope of the roof, based on the difference in the size of the racks, goes to the back of the structure.
Before starting, mentally divide the future garage into seven elements. These are: side walls, each of which consists of two parts, the back wall, which is a solid element, the gate, represented by two wings.
The back wall is done as follows:
The key to the strength and reliability of a shell garage is well-installed racks. The lack of one element will lead to a distortion of the entire structure.
 After the walls are erected according to all the rules, it's time to take on the strengthening of the floor.
The upper part of the structure is strengthened at four points - only three.
Preliminarily, a profiled sheet is cut with a size of 50x100 mm. and here it is very important that the thickness of the sheet is at least 5 mm.
There should be 14 blanks in total, and holes for fasteners are made in ten of them. These blanks then need to be welded along the central axis to the crossbars.
The frame of the gate is also cooked from a sheet of 50x50 mm. But for the manufacture of the gate you will already need two racks vertical type, 2.6 m long and three cuts 1.4 m long: one horizontal, lower and upper racks. All elements are welded to the central part of the frame.
To make it easier for yourself to assemble the garage, it is better to prepare separate sections first, and only then assemble them together.
WARNING: Metal parts must be cleaned with a grinding wheel. This procedure will reduce welding time. The frames need to be treated with an anti-corrosion mixture, and only after that you can start painting the garage pencil case, but not otherwise.
If possible, it would be good to carry out thermal insulation in the garage to create a comfortable atmosphere, because the garage is usually used not only as a parking space, but also as a warehouse for storing inventory, and a car repair shop. Installation of sockets does not take much time, double-insulated copper wire wiring is passed in the corrugation.
As a heater, many motorists use expanded polystyrene. This is a versatile material, characterized by very good thermal insulation characteristics and durability. In addition, the material easily takes any shape we need, it is easy to work with. Installation of the heat-insulating layer is carried out using ordinary building glue.
The assembly of pencil case garages takes an average of about three days, and it can be done by two people. Compared to installing a major garage, this is an easy task. Now you know the main stages of installation technology, the basic assembly rules. Well, we can only wish you good luck and a good day.
The purchase of a car is often accompanied not only by the joy associated with the purchase, but also by objective problems that require a quick solution.
We are talking about the fact that for the safety and long-term operation of the machine, it should be placed in an absolutely safe area. To date, there are two ways: a guarded parking lot and a garage.

Both a standard and a special project can serve as the basis for building a garage. There are no serious restrictions in terms of material for the construction of buildings: brick, metal, gas blocks, foam blocks.

The first and most significant difficulty that owners usually face Vehicle at the stage of construction of a capital structure - the need to obtain permission from the administration. Most often on this stage the process stops or is completely curtailed.

An alternative and a way out is a shell garage or a pencil case garage. It is a design that is compact and convenient building. The main advantage of a shell garage is that it can be built without official permission (if we are talking about legalized personal land).

Rigid cold-rolled materials are used for the manufacture of a garage-pencil case. In particular, we are talking about corrugated corrugated board, the “waves” of which provide the structure with unprecedented strength.

This design was extremely popular during the Soviet Union, but in our time its popularity has increased for many reasons, which will be described below.
Advantages of a shell garageThe advantages of a shell garage over standard garages are so numerous and obvious that they need no further explanation.

 Disadvantages of a Shell Garage
 In addition to numerous advantages, the following disadvantages can be distinguished, which may somewhat overshadow the joy of using the design:
 Construction features
 During construction compact garage some nuances should be taken into account, which are mainly related to interaction with other car owners and the external environment.

Firstly, the place for the shell must be carefully calibrated, because in an unfavorable location, the garage can block the passage for other cars, as well as interfere with access to hatches.
Secondly, you should consider the appearance of the structure in order to protect others from aesthetic shock.
Video - Seashell Garage Authorities Building tool kitFor self erection construction, it is necessary to arm yourself with a set of tools, including:
 Components for the construction of "shells"
 To build a full-fledged structure that will last a long time, you will need the following materials:
- metal profile;
- profiled sheets;
- sheet metal;
- bolts;
- loops;
- screws with a press washer;
- Styrofoam;
- liquid Nails.
As mentioned above, the low weight of the structure allows you to start construction without pre-training foundation. According to experts, for construction it is enough to find an even surface, the area of \u200b\u200bwhich allows you to place the structure.
In order for the installation of the garage to take a minimum of time, you should spend preparatory work. Their essence lies in the manufacture of individual sections of the garage. It is necessary to clean each of the metal elements in advance using a grinding disc.
In addition, pre-made holes for hardware will help simplify the installation of the segments. They greatly facilitate and speed up the assembly of the necessary elements.
It is important not to forget to cover the frames with an anti-corrosion compound, which will save you from serious problems during the further operation of the garage. After that, the components are painted.
Important points when building a garageMany garage owners set out to bring electricity to the garage. This is a real rational action, since it is quite difficult to use a room without light. It is necessary to purchase a lamp and several sockets, as well as double-insulated copper wire.
Styrofoam is used to insulate the shell. The choice is due to the possibility of giving the material any shape, which greatly facilitates installation. A special adhesive is used for installation.
Each garage-pencil case must be equipped with shelves for tools.
Preparatory workThe construction of the pencil case implies visual separation a garage into seven sections: a solid back wall, a side wall (of two segments multiplied by two), a gate (two wings).
To create a back wall, take two segments metal profile and one three-meter crossbar for extra stability. It is she who becomes the basis where the profiled sheet and foam are attached.
The standard design parameters are 2.2x2.9 meters. Welding of elements is carried out on flat surface with constant checking of corners using the building level. To mount the crossbar, you should step back from the top edge a little more than a meter.
The side walls of the garage consist of two autonomous structures. The first consists of the lower, upper crossbars, a vertical rack and a rack, which is mounted to the adjacent part of the frame. All elements should be connected, it is also necessary to weld an additional spacer in the central part.
The second frame consists of a vertical section of rectangular rolled products, an extreme rack, lower, upper crossbars. It is necessary to assemble the frame and weld a cross member to it. In order to calculate the mounting point, you should divide the height of the racks by two. The two sections of the structure are connected using bolts.
Video - Assembling a shell garage step by step Construction fastenersTo ensure the strength of the shell garage, you should take care of the basic fasteners, which are the crossbars. They are installed at the top as well as at the bottom of the frame. The floor of the structure is reinforced in three places, and the ceiling in four. Rolled metal is used as crossbars.
Garage installationStep 1. We strengthen the assembled frames with props, which should be removed after all work is completed.
Step 2. We strengthen the back wall with the help of jibs.
Step 3. Install the 1st section of the side frame. We check deviations. Holes are made through two frames. We twist the hardware.
Step 4. We do the same on the other side.
Step 5 Install the second wall frames.
Step 6. We mount three transverse logs (the step is two meters). The plates must face inward.
Step 7. We do the same on the top of the frame.
Step 8. Tighten all the bolts.
Step 9. We begin to mount the gate. We fix the door canopies so that the gap does not exceed two and a half centimeters.
Step 10. We weld the ears intended for the lock onto the frames.
Step 11. We sheathe the frame using profiled sheets that are vertically "overlapped". We carry out fastening in every 2nd deflection.
Step 12. We install additional elements at the corners to protect against moisture.
Step 13 We cover the roof, starting from the bottom. It is important to ensure that the sheet protrudes beyond the cornice line and forms an overhang.
ConclusionOn this, the installation work of the structure is considered completed. If you are not confident in your abilities and are afraid for the result, you can turn to specialists. It is not necessary to trust them with all the work, you can agree on the project and get important recommendations, which will save you from key mistakes.
Subject to the purchase of all necessary materials and components, a new standard shell garage will cost about 30-40 thousand rubles. This is an insignificant amount compared to the construction of a standard garage.
A garage garage is not only a great opportunity to save money, but also a chance to realize your potential in the construction field.

The question of the need for a house for a car sooner or later confronts the owner with a “rib”, and everyone strives to solve it with least cost. To replace the whole - welded metal garages, which received recognition a few decades ago, today came garages - pencil cases. The modern analogue was developed taking into account the solution of all the shortcomings that were inherent in its predecessor.
What is a garage shed?
The basis of the construction of the garage-pencil case is the supporting galvanized corrugated board, which is a "corrugated" sheet of cold-rolled steel with a protective anti-corrosion coating in the form of a thin film of zinc oxide. Despite the small thickness of 0.7 to 1.5 mm, the “injury resistance” index of this metal is several times higher than that of standard smooth steel. The wave profile increases the rigidity of the structure, gives it lightness and elegance.
|
|
Pencil garage successfully fits into any space without violating the general architectural solution. An additional plus you can consider the possibility of choosing the desired color.
The name "garage-pencil case" is directly related to the compactness and ergonomics of the design. Due to the current shortage of free meters on land plots, the ability to order a house for a car strictly according to the size of the car is very relevant. The construction will not take extra centimeters and will fit exactly into the allotted place. When calculating the dimensions of the "box", all the wishes of the customer are taken into account. Places for storing spare parts, machine care products and tools will be provided taking into account the efficient use of usable space.
The most important arguments in favor of a garage canister are the collapsible design and the possibility of repeated assembly / disassembly of the garage without damaging it. structural elements. The timing of the construction of the building, which can be assembled in just a couple of hours, is also impressive. Just think! 2 hours and the shelter for the "horse" is ready.
The light weight of the structure is also important. Under the garage - "pencil case" is not required to build an expensive massive foundation. It is enough to pave the site with asphalt or arrange a platform from posts that do not need to be buried in the ground.
Manufacture of garages of cases.
There are several modifications of penile garages on the market with standard parameters. At the request of the consumer, it is possible to make a “box” and a “stuffing” according to an individual order.
The simplicity of design and assembly, as well as the low cost, make the production of garages - "pencil cases" an affordable and profitable business.
Everything ingenious is simple! For the construction of the structure, you will need a steel corner, sheets of galvanized "corrugated board", rivets, a spring mechanism for tilting the gate up and a welding machine. And that's it!
First, a welded frame of the building is assembled from a steel corner, on which a “profiler” is attached with the help of rivets. In the same way, gates are made separately. Then a spring mechanism is attached to the finished “box” and the gate is installed. Garage ready!
If you take this matter seriously, then, even without seven spans in your forehead, you can understand that with the right calculation and clear planning, this can bring good income. The cost of materials is not quite high, and they are widely represented on the market. In Russia, garages - "pencil cases" are in sufficient demand in the conditions of modern cities and their prices are about 20 - 30 thousand rubles, which significantly exceeds their cost.
The thickness of the zinc oxide coating film can be offered in several options:
. elevated - from 40 to 60 microns (the most reliable)
. 1st class - from 18 to 40 microns (medium protection)
. 2nd class - up to 18 microns
Firms engaged in the manufacture of garages use high-class sheets with a double-sided application of galvanized coating. Such a coating several times increases the service life of structures and their resistance to the harmful effects of various environments. In this case, the service life of the metal increases, and the product allows you to extend it for several decades.
The frame of the garage is made of a steel bent corner, and the frame for the gate is made of a steel bent channel.
In the manufacture of pencil garages, only the highest quality materials are used and Newest technologies representing a single production process. These factors make it possible to ensure highest level quality and accuracy of designs.
An indicator of the strength of structures can be a guarantee that it can withstand a 2-meter layer of snow on the roof, which is not the limit.
| Back | Forward - |
|
|


The problem with car storage existed twenty years ago, exists today, and is unlikely to disappear in the foreseeable future. With an increase in the number of parking lots and parking lots, the number of vehicles is growing, a place for building a garage in a cooperative can be obtained on the other side of the city, and the construction of the structure will cost a tidy sum, so motorists prefer a simpler and cheaper option in the form of a compact metal garage-pencil case.
Features of the design of the garage-pencil caseAt first glance, there is nothing special about the device of the garage-pencil case:
- The box of the garage-pencil case is framed in the form of a steel frame made of a galvanized metal profile or pipe. The garage structure is assembled by welding and bolting, all seams and cut lines are treated with an anti-corrosion compound, after which they are painted with pentaphthalic enamels;
- Walls and roof frame base the garage-pencil case is sheathed with sheets of corrugated board. To cover the roof, a roofing version of corrugated board with a profile height of at least 50 mm is used. The roof of the pencil case garage is laid on horizontal ceiling beams without intermediate crate;
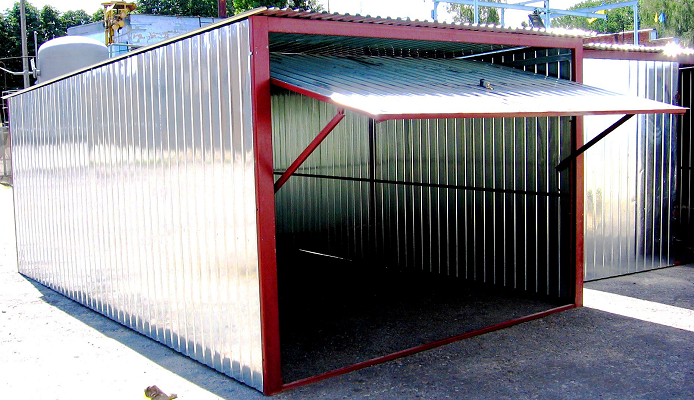
- Gates for a garage-pencil case are made swing or lifting structure, at the choice and desire of the customer, depending on the intended purpose of using the premises.
If we calculate the mass of the pencil case garage, then taking into account the mass of the frame of 110-140 kg, the total weight of the corrugated sheet for a garage of 2.5x3x6 m will be 320-350 kg. The final calculation shows that the total weight of the construction of the garage-pencil case, taking into account the gate and accessories for fastening the frame to the ground, will not exceed 500 kg. Boxes of a garage-pencil case for a minibus or pickup truck can weigh up to a ton.
For your information! The dimensions of the canister garage can vary considerably, from small canisters with an area of 7 to 9 m2, for a motorbike or scooter, to huge parking boxes, 4.5x7.3 m in size, which can easily fit a minibus or pickup truck.
Most urban motorists who park their vehicles on adjoining territory, changed a long time ago shell garages on pencil cases. Moreover, the city authorities strongly disliked the small garages that saved equipment from vandals and bad weather.
Advantages and disadvantages of a garage-pencil caseEach garage design has its advantages and disadvantages, and a pencil case garage is no exception. You can look for shortcomings and problems in using a lightweight steel box, but the existing demand for canister garages says that motorists are ready to put up with many inconveniences if the main function is provided. steel box- secure storage and protection against hacking. For a garage of any design, there are skeptics and amateurs, so it is better to evaluate the effectiveness of the pencil case from your own experience.

In fact, a garage-case for a number of reasons can be called the most effective way car storage:
Important! Accordingly, documenting the garage-pencil case, as a capital building, is not required, only the permission of the owner of the land plot is necessary.
There are also enough shortcomings in the garage-pencil case. The main problems: a strong warming up of the canister design in the summer, poor resistance to breaking. In both cases, problems are solved if you connect electricity to the pencil case garage.
Assembling a garageThe cost of assembly and installation of a garage-case structure is usually estimated at 10% of the value of the object. But motorists with experience and experience in plumbing work prefer to study the drawings on their own and install a garage pencil case with their own hands.
On initial stage you will need to prepare a place for installing the canister garage structure, remove the sod and level the site horizon using a rammer and a building level. Usually the first layer is covered with gravel and rammed with a wooden mallet. Next, a layer of sand is poured, and you can begin to assemble the garage-pencil case.
At the first stage, the base is collected and side walls designs. Before assembling the garage-pencil case, it is necessary to calculate according to the drawing and prepare segments from steel profile square or inch pipe. In accordance with the installation scheme, each element is marked and signed according to its position in the canister frame. It is advisable for the ceiling, base and side walls of the pencil case garage to mark pieces of a pipe or square with paint of different colors.
First of all, we collect the lower contour of the garage-pencil case. We hammer the mounting pegs into the ground, after which we lay out the rectangle of the lower contour from the pieces, connect them with bolts and grab them with dots welding machine. If the diagonals converge to a millimeter, and there are no problems with right angles, you can weld white. Next, we weld the transverse segments of the lower contour of the garage-pencil case.
Next, you need to weld a pencil case to the lower base of the garage structure vertical racks. The position of each of the racks must be controlled by a tape measure, a vertical plumb line and building level. At the next stage of assembling the pencil case garage, you will need to bolt horizontal pipe sections connecting the middle of the vertical racks, and also grab them with welding points. If the work is done correctly, the position of the racks should not change.
At the next stage of assembling the garage structure, you will need to weld the upper contour of pipes and profiles. Initially, side sections are installed on the vertical racks and fixed after leveling their position with welding points or bolts. A similar operation is performed with the jumpers of the front and rear wall pencil case garage. The largest number it takes time to align the upper tier of pipes or profile along the horizon and right angles, after which the joints of the pipes are welded with a semiautomatic device or a welding inverter.
It remains on the finished frame to fix the sheets of corrugated board and hang the garage door-pencil case. The corrugated board is fastened with self-tapping screws. Experts recommend that after the assembly of the heads of the self-tapping screws be welded or cut off the screwdriver groove with a grinder. It is difficult to say how much this will complicate the life of attackers, but the design of the garage-pencil case in this case becomes clearly non-separable.

It is better to order gates for a garage-pencil case in a lifting version. This design reduces and evens out the load on the light frame front wall of the garage. swing gate cheaper, but over time they have to be regularly aligned and folded on the frame, so their service life may be less than that of lifting structures.
ConclusionGarage-pencil case can be insulated with a layer mineral wool This will reduce temperature fluctuations and improve room ventilation. The use of polystyrene makes sense if the structure is located in a protected area, otherwise there is a risk that "well-wishers" will try to test the fire properties of the garage walls. To prevent water and snow from accumulating inside the garage-pencil case, it is better to close the gap between the lower edge of the cladding and the soil surface with a blind area made of a sand cushion and paving slabs.


