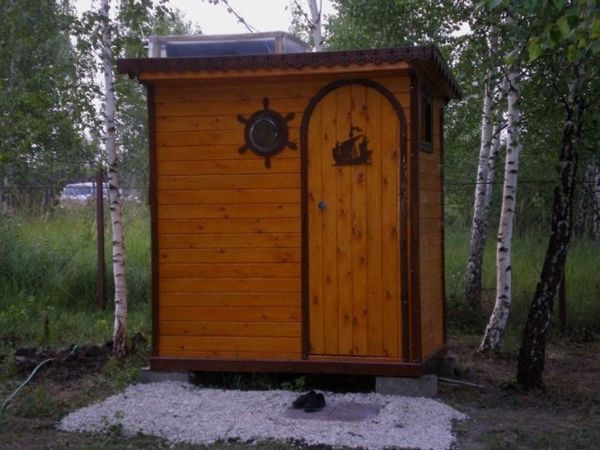
In hot weather, a summer shower for a summer residence is not a luxury, but a necessary outbuilding. The shower makes it possible to freshen up, wash off the dirt after garden work. The presence of a shower on the site ensures a comfortable stay in the country, especially if there is no nearby reservoir suitable for swimming. When designing a country shower, its size, materials used and the place where you plan to build it are taken into account. The cabin should be quite spacious so that it can comfortably accommodate everything you need and move freely. Comfortable Height shower - 2.5 m, the most common cabins, the size of which is 190/140 mm and 160/100 mm. Want more details?!
For a garden summer shower, it is better to choose a sunny place away from other buildings. In the sun, the water heats up quickly, which is convenient if you plan to build an unheated shower. If the tank is painted black, the water will heat up faster. Consider also the fact that the water supply to the shower is convenient, preferably automated. Climbing up the ladder with a bucket of water to fill the tank is not the best way.
So, the place for the shower is chosen. Now you need to prepare the base - remove upper layer soil, level the site and fill it with sand. To create the right base, markings are made using pegs hammered in the corners and a rope stretched over them.
The shower may be lightweight construction, and can be a capital building. The type of foundation depends on the materials used. If the shower is brick, a concrete foundation is used, the depth of which must be at least 30 cm. Before proceeding with pouring, a place for pipes is prepared - you need to lay a log wrapped with roofing material. The base is poured with concrete using guides and a level so that it is even. When the base is ready, laying can be done. A brick shower will be more hygienic and aesthetic if it is tiled. But this is an expensive labor intensive option.
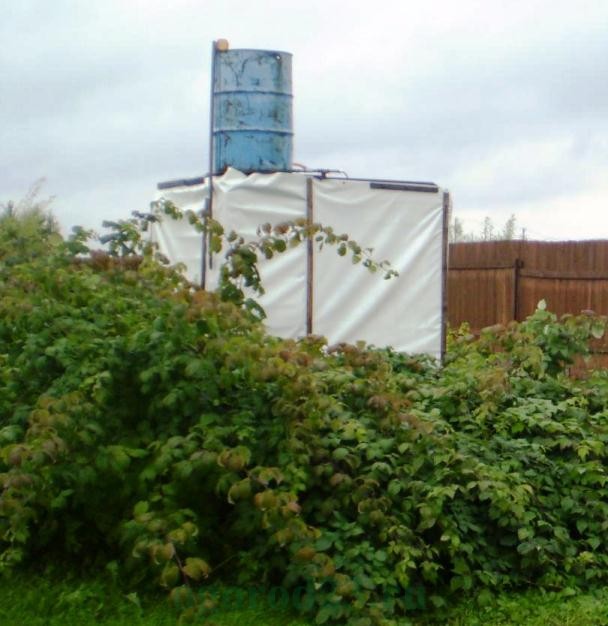
Option # 1 - a budget tarpaulin frame summer shower
This option will allow you to build a summer country shower without incurring high costs. After all, if you come to the dacha only in the summer, you can get by with a simplified version. For example, build a canvas shower using a metal frame.
A metal frame will require the most cost, but it will still cost much less than a brick. For construction frame shower you will need: tarpaulin (3/5 m), metallic profile(18 m, 40/25 mm), a plastic shower tank, preferably black (volume 50-100 l), a shower head, a ½ squeegee and a faucet with such a thread. Parts such as a watering can, nuts, squeegee, faucet, gaskets and washers are very popular materials, which is why they are often sold in one set, which is especially convenient.

It is not difficult to build a tarpaulin shower, it is convenient and functional, the tarpaulin can be removed for the winter, the frame can be covered with cellophane so that it does not rust
Similar to this design - a shower for giving from flat slate. It has exactly the same frame, but in this case the profile replaces the square (40/40 mm).
Water from the base in the shower should drain towards the drain pipe, and a shield (usually made of wood) is placed on top, on which a person stands and performs hygiene procedures.

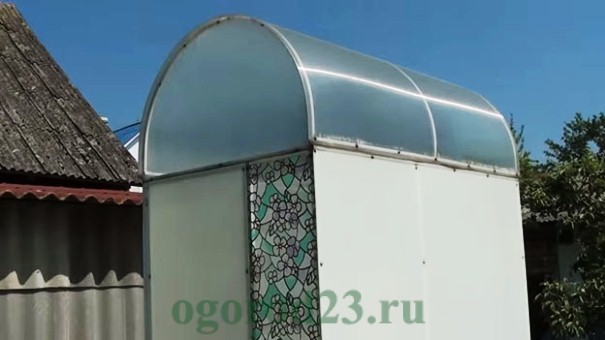
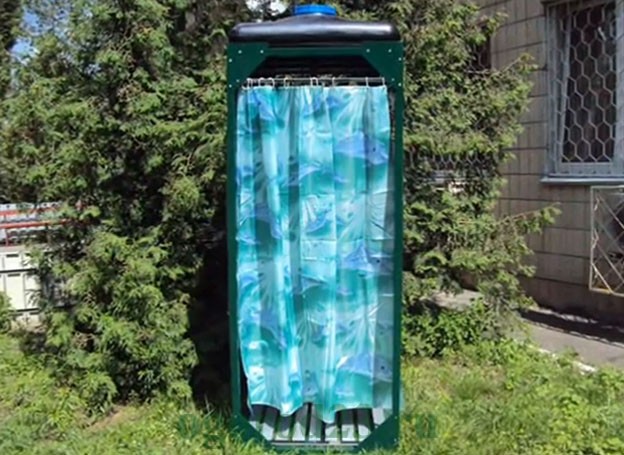
If you don’t want to build a shower yourself, you can buy a ready-made one - for example, with a polycarbonate cabin, or completely open, and enjoy water procedures right in the garden
Advice. It is better to make a water drain with a waterproof layer - lay a PVC film, hydrostekloizol or roofing felt on an inclined embankment. The slope is made in such a way that the drain from the shower is directed towards the trench or drainage tank. Well, if the drain is ventilated, it dispels unpleasant odors.
The problem of water flow today can be successfully solved using a septic tank. When installing a septic tank, do not place it directly under the shower. In the summer, when large volumes of water are consumed, the septic tank may flood and the drainage work poorly, resulting in unpleasant odors. It is better to arrange a drain at a distance of several meters from the shower, place a septic tank nearby.
Advice. Plants that grow well in moist soil will be appropriate near the shower - they will perform a drainage function.
Option # 2 - a solid building on a pile foundation
With a fairly high height, the shower structure must have a stable base. To build a summer shower of a strong structure, you can make pile foundation from pipes. Pipes should be 2 meters high (diameter 100 mm), holes of one and a half meters deep must be drilled in the ground under them. Above the soil level, the pipe should rise by about 30 cm. The dimensions of the beam for the frame are 100/100 mm.

In order to drill holes for supports, you can call a team that installs fences, the work will take about half an hour
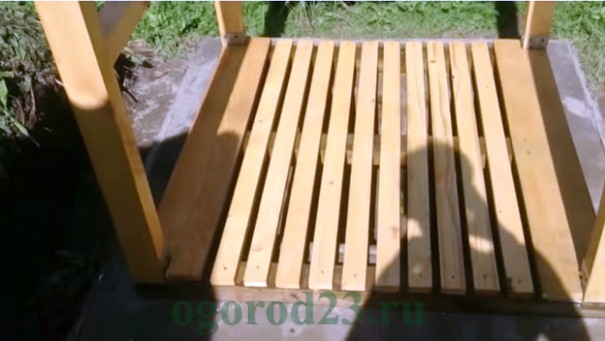
On the ground, a rectangle is measured according to the size of the soul, foundation supports are installed in the corners. The next step is the installation of the beam and the bandaging of the pillars. It is convenient to assemble the frame on the ground and fasten the structure with long bolts. Then a dressing is done inside frame structure- these will be the logs of the floor in the shower. Rigid elements are placed between adjacent pillars in the thickness of the wall.
The floor can be made with gaps between the boards to drain water. But sometimes you have to take a shower in cool weather, and blowing air into the cracks will not add comfort. You can also install a tray, the water from which will drain through a hose. More convenient would be a shower consisting of a dressing room and a bathing area, which can be separated by a bathtub curtain. At the same time, the locker room should be separated by a threshold to avoid water leakage.
As an outer upholstery, lining, sheets of moisture-resistant plywood, and fiberboard are most often used. If all the buildings on the site are made in the same style, the shower should not differ too much from them.
If you expect to use the shower outside of the hot summer weather, it needs to be insulated. It is most convenient to use polystyrene foam for this. As an interior finish, waterproof materials should be used - plastic, PVC film, linoleum. wood paneling needs to be sanded and painted.
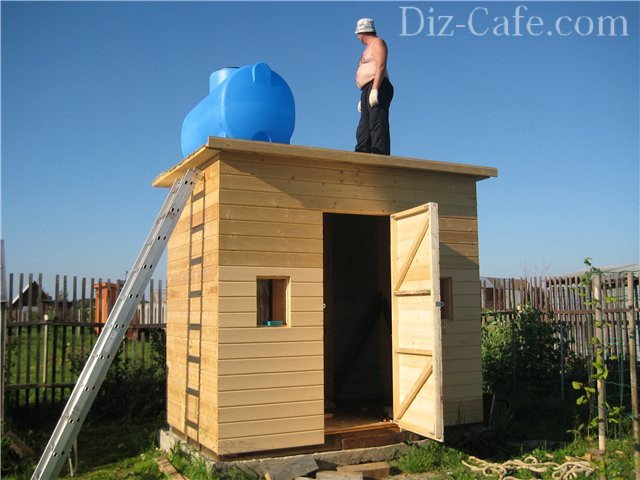
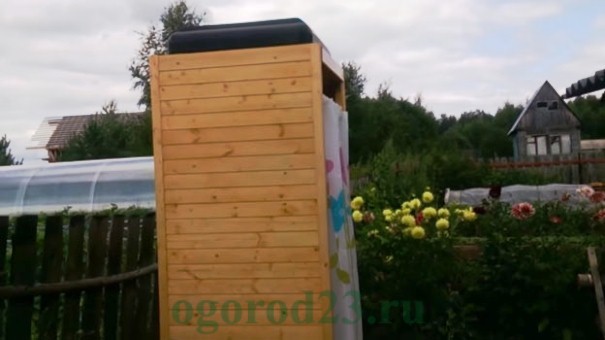
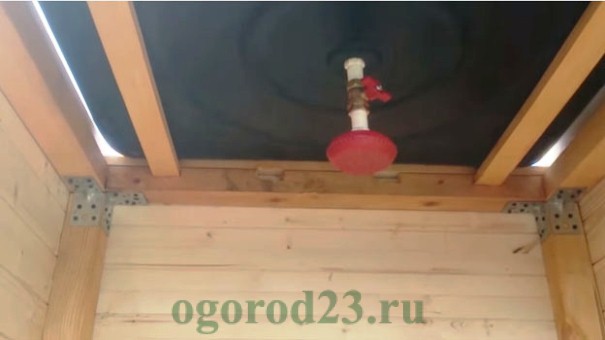
A water tank is installed on the roof of the structure. It can be connected to the water supply or filled with a pump. It is good to equip the barrel with a plumbing valve that will shut off the water when the container is full.
In order for the water in the tank to heat up better, you can make a frame for the tank that acts as a greenhouse. It is made according to the size of the container from a bar and covered with a film. In such a frame, the water in the barrel will remain warm even if the sun hides. The wind will also not cause a decrease in its temperature.
As they say - it's better to see once:
A selection of diagrams and examples of a shower device
The drawings of the summer shower below will help you choose right size, pick up suitable material, visualize what kind of shower you want to see in your area.
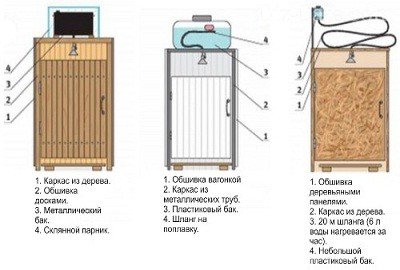
Shower trim options different materials: boards, clapboard, moisture resistant wood paneling, Various types tanks

There are simple devices that allow you to use the shower more comfortably: a - the float intake will take warm water from the top layer; b - a tap driven by a foot pedal (a fishing line from the pedal is thrown through the block, it is connected to the retractable spring and to the tap that opens at a right angle, which will save water); c - an improved scheme for connecting the heater to the water tank will allow the water to warm up and circulate evenly
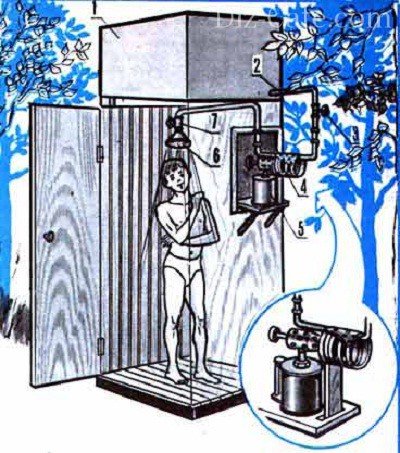
Summer shower heated: 1 - tank, 2 - pipe, 3 - tap for supplying water from the tank, 4, 5 - blowtorch, 6 - a watering can, 7 - a tap for supplying water from a watering can
The choice of design, materials, work on the drawing are important points that should be paid attention to so that the process of creating a shower is continuous and error-free.
In the summer heat, there is nothing better than refreshing yourself with cool water, especially after active work on personal plot. With the onset of hot days, the presence of a shower becomes relevant and necessary requirement. This factor is especially important if your house is under renovation, and plumbing communications have not yet been completed. You can easily equip a summer shower in the country with your own hands, photos and sizes, as well as recommendations for choosing a place for construction, you will find in this article. In any case, the interior space of the shower must be spacious so that the bathing person can comfortably accommodate himself and with him all the things necessary for this procedure.
The most common parameters of country shower buildings are 2.5 meters high and 190/140-160/100 cm wide. It is necessary to plan the construction of a summer shower in the spring, at its very beginning, so that by the time summer comes it will be ready.
There are no particularly strict criteria regarding the arrangement of such a shower. With imagination and the ability to keep Building tools in your hands, you will be able to translate your ideas into reality and build such a necessary thing for giving. Depending on the complexity of the plan, it is possible to equip a simple outdoor shower in one day. A more detailed project will take more time, but it will also serve you for more than one year.
Choosing a place for a summer shower
So that the water in the tank is not cold, it is more logical to place the shower building in a place illuminated by the sun's rays. If you prefer to take a shower in the afternoon or late afternoon, then you should choose a part of the site where the concentration solar activity seen in the afternoon. It is important that this place is protected from winds.
Second an important factor is the presence of a drain for used water. A summer shower for a summer residence should be installed on a hill so that the water drains quickly and does not stagnate, attracting insects. The operation of any shower involves the use of large amounts of water, and if many people (a large family) wash in it, then this nuance must be calculated and properly equipped.
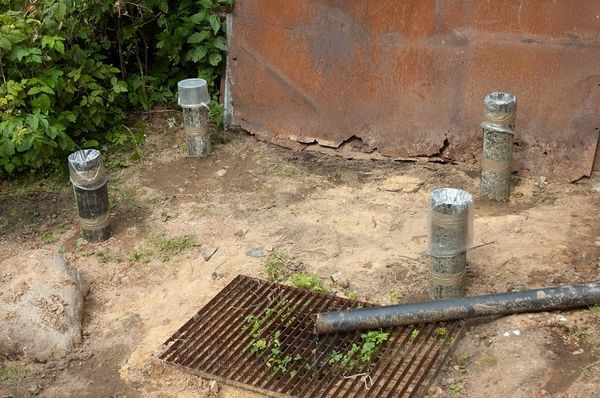
If the capacity of your shower tank will be approximately 1-2 m³, then a drain pit will be required. When arranging a place for water flow, its correct placement is important - in no case should it be located under the building itself. A sewer pit or a septic tank with drainage should be located at some distance from the booth, in turn, the slope should go in their direction.

The presence of a waterproof layer for drainage is highly desirable: hydrostekloizol, PVC film, roofing felt or concrete screed are suitable for this purpose. drainage pit should be located at a distance of at least 3 meters from the cabin, its depth should be 2.5-3 meters, the bottom is covered with gravel or a thick layer of sand. The top of the pit must be covered and fenced off.
How to build an outdoor shower - an example of a simple design
options for this useful dacha building there can be a great variety - here the matter already depends on your creative approach. For example, we will consider the features of the "standard" version of the country summer shower.
The shower should be comfortable, so the most minimum dimensions the internal space should be at least 100 × 100 cm. Movement should not be constrained - a person should freely raise his hands and bend over in the process of washing. A small place for clothes and towels (cloakroom) should also be allocated, 50-60 cm is enough for it. Thus, in the total footage, the dimensions of the shower will be 160 × 100 cm and 2-3 m in height.
- Install strong and reliable racks - this is your safety, since the tank filled with water for an outdoor shower has a huge weight. For this purpose, a wooden beam 100 × 100 is ideal.
- It is better to dig the racks into the ground, having previously treated them with tar or a fat-containing agent. Pour them concrete mortar, by the way, will be the best.
- For the container at the top, a horizontal platform should be equipped.
- The cabin is made of any materials, the main thing is that it should hide the swimmer from prying eyes and protect from drafts.
- Containers for a summer shower can be metal or plastic. It is worth considering that the metal tank will heat up faster, but it will also rust. In order for the water to heat up quickly, it is recommended to paint the tank with black paint.
- If you make a frame over the tank and cover it polyethylene film, then the process of heating water will occur much faster.
- The valve for the tank can be anything, but a ball valve is most suitable.
The whole process begins with marking the perimeter of the future shower, the racks are installed at the corners and connected from above with a dressing from a similar beam. After that, there is a turn of the lower dressing, keep in mind that it should be located 10-15 cm from ground level.

To fasten all frame fragments, use long bolts - this will have a positive effect on the overall strength of the structure.

However, you can do it easier and install a metal or acrylic tray, while the water will be drained using a hose.
To ensure that the shower door closes tightly, use seals. The shower compartment and the dressing room can be separated by a special curtain, and it would be better if the threshold between these two compartments is somewhat high (to prevent water from flowing into a dry room).
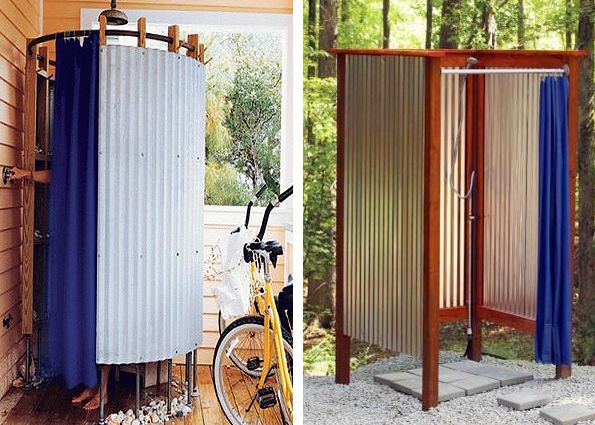
The summer shower, as already mentioned, can be finished with absolutely any material on the outside. Lining, plastic, polycarbonate, moisture-resistant plywood, fiberboard, slate, metal sheets, siding - the main thing is that the building is in harmony with the rest of the buildings on the site.

Wooden materials do not hurt to pre-open protective compounds.
If the frame is welded from metal, then it must also be coated with anti-corrosion agents or painted with paint.
In order for the water in the tank to heat up many times faster, rafters can be laid on top of the upper trim, and a sheet can be placed on top of them roofing iron. The metal will reflect the rays of the sun, which will make the process of heating water more active.
Summer shower containers

Separately, it is worth paying attention to water tanks - their choice is determined by the individual requirements and preferences of the developer. They are small and large-capacity, flat and round, iron and plastic. The size of the tank depends on how many people will wash in this shower, often a volume of 100-200 liters is enough for an average family. As mentioned above, it is better to choose a tank dark color or even black - so the water will heat up faster.

Such a container must have a lid so that various debris and insects do not get inside. At the very bottom of the tank, a tap outlet is mounted, to which a diffuser is screwed.
There is important point- the tap should be located on the lowest part of the tank, so that all the water drains from the tank and does not stagnate.
Equipping a summer shower with your own hands, you can purchase a ready-made tank in a specialized department of the building market. On sale there are also containers specifically for such showers, with all necessary details included.
If you have a suitable size metal or plastic barrel, then after certain manipulations it can turn out to be a completely acceptable shower tank. For these purposes, a hatch is cut out on top of the barrel laid on its side to fill the water, and it is processed acrylic enamel(or bath repair agent) from the inside - this applies to metal containers.
And you can not lay the barrel on its side. Everything is within your power if "hands grow from where it is necessary."
Also in this role, tanks from those that have become unusable “act well” washing machines. Despite the fact that their volume is enough for 2 washes, they very quickly adapt to the shower tank, thanks to the presence of inlet and outlet pipes, as well as the necessary technical holes. Such tanks are not afraid of corrosion.
Equipping a summer shower in the country with your own hands, it is better to prepare photos and dimensions, as well as approximate drawings, in advance. So you will see all the working stages clearly and will be able to accurately calculate the final result. With such a work plan in front of your eyes, you will know how much material you will need for external and interior decoration booths and drain pits.

Paying attention to the functional part, do not forget about aesthetics appearance your summer soul - everything should be not only comfortable, but also pleasing to the eye.
The next summer season begins, and many owners of private estates or dachas want to build a comfortable, high-quality summer shower for their dacha. Usually you can always find construction material for the construction of such a structure, for example, use the remnants of a recently made repair or any construction.
Building materials that could not be obtained (parts of the skeleton, a suitable container for warm water etc.), must be purchased in advance in specialized stores or markets. Any man can build a summer shower with his own hands. It will be enough basic skills and knowledge in the field of construction, as well as the ability to use the right tool.
Many options for building a summer shower have been developed. Consider one of the acceptable ways that will allow you to build a good summer shower, a maximum of a couple of days.
The most important design elements of a summer shower for a summer residence
The simplest, uncomplicated design of a summer shower is a rectangular cabin. The length of its sides is determined by the features of the build of people who are supposed to use the product.
Important! The interior space of the booth should not be made too cramped. It is imperative to provide an auxiliary space that is reliably insulated and protected from splashing water. In it you can have hygiene items, as well as personal items!
 For a shower stall, the following optimal dimensions:
- height to the shower head - 1915.0 or 1855.0 mm;
- wall length - 895.0 mm;
- the height of the structure (including the tank on the roof) - 2875.0 or 2525 mm.
Advice! If there is free space on the site, you can increase the length and width of the structure by 110.0 mm to expand the total and usable area of \u200b\u200bthe booth!
We give the structure proper stability
For the stability of the frame, built of wooden beams, it is necessary to build a pile-type foundation under it. To do this, you should get a garden drill and dig channel holes in the ground to a depth of 1.15-1.45 meters. Then, pipes are lowered into the prepared pits so that their ends protrude 26.0-31.0 cm above the ground. Asbestos-cement pipes (diameter 100.0 mm) or similar in diameter can act as supporting piles. hardware(normal or profile pipes).
Read also: Do-it-yourself brick garage construction
 Recommendation! So that the skeleton does not collapse from the load (water in the tank), it is necessary to take a beam of at least 100.0x100.0 mm for its construction, and to extend the service life, the tree can be impregnated with various protective compounds (fungicides, water-repellent, etc.)!
A well-hewn beam is installed on the foundation and the ligation of the pillars begins from top to bottom. Of course, the frame must first be assembled on the ground, and then, using long bolts, fixed to the poles. In this case, the lower dressing acts as a lag for arranging the floor in a summer country shower under construction.
 Previously, there was only one way to install the floor - in the summer shower it was made of wooden planks with the formation of wide slots for the flow of washed water. Now, along with this method, a metal tray is installed (as in a home shower), which has a drain hole. Through it, the waste water is discharged through a pipe to the side, for example, into a gutter or grassy thickets. Neighboring poles are connected by rigid slopes - special elements that are not mounted with an overlap.
We make a septic tank for the accumulation of drains
When developing a project for a country summer shower with a special septic tank for collecting wastewater, you need to remember the method and location of its placement. Installing a septic tank directly under the cabin is unacceptable. If you ignore this recommendation, then a specific (putrid-stale) smell will quickly appear in the shower stall.
 In addition, more significant problems may appear - the destruction of the foundation and soil. That is why the septic tank must be placed a couple of meters from the mounted country shower. A drain pipe or, alternatively, a gutter lined with waterproof material (hydrostekloizol, PVC film, roofing material) must be brought into the septic tank.
Read also: Sectional doors (photo): application, advantages and disadvantages, types, installation steps
Materials for finishing a summer shower
The most budgetary solution is to cover the frame with opaque polyethylene, however, this design will not last more than a year.
 As a rule, the skeleton of the soul is sheathed with such materials:
- lacquered lining;
- moisture resistant plywood;
- siding;
- slate sheets (flat or wave);
- professional sheet;
- Fiberboard, etc.
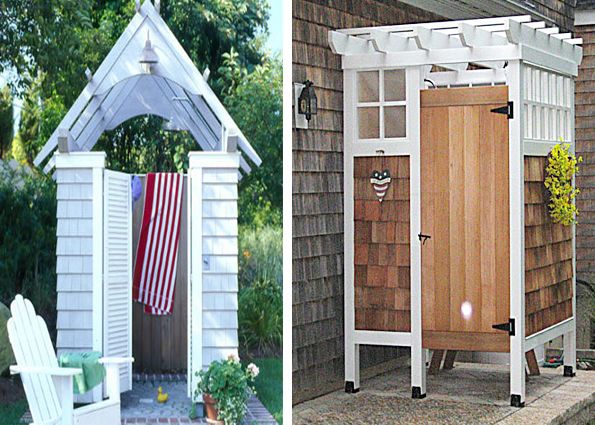
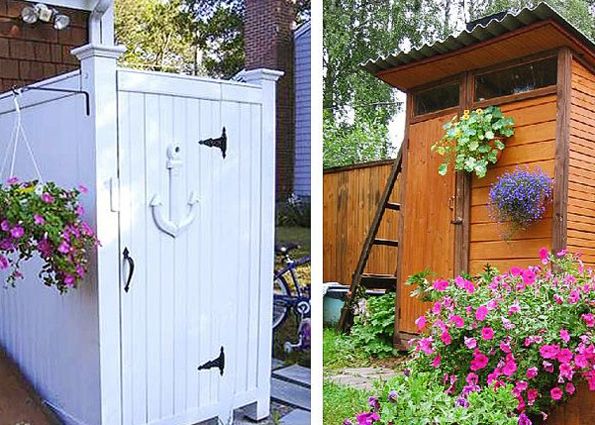
An important nuance! To keep unity general style and harmony in the design of a backyard allotment or dacha, specialists-designers advise covering an outdoor shower with materials used in the decoration of nearby structures or buildings!
 A waterproof curtain can be used as a closing (fencing off) element. It is easy and simple after the completion of water-hygienic procedures, it shifts in any direction. It will look more aesthetically pleasing and reliable wooden door, closing which you can not be afraid of the invasion of "random guests".
Principles for attaching a watering can
A plastic container or a water barrel is mounted at the top (roof) of the summer shower structure. Faster and optimal water heating solar heat, will provide coloring of the reservoir surface in intense black or deep brown color. Water can be drawn into the installed tank using an electric pump or manual buckets. If a pump is installed, then it must be equipped with a special plumbing valve that allows you to stop the water supply after filling the volume of the barrel.
The price of a ready-made outdoor shower depends on its comfort (the material from which the walls of the shower are made, the method of assembly and the presence of a water heater). The benefits of a country shower cannot be overestimated. You need to choose which summer shower in the country with your own hands you want to build:
- Temporary - building for 1 season
- Capital - a multi-year building that can be left for the winter.
Let's take a closer look at how to make a country shower yourself.
Choosing a place for a country showerTo begin with, you must determine exactly where the shower will be located and you need to know some more points: 1. Where exactly will the water you use drain;

2. In what way will the tank located on top be filled with water;

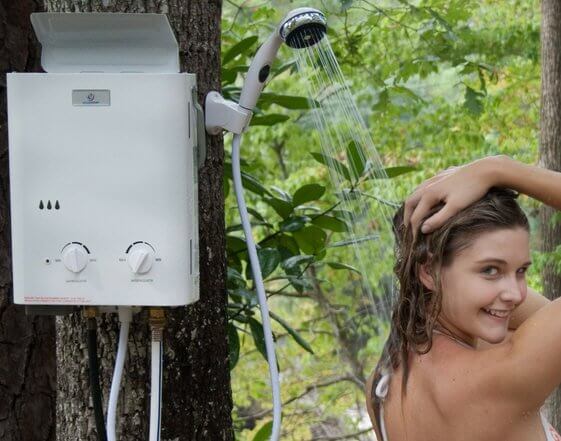
3. If you do not have an automatic water heater, then you need to choose a sunny place on your site so that the water is heated from the sun's rays.
2. Shower drain.
If you have a drain ditch on your site, then it is better, of course, to connect the drain to it. But if you do not have a ditch, then you need to dig a shallow hole into which the used water will drain. It is better to make the depth of the pit such that it does not have time to overflow. The drain can be removed using a pipe so that the water flows to the place where you need it, for example, to moisten the soil.
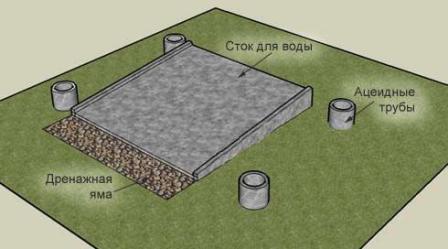
In no case should a sewer pit be made under the shower itself, because the soil under the shower will erode and this can lead to the destruction of the structure. That's why drain hole best done a few meters from the shower itself. The outflow of water can be done using the most common waterproof materials. Can apply pvc film, roofing material, hydrostekloizol, while laying them necessarily on an inclined embankment. More reliable and quality option stack of water is with the help of a gutter made of concrete screed using metal reinforced mesh. Water runoff is not recommended to be made of clay and materials that, with frequent use of the shower, will quickly get wet and washed away with water.

3. The frame of the soul.
Any materials at hand can be used for the frame. For walls, you can use a film, ordinary boards or even slate.

For the frame, it is best to use four metal pipes, you can of course use wooden posts, but they are less reliable than metal ones. To make the frame strong, dig four holes in the ground for each post and insert them into the holes, then concrete the whole thing. Can be used for concreting cement mortar by throwing fragments of bricks into it. After the mixture has completely dried, you can start decorating the walls of the shower.
In summer, a fairy tale in the country: the air is clean, berries from your garden, salads from only plucked vegetables. Spoil this happy time, can only lack of water. Everyone wants to get under the shower in the country, finishing work in the garden. If some prefer the bath, then others need a shower and nothing more. Therefore, the decision to build a summer country shower with your own hands is logical and expedient. After little house without windows, the building of the soul is at the top of the list for everyone. For her, they use the materials found on the site and purchased, the advice of neighbors in the site and their own imagination.
One of the options for creating a shower enclosure in the country is to build an additional structure for the finished barn, it can be painted with cheerful colors. You can also divide an existing building, and with the help of a partition, make a place for a shower.
If there is no such shed that will be comfortable and durable, you can give preference to a frame made of wooden beams. A reliable support will be a beam of 10 cm in cross section. To protect against moisture and insects, we paint the wood or treat it with a wood preservative. We choose the installation site, it should be the sunniest and preferably on a hill, otherwise you will have to make an embankment so that there is a drain.
Do-it-yourself shower plan
- Choose a sunny place
- Pour the foundation
- Make a drain
- Install pallet
- Build a frame
- Install tank
Building a foundation
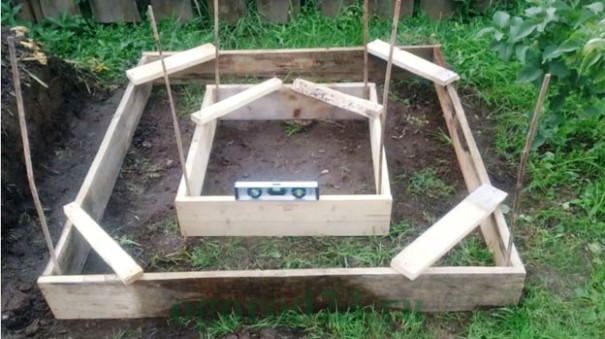
We mark out a rectangle of 1x1.4 meters, drive in the pegs, pull the rope between them, measure the distance of the sides and diagonals with a tape measure.
If we are planning a stationary and durable shower in the country, then we need to make a columnar foundation. By using garden drill in place of the pegs we make holes one meter deep. Fits there metal pipe 1.2 meters long and 90 mm in diameter. Three parts of sand, one part of cement and five parts of crushed stone are used for pouring. We measure the distance between pipes rising 20 cm.
Formwork will protect the structure from moisture, they must be filled with the same mixture as the foundation. Due to this, the country shower will rise above the site. On the columns that have not yet frozen, you need to insert 3 reinforcement sticks with a small cross section of up to 1 cm and 20 cm in length. We are waiting for the foundation to be solidified.
Making a drain
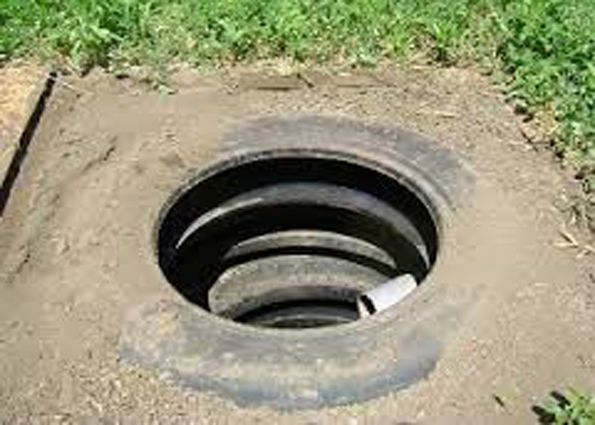
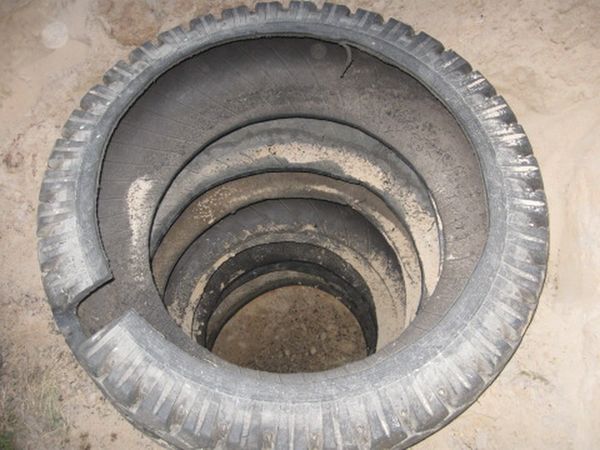
To equip the drain, we dig a two-meter hole. We strengthen the walls so that the edges do not crumble, an economical way is to lay 6 - 8 unnecessary tires. Hole for drain pipe connected to the pallet, we do it in the penultimate one. You can do without a pallet, but the water will corrode the soil, you can buy a ready-made pallet.
Building a frame

We assemble the wooden beams of the frame on a dry foundation. Dressing is done from below and from above. The upper and lower frames are assembled separately on the ground. The structure is bolted and installed on the foundation. For installation, you need to drill holes for the reinforcement on which the bars are mounted. Additional stability is provided by fixing the struts diagonally. You can sheathe it with planed wood, be sure to varnish or paint it. It is desirable to seal the door to avoid drafts.
Tank installation

There are two options, just put the tank on the roof of the building or create a frame of bars above the tank and cover it with polyethylene, which will give the effect of a greenhouse. If the first option will speed up the work, the second will save the time it takes to heat the water and will keep the heat.
Given the instability of weather conditions, it is worth choosing the second option so that the presence of a shower in the country does not depend on the sunshine of the days. To create a structure above the tank, we knock down two blanks, from the bars into the letter V. We select the length of the bars according to the diameter of the barrel. We connect the workpieces using wooden lath. We put the structure along the edges of the roof, fix it using self-tapping screws. Then just wrap it in plastic.
Tank material alternatives are between lightweight plastic and rapidly heated metal. The metal tank can be painted with dark paint, and it will heat up faster, lightweight plastic is convenient to install. We will give preference to dark plastic, a barrel of 200 liters. in volume. It must be laid on the roof, fastened with straps, fixed on both sides with nails.

It is necessary to cut two holes in the barrel, the first one will be for a watering can, it should be sealed with silicone, and it will be filled with water through the second tank. Using a hose, we connect the upper opening of the tank and the faucet with water. You can use a pump to pump water from a well.
Your garden shower is ready to use!
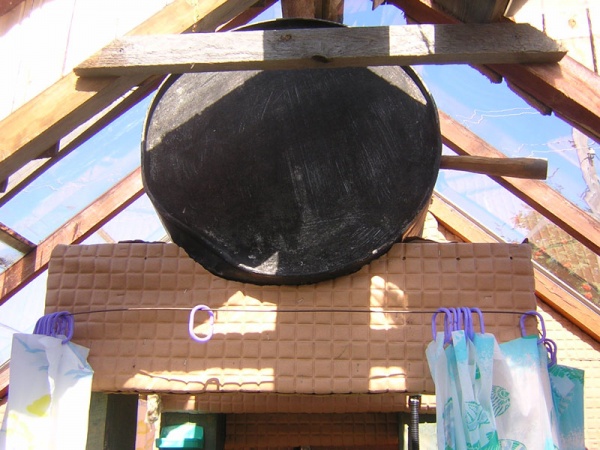
Summer country shower in the greenhouse
Moisture-loving plants can be planted around the shower. Outside the building, fasten hooks for clothes. Creating a summer shower in the country is an easy and enjoyable activity, the result of which will delight you for many summer days.

Those who have suburban area good greenhouse for vegetables, sometimes have a barrel of shower water in it.
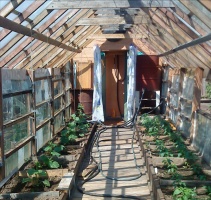

Even in the case of windy and cloudy weather, you can close all the windows and doors in the greenhouse to comfortably take a shower in the country.
It is very convenient that the water in the barrel, which is in the sun all day, warms up much faster.
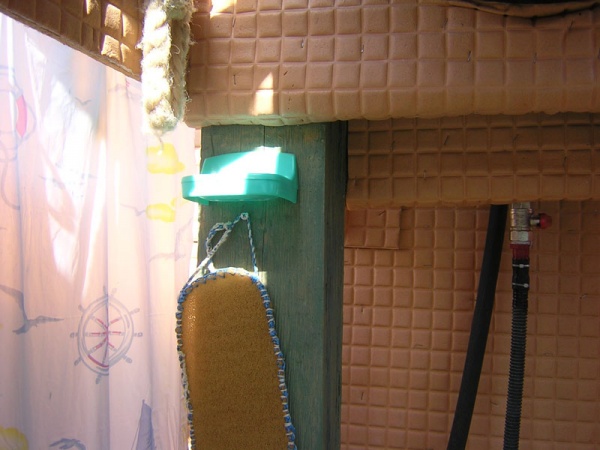
To organize a drain, you can bury a small holey barrel in the ground, on the bottom of which pour pebbles. The barrel is installed on a pedestal of bars, the height of the front racks should be higher than the rear ones. The barrel should lie at an angle.
The hole in the bottom of the barrel is used to install a faucet to which a hose and shower are connected.

You can hang curtains for the bathroom.
The main advantage of a country shower in a greenhouse is the ability to wash in it from May to September. Look how we made a country shower with our own hands.


