For the convenience of processing wood, stone, plastic and metal, for finishing and assembly manipulations, a carpentry workbench is often needed. To make it yourself, you don’t need drawings - they are needed for desktops complex design, which are also described in this article.
Purpose and typical structure of a workbench
Any workbench is a massive and necessarily stable work table for processing products of various sizes. The larger its dimensions, the larger and heavier the parts that can be processed on it. Moreover, the work itself is performed as hand tools(hacksaw, brace, etc.), and mechanized - for example, using electric drill or electric planer. A carpentry workbench has the following typical layout:
- The working surface is made of solid boards with a thickness of at least 60 mm. It is advisable to use wood for the workbench cover hard rocks– beech, hornbeam or oak, otherwise it will have to be changed periodically due to rapid wear. The lid can be put together from separate dry boards and treated with drying oil before installation;
- A vice is “hung” on the front (front) part of the top cover for fastening the workpieces. If the linear size of the workbench exceeds 1 meter, you can install two vices - separately for large and small parts. Large vices should be made of wood, small ones are acceptable in the “steel version”;
- Bench supports are made of soft wood - pine or linden. The wooden workbench supports are necessarily interconnected by longitudinal strips for overall stability of the structure;
- Retractable or tightly fixed shelves for tools can be located on supports in the underbench space.
A series of holes are drilled in the front of the top cover to install clamps, wedges and other parts for fastening large parts. In the back work surface provide a recess - it is intended for small parts and accessories. You can replace the difficult-to-make recess with a perimeter made of wooden slats.
A homemade workbench can have three types of design:
- Mobile. A small table measuring approximately 70 by 80 cm in length and width, with one vice and weighing up to 30 kg. The lower parts of the supports are made of metal for additional stability. Created for minor repairs and work with light wood products;
- A stationary workbench of simple design - easy to manufacture, but firmly “tied” to one place. Used for processing heavy boards and massive wooden pieces;
- Composite with bolted connections. It is convenient due to its “disassembly” and ease of replacing individual parts, but it is more difficult to manufacture than others.
Photo gallery: drawings with dimensions and designations
Methodology self-made We will consider stationary and adjustable workbenches in more detail. The stationary one is dug into the ground on your own site, in the country or in the yard. If it is installed inside a garage or other work space, it is recommended to secure it well to the floor so that the workbench does not rock during operation.
The installation sequence is as follows:
- Base - frame made of wooden beams, which is fastened so that the resulting structure is as reliable as possible. To do this, you need to place a jumper between the legs and install a drawer in the middle. They are best placed at a distance of about 40 cm from the floor level. By the way, they are also useful for creating additional shelves. The beams are combined using construction glue. Where it is impossible to carry out such work, you need to use self-tapping screws. If you are going to make a disassembling tool, it is best to connect the supports with metal corners. In any case, first all the grooves are prepared, then the structure is assembled, the joints are treated with glue, and we secure them with clamps. The best option When setting up a stationary workbench, it is considered possible to attach part of the tool to the wall for reliability.
The base is a frame made of beams
- If you are constructing a tabletop from several boards, then it is important to knock them down as efficiently as possible so that debris and sawdust do not get into the gaps. The dimensions should exceed the width and length of the base by 3-5 cm - this will allow you to clean the instrument with all convenience.
- The tabletop is screwed and nailed to several boards, which are located on the other side of the working surface, and grooves must be placed in the base for mounting the bars.
The boards are attached to a stable frame
- The desktop needs to be tidied up using grinding machine, cover with drying oil to reduce the risk of injury from splinters, and metal corners are bolted to its base.
- We attach a vice to the already made working surface, under which we should create recesses in the working surface, this will allow the vertical plate to be positioned in the same plane as the tabletop. We install a plywood spacer on the bottom side; it is important to ensure that the lips of the vice are flush with the surface. Using a vice, we mark the area where the holes will be drilled and attach them with nuts. We mill the holes in advance so that the bolts “sink” into them. It is best to install the vice not in the corners, which will make them reliable even under heavy loads.
You can attach a vice or saw to the surface of the workbench
- In addition to the vice, you should also make stops. Of course, you can make them yourself, but it’s better to buy ready-made ones. However, if you decide to create them yourself, prepare rectangular stops that can be adjusted in height. Bolts should not be used, as they can damage the workpiece during operation. We make holes on the working surface for the stops, preferably placing them at a distance of up to 50% of the vice stroke - this will allow you to securely fasten any workpieces.
Video: workbench with a vice
Video: workbench with saw
How to make a simple carpentry workbench with your own hands
- The top cover is knocked together from thick boards, which should form a massive shield with a width of 70 cm and a length of up to 2 meters. For fastening, long nails are used, driven into the boards from the “front” side and carefully bent onto the backside of the wooden lintels. The working surface of the workbench must be made of solid wood; fiberboard, chipboard and other materials made from pressed shavings are absolutely not suitable for it.
- A good design solution would be to cover the lid along the lower perimeter with a 5 by 5 cm beam - subsequently it is convenient to attach vertical supports to it. The increased heaviness of the lid will only add additional stability to the entire structure.
- The location of the vertical supports depends on the size of the top cover of our workbench. It is advisable to make them from rectangular timber measuring 120 by 120 mm. Can be taken as supports and round wood, but its fastening is not as reliable as that of square (rectangular) bars. The height of the working surface is of great importance; the convenience of carpentry manipulations depends on it.
- It is optimal to install the upper cut of the supports at the level of the hand lowered down - due to the installation of the cover, the total height of the workbench will “grow” by 7-10 cm and it will become quite comfortable to work on it. On the ground, we mark holes for vertical supports and dig them to a depth of 25-30 cm. Accordingly, the total length of the dug bars is 1.2-1.3 meters.
- Vertical bars are installed in the dug holes exactly, strictly according to the building level. The installed supports are connected in pairs using wide boards at a height of 20-40 cm. Transverse boards are attached to vertical bars using long self-tapping screws. After which the working surface is mounted on the ends of the supports. For its installation, self-tapping screws are used, since hammer blows on nails can move the frame of our structure.
- When top cover securely fastened, vices, clamps and other devices can be “hung” on it for the convenience of carpentry.
If the design is more complex
In the manufacture of composite carpentry workbench Do-it-yourself drawings will definitely be required, although the manufacturing procedure itself is in many ways similar to that described above. The main differences are related to the use of bolted connections instead of self-tapping screws and the installation of tool boxes in the underbench space.
When the installation of vertical supports is completed, they are connected to each other by horizontal jumpers. First, in each jumper, using a chisel and a hammer, grooves are hollowed out for a nut with a washer (you can use special furniture bolts with C-shaped nuts). Having set the jumper beam to the required height, in a vertical support and horizontal bar a through hole is drilled into which a long bolt is inserted. From the side of the prepared groove, a nut and washer are “attached” to the bolt and carefully tightened along the thread.
You will need two horizontal jumpers for the frame of a collapsible workbench on all four sides. In addition, it is necessary to install 1-2 jumpers in the middle of the tabletop, directly below it. Horizontal slats are attached to these additional jumpers using small self-tapping screws, along which the drawers for tools will slide. The boxes themselves are made “on site”, that is, depending on the size of the mounting clearance between the jumpers.
The working cover of the collapsible workbench is also bolted. Using a chisel, a mounting recess is hollowed out in the upper part of the vertical supports, and holes for bolts are drilled in the cover. Because a flat working surface is required; the bolt heads are “recessed” into the cover by drilling them seats drills of the appropriate diameter.
Video: how to make your own milling table
The undeniable advantage of a collapsible workbench lies not only in the easy replacement of parts and the tabletop itself. As you know, under the load from planing, drilling, and other mechanical processing, the most durable workbench becomes loose. It is much safer and easier to re-tighten the mounting bolts than to drive new nails or screws into the wood - so collapsible models last much longer than their knocked-together counterparts.
Video: folding workbench
The design of your woodworking bench will depend on your needs. In order to make it yourself, minimal knowledge and skills are enough.
It is not difficult to assemble a carpentry workbench with your own hands.
A good workbench should be in the household of everyone who works with wood or performs carpentry work.
Before we look at the drawings and start assembling the workbench, let’s get acquainted with its structure and manufacturing nuances.
The workbench consists of a workbench board and a base (underbench).
The board has a vice - one or two, in which the master clamps the parts with screws.
You can place the emphasis directly on the working board of the workbench using wedges that are inserted into holes in the board itself, thereby you can adjust the length of the emphasis in accordance with the length of the workpiece.
The bench board is made of dry wood or plywood up to 8 cm thick. The bench board is made of bars with a thickness of 6 cm.
The underbench is supported by 2 racks, which are transversely fastened together by beams with screws/wedges.
This is necessary so that the workbench does not “move” from side to side when planing and sawing.
Workbench structure in detail:
- The worktop is made of solid wood/plywood with a thickness of 6 to 8 cm;
- Vise on the front of the table top;
- The workbench supports are made of solid wood/plywood, connected cross bars for stabilization;
- You can install shelves and a tool box on the supports;
- Holes for wedges are drilled in the tabletop to support the workpieces;
- You can make a recess on the side or back of the work board to store tools.
The complete structure of the workbench is shown in the photo below.
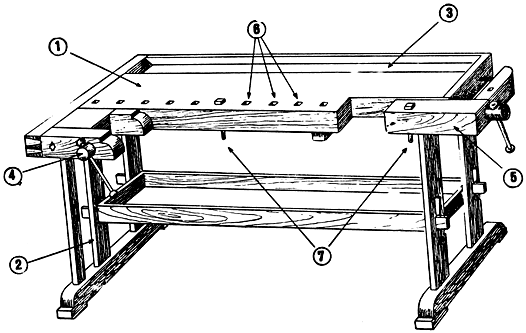
1 - cover; 2 - subsurface; 3 - tray; 4 - front clamp; 5 - rear clamp; 6 - sockets; 7 - adjustable wedges (combs)
Workbench dimensions
Here we meet the first important nuance, which cannot be ignored when making a workbench with your own hands - its height and length.
Minimum permissible height workbench – 130 cm, length – no more than 260 cm.
The height of the workbench is adjusted to the height of the person working on it:
- too high will not allow you to push hard, which is important when planing;
- a low workbench will force you to constantly hunch over, which will have a bad effect on your back health after just a couple of months;
- the height will be normal if you stand straight, have your back straight and can place your hands on the board without bending your elbows.
Manufacturing nuances
Making a workbench has its own nuances, the observance of which guarantees the production of a workbench that will perform its functions flawlessly.
There are a lot of nuances, so we structure them in relation to each stage of the future assembly process:
- Initial stage of work. You need to start with a working board. Someone will rush to look for an expensive solid piece of wood, and not just any kind, but according to science - oak, beech or ash. Experts will advise you to take a ready-made wooden tabletop, which will cost an order of magnitude less;
- Working with the future working surface of the workbench. The surface must be made smooth, therefore any wood prepared for the role of a workbench board must be properly sanded. To varnish or not is up to you;
- An important point is that a workbench is a type of table. Your task, in essence, is to make a table on which they cut not sausage, but wood. Therefore, having assembled the workbench, fasten it thoroughly on four legs and then connect them with transverse slats to each other for stability;
- Drawers are an important element of comfort. Take the drawer out of the bedside table and pay attention to how it is installed: there are a pair of guides in the shape of the letter “P” along which the side slats of the drawer slide. Nail two guide rails at a distance from each other equal to the width of the drawer and you're done;
- You need a sawing table if you are going to saw. The table is placed 20-30 cm beyond the board itself. It is a small board that is attached to the desktop with screws (see photo);
- The bench board must be straight. Planing, sawing, burning, carving and other manipulations can be carried out strictly on a flat surface and nothing else;
- Don't forget the wedges! Wedges are needed to provide emphasis when planing the workpiece. In the table at certain step(10-15 cm) you need to drill a row of holes (several rows in a row are possible), into which you will then insert rounded wedges. If possible, use a nozzle for drilling square holes - square wedges hold the stop better due to their shape than round ones, which tend to deviate the vector of the applied load - the workpiece will fly out of the stop every now and then.
Practical instructions for creating a workbench
So, it's time to make your own carpentry workbench. Each stage of assembly is accompanied by a description and photo of the process.
At the end practical instructions Watch the video summarizing the assembly process step by step. We do not provide drawings of the folding version, since it is much more difficult to manufacture.
Let's look at the assembly step by step.
Step 1 – take measurements
Is your back very tense or not? If everything suits you, measure the distance from your palm to the floor - this will be the total height of the workbench.
Step 2 - making the legs
Take ready-made bars of the required height, or purchase plywood and cut the sheets into strips of the required width.
Now they need to be glued together: take wood glue or powerful epoxy, put several layers on top of each other, simultaneously gluing them together.
You may need 10 of these strips of plywood for each leg. It is better to glue together 10 sheets of plywood at once and, after drying, cut them into 4 parts.

Step 3 - making the frame of the workbench
We take a ready-made board, 4 cm thick - 4 pieces, which will be the sides of the frame-box and assemble the box, placing the sides on the screws.
In another case, you can also take several sheets of plywood, glue them together and then saw them evenly.
But in order to properly connect them together later, it is better to use a router and lamellas.
Having drilled the necessary holes, we assemble the wooden box: we place it on PVA glue using the dowels of the board, and clamp it with clamps. After drying, we attach the legs to the box with self-tapping screws.
Step 3 – assembling the tool shelf
From glued plywood (5-6 sheets) we cut out a shelf that is placed in the grooves.
The shelf needs to be secured with confirmations: use a special drill (see photo), which simultaneously chamfers and drills.

The confirmation must be recessed, since this part of the shelf will be used as a guide for the drawer. Now the base of the table is ready.
Step 4 – making a drawer for the countertop
We take a sheet for the bottom and again 4 strips of plywood from several glued layers. We will make grooves on the inner sides of the two side walls for the bottom of the box.
And on the outside of these walls we make grooves by milling so that the box can move freely on the shelves. We select the cutters as follows: the smaller one is the thickness of the bottom, the larger one is the thickness of the side strips + 1-2 mm.
To secure the side wall, we install dowels: drill holes for the dowels at the ends of the walls, mark a point for drilling on the adjacent wall with a pencil and drill to a small depth.
Then we place the dowels in both holes using PVA glue. For final assembly When installing a drawer, you should use countersunk screws that will not interfere with the opening and closing of the drawer.
Step 5 - making the tabletop itself
Again we cut strips of plywood glued together in several layers for the base of the tabletop. We connect the strips into a box using dowels and PVA.
If you use round dowels, then you need to take at least 4 of them for each connection.
While the tabletop box is drying, we assemble its working board: we take wide sheets of plywood and glue them together in several layers.
You can also choose a tabletop from an old one desk and then just adjust it to size. We glue the tabletop onto a box reinforced with dowels.
Step 6 - install the vise
As soon as the glue has set and the tabletop is ready, we drill holes in it for wedges for stops and for attaching a vice.
Typically, the vice is placed on 3 holes: two for fastening with bolts, one for the screw that imparts pressure when the handle rotates.
The vice can be taken from an old workbench or purchased ready-made and then simply adjusted to the tabletop by drilling holes of the required pitch.
A bench vise is a metal screw with guides and a wood clamp.
You can take several layers of plywood about 5-7 cm thick and simply drill holes in it and put it on a screw - you will get a stop, then put snap brackets so that the vice does not fall out and you're done.
You can drill holes in the stop to match the dimensions of a large-diameter dowel, then attach it with a screw to a square of plywood, having previously drilled a recess in the square.
Make 4 such stops and place them all over the tabletop to fix the workpieces with the stop in a vice.
Our workbench is ready!
(All the above steps are shown separately in the video of the assembly process)
Rules of care and use
There are a number of rules that must be strictly followed in order for the workbench to last as long as possible:
- Clean the surface from dust and glue after each use;
- Wipe the surface once a month with hot drying oil;
- Do not flood the workbench with water or place anything adhesive on it, including parts to be glued.
- The chopping workbench is not used under any circumstances;
- Place a board or plywood under the workpiece if you want to use a cutting tool.
- Do not over-tighten the vice screws;
- When the screws are tightened, do not hit the vice;
- The workbench is attached to its permanent location using strips with screws or nails;
- The bench board should not move. Otherwise, strengthen all its connection points;
- Wipe wooden screws with dry soap, paraffin or graphite, and metal screws only with machine oil.
Reading time ≈ 3 minutes
In any private home, workshop or garage, a carpentry workbench is very the right item. With its help it is convenient to make or repair any things, and it also combines the functions of a table and a shelf for tools at the same time. It can be equipped with a bench vice, and a sharpening machine can be installed on it various instruments. If you buy a metal workbench in a store, it will cost a considerable amount of money, but it is quite possible to make a workbench from wood with your own hands.
Required tools and materials
So, to make your own workbench for the garage, you will need the following tools:
- Hacksaw or electric jigsaw;
- Roulette;
- Square;
- Building level;
- Spanners;
- Drill;
- Screwdriver.
Materials:
- bars for supports;
- 2 sheets of plywood or OSB (one of the sheets is cut to fit a shelf of the required size);
- boards for the frame;
- self-tapping screws;
- bolts;
- washers;
- nuts
Before work, you need to make a drawing of the workbench with dimensions for ease of assembly.
Step-by-step instructions for making a workbench
To make the upper frame, it is necessary to saw off the boards based on the required size of the workbench (see photo).

Using self-tapping screws, secure 2 long and 2 short boards to form a rectangular frame. Using a tape measure, mark the distance to the middle of the frame, and perpendicularly, between two long boards, secure the remaining short board, attaching it with self-tapping screws at both ends.

To make the legs of the workbench, you will need to saw off 6 equal bars. WITH inside of the resulting base, secure one leg to each corner of the frame using bolts, washers and nuts (see diagram of the workbench).

To make the structure rigid, it is necessary to install additional boards, which will also serve as the basis for the lower shelf. To do this you need to saw off 4 boards.

Using a tape measure, you need to measure an equal distance from each leg of 30 cm, at the resulting level, fasten the board to the back of the structure to 3 legs, and from the front, fasten the board between the outer and middle legs, in the place where the future shelf is planned.


The remaining two boards must be secured to the legs, at the same level as the boards for the shelves.

We cut out the necessary sections from one or several sheets of plywood or OSB using a hacksaw or electric jigsaw. We fix them flush to the top of the workbench using self-tapping screws. Additionally, you can fasten a sheet of hardboard on top, because it can be easily replaced with a new one if the old one is very worn out. The bottom shelf is made using the same scheme. Using a tape measure, measure the distance between the outer and middle legs of the workbench; a sheet of material is cut to this size and installed on the resulting base.

When attaching legs or crossbars, it is necessary to use a square to obtain an equal distance between parts of the structure. Using a level at the installation site, you need to check whether the workbench you made yourself is level. If there is a slope, it must be leveled by placing wooden chips under the legs of the workbench.
It's no secret that the well-equipped workplace- the key to successful performance of plumbing, electromechanical or installation work. The main item in a garage or workshop around which everything is arranged work zone, is a workbench. This desktop must have the necessary functionality, be durable and reliable. Purchase finished product in a retail chain can cost a pretty penny, so it’s better to make it yourself. This will make it possible not only to save money, but also to get a garage table in exact accordance with the requests for functionality and placement.
DIY workbench. How to do it?
Below we will tell you how to make a wooden or metal workbench with your own hands. The presented designs do not require the use of any scarce parts or the use of expensive equipment, and during the installation process you can get by with minimal carpentry and plumbing skills.
Making a workbench with your own hands (from wood)
Making a carpentry workbench with your own hands has a lot of advantages, which include the fact that you can arrange the locations of vices and other devices in advance, think about the quantity and location drawers etc.
Required tools and materials
To make your own workbench, you need to prepare the following tools:
- electric jigsaw or hacksaw;
- electric drill and set of drills for wood and metal;
- carpenter's square;
- roulette;
- bubble level;
- set of wrenches.
- When stocking up on materials, be sure to ensure that the wooden parts do not have cracks or knots. To get started, you will need:
- bars for support legs 100x100 mm;
- two plywood sheets with a thickness of at least 20 mm (OSB can be used). In this case, one sheet will go on the table top, and the other on the lower shelf.
- boards 50x150 mm, from which the frame will be mounted;
- bolts (it is best to use furniture bolts, with a square part that prevents them from rotating in wooden parts);
- washers and nuts;
- self-tapping screws
To facilitate assembly and avoid errors when cutting material, it is better to make drawings of the workbench and indicate on it the dimensions of each part.

DIY workbench drawings
DIY workbench. Step-by-step instruction
First of all, you need to make top frame underframe. To do this, boards of the required length are sawn off in accordance with the drawing.

Using self-tapping screws, long and short parts are fastened in such a way as to obtain a rectangular frame. After this, measure the distance to its middle along the long side, where a spacer bar is installed. The same 50x150 mm board is used, which is attached to the frame with self-tapping screws at both ends.

DIY wooden workbench. Photo
Support legs The workbench is made of 6 identical bars. To attach them to the upper frame, long bolts with nuts and washers are used. To install the support, place the block in the corner of the frame and drill two through holes through the leg and side board. Then the connections are tightened using bolts and nuts.

To achieve the required structural rigidity, lower boards are installed. By the way, these same details will also serve as the basis bottom shelf. To do this, in full accordance with the workbench drawings, 4 wooden parts with a cross-section of 50x150 mm are sawn off.

To secure the bottom boards, measure 30 cm from the edge of each support. At this height, one part is attached to the three rear legs of the structure, and from the front, the board is attached between the middle and side supports on the side where it will be installed additional shelf.


Two short boards are mounted at the same height on the sides of the workbench.

Using an electric jigsaw or hacksaw, parts are cut from sheets of OSB or plywood for table tops. It is attached flush to the top of the desktop using self-tapping screws. To protect the surface of the workbench from damage, a layer of hardboard is laid on top of the plywood, which can be easily replaced with new material as it wears out. To install the bottom shelf, measure the distance from the middle to the outer legs. The material is cut to this size and cutouts are made in its corners using a jigsaw or hacksaw. support legs. Attaching the shield to the lower base is carried out in the same way as installing a table top.

To obtain stability of the frame structure, when attaching supports and assembling the frame mechanic's workbench must be used carpenter's square. After installing the workbench, bubble level check its horizontal position. If necessary, the level can be changed by placing small pieces thin plywood under the legs.

DIY workbench. Step-by-step instruction
After assembly is completed, the workbench is impregnated with a special protective composition, varnished or painted.

A small workbench for the home with your own hands
The design of the mechanic's workbench proposed below will greatly facilitate metalworking and installation work not only in a small garage, but also on the balcony, in the corner of a utility room, etc. With all the functionality and convenience of a full-size workbench, it won't take up much space and can hold a variety of tools and gadgets in its drawers.
Tabletop small workbench It is made from two sheets of plywood glued together with a thickness of at least 18 mm and has dimensions of 1500x600 mm. To strengthen the table cover, it is additionally thickened at the edges with two layers of plywood sheet, giving a thickness of 72 mm.
Considering that plywood with a thickness of 18 mm is not the cheapest material (the cost of one sheet is about 1000 rubles), you can save a little if you buy a full-size sheet with dimensions of 2440x1220 mm. Unfortunately, this material is not enough to make the reinforcing strip that is located around the perimeter of the lid, so you will have to additionally look for a small piece of plywood sheet. Otherwise, the design of the tabletop will have to be changed.

When starting to build a small carpentry workbench with your own hands, prepare the following tools and materials:
- rule at least 2 m long;
- Circular Saw;
- carpenter's square;
- serrated spatula with tooth size 2x2 or 3x3 mm. Can buy ready-made tool or make it yourself using a grinder;
- screwdriver or set of screwdrivers;
- spanners;
- good wood glue, for example, “Moment Joiner”
- plywood 18mm thick;
- wooden beam 40x60 mm;
- self-tapping screws;
- bolts, nuts, washers.
In addition, to make a workbench yourself, you need to acquire good carpentry clamps, without which gluing plywood sheets will be problematic. If quality tool It is not possible to purchase; you can use inexpensive Chinese clamps, of which you will need double the amount.
The process of making a workbench with your own hands begins with covers, onto which a strip 1520 mm long is cut from a sheet of plywood 2440 mm long. By sawing this part, we obtain elements measuring 1520x610 mm to strengthen the sides of the lid. Then the plane is checked using the rule plywood sheets, in order to orient them with their convex surface inward when gluing.
The next stage will require maximum concentration and accuracy - within a couple of minutes you need to evenly distribute wood glue on the surface of one sheet of plywood. If you feel that lack of experience will not give you the opportunity to cope with this work in such a short time, then use wooden parts PVA furniture glue. It has no time restrictions and allows simple application. paint brush. Having prepared clamps and boards in advance to distribute the load over the entire plane, lay the bottom sheet on three boards, and after applying the adhesive, cover it with the top plywood board.

Having installed pressure boards on top, tighten the structure with clamps, constantly monitoring the flatness using the rule. It will not be possible to press the place in the center of the tabletop with a clamp, so it is left without load.

When gluing a board from several sheets of plywood, you can do without clamps if you place the structure on flat surface and press evenly over the entire plane with some kind of weight. After the glue has dried, the clamps or weights are removed and the next stage of making a workbench with your own hands begins.

So that the tabletop has a strict geometric shape when cutting it parquet flooring you have to be very careful. The rule can be applied as a guide bar for guiding a saw. When cutting the tabletop to dimensions of 1500x600 mm, maintain 90° angles using a carpenter's square or using the factory angles left over from cutting plywood as a template. Distribute the remaining scraps of plywood board into strips 150 mm wide. They will be needed to reinforce the perimeter of the tabletop, so glue them along the entire edge of the tabletop in two layers. In this case, the upper strips should overlap the joints of the lower sections of plywood.

For the manufacture of underframes timber with a cross section of 40x60 mm is used. In this case, the drawers and legs are made from solid lumber, and the supports are glued together from two pieces and one whole beam. The height of the workbench is chosen taking into account your height, since there should be no inconvenience or discomfort when using it. In our case, the height of the workbench from the floor to the top surface of the tabletop is 900 mm.
Next, glue the legs and assemble two frames. In this case, it is important to maintain the perpendicularity of the connections, since if they deviate from right angle the geometry of the structure will be disrupted. It will be easier to achieve this condition if, even at the trimming stage, the angles of all parts are strictly 90°. In our workbench, the frame width is 900 mm, and the height of the support legs is 830 mm. The gap from the floor to the bottom rung should be 150 mm.

After the glue has dried, the frames are mounted on the tabletop and secured with clamps. Then the legs are set strictly at an angle of 90 degrees to the bottom surface of the plywood panel and another set of legs and drawers are cut out. To fasten the structure to the tabletop, use 8x120 mm self-tapping screws.

The stability of the workbench can be increased if the legs and drawers are additionally fastened with the same screws. Choosing a recess for the head of the hardware feather drill, provide aesthetics to the joints.

The workbench is almost ready. If desired, you can make a box for storing tools in its underframe.

DIY metal workbench for the garage
A workbench made of steel has the necessary strength and reliability required when working with metal products. This desktop can add functionality to any garage or workshop.
Materials and tools
To start making a workbench for your garage with your own hands, you should acquire the following plumbing tools:
- angle grinder with cutting and grinding discs;
- welding machine;
- building level;
- electric jigsaw;
- drill with a set of drills;
- screwdriver;
- measuring tool.

DIY metal workbench drawings
Some materials needed for a workbench can be found in the garage, and the missing parts can be purchased on the construction market. You will need:
- steel corners 50x50x4 and 40x40x2;
- profile pipe 60x40x2;
- steel strip 40x4 mm;
- steel sheets 2200x750x2 mm;
- boards 50 mm thick;
- 15mm plywood and drawer guides;
- metal screws and bolts.
In addition, prepare paint and rust converter to make the product look aesthetically pleasing and protect the metal from moisture.
Step-by-step instructions for making a metal workbench
Cutting the material. Cut into frame profile pipe. Steel angle is used to strengthen the structure and edging the tabletop. The metal strip is needed as guide elements for the side panels and for making table drawer brackets.
Frame welding. A rectangular tabletop frame is mounted from pipes 2200 and 750 mm long, connected in pairs. At the same time, it is taken into account that on top of the frame it will be necessary to weld the corners into which the boards of the working surface are laid. To strengthen the frame, sections are welded every 400 mm steel pipes as stiffeners.

How to make a workbench with your own hands from metal. Photo
At the edges of the table, support legs 900 mm long are mounted by welding, which are reinforced at the bottom with jumpers from a corner or profile pipe.

The frames of the workbench drawers are welded to the legs on both sides.

Corners for edging are installed on the tabletop frame, and then secured with a welding joint.

From a corner 2200 mm long and 4 corners 950 m long, a sheathing of a power vertical panel for tools is arranged.

The finished frame is strengthened brackets made of steel bars, which are welded to its sides. To strengthen you will need 24 elements. Additionally, it is necessary to drill holes in each strip for mounting the side and rear plywood walls.

Plywood is cut into parts to make boxes, after which they are assembled using self-tapping screws. The number of drawers and their location depends on the specific need and personal preferences of the owner.

After assembling the drawers, metal strips with holes for attaching the slides are welded to the sides of the frame.

All welds and sharp corners pass with a grinder with a grinding wheel installed, and rusty areas of rolled metal are cleaned with a metal brush attachment.
The metal frame is treated with an anti-corrosion compound and painted with weather-resistant paint.
The boards are cut to the length of the tabletop and placed in a frame made from a corner. To prevent rotting and damage to wood by insects, the boards are treated antiseptic composition.

The lumber is laid in the prepared bed, leaving 2-3 mm gaps between the wood and the metal to allow the wood to expand when swelling. After this, the boards are screwed with self-tapping screws.

The top steel sheet is treated on both sides with a rust converter, and after drying it is attached to wooden tabletop self-tapping screws.

The table drawers are painted and installed on the guides, and the side and back plywood trim is attached.

After the workbench is made, a vice and other things are installed necessary equipment, attach hooks to place the tool.

What is a workbench
A workbench is a table designed for work related to the manufacture and installation of products made of wood, metal and other materials. Workbenches are often additionally equipped with equipment for fastening workpieces, drawers and shelves for storing tools and accessories. Depending on the intended purpose, there are carpentry and metalworking workbenches for working with wood and metal, respectively. Work tables for workshops and garages can be single or multi-seat. Workbenches designed for one workplace have a width of up to 0.8 m and a length of up to 1.5 m. The dimensions of multi-person benches increase according to the number of people working at them. The distance of the working surface from the floor is usually 0.8 - 0.9 m, however, there are also designs with adjustable height. Workbenches are most often made of metal or wood, and their tabletops are covered with sheets of plywood, hardboard, galvanized sheet, boards and other materials.
Every craftsman needs a comfortable workplace to work with wood or for finishing manipulations. In order to carry out all the work as efficiently as possible, you can quickly build a high-quality and inexpensive workbench with your own hands to suit your needs.
Construction and purpose of a carpentry workbench
A workbench is a stable, massive work table designed for processing various products using hand or power tools. The larger the size of such a table, the heavier and larger the parts can be processed on it.
Typical workbench layout:
Having decided to make a workbench with your own hands, you need to study everything possible designs tables, their drawings, and only then make a choice.
Simple stationary workbench It is not difficult to make, but it will be “tied” to a specific place. It can be used for processing massive wooden blanks and heavy boards.
Mobile desktop It has small sizes(approximately 80x70 cm), weight about 30 kg and one vice. It is intended for working with small products and for minor repairs.
Composite workbench connected with bolts, so it can be easily disassembled. However, it is quite difficult to do it yourself.
Making a workbench project
 Worker carpenter's table should be made in such a size that it is convenient to work on it.
Height The table directly depends on the height of the owner, who should be comfortable standing to perform any operations. For an average height person, the workbench can be from 70-90 cm in height.
Lenght and width The size of the workbench depends on the area of the room in which it will be installed. A table with a width of 80-100 cm and a length of at least two meters is very convenient.
Required fixtures and table configuration should depend on which hand the master will work with and what operations he will perform on the workbench.
Set up a workbench It's best to be near a window, but you'll still need additional lighting. In addition, sockets must be provided near the workplace.
design collapsible table can be reduced due to the small thickness of the material. In such a workbench you can make folding legs or a twist-off tabletop.
DIY workbench. Blueprints. Video instruction
A stationary workbench can be installed not only indoors, but also in the yard own home or dachas.
Making the base
First of all, you should make the frame of their beams with your own hands and fasten it in such a way that the base is as rigid as possible.

Most often, first, according to the drawing , grooves are made, and only then the entire structure is assembled. In this case, all joints are glued and fixed with clamps. If the workbench is collapsible, then all parts of the frame can be connected using metal corners.
To stationary design was even more reliable, several parts of the support frame can be fixed to the wall. You can increase the stability of a carpentry workbench with wedge-shaped inserts or diagonal jumpers. They are attached with self-tapping screws between the top of the frame and the legs and are made of the same material as the table base.
Making a table top with various accessories
Workbench cover size should be a few centimeters larger than the base of the structure, then it will be convenient to work behind it.
- The boards are attached to three bars using metal corners, which are placed with reverse side countertops. Grooves must first be made for these bars.
- Then the boards are carefully adjusted to each other, sanded and coated with a protective solution. It is recommended to use drying oil or oil.
A recess is made at the end of the tabletop for vice. Wherein vertical plate should form one plane with it. In addition, you will need a plywood pad, which will need to be placed at the bottom of the workbench.
The vice is applied to its location, and the location for the holes is marked. A vice is inserted into the finished recess and fastened with bolts and nuts to the table top so that its lips are located flush with the surface of the table top.
You also need to build stops on the carpentry workbench, which you can purchase or make yourself. It is not recommended to use round dowels or bolts as stops, since dowels do not secure parts well, and the bolt head can damage the workpiece.
It's quite easy to do pegs or rectangular stops. With their help, you can securely fix parts of any size. These stops are made from hard wood. You can simply make them rectangular, widen them at the top, or cut them out with a jigsaw and make them with a “spring.”
You can make holes in the tabletop for pegs or build it up with bars of the required thickness, screw them to the edge of the table and cover it with a plank on the other side. In order to fix any part, the sockets should be located from each other at a distance of half the travel of the vice.
The stationary workbench is ready, now you can work on it. However, if there is not enough space to install a desktop, then you can make a collapsible carpentry workbench.
Do-it-yourself collapsible workbench - arrangement
The procedure for making such a table is similar to that described above. Its main difference is that connecting parts requires use of bolted connections.

The advantage of such a workbench is not only that during its operation you can easily replace any parts. For example, every table becomes loose over time, and it is much easier to simply tighten the mounting bolts on it than to strengthen it with new screws and nails.
Of course, building a workbench with your own hands is not an easy task. But, having worked hard, you can end up with an excellent and comfortable workplace with various devices, at which work will bring joy.


