Milling table will make your work easier and help increase the accuracy of workpiece processing. You can buy a ready-made one, or you can make a milling table for a manual router with your own hands, using woodworking skills. We have prepared quite detailed information for you step by step instructions for making a table.
The essence of all designs of a horizontal milling table is the same, the idea is clear - you need to think it over for yourself and implement it, taking into account your capabilities. And in the end, you will get a machine that allows you to process workpieces much more accurately and perform operations that previously seemed difficult for a manual milling cutter.
Decide on the size of the working surface, based on the dimensions of the workpieces being processed and the free space in the workshop. Start small - build simple table top, incorporating modernization possibilities into the design. Work on it and little by little bring it to mind.
Make a table top
The simplest table for a router - separate work plate, placed on carpentry trestles or between pedestals. The device costs pennies and can be manufactured in a few hours, but will allow you to perform a significant proportion of the same operations as a multifunctional machine. All you need is MDF or birch plywood with a thickness of 19-25 mm. Better fit a plastic-coated panel that provides less frictional resistance, and a plate laminated on both sides will not warp during use.
Set the exact right angle of cut on the circular saw, cut the parts according to size and sand the ends.
 Cutting diagram: 1 - main plate; 2 — support base; 3 — front wall of the stop; 4 — gusset (4 pcs., dimensions for 19 mm plywood); 5 — drawer (2 pcs.); 6 — side bar; 7 — connecting strip (4 pcs.)
Advice. Before cutting, measure the thickness of the sheet material, which often differs from the standard. Amend the drawings to eliminate problems when assembling the structure.
Remove the plastic cover from the router base.

Draw a line in the middle of the slab and place a mark 235 mm from the edge.

Place the pad so that later the main router controls are closer to the edge of the table. Visually align the center of the cover with the marked point and mark the locations for drilling holes for the mounting screws.
Determine the center location for the sole with equally spaced screws.

For a base with asymmetrically placed screws, measure the diameter of the pad and the distance from the outer circumference to the cut of the sole.

Mark a mark with a pencil in the middle of the beveled side, calculate the distance from it to the center:
- S = D / 2 - (D - H)
Position the cut perpendicular to the midline and mark the center of the sole.

Mark the locations of the mounting screws.

Drill holes for mounting and for the cutter, countersink the recesses. Mark semicircular cutouts in the base and front wall of the stop.

Cut out the bends with an electric jig saw. Make auxiliary frequent cuts perpendicular to the edge of the part, slightly short of the marking line. Then move the file a little closer to the contour line - pieces will fall out without interfering with the movement of the blade. Sand the cutout with sandpaper wrapped around the pipe.
Attach the connecting strips to the bottom of the tabletop.

Glue all the pieces together and secure them with additional screws. Select screws that are longer than the standard ones by the thickness of the plywood and install the router from the bottom of the slab.
 1 — side strip for fastening with clamps on trestles; 2 - drawer; 3 — countersunk guide holes; 4 — front wall of the stop; 5 - self-tapping screw with countersunk head 4.5x42; 6 - scarf; 7 - support base
Fasten the table to the trestles with clamps, secure the position of the stop with clamps and get to work.
Make a solid base
The worktop can be installed on a frame of low height, sufficient to accommodate the router. The portable table is stored on a rack, and for work it is fixed on a workbench. If you often mill and have free space in the workshop, add support pedestals to the tabletop and get a full-fledged machine.
Cut the cabinet elements according to the dimensions given for the 820 mm high table, or change them so that the table top is level with other equipment.
 Frame details: 1 - outer side panel; 2 — inner panel; 3 - rear panel; 4 - base
Place the tabletop with the back side facing up. Install the side panels sequentially and screw them with screws, pre-drilling the guide holes. Secure the base, place the frame front side down, align the right corners and install the two back panels.
Finally, attach the wheel supports to the bottom of the housing using roofing screws. Place the wheel mounting pads no closer than 20 mm from the edges.
 1 — side stand; 2 — wheel support; 3 - bottom; 4 — internal stand; 5 - rear panel
Use the free space in cabinets to solve the problem of storing tools and consumables.
Embed the mounting plate
Get a longer cutter reach by placing the tool on a 4-6 mm thick plate made of duralumin, getinax or monolithic polycarbonate.
Cut a square with a side of 300 mm from the sheet and place it on the workbench. Glue the plastic sole of the router on top with double-sided tape, placing it in the middle face up. Using a drill of the same diameter as the mounting screws, drill holes in the plate, using the plastic trim as a template. Remove the sole, use a countersink or a large drill to make indentations for the caps.
Screw the plate to the disconnected router, insert an 8 mm drill into the collet. Lower the tool body until the drill touches the surface and rotate the chuck, marking the center. Unscrew the plate and use a hole saw to make a hole at the mark.

Place the plate on the tabletop and trace the outline. Draw and cut the cutout by inserting the jigsaw blade through drilled hole. Straighten the ends with a file and sand with sandpaper.

Secure thin boards around the marked outline with clamps.

Clamp in collet copy cutter with a bearing, set the milling depth according to the thickness of the mounting plate. Carry out the milling in several passes, then add 0.5 mm with the micrometer adjustment of the router and make the final pass.
Drill through holes under the screws and expand them with reverse side table tops with an 11 mm drill bit for self-locking nuts. Clean the surfaces and install the nuts with epoxy glue, aligning with the screws.

Customize mounting plate under the cutout, put it in place, drill the mounting holes and countersink from the front side. Attach the part to the router base, insert the tool into the tabletop and tighten the screws. Check that the plate is flush with the plane of the tabletop; if necessary, compensate for errors with washers.
Improve your focus
For faster and more convenient machine setup, upgrade the parallel side fence and add a rotary fence to help machine the ends of narrow parts. The latter can be taken from a stationary circular saw. Cut aluminum T-profile guides into the surface of the slab. To make cutouts in the tabletop, use a router or circular saw with groove disc.

Lightly round the top corners of the grooves with sandpaper. Cut the profile to size, drill holes according to the diameter of the screws, and countersink them. Place the parts in the grooves, make thin holes and tighten the countersunk screws.
Drill 7mm holes in the base of the stop, select hex bolts and plastic handwheels with nuts.

Install a guide profile in the front stop bar to secure clamps, auxiliary pads and protective devices.


Cut a cover from plywood with a hole in the center, secure it to the gussets located near the cutout of the longitudinal stop. Connect the adapter fitting and connect the vacuum cleaner when working on the router table.

Add a safety shield made from plywood scraps and a strip of plexiglass to the stop.

To make oblong cuts, drill 7mm holes at the indicated points, connect them tangents and make cuts with a jigsaw.
Make homemade clamps and clamps necessary for milling small elements.

The comb clamp can be made from maple wood, choosing a section with a straight grain pattern. Make the gaps between the ridges on a circular saw:
- Set the cutting height to 50 mm.
- Set the cutting width to 2 mm.
- Make a cut.
- Pull the workpiece back with a hand pusher.
- Turn the board 180° and saw through the other side.
- Move the stop by 5 mm, repeat the operations.
- Move the stop back again and make cuts throughout the entire workpiece.
Secure the clamps to the guide using bolts and wing nuts.
 1 - stopper; 2 — comb clamp; 3 — protective shield; 4 - aluminum guide; 5 - pipe for vacuum cleaner
Sand the surfaces of the parts, especially in areas where the workpieces will pass during the milling process. Clean the machine from dust and coat it with oil.
 1 — drawer for cutters; 2 - trapezoidal groove for stop
Let's summarize the project
Materials needed:
- Plywood 19x1525x1525 mm - 2 sheets.
- Plastic 4x30x30 mm.
- Several dozen screws.
- Aluminum guides - 2.3 m.
- Wheel support with brake - 4 pcs.
- Wood glue and epoxy.
- M6 bolts with nuts.
The ability to take your time and think through each step, to accurately mark and cut out blanks, or the desire to learn this came in handy. The result is a high-quality milling table for little money. In the future, it is worth thinking about equipping the machine with a switch and a mechanism for adjusting the milling height.
The presence of a milling machine will greatly simplify the process and accuracy of product processing. It can be purchased at finished form in a specialized store, or you can save your own savings and make a table with your own hands.
With this device you can cut not only different breeds trees, but also plastic, wood boards. You can also use it to independently make profile cuts, grooves, tenons and slots.

With a DIY router table, you can equip your workshop with a practical woodworking machine. Everything you need for efficient work- this is to attach the manual router itself to the product.
Type designs, the milling table can be:
- mounted. This option quite practical and easy to use. To do this, a separate unit block is attached to sawing machine on the clamps on the side. This design allows you to save space. If necessary, it can be easily and quickly removed and left aside;
- portable. This option is in great demand, especially if the workshop small sizes. Also, this type of design is suitable for those who often change their place of residence or take a router with them to construction sites;
- stationary. This option is suitable for a spacious workshop. This is a very convenient model. Since a stationary product can be equipped with a well-thought-out workplace.
Material
 To make a milling table, you can use various materials:
Each individual option has its own advantages. Wood is characterized by high strength, reliability and durability. But you need to know how to work with this material. It is more difficult to process manually, unlike DPP or MDF. Yes and it's worth it natural massif much more expensive.
As for chipboard and MDF, these materials are more affordable in terms of price. They can be easily processed with hand and electric tools and have good technical characteristics.
Drawing of a homemade wood milling table
Before you start making a milling table, you need to make a drawing. It indicates the exact dimensions of each individual element and materials of manufacture. As for making the drawing, you can make it yourself, you can use special programs on the computer or, order at furniture company . The last option is the most reliable. Since the specialists will make a competent calculation of all the details, with an accuracy of one millimeter.

Tools
 For the manufacture of homemade design router table you will need the following tools:
- hacksaw;
- electric jigsaw;
- sanding machine or sandpaper;
- drill;
- chisel;
- screwdriver or screwdriver.
Advice: Using power tools will greatly speed up the process of making and assembling the product.
From materials you will need:
- Chipboard or MDF. To avoid sagging during work, you should choose lumber with a cross-section of 3.6 cm. For the side parts, chipboard with a thickness of 1.6 cm is suitable;
- plywood, textolite, metal (production of mounting plate);
- The router is purchased at a specialized store.
An easy way to make a table for a hand router
Making a countertop
First you need to prepare the parts for the table. They are cut with a jigsaw from selected lumber, according to the drawing.
Advice: detailing can be ordered from a specialized furniture company. Here they will help you immediately create a competent drawing and select lumber. The cost of the furniture company's services is fully justified by the quality and precision of the work. All you need next is to simply assemble the product according to the diagram in your workshop.
The manufacturing process of a milling table is carried out in the following sequence:

Important: whether to do it for the table design or not is everyone’s personal choice. Table top with installed router You can simply attach it between two tables.
How to make and install a plate yourself
Since the tabletop of a homemade milling table is quite thick, the mounting plate should have a small thickness. Then you can make maximum use of the cutting tool reach.
Attention: a plate with a minimum thickness should be as strong and rigid as possible.
 It can be made of metal or of a material that is in no way inferior in strength, for example, PCB. The thickness of the PCB should vary between 4-8 mm.
The plate manufacturing process is as follows:
- After checking the drawing, cut out a rectangular piece from a sheet of textolite.
- In the center of a rectangular piece make a hole. Its dimensions must correspond to the diameter of the hole in the router sole.
- We connect the plate with the router base and the table.
- For fixing plates to the tabletop making clamps for the machine, which are located at the four corners. These dimensions must strictly correspond to the holes located on the tool itself.
Work area equipment
After manufacturing and assembling the milling table, it is recommended to think over a competent work area. To maintain the accuracy of milling processing, it is worth installing on the tabletop:
- guides. They can be made from chipboard or from the same materials as the countertop. The guides are installed at right angles and fastened with four oblique stops.
- clamps. They can be made in the form of a wooden comb or from a ball bearing required sizes and weight.
Finishing
 After constructing a milling table with your own hands, to give the product an aesthetic appearance and to extend its service life, you need all the working surfaces:
- polish;
- polish;
- bottom and sides - paint;
- open with varnish.
The electrical part of the product must be covered with a metal sleeve.
Photo
The result of your work may be a table that looks like one of the following


Useful video
A detailed description of the manufacturing process can be seen in the following video:
Conclusion
In conclusion, it is worth noting that the process of manufacturing a milling table is a rather responsible process. If you are confident that you can handle this task, you can save your own savings and make the product yourself. To do this you will need: stock up on a well-designed drawing, necessary materials and tools and free time.
In contact with
Anyone who seriously engages in woodworking knows how important it is to have a good router. However, it is not at all necessary to pay exorbitant sums for this instrument - it is quite possible to make it yourself. How to do this will be discussed in this article.
A well-made milling table significantly increases the efficiency of work with manual router. However, buying them can cost a pretty penny, because it will be much easier to make such a table yourself, using special drawings for this. This will allow you to save a lot of money and, moreover, the process will not take too much time. There are several types of milling tables: stationary, adaptive and portable. In this article we will talk about the stationary option, because it is the most difficult to implement. This means that having learned how to make it, other types of milling cutters can be made without difficulty.
Selection of drawings and materials
Before starting any work, you should decide what kind of result you want to get. The easiest way would be to make a milling table based on a regular workbench, but it’s better to do it anyway separate design. But if for this purpose it is still taken regular table, then it must be very strong and stable. It is important to choose the right dimensions: so, optimal height is approximately 90-100 cm. An even better solution would be a table with adjustable height, because this will allow you to adjust milling machine according to the needs of the master. General form elements of the milling table can be seen below.

As for materials, there are also subtleties here. Often the covers for such a table are made from MDF board. In general, this is justified: they are inexpensive, lightweight and easy to use. Phenolic plastic is also a popular material - it is stronger and more durable than MDF. But also more expensive - by about 20%. You can make a tabletop from a sheet of metal. One thing is important - the surface must be absolutely smooth, since the workpieces must move easily across the table surface without clinging or getting stuck anywhere. The thickness of the cover should not exceed 35 mm.
Tools for work you will need:
- Electric drill.
- Chisel.
- Sander. In principle, sanding can be done manually using sandpaper, but it will take much more time.
- Plane.
- Screwdriver.
- Jigsaw.
As you can see, both the materials and tools for making a milling table are not so difficult to get. But it is extremely important that everything is of high quality, because the durability and reliability of the product directly depends on this.
Table manufacturing stages
When all preparatory work completed, you can proceed directly to the manufacture of the product. Everything is done in several stages. They will be listed below.

There are some nuances associated with the implementation of each of the points. However, anyone who has experience working with wood products will be able to make a router table. It is only important to pay close attention to the task at hand.
How to make a router yourself + (Video)
Most people prefer to buy ready-made tools, but some of them can be done with your own hands. A manual router is also one of these. Of course, we are not talking about assembling from scratch - this takes a lot of time. But the router can be made from another, simpler and cheaper tool. For example, from a drill. You can also make this tool from a grinder or hammer drill. It is optimal to take a device with a power of 600 to 1000 W (it could be “Fiolent” or something like that). The entire structure will consist of a motor (that is, the drill itself) and a frame in which it will be fixed. Exactly how the process will take place will be discussed below.
Milling cutter manufacturing process
The first step is to make a frame into which you will then need to install a drill. It is cut out of a chipboard, then a special iron clamp is installed on top for additional fixation. The parts of the structure are fastened together with self-tapping screws. The cutter is clamped into the drill chuck. To make the structure sufficiently stable, the frame is attached to the tabletop using self-tapping screws. Of course, even with seemingly good fixation, the drill may wobble in the frame, which will lead to wooden parts, processed on such a router will look sloppy. A good solution would be to place the rotary lever on the side, and not on top - in this case, the motor will be less loose during operation.

Of course, this solution also has certain disadvantages. For example, this homemade device not suitable for long work: With constant use, it will quickly become damaged. And due to the low power, it is difficult to process wood using such a tool hard rocks. But a router made from a drill will be inexpensive, it is easy to use, and even a beginner can assemble it. That's why this design is used quite often.
In conclusion, it is worth noting that you should not be afraid to make woodworking tools yourself: expensive factory equipment will undoubtedly be better in some ways, but sometimes availability and low price play a much larger role. Especially when it comes to products where high precision is not necessary. Such a self-assembled product is ideal for those who are just learning to work with wood, but sometimes it can also help out more experienced craftsmen.
The use of various devices for a manual router significantly expands the capabilities of this unit, and also increases the comfort and safety when working with it. There are ready-made models of devices on sale that are designed for use in conjunction with a router, but, as a rule, they are expensive. Therefore, many craftsmen prefer to make accessories for this unit with their own hands.
If you attach a hand router in a special way under the table, you will get universal table Yarny machine, allowing for precise and fast processing of long and short wood blanks. To make a table for a router with your own hands, you first need to prepare necessary details to assemble the entire structure. The figure below shows a cutting map on which all the details of the future milling table are located. They are cut using a circular saw or format cutting machine.
The device can be made made of plywood, chipboard or MDF. The cutting card indicates a material thickness of 19 mm, but this is not a prerequisite. The table can also be assembled from slabs with a thickness of 16 or 18 mm. Of course, to make a countertop it is better to use laminated or plastic-coated sheet materials, which will allow the workpiece to easily slide across the surface.
It should also be noted that this homemade table intended for installation on trestles. If you need desktop version, then the drawers (5) need to be made much wider than 150 mm. Their width should be slightly larger than the height of the device so that it can fit under the countertop.
If the table parts are cut from plywood or MDF, then their ends should be sanded. The ends of parts made from laminated chipboard will need to be covered with a melamine edge using an ordinary iron.
Making a countertop
Installation of the router into the table can be done either with or without the use of a mounting plate. Preparing the countertop for direct mounting the unit is connected to it as follows.
- Since the main slab is 900mm long, its center will be 450mm from the edge. Place a dot in this place and use a square to draw a line.
- Remove the plastic pad from the base of the device.
- Find the middle of the cut on the overlay and draw a line through the center of the sole using a square.
- Place the overlay on the center line of the main plate so that the center of the sole coincides with it, and mark the center of the future hole in the tabletop with a pencil.

- Next, you should make markings for the mounting screws.

- Drill holes through which the unit will be attached to the table. Be sure to countersink them so that the screw heads are slightly recessed into the tabletop.
- Drill a 38mm diameter center hole.
- The next step is make a parallel emphasis. Using a jigsaw or router, make semicircular cuts on the front wall of the stop, as well as on its base.
- Screw the gussets to the stops. Below is a drawing that shows all the indentations for placing gussets.
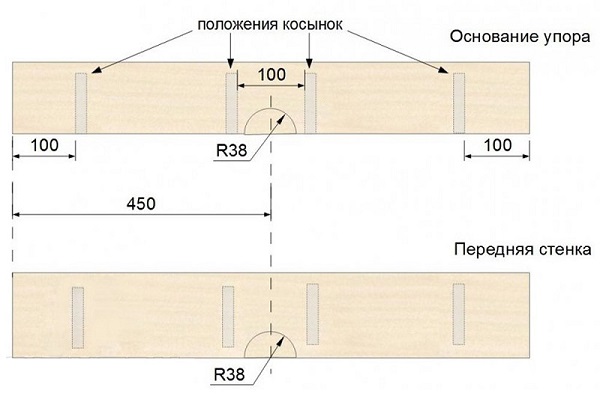
- Screw the connecting strips to the bottom of the tabletop.

- Assemble the milling machine using the diagram provided below.

Mounting the unit using a mounting plate
When installing the device on the main plate, its thickness significantly reduces the overhang of the cutter. Therefore, to install the unit on thick countertops, it is customary to use thinner mounting plates made of durable materials (steel, duralumin, polycarbonate, getinax or fiberglass). The plate is made as follows.
- From a sheet, for example, textolite, cut a square blank 300 x 300 mm.
- Attach the plastic pad removed from the router base to the top of the plate.
- Select a drill bit that matches the diameter of the mounting screws and drill holes in the plate using the plastic trim as a template.

- Place the plate on the tabletop and trace it with a pencil. After this, inside the resulting outline, draw a square with cut corners, as shown in the following figure.

- This figure with beveled corners must be cut out with a jigsaw, having previously drilled a hole in it for the saw to enter.
- After cutting out the inner part around the outer contour, you should secure the strips using clamps. They will serve template for rolling cutter. The thickness of the strips must be sufficient so that when setting the processing depth, the thrust bearing of the cutter is in the area of the edge of the guides.

- To mill the recess, secure a rolling cutter with an upper bearing in the collet of the unit.

- Set the processing depth. It should be equal to the thickness of the plate intended for mounting the unit.
- Mill this section of the tabletop according to the established template in several passes.
- Place the plate in the made recess. It should be flush with the surface of the main plate. If the plate protrudes a little, then add a little more immersion depth using a micrometer screw and make a second pass with the cutter.
- At the corners of the sample, mark and drill holes for fastening the plate.

- Place the mounting plate in the prepared seat and, holding it, turn the tabletop over. Then drill holes in the plate for fasteners. To hide the bolt heads, countersink the holes in front side overlays.
- Also, all holes on the back side of the tabletop intended for fastening the plate should be widened to accommodate self-locking nuts using a drill with a diameter of 11 mm. The nuts need to be placed in the resulting holes using epoxy glue (you can screw bolts into them for alignment).
Improvement of the stop
The parallel fence can be modified to make setting up the milling table more convenient and quick: to do this, you need to cut C-shaped guides into the tabletop. The profile can be made of aluminum. A straight groove cutter is used for tapping. The profile is placed in the prepared groove and screwed in place.


Next, you should select bolts with a hex head of such a size that it can fit into the C-shaped profile and not rotate in it. Drill 2 holes in the base of the rip fence to match the diameter of the bolt.

You should also cut a C-shaped profile into the front stop bar to attach various clamps and protective covers to it.

The stop is screwed to the tabletop using wing nuts.

On the back side of the stop you can make chamber for connecting a vacuum cleaner. To do this, just cut a square out of plywood, drill a hole in it for the vacuum cleaner pipe and screw the resulting cover to the gussets.

You can also add to the stop safety shield, made of MDF or laminated chipboard and a small rectangle of plexiglass. To select grooves, you can use a jigsaw or a router with a groove cutter installed.

To be able to process small parts, it is necessary to make clamps and clamps from plywood or MDF.

It is made on a circular saw with a pitch between cuts of 2 mm.

If desired, you can make a milling table with tool boxes.

Making the table base
If you need to use a hand router to make stationary machine, then without manufacturing solid foundation not enough. Below is a cutting map with the parts marked on it that will be required to assemble the table base. The dimensions of the parts will need to be adjusted if used sheet material different thickness.


All parts of the table for a manual router are assembled using confirmations. To make it easier to move the table, rollers can be attached to its bottom. If you expand this table a little and attach a disk in the free part hand saw, then it will work out universal table for router and circular saw.

So that the machine occupies less space, it can be made according to the principle of a table-book with tabletops descending on both sides.

Homemade tools for a router
To expand the functionality of this unit, quite expensive accessories are available for sale. But in order to save money, owners of milling cutters try to make various devices with their own hands that work no worse than factory ones.
A simple tenon cutter for a router is made from two pieces of plywood and a pair of furniture telescopic guides. The milling cutter is installed on a platform that has a hole for the tool. The platform is attached to the workbench at an angle (for more convenient positioning of the equipment in height), as shown in the photo below.


So, the tenoning device is made in the following order.
- Cut out 2 platforms of the same size from plywood. The size of the device can be any.
- Place two telescopic guides parallel to each other along the edges of the first platform and fasten them with screws.

- For more precise positioning of the guides, you can screw two strips of equal length between them.

- You should extend the counter strips and place a second platform under them flush with the first. Use a pencil to place points through the bar on the second site, and then draw a line through them.
- Remove the strikers from the guides by pressing on the plastic “antennae” located on their reverse side.
- Place the strikers on the marked area so that the line passes through the center of the mounting holes, and screw them in with screws.

- Carefully align the 2 guides and push them in (you should hear a click). If you insert a part askew, you will break the telescopes and balls will spill out of them.

- Between the vertical stop with the unit and the movable table it is necessary maintain a certain distance. This is done so that when lowering the cutter it does not touch the table platform. Since in this case the maximum overhang of the cutter will be about 25 mm, you can temporarily lay a bar of the same width, that is, 25 mm, between the table and the stop. The bar will allow you to place the structure parallel to the vertical stop
 .
. - At the next stage, holding the fixture, drill 2 holes for the dowels. They will allow you to quickly position the tenoner on the workbench. When the holes are ready, insert a couple of dowels into them. Now you can remove the bar placed between the stop and the device.

- Now that the movable table is fixed, a vertical stop must be installed on its upper platform, as shown in the following figure. For rigidity, the stop is supported by two gussets.

- When all tenoning elements are secured, testing can begin. Place the workpiece on the fixture table and press it against the stop. Set the required cutter height, turn on the unit and mill the workpiece.

- After the first pass, turn the workpiece 180 degrees and repeat the processing.

- Rotate the workpiece 90 degrees, placing it on the edge, and repeat the operation again.

- Rotate the part 180 degrees and finish the tenon.

As a result, you will get an even and high-quality tenon.

By changing the height of the cutter relative to the tenoning platform, you can obtain tenons of various thicknesses.
Copy sleeve
If your router did not come with a copy sleeve, then you can make one in literally 30 minutes using improvised materials. For homemade products you will need a metal or duralumin washer, which can be made from sheet metal, and a plumbing threaded extension.

The copy sleeve is made in the following way.
- Select a nut that fits the threads of the extension and cut it with a grinder so that you get a thin ring. After this, straighten it on the sharpening machine.

- It is necessary to make a round platform for the sleeve from sheet metal or aluminum 2 mm thick. Depending on the model of the unit, the hole in its base may have different shape
. In this case, the platform must have cuts on the sides, which are ground off on a sharpening machine.

- After sanding off the washer on both sides, place it on the sole of the unit.

- Place the unit vertically without removing the washer and mark with a pencil the places for fastening through the holes in the base of the unit.

- The places marked with a pencil must be marked for precise positioning of the drill.


- First, drill the holes with a thin drill bit, and then with a drill bit that matches the diameter of the mounting bolt.


- Place the washer on the threaded extension and tighten the ring nut. Clamp the part in a vice and trim the excess thread flush with the nut using a grinder.


- Clamp the part in a vice with the other side and shorten it slightly.

- Align the part to grinding wheel, insert into the base of the device and secure it with screws. The ring nut should be slightly below the base of the unit.


Guides for working with a router
If you need to select a very long groove in the workpiece, you will need a tool for the router, which is called a tire. Ready-made metal tires can be purchased in specialized stores. But they are also easy to make with your own hands from plastic, plywood or MDF.
The thickness of the material should be about 10 mm so that the parts can be tightened with screws.
The guide for the unit is very simple to make.
- Cut three strips on a circular saw. One wide, about 200 mm, and 2 narrow ones - 140 and 40 mm each.
- Also make a small strip from the same material, about 300 mm long and 20 mm wide.
- Place a 140 mm wide piece on a wide strip, align it along the edge and screw both pieces together with screws.
- Place a narrow strip 40 mm wide on top of the wide strip, opposite the screwed part. For precise positioning, place a 20 mm wide strip between the upper parts and screw the narrow strip to the lower part with screws. Thus, you will get a long tire with a groove 20 mm wide.
- Take a 20 mm wide strip and screw it to the base of the device, as shown in the following photo. To select a groove, select straight or shaped groove cutter and is fixed in the collet of the device.

When all the fixtures are prepared, follow these steps. Place the workpiece that needs to be processed along its entire length on the workbench, place the tire on it, securing it with clamps. Insert the strip attached to the router sole into the groove of the guide. Start the machine and mill the workpiece along its entire length.
If you need to select a deep groove, then processing occurs in several passes so that the equipment is immersed into the workpiece gradually.


A milling machine is purchased for many carpentry jobs. But sometimes the scope of its application increases significantly, and there is a need to reconstruct the workplace. A do-it-yourself milling table for a manual router is a great opportunity to save money cash and create for yourself a quality work surface. Carpentry work is now in great demand, and in Everyday life this tool is quite useful. And more convenient working conditions will make him simply irreplaceable.

Milling table
An experienced carpenter can assemble a simple milling table with his own hands even without drawings, prepared dimensions and diagrams. There are many videos on the Internet on this topic and step-by-step explanations of the essence of the work. If you have decided to try yourself in this area for the first time, then do not despair; if you wish, you can make a table for a hand router in just one day. In addition, you will be completely confident in the strength of your product, and you will also be able to choose the ideal dimensions that are necessary specifically for your room. But, before making a circular milling table, you should understand what it is.
Milling table drawing
A homemade milling table is in no way distinguishable from a store-bought version if it is made in compliance with the basic rules and requirements. Milling machines move along the surface of the material being processed, thereby leveling it. If this type of processing is made stationary, then the master will spend much less time and effort on the work.
A DIY router table takes up a certain amount of space in the room. Therefore, before installation, decide what kind of table you want to see:
- aggregate;
- removable;
- stationary.
Aggregate Portable Stationary
remember, that most work can only be performed in a stationary mode. Also, consider how often you will use the machine, because for rare use a portable model is quite suitable, and for daily use - a stationary workstation.
What parts does a milling table consist of?
A homemade milling table can be made alone, without resorting to outside help. To do this, it is necessary to manufacture all the main parts of the structure for subsequent assembly. Without one of the parts, the milling table can become practically useless, since it will not perform its main duties. The DIY router consists of the following parts:
- countertops;
- beds;
- hem support;
- pressing combs;
- mounting plate.
The tabletop for a hand router should be thick, durable and even. Great for this kitchen countertops, or, if this is not available, ordinary plywood. Just remember that a universal milling table requires a thickness of at least 16 mm, so plywood sheets should be glued together with wood glue. Additional means can be used to make the surface smoother, for more comfortable work. You need to make a hole in the center to install the router.
Milling table drawings cannot do without a bed. It is responsible for the stability of the structure, absorbing all vibrations emanating from the instrument. For this you can use old bedside tables and tables, but provided that they are very durable. Some focus their attention on metal models, which is quite practical.

Milling table from an old bedside table
The hem stop, fixed to the tabletop, is responsible for the correct supply of material. It can be made stationary, for permanent materials, or sliding, if the master will work with elements of different sizes. This is a very important element in the work, since the quality of the cutter’s work will depend on the evenness of all sides.
Pressing combs on the table for a circular saw and a router are almost mandatory. They perfectly fix the material not only from the sides, but also from above. This comb can be installed at any height using fasteners. Its dimensions are set based on the personal wishes of the master and what he will encounter in his work.
Experts advise immediately installing sliding ridges and stops, then the functionality of the working machine will increase significantly.
Assembly Rules
Assembling a milling table with your own hands should be done in stages. First you need to decide on the tabletop and make a hole in it for the tool. Next, material supply control systems are attached.
In this case, it is necessary to accurately determine the places of their attachment down to the smallest detail, since the quality of further work depends on this.
Herself milling machine must be firmly secured under the tabletop. It should not dangle or hang; any movements can lead to injury during operation or equipment breakdown. It is better to fix it with self-tapping screws, for your own peace of mind.
The main thing in this method of work is to make the most convenient workplace for the master. And in this regard, the master himself works with all dimensions, knowing what he actually wants to get as a result.
Electronics at work
It is quite easy to make a circular and milling table with your own hands, but do not forget that this tool works from electric current. Since the start and stop buttons will be located in an inconvenient place for the master, care must be taken to use them. You can make an exit and install buttons to start and stop the mechanism in convenient location, but this requires knowledge in electronics.
Eat Alternative option, which is less safe for the router and circular saw. The start button is pressed, and it is in a constantly on state, stopping only by the cable when disconnected from the network.
A new milling table made by yourself must fully comply floor covering workplace. If the floors are uneven, you should make legs with a movable mechanism, otherwise the structure will quickly become unusable. In order for the service life of the router table to significantly exceed all expectations, its surface is coated with varnish or other woodworking liquid. This not only increases service life, but also additionally holds the elements together.
1
2
3
Protect yourself from damage that may occur during operation. On longitudinal stop install protective glass, which will be a barrier to flying chips, sawdust and other elements.
When making a milling table at home with your own hands, remember that working with it is quite dangerous and you better take care of your safety.
Every person's workshop contains all the tools he needs. But at the same time, there may be an urgent need to arrange a workplace, and store prices may not suit you. And in general, not all people have the opportunity to visit stores with similar goods.

Milling table drawing
The milling table has drawings and diagrams, so making it yourself will not be difficult. Moreover, you yourself will know which model you need and what sizes will be convenient for you. The purchase option may not always be the way out. Don’t be afraid and waste time; even a beginner can figure out how to make a table.


