A traditional frame panel house consists of a wooden or metal base, as well as flat cladding in the form of large panels.
In addition to the reliability and stability of such structures, one of the advantages of a panel house can be considered ease of construction: just read the step-by-step instructions for do-it-yourself frame houses to understand the main stages construction work.
For this reason, we decided to tell you about how you can quickly and efficiently build a house using panels yourself.
In this article you will see a photo of a frame-panel house - and make sure that appearance There can be a wide variety of such buildings, and a video about assembling a frame-panel house will help you master the most necessary information.

Frame and panel house, photo
Preparation for construction
Here's what you need to know if you are planning to build a panel house with your own hands: the frame house must be drawn in the form of a model - and all the subtleties of its shape, size and layout must be taken into account in advance. Common frame house diagrams can help you with this, and if you wish, you can entrust the design to architects who will turn your ideas and wishes into reality.
Advice: Involve all family members in creating a scheme for building a frame house, so that everyone feels comfortable in it.Since the amount of material consumed for a panel house will depend on the design features, calculate its area and decide on the number of floors. Also it is important to remember the need to allocate space for communication systems(electricity, gas, water, etc.), and heating may require the allocation of an entire room.
Before you start building a panel house with your own hands, you should decide on the terrain. The ease and duration of construction work, as well as the reliability of the structure being created, will be affected by the nature of the soil, the presence of groundwater, the evenness of the surface and even the climate.
Advice: If you need to start construction work in an area that is not level enough, you can correct the disadvantages of the terrain by building a terrace, an open area, or even a basement floor.When we build a house with our own hands, showing phased construction building a frame house with your own hands on video can help you avoid basic mistakes. But you still have to make some decisions yourself: for example, choosing materials for building a frame house.
The frame base can be metal pipes with rectangular cross-section or wooden beams. And as a material for covering the frame, you can choose pox or lining, quality plywood, corrugated sheets, siding and other materials.

Basic construction work
How to build a frame-panel house with your own hands? To do this you will need a saw, a jigsaw, a metal square, construction pliers, a level, medium and big hammer, medium and large axe, screwdriver, nail puller, tape measure, hacksaw, reinforcement and small construction parts (nails, screws, angles, etc.), as well as a concrete mixer.
The main materials for building a frame-type house with your own hands will require roofing felt, cement, insulating finishing, roofing, boards, brick, broken slate, M500 cement, gravel and sand with small granules, stones, as well as facing coatings.
In what difference between frame and frame-panel house? It turns out that the difference between the two indicated types of houses is simple: a frame house is erected from separate boards on a selected site, and a frame-panel house is made at the factory in parts (panels), and only then at the construction site such panels are assembled into a solid structure.
If you watch the construction video lessons frame houses with your own hands, you will see that the work begins with the creation of primary structures.
In particular, the upper and lower base for the frames is cut, which is subsequently secured with screws, nails or strong staples. Place supports between the two bases at a distance of about 65-80 cm.
Remember! The wood must be strong and wear-resistant, since it is this part of the wall that will bear the main load of its weight.
To protect a prefabricated panel house from the wind with your own hands, use additional Decoration Materials for the frame. This can be a special particle board, moisture-resistant plywood and other wood-based materials.
Step-by-step instructions for building a frame-panel house with your own hands include the following steps:
- laying the foundation;
- walling;
- external finishing;
- interior finishing (including thermal insulation);
- roofing.

Step-by-step construction of a frame house with your own hands, photo
Let's discuss the details of building a frame-panel house. Since the shields used in such work are light in weight, it is not at all necessary to build a deep foundation. You can stop on the foundation belt type or a complete slab. But these works should begin with the preparation of a two-meter trench (depending on the climate, its depth may vary).
Next, make the formwork from edged boards: it should be about 0.4 m above the trench. To do this, you will need strong 3-6-meter boards (grade 1 or 3) with a thickness of 25 mm, bars with a section of 5 by 5 cm, and 80 mm nails .

Next stage - laying broken slate, creating a structure from bricks and stones. In this case, the thickness of the formed layer should be up to a third of the depth of the trench. Details of this stage can also be found in the video of a frame-panel house. The top layer is covered with sand for another 20 cm, and to fill the niches it is watered. It is better to repeat this procedure about five times.
After compacting and drying the foundation, you can begin to create frames with your own hands.
The construction of walls begins with an insulating roofing felt substrate. By the way, many videos on how to build a frame house with your own hands inexpensively use this particular material due to its low cost.
Lay the roofing felt between the foundation surfaces, and then you can begin building the walls:
- Drill holes in some places of the foundation: here, to connect the timber, you need to drive in vertical pins made of dry wood (dowels). The dowel should fit into the hole with interference. The frame base should be equal to the height of the two beams. In the upper beam, a cut is made into half the beam. Consider the width of the beams used, since the number of landing sites should be equal to the number of racks.
- Proceed with the installation of the racks: they are inserted into the holes made. They can be secured using an inclined support-bracket, which will connect two frame units. After all the posts are installed, secure the top beam with the prepared holes.
- Insert the upper ends of the posts into the grooves. At the same time, maintain the distance between the grooves: it should be equal to the lower distances between the holes.
- Make sure that the created structure is not tilted and is firmly supported on the foundation. Use a level to check for evenness.
- Secure the racks using jibs, and also remove the temporary jibs.
- Secure all longitudinal beams in the same way. Use 10cm nails to secure.

After completing the described work, you can begin outer skin without first boarding up windows and doors. We advise you to watch a video on how to build a frame-panel house to understand the nuances of the stages described.
Do-it-yourself insulation and external finishing
It is not enough to know how a frame house is built: if you plan to spend the cold seasons here, you need to think about insulating the walls.
To insulate a frame-panel house with your own hands, you will need one of the following materials:
- mineral wool;
- Styrofoam;
- expanded clay;
- boiler slag.
The first two materials are considered the most reliable when carrying out insulation work. Expanded clay and slag allow you to retain heat in the room only if the temperature drops at least 20 degrees.
Let's look at step-by-step instructions for insulating a frame house with your own hands. First you need to create a waterproofing layer on the wall: use film, or even better, parchment.
For convenience, cut the material into strips and secure them with slats, laying them on top of each other to prevent gaps from occurring.

Below in the video of building a frame house you will see examples of working with different materials, we will tell you how to insulate panel walls mineral wool. Using bars with a cross section of 150 by 200 mm, fasten the cotton wool to the surface of the walls.
It is advisable to fill wider bars at the joints of the slabs: they will hold better and prevent cold from entering the room.After completing this procedure, you can do the finishing. For interior design It is fashionable to use wood, drywall, and also create decor using paint and other materials.
When flashing the inside of the walls, please note that the materials should not go beyond the threshold limits, otherwise, during the process of decorating the floor, the board will go under the wall. By the way, for the floor in houses of this type it is best to use wood-based flooring or parquet.
You already know how frame houses are built, but it is important to remember about external cladding. For example, you can choose vinyl siding (it will not heat up from the sun) or metal with anti-corrosion treatment. Also suitable for decoration block house or wooden panels, stylized as bars.
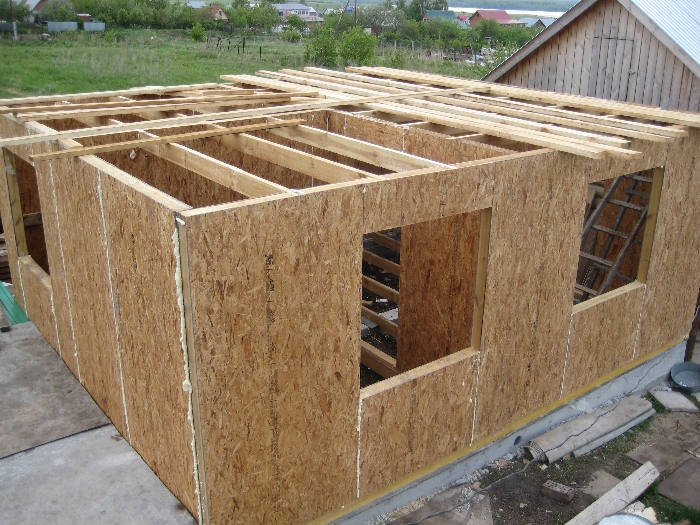
The photo below is an example of a house made of panel panels, or shields:

When building, you can use lining or decorative plaster. Almost any facing material will look good, but for this you need to be careful in the process of finishing surfaces.
Advice. To fix the chosen material without spoiling the appearance of the walls, start at the corner area and work your way around.After completing these works, you can start laying the floor, as well as installing windows and doors. Experts will tell about these and other stages on the video of mounting a frame house with their own hands.
Making a roof
Roofing is one of the important technology procedures when we build a house with our own hands: a frame house does not require the construction of non-traditional roofs. It is enough to build a frame, provide hydro, steam and thermal insulation, carry out work on the crate and counter-crate and think over the finish and decor.

If you decide to build a house roof from metal tiles, there is no need for sheathing, since the material itself is highly durable and wear-resistant. After frame construction do-it-yourself material is fixed with self-tapping screws. The edge of the facing sheet should be 4 cm below the cornice. This will create a gap that will perform a ventilation function.
We advise you to tell the consultants that you are planning to build a frame house with your own hands - and ask them about the advantages and disadvantages of each roofing material. Today, fortunately, there are enough coatings that will make the roof also beautiful and will reliably perform its functions all year round.
That's all it takes to create cozy home for the whole family.
 If you are planning to build, a description of the stages of construction technology and video tips will help you cope on your own, without expensive craftsmen.
You need to think about preparing for winter cold in advance, even at the construction stage. Find out how to insulate walls wooden house inside, what materials to choose for thermal insulation.
Video
Finally, we invite you to watch several videos about a do-it-yourself frame house with step-by-step instructions for its construction.
IN last years The construction of frame houses using Canadian technology has become widespread in Moscow. Although this method of building construction was indeed improved in Canada, it has long been used in many European countries - Norway, Sweden, Denmark.
Prefabricated panel houses abroad and in our country
The traditional Canadian project of a frame-panel house is a one-story building with a large hall, storage rooms, and sometimes a sauna. Such a house has excellent energy-saving and performance characteristics. In Russia, due to the high cost of land, turnkey two-story panel houses are popular, although one-story buildings are often purchased. Russian people love space and scope in everything, but in our conditions it is cheaper to grow upward than to grow wider.
Unfortunately, by the beginning of the 2000s, construction frame-panel houses things have calmed down in Moscow, as careless developers have greatly damaged the reputation of Canadian technology. The fact is that the construction of houses must be carried out according to all the rules - here you cannot save on materials or cheat with the design, hoping to keep the extra money for yourself. Such a house will be cold and inhospitable, and its durability is questioned. Fortunately, subsequently many companies, including Master LLC, revived the classic Canadian technology construction of housing. The houses we offer are distinguished by good quality, a high degree of heat and noise insulation, as well as low costs for construction and further maintenance of the structure.
Advantages of prefabricated panel houses
- When building a frame wooden house, it is made lighter, and therefore more cheap foundation.
- For cladding and decoration you can choose any finishing materials that the customer likes.
- Price prefabricated panel houses much lower than brick or timber.
- Panels are made only from environmentally friendly materials.
- Construction is underway all year round, be it high summer or winter.
- High speed of construction. In just a week you will be able to enjoy your own country house.
Our step by step instructions We will divide the construction of a frame house into several stages:
It is worth noting that each stage of building a frame house deserves a separate article, in addition to everything, if we describe everything possible options foundations, roofs, etc., it could be a whole book. In this regard, to improve readability, some steps in construction are described in detail in separate articles, but here - only what concerns the features specifically frame house.
Step No. 1: Preparatory work for the construction of a frame house
Preparatory work for the construction of any house is the same and includes:
- Site preparation
- House marking
Site preparation
First, you need to clear the area of vegetation, if not all, then at least the place where the house will be built. This will greatly facilitate the marking and allow you to make it more accurately.
If the construction site has a large slope, then, depending on the type of foundation and desire, it can be pre-leveled using special equipment.
Attention! Do not neglect this procedure, spending 1-2 hours on clearing, in the future you will make your work much easier, and measurements in the grass may be subject to a large error.
House marking
 Marking is a very important stage, because the layout and evenness of the corners of the walls depends on it. If the marking is inaccurate, it will be very difficult to correct this error in the next stages.
Marking the foundation of a frame house, as well as any other, as a rule, includes preliminary placement of pegs (all external walls are marked), as well as marking of all interior walls.
If you want to learn how to correctly mark the foundation for a house with your own hands, and so that all the walls and corners are level and correspond to the project, I advise you to read my article about this. Given the large amount of information, it had to be submitted separately.
Step No. 2: Do-it-yourself foundation for a frame house
The great advantage of a frame house is that almost any type of foundation is suitable for its construction. The only limitation is the type of soil on the site and your capabilities.
It is worth saying that laying the foundation for a frame house with your own hands deserves separate topics of discussion and is included in separate articles. Moreover, there are several types of suitable foundations, and it’s up to you to decide which one to choose.
Here I will tell you in a nutshell about suitable foundations for a frame house, and in what cases each of them is used, and I will also give links to their detailed description.
 The most common type of foundation for a frame house is a pile-screw foundation. This is practically the simplest and cheapest option for such a house, especially since installing a pile-screw foundation is not difficult even with your own hands.
Such a foundation is suitable for almost any soil, except rocky ones. Particularly suitable for swampy soils, where compact soils are located deep and other types require huge costs.
In general, all the pros and cons of pile-screw foundations are discussed in another topic that will help you decide on the choice of support for your home.
Shallow strip foundation
 Shallow strip foundation, is also used for construction quite often. This is due to the relatively low cost of laying it, as well as the possibility of using concrete floors in the house.
Such a foundation, due to its relative fragility, requires strict adherence to laying technology.
As a rule, shallow strip foundations are used in good soils, and is strictly contraindicated on the basis of very high level groundwater and marshy soils.
Slab foundation for a frame house
 IN Lately, slab foundations are becoming increasingly popular for building a frame house with your own hands. Despite its considerable cost, it has obvious advantages, such as versatility, reliability, durability, and it can also be used as a subfloor in the house and not spend money on it separately.
Often, instead of the classical monolithic slab use a slab foundation with stiffeners. This allows you to save a little on laying, and also strengthens the entire structure as a whole.
Step No. 3: Installing the floor of a frame house with your own hands
The floors in a frame house are not much different from the floors of other types of houses and can be wooden or concrete. The choice depends entirely on the type of foundation, capabilities and desires. 
In this step-by-step instructions, we will look in detail only at the wooden floor, concrete - in a nutshell, since it is used less often, and it is not possible to fit everything into one article.
Concrete floor installation
 It is worth noting that a concrete floor in a frame house is installed in cases of a slab foundation or a strip foundation. With a slab, everything is clear - the slab itself will be the floor of the first floor.
But if the foundation is strip, the concrete floor is made of lightweight concrete, such as expanded clay concrete, for example.
Wooden floor installation
Let's look at the construction of a wooden floor using the example of a pile-screw foundation. For tape, in principle, everything is done exactly the same, except bottom trim, it may be made of thinner timber. But first things first.
Tying the foundation of a frame house
The installation of a wooden floor begins with tying the foundation. As a rule, the piping is made from timber 150x150 or 150x200, depending on the thickness of the wall and the distance between the piles. The greater the distance, the thicker the timber should be to avoid sagging. 
The strapping is necessary, firstly, in order to give rigidity to the foundation, and secondly, to evenly distribute the load on the foundation, and thirdly, it will serve as a support for the future floor of the frame house.
In order to easily carry out the strapping process with your own hands, we divide it into several stages:
- The timber is laid out along the perimeter of the foundation, the length of the walls and diagonals are checked. At this stage, the final and accurate marking of the walls is carried out, according to the project. By the way, don’t forget about waterproofing, which we put under the harness in the form of roofing material.

- The next step is to outline the joining points of the timber; they should be located on the pile, since these will be the weakest points that should not “hang”. This applies to houses whose walls are longer than the length of the purchased beams.

- The beam is joined with an overlap of 20-30 cm, as shown in the photo. To do this, so-called “locks” are cut out from the end.

- The corners fit almost exactly the same way. This is clearly visible in the photo.

- The beam is attached to the foundation using bolts or studs. To do this, it is necessary to drill holes both in the head of the foundation and in the beam itself. For ease of further installation, protruding parts - bolt heads or nuts with studs - must be deepened. The joints are additionally punched with nails measuring 150 mm or 200 mm, depending on the size of the timber.

- Once the perimeter is ready, we move on to the final step - tying the foundation under the internal walls of the frame house. This beam, to the already installed external one, is attached in the same way. For reinforcement, you can additionally use fastening metal corners.

When the piping of the foundation of the frame house is ready, we proceed to the next stage of our instructions - the construction of the floor frame.
Floor frame in the house
It is worth noting that already at this stage it is advisable to provide for all communications entering the house, such as water and sewerage. Electricity and gas can be supplied later, but if you plan everything in advance, there will be much fewer problems later.
The next step is to install the joists on top of the trim. If the distance between the supports is about 4 meters, then it would be better to use timber measuring 100x200mm or 100x150mm. You can use a 50x200mm or 50x150mm board, sewing them together in twos. 
If the distance is less than 3 meters, you can use a board measuring 50x150mm or better 50x200mm.
Installation of logs is a simple stage in assembling a frame house, but there are some nuances that must be covered in these instructions:

Do-it-yourself waterproofing and insulation of the floor of a frame house

It should be noted that waterproofing, as well as vapor barrier, must be installed with an overlap, according to the instructions for the material, while eliminating the ingress of moisture into the insulation, both from the outside and from the inside. And the insulation itself is laid tightly, without gaps.
So we reviewed the instructions for arranging the floor of a frame house, now it's time to start on the walls.
Step No. 4: Construction of the walls of a frame house
Our next step instructions I will be installing the walls myself. Just like with the floor, we will fasten all boards and beams with nails and (or) mounting metal corners, some fastenings can be made with studs.
It should be noted that almost the entire frame is assembled from a board measuring 50x150mm or 50x200mm, depending on required thickness walls and the required thickness of insulation. 
Some people think that it would be better to install a beam at the corners of a frame house, but this is not entirely correct, and why - a little later, during the installation process, I will tell you about everything.
So, let's start assembling the frame of the walls of the future house.
For a better understanding and assimilation, we will divide our instructions for arranging the walls of a frame house into several stages:
- Assembling the walls of a frame house. Windows and doors
- Installation and fastening of walls vertically in place
Assembling the walls of a frame house with your own hands. Windows and doors
We will assemble the walls on the finished floor of the frame house, this is the most convenient option. But we must take into account that in this case, it is necessary that all dimensions be accurate so that the walls do not turn out to be longer or shorter than the already installed floor.
To make it clear what I'm talking about, first look at
sectional wall of a frame house , and then I will tell you everything in order.
Now let’s look at step by step how to assemble all the walls of a frame house with your own hands:
- First of all, we need to decide on the ceiling height in the house. Let's assume that the height of the rough ceiling will be 280cm. Means vertical racks frame walls should be 280-15=265cm. The diagram shows where the 15 cm came from.

- The distance between the racks, as a rule, is selected based on the width of the insulation sheet, as a rule, its width is 60 cm. If the insulation is on a cotton basis, then the distance is made less by 2 cm, for a tighter contact.

- The top and bottom boards of the wall are laid out on the floor and the places where the vertical posts will be nailed are marked. Then the racks themselves are laid out and pierced with 120-150mm nails. You can additionally fasten them with corners.

- It is worth noting that each wall will be smaller in wall thickness than the length of the floor. This is clearly visible in the diagram.

- If the length of the wall is greater than the length of the board, then the wall is assembled from several parts. This is also done in cases where there are few helpers, because the entire assembled wall will have a lot of weight.

- As a rule, to add rigidity to the entire structure, jumpers are mounted between the racks. There are no strict rules on the number and frequency of installation, it all depends on the length and height of the walls, but usually they are installed one or two per space between the racks. The second option is better and is visible in the photo; in the case when they are made one at a time, they are mounted in a checkerboard pattern (one at the bottom, the next at the top). This can be done later, when the walls are installed. Most often, jumpers are made with the expectation that they will serve as a joint for plywood or osb boards, depending on further work.

- Window and door openings in the wall of a frame house are arranged as shown in the diagram.

- This is what it looks like “live”.

The most common mistake when assembling the walls of a frame house is that many people forget to take into account the thickness of the board when calculating, thus the wall is not as long as we would like.
Putting the walls in place


It is worth noting that when assembling walls, it is necessary to use a cord, pulling it from one corner to another, otherwise the corners will be even, but the walls will not.
Top trim and structural reinforcement
So, the frame of the walls has been assembled, now you need to make the top frame from the same board as the walls.
The top trim is necessary, first of all, for stronger adhesion of the corners, and will also give unity to all parts of the frame walls and distribute the load between them. 
To do this, it is necessary to pierce the board with 120-150mm nails over the walls, along the entire perimeter, including the internal load-bearing ones, so that all joints are covered with an overlap of at least 25-30 cm. Except for the corners, where the overlap will be equal to the thickness of the wall. 
The next step in our instructions will be to strengthen the entire structure as a whole. There are several options, the most common is reinforcement using plywood or OSB board. 
As a rule, having pierced one side along the entire perimeter (internal or external) with sheets of OSB boards, the frame of the house already becomes very rigid.
Internal partitions of a frame house
The design of internal partitions is almost no different from the design external walls, except that they have softer requirements in terms of thickness and insulation. 
- Internal partitions, unlike external walls, can be made thinner. Everything will depend on preferences and comfort in terms of sound insulation.
- The insulation inside the partitions will serve primarily as a sound-absorbing material rather than as thermal insulation.
- Internal partitions can be insulated without waterproofing and vapor barrier materials.
These are all the main differences between internal walls and external ones, otherwise they are arranged in exactly the same way.
Step No. 5: Roof of a frame house
The roof of a frame house is practically no different from the roof of other houses, be it concrete, brick or any other. I’ll even say more that installing a roof for a frame house will be less labor-intensive than, for example, for a block or brick house, because its fastening to the walls will be much simpler. 
It is worth noting that building a roof is a very responsible process, but if you do not have a complex house layout, then you can easily do it yourself.
Building the roof of any house, including a frame one, is a very large topic with many nuances. Firstly, there are many types of roofs, and it is not possible to describe everything in detail in one article. Well, secondly, in order not to confuse you, I will probably move this topic to a separate article.
Step No. 6: Insulating the frame house
Now we have come to the final stage of building a frame house - its insulation. Everything needs to be insulated - floor, walls and ceiling.
You can read more about insulating a frame house with your own hands in another step-by-step instruction; here we will discuss only general points.
When choosing insulation for the walls of a frame house, it is necessary to take into account not only the characteristics of the insulation itself, but also the characteristics of wood, with which not all types of insulation will interact well.
Here is a short instruction on how to insulate a frame house with your own hands:
- Outside, over the OSB sheets, a special waterproofing membrane is stretched. Which side should be in the instructions for it.
- From the inside of the house, between the studs, insulation is laid in several layers, depending on the requirements for the house and the thickness of the wall. Each layer is laid overlapping the joint of the previous one to avoid cold bridges.
- Floor insulation occurs in the same way.
- It is better to insulate the ceiling from the attic, having previously filled the vapor barrier film from below onto ceiling beams and hemming them with board or plywood.
- After laying the insulation, it is necessary to fill a vapor barrier film over it; it will protect the insulation from moisture from the inside.
- Depending on the needs and further finishing work, sheathing material is placed on the walls on top of the film - boards or slats, but most often - OSB sheets, on top of which, in the future, finishing is carried out.
As you have already seen, there was a lot of text. But, I believe, all stages of construction were described in detail here DIY frame house, despite the fact that some points were included in separate topics, but this is only for your convenience.
I hope that by following these step-by-step instructions, you will be able to minimal costs get a warm, cozy and reliable home.
Some developers suggest that building a panel house is not worth the cost or effort. But with the right approach, building a panel house with your own hands is not at all difficult. A verified project, availability of drawings, selection of materials and you can start building. The main thing is that the developer receives a house that he made for himself, combining in the project all the requests and requirements for comfort and convenience.
Panel construction: design features of the technology
A panel house is a structure assembled from flat parts held together additional elements. Complete assembly of the frame takes a little time, after which you can begin finishing works internal and external nature. Frame houses- a technology that is widespread in many countries of the world, and in some regions only this method is used due to the simplicity and efficiency of all processes.
The structure is assembled from ready-made elements at the construction site. The stages of work are simple, except for pouring the foundation, the processes resemble the usual assembly of a designer, so building a frame house with your own hands is not only economical, but also practical.
Frame houses differ by type as follows:
- Wooden frame assembled from lumber. At the same time, the price of the “box” is extremely affordable. It is especially important that working with wood is easy; sawing does not require a special tool; a saw or hacksaw is enough. Fastening is done with a screwdriver. The disadvantage is that you will have to pre-treat all lumber with antiprenes, compounds against fungus, and bugs.
- House on metal frame involves the arrangement of a “box” made from a corner and square pipes. Processing requires the use of heavy tools, welding machine to hold all the elements together. The cost of a steel structure is higher than lumber, but if the technology is followed, building a frame house on metal is more profitable - the building turns out to be more durable and stable.
- A house made of LSTK is a structure made of light steel structures special strength. The LSTK profile is light in weight, has excellent resistance to environmental influences, does not require additional processing, and destruction occurs within 200-250 years, a good service life! Working with the material is easy and simple - it is cut with a hacksaw for metal and fastened with self-tapping screws. The price of LSTK is high, but the practical qualities of the frame will be ideal.
Advantages and disadvantages of frame houses

About how good country house or a mansion built using frame technology, a lot has been written, so we will briefly dwell on the pros and cons. So, the advantages of technology over other construction options:
- Efficiency of construction. You can build a panel house with your own hands in 2-3 months.
- Reduced construction costs.
- High strength of construction. Despite various reviews, the houses are durable and can withstand not only hurricane winds, but winds up to 7 on the Richter scale.
- Variability of projects. If you take the construction of a panel house into your own hands, you can realize all your ideas in it, no matter how fantastic they may seem. In addition, there is always the option of external, interior decoration in accordance with the chosen style and tastes of the developer.
- Hidden laying of communications. Therefore, you will not have to install various boxes or lay highways. But you should not abuse this, since many communications require timely inspection.
- Low mass of buildings. This feature allows you to save a lot on creating a supporting base. Frame technology construction allows the use of pile, strip shallow foundation.
- Resistance to deformation. Frames resist changes in shape, even if the house is not heated during the cold season.
Disadvantages of frame houses:
- The tree is susceptible to rodents, so additional protection should be taken.
- Difficulties in redevelopment of finished buildings.
Advice! If you are building a frame-panel house with your own hands and you know exactly about the subsequent changes, you should use frame-and-frame technology.
- The second floor in such buildings is not always comfortable, but you can make a comfortable residential attic.
Many developers complain about the low thermal qualities and high sound permeability of houses. But application modern materials allows you to achieve ideal insulation and make the house absolutely soundproof.
Construction stages
Construction of a panel house with your own hands begins with preliminary preparation.
Planning

This is one of the most important processes, since the further assembly of the entire structure depends on it. Independent project development is not always available to an ordinary developer. It's best to take standard project and consider it in detail. This method is also convenient because planned projects, as a rule, are given with drawings according to which it will be easy to build own house. What is taken into account: number of floors, the presence of an attic, the layout of the interior, the presence of balconies, attics, verandas, roof type. When building a frame house with your own hands, there is no need to limit yourself in choosing a roof. It can be pitched, multi-pitched, multi-gabled or any other, depending on the preferences of the owner.
Foundation

Arranging a load-bearing base will not require a large financial investment. Easiest and fastest way to do it pile foundation or shallow tape. But the house is on screw piles It turns out cheaper, and you can screw in the piles either in summer or winter. When choosing the type of foundation, the complexity of the soil, the level of water in the soil, and the number of storeys of the future house are taken into account. For a one-story building, either a pile or columnar foundation is suitable. Installation of piles occurs as follows:
- The construction site is marked, and the places for deepening the piles are marked in increments of no more than 1.2 meters.
- Small recesses are made in the places where the pile elements will be screwed in.
- The piles are screwed in with the calculation of the depth below the freezing point of the soil or at least 0.8-1.5 meters.
- To strengthen the structure, a cement composition can be poured into the cavity of the piles.
- The heads are covered with roofing felt sheets to prevent moisture from entering.
- The above-ground ends of the piles are aligned horizontally.
- A frame is constructed from a frame or grillage poured onto which the plank floor is laid.
- It is best to lay the floor in two layers; untreated lumber works well for the first. The boards are laid out so that the markings of the wall structures are visible. The floor is attached with anchor bolts in increments of no more than 2 meters.
- Logs are thrown over the floor, the space between which is filled with mineral wool-type insulation.
- The second layer of flooring covers the interior of the subfloor. Moisture-resistant plywood is suitable for flooring.
Frame

It is extremely important to make a strong frame when building a panel house with your own hands. The video material will tell you the technological aspects of construction that will not be superfluous. The simplest and most convenient is considered to be a “box” made of lumber, since it is convenient to work with wood, and the price is quite affordable. To make a frame format, oak timber with a cross-section of 150*150 is useful, but you can get by with other types of wood. The corners are connected using the tongue-and-groove method, and when adjusting the elements, it is necessary to ensure that there are no cracks or gaps. It is undesirable to use metal corners and fasteners, since the oxidation process is transferred to the wood, and it begins to rot. Due to this, the frame house becomes loose and loses its high qualities.
Advice! Braces are bars that are installed in the corners to prevent loss of frame rigidity. Any lumber that is cut to the required size is suitable for use.
Wall panels
Once the frame is completely ready, it’s time to erect and insulate the walls. If we build a house without ready-made panels, then the insulation is the material in sheets. You should not be cheap; the insulation must be of the highest quality, not subject to deformation and moisture.
The walls are covered with boards with a thickness of 100 mm or more or pre-prepared boards, and the insulation is secured with bars with a cross-section of 15*20 cm. At the joints of slabs of the material, bars of a larger width are indicated for use, and it is better to stuff them vertically so that the insulation sheets do not move during the operation of the house. You need to lay it on the insulation waterproofing material, preventing moisture vapor from entering the structure.
Advice! If factory-made panels are used, insulation is not needed; all the elements are already in the “pie” of panels.
Finishing work, window installation

Finish with inside home is carried out at the request of the owner. Such walls are easy to paint, paste over, cover with boards or use other materials. Flooring you can also select any one, but you will have to tinker with the windows:
- The window opening in the frame must match the dimensions of the window.
- To keep your home always warm, it is better to use double or triple glazed windows.
- The total area of windows on one wall should not exceed 18% of the area of the wall panel.
- To strengthen the structure, it is necessary to provide additional reinforcing bars under and above the opening.
Once the windows are in place, you can move on to the doors and exterior trim.
Roof

A built house cannot do without a roof, so we take bars with a section of 50 * 150 mm with a bevel of edges of 50 degrees. Then like this:
- Fasten the resulting connected rafters with nails and a crossbar to make the letter "A";
- Secure each intersection with a pair of scarves;
- Make the sheathing from lumber 25*100 mm in increments of 10 cm;
- Roofing material or any other material is mounted on top of the crate, fastened with a furniture stapler;
- Then the roofing material is laid. Moreover, laying occurs from the top rows to the ridge. The sheets are overlapped, the excess parts are cut off;
- On a skate roofing material fixed with self-tapping screws.
Advice! For the base of the roof, it is most practical to use a Mauerlat.
It remains only to lay communications and you can import furniture. Such a phased analysis will tell you how to build a panel house yourself. But still, there are works where you can’t do without the help of craftsmen, for example, electrical wiring, laying communications.

If we are building a house ourselves, any good advice and practical notes. Do not neglect the recommendations of professionals when planning to equip a panel house with your own hands. Even if there is a photo, step-by-step instruction.
- After the development of the project, any changes will entail additional financial and time costs.
The construction of a panel house on a frame is a laborious process and requires knowledge. But if the preliminary selection of the house project and the calculation of the estimate were correct, the owner took care of the availability of time, materials and the weather did not let us down, the result will be excellent. It is very good to talk to specialists who know how to build a house: practical recommendations and the secrets of professionals will not be superfluous, because we are talking about your own cottage.
Today, many people are interested in the opportunity to independently build a frame-panel house. Why do people want to build a house with their own hands? First of all, it will not cost as much as the services of professional workers. Secondly, rare companies can "as for themselves." In this situation, technology will help you self-construction houses. A panel house requires a minimum of time, money and effort. Among the main advantages of such a house are the relatively low cost, the possibility of construction in winter, high energy saving rates, environmental friendliness, short construction times, the possibility of architectural expressiveness, fire safety, high performance indicators, as well as the construction of the structure without construction equipment.
Project preparation
Frame houses are constructed from flat components with subsequent reinforcing finishing. For example, in Canada, almost every owner personally takes part in the construction of his home. They do it this way: the family hires a professional who controls all stages of construction and manages the work. However, construction operations are carried out by the future owners of the house. Practice shows that this approach is justified. Construction costs are reduced, and the quality of work under the guidance of a specialist increases.

Correctly means significantly simplifying the work and minimizing the requirements for the qualifications and number of builders. you can resort to the help of professional workers, but now it is quite difficult to find a company that has been operating for a long enough time (more than 50 years) to be able to objectively evaluate the results of its work. Frame houses can be easily erected without the involvement of specialists. If you decide to build such a house yourself, you need to strictly follow the technology and consistently go through all stages of construction.
The first thing you will need is design. If you do not have such skills, it is better to trust this work architects. However, if you have the time and desire, you can try to master architecture programs.


