It is cheap, easy to install, and highly reliable. But it has two drawbacks:
- Passes through one of the parts to be joined, its cap is closed with a plastic plug, which spoils appearance furniture;
- As a result of using the confirmat, we get a practically inseparable connection: the confirmate thread is screwed directly into the chipboard, which allows a maximum of three times assembly / disassembly of furniture, after which the hole in the chipboard becomes too broken and cannot ensure a reliable connection.
Taking into account the fact that the table is an overall furniture, and it may be necessary to disassemble it (for example, when moving), and especially the fact that the table cover is a front part on which any bolts or plugs are unacceptable, the use of confirmations in this unit is devoid of any meaning. Therefore remain screw-on corners and eccentric ties.
Many small furniture manufacturers that lack equipment, like private craftsmen, usually use metal, or more often - plastic corners, which are attached to the chipboard with 4x17 mm screws.
![]()
If such a mount is used, then dowels (wooden pegs, 8x30 mm) must be installed in parallel. But even with dowels, such a connection is too unreliable and unprofessional. Flaws:
- Plastic can become brittle and crack over time (there were cases - the closet fell apart);
- Screws, even if the corner is wide, and there are two screws in each part, are not able, in principle, to withstand the loads that arise during the operation of the slot (lift, move, etc.).
As an experiment, take two chipboard blanks, connect them using a wide plastic corner on four 4x17 screws, and then try to break the joint - the screws will come out of the chipboard without much effort. - Ugly appearance that spoils general form furniture.
- The ability to cheat and not put wooden pegs, which is what craftsmen do at small enterprises in order to save their time and effort: they say, the lid will not fly up (I myself have observed it more than once).
Ideal for fixing the table top (and, strictly speaking, all other parts), suitable eccentric tie "minifix".

Such a mount consists of four parts: an eccentric, a bolt, a coupling and a plug. It is attached in the same place as the corner - inside the joint, on non-facial surfaces. To separate the parts, you just need to release the eccentric and remove the part. In the second part, however, a pin will remain sticking out, but it can also be unscrewed from the coupling. The clutch will remain in the workpiece.
Such a connection is much more reliable than a plastic corner, since the weak element - the coupling - has much larger diameter, and, accordingly, the area of \u200b\u200bcontact with chipboard than a screw, as well as a much larger thread. In addition, since it remains in the plate forever, it is advisable to pour a little glue into the hole before screwing it in - this will make the connection no worse in terms of reliability than the connection with confirmat. Advantages of minifix:
- The main advantage is that the metal parts of the mount interact only with each other - there is no friction with the chipboard, which makes the connection collapsible, an unlimited number of times;
- Aesthetic appearance - all expensive furniture is assembled on such or similar mounting hardware;
- High reliability;
- The fourth point was invented by myself, based on personal experience: protection from a fool, or a freeloader.
On the last point ... As mentioned above, often masters "forget" to install dowels.
If we are talking about a large enterprise, then such a question will not arise - everything is made there by machines. At a small enterprise, a lot of processes take place in manual mode, so sometimes it’s too lazy to drill extra hole. As a result, products are unreliable and not durable.
Installing minifixes is a rather complicated process, and in order to do it manually, you need a template, or a jig. So, we came up with a little trick.
The template has two drills, or two holes for drills - who has which. So, in the end plane, where the drill for the minifix stud is, at a distance of 32 mm from the drill, you need to weld a pin, 20 mm long and 7-8 mm in diameter, which should stick out parallel to the end drill. Now, in order to use the template and drill holes, you need to pre-drill a hole for the dowel! The pin will go into this hole - otherwise the template simply will not stick to the part.
Of course, you can use anything to fasten the table top - even nails! But best option- this, of course, is a minifix. The use of minifix ensures the reliability, versatility and aesthetic appearance of the product, as well as the high professionalism of the furniture manufacturer.
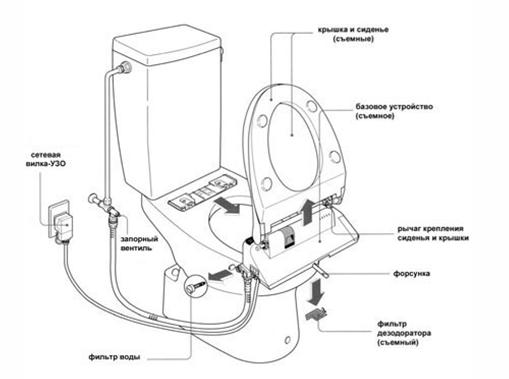
Do you think that the production of toilet seats and lids is at the mercy of the manufacturer and is not regulated in any way? How wrong you are! In Russia, the production of toilet seats is carried out in accordance with GOST-15062-83. This document also regulates the methods used to attach seats and lids to the toilet.
Here are some interesting excerpts from the standard:
- toilet seats can be made of wood and plastic;
- wooden toilet seats are available without covers;
- plastic toilet seats can be produced both without covers and complete with them. But GOST applies only to manufacturers from Russia. As a result, you can find high-quality toilet seats equipped with lids made of natural wood imported production;
- wooden seats should be made of birch plywood;
- the toilet seat must be equipped with shock absorbers in the amount of at least 4 pieces, the material of the shock absorbers is chemical-resistant rubber of medium hardness;
- fasteners of the seat to the toilet should not create obstacles for its lifting and lowering;
- The assembled toilet seat must be able to withstand a uniformly applied load of 120 kg and a load of 80 kg applied to the two edges of the seat without problems. If you weigh more, consider this point and order yourself a custom toilet seat.
Are you familiar with the requirements of GOST? Now study the market. You will see a lot of products on the market that do not meet the requirements of the State Standard. This is due to the fact that the stores exhibited a large number of imported products, whose manufacturers are not aware of the requirements of Russian standards. It is also worth considering that such products can also be produced according to specifications presented by the customer for this batch of the order.
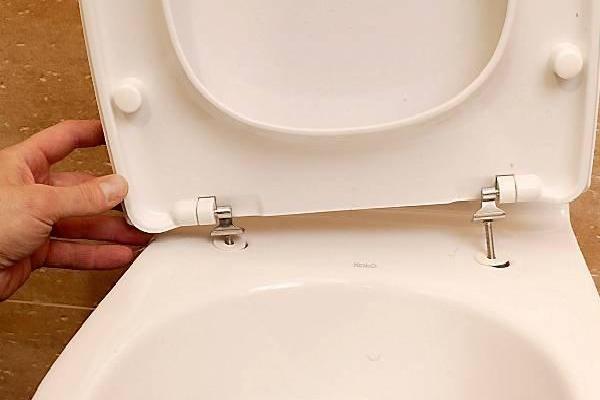
Cover and seat fastening methods
The method of attaching the lid and seat to the toilet body depends on the features of its design. 
Separate shelf for the tank
To attach the lid and seat, we use the holes for attaching the tank. For fastening in this case, special thin polyethylene clamps are used, which are mounted on the bolts of the shelf to the toilet bowl.
Tips for the home master:
- use plastic or brass bolts as fasteners;
- when using brass bolts, be sure to install plastic washers under the fasteners (without washers, you risk splitting the porcelain);
- do not use steel bolts for fastening, they will quickly rust, and in a year you will not be able to unscrew them.
Toilets with one-piece cast shelf, wall-hung and side-mounted toilets
Installing lids and seats on cast-in-shelf, wall-hung and side-mounted toilets is extremely simple. To fix the covers, there are special holes for which fastening is carried out using plastic or brass bolts. In the case of brass bolts, do not forget to put plastic gaskets.
Dismantling and repair
Over time, any seat loses its color and texture, may crack, break. As a result, the toilet seat cover will need to be replaced or repaired.
Removing the old seat
The process of dismantling the old seat largely depends on the material and condition of the mounting bolts. If the bolts are in poor condition, you will have to work a little.
Fixing with plastic bolts
Usually such a connection is easily disassembled. If you still have problems, take an old knife, heat it in a burner flame or on gas stove and cut the connection. In the process, do not be afraid to spoil the toilet with splashes of melted plastic. TO smooth surface porcelain or faience plastic does not stick and is easily removed from it without any traces.
Connection with brass bolts
 Fastening with brass bolts is usually no problem either. If the nut is still stuck and cannot budge, moisten the thread and the fastener with kerosene or a special lubricant. For example, WD-40.
Steel bolts
There are always many problems with steel bolts. They rust very quickly in high humidity conditions in the toilet. If it suddenly turned out that your toilet seat is fixed on steel bolts, and they are rusted, then you should not suffer to unscrew them. Just take a grinder or hacksaw blade and cut the bolts.
Problems under the shelf
If the toilet is with a shelf, then when replacing the seat, you can accidentally displace the cuff and leak. If this happens, take a flashlight and carefully inspect the junction of the shelf with the toilet bowl and the cuff, after unrolling the connection. If the cuff is in good condition, try reassembling the connection. If the cuff is deformed, look in stores for a new one and replace it.
Cuff Replacement Technology:
- turn off the faucet cold water on the toilet and drain the water from the tank;
- unscrew the bolts of the shelf;
- we feed the toilet back and pull it out of the cuff;
- remove the old cuff. In its place, we install a new one, roll it up;
- carefully put the tank in place and tighten the tightening bolts.
And it is best to replace the toilet with a new one with a solid shelf as soon as possible.
Broken plastic fasteners
If the plastic fasteners of the toilet seat are broken, it is best to go to the store and buy a new seat or fastening clamps. But it is not always possible to do this. In this case, you will have to repair the toilet seat mount.
How to glue plastic?
We take acetone or dichloroethane. They are good at dissolving many types of plastics. To make the connection, you need to drop a solvent on both parts of the parts to be joined, press and fix them. The connection will be ready for use after it dries. You can use superglue with cyanoacrylate. Cyanoacrylate adheres well to many types of plastics. Parts made of polyethylene or propylene cannot be glued together. To connect them, the edges of the parts are melted and welded. After the parts have cooled, the joint is carefully sanded and becomes almost invisible. When working with cyanoacrylate and dichloroethane, you need to remember that they are toxic. Contact with them and inhalation of vapors should be avoided.
Broken toilet ears and shelf
The weak point of the toilet bowl with a separate shelf is the ears of the toilet bowl and the shelf itself. There is a very large load on the shelf and mounting ears as a result of the mass of the tank, so they can be broken in one careless movement. If the toilet shelf is broken, it is better to replace it. But as practice shows, it can be repaired. Just like the broken toilet lug. How and with what can a broken toilet bowl or a broken shelf be repaired? To do this, you can use epoxy glue, prepared from resin and hardener. It has long been known that epoxy best glue for the toilet.
Repair technology:
- first of all, we thoroughly clean the chipped surface from contamination;
- Dry the bonding area thoroughly. The presence of moisture at the junction is unacceptable;
- degrease the surfaces to be glued with acetone or gasoline;
- we prepare epoxy glue by mixing resin and hardener in the ratio;
- Apply epoxy glue to both surfaces to be bonded and press the surfaces to be bonded. Immediately remove the extruded resin and fix the connection, with any possible way;
- after the connection hardens, install the tank in place. Don't forget to prop it up after assembly.
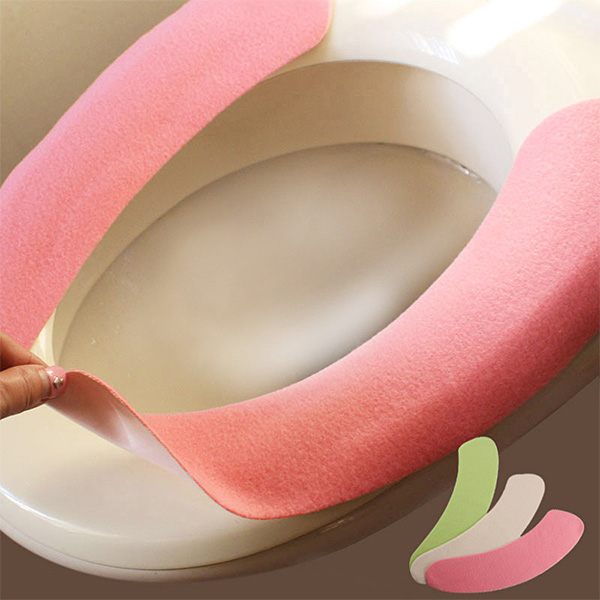
Experts have proven that the absence of a toilet cover leads to a violation of the rules of elementary hygiene, since when flushing, splashes of water with feces can spread over a distance of 3-5 m. Currently, a toilet cover can be an addition to the interior of a toilet room, as well as a way to additional functions of a sanitary ware.
Cover selection
To choose a toilet lid, you need to rely on the following parameters:
- material of manufacture;
- shape and size;
- additional options;
- manufacturing company.
What are lids made from?
The lid-seat for the toilet bowl can be made:
- plastic. The most commonly used polyethylene, polyvinyl chloride or polypropylene. Plastic lids low cost and a variety of shapes and colors. Negative qualities are poor thermal conductivity and susceptibility to mechanical stress;

- duroplast. A more expensive, but also more advanced material for the production of caps. Most often, child seats are made from duroplast, since the composition of the material includes an antibacterial component that prevents the growth of bacteria on the surface of the device. Lids are also available in different shapes and colors;

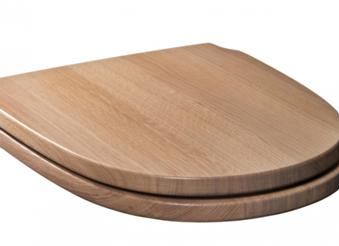
- wood (MDF, chipboard). Covers made of these materials are characterized by high cost and high weight. In case of accidental sharp lowering, chips may appear on the surface. A positive aspect is the environmental friendliness of the material used.
The optimal material for home use, according to experts, is duroplast.
Variety of shapes and sizes
The toilet lid should completely repeat the shape of the bowl. Only in this case it is able to serve for a long time.
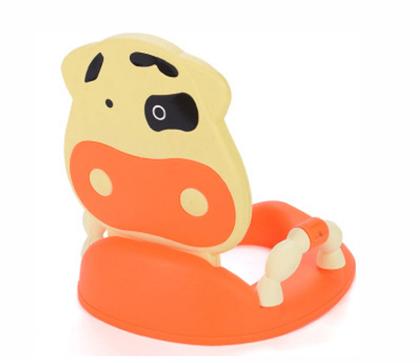
If small children live in the house, then you can install multi-colored cover in the form of any animal.
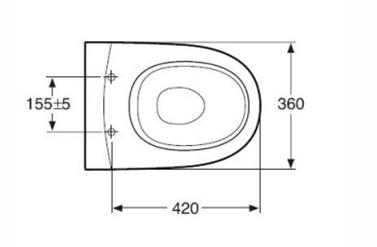
To determine the dimensions of the cover, you need to know:
- the distance between the holes for attaching the device to the toilet bowl;
- the width of the toilet (measured in the largest part of the plumbing equipment);
- the length of the toilet bowl (measured from the center line of the location of the fasteners to the edge of the bowl.
Availability of additional functions
IN Lately lids are popular additional features:
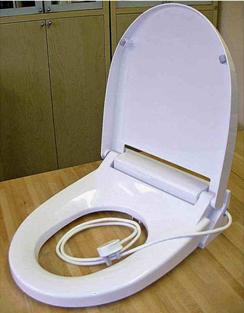
- bidet cover. Allows you to install one plumbing fixture instead of two, which saves space in the toilet room. Depending on the model and cost, the function of autonomous water heating can be provided on the lid. The lid is controlled from the panel located nearby or from the remote control;
- cover with microlift. After using the toilet, the lid slowly lowers onto the seat, eliminating the possibility of a sharp fall that could cause damage to plumbing and noise;

- The heated seat cover ensures maximum comfort even in the cold season. With the help of a temperature sensor on the seat surface, the temperature is constantly maintained at 35ºС - 36ºС;
- cover for an adult and a child, complemented by two seats of different sizes. For the comfort of small toilet users, special lids have been developed that do not require the installation of additional equipment in the form of a lining.
All additional functions can be installed both separately and together with each other. For example, a cover with a child seat, supplemented by a heating function and a microlift.
Separately, you can highlight the "smart" cover, which is equipped with a sensor that reacts to the approach of a person. When the user enters the toilet, the lid opens, and when the user leaves, it closes. "Smart" covers can be supplemented with any functions.
Cap manufacturers
When choosing a cover, you should also pay attention to the manufacturer, on which the quality and durability of products depend. The most popular are the lids issued:
- Spanish company Roca. Toilet lids are suitable for sanitary products of this brand, as well as for other modifications. Lids are available in different sizes, colors and with various additional features. The product warranty is 3-5 years;
- Polish company Cersanit. The company's products are recommended by experts as the most durable and reliable. Wide the lineup allows you to choose devices of different shapes and sizes;
- Jika company (Czech Republic). On Russian market the company was introduced relatively recently, but, according to users, the covers are reliable products;
- by Gustavsberg (Sweden). The company specializes in the production of lids with additional options.
Among Russian companies you can select the company Santec, which produces high-quality covers of different configurations, colors and sizes
Cover installation
You can replace the lid on the toilet or install a new device without the help of specialists. The installation scheme consists in carrying out the following actions:
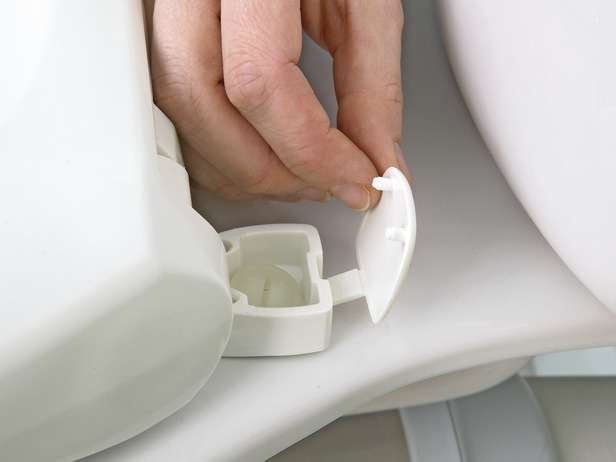
- dismantling the installed cover. A standard white cover without any functions is attached to the toilet bowl with special bolts located nearby. Therefore, in order to remove the cover, it is enough to unscrew the fasteners;
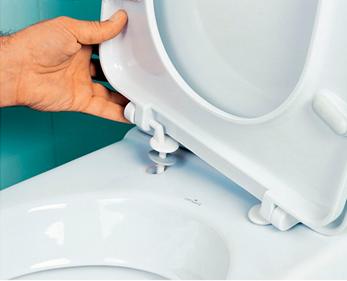
- to install a cover with additional options, you need to connect to electricity, and in the case of a bidet, to water supply. To connect the power supply, it is necessary to install the socket. For the water supply of the cover, pipes are laid out;
- the mounting plate is installed;
- a new device is attached to the toilet bowl;
- the cover is connected to the power supply and the water pipe;
- device performance is checked. If necessary, adjust or adjust individual options.
Instructions for mounting the cover are presented in the video.
When installing covers from different manufacturers, certain nuances may arise. The process of mounting the cover should be described in detail in the instructions supplied with the device.
Repair plumbing, as a rule, does not bring much trouble. From frequent breakdowns- there is a leak in the tank, damage to the fasteners or the seat itself. In the first case, you can tinker a little with it yourself and fix the situation. In others, you will need a new seat with a cover. Repairing the old, most often, will not work. Therefore, it would be better to go to the store. But before visiting the store, you need to decide on the material and shape of the seat.
Choosing a new lid
You can pick up a toilet lid without any problems. Moreover, not only classic models are available, but also versions with additional options: an intestinal gas analyzer, a microlift or the possibility of heating.

There are even seats with a built-in radio tuner and acoustic system to improve the mental state of the client. Sometimes a manufacturer builds a speaker into the toilet lid that makes the sound of flowing water to improve the process of emptying the bladder.
Material
The material can also be selected from various options:
Seat shape and inserts for babies
Beyond material important role the shape of the seat also plays: for example, for a square toilet, a round seat will not only be illogical, but also uncomfortable. In order not to miscalculate with the shape of the seat and lid, you can take a picture of your toilet on a mobile phone, measure and record its overall data and the distance between the fixing bolts on the toilet. This distance must match the one on the purchased cover, otherwise the installation will fail.
Most of the lids offered in the store have a semi-oval shape. Rectangular models are much smaller; their corners are rounded so that the client does not get hurt during use. For those who want to create a positive atmosphere in the restroom, you can pick up original covers with ducks, frogs or flowers, in the form of folk instruments (guitars or domras).


Pad for small children and a seat with a step
If the family has small children for whom the pots are already small, and the toilets are still large, you can look at a special seat with an insert for babies. Pay attention to .
Removing the old seat
Before removing the old seat, you need to prepare the necessary tools. The degree of complexity of the work will depend on the material of the bolts. If they plastic, then you can simply cut them off with some old knife, previously heated on fire. Even if the melted plastic gets on the toilet, there will be no particular problems with its removal.

Breakage of fasteners cover - the most common cause repair
We tried to tell all the secrets in our review.
brass the bolts can also be removed fairly quickly. If the nut on them does not give in even with a little effort, moisten the thread with a drop of kerosene or kerosene grease (from an auto shop).
Harder to deal with steel bolts. high humidity in the restroom can negatively affect them - rusty, they are difficult to physically attack. You can remove them using one of two methods.
- Carefully cutting off the heads with a grinder for metal.
- Sawed with a hacksaw for metal, after placing plywood or thick paper so as not to hurt the toilet itself.
Installing a new cover
New seats are now equipped with plastic hinges. They are easy to screw on and off. High humidity does not lead to corrosion. In addition, with such bolts, the structure fidgets less.

First, attach the lid to the toilet. Fasteners should go into their grooves. Then we shift the entire structure forward a little and tighten the nuts more tightly. This allows the seat to be more stable, preventing it from shaking. Now the seat with the lid is securely fixed and can be used together with the toilet.
In the next article, read and connect it to the sewer.
Thus, the lid on the toilet is placed without extra effort, an additional mass of knowledge and experience. In the case of original seat models, it is still better to use the services of a specialist. So the interior of the room will not suffer, and the structure itself will avoid accidental damage.
After you have installed the toilet, securely fasten it to the floor, and cistern directly to the toilet bowl, the final touch remained - fasteners. Usually the seat along with it comes with the toilet. But if there is none, or you just need to make a replacement, then you can buy them separately. The main thing is to choose the right seat, toilet models are now very different and you can easily make a mistake and buy a product that does not fit the fastener holes.
Choosing the right toilet seat
- The easiest way to buy what you need is to draw a toilet rim on newspaper and measure the distance between the mounting holes. And already in the store, having a drawing and measurements in hand, choose a suitable seat.
- Can be photographed on mobile phone toilet and show the photo to the consultant in the store - he will help you find the seat you need.
- Another small nuance: pay attention to the width of the toilet rim: if you purchase a narrow lid and seat, then, not only will it be uncomfortable and unstable, dirt will constantly accumulate on the toilet rim - and this is an extra waste of time for cleaning.
Removing the old seat
The dismantling of the old seat, in principle, is carried out very quickly and effortlessly, however, there are times when you have to tinker. It all depends on which toilet seat cover mount was used.
- Plastic bolts - as a rule, there are no problems with them, they are freely unscrewed. If, nevertheless, there are difficulties, glow the old knife red-hot and quickly cut off the recalcitrant plastic bolt with it. Do not worry if melted plastic gets on the toilet, it can be easily removed from faience or ceramics.
- Brass fasteners - also dismantled without any problems. If such a bolt is still stuck, use the good old kerosene - a few drops will be enough to budge the capricious bolt.
- Steel bolts - that's what they can put you "pig". They are generally not recommended for use in the bathroom and toilet rooms due to high humidity - they rust very quickly and when dismantling the elements that they fix, there are big problems. If this is exactly what happened in your case, let's look at several ways to get rid of such fasteners.
We unscrew rusty bolts with a penetrating lubricant
First you need to buy a special penetrating lubricant with a freezing effect - it is available in almost all construction stores. Its action lies in the fact that after applying lubricant to a rusty part, the rust simply begins to crack.
When you missed well rusty bolts, wrap them with a piece of rag - thereby the effect of the lubricant will increase. 10-15 minutes - this is usually enough for the lubricant to work and the rust to recede. Now you can try to unscrew the bolt - for this you will need a socket wrench.
However, sometimes it also happens that the bolts “stick” so much that even with the help of a penetrating lubricant they cannot be unscrewed. Then you can try to do it with an electric drill.
We unscrew rusty bolts with an electric drill
For this work, we need an ordinary electric drill and a set of drills. different size. The first thing to do is to drill out the circumference of the nut where it meets the bolt. To do this, take a ¼ inch drill bit. The main thing is to be very careful and do not make sudden and hasty movements so as not to accidentally touch the toilet body itself with a drill.

Then change the bit to 1/16" and continue drilling. When this work is completed, take the socket wrench. Your task is not so much to unscrew the fastener as to loosen it. And sooner or later you will definitely succeed!
Faced with the problem of rusty fasteners and having spent a lot of time and effort dismantling them, try not to buy steel fasteners for the toilet seat cover in the future. Let's say you are lucky: the mount on your toilet is plastic, then just unscrew it. You don't even need tools for this. The fasteners are unscrewed from the bottom of the toilet bowl. After unscrewing the bolts, simply remove the toilet lid. There is nothing difficult in this.
So, having dealt with the problems that may await you when dismantling the old toilet lid, we will move on.
Ways to fix the toilet seat and lid
Here the shape of the toilet bowl plays a big role, namely what kind of shelf it has - solid or invoice.
- A model with a false shelf (it is also called “eared”): it will take a little longer to tinker with it, because the toilet lid is attached to the same holes where the drain tank is attached. You will need plastic mounting clamps that are installed on the bolts that attach the shelf to the toilet.
A few simple tips to help you install the seat on the "eared" toilet:

- use only plastic or brass fasteners;
- if you use brass fasteners, install plastic washers under them - otherwise there is a high probability that, by tightening the bolt, you will break the toilet itself;
- when fixing the toilet lid, do not use steel bolts: they will rust invisibly and the next time you dismantle the lid, you will have problems removing them.
Be careful: when dismantling the seat in such a toilet model, the shelf may shift. As a result, the rubber cuff will let water through. To fix this problem, you will need any light source - you will have to look under the toilet bowl. Check the condition of the cuff: if it is not torn, but flows exactly from the place where it connects to the toilet, it will be enough just to pull the end of the cuff with a thick wire. If the cuff is cracked, burst from prolonged use, then nothing can be done about it - you will have to change it.
This procedure is simple, but takes some time: you need to turn off the water and remove the drain tank, and then the old cuff. It is good to clean everything from accumulated dirt and limescale. Then take the purchased cuff and put it on the shelf with its narrow part. Then the cuff should be rolled up. The drain tank must be put in place, then roll out the cuff and put it on the toilet bowl socket.
- A model with a solid shelf: everything is as simple as shelling pears here - special holes are made for installing the seat, where fasteners are inserted that clamp this very seat.
If a breakdown has occurred
It often happens that the fasteners or the seat itself with the cover break, crack, and various chips occur. The reasons for these minor troubles are very different: they threw back the toilet lid too sharply, unsuccessfully stood on it or on the seat with their feet, dropped something heavy ... But you never know the reasons, as they say: “breaking is not building”. There is not always a desire to go to the store for a new cover. Let's try to fix these minor problems on our own:
- To glue the crack, there is an easy way: apply a little acetone to the cracked plastic - it is known to dissolve most types of plastic, then connect both parts along the fracture line and let dry. Dichloroethane has the same effect.
- If there is a breakdown of parts made of polyethylene or polypropylene, then fire will come to the rescue: you need to melt the edges of the cracked part a little, and then connect them and let them cool. Then gently sand the seam - it will become almost invisible.
Models have one common “trouble”: often either the shelf itself or its eyelet breaks. This is due to the fact that the cistern is installed incorrectly, without the use of any props, and all its weight lies directly on plastic mounts. With this method of installation, it is enough to lean your back on the tank while sitting on the toilet, or simply push it with your hand - and problems cannot be avoided.
Do not rush to immediately run to the store for new fasteners or a shelf. Repairs can be carried out without leaving home:
- Clean the broken surface of debris.
- We wipe it dry (you can use a hairdryer) - the surface should not be wet.
- Any improvised means must degrease the surface (acetone or gasoline will do). If the chip is completely fresh, this can be omitted.
- Further hardener and epoxy resin gently mix in any unnecessary clean container.
- Lubricate both sides of the chip with the resulting mixture, strongly press them against each other. Important: the protruding mixture must be removed immediately before it hardens. Then firmly fix the connection.
- When the resin hardens, we put everything in place: both the tank with the shelf and the seat with the lid. And do not forget this time about supporting the tank - do not step on the same rake twice.
We hope that this instruction on fastening the toilet lid and eliminating the problems that may arise during its installation and dismantling will help you cope with such a simple task as replacing the toilet seat.


