Decorating the house with the help of various accessories, decor elements today is the prerogative not of those who do not have enough money for expensive accessories, but of craftsmen who have a craving for needlework. Made templates for decorating walls, windows, furniture today are the most popular. You can make stencils for decor with your own hands, draw, download from various needlework sites. Stencils have been in demand for several recent years, because they are quite simple, convenient, concise. Problems with manufacturing will not arise even for novice craftsmen. You can use this decoration to decorate almost any surface: windows, mirrors, ceilings, walls, fittings.
Many still in kindergarten, primary school cut out snowflakes to decorate the premises before the New Year. This will also be a kind of example of how stencils are used to decorate a room. A nice bonus is the inability to overdo it with the amount of decor if you pick up stencils of the same theme. Even a repeating pattern will play into the hands, decorating the design, adding a unique charm to it.
Do-it-yourself stencils for interesting decor, templates and photos of products
This issue must be approached with all seriousness: the future appearance of the ornament, its interestingness, and originality depend on the choice of base. You should not blindly copy the finished drawing, because you want to make the house original, and not mediocre. For achievement maximum effect simple rules should be followed:
Carefully approach the combination of stylistic elements containing the image of flowers, geometric shapes and stencils of different styles. When decorating walls using stencils, experts call conciseness the main condition. If you combine completely opposite images, the result will look ridiculous. The same applies to the pattern used in the design. The type of ornament should be the same. The main thing is not to combine stencils of colors and geometric shapes with each other. It looks primitive and not pretty.
Stencils containing the image of various figures should be large, bright, and clear. A small pattern of flowers, stars, small details looks like a dirty spot on the surface. It is important to observe the principle of linear filling of the pattern. More strokes, contours, lines - a brighter and clearer picture.
Templates containing a ready-made compositionally completed image may look completely different. Often, beginners use plain stencils of abstractions, ornaments that look simple, but attractive enough. Drawing in one color will suit for the decoration of rooms, the interior of which looks complete. A simple drawing will not spoil it, but will add an interesting zest. A multi-color pattern is best used on plain surfaces, adding color, color, and liveliness to the design. The drawing should not be single, but combine different shapes, figures, ornaments, combined in a holistic composition. Volumetric drawing is especially popular today: putty is used in the manufacture. The finished drawing in volume reaches 4 mm. Sometimes reverse stencils are used: use involves painting not the inside of the stencil, but the outside. Do not forget that the stencil does not have to be used separately, because it can become part of a beautiful, logically complete composition, making stencils unique. So, the image of butterflies goes well with drawings of flowers, dragonflies, small birds.
As for how to choose quality materials, from which the drawing is made, masters prefer to use different forms of paper. It is cheap, simple, widespread. You can make any stencils by drawing them yourself, printing ready-made samples. Some techniques involve using cardboard to make stencils on which the design is placed. It is quite simply attached to the surface of the walls, being a solid foundation.
There are several problems with the application of the material: in the work that such patterns imply, it will be difficult to cut stencils of the round parts that the pattern contains, especially if they are small. But you can apply cardboard templates several times without fear that the stencils will tear. IN Lately self-adhesive began to be used quite often. It is made of polyethylene, vinyl. The sticky side of the paper makes the image perfect for painting the outside and internal parts containing stencils.
Do-it-yourself stencils for room decor templates and types
Templates imply finished materials: drawn, printed on paper, film, metal. The patterns evenly fill the surface where the working materials are placed, after which the desired part is cut out, which contains the image. The mentioned parts will be painted in bright colors.
Similar patterns using paint can be performed in one or more layers. A single layer image does not cause problems. What are multi-layer stencils? The templates of the named images are used in the street art technique. Acrylic paints, water-based emulsions, alkyd enamels are used. At the stage of applying the paint, it must be taken into account that not all colors blend well with each other. For a high-quality result, it is advised to use a flower circle stencil, where one shade smoothly flows into another. This will help you see which colors are contrasting and which should not be paired when using a technique called stylistic patterns. When applying the dye, it is recommended to use rollers and sponges. They absorb excess paint, preventing it from spreading over the surface of paper, glass, walls. The use of brushes on the vertical part of the walls will lead to the fact that by moving the materials, you will smear the pattern over the area of the walls: it will spread, forming ugly stripes.
The paint application technology is as follows: you create a specific pattern using a stencil made of vinyl, paper or plastic. In order for the work to go as accurately as possible, it is necessary to use lavsan film when drawing. It is placed on the glass, under which lies the lamp. Then a stencil for the walls is made from this film.
Never cut from the edges to the center if the main and largest compositional spot is in the middle. Start cutting out large parts, smoothly moving on to smaller parts. In the event that stencil patterns occupy a very large area in width or height, try to break them into small structural parts, which will greatly facilitate not only drawing the stencil, but also applying it to the wall.
If you are just getting started with stenciling and applying paint, try to work exclusively with self-adhesive film. This will greatly facilitate your work by eliminating possible ink shifts in the drawing. When you fill your hand, you can make masterpieces even on a glue-free basis.
You need to apply stencils according to this scheme:
Prepare templates for creating an ornament with your own hands by cutting out all the necessary parts of the design. Using tape or the sticky side if film is used, attach the stencils to working surface. Proceed to the stage of applying paint with your own hands on open areas, which did not cover the patterns, without pouring it onto the surface in large quantities, because the pattern can spread ugly. It is better to apply the dye layer by layer if necessary to add brightness to the pattern. When the work is dry, remove the templates without damaging the picture.
There is a list of certain tips when working at the stage of applying paint with a brush / sponge to create an ornament with your own hands:
- If you still decide to use paint brush to create a decor with your own hands, which is highly discouraged for beginners, hold it perpendicular to the area of \u200b\u200bthe walls or other surface.
- Try to make sure that the small fibers from the brush do not stick to the already painted part of the picture. To do this, paint over the stencils in a circular motion.
- As for large areas of decor, they must be worked out with a paint roller.
- Do not dial a large number of paint on a working tool, it is better to remove excess with a sponge or a clean cloth.
- If you have used reusable stencils, wash them in room temperature water.
- Once the drawing is dry, varnish it.
If you want to use ready-made printed templates from the Internet that take up a large area, you just need to scale the drawing to the required size. And one more useful advice: if you want to highlight the picture, and not make it part of the wall design, then paste it with special borders for decoration.
DIY stencils for decorating various surfaces and pattern templates
If you want to create stylish interior your room, while radically changing the design of the room, but leaving the whole situation in its original form, use flower stencils for decoration. They are ideal for creating beautiful interior in the style of Provence and do-it-yourself decor. Light and unobtrusive patterns in the form of flowers of roses, daisies, tulips and poppies will help to make the interior original and individual.
The decor stencils you choose are entirely dependent on the pattern technology. For beginners, a simple option is suitable, which depicts floral motifs. It is worth noting that they can be both abstract and natural composition, which makes them versatile when used in any style of room.
If you are a fan of everything non-traditional and original, you should not even think about using the usual geometric or floral patterns. The best option there will be stencils on which various animals are drawn, including cats. Funny faces will be a wonderful decoration not only for walls, but also for fittings. With the help of such stencils, you can decorate not only the bedroom or nursery, but even your own refrigerator. In addition to animal motifs, you can use applications with butterflies. If you do not know how to draw these insects yourself, use a ready-made template from the Internet. All that remains is to print it, although today designers even offer ready-made vinyl stickers, which will not have to be cut or painted in the future.
If your soul wants creativity, then use unusual applications to decorate the room with them. Patterns in the form of geometric ornaments will help to personalize the situation.
It looks very interesting in the design of the room, fully or partially decorated. geometric shapes part of the walls. In this case, stencils can be repeated, which will be similar to oriental style Samarkand, or you can create an abstract composition from randomly scattered and non-repeating parts of the picture. Geometric ornaments look especially good when decorating a room made in art deco design with paint.
If you are a fan of more calm and classical motifs, turn to Byzantine and Greek ornaments. In them, small straight lines are intertwined with each other, creating complex compositional patterns with the help of patterns. This technology best suited for beginners, because it does not require significant effort when cutting.
Video: Stencil Drawing Workshops
Photo gallery: Stencils on various topics


Stencils for walls for painting best opportunity decorate the interior with your own hands.
Wall decor with stencils
It is necessary to choose a painter's suit, a roller, a brush, several colors different paint and buy your favorite stencil for wall decor at Olstik. Next, clear the wall of old paint, putty cracks and crevices, level the surface. After that, open with a layer of screed.
For fine work, water-based paint is suitable. If it is decided to leave the walls pure white, then it is necessary to repeat the procedure for applying the water-based emulsion a second time. And if you plan to paint in a certain color, then you need to let the walls dry. You can also add color to water-based paint and make a cover certain color. Keep in mind that the more color you add, the darker the color will be.
After the base dries, apply to the surface beautiful stencils for wall decor. Fix the stencil with small pieces of adhesive tape at the top and bottom so that the picture does not “move out”. Step back and analyze whether the drawing is evenly placed, whether the stencil is correctly fixed. Next, apply paint to the places where the details are cut out. If the drawing is large, then use a paint roller to apply paint, and for small parts, a brush is fine.
The choice of stencils for various rooms
The unique selection of patterns presented by Olstick allows you to act in any direction and decorate the surface of the walls in the following types of interiors:
- Entertainment venues: centers children's creativity, youth clubs, exhibition pavilions, theater foyers, cinema halls, sports complexes, dance floor.
- Business complexes: trading houses, bars, salons cellular communication, restaurants, spa-centers, massage rooms, work offices.
- Living areas: living rooms, hallways, corridors, bedrooms, kitchens and dining areas, loggias and balconies, bathrooms and toilet rooms.
Almost any room can be decorated in an original way, using stencils of flowers, ornaments, patterns, etc., if you buy wall stencils from Olstik. We work throughout Russia, including remote regions.
Benefits of buying stencils for decorating
Online store site offers to buy stencils for self decor walls. Products are made in accordance with five basic rules and requirements for compositions.
- Possibilities. With these convenient elements, the client will be able to independently decorate their home, workplace, business center.
- Uniqueness. Stencils for wall decor are made of original material, which allows you to draw a clear line between the picture and the wall without blurring the image.
- Exclusivity. Design for many models developed in our design office.
- Convenience. Wall stencils for painting have a unique structure, which makes them comfortable to use. Even a non-professional designer will cope.
- Quality. The peculiarity of stencils for painting walls allows you to successfully combine several types of drawings, paintings, panels in one room.
Contact us, the quality of interior decor is guaranteed by the Olstik manufacturer!
Today's selection contains stencils and wall decor ideas. Textured painting - very modern way transformation of your home. The monotony of the coating inspires despondency, but the multidimensional layers are very creative. The whole question is how to apply them. Let's talk about this today!

By the way, it is not at all necessary to buy some exquisite rollers and stamps. On a simple paint roller, you can screw the fabric and get the original texture.
Handy stencils for wall decor

However, even without a roller, you can create a very interesting structure on your walls.

Use a large sponge or washcloth as a stencil for wall decor.
You can use rollers with pimpled film, some kind of nets or twine.

An old dust fan will help create a light, airy pattern on the wall.

Painting through tulle or mesh will make your walls look spectacular.

Tulle as a stencil for wall decor
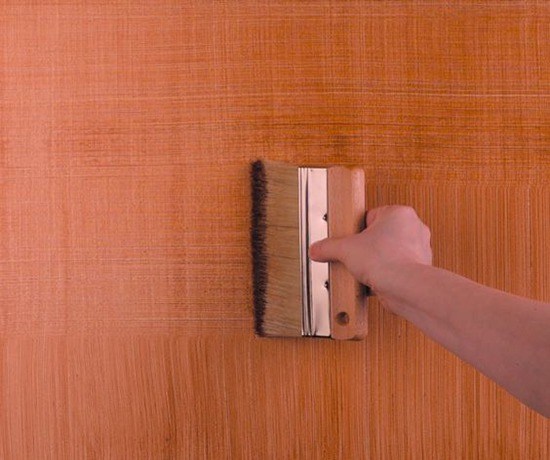
By the way, you can create vertical stripes on fresh paint with brushes or brushes. The depth of the stripes can be changed by pressing the brush. The pattern will depend on the thickness of the pile and on its rigidity.


You can make both vertical and horizontal stripes. And you can combine them.
The usual plastic film when painting the walls will help to give a very interesting texture.

Film as a stencil for wall decor
Using thin transparent paper, you can decorate the walls like this.

Additionally, you can apply a patina over the paper.

In addition to abstract backgrounds, you can also experiment with normal wall decor stencils.

Stencil for wall decor - scales

You can cut out stencils from thick cardboard or from floral wrapping film.

Stencils for wall decor made of cardboard

Stencil for wall decor - polka dots

Stencil for wall decor - monogram
You can even use some items from the kitchen as stencils.
Related article: Do-it-yourself gold wedding rings in 1 day!

By the way, functional idea reusable stencil - from a canvas stretched on a stretcher. You can cut both simple and complex patterns.

Wall decor stencils

Stencil with astel pattern

Stencil for wall decor - ornament

Stencil for decorating columns

Ornament for wall decor
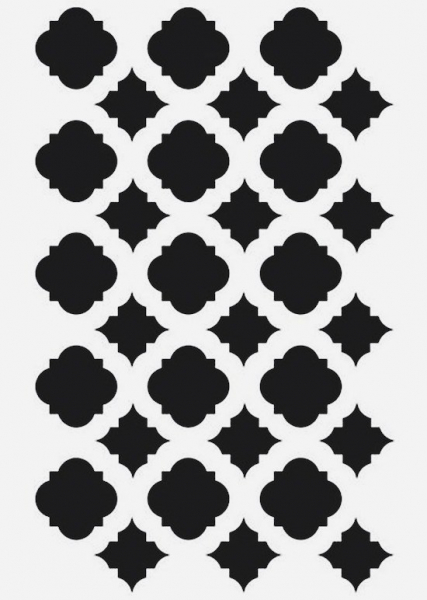
Stencil for wall decor - quadrangular ornament

Stencils for wall decor - diamond pentagons
If you use several colors when painting through a stencil, you can get spectacular transitions along the walls.
Multicolor Wall Decor Stencils


At the end I offer one more original idea- mountain landscape on the wall. Gradient with a transition from dark to almost transparent.

Stencil for wall decor with a landscape
For wall decor with two-tone painting, you can use ready-made stencils. You can print the stencils below by scaling them. If you know how to draw, then you can redraw the stencil on very large paper and then you will be able to decorate a large area of \u200b\u200bthe wall.
Now you can also print large format stencils in print shops. For the money it will come out quite budget. By the way, you can also order a slot, so that later you can simply peel off the excess, leaving the right one. Explained chaotically, but I think it's clear ...
Below you see stencils for wall decor "Africa". There are two of them, they differ in the width and size of the elephant. As well as a stencil for the walls "Giraffes".
How to make stencils
You can use stencils by cutting them out of paper with a breadboard knife, attaching them to the wall with tape and stamping them with an acrylic paint sponge.
It is much more interesting to create your own stencils than to download ready-made ones. That way you don't show your personality. But, of course, in a circle of friends, if no one has seen them before, even common patterns will be like the original ones.
Related article: DIY colored summer scarf
Video - how to make a single-layer stencil from a photo
Another option - you can order a vinyl stencil from any outdoor advertising company - they have special plotters and they will cut you a stencil from self-adhesive vinyl film. You can decorate the wall with a vinyl decal, or again, use this as a stencil by stenciling with acrylic paint and a foam sponge. In a word, there are a lot of options for drawing a picture on the wall.
Video - do-it-yourself stencil for wall decor
Pavel Perederiy tells more intelligibly, watch his master class and your knowledge will increase significantly.
By the way, on my website you can also see corner stencils or butterfly stencils.
We will send the material to you by e-mail
Few homeowners have artistic skills. But this does not prevent them from decorating the surface of the home. For this purpose, do-it-yourself stencils are used for decoration. You can study patterns, schemes and interesting ornaments in today's publication, which the editors of HomeMyHome kindly agreed to prepare for you.
Such cutting templates are best printed on whatman paper or any other thick paper.
PHOTO: jurnalstroyka.ru
Whatever pictures are used to decorate the walls, you need to know about existing options. Some models have unusual design, serve for large-format decor or other way of hand-painting on the walls. Devices for creating wall decor are divided into:
- patterns for plain walls. Suitable only if the surface of the partitions is painted in one color. When applying the finished template, a different, more contrasting tone is applied. Various ornaments, landscapes and floristry act as a drawing;
- multi-color fixtures. In this case, it is very important to monitor the maintenance of the chosen style. It is necessary to use two or three stencils that involve the imposition of drawings different shades. It is advisable to wait until the first pattern dries;
- stencils for volumetric decor. The cutouts for the drawing on such templates are of sufficient thickness. That's why ordinary paints they don't make ornaments like that. They try to apply putty or decorative plaster. On ready-made version color can be superimposed;
- anti-stencil. The essence of its use lies in the fact that it is necessary, bypassing the main drawing, to paint larger areas. As a result, the pattern turns out to be dimensional, it may have clear, most often rectangular borders. It is convenient to use this option for living rooms. Especially when decorating the wall by the sofa.
Making stencils for painting
It is conventionally accepted to divide stencils for painting into two types: disposable and reusable. The material used as the basis of the product also depends on what type they are intended for. Also, multidirectionality varies depending on the type of decor.
DIY home decor in floral style
Decorations in the form of flowers on the wall remain in trend today. They are often used to decorate a kitchen in a classic or style. In addition, such art looks great on perfect. smooth walls in living rooms. Ornaments and patterns in the form of stencils can be printed ready-made.

Bedroom and children's room
In these rooms, first of all, comfort is valued. Therefore, all drawings should be neutral and calm. Butterflies or floristry in gentle tones are suitable for decorating the sleeping area in.

PHOTO: yandex.ru
To design a children's room, templates with cartoon characters and any characters will come in handy. Of course, it is necessary to distinguish boyish hobbies from girlish ones. Be sure to consider the opinion of teenagers when choosing templates for creating drawings.

Kitchen and bathroom
In dining rooms or small apartment kitchens, decor will become a relevant option for decorating themed images. For example, it is advisable to depict cutlery, dishes and other similar images on a free wall.

PHOTO: dekoriko.ru
In decor, it is better to give preference to the marine theme. These include various images of dolphins, algae or other marine life.

PHOTO: stroypomochnik.ru
Loggia and balcony
Always considered individual. It has no restrictions on the design and wall cladding. However, techniques such as decor using stencils are considered popular. Here you can use templates for drawing animals, unusual natural motifs and ornaments.

PHOTO: interiorsroom.ru

PHOTO: tr.aliexpress.com
How to use wall decor stencils
In order to work with schemes using the technology of transferring the finished ornament to the wall, you do not need to have special skills. The main thing is to pay attention to the options for creating jewelry. To do this, it is worth choosing stencils depending on their type.

PHOTO: stroyfora.ru

PHOTO: peredelka.tv

PHOTO: roomester.ru
Related article:
Today in modern and expensive apartments often there are "decorated" walls. (print or draw) will be the perfect complement to a unique interior.
Flat stencils for walls to be painted
As a rule, flat stencils help to create simple drawings on the walls. If such blanks are made by hand, then before work it is better to laminate them or paste over with adhesive tape, and then cut out the necessary holes. This will extend the life of your template. Further, all actions are performed according to the algorithm.
- Preparing the surface for application. We wipe from dust and dirt, if possible, vacuum.
- We do markup. We mark all the extreme points of the stencil used with a pencil on the wall, fix the base. It is advisable to double-check this by level.
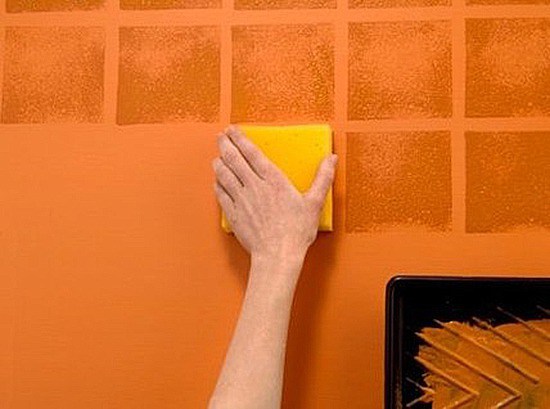
- Pre-training for clean slate. The main thing is not to apply too much paint. For this purpose, we use an ordinary kitchen sponge.
- As soon as the borders of the ornament dry out a little, remove the template, leave the drawing to dry completely. If necessary, we make corrections.

PHOTO: origa-utosha.blogspot.com

PHOTO: kristinapeshko.blogspot.com
Creating three-dimensional ornaments on the wall
Volumetric patterns on the wall are made with acrylic putty. Estimate how much it will take to create a pattern, and proceed to the stages of decor formation.
- Prepare the surface and fix the template in the desired location.
- Apply layer by layer until the decor reaches the desired thickness.
- Remove the stencil as soon as the putty hardens a little. After waiting for complete drying, sand the bumps and paint the ornament.
On dark walls, the pattern can be left light, it is important that there are no defects and errors on it.

PHOTO: popul.ru

PHOTO: popul.ru
Other types of decor
Room decoration can be done with any other elements. The main thing is to properly organize the situation and not overdo it with decoration. Often improvised means are used for this purpose.

PHOTO: p-plotter.ru
DIY bottle decor: video
Such compositions are not at all difficult to create, so a large number of them can be made. We bring to your attention a video in which all the nuances of this technology are analyzed.
Decor of furniture and mirrors in the apartment: photo gallery
A good way to arrange furniture in the house is the use of various stickers or spraying. If it is not possible to make a pattern with your own hands, they make a similar design to order.

PHOTO: arovana.kiev.ua

PHOTO: yandex.uz

PHOTO: yandex.com.tr

PHOTO: oz90.ru
Decor made of wood and flowers
If you need to decorate your home garden with your own hands, then it is advisable to use either artificial flowers for decoration and wooden pots. It is desirable that all plants be planted in dishes made of such material.
For example, we offer a few photos.

PHOTO: elitdom.com

Drawings on the walls were made long before our era. Hundreds of years later, rock carvings make the "interior" of the caves not only attractive, but also unique.
Nothing has changed. Well-chosen, and properly executed, wall painting will help transform the room.
Screen printing on the wall is an easy way to achieve the desired zoning of space. By making small changes, you can hide the flaws of the layout or, conversely, pay attention to the advantages.
The execution of this painting is both very complex and very simple. The difficulty of the work is largely determined by the chosen technique of execution, the size and number of details in the outline. You need to figure out what is right for your home.

How to make the right choice: types of stencils
Determine with what number of shades will work:
- One tone of paint. Use if you need to apply various inscriptions or graphics. This method is popular when drawing silhouettes or ornaments.
- Several shades or colors are used at the same time. It makes it possible to create whole pictures. This technique is chosen when they want to apply an auxiliary drawing to the main drawing in order to highlight or hide some part.

Volumetric or embossed. Instead of paint, at the initial stage, putty is used (coating thickness does not exceed 3 mm), which gives the surface a certain silkiness. Then, paint is applied to the pattern. To perform such work, you need to confidently own a spatula. Proper lighting and careful execution allows you to achieve a 3D effect.

reverse stencil, where the paint is applied not inside, but outside the stencil. The main drawing (cut-out - a part that is usually thrown away) is fixed to the surface and painted not inside, but behind it. Either a small area is painted, creating a kind of contour, or the entire surface beyond the boundaries of the cut.

Decide on stencil quality. Think about how many times you want to use your stencil.
- Disposable. Apply one or two patterns. The quality of the material is not so important, the main thing is that it can withstand our manipulations.
- Reusable. When doing large-scale illustrations or when they want to create a wallpaper effect. The stencil is made of durable material resistant to moisture.
You should not rush when choosing, it is better to think carefully and prepare everything.

Making a stencil yourself
Having decided on the pattern, we will select material for the stencil and proceed to its manufacture.

For disposable, small templates can use a simple office paper, cardboard or other dense material. For example, polyethylene film, foil, parchment. If the budget allows you to better choose a self-adhesive film (it is strong enough and able to withstand moisture).

Do the following:
- Draw or transfer the drawing you like on the prepared base. In some cases, it can simply print on the printer. In others, it is better to use tracing paper. If this is a transparent film or parchment (fix the layout on them with a needle or tape so that it does not move), carefully circle the image with a marker. A not very dense base (for example, plain paper) can be made more solid by sticking adhesive tape on it over the entire surface.
- Lay the workpiece on any surface that you are not afraid to cut. With a clerical knife (if more convenient, use scissors) carefully cut out the inner areas of the contour so that the main pattern is hollow, but at the same time all the details of the image hold well.
Tip: Try to make even cuts, then the template has fewer gaps with the surface. The drawing is clear and beautiful. Follow small details. They must be securely fastened.

For complex or repetitive illustrations, do reusable template. Choose very thick cardboard, acetate film or thin plastic sheets are suitable.
Tip: You can laminate paper, it will acquire the necessary moisture resistance. Thick cardboard will become more rigid if coated with waterproof paint.

Do the same as in the previous case, taking into account some nuances:
- When making large or complex drawings, you should break them into parts, which will be combined in the process of transferring to the wall. Otherwise, it will be very difficult to keep them when painting.
- You can fix the overall pattern on the basis with masking tape, adhesive tape, or even glue it (at several points).
- Cut out contours can be strengthened by gluing them with tape. Having pressed the middle of the adhesive tape to the cut out border, bend its edges along the borders (one edge of the adhesive tape inward, the other outward). You will achieve a snug fit of the material to the surface, the cuts will be smoother.

How to use wall stencils?
Exists a few rules to achieve the desired result:
- Correctly placing the stencil on the prepared wall surface will help markup. This is necessary when applying an ornament (a slight distortion will definitely catch your eye). Large drawings that were divided into parts, after marking, will fall exactly into place.
- The stencil needs to be securely to fix on a surface. Using self-adhesive film remove the protective layer and stick on the wall. Cardboard, plastic, paper is fixed with masking tape, adhesive tape. IN last resort, press firmly with your hand. Other materials should be fixed special adhesives temporary fix (eg Spiri or Takter). They do not leave visible marks, but securely fasten the stencil.
- Choose your paint depending on the surface. Suitable for concrete or brick acrylic paint. Use a small amount of paint on a brush or sponge, otherwise it may fall outside the stencil. Try to distribute the paint evenly.
- When choosing a multi-color stencil, think in advance color scheme. Which will be the first, second, etc. Apply subsequent colors after the previous patterns have dried. Performing a three-dimensional drawing with a stencil, the paint is applied after the putty has dried.
- Application technique reverse screen pattern requires preliminary calculation ink density and halo width. An image made of a material impervious to paint is fixed on the wall. Paint (spray) makes a halo of the desired shade. Keep the sprayer at a distance of at least 20 cm from the wall.
- The stencil is removed from the wall immediately after applying the paint. At reusable don't forget to wipe it off before using it again. When applying putty, on the contrary, leave the stencil to dry.


