Preparation for work
- Joiner's glue.
- Screws.
- sanding paper.
- Double-sided tape.
- Drill.
- Screwdriver or screwdriver.
Marking and sawing MDF
First cut out the top cover. To do this, we lay the stand on the sheet with its side so that the back side of the future cover is aligned with the horizontal shelf flush. The front side of the cover should protrude 1.5 cm forward beyond the horizontal shelf. We mark the position of the first part of the shelf.

Marking the outline of the lid

Cut out the top cover
We cut out the top cover with an electric jigsaw, installing a file for a curved cut into it. The pendulum stroke must be turned off during operation. The dimensions of the lid should be:
- Length - 890 mm,
- Width at the ends - 170 mm.

Scheme of our secretary

Lacquering MDF parts
Assembling the secretary

Completed restoration of the secretary 1830-1850
Friends, we are pleased to announce that we have fully completed the restoration of an antique secretary, which was made in the period from 1830 to 1850. It is known that since 1850 this secretary belonged to one of the ladies-in-waiting of the Empress. In general, the history of his travels is unknown to us. He was transported to Moscow from St. Petersburg, where he suffered greatly from one of the floods.
So - the restored secretary of the middle of the 19th century:
Conditions AFTER restoration.
Condition before restoration:
A detailed article on damage is available here. An article about the restoration process is here.
Now let's list the difficulties that we had to face. And there were difficulties on every centimeter:
Numerous and various damage to the veneer. In some places there are very large swellings and detachments of huge fragments.
Status DO
After restoration:
At the secretary once upon a time the central fragment of the pommel was broken off and lost. One old photograph has been preserved, according to which we recreated the lost element.
The pommel was completely hand-carved from solid anegri.
And here is a short video of how it was made.
Almost every corner of the product had numerous chips. Many panels were missing.
On the doors of the secretary were made slips of mammoth bone. Only 2 survived. We ordered the manufacture of the missing ones. The handles on pull-out cabinets had a similar story - of all the handles, only 2 were preserved and the rest were also made of bone.
PAINTWORK:
The old coating on the secretary was almost completely erased, and where it was preserved, it was covered with layers of dust, grease and dirt. We completely washed all surfaces, removed dust and dirt layers. After removing all the damage and careful grinding and polishing, we covered all the elements first with a stain, and then all the internal cabinets and drawers were covered with shellac (about 50 layers). Outside the secretary is covered with oil and wax.
It is interesting that in the photo you can see the secret section of the secretary:
a special section (it now stands on the left) in the form of an open shelf is fixed with a lock. If you remove it, then inside there are 3 retractable drawers.
How to make furniture with secrets and hiding places
Each has a soft leather handle, as it fits snugly against the wall of the lid-shelf.
We are glad that the owner of the secretary was very flattering about our work. All final photographs were taken at his home and there were no complaints about the restored family heirloom. Thank you so much for giving me the opportunity to take these pictures. Restoration of the old secretary is fully completed.
Our workshop is open to accept new orders. You can use the quick contact form below this news right now and send us photos of your antique furniture. We will promptly answer you about the cost of restoration.
Come back to our site more often. Subscribe to our Instagram, Facebook, Twitter and come visit us.
Restoration workshop of Victor Morozov.
Find out how much it costs to restore your antique furniture!
Message sent successfully
A notification about the delivery of your letter to us has been sent to your mail
Furniture restoration. Repair of antique, vintage and old furniture in Moscow.
If you liked this article, we will be grateful if you share it on your social networks.
The classic secretary is a chest of drawers with a top-down door, behind which there are many hidden drawers and compartments. At first, this furniture was considered ladies'. The open door served as a table for writing love letters, and pearls and diamonds shimmered in the locked recesses. However, the design turned out to be successful, and it was borrowed for more prosaic purposes: storing documents and writing materials. Let's try to assemble a simple secretary with our own hands, so that markers, disks and folders with papers finally find their permanent place.
Let's make a very simple secretary
Preparation for work
Our secretary will have the simplest device, but in terms of convenience and functionality it will not yield to the factory one. For its manufacture, the following materials will be required:
- Ready-made desktop holders for folders made of plywood (sold in stationery stores) - 6 pcs.
- MDF blank for the top cover - 890x330x16 mm.
- MDF blank for the back cover - 890x325x16 mm.
- Joiner's glue.
- Screws.
- sanding paper.
- Double-sided tape.
From the tools we will need:
- Electric jigsaw with a blade for a curved cut.
- Drill.
- Screwdriver or screwdriver.
As you can see in the picture, our module is mounted on an ordinary dining table with a tabletop size of 100x80 cm. The superstructure for placing papers looks like a complex of interconnected horizontal and vertical supports, united by an MDF top and back covers.
In a small apartment, it would be nice to figure out how to make a secretary mobile. This condition is just built into our design. The trick is that our shelf module is removable, which means that if necessary, it can be quickly removed to any other place.
Marking and sawing MDF
First cut out the top cover. To do this, we lay the stand on the sheet with its side so that the back side of the future cover is aligned with the horizontal shelf flush. The front side of the lid should protrude 1.5 cm forward from the horizontal shelf.
We mark the position of the first part of the shelf.
Marking the outline of the lid
We turn the stand over and mark the position of the second, mirror part of the shelf.
Cut out the top cover
We cut out the top cover with an electric jigsaw, installing a file for a curved cut into it.
The secretary is a great workplace for small apartments
The pendulum stroke must be turned off during operation. The dimensions of the lid should be:
- Length - 890 mm,
- Width at the junction of horizontal supports - 320 mm,
- Width at the ends - 170 mm.
We cut out the back wall in the form of a rectangle, according to the given dimensions 890x325x16 mm.
Scheme of our secretary
We grind the finished covers and cover them with furniture varnish for 2-3 times or paste over with a self-adhesive film.
Lacquering MDF parts
Assembling the secretary
Now we proceed to the main task, how to make a secretary with your own hands:
As a result of our efforts, an original mobile product appeared in the house, which will eliminate the problem of lost papers, pens, paper clips and other trifles necessary in everyday life.
 Today, secretaries are produced with a touch of antiquity, using dark wood and various decorations.
This furniture is ideal for classic interiors, modern style and many other established styles, but not for modern.
It will not be difficult to buy a beautiful and comfortable and modern secretary if you turn to a wide range of elite Chinese furniture from the Meb-Elite company. The Meb-Elite store has been supplying high-quality, beautiful, reliable and practical furniture to residents of Moscow and Russia for a long time.
Choose a secretary for a classic interior, you will need a change in approach and the choice of more concise forms, where there will be no place for a catchy finish. Such modern secretaries were previously made exclusively from solid wood, but today this furniture can be made from MDF, a modernized chipboard with veneer trim.
In most cases, antique secretaries are impressive in size, they are made from expensive wood, they have rich dark colors and carved decorations. Under the classic interior, such aristocratic, solid and chic furniture will suit in the best way.
Art Deco secretaries have elegant forms and are often made in white or black colors. Country writing cabinets often have simple form, without finishing and with some scuffs on the case. As for modern interiors, here the secretary is assigned the role of a component of a furniture set, one of the segments of the wall.
10 Furniture Stash Ideas
Similar built-in workplace does not require a lot of space, also remaining an element of the headset.
Often, universal secretaries are usually placed within the living room. This compact workspace allows you to easily place a laptop, lamp, various papers and books on the surface. Upon completion of the work, the described accessories are removed, the lid is closed, after which the secretary becomes like a traditional cabinet.
However, no matter how high the convenience and spaciousness of the secretary would be, such furniture is not designed for long-term activity. A full-fledged personal computer cannot be installed, and sitting with your feet resting on drawers is also not always convenient. However, the secretary is quite capable of becoming an alternative to the home office. The most important thing is to choose the right place for such furniture so that it is appropriate and functional.
Furniture is an integral part of the interior, so when creating the decoration of a children's room, you should pay attention to this aspect. Furniture designed in the same style not only speaks of the aesthetic taste of the owner, but also helps to create a pleasant atmosphere of comfort and warmth.
When furnishing a room, remember that pieces of furniture should not occupy more than 50% of the area. In a child's room, there should be less furniture than in the living room or hall.
You can not put too much furniture, otherwise the child will have little room to move. Also, with a large amount of furniture, dust accumulates faster, which requires a significant amount of time for cleaning. When planning, you need to leave room for aisles.
First of all, furniture should be aesthetic and comfortable. Convenience is understood as such an arrangement, which creates favorable conditions for work and household chores. Aesthetics is expressed in the fact that the furniture should be in harmony with wallpaper, lamps, carpets, etc.
When buying furniture, you should pay attention to its style. Furniture can be of various shapes and made in any style. Nowadays, some people prefer to make furniture to order. This is a rather expensive way to create an interior and is available only to wealthy people. However, in this case, the costs are fully justified: the room takes on a unique look.
If we take into account functional features, then all pieces of furniture can be divided into three groups.
1. Furniture that serves to store things. These are, first of all, bookcases and wardrobes, sideboards, bureaus, secretaries, cabinets, etc.
2. Furniture designed for relaxation. This group includes beds, sofas, couches, stools, chairs.
3. Furniture with a working plane, such as tables, dressing tables, etc.
The furniture is divided into upholstered, cabinet and lattice. Upholstered furniture includes items intended for relaxation: sofas, beds, etc.
Cabinet furniture includes items used for storing things: cabinets, sideboards, secretaries.
Trellised furniture includes chairs and tables.
According to the manufacturing method, furniture is divided into non-separable and collapsible. A separate place is occupied by built-in furniture.
Non-separable pieces of furniture are used separately or in composition. The design of such objects is indivisible (Fig. 40).

Rice. 40. Non-separable furniture
Collapsible items are part of the headsets, but they can also be used separately. They are easy to transport and compose compositions at your own discretion.
Collapsible structures include sectional and shelving furniture. Sectional furniture consists of separate multifunctional items (Fig. 41). The only drawback of such furniture is that it looks bulky.

Rice. 41. Sectional furniture
Shelving furniture is a structure of many shelves, sections and cells (Fig. 42). It houses not only various household appliances, but also decorative interior items: vases, lamps, artificial flowers.

Rice. 42. Shelving furniture
Built-in furniture (Fig. 43) is convenient to use in small apartments, as it takes up little space. Furniture of this kind is often used in children's rooms. In the daytime, there is enough space for children to play. Built-in furniture is installed in special construction niches, the arrangement of which should be taken care of in advance.

Rice. 43. Built-in furniture
If the child is still small, then at first he is in the parents' bedroom. In such a room, a bed or two beds are placed if there is enough space, a trellis, a pouffe or a small chair. Sometimes the size of the room allows you to install armchairs or chairs.
In the bedroom most often store various items. Therefore, the room should be equipped with bookcases, wardrobes for linen and clothes, bedside tables for audio equipment. You can not put audio equipment on the windowsills, because in this part of the apartment, as a rule, it is damp, which contributes to the appearance of an electric field.
If the room has two beds, then the distance between them should be at least 60 cm.
Assembling units and parts into products, furniture finishing
The room arranges a workplace for needlework, a sewing machine or a computer.
With a sufficient length of the room, it is divided into two parts: for rest and work, or a crib is placed instead of a work table.
Airing the bedroom is a must, especially if there is always a small child in the bedroom. Everything you need for a child is placed in the room. For these purposes, you can arrange a separate children's corner.
The children's corner is located in a well-lit place, near the window, but not under the window itself. It is better to put a crib against an inner wall. With a large room width, the crib can be placed at the end of the parent's bed. If the child is nursing, a changing table should also be provided, next to which you can hang a shelf with baby cosmetics.
Comfortable children's furniture is considered furniture made of natural wood. The design should be well thought out and not have sharp corners and edges. Small children spend a lot of time on the floor, so it is better to lay a soft, warm carpet on the floor. Linoleum flooring will keep the floor clean at all times.
All items of children's furniture can be made with your own hands. If the child is already big enough, then he needs a separate room. In order to increase the space for games during the daytime, a bunk bed can be installed in the room (Fig. 44).

Rice. 44. Children's bunk bed
The bed material is wooden racks with a section of 40 x 45 cm and boards with a section of 2 x 13 cm. For side and top fences, boards with a section of 2 x 11 cm are used.
Space in the children's room can be saved with a folding or you - a movable bed built into the wall. For a spring shock absorber, two pipes are taken, one of which must fit freely into the other, and a spring. Trumpet with large diameter fastened to the wall with a bracket, and with a smaller one - to the bed using a corner. The spring should be of such a size that when the bed is lowered, a smaller diameter pipe clamps it.
A closet-secretary for a children's room will also allow you to significantly increase the space (Fig. 45). Lamps are mounted behind the blind side of the secretary, and two retractable stools are placed in the lower part.

Rice. 45. Closet-secretary for a children's room: 1 - shelves for books, 2 - a lamp, 3 - a folding cover of a secretary, 4 - a back wall, 5 - a hinge-holder, 6 - a loop, 7 - a retractable stool
For finishing children's furniture, you can use any materials. The main thing is that the furniture pleases the eye and is easily cleaned of dirt.
In a student's room, a wall-length desktop (Fig. 46) can serve not only to do homework, but also become a wonderful decor element. On the right side, the width of the table is wider, which allows the child to take the correct position during homework.

Rice. 46. Desk for a student: 1 - table cover, 2 - front side of the cover, 3 - metal rack with tubes and brackets, 4 - volume shield for radiators, 5 - back side of the cover
A hanging shelf for a children's room is also quite simple to make yourself. The convenience of such shelves lies in the fact that they can be easily moved to another place (Fig. 47).

Rice. 47. Hanging shelf for children's room
The shelves are attached to the wall on sheet steel profiles. In order to embed a profile in the wall, it is necessary to punch holes in the wall with a diameter of 2 cm every 30 cm. The depth of the hole is measured and corks are made of wood in accordance with the size. A little gypsum mortar is placed in the hole and a cork is inserted, while the excess gypsum is removed. Profiles are superimposed on the wall in a day. Holes up to 4 cm deep are drilled in the plugs and screws up to 6 cm long are screwed in. The shelf itself is made of plywood 2 cm thick.
Many people incorrectly believe that functional furniture appeared not so long ago, when it was time to furnish not chic apartments, but compact apartments. Meanwhile, history takes us several centuries into the past to tell about the appearance of one of the most fascinating and multifunctional types of furniture - a secretary. Indeed, the secretaire is as popular today as it was in the 18th century, when it first appeared. Now, together with the Dream House website, we will plunge into the world of retro furnishings and learn a little more about this furniture.

Furniture secretary photo
A little about the history of the creation of the secretary
As mentioned earlier, the secretaire appeared in the 18th century, but some sources date its appearance to the 12th-13th centuries. It was specifically behind the secretary that the ladies of that era wrote thousands of letters, in their own countless drawers they kept both love messages and municipal secrets. In this way, the secretary closet easily replaced both the desk, the safe, and the closet at once.
Modern models have been slightly modified, but, as before, they are a cabinet with drawers and a folding shelf that plays the role working surface. A huge number of drawers allows you to keep all the writing instruments at hand, but at the same time, in perfect order. And secret locks and reliable locking systems save important papers from inquisitive glances.

What is a secretary

White secretary photo

Modern secretary - desk
Initially considered as ladies' furniture, the secretary quickly fell in love with the male half of the world's population, becoming the workplace of kings and rulers. For example, Napoleon Bonaparte took a folding travel secretary with him on trips - when folded, he took up little space, but the desk was always there, even on the battlefield. And later, doctors liked this multifunctional furniture, allowing them to keep doctor's instruments and medicines in order.
Currently, writing secretaries decorate modern interiors, combining working area and a capacious closet.
Do-it-yourself secretary - a useful design for organizing a workplace
The aristocratic look of furniture with a retro touch fits perfectly into both traditional and modern interior styles. The main thing is to choose the right shape, color and finish of the secretary.

Secretary with folding table for computer

Secretary in the interior photo
Secretaire in the interior: the ability to implement
At the moment, secretaries in most cases are made "antique": from dark wood, with carved decor. Such furniture is perfect for the traditional style of the interior, also for the Art Nouveau, Baroque and Rococo styles, but categorically does not fit into modern styles. When choosing furniture for such an interior, it is necessary to change the approach and look for more concise forms with no conspicuous finishes. Such modern secretaries in small quantities are also on the furniture market. And if earlier they were made only from solid wood, then at the current time this furniture can be made from MDF, laminated chipboard veneered. And only a few can afford a secretary made of solid wood.

Beautiful secretary in the interior

Secretaire - ancient furniture
Ancient secretaries are usually huge, they are made of expensive woods, have a rich black color (brown, burgundy) and are decorated with carvings. For traditional interiors, such aristocratic furniture, which exudes solidity and chic, fits perfectly.

Ancient secretary photo

Old secretary in the interior
Art Deco secretaries have stylish shapes and in most cases are made in black or snow-white. And country-style writing cabinets are usually of the usual form, without decoration, from time to time having scuffs on the body.

Secretaire in the interior
In modern interiors, the secretary from time to time is part of the furniture set and is one of the sections of the "wall". This seems to be a built-in workplace that does not take up much space and, at the same time, is part of the headset.

Modern secretary photo
Where can I put a secretary
This versatile type of furniture is mainly located in the living room. Representing a small-sized workplace, it easily places a laptop, a table lamp on its own surface, and there is still room for various folders and books. After work, all these accessories are removed, and the lid is locked, turning the secretary into an ordinary closet or chest of drawers.

Photo desk desk

Modern secretaries in the interior

Snow-white secretary chest of drawers
But no matter how comfortable and capacious the secretary is, it is not intended for long-term work behind it. You can’t put a stationary computer on it, and it’s not very comfortable for your legs to constantly rest against drawers. But as a candidate for a home mini-office, it fits amazingly.
The secretary can be placed not only in the living rooms, but also in the library, office and even in the bedroom. The main thing is to find a place for a small-sized workplace, where it does not interfere and does not take up unnecessary space. square meters. Under this description, a corner secretary-chest of drawers fits perfectly, which allows you to store different things in a large number of drawers, and with the lid open it plays the role of a desk.

Snow-white secretary for a children's room

Secretary desk photo

Where to put the secretary
A small workplace is necessary not only for adults, but also for children. From time to time, a secretary cabinet for a student is placed in the nursery, in this case it replaces the desk and has portable computer equipment and other study supplies. Maybe the best option would be to use a large desk for work and study, and a secretary for a laptop or computer, but each parent chooses furniture based on the size of the children's room, so advisers are superfluous here.

Photo secretary chest of drawers

Closet-secretary photo

Wood secretary with carving
Secretary and bureau - two brothers
Often, together with the secretary, they also look for a bureau. Both types of furniture are a small-sized workplace, only the secretary is basically a closet with a sliding or hinged lid, and the bureau is a kind of table with an add-on. The latter stands stably on 4 legs and has small dimensions that fit perfectly into virtually any interior. Meanwhile, the presence of a work surface and shelves for papers allows you to use it for short-term work, for example, sitting at it you can pay bills or write a shopping list for the store.

Wood secretary with carving

Wood secretary photo

Ancient secretary with carving photo

photo secretary bureau
Both the secretary and the bureau are a kind of functional furniture, but the first one does more functions, but the second one is more compact. Probably there is no need to have both of these pieces of furniture in the apartment at once, therefore it is up to you to choose what is more necessary or what is better.
Changing the environment has a beneficial effect on well-being, mood, makes a satisfied perception of the world.
At the current time, some structural elements of structures, for example, stairs, have long ceased to bear only a multifunctional load.
Solving the issue of installing an air conditioner in an apartment is quite complicated and requires a lot of knowledge and special equipment - for an ordinary person, even if he is familiar with the basics of repair and technologies in the field ...
A modern person has to overcome excessive mental stress, especially if he lives in a large city and is exposed to stress every day.
A convenient place to store your own things is easiest to create yourself. This approach eliminates multiple adjustments and approvals. It allows you to personally control all important work operations. Simplifies the task of having a variety of components in the relevant market segment. This article talks about what a quality do-it-yourself dressing room is. Drawings and diagrams, photos and additional materials will help to realize the most complex ideas without errors and extra costs. Even if you decide to give the order to specialists, this information will be useful at all stages of the project from the formulation of the task to the acceptance of the assembled structure.
Read in the article
Rules for organizing storage of things, basic provisions
Storage of clothes and shoes, accessories and jewelry should be thought out taking into account individual capabilities and needs. A young couple planning frequent moves does not make sense to think about. A set of cabinets may be enough. Difficulties arise when the allocation of a separate room is simply impossible.
To search for a suitable cabinet, you can, after compiling a list of personal requirements, find a specialized store on the Internet. This article discusses in detail the creative process of implementing unique projects using serial components.

The following are the basic rules and important nuances, which must be taken into account for a quality organization:
- A do-it-yourself dressing room can be installed in a separate room, or you can allocate for this part of the passage, rooms,.
- The appropriate amount should be used to the maximum. Structures are mounted from floor to ceiling.
- It is necessary to leave passages sufficient for convenient use.
- For each type of thing, suitable storage places are created, taking into account the size, weight, requirements for.
- Provide conditions suitable for fitting: free space, .
- Visible parts are created with improved aesthetic characteristics.
For your information! The cost is estimated taking into account the initial investment, the expected service life, the cost of installing furniture components, construction and finishing work.
Preparation of design documentation for the dressing room: layout with dimensions, drawings

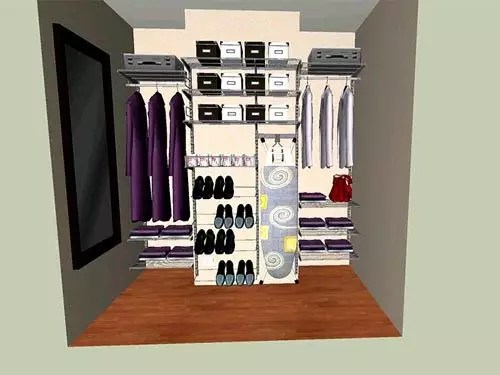
This figure shows the dimensions of the dressing room, parameters individual elements. The author of the project was able to organize storage places in the corners. He installed hanger rails at different heights to accommodate long coats and short jackets. Even without a thorough study of the market, it is clear that such a design can be assembled from standard boxes, other inexpensive standard components.
However, there is not enough data for a full-fledged project:
- Absent entry group. Meanwhile, ordinary in, or will be expensive. The relevant parts need to be carefully considered.
- Finishing information must be added to the documentation. Here, for example, the rear walls of the furniture are not provided. Therefore, the side planes of the room must be covered with a layer of washable, or other non-staining material that is resistant to mechanical stress.
- There is no artificial scheme. When equipped ironing board 220V power supply will be required.

The project should be considered as a whole, so as not to miss the really important nuances. After a photo of a suitable do-it-yourself dressing room is found, drawings and diagrams can be entrusted to professionals to prepare. They know the range of accessories well. They have specialized software to create three-dimensional layouts that are convenient for carefully studying objects from different angles. Of course, the respective services are provided free of charge only when the components are purchased from the respective shop.
A well-prepared project should have the following components:
- Drawing of a structure installed in a certain place of an apartment (house).
- List with dimensions, prices and other parameters of individual parts.
- Data on, electrical wiring, general construction and finishing works.
Related article:
At a certain point, all this ceases to fit in a traditional wardrobe. A logical question arises: is it necessary? Layout with dimensions, types of wardrobes, lighting features and many other nuances - in this material.
What kind of dressing room can be installed with your own hands: drawings and diagrams, photos of typical designs
For preparation, a preliminary study of well-established engineering solutions in practice is useful. Please note that the dressing room in can be supplemented with a design similar in purpose to,. It is acceptable to use various combinations, create unique modifications, taking into account the architectural features of a particular property.

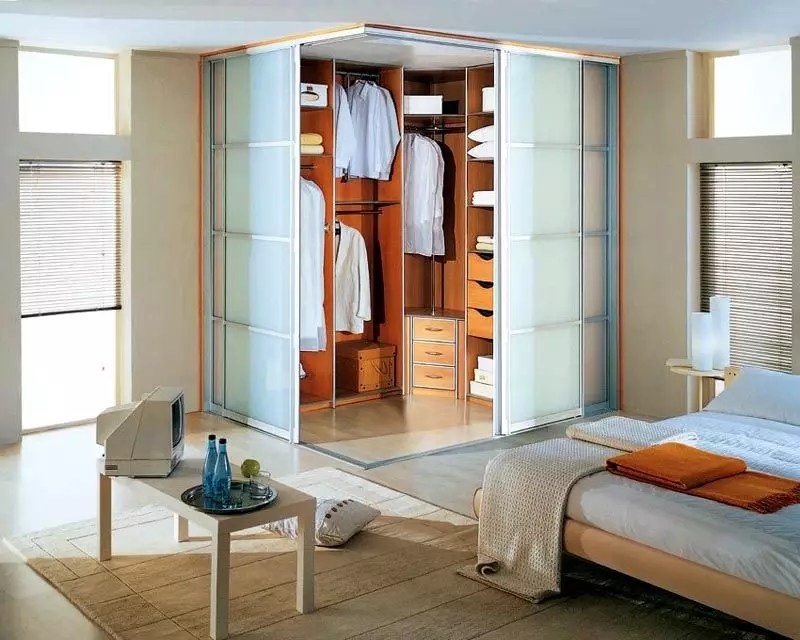
Corner wardrobes in the hallway

It should be noted that at the entrance to a residential facility, increased attention should be paid to the appearance of the interior. The sliding door system has the necessary functionality and aesthetic characteristics. In order not to load wet things into a closed volume, it is recommended to install nearby. To remove moisture, use carefully so as not to dry out shoes made of genuine leather.


The last project is suitable for equipping a relatively small hallway. By removing the partition, increase the passage and free space. It will come in handy for testing. To simplify this mandatory procedure, the door is often installed with top lighting.
Linear type of dressing rooms and cabinets

Such solutions are used when equipping niches, for mounting several functional parts between columns. If necessary, the facade is covered with sliding doors.
parallel type

The same solution is used in wide passages. To create the impression of a larger volume, light colors are used for decoration. In rooms without windows, they are especially carefully designed.
The built-in parts of the dressing room with your own hands can be perfectly combined with architectural elements. With accurate calculation and high-quality installation, it will visually align flat surfaces premises. Typical furniture, with right angles, on the contrary, highlights the slightest irregularities.
L-shaped
The figure shows an example with a protruding column that had to be sheathed with panels. In the standard version, the recess is used for its intended purpose. Since access to the far part is difficult, rarely used things are placed there.
U-shaped
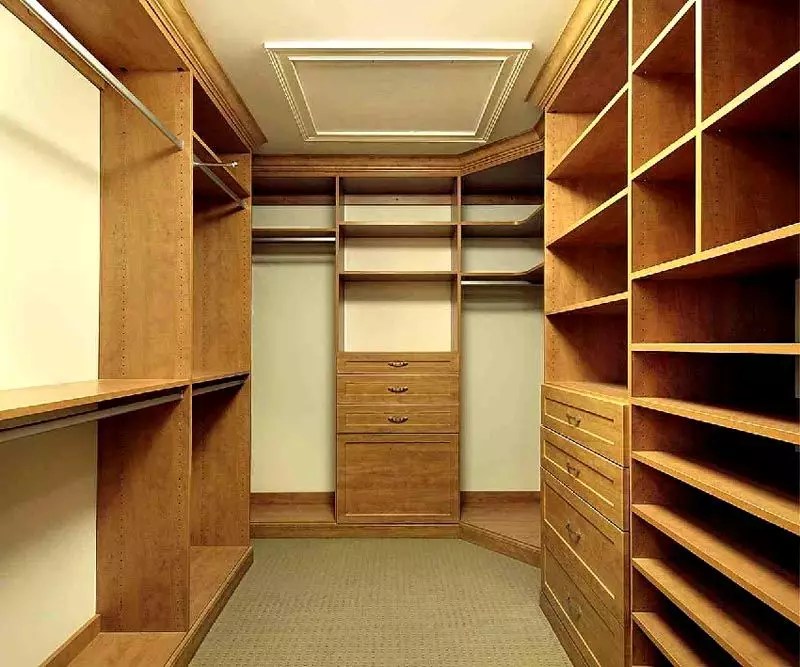
Note the absence of wide gaps. Unlike standard cabinets, here the architectural parts are used as separate walls. A do-it-yourself dressing room can be accurately built into a room of complex shape. During operation, displacement is excluded. It is permissible to use solid loads (with the correct calculation of supports and shelves).
For objectivity, it is necessary to note the disadvantages of built-in structures:
- They are designed for stationary use in a specific location. Dismantling and transfer to another object is difficult, or completely impractical.
- The ideal docking of all nodes and the room is obtained from experienced professionals. Creating a quality dressing room with your own hands will cause certain difficulties.
- Fixing structural elements spoils the walls in the room. This point is not too important, since stationary long-term operation is assumed.

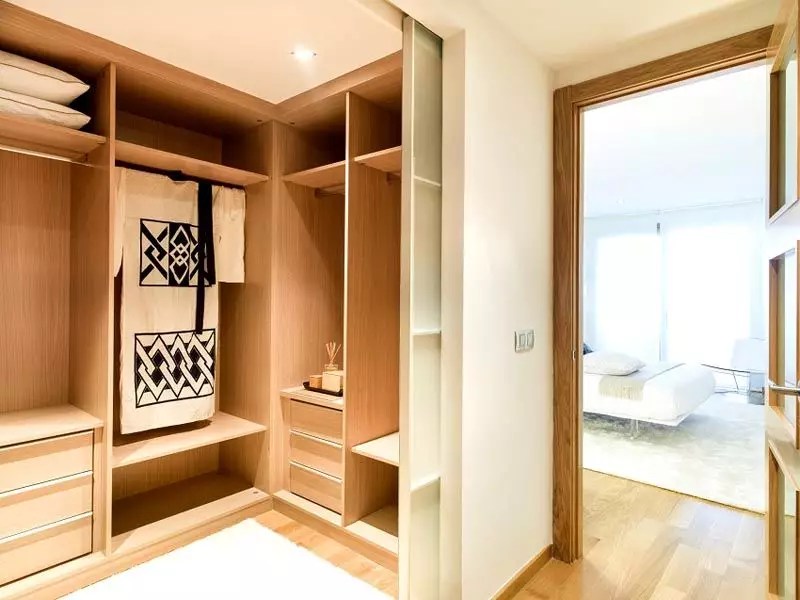
Dressing room in the bedroom

With the help of such a layout, you can study the design from different points, check the width of the aisles, make sure that there are no obstacles when the doors are open.

Such solutions are quite suitable for a private room. This option offers the following benefits:
- quick search for things;
- Free access;
- good ventilation;
- democratic cost of components;
- simple installation.
For your information! Such details, unlike built-in furniture, can be easily moved around the room, transferred to other places.
This project does not provide for construction, special finishing work.
The device of the dressing room from the pantry in Khrushchev

The following are comments that will come in handy when refining the parameters of a small dressing room project:
- The top shelf (1) may not be needed if boxes are to be placed on the bottom shelf.
- This support (2) must be designed for future loads. With a large weight of things, it is necessary to install reinforced cantilever fasteners.
- To lift heavy objects to a great height (3), a microlift can be used, but this will complicate the design.
- It is easier and cheaper to use a ladder. She, skis, fishing rods, other long objects are placed in a special wide slot (4).
- The dimensions of this place (5) are set taking into account the dimensions of a certain technique.

Requirements for individual parts of the structure
The floor in the dressing room with your own hands does not need to be made from, if a full-fledged fitting area is supposed to be there. Sharp heels will quickly damage insufficiently durable flooring. It is better to choose a more resistant to mechanical stress option. Don't pick too much bright views decorative finishes to minimize distorting external influences. This approach will simplify the formation of a harmonious image during the selection of individual components of the outfit. The suitable surface must not be slippery. In some situations, system installation is useful.

Similarly, taking into account functionality, convenience and future operation, other components of the do-it-yourself dressing room project are chosen.
Power frame features
The supporting parts of the structure are made of different materials, with different types of finishes. This table shows the distinguishing parameters of popular options:
| Material/Finish | Advantages | Flaws |
| Powder coated steel | High strength, variety of colors. | Large dead weight, formation of rust streaks due to improper installation / operation in high humidity conditions. |
| Nickel-plated steel | Flawless appearance. | Poor or complete inconsistency with the classical trends in design, high price. |
| Aluminum | Lightweight, corrosion resistant. | Less load capacity than steel. |
| Chipboard and fiberboard with veneer | Excellent aesthetic performance at a reasonable cost. | Some manufacturers use outdated technology. Their products contain ingredients that are unsafe for health and worsen the composition of the atmosphere in the room. |
| Chipboard and fiberboard with lamination | Low price, great appearance, resistance to changes in humidity and temperature. | "Cons" - as in the previous paragraph. Variety and high quality of drawings is not provided in all products. |
| natural wood | Unique aesthetic options. | Products from natural wood damaged by changes in temperature and humidity. They are more expensive than artificial counterparts. |
| Polymers | Lightness, variety of colors and shapes, resistance to high humidity. | Limited durability. |
| Glass | Durability, ease of removal of pollution, faultless appearance. | Good visibility of dust, small defects. Fragility. |
The definition with suitable details is due to a complex of factors, a specific purpose. So, to ensure transparency, glass and plastic parts are installed in prominent places. Inside - lattice structures.
Choosing doors for the dressing room
It's easier if there is enough space. The use of a standard leaf with a swing system does not need to be considered in detail. Below are other engineering solutions with comments on the advantages, features and disadvantages.
Wardrobe storage systems

| Product | Depth/Width, cm | Notes |
| Built in furniture | 45-90/- | Too deep construction is not needed, so as not to complicate access to distant areas. |
| 30-40/- | Separate places should be allocated for storing children's and adult shoes, boots with long tops. | |
| Hangers | 50-70/- | With a small depth, hangers are deployed parallel to the door, retractable structures are installed. |
| Laundry shelves | 40-65/80-100 | Dimensions can be specified taking into account the parameters of the kits. |


Hooks, rods, shelves are inserted into such surfaces. If necessary, you can quickly change the location, remove unnecessary and add the necessary functional elements in the dressing room with your own hands.

They are rigidly attached to the wall with fixation of the width distance. However, shelves can be installed at different levels as needed. Any user can quickly perform the corresponding transformation without the use of additional fasteners.

Cantilever mounts (1) provide versatility, easy access. Floor-supported structures (2) are highly durable. They are designed to store heavy items. Mobile modules (3) are equipped with wheels.
Clothing storage systems

Requirement for ventilation of the dressing room

To increase efficiency, they install, with an electric fan in the channel.
Where to buy components and ready-made kits, prices, current market conditions
| Photo | Brand/ Model | Dimensions, cm | price, rub. | Notes |
 | PAX/ GS 450 | 53.5×117×40 | 7200-8650 | The dressing room set includes racks, rails, shelves, crossbars, fasteners and end caps. |
 | -/Miolla | 88×160×45 | 2480-4500 | Inexpensive collapsible design with a cover made of nonwoven fabric. It is not difficult to assemble it with your own hands in a few minutes. |
 | -/Orlando 1 | 210×250×50 | 18200-21300 | The manufacturer included a pantograph in this dressing room set. This furniture microlift facilitates the lifting and lowering of heavy and large items. |
 | Elfa/ Comfort 1 | - | 64200-67800 | A kit for equipping a dressing room with your own hands. |
 | Tatkraft/Saturn | 84-121.5×42.5×113-198 | 2280-3650 | Universal stand on wheels. |
 | Amethyst/ GR128S.300CP | 6.2×30 | 70-120 | Clothes hanger 128 retractable L300 mm GR128S.300CP |
According to an individual design project, dressing rooms are made to order by domestic and foreign specialized companies. This process is no different from the manufacture of ordinary furniture.
How to make a dressing room with your own hands
The project implementation consists of the following stages:
- choice suitable place, specification of the sizes;
- determination of the functionality and design of the dressing room;
- drawing up a package of project documentation (drawings, a list of necessary purchases);
- purchase of products, delivery, installation and commissioning;
- execution of construction and finishing operations.
At each stage, you can turn to professionals for help.

Design projects of wardrobe rooms, photos with comments

The presence of a dressing room in the house helps to free the living space from bulky furniture, optimizes life and allows you to quickly find the right thing. You can equip such a room by contacting professionals by ordering a ready-made storage system according to individual sizes. A less expensive and at the same time interesting solution is a do-it-yourself dressing room: drawings, diagrams and photos with useful tips for arranging will help make the process easy and fast.
For those who intend to assemble a wardrobe system with their own hands, it is necessary to pay attention not only to the size of the room itself, but also to the possibility of compact and rational internal filling. To achieve maximum accuracy, it is recommended to pre-develop drawings and diagrams of the future storage system. Ready-made design projects of wardrobe rooms with your own hands, photos and diagrams will become good example when creating your version.

The exclusivity of the corner layout lies in the fact that under the dressing room you can use places that are usually not involved in any way and are difficult to access. For example, it can be a corner, where doors or windows are located in the walls forming it at a small distance from the center of the corner. Such a space is usually empty, so taking this area under the corner dressing room is the most successful and practical option.

Depending on the area allotted for the dressing room, the corner space can be separated from the main room in several ways. If there is enough space, arrange drywall partition, and in the case of minimal dimensions, an open storage system project is suitable. Many people use a corner wardrobe in the hallway, which is worthy alternative separate room. Photos of dressing rooms with your own hands will serve as a good example of creating a storage area.

Helpful advice! When cutting off the corner for the dressing room, it is best to use drywall boards: this material is quite light, it is well cut and easy to install.
If you prefer a corner dressing room in the hallway, which will be separated from the main room, then you can equip the interior in two ways: along one or two walls. The scheme of the first option is a storage system compactly assembled along one wall. It is recommended to leave racks and shelves open, which will save space. The remaining space is used for moving around the dressing room, as well as under the fitting room.

In the second option, the location of the filling is planned along two walls. The main advantage of such a filling is compactness with maximum capacity. However, it is worth considering that you can simply enter such a dressing room, but you will not be able to use it as a fitting room. This filling method is suitable for families of several people, where the main task- maximally fit the things of each of the household members. For filling, storage systems with a set of corner components are used, which provide good ergonomics for a small space.

Corner wardrobes in the hallway can be fenced off with swing doors, accordion doors or light sliding partitions, however, it is worth considering the features of the hallway. If the room is rather modest, swing version absolutely inappropriate. Effectively look radius sliding systems, the content of which is selected in unison with the overall interior.

Arrangement of a dressing room in the bedroom
Photos of do-it-yourself wardrobe systems, equipped in the bedroom, indicate that this is one of the most common and convenient options. The feasibility of creating a dressing room on the territory of the bedroom can be determined by calculating the area of \u200b\u200bthe sleeping area. If the size of the bedroom significantly exceeds this parameter, you can safely proceed to self-construction dressing room.

There are several schemes for organizing the internal space in the dressing room. This can be a linear storage system design, the arrangement of modules in the form of the letter "U" or "L", as well as the parallel placement of racks and shelves. The most optimal version is a U-shaped dressing room. This layout contributes to the maximum filling of the room and at the same time allows you to leave room for movement around it. As a rule, for U-shaped dressing rooms you need enough footage, however, they can also be accommodated in modest areas.

Helpful advice!An interesting idea is to arrange a dressing room in the bedroom behind the head of the bed: it is separated by a light stationary partition or sliding systems.
For small bedrooms, where it is not possible to isolate 1.5 - 2 m from the room, they are limited to a wardrobe in the bedroom. Such furniture is compact, it does not take up much space and has a thoughtful filling. Ways to fill wardrobes can be found in the catalogs of sites that sell and manufacture furniture. Ready-made sets of storage systems with a narrow specialization for clothes, shoes and accessories are distinguished by unsurpassed ergonomics.

If the layout is such that Walk-in closet is a pass-through is the best suited scheme for parallel placement of storage systems. Do-it-yourself drawings of racks and shelves in the dressing room indicate that with this method of filling, movement around the room is not difficult, and the storage system can accommodate everything you need. The most convenient combination is the bedroom-dressing room-shower room. But there may be other options.

Dressing room design from pantry 1.1 by 1.5 m
Many professional designers believe that it is not advisable to use a dressing room smaller than 2 sq.m. However, photos of wardrobes from small pantries indicate that such a small space can be successfully planned for a functional storage system. It is on such works that the professionalism of designers is tested. After all, it is necessary not only to transform the pantry into a dressing room, but also to take into account the interests of everyone who will use it, given the lack of square meters.

Projects and drawings of such wardrobes require accurate calculations and optimal internal content. Shallow shelves are very relevant for filling a dressing room measuring 1.1x1.5 m. If you do not fence off the room with a door, the shelves can be moved outside the pantry and then they will become part of the room's furniture and effectively complement the interior. In this case, shelves and racks are designed in such a way that they flow smoothly from the dressing room into the room.

A photo of small dressing rooms from pantries clearly illustrates the options when the entire length of one of the walls is used for the storage system. With such a project, you can carve out additional space so that you can enter the dressing room to search for the right things. However, in order to use the space of the mini-dressing room as much as possible, it is recommended to arrange them as a niche, which is fenced off from the main room with an accordion door or a sliding sliding door.
Helpful advice! When filling a small dressing room, you should place things so that the most frequently used ones are located in the middle.

Dressing rooms in Khrushchev instead of a pantry
The main difference between modern dressing rooms and pantries is the presence of an ordered system of shelves, mezzanines, drawers, hangers and other components for convenient storage of not only personal items, but also items and inventory of various shapes and purposes. In addition, such systems are designed in such a way that all objects and things are visible and easily accessible. There are hundreds of options for dressing rooms, the layout and content of which depends on the area and budget of their owners.

Before you make a dressing room with your own hands, it would be useful to familiarize yourself with the basic planning solutions for dressing rooms. The fact is that in large-sized apartments, as a rule, separate rooms are already provided for dressing rooms. The owners can only equip them suitable systems storage. But in the apartments of the old housing stock, pantries are allocated for such needs, the dimensions of which are quite small.
To maximize the space small room, designers offer various techniques for arranging dressing rooms from pantries in Khrushchev. Many different projects are offered for independent implementation. You can choose the most suitable one by reading the drawings, diagrams and photos of dressing rooms in Khrushchev instead of a pantry.

If initially there is no pantry in the layout of the apartment, the dressing room can be arranged anywhere. It can be a combination of a dressing room with a bedroom, hallway, hall, nursery and other rooms. Experts recommend allocating several zones for storage systems, for example, in the bedroom and hallway, if possible. In an ordinary Khrushchev, a place for a dressing room is determined at the stage of redevelopment, which is preliminarily agreed upon with the relevant authorities.

Depending on the location in the apartment, configuration and area, the dressing room can be arranged along one wall, formed at an angle or given an L- or U-shaped shape. The latest technologies make it possible to plan the optimal storage system for any, even a modest, dressing room. After all, the main advantage of internal filling is a huge range of components for every taste.

Schemes of wardrobe rooms from pantries: photo examples
How to make a dressing room out of a pantry? A photo selection of various transformation techniques demonstrates many options for arranging pantries. There are two main conversion methods. The first is characterized by dismantling the partitions of the pantry and installing a cabinet of the appropriate size in this place. Typically, these cabinets are equipped with sliding sliding doors, which have a mirror filling.

Another option involves completely emptying the contents of the pantry and equipping the room with modern compact storage systems. Updating the internal content will make it possible to maximize the use of the pantry space with racks, shelves, baskets, bars and other elements of various shapes and sizes. The presence of many special hooks, holders will increase the comfort level of the former pantry and extend the life of many things.

Before you make a dressing room out of a pantry, you should carefully consider and draw up a scheme for filling it. Having made the appropriate measurements, it is necessary to calculate the number of shelves, trempels and drawers for small items, special holders for trousers, ties, hats and other accessories. The presence of a detailed project will help to avoid mistakes and unreasonable consumption of materials when converting a dressing room from a closet with your own hands.

Helpful advice! To make the dressing room as comfortable as possible, you can use the metal frame filling system, thanks to which you can adjust the height of shelves, baskets and trempels.
The choice of a suitable dressing room project depends on the plan of the apartment itself. In many Khrushchev buildings, a typical layout of apartments provides for a pantry in the bedroom. This room is formed by enclosing part of the bedroom with a partition for the entire width of the room. The entrance to the pantry can be from the side of the bedroom or from the side of the adjacent living room. In some apartments, the pantry is located at the end of a long corridor, part of which is fenced off with a partition. For example, on the network you can find many suitable projects and photos of dressing rooms from closets in Khrushchev.

How to make a dressing room from the pantry with your own hands
Before you make a dressing room in a room from a pantry on your own, you should choose the best project for such an area. In addition, the choice of option depends on the number of residents whose things will be stored in the future dressing room. You can find drawings and diagrams that fit the dimensions of your room by viewing a selection of photos of dressing rooms from the pantry. The drawings show all the necessary dimensions, as well as examples of internal filling systems.

Re-equipment of the dressing room from the pantry with your own hands: photo ideas
For those who want to become the owner of a spacious and comfortable dressing room with a minimum financial investment, the option of re-arranging the pantry for these needs is suitable. To do the job, you will need a set of tools, which is probably in the arsenal of any owner:
- construction tape measure, level, pencil;
- screwdriver, hammer, pliers;
- drill or perforator;
- screwdriver;
- jigsaw;
- self-tapping screws.

The selection of material for the internal filling of the dressing room depends on the intended storage system. It is calculated according to the drawings and diagrams of your project. Usually for these purposes they acquire:
- furniture pipes (metal and wood) for the installation of a wardrobe rod or frame;
- durable lumber for shelves, mezzanines, pedestals (you can use, for example, laminated chipboard);
- furniture accessories: guides, corners for connection, handles, hinges, etc.;
- boxes, baskets, storage boxes.

At the first stage, it is proposed to dismantle all the contents of the closet: remove the old shelves, remove all hooks, hangers, nails and other fixtures. Clean the walls of old wallpaper or paint, and then carefully align. For a new design of the walls, you can apply coloring in light colors or wallpapering. The photo of the dressing room in the pantry, which has hinged doors, shows that a large mirror can be fixed on them from the inside.
Helpful advice! If you have a project with drawings and diagrams of the internal filling of the dressing room, it is not difficult to assemble a storage system.

As soon as the design of the walls is completed, proceed to the manufacture and installation of internal storage systems. Purchase of materials is carried out according to the developed drawings and sketches. They are counted on required amount Chipboard, furniture pipes, accessories, fasteners, self-tapping screws, as well as additional elements storage systems.

Assembling a wardrobe system with your own hands: basic principles
Filling the wardrobe storage system depends entirely on the specific requirements of its owners. In addition, the budget allocated for these needs also plays a role. The filling of the dressing room can have several design options. Those who have certain skills in assembling furniture can independently assemble and install cabinet modules in the dressing room. Most often, such filling models are made to order according to individual sizes.

The cabinet structures are quite roomy, fit perfectly into the space and contribute to the neat storage of things. Elements of case modules have standard sizes. They are equipped with a choice of various accessories that are assembled according to the type of designer. But it should be borne in mind that shelves and racks in cabinet design are quite bulky and take up a lot of space, which is why they are not recommended for filling dressing rooms of modest size.

For small dressing rooms, the assembly of mesh structures is suitable. This type of filling is characterized by compactness, lightness and the possibility of transformation. Structural elements are easy to assemble with your own hands, do not visually overload the space and are inexpensive. For those who make a choice in favor of such filling, it is worth considering that cellular storage systems cannot be overloaded with items that are too heavy.

Frame storage systems are appropriate both in small wardrobes and in rooms with significant dimensions. The assembly scheme is a metal rack that is mounted between the ceiling and the floor by surprise. Further, shelves, boxes, racks and crossbars are fixed to them, which practically “float in the air”. Such filling is characterized by ease of installation, lightness and strength of the structure itself.

Helpful advice! Whatever storage system you choose, in order to achieve maximum comfort when using the dressing room, you must follow the principles of ergonomics.
Get acquainted with the photo of dressing rooms with your own hands using various systems storage is possible on the Internet, where users share their work. In addition, it will be useful to ask about filling options from professionals.

Basic rules for organizing storage
Not only a quick and convenient search, but also their service life depends on how correctly things will be placed in the dressing room. Therefore, it is very important to properly organize the interior space of the dressing room. To do this, it is necessary to plan in advance the storage areas for various things and objects. It is recommended to divide the wardrobe-dressing room into several functional sections:
- lower compartment - shoes, small accessories (umbrellas, bags) and trousers should be stored here. The height from the floor should be no more than 70-80 cm. It is better to store shoes on special inclined sliding shelves (height is about 30 cm for summer shoes, 40-45 cm for winter shoes);

- middle compartment - used primarily for storing frequently used items. Rods, pantographs, as well as retractable shelves for storing small toilet items are equipped here. Depending on the length of things, the height of the middle zone varies from 140 to 170 cm. Approximately 100 cm is allocated to the compartments for storing shirts and jackets. Knitwear is conveniently stored in baskets and boxes mounted on shelves;

- the upper compartment is equipped with racks for storing overall items and seasonal items: blankets, pillows, bulky bags, suitcases, as well as sports and household equipment.
Modern storage systems are hard to imagine without innovative components. These include various holders for trousers and skirts, belts, ties, scarves, boxes for various small things, textile holders for bags and much more. The press hanger for trousers is very convenient in use: it is supplied with coat hangers for a jacket, a hanger for a belt and a tie. All holders are equipped with special soft clips that do not leave marks on clothes.

Independent re-equipment of the pantry allows you to acquire a practical and functional dressing room for storing things and items necessary for everyday life with minimal investment. In addition, the hand-crafted transformation process will enable personal interpretation to meet individual needs.
How to make a dressing room so that things are stored in one place and you don’t have to look for them different rooms and cabinets. Its installation does not require a large area, even in small apartments, if desired, there is a suitable place.
Plus, a dressing room made by yourself - it will be made in a way that is convenient for you to use, it will cost much less, because the material in the house will go to work. Another positive side - its presence will save you from unnecessary furniture in the apartment.
Where to start manufacturing
There are many ideas for dressing room equipment. There are all kinds of systems, devices for storing things. Getting down to business, you should think in advance and plan the course of work.
Layout and drawing
You should start by determining the location, dimensions of the dressing room and drawing a plan, indicating the dimensions. A drawing is drawn on a reduced scale, planned systems, fixtures, boxes are inserted. Systems should be distributed ergonomically without overloading the space.
When planning, it is necessary to take into account the distance between the shelves:
- for storing things - at least 30 cm;
- for shoes (without heels) - 20 cm;
- for shirts, jackets, jackets - 120 cm;
- trousers - from 100 - 140 cm;
- dresses - 150 - 180 cm;
- coat - 180 cm.
From above, it is more practical to make shelves for things that are not used often. And below, a place for a vacuum cleaner is recommended.
The dressing room is not done in the passage room, it is better to place it between the bedroom and the bathroom.

Filling
With a limited area, it is not recommended to make furniture from wood, MDF, chipboard in the dressing room. This material will reduce a small area. Metal storage systems are popular today, they are lightweight, modular. Are established on the special racks fastening on a wall, a floor, a ceiling. Racks are equipped with many notches, with the help of which the height of the shelves is quickly adjusted. Material for the manufacture of shelves - wood, metal, plastic. Shelves are retractable.
These storage systems are sold, but are expensive. It is more economical to do it yourself, from a chrome-plated furniture pipe.

There are many options for arranging wardrobes: rods for trousers, skirts, all kinds of shoe stands, drawers for small items. They are retractable - convenient and functional
Material selection
Suitable for making:
- Wood (chipboard) is a common material, able to withstand the load of things, absorbs moisture, economical.
- Plastic - used plastic panels different sizes.
- Metal - aluminum is more commonly used, it is light and durable. The building is well ventilated. At a cost - more expensive than chipboard.
- Glass - contributes to the visual expansion of space. Suitable for high-tech style, modern.
Finishing is carried out from any material: wallpaper, glass, ceramic tiles.

When finishing, you should take into account the location of additional lamps for the shelves, having made holes in advance. The built-in mirror in the door looks original
How to make a dressing room: open and closed type
When choosing a type, you should take into account all the nuances: location and rational use of the area.
outdoor view
An open dressing room is a structure for storing things that is not fenced off by a partition from the living quarters. She must answer general style rooms. It is recommended to use when there is a shortage of free space in small apartments.

The advantage of the open design is that everything is at hand. Minus - clothes get dusty, they should be placed carefully so as not to spoil the appearance of the room
closed view
The closed dressing room is separated from the room by a wall and has doors. It provides order in the room, as the contents of the closet are hidden.
Closed dressing room with a large area, has a well-thought-out organization of the storage system.

Closed wardrobe - convenient, allows you to try on and care for clothes right in the dressing room. The arrangement requires a large space, which is not possible in ordinary apartments.
An example of a do-it-yourself dressing room
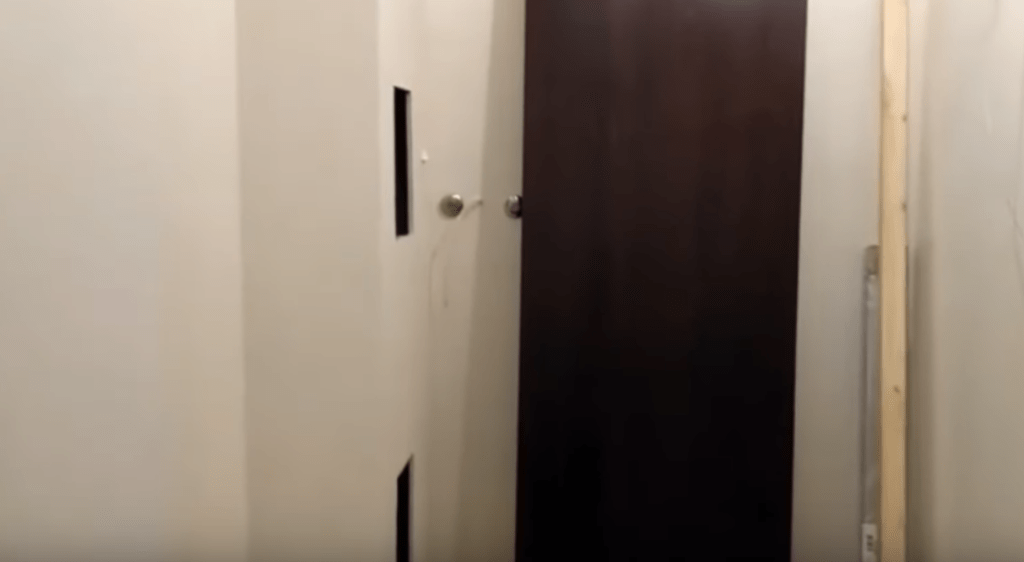
The first step is to mark the height and width of the shelves, rolling doors in the niche of the future wardrobe. In our case, the depth of the niche is 1.4 m, while taking into account the protruding box

The box is necessary to hide pipes and install a water meter. Let's not forget to leave space between the shelves, because. titanium will be present in the dressing room. In the same place between the shelves, we provided a place for a socket.
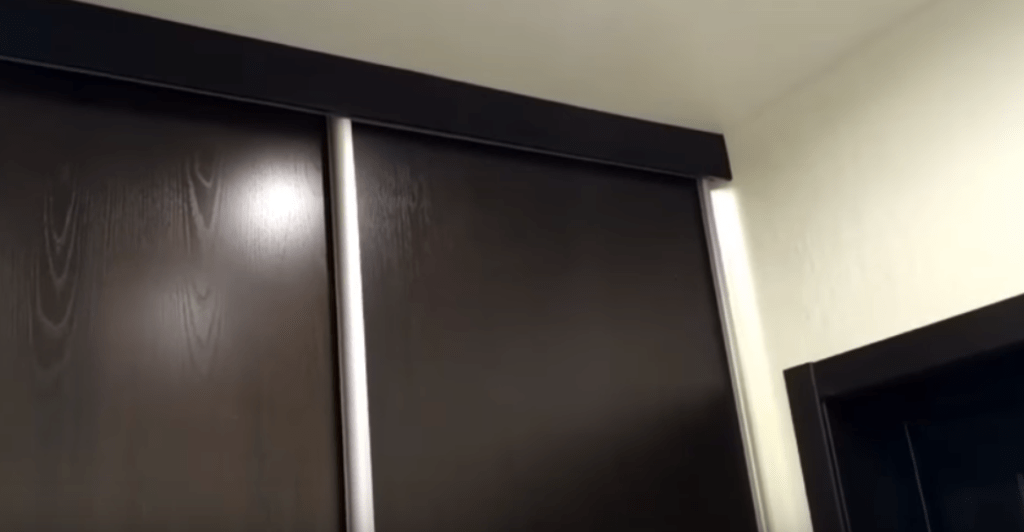
- We bought a 5×5 bar to solve the problem with the placement of the rolling door. Reason: the ceiling height is 275 cm, but the stretch ceiling takes another 10 cm;
- Above and below we will install aluminum rails for door mobility;

- In the Leroy Merlin hypermarket, where we bought, there is a service for cutting shelves using big machine. Having previously measured the length and width, having estimated everything on paper, we ordered shelves 30 cm and 60 cm wide. The service is very convenient, because shelves ready for installation will be brought to the house. A hacksaw will only have to work if the corners are uneven;

- Do not forget about the addition for finishing the cabinet on top, which we buy in wenge colors. The width of the extension is 10 cm. To attach the hangers, we purchase two round metal holders. We check again: the distance between the shelves is 40 cm, we fix the small corners 5 cm from the edge of the board. We place large corners immediately below them, so that later we can attach the end guide to the floor and wall (it will have to withstand a large load);
- We fix two large corners in width, and 4 in height. For this stage of work, we will take care of buying a level;
- We recommend using a long level. In order to install the end guide without any problems, it is necessary to twist the corners in advance on the floor. Do not forget to measure the distance on the wall with a level. Then we proceed to the installation;
- We originally planned to create a dressing room, although the box is made of drywall. Previously, aluminum guides were missed inside, which are attached with the help of corners;
- We adjust the length of the aluminum guide with a hacksaw. On the right side of the wardrobe there is a sliding door that can move to the side, and on the left there is a large shelf 60-2.70. Internal shelves are fixed to the latter;
- We repeat that the top is trimmed with a 10 cm wenge-colored addition;
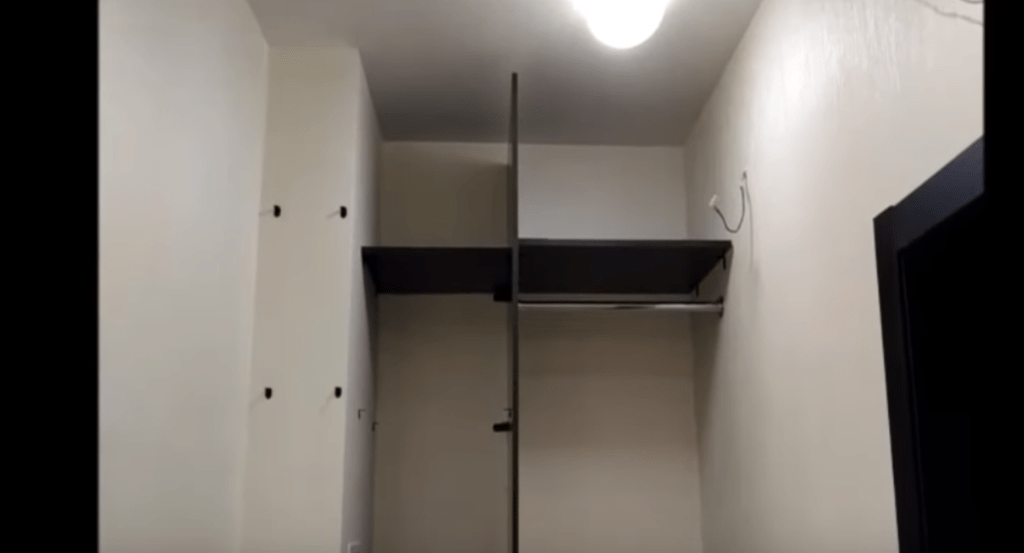


- Inside the wardrobe, but on the left side, there is a place below for boots and other shoes. A lot of shelves are also installed here, a socket is displayed. We left a place for titanium. Even further to the left is a niche 25.5 cm deep. During installation, we used shelves 30 cm long to fit more boxes here;
wardrobe type
The arrangement of the dressing room is an important point, it is worth considering the installation location, and based on this, choose the type of model.
Angular
A great option, if there is a free corner in the room. A corner cabinet is more practical than a straight one. It can accommodate: shelves, drawers, bars.

Zoning of the corner cabinet is carried out different ways. Trim the corner with drywall and make doors, hinged or sliding. It is possible to fence off the corner with doors, like a compartment
Linear
Linear - similar to a large closet. Mounted along the wall, on which there are no window and doorways. Fences off from the room in several ways:
- plasterboard wall with sliding doors;
- sliding doors to the entire wall;
- cornice on the ceiling with a curtain.
Linear model with open shelving, looks great in a loft-style room. The main thing is to successfully choose the material for the overall interior and color scheme closet
U-shaped
U-shaped - ideal for a long room. Bed on one side, dressing room on the other. It can be in the form of cabinets or as a full-fledged room.

Having fenced off the space, you should think over the lighting, divide it into 4 zones: for outerwear, shoes, short things and for trying on
Parallel
This type, designers are advised to use in wide, long corridors. Consists of two cabinets standing friend against a friend.

A parallel dressing room can be closed, in the form of cabinets or open, with racks and shelves
Dressing room dimensions
The dimensions of the dressing room are determined taking into account its location and use. Ideally, it should have a place to store clothes and an area for changing clothes.
The optimal size is calculated individually, you must consider:
- size, location, shape of the room;
- the presence of a niche;
- location of windows and doors.
Measurements must be made accurately so that there are no difficulties during the installation process.
The width is different, it is calculated as follows:
- if the cabinet is on one wall, the width is its depth, plus the width of the doors;
- in the absence of doors, but the presence of drawers, the width is two depths;
- when two cabinets are placed opposite each other, the width is two cabinet depths, plus two door widths and aisle.

A prerequisite for size is that the doors should open freely and not interfere with the unhindered entry into the room. If the dressing room is narrow, do not make large wardrobes
Ventilation and lighting for dressing room
In the dressing room, ventilation is required, as smells will appear in the closed space. It should be planned in advance. There are two types:
- Natural - air enters from below, and exits from above. To arrange ventilation, it is necessary to make holes in the cabinet, below and above, for air movement. This method does not always give a complete result.
- Forced - implies the installation of a fan in the hole. It is better to put a forced exhaust - will provide a suitable atmosphere for storing things.

The exhaust hole is made on the opposite side of the inlet. It's great if the exhaust hole goes into the ventilation
The dimensions of the holes must be determined in accordance with the area of \u200b\u200bthe dressing room.
A wardrobe is not a closet, but a room with shelves and drawers. To quickly find what you need good lighting. Better, multizone:
- on the ceiling - general lighting;
- for illumination of shelves - additional rotary lamp.

The ideal solution is to install a motion detector to turn on the lighting. It's economical and convenient. And the backlighting of the shelves looks beautiful and stylish
wardrobe doors
When making a wardrobe with your own hands, it is important to choose the right doors. The comfort and convenience of using the room depends on a well-chosen model. Common types are:
- Swing - practical, but require space. Protect from sunlight, dust, with a high degree of sound insulation. The cost is the most affordable.
- Accordion - the doors are compact, fold like a screen. The structure is fragile, consists of many rails.
- Coupes are popular, the movement of the doors is carried out along the cabinet, no additional space is required.
- Roto door is a non-standard solution. Suitable for loft style, high-tech. The door is installed on a special mechanism, it allows it to rotate around its axis and open in any direction. Free space is required for installation.
- Case - the doors are hidden in the wall, no extra space is required. Convenient for small apartments. But the installation of such a design is complex, without experience, it is difficult to do it yourself.

The accordion doors look beautiful. They transform the room, adding some zest to the interior.
Material for the manufacture of doors is different:
- Wood - looks aesthetically pleasing, is an environmentally friendly material. But a wooden door is heavy and expensive.
- Glass or mirror is popular today. Doors decorated with stained glass will decorate the room, make it bigger.
- Plastic is light and cheap. Plastic doors less durable and less beautiful.
To make the dressing room door look stylish, it should be decorated with sandblasted mirror inserts or embossed glass elements.

The door looks original and unusual, it will give the apartment a modern, fashionable look. But not suitable for classical style
Arrangement: filling and storage systems
For the practical use of the dressing room, you should properly equip it, choose acceptable options for storage systems. Do not come up with complex, intricate designs.
Clothes placement system
There are different designs for storing things, the main ones are.
| Storage systems | Cabinet | Modular design, consists of sections with walls: side, bottom, top. It is located close to the wall and fixed in a single complex. Made from chipboard. |
| frame | Model of metal racks attached to the walls, floor and ceiling. On it are installed: rods, hooks, holders. Installation is simple, elements can be moved and things are well ventilated. | |
| Panel complex | These are decorative panels fixed to the wall, modular elements for storage are attached to them. The system has no divisions on the sides, there is no floor and ceiling. The cost of the complex is not cheap. | |
| Mesh | The model is universal. Horizontal rail screwed to the wall to which the rails are mounted. Brackets, shelves, hangers are installed on them. |

There are accessories for skirts, trousers and tie hangers, and clips on them allow you to fix the item. Very handy if the hanger slides out
Shoe storage system
There are always a lot of shoes in the house, it is important to organize a system for storing them, compact and convenient. The ideal solution is to place shoes on shelves or in special cabinets. Well, if for each type of shoe there is a compartment of the appropriate size. And when using sliding shelves, saves space.
If space permits, it is worth equipping a full-fledged built-in storage system for shoes. It has special shoe sections - it is convenient to use, the shoes do not gather dust. Shoe racks are produced different size and have various ways of installation, so it is easy to choose for any dressing room.

The original design for shoes - looks like pins with modules on a retractable frame. Compact and handy system
Shelving
Shelving - design, consists of racks and attached open shelves. Usually metal. Access to things stored on the racks is free. Their main advantage is modularity. They come in different sizes and number of shelves.
Where to make a dressing room
Not every apartment has a place for a full dressing room; you have to equip it in the most suitable rooms.
Dressing room in the hallway
It is convenient to make a dressing room in the hallway, you can not clutter up the rooms with large wardrobes. A dressing room in the hallway involves storing outerwear, but with space that allows, you can equip storage for all things. A good option- built-in wardrobe, finished under the walls of the hallway itself. A mirror is an indispensable detail, you can’t do without it in the hallway.
Can be done:
- Closed - a large closet, often with sliding doors.
- Open - racks, shelves, hooks for clothes. The option requires compliance with the order, since all things are in sight, but takes up less space.
- Combined - consists of closed cabinets and open shelves. Conveniently, things used infrequently are removed in a closed part.

The dressing room in the hallway should be installed along a large wall. If the area is small, ideal - angular, from floor to ceiling
Arrangement of a dressing room in the bedroom
The bedroom is the room most suitable for a wardrobe. Models are different - with a large area, it is possible to make a whole dressing room. If the bedroom does not allow, then it is better to use:
- open shelves and mobile hangers, decorated with decorative drawers;
- a small built-in drywall wardrobe;
- partitions made of mirror or glass, which will visually enlarge the room.

The dressing room in the bedroom fenced off with a screen or a curtain on the curtain looks good. This storage system is handy in a small room
Closet closet design
Making a dressing room in the pantry - good decision especially for small apartments. It’s easy to do - you need to remove everything superfluous, finish it in light colors (this will increase the space), replace the doors (preferably like a compartment) and fill it with: racks, racks, shelves.
Since the pantries are small, you should equip them with mirrors, thereby making more.
Dressing room in Khrushchev instead of a pantry
Khrushchev small apartment with standard layout. The only plus is the presence of a pantry, it is easy to convert it into a dressing room on your own. Depending on the size, you can make from it:
- built-in wardrobe - a niche already exists, it remains to put doors and install shelves, hangers;
- equip with a full-fledged system for storing things - dividing into zones and filling with functional systems.

It is important to consider the location of furniture and shelving. For rational use - space should be used from ceiling to floor
in the attic
The advantage of an attic dressing room is saving living space, the ability to collect things in one room, making it easy to find them. In such a room, there is a place for all types of clothes and for a fitting room.
The layout should be done starting from the shape of the attic. If the attic is sloped, then the dressing room should be located along the lowest or highest wall. Rational use of the attic is obtained with a corner dressing room.

Attic dressing room - perfect solution, trying on in front of a mirror, choosing the right set of clothes in comfortable conditions
It is possible to organize convenient storage for things almost anywhere. It is not difficult to make a dressing room on your own by fencing off part of the room with doors, leaves from chipboard, drywall. But this method is not acceptable in standard apartments, but niches are often found in them - an almost ready-made dressing room, the main thing is to properly equip it.
It is easier for the owner of private houses, if space allows, you can give an entire room for a dressing room, especially suitable attic room. Experts recommend zoning the space.
Plus, a do-it-yourself dressing room is the ability to design it for yourself, providing for the zones and elements that you need. In addition, the opportunity to show their design skills, make a one-of-a-kind dressing room.


Video
Each time dictates its own styles, including furniture design. However, in addition to beauty, many interior items should also have additional functionality: drawers, drawers and shelves. And in some cases - hiding places, small safes disguised as ordinary bedside tables, chests of drawers or other pieces of furniture, as well as built into bookcases and wardrobes.
Secretaire with curved legs, decorated with carvings
Their presence always had its own meaning: here it was possible to hide something that was not necessarily visible to the rest. And, starting from the 18th century, in any rich house one could find a secretary, and in the Russian version - a desk, where the owner kept especially valuable documents: bills, money, jewelry.

Inside the antique furniture that has survived to this day, various hiding places and secret boxes are very often found.

Furniture with secrets - table and cabinet with additional drawers
In past centuries, in the homes of wealthy people, a table or a cabinet with secret drawers was an obligatory accessory for a study, which was used to store especially important documents, money, jewelry, which made it possible to protect them from thieves. Later, in France, a special table-wardrobe was invented, called a secretary, because it was really possible to store various secret documents and small valuables in it.

The drawers were often supplied with secret locks and secret locking mechanisms.
The popularity of secretaires and other furniture "frills", equipped with various secret spaces, was not accidental. Their design has its advantages, which do not have regular tables and cabinets, and features peculiar only to such products.
They are no less relevant today: in stylized safes and hiding places they store securities, expensive jewelry, important correspondence and documentation. Among the clear advantages of such furniture can be noted:
- storage of valuables without access to them by outsiders;
- their arrangement in different furniture elements;
- the possibility of making secret vaults with your own hands.
Among the factors characteristic of furniture with a secret, the design features of such products stand out, which make it possible to prepare places for storing a particular type of value. As a rule, if caches are specially equipped, they are supplied with secret locks, and today - with an electronic security system.
Today, the furniture market offers products not only for personal use, but also for businesses and organizations. In addition, it can be made to order according to individual drawings.

To open this table, you need to place a special magnet in the right place, there are no more handles and levers
Caches in ordinary furniture
![]()
Caches are often arranged under furniture - in the empty space between the legs
Antique furniture is a storehouse of secrets and mysteries. Old master cabinetmakers turned furniture design elements into real works of art. The current craftsmen make modern furniture in the old style, helping to create a special interior and complement it with hidden elements.

Secrets in antique furniture
The purchase of special tables, cabinets and bedside tables with hiding places is a rather expensive pleasure. But this does not mean that especially important documents and jewelry will remain on the shelf in the closet.

Stash option in the house on the bookshelf
Finished furniture with hidden niches

Wall mirrors and specially designed paintings can also be a great hiding place.
Released today different kinds ordinary furniture equipped with secret spaces. Caches can be located in any part of it, and both the owners themselves can equip them with their own hands, and by ordering their production from craftsmen, secret places can be located:


Secret drawer or safe disguised as an outlet
Caches with your own hands or to order

Stash in the table, custom made
It is not always necessary to buy expensive exclusive furniture equipped with hidden places. You can use the budget option by ordering the desired element of the furniture interior to specialists according to your own drawings. Or you can try to create and equip it with your own hands for a home master.
These can be equipped hiding places under or inside countertops, in the doors of cabinets and bedside tables, as well as shelves and drawers on which locks can be inserted.
Of interest are small turnkey niches equipped in the depths of the drawers of the desk with a secret.

An interesting option for a hiding place in a chest of drawers
Hollow legs and furniture racks

A simple hiding place in furniture - in the hollow legs of a chair
The hiding place, equipped in these pieces of furniture, is considered a classic. It is quite simple to make it: you need to drill a hole of the selected size inside the furniture element. It is assumed that only one person will know about such a "secret" - the one who made it.
It is clear that the place for storing valuables equipped here does not imply a large number of them, which must be remembered to be disguised in a convenient way.
Advice. Holes must be made very carefully and not overdo it with their diameter, so as not to weaken the structure and not lead to its breakage.

Stash inside chair seat
Secrets in boxes

The double bottom drawer is a true classic that still works to this day.
Traditionally, hiding places are arranged in the drawers of a desk or chest of drawers, where you can make a "second bottom". For its equipment, they take the same material from which the furniture itself is made, of the same size, fix it:
- Velcro;
- magnetic strips in a plastic frame;
- in other convenient ways.

The idea of a small cache - a box inside a box
You can put flat objects there:
- documentation;
- cash;
- photos;
- securities.
Hidden "treasures" must also be fixed on the "second day".

Drawers with secrets for in ordinary lockers
Secrets in closets

Secret boxes, safely hidden in the most ordinary-looking bookshelves
Cabinets provide a wide field of activity for equipping hiding places from thieves. Their large internal and external space allows you to hide a large number of items of various configurations.

Caches built into a regular closet
| Stash location | What can be hidden | How to fix |
| Under the bottom of the cabinet, in the far corner | Jewelry, small valuables | fold into a box of a suitable size and place on the floor; pack in a bag and attach with Velcro to the bottom of the cabinet |
| Behind the back wall | Documents, securities. Jewelry, art canvases |
Secure in bags and attach with tape or glue |
| Behind the inner surface of the mirror | Only flat objects | Use tape |
| At the bottom of the cabinet - the formation of the second bottom | Any items corresponding to the height of the second bottom | Fold in a niche, cover with a second bottom |
| In the far corner inside a closet, disguised as a shoebox | Items that fit the box | Put a box with a lid that can be locked with a key in a shoe box, fixed with screws to the cabinet floor, put a pair of shoes that no one uses on top, cover with a shoe box lid |

Retractable panel in the closet, hidden from prying eyes
Attention! Before hiding a thing, it is necessary to decide who can know about the existence of the cache and have access to it, so that, if it is discovered by the household, not to get into a stupid position.
Video: how to make - The easiest cache


