Making wooden windows with double-glazed windows with your own hands is a labor-intensive process and requires a lot of effort and time. However, the result will please you. Firstly, such windows perfectly retain heat in the room. Secondly, the wooden base allows air to pass through, as they say, “breathes.” Thirdly, wood has high sound insulation rates; in combination with high-quality double-glazed windows, it will allow you to achieve almost complete isolation from noise in any conditions. Fourthly, the environmentally friendly material is completely safe. Video:
How to make a double-glazed window with your own hands
Double-glazed windows have gained unprecedented popularity in last years connections with your technical features. What is needed for self-production glass unit?
- Double-sided mounting tape (1-2 mm thick);
- sealant or plasticine;
- hardener;
- catalyst;
- cleaner
To hold the glass together, a special styrene-based binder is used, which can be prepared at home. To do this, you need methyl ethyl ketone peroxide in a 36 percent dimethyl phthalate solution; this element plays the role of a hardener, as well as a cleaner and toner (paint of synthetic origin).
The volume of the binding component is calculated depending on factors such as the thickness of the mounting tape and the dimensions of the glass: for a tape 1 mm thick and 1 sq.m. glass will require a liter of composite.
Advice! It is recommended to prepare the solution in a container with a scale - this simplifies the measurement of the components.
Mix the components in a clean plastic container, then add the hardener. The dosage is calculated taking into account the temperature; the higher, the greater the percentage (from 1% at + 24 degrees to 2% at 12 degrees).
If you want to paint the glass in any color, for example, to create a tinting effect, then toner paint is added to the solution, the dosage of which is no more than 5%.
The solution is thoroughly mixed and left for 15-20 minutes. This is done to ensure that the air escapes and no bubbles form on the surface.
The first step is preparing the glass. We cut two pieces of glass of the same size to fit the window. The surface is thoroughly washed with a glass cleaner and then wiped dry with a paper napkin or newspaper.

Important! The tape should be applied so that there is a small gap at the corners. To do this, you need to retreat 2-3 mm from the edge of the glass.
Remove the protective layer from the tape and attach the second glass joint to joint. Press down the surfaces a little for better fixation. Next, the glass is filled with the component solution. To do this, the glass is moved apart and a funnel is inserted inside the glass unit.
Important! When gluing the tape, you must leave space for the funnel. To do this, the ends of the adhesive tape are brought out, but the protective layer is not removed.
To make pouring the reagent convenient, it is necessary to position the structure at an angle. They put it under it wooden block. The liquid is poured through a funnel. After the glass unit is completely filled with the component, the funnel hole is sealed. The funnel is removed, and the remaining protection of the mounting tape is removed.

If bubbles are found inside, they are removed using a medical syringe and needle. The glass unit is sealed around the perimeter and left to dry completely - this will take 2-3 hours. This method will save money on the purchase of ready-made double-glazed windows.
How to install a wooden window with double glazing
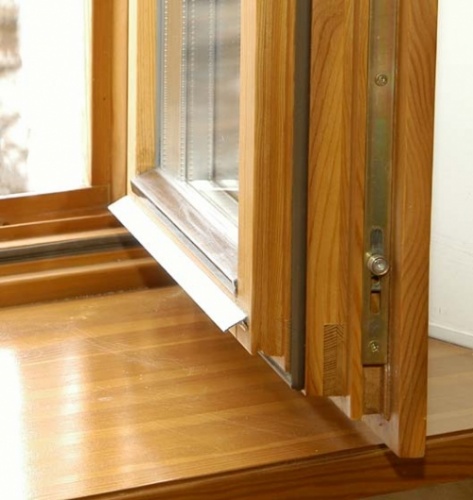
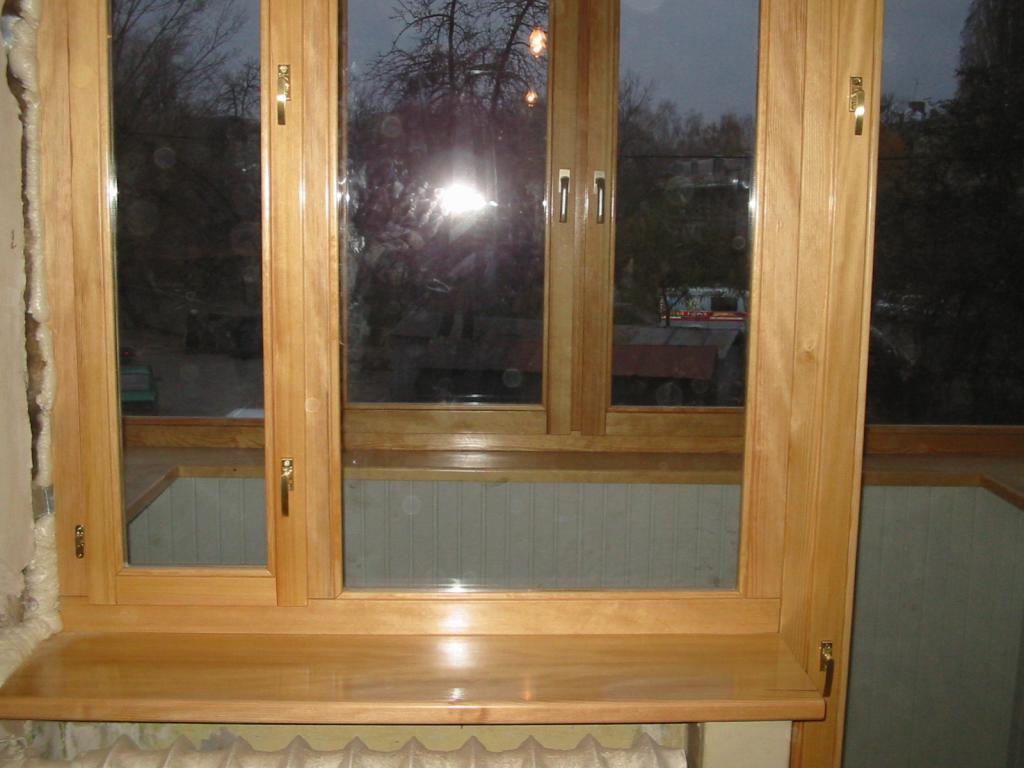
After the double-glazed window is ready or, alternatively, a ready-made one is purchased, it must be secured in a wooden frame. This manipulation is performed using sealant. To make the window look aesthetically pleasing, it is recommended to use a colorless sealant. Now the whole window is ready.
Installation wooden window with a double-glazed window has a number of features that are determined depending on the type of opening and the material of the house where the window is placed.
Technology for installing a wooden window in a building made of brick or concrete
Stage No. 1. Analysis and preparation of the opening. The window opening must have a clear geometry. To do this, all edges are checked using a level. Surfaces are cleared of debris and uneven surfaces are removed.
Stage No. 2. Installation and fastening of the window block in the opening. The frame is fixed using dowels or self-tapping screws, but in no case, nails or polyurethane foam. The distance between the fastenings is 70-80 cm.
Stage No. 3. Sealing. A double-glazed window may lose its properties if there are gaps between the frame and the frame, so treatment with a sealant is a mandatory part of installation. Compression tape is used as a sealing agent.
Stage No. 4. It is imperative to take measures aimed at vapor barrier of the structure.
Stage No. 5. Elimination of cracks and holes. The final stage is foaming the holes. Polyurethane foam will help prevent cold air and dust from entering. After hardening, the foam is cut with a mounting knife. On the outside, in order to avoid the destruction of the foam during operation under the influence of natural factors, they are sealed with tape, mounted with casing or plastered.
Stage number 6. Installing the window sill. The plate must be made of wood hard rocks(oak, beech).
Dimensions and design of the window sill are chosen by the user. However, it is worth remembering that the window sill should not protrude more than 5-6 cm. If you want to expand the structure, then it needs to be strengthened.
It is common to see double-glazed windows in windows that are assembled from a metal-plastic profile. But not everyone has the desire to install just such structures in their home. Someone prefers wooden windows large quantity the benefits they have.
In fact, there is a way to combine the two technologies and build wooden windows with double-glazed windows. How this can be done will be discussed in the article.

Preparatory stage
Making a wooden window yourself will require not only basic carpentry tools, but also the skills to work with them, since high precision will be required. From the basics you will need:
- roulette;
- square;
- screwdriver;
- drill;
- plane;
- chisel.

You can also use machines if they are available. The direct manufacturing process is preceded by a preparatory process, which includes the creation of a drawing of future structures. To compose them, you must first determine what exactly the window design will be:
- deaf;
- with two doors;
- with one leaf.

Depending on the installed fittings there may be various ways interaction with the sash. Wooden windows with double-glazed windows do not exclude the presence of vents, so it is also worth thinking about them. Measurements for the window are made directly at the place where it will be installed. Even with visually identical dimensions, there may be differences in the size of the openings, which will create problems during installation.

If the work will be done independently, then the drawing can be done in free form. It is better if the scale is respected, and this is easier to do on a checkered piece of paper. This approach will allow for more accurate calculations required material, which includes not only wood, but also fittings in the form of hinges, latches and bolts.
Advice! Accessories for your window can be purchased at a specialized store or from those who assemble metal-plastic structures.

Any wood can be used as a base for a window; the only question will be the ease of processing and service life. Due to its cheapness and availability, many people choose pine. There is also an option to assemble the window frame from oak. You shouldn't do this if this is your first window project, as handling oak can be a real hassle.

Drying wood yourself should be done if you have enough experience. Otherwise, it is better to purchase ready-made dried boards. This is due to the fact that if the drying technology is violated, cracks may appear in the wood or the boards may become deformed. It is also worth paying attention to the presence of knots. It’s good if there are none at all, because during operation it is from them that the process of rotting can begin.

The next step is the preparation of blanks, which are cut out according to the drawn up window drawing. During the sawing process, you can leave gaps of a few millimeters, which will be processed later milling machine. If it is not possible to use a solid board, then laminated veneer lumber is also suitable. It will be quite easy to work with a board with a section of 15 by 5 cm.
Build process
After completing the preparatory process, you can proceed to window assembly, which begins with the frame.
Box

The frame serves as the basis for the construction of the window. Since the blanks for it are already ready, you can start connecting them. To do this, it is best to use a proven tenon-groove joint. To implement it, tenons are cut out at the end of one of the parts, the width of which must correspond to the width of the board. In the counter part, in place of the tenons of the previous one, recesses are made into which they must fit. In the illustration you can see an example of such a connection. After the window frame parts are adjusted, you can fix them. To do this, PVA glue or other suitable wood glue is applied to the joint. You need to wait a few minutes for it to absorb a little. After this, the window frame parts are fixed.
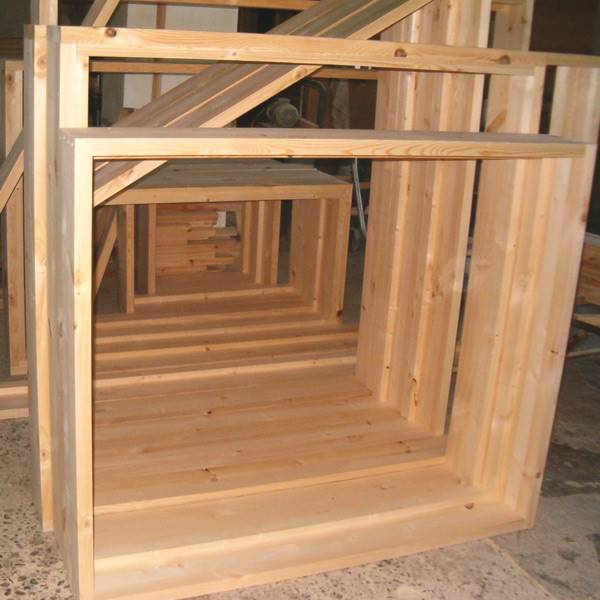
If you leave everything in this form, it is easy to loosen the frame and it will become deformed. To prevent this from happening, you will need to further strengthen the joint. To do this, you need to use a dowel. A hole is drilled exactly in the center of the junction. A wooden cylinder is inserted into it according to the diameter of the hole. First, it must also be impregnated with glue. To prevent window frames from losing their configuration during the drying process, they can be clamped with clamps.
Frame
Using a finished window frame, it is easier to make a frame for it, since measurements are already taken after the fact. It is better to entrust the measurement process to someone who has experience in manufacturing windows, since there are a significant number of nuances that are difficult to take into account during the first experience. Minimum size The timber that will be easiest to process when making a window frame has a cross-section of 60 by 40 mm. Under the windows into which the double-glazed windows will be inserted, the moisture content of the wood should not exceed 12 percent. If we talk about the species, it is better if it is beech, oak or hornbeam.

Pay attention! It is better to assemble a window frame from a solid beam or from one that has been glued not in length, but in thickness. This is necessary for greater rigidity of the window, which is especially important for sashes that will open.

In the case of installing a double-glazed window, a groove will be required as for a single-glazed structure, but in this case it is made deeper, and its size is determined by the thickness of the double-glazed window. To ensure that the groove for the glass unit is smooth and meets the required characteristics, it is better to process it with a router rather than with a chisel. It is also worth understanding that the double-glazed window will be secured with glazing beads, so it is also worth providing a gap for it. Once all the blanks for the frame are ready, you can begin to connect them. But it will not be performed in the same way as for the box. In this case, you will need to cut the ends at an angle of 45 degrees, making a tongue and groove. The joints are glued and set aside until completely dry.

After the frame has dried, all fittings are installed. In this case, you need to be careful, because you will need to make cuts in the appropriate places and select the necessary recesses in the box into which the window frame will be installed. A video of the assembly of the accessible window structure is below.
Window installation
The process of installing a manufactured structure begins with preparing the opening. If there is a need, it can be expanded or, conversely, made smaller. All surfaces are cleaned of debris and made as smooth as possible. Cracks can be repaired with tile adhesive, which will subsequently be covered with putty. The next step is to fix the manufactured box. It must be placed in the opening vertically and horizontally. To level it, you can make linings from wooden pegs. Next, markings are made and holes are drilled both in the wood and in the wall. It is better to fix the box with a frame anchor; the screw head needs to be countersunk so that the window frame fits without any hitches.

A frame is installed on the box. It must be well fitted so that air does not enter through the cracks. For additional fixation and sealing, special compounds can be used. The next step is to hang the sash, if provided. Loops are pre-hung if this has not been done previously. The last step is to install double-glazed windows. They are fixed in place using glazing beads. Typically, the design of a double-glazed window provides for the presence of a sealing tape that closes the space between the glass and the frame. Next, you can install the handles in their place.

The last step is to eliminate the gaps between the frame and the window opening. This is done with polyurethane foam. In this case, the frames should be closed, and you should not apply a lot of foam, because when it expands, it can deform wooden structure window. When the foam dries, it must be cut off. The next step is to install the window sill. The part that will protrude above the radiator should not have a protrusion of more than 5 cm, as it will be easily damaged. The window sill sits on polyurethane foam, after which it must be pressed down well. The final stage of window installation is decorative finishing slopes. This can be done with plasterboard or putty.
Manufacturing of double-glazed windows
You can also assemble a double-glazed window for a wooden window yourself. All components can be purchased at a specialized store. To work you will need the following:
- glass;
- remote profile;
- desiccant;
- butyl tape;
- corners.

The first step is to cut the glass for the future window. You can order cutting from craftsmen or do it yourself if you have a good glass cutter. The number of glasses will depend on the desired number of chambers in the double-glazed window. If there are two cameras, then there should be three glasses. Next, the spacer profile for the double-glazed window is prepared. The size of the frame that will separate the glass should be 5 mm smaller on each side. This is required to attach the seal. Before assembling the spacer frame, it is necessary to fill it with desiccant. To do this, one side is closed with a connecting corner, and backfill is made through the other end. Occupancy should be 40%. A dehumidifier is needed to eliminate moisture between the glass panes, which can lead to mold.

Now you can begin assembling the glass unit for the window. The glass surface on which the spacer will be mounted is degreased. Butyl tape is glued to the spacer frame for the double-glazed window. After which the frame is placed on the glass. The top of the frame is once again covered with butyl tape and covered with another glass. The operation must be repeated if the glass unit for the window is double-chamber. Now all that remains is to fill the space between the ends of the glass and the spacer frame. For this, a polyurethane or polysulfide composition is used. They can be applied with a spatula. You need to be careful not to leave any bubbles. The drying process may take up to 12 hours. You can see the sequence of assembling a double-glazed window for a window in the video below.
Summary
As you can see, it is possible to make a wooden window with double-glazed windows with your own hands. For greater window tightness, it is better to use a factory-made double-glazed window. This is due to the fact that some of them are produced filled with inert gas, which reduces heat loss. When assembling the window frame, it is worth practicing on blanks, which will allow you to acquire the necessary skill before assembling the finishing structure. The work of making a window does not tolerate haste, which often leads to errors.
The production of wooden frames for a summer house does not end with the assembly of the box. After it is ready, you need to take care of the window sill. For its manufacture, a beam of 50x50 mm is required: the desired profile is cut out of it, the shape of which depends on what design your window will be and what width you will install the glazing bead.
The frame itself must be slightly smaller than the box so that it can be put into it. The gap should be about 2 mm. You will need a plane to create the profile. Finished item needs to be sanded thoroughly.
The production of wooden frames for windows follows the same principle as the assembly of the box. Saw out a castle in the design, spread it with glue and connect the elements. Outside, you can install metal corners, thanks to them the structure will become more durable.
Before installing the structure, it is recommended to paint or stain it. After the paint dries, hinges and sashes can be installed if the structure is openable.
Learn more about eurowindows from our article “Eurowindows made of wood – how are they different from other wooden windows? Manufacturers and prices."
Read on our website wooden double-glazed windows from which countries are more often chosen in Russia and why?
Option 2 install a ready-made double-glazed window of a new type of window
You can buy a double-glazed window without a frame from manufacturers or window companies, though there is a limited choice of sizes, so consider this at the stage of drawing up window drawings.
To fix the finished double-glazed window in a wooden frame, a colorless sealant is required. It will be invisible and will not spoil appearance window.
After the window is ready, it is installed in the window opening. This is not difficult to do, but during installation, you need to take into account the type of opening and the material from which the house is built. Rules for installing an eurowindow in a brick and concrete room:
- The opening in which the double-glazed window is installed must be even and clean. With the help of the level, the geometry of the opening is checked, all uneven places are leveled.
- A double-glazed window made of wood is installed in the opening and fixed with self-tapping screws. Mounts are made at a distance of 70-80 cm from each other. It is impossible to use mounting foam and nails for fixing.
- If gaps appear between the double-glazed window and the box, the window will lose its characteristics. To prevent this from happening, during installation, the window is treated with a sealant.
- All cracks and holes are sealed with foam. It will protect the room from dust, dirt and the penetration of cold air inside.
- When the foam hardens, it is cut with a knife. Outside, the replaced area is sealed with tape, cashing is installed on top. This is to protect it from destruction.

To ensure high operational properties, carry out insulation of windows according to Swedish technology. The method got its name thanks to the EuroStrip material, which was chosen by the Swedes. In terms of heat saving, the groove insulation of wooden windows is not inferior to PVC insulating blocks. The manufacturer produces 3 types of seals: silicone and rubber, as well as thermoplastic elastomer.
Window frame assembly
 Preparing for assembly window frame made of wood
The size of the window determines its configuration. When deciding to make a window frame for the first time, it should be borne in mind that it is easiest to make Standard products. In order for the product to be of high quality and last for a long time, it is necessary to buy glued pine timber. It is less susceptible to torsion, this is an undeniable advantage of the material.
It is important to choose the right type of glazing. It can be double or single
The first is most often used in areas with a harsh climate, such windows are installed in houses. For summer kitchen and a balcony, it is enough to make windows with single glazing. Experienced craftsmen They are made in 1 day.
The work begins with marking the bars; you need to select grooves on them. The easiest way to do this is with a cutter; it is installed on electric drill. The lower grooves are necessary in order to install the frame in the box profile, and the upper ones will be needed for mounting the glass. The joints should be glued with wood glue.
The window frame should be assembled according to the drawing, the process is similar to assembling a box. When the work is completed, the window frame must be laid on the floor until the glue has completely dried.
In order to properly install the windows made by yourself, you will need to pre-cut holes in the wall. It is important to remove construction debris and dirt.
Holes must be drilled in the walls, subsequently dowels will be placed in them. The pitch between holes should not exceed 80 mm.
The highest quality fastening is achieved through the use of self-tapping screws. When the box is installed, all cracks should be “blown out” with polyurethane foam. Other heat-insulating materials can be used.
When installing windows, it is important to observe geometry. The angles must be strictly 90°, deviation no more than 1 mm per 1 m.
Glass cutting consists of the following steps:
- The material is laid on flat surface without tubercles. This is very important point, because on uneven surface brittle material may crack. A table is suitable for work.
- Marking is being done. Then you need to put a ruler on the glass.
- The glass cutter should be pressed against the material, and then drawn along the glass along the ruler. There should be a solid scratch on the material.
- The glass is shifted to the edge of the table, placing it so that the cut line coincides with the edge.
- The part of the glass that lies on the table should be held with one hand, and the other should be slightly pressed on the part hanging above the floor. The pressure should be increased until the glass breaks along the line drawn by the glass cutter.
It is best to practice on an old piece of glass in advance, and then cut out a new one. There is 1 more glazing option. You need to take measurements and then order glass cutting in a workshop. When the work is completed, the material should be picked up and brought to country cottage area and insert into the frame.
Glass installation is carried out as follows:
- The sheet is placed in a frame. Then it is taken out and applied along its edges. silicone sealant. The glass is installed in place.
- Fixing the bead. Each frame element must be measured. The glazing bead is cut, the ends are filed at an angle of 45°.
- Silicone sealant is applied to the glass in those places where the glazing bead will be installed, which is then nailed with small nails.
As a result of using silicone sealant and glazing beads, the glass will be securely fixed in the frame, there will be no gaps. When installing windows, it is important to ensure that all cracks are filled with foam. If they are not removed, cold bridges will form.
When working with glass and wood, you should not forget about protection. Hands are covered with gloves, and eyes are covered with special glasses when cutting glass.
When installing a finished double-glazed window into the frame, do not forget about installing the window sill. It can be made from different materials. When the windows are securely fixed in the opening, they are coated with a primer and then painted. Any paint can be used on the side of the room, but to paint the side facing the street, you should use paint that is resistant to temperature changes.
Frame making features
Before starting work, measurements must be taken window openings. This can be done with a roll
Please note that if wooden windows are made for a private building, the window sizes can be completely different. But even windows in a standard apartment may differ slightly in size.
Therefore, regardless of the structure, measurements must be taken at each window opening.

Triple glazed windows keep more heat in the house.
The bars of the window frame are connected to each other using a tongue-and-groove method. This is the tightest connection that will last a long time. To perform this, a groove is drilled on the vertical side of the frame, and a tenon is cut on the horizontal side. The depth of the groove corresponds to the width of the block.
You can make a shallow cut with a hacksaw to mark the required size. A cut is made from the end with a jigsaw and the wood is removed. Using a caliper, the center line of the groove is determined - the center of the block. A hole is drilled along this line using a drill and a wood drill bit. After marking the shape of the groove, it is cut out with a jigsaw. 4 grooves are made using the same principle.
Next, on the bars, which will be the horizontal part of the frame, you need to make a spike. The thickness of the spike should be slightly greater than the width of the groove, for a tighter connection and precise fitting of parts during assembly. All markings must be done using a caliper. For a spike from the center line of the bar, measure the width of the spike and cut the spike with a jigsaw or use a saw and a chisel. The surface of the spike, which will border the bottom of the groove, must be rounded with a chisel.
In addition, it is necessary to cut the grooves for the glass.
The most acceptable dimensions are grooves with a height of 10 mm and a width of 14 mm.
After completed preparatory work You can begin assembling the frame of the future window. Additional strength to the connection will be given by applying glue at the joints. Excess glue must be removed before it hardens completely.
Making a window frame from plywood
The configuration of the profile to be cut out of the timber has a rather complex appearance.

Window design with double glazing and plywood frame.
Making it with the precision of a carpentry machine is quite problematic. As an alternative, it is permissible to make a window frame from plywood.
As an additional tool, you may need an electric jigsaw with a set of files or a hacksaw with fine teeth.
For this purpose it is necessary to use moisture-resistant plywood good quality. There should be no defects on it, or their number should be minimal. Its size depends on the complexity of the intended profile. The most suitable thickness would be 9-15 mm. From a plywood sheet using electric jigsaw Cut out 4 strips of different widths. Strips are processed sandpaper, removing small nicks that have formed. They are held together with glue. After gluing each layer, the part must be fixed with a clamp and allowed to dry. The strips of the 2nd layer should be the thinnest, which allows glass to be inserted into the frame. After this stage is completed, a laminated timber is actually formed. In this case, the final profile structure is twisted onto self-tapping screws.
The fastening of the frame parts with this design is carried out according to the tenon-groove principle. Only the spikes and grooves are not cut out, but are taken into account in advance when cutting out the frame elements. Using a square, the geometry of the frame is checked. And only after this the parts are glued and connected to each other. Metal corners can be used for rigidity. They can also hide the screw heads.
The plywood frame should be coated with an antiseptic compound. After it has been absorbed, you can begin painting and glazing.
DIY wooden window box.
As a rule, pine is used as a material in production. This is an affordable and practical material at an affordable price. Plus, it's great for first-timers. make your own window. Oak can be used as a material. The window will be stronger and more durable. But in case of failure, the material will become unusable, and its cost is quite high.

Regardless of the type of wood, it must meet certain requirements. The material must be well dried and free from damage or other defects (such as knots or cracks). When choosing a material, it is necessary to take into account that the box is located in window opening and it bears the entire main load.
Some experts advise choosing laminated veneer lumber as a material. It is believed that the frame has high strength and copes well with various influences that can cause deformation.
To begin with, take a board with the following dimensions: 150x50 mm. Then, grooves are made on the details of the box, shaped like the letter G. The depth of the grooves should be approximately 15 mm. After that, the blanks of the future box with the help of special wood glue are interconnected in the area of the grooves.

After that, it is necessary to drill holes and place a wooden rod in them, at least 3 cm long. This will increase the reliability of the connection and achieve necessary requirements immobility and rigidity.
The resulting box is mounted in the window opening so that it is motionless. To do this, holes are drilled in the wall into which dowels are driven. Self-tapping screws are used as fasteners.
After inserting the box, small gaps and gaps may form, which must be processed with mounting foam. It serves as a sealant and performs an additional strengthening function.
Important! With this installation, the mobility of the boards is not taken into account, which can be with differences temperature conditions. .
Do-it-yourself double-glazed window
page 2

One of the main parameters of a double-glazed window is its tightness.
And since we do not have expensive equipment, we will make a double-glazed window with our own hands
then tightness must be given Special attention! . It has two circuits
First, this is the perimeter of the fit of the glass to the frame (butyl),
It has two circuits. First, this is the perimeter of the fit of the glass to the frame (butyl),
the second is filling the specially left space between the frame and the edge of the glass.
For the second circuit, mainly thiacol (polysulfide, polyurethane) is used. Sealing a double-glazed window, among other things, gives it rigidity.
Double-glazed windows according to their properties, very conditionally, are divided into several types.
General construction - as a rule, single-chamber, without increased heat - noise insulation. Mainly used for unheated rooms.
Energy saving. Beneficial features these packages depend on several parameters. The width of the chamber - it would seem, the larger, the “thicker” the insulator layer, but the wider the chamber, the greater the heat loss due to convection, so a 2-chamber package is preferable.
Spacer material. The metal frame creates a "cold bridge" around the entire perimeter, so it is better to use a plastic one, but it is much more expensive.

Well, and most importantly - glass! The largest area of contact with the external environment. Heat loss through glass occurs in three directions. This is heat transfer itself, convection and heat loss in the form of radiant energy.
The last component causes the greatest damage - up to 50% of all losses. Therefore, a special energy-saving glass is introduced into the "composition" of the heat-saving package. The principle of operation of such glass is to reflect heat rays back into the room. To do this, a special reflective layer is applied to the glass.

Currently, two types of coatings are used for these purposes: hard and soft. Hard - applied to glass during the manufacturing process, reduces losses by 7-8 times. Soft - applied to glass using cathode sputtering, reduces losses tenfold. Both types of glass are installed with a coating inside the package.
Soundproofing packages. Sound insulation directly depends on the following parameters: glass thickness - the thicker the better, and a combination of glasses of different thicknesses gives a greater effect; the width of the chamber; the wider the distance between the glasses - the better the number of chambers - a 2-chamber package has more insulation than a simple one , and it is advisable to make cameras of different widths.
Double-glazed glass technology allows for the combination of several protection methods. For example, a 2-chamber package with special glass filled with argon. Or these builds:
4-16-4 - single-chamber
4-10-4-10-4 - 2-chamber double-glazed window 32 mm thick
4-12-4-16-4 - 2-chamber double-glazed window 40 mm thick
4-16Ar-4I - single-chamber energy-saving double-glazed window
4-10-4-10Ar-4I - 2-chamber energy-saving double-glazed window 32 mm thick
4-12-4-16Ar-4I - 2-chamber energy-saving double-glazed window 40 mm thick
4Solar-16Ar-4 - single-chamber multifunctional double-glazed window
4Solar-10Ar-4-10-4 - 2-chamber multifunctional double-glazed window 32 mm thick
4Solar-16Ar-4-12-4 - 2-chamber multifunctional double-glazed window with a thickness of 40 mm.
4Solar-10Ar-4M1-10-4M1.
Double-glazed window formula:
4M1 - glass 4 mm thick, quality category M1
4I - energy-saving I-glass 4 mm thick
16 - inter-glass space 16 mm wide, filled with air
Now that you are familiar with the design of the package, nothing will stop you from making a double-glazed window with your own hands. In a mini-production environment, knowledge of double-glazed window technology can help out in an emergency, for example, when repairing a double-glazed window. Go ahead.
Do-it-yourself installation of double-glazed windows instruction
Repeat the procedure until the frame closes.
We lay the dried first glass on the table, observing maximum sterility. Remove from one side of the frame protective film butyl.
Place the frame on the glass, butyl side down, maintaining the same indentation on all sides.

Remove the film from the top and cover with a second glass.
If the package is 2-chamber, repeat the procedure.
Attention!!! Even the minimum displacement of glasses relative to each other is unacceptable!
Now we very carefully crimp the entire package for a better connection of the butyl with the glass. . So we got the primary sealing circuit
Now we fill the entire perimeter of the bag with thiacol (polysulfide, polyurethane), creating a secondary sealing loop.
This is how we got the primary sealing circuit. Now we fill the entire perimeter of the bag with thiacol (polysulfide, polyurethane), creating a secondary sealing loop.
The sealant is applied with a special syringe,
or with a small spatula.
Leave to dry for 6-12 hours. When the external sealant has completely hardened and becomes like thick rubber, we clean off the smudges and visually check the quality of our work. There should not be even microscopic gaps in the sealant at the end of the glass unit.
If everything is in order - congratulations, you have mastered the technology of manufacturing double-glazed windows! You can start installing.....
And if you really want to, you can offer the client such a stained-glass window instead of a double-glazed window.

I would be grateful if you use the buttons:
Self-production of windows
The price of factory-made wood windows is quite high. If the tightness requirements are not so great (for example, you need to glaze a balcony, cottage or greenhouse), then making wooden windows with your own hands will help save money.
A prerequisite for the production of wooden windows is precision.
The manufacturing process requires the following tools:
- electric plane;
- chisels;
- screwdriver;
- drill;
- jigsaw;
- sandpaper with different grain sizes;
- mallet;
- drill;
- glass cutter;
- milling machine or milling attachments for a drill.
 Drill Bits
Materials needed to make windows:
- glued laminated timber with a cross section of 60 * 40 mm and a board 150 * 50 mm;
- glazing bead;
- window glass;
- silicone sealant;
- wood screws and small nails.
Creating a box
For a window, you need a base that will protect its integrity in case of shrinkage of the house. Therefore, a box is made. To make it you need a board 150 * 50 mm. In the workpiece, a groove is made with a depth of 1.5 cm L-shaped.
The parts are glued together with wood glue. To maintain an angle of 90 °, holes are made in the corners of the product, into which rods 30–40 mm long are inserted. The finished box is inserted into the opening and fastened with dowels. The gaps are treated with mounting foam.
How to make a frame?
To make window frames, you will need laminated veneer lumber with a cross section of 60*40 mm. The shape of the profile depends on the number of glasses and is created using an electric jigsaw and a milling cutter.
 Fraser
For a single-glass profile, two L-shaped grooves are made in the workpiece. To install glass, the groove size is 10 * 14 mm, and for connection with the box - 15 * 20 mm. Three grooves are made in a double-glass profile - for glass, two grooves 10*14 mm and one 15*20 mm for installation in the base.
To make window frames from wood, glass 4 mm thick and a centimeter glazing bead are taken. The profiles are joined using a tongue-and-groove connection, and the ends of the parts are processed to create a 45° bevel to create right angles. Another way is to strengthen the structure with a metal corner. It is placed in the corners of the frame and secured with self-tapping screws. This option is suitable if the finished frame does not require a good aesthetic appearance.
Installation of glass sheet
Before installing the glass into the frame, it is important to determine the dimensions to the nearest millimeter. The glass should fit tightly to the wood without forming gaps
Using a diamond glass cutter, glass sheets are cut, which must first be cleaned and slightly greased. The tool is drawn in a continuous motion along the ruler, which should be longer than the material being cut. The cut glass is placed on the edge of the table and pressed, simply breaking it off.
The edges must be sanded with sandpaper to prevent cuts on your hands. After this, the glass is tried on the frame.
Important! Be sure to wear protective clothing when working with glass - safety glasses, thick rubber gloves and a face mask.
Before final installation on the grooves wooden parts apply silicone sealant. Next, the glued glass is additionally fixed with a bead into which small nails are driven or self-tapping screws are screwed in. There is no need to paint the caps so that the window can be easily disassembled for repairs in the future.
To prevent the window from fogging up from the inside, a dehumidifier is placed between the panes. You can fill the space between the glass with dry air if you have a compressor. For this purpose, a hole is made in the doors, which is then closed with a wooden pin. All surfaces are treated with varnish or paint in two layers.
You also need to remember to keep the glass clean while working. After each stage it must be wiped dry.
Window installation
The necessary fittings are mounted on the window frame. Next, the frame is inserted into the box and secured with self-tapping screws. The gaps between the wooden parts of the window must be treated with sealant or polyurethane foam. On finishing stage work, a window sill is installed and slopes are made.
Video on the topic: Do-it-yourself Eurowindow
We make a box, if it is not there, everything ingenious is simple
If there is no box built into the wall where your window will be installed, then you will also have to make it yourself. It serves to ensure that the load from the weight of the walls does not fall on fragile window frames, which is quite dangerous. There will definitely not be anything complicated here, everything is simple, you need a regular box of dimensions that you must measure yourself.

- Take a board or beam with a cross-section of 15x5 centimeters, which will be quite enough to make a box.
- In the workpiece you need to select a groove, one and a half centimeters deep, in the shape of the letter G.
- Initially, you can connect the parts of the structure using ordinary wood glue.
- Next, holes up to three centimeters deep are drilled in the corners, into which wooden pins are inserted to rigidly fasten the structure at an angle of 90 standard degrees (right angle).
It is necessary to mount the box in the wall so that it is completely motionless. That is, you need to drill holes where anchors or dowels are inserted, and tightly screw the box to it. It is recommended to fill all cracks with polyurethane foam, which is quite advisable if you subsequently do not forget about heat and waterproofing.
Do-it-yourself wooden window frames, videos, comments

First you need to know that in your work you will need a special beam, 6x4 centimeters in cross section, and maybe even larger. It all depends on the main size of the window unit. The shape of the profile for the frame can be varied, it all depends on the expected number of glasses, their original thickness, as well as the size of factory beads purchased in advance.
Need to know
The larger the area you get window unit in general, the larger the beam, that is, the larger the cross-section, you need to choose. It may happen that the frames can be significantly skewed due to their own weight and the mass of the glass, and this must be foreseen in advance so as not to redo the entire structure later.
- Single glass option window profile will have to have two rectangular grooves, which are needed for installation in the box and for glazing.
- If the profile is supposed to have two glasses, then it is necessary to make an additional groove for the second glass.
- For a centimeter bead, you will need to choose a rectangular groove, as well as glass four millimeters thick.
- The frame will be assembled from a profile with pre-cut grooves, and for this it needs to be marked, carefully measured, and then cut at an angle of 45 degrees.
- It is necessary to make a tongue-and-groove fastening connection standard type, and place it on wood glue for greater reliability and to ensure the immobility of the structure.
You can also additionally secure the frame with self-tapping screws. However, here you will have to make sure that their caps fit flush into the wood, otherwise they will interfere with the closing and opening of the doors, and this is unacceptable.
We insert glass into window frames with our own hands, video

When all the work on manufacturing the frames is completed, all that remains is to insert glass into the structure, and then you can begin installing the window unit in a box in the wall. You can and should read it on the website. Correct and accurate measuring and cutting of glass will ensure the absence of cold bridges by tightly fitting the glass to the wood.
- It is imperative to follow safety precautions, therefore, when working with glass, you must immediately put on special gloves. It would also be a good idea to wear glasses to prevent glass dust from getting into your eyes.
- The glass must be cut with an error of no more than one millimeter, and all edges must be sanded with a small pebble.
- Having previously tried it on, the glass is inserted onto a frame coated with sealant, exactly into the groove chosen specifically for this purpose. Remains of sealant must be removed immediately with a clean cloth, otherwise it will be difficult to remove it later when it dries.
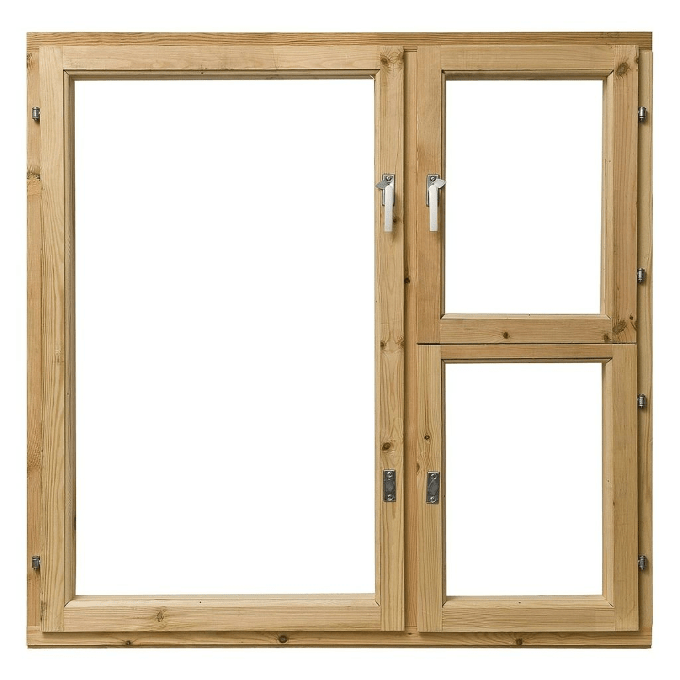
- If the window consists of a couple of parts, then a special wooden impost will need to be screwed to the middle part of the frame, which must also be made, like a frame, with all the necessary grooves.
- Opening sashes are made of thinner timber, and are attached to the main frame using hinged hinges. It is on this sash that you will need to secure the handle, and on the opposite part of the frame, select the appropriate groove for the latch-tab.
The manufactured window block will only have to be placed in its place in the box and securely fastened, as indicated in the article at the link above; there is nothing complicated here for a person with a certain skill. Be sure to also seal all cracks securely to ensure reliable protection from wind and precipitation, as well as the occurrence of drafts indoors.
Advantages
Today, wooden windows with double-glazed windows are considered an elite option that not every homeowner can afford. In terms of their technical and operational characteristics, they are in no way inferior to PVC structures, and in terms of environmental safety they are superior in many ways.
The undoubted advantages of wooden models include:
- naturalness;
- safety in use (they do not emit toxins due to temperature changes, and with high-quality installation they do not change their parameters);
- simplicity and ease of installation and repair work;
- aesthetic appeal (for wooden models dirt is almost invisible);
- several opening options, mosquito net.
Of course, such designs are by no means cheap. But making them yourself is a way to save money.
Wooden windows made on special machines are distinguished by precision assembly. But respect for everyone technological features the process of connecting various structural elements will make it high quality and reliable.

Preparatory stage
Making a wooden window yourself will require not only basic carpentry tools, but also the skills to work with them, since high precision will be required. From the basics you will need:
- roulette;
- square;
- screwdriver;
- drill;
- plane;
- chisel.

You can also use machines if they are available. The direct manufacturing process is preceded by a preparatory process, which includes the creation of a drawing of future structures. To compose them, you must first determine what exactly the window design will be:
- deaf;
- with two doors;
- with one leaf.

Depending on the installed fittings, there may be different ways to interact with the sash. Wooden windows with double-glazed windows do not exclude the presence of vents, so it is also worth thinking about them. Measurements for the window are made directly at the place where it will be installed. Even with visually identical dimensions, there may be differences in the size of the openings, which will create problems during installation.

If the work will be done independently, then the drawing can be done in free form. It is better if the scale is respected, and this is easier to do on a checkered piece of paper. This approach will make it possible to more accurately calculate the required material, which includes not only wood, but also fittings in the form of hinges, latches and bolts.
Advice! Accessories for your window can be purchased at a specialized store or from those who assemble metal-plastic structures.

Any wood can be used as a base for a window; the only question will be the ease of processing and service life. Due to its cheapness and availability, many people choose pine. There is also an option to assemble the window frame from oak. You shouldn't do this if this is your first window project, as handling oak can be a real hassle.

Drying wood yourself should be done if you have enough experience. Otherwise, it is better to purchase ready-made dried boards. This is due to the fact that if the drying technology is violated, cracks may appear in the wood or the boards may become deformed.
It is also worth paying attention to the presence of knots. It’s good if there are none at all, then
Because during operation, it is from them that the process of rotting can begin.

The next step is the preparation of blanks, which are cut out according to the drawn up window drawing. In the process of sawing, gaps of a few millimeters can be left, which will later be processed by a milling machine. If it is not possible to use a solid board, then laminated veneer lumber is also suitable. It will be quite easy to work with a board with a section of 15 by 5 cm.
In addition, wooden windows are divided into
- Double-leaf mullioned wooden windows - several sashes are connected into one whole structure with the help of an impost, this option is reliable, durable and easy to use;
- Blind, in which there are no valves. There is no ventilation function in them. Due to the ease of manufacture, the cost of such windows is low. It is necessary to think over the care of the front part of the window structure and ventilation before proceeding with the installation;
- Double sash windows - the opening mode is similar to double sash windows, however, here the first sash has a swing-out handle, and the second without a handle. The second leaf can only be opened when the first one is closed;
- Tilt-and-turn and rotary - have sashes that open inward. Thanks to the ventilation mode and reasonable price, they have become quite common.
Swedish windows made of wood are also noted. They are something of a fusion of Russian and German. It has an inner frame with a single pane of glass and an outer frame with a single pane of glass. This results in a high degree of thermal and sound insulation.
Carved windows made of wood are characterized by the presence of multiple patterns, which makes them the most beautiful.
4 Product installation
The fully assembled window should be installed in the opening. All garbage is removed from there first. Then you need to make holes for the dowels in 80 mm increments. After installing the window, it is fixed using self-tapping screws. All cracks are filled with polyurethane foam. This allows you to insulate the window opening. The installation is accompanied by regular checking of the window geometry.
An important step is installing the window sill. It should be remembered that along the length it is made 100-200 mm more than the window opening. The protruding part is around 70 mm.
The installation procedure is as follows:
- 1. The required size is cut from a board or purchased product.
- 2. The outside is lined with felt.
- 3. It is being placed under the frame.
- 4. The window sill is leveled relative to the ground using wedges. A slope to the outside of up to 2 degrees is allowed.
- 5. All empty space is filled with foam using a gun.
In order for windows to serve you for many years, you must follow a few rules for caring for them.
In order to improve the performance of windows, wood must be treated in a special way, for this they use:
- impregnations that protect the material from the adverse effects of moisture and prevent the appearance of cracks and deformations;
- primers and special paints that make window maintenance easier and, in addition, give it the desired shade.


However, the care does not end there. No matter how high-quality the impregnation is, wood must still be treated with extreme care and “hygiene” must be observed. In particular, if you are carrying out general repairs in the house, then all finishing work associated with plastering and manufacturing concrete screeds, should be completed before installing double-glazed windows, especially if work is carried out in the cold season. Plaster and other building mixtures should not come into contact with the surface of the window, which means that all surfaces of the window opening should be temporarily finishing works must close plastic film and secure with masking tape.
Windows need to be washed regularly, and this is important not only to increase their aesthetic appeal, but also to understand the fact that dirt causes significant damage to the paintwork. Wooden frames can be wiped with a regular rag and a little liquid detergent.
Please keep in mind that the use of alcohol-containing and abrasive products is strictly prohibited.


It makes sense to update a couple of times a year wooden elements with a special polish, and non-wooden fittings with machine oil.
It makes sense to insulate the windows so that they can better withstand the winter, and in the summer you will need a mosquito net that will protect the frames from insects, which are known for their “love” of arranging homes in wood.
In case of deformation, you can easily repair the windows using a hand router.

And finally, let’s dwell on the following question: right choice wooden windows.
The market is overflowing with offers, but there are not so many manufacturers offering truly high-quality and durable products. You need to approach the choice of a company that will manufacture and install wooden windows for you with special care: collect information about it, get acquainted with customer reviews, clarify the level of professionalism of the craftsmen and warranty obligations.
How to make a double-glazed window with your own hands
How to make a double-glazed window with your own hands? Currently, the installation is very popular in construction plastic windows. They are characterized by high tightness, strength, long term operation. Double-glazed windows reliably protect the room from the penetration of cold and noise.
Making a double-glazed window with your own hands
You can make the package yourself in a home workshop if you don’t have a special one. industrial equipment. It is necessary to very carefully seal the glass unit and carry out all work with extreme care.
Materials and tools:
- glass
- glass cutter
- roller quick cutter
- wiper
- metallic profile
- connecting corners
- dehumidifier
- sealant.
Design of double-glazed windows.
First of all, you need to cut the glass to the appropriate sizes. For this purpose, the home workshop should have a large durable table having an even surface. You need to cover the table with thick cloth.
You need to buy a good glass cutter. You need to prepare a large ruler 1.5 m long in advance. Glass large sizes cut using a roller cutter. For the manufacture of the structure, glass with a thickness of 4 mm is used. Their sizes depend on the size of the window opening.
After preparation necessary tools and materials begin cutting glass. After cutting the glass, they must be washed and cleaned. Liquid glass cleaner is used to clean glass.
Glass must be perfectly clean and transparent.
Then spacer frames are made. To do this, you need to cut a special metal profile of the required dimensions.
The prepared profile is bent at right angles using connecting corners. This way you get a frame.
Before bending the profile, it is pre-filled with desiccant. To do this, install a corner at one end of it. A desiccant in granular form is poured through the hole at the other end.
Diagram of a plastic window.
In this case, the profile is filled with desiccant so that 1/4 of it is unfilled. Then its free end is closed with a corner. You need to install the next section of the profile on the connecting corner and fill it in the same way.
In this way the spacer frame is assembled. Then they create another frame of the same type, since the result should be a two-chamber double-glazed window.
Then you need to transfer the clean glass to the table. At the same time, you need to be very careful not to get it dirty. After this, you need to remove the protective film from the end side of the spacer frame that covers the special layer with butyl applied to the profile.
This layer is made in production; it is applied to both sides of the profile. Then remove the protective film from the top surface of the frame. Then you need to put a second glass on the frame, which should be on the same level as the first.
Next, the above procedure is performed for the next frame. After this, it is necessary to compress the bag so that the butyl is tightly connected to the glass. This completes the first stage of sealing the double-glazed window.
After this, the outer end of the bag is filled with polyurethane and polysulfide sealant. A special spatula is used for this. After this, you need to wait 12 hours until the sealant dries. After hardening, the sealant should become like rubber. Then the irregularities are sanded down. The glass unit is ready.
Making double-glazed windows with your own hands will significantly save your family budget. You can make such products for all rooms, kitchen and loggia. If all work is carried out using this technology, the products will be strong, reliable and durable.
Making a wooden frame from timber

Scheme of rigid fastening of a wooden frame.
Before the wooden frame is assembled, it is necessary to treat the bars with a special antiseptic composition. Thanks to this, the frame will last longer, since the wood will be protected from the formation of fungi and moisture penetration.
Making a frame with your own hands begins with a box. A slot is made in a board measuring 50x150 mm in such a way that a configuration in the form of the letter “L” is formed. This will ensure the window is airtight. Next, you should divide it into 4 equal parts. They are fastened together using a tongue-and-groove connection. That is, a groove is sawed on one of the parts, and a tenon is cut on the other. These 2 connection elements must be made carefully in size so that the tenon fits into the groove without gaps, stretched. This will ensure secure fastening.
The groove is made using a circular saw, which is used to make cuts. And the excess is removed with a chisel and hammer. The spike can be made either manually or circular saw, with a certain skill. Grooves must be made on frame parts that are located vertically. On horizontal ones, a spike is cut out.
After preliminary assembly of the box elements, it is disassembled. Carpenter's glue is carefully applied to the fastening parts. Next, they are connected, strictly observing a geometric angle of 90°. You can control this using a square.
After this, metal corners are inserted at the end corners. They will provide the box with additional rigidity. Further work can be carried out only after the glue has completely dried.
Window sill diagram for a wooden frame.
The wooden window frame is made of timber with a section of 50x50 mm. A profile should be cut from it according to the design of the window. It will differ depending on the size and dimensions of the glass that will be inserted later, and the width of the glazing bead. Wherein dimensions the frame should be such that when it is inserted into the box, a gap of 1-2 mm is maintained. The profile is made using electric or hand plane. The resulting nicks should be sanded with a machine or sandpaper.
The wooden frame blanks are fastened together in the same way as a box, that is, a tongue-and-groove connection is used. For reliability and rigidity they are glued. On the outer part, metal corners can be screwed into the corners, which, in addition to decorative purposes, will enhance the rigidity of the structure.
After this, the wooden frame and box can be coated with stain and varnish, if there is a desire to preserve and emphasize the texture of the wood, or painted. Hinges are screwed onto the window frame and frame, which serve as a connection between these parts. After inserting the glass, the frame can be hung on the prepared hinges.
Technology for installing a wooden window in a building made of brick or concrete

Stage No. 1. Analysis and preparation of the opening. The window opening must have a clear geometry. To do this, all edges are checked using a level. Surfaces are cleared of debris and uneven surfaces are removed.
Stage No. 2. Installation and fastening of the window block in the opening. The frame is fixed using dowels or self-tapping screws, but in no case, nails or polyurethane foam. The distance between the fastenings is 70-80 cm.
Stage No. 3. Sealing. A double-glazed window may lose its properties if there are gaps between the frame and the frame, so treatment with a sealant is a mandatory part of installation. Compression tape is used as a sealing agent.
Stage No. 4. It is imperative to take measures aimed at vapor barrier of the structure.
Stage No. 5. Elimination of cracks and holes. The final stage is foaming the holes. Polyurethane foam will help prevent cold air and dust from entering. After hardening, the foam is cut with a mounting knife. On the outside, in order to avoid the destruction of the foam during operation under the influence of natural factors, they are sealed with tape, mounted with casing or plastered.
Stage number 6. Installing the window sill. The slab must be made of hardwood (oak, beech).
Dimensions and design of the window sill are chosen by the user. However, it is worth remembering that the window sill should not protrude more than 5-6 cm. If you want to expand the structure, then it needs to be strengthened.
Stage No. 7. Installation of platbands and ebbs. Platbands are designed to disguise seams and give the window an aesthetic appearance.
Drains are installed to remove moisture and condensation. They are usually made of steel or aluminum.
Window installation

The process of installing a manufactured structure begins with preparing the opening. If there is a need, it can be expanded or, conversely, made smaller. All surfaces are cleaned of debris and made as smooth as possible. Cracks can be repaired with tile adhesive, which will subsequently be covered with putty. The next step is to fix the manufactured box. It must be placed in the opening vertically and horizontally. To level it, you can make linings from wooden pegs. Next, markings are made and holes are drilled both in the wood and in the wall. It is better to fix the box with a frame anchor; the screw head needs to be countersunk so that the window frame fits without any hitches.

A frame is installed on the box. It must be well fitted so that air does not enter through the cracks. For additional fixation and sealing, special compounds can be used. The next step is to hang the sash, if provided. Loops are pre-hung if this has not been done previously. The last step is to install double-glazed windows. They are fixed in place using glazing beads. Typically, the design of a double-glazed window provides for the presence of a sealing tape that closes the space between the glass and the frame. Next, you can install the handles in their place.

The last step is to eliminate the gaps between the frame and the window opening. This is done with polyurethane foam. In this case, the frames should be closed, and you should not apply a lot of foam, because when it expands, it can deform the wooden structure of the window. When the foam dries, it must be cut off. The next step is to install the window sill. The part that will protrude above the radiator should not have a protrusion of more than 5 cm, as it will be easily damaged. The window sill sits on the mounting foam, after which it must be pressed down well. The final stage of window installation is decorative finishing of the slopes. This can be done with plasterboard or putty.
How to make a double-glazed window with your own hands
Double-glazed windows have gained unprecedented popularity in recent years due to their technical features. What is needed to produce double-glazed windows yourself?
- Double-sided mounting tape (1-2 mm thick);
- sealant or plasticine;
- hardener;
- catalyst;
- cleaner
To hold the glass together, a special styrene-based binder is used, which can be prepared at home. To do this, you need methyl ethyl ketone peroxide in a 36 percent dimethyl phthalate solution; this element plays the role of a hardener, as well as a cleaner and toner (paint of synthetic origin).

The volume of the binding component is calculated depending on factors such as the thickness of the mounting tape and the dimensions of the glass: for a tape 1 mm thick and 1 sq.m. glass will require a liter of composite.
Mix the components in a clean plastic container, then add the hardener. The dosage is calculated taking into account the temperature; the higher, the greater the percentage (from 1% at + 24 degrees to 2% at 12 degrees).
If you want to paint the glass in any color, for example, to create a tinting effect, then toner paint is added to the solution, the dosage of which is no more than 5%.
The solution is thoroughly mixed and left for 15-20 minutes. This is done to ensure that the air escapes and no bubbles form on the surface.
The first step is preparing the glass. We cut two pieces of glass of the same size to fit the window. The surface is thoroughly washed with a glass cleaner and then wiped dry with a paper napkin or newspaper.

Important! The tape should be applied so that there is a small gap at the corners. To do this, you need to retreat 2-3 mm from the edge of the glass.
. Remove the protective layer from the tape and attach the second glass joint to joint
Press down the surfaces a little for better fixation. Next, the glass is filled with the component solution. To do this, the glass is moved apart and a funnel is inserted inside the glass unit.
Remove the protective layer from the tape and attach the second glass joint to joint. Press down the surfaces a little for better fixation. Next, the glass is filled with the component solution. To do this, the glass is moved apart and a funnel is inserted inside the glass unit.
Important! When gluing the tape, you must leave space for the funnel. To do this, the ends of the adhesive tape are brought out, but the protective layer is not removed.
To make pouring the reagent convenient, it is necessary to position the structure at an angle. A wooden block is placed under it. The liquid is poured through a funnel. After the glass unit is completely filled with the component, the funnel hole is sealed. The funnel is removed, and the remaining protection of the mounting tape is removed.

If bubbles are found inside, they are removed using a medical syringe and needle. The glass unit is sealed around the perimeter and left to dry completely - this will take 2-3 hours. This method will save money on the purchase of ready-made double-glazed windows.
Making a box
Despite the ease of manufacture, the box must be treated with great respect. After all, it is the box fixed in the window opening that will bear the main load. If it cracks or bends under the weight of the wall, it will be impossible to insert a window into it, and the glass of the inserted one will probably break.

Scheme of a wooden window.
The manufacture of the box begins with blanks. To do this, 2 pieces are sawn off from the board, the length corresponding to the width of the window opening, and 2 pieces corresponding to its length. The ends of the boards corresponding to the width of the box are turned into a tenon 20 cm thick using a jigsaw and chisel. And at the ends of the boards, measured along the length, a groove of the same thickness is made in the middle.
After this, for each board you need to select a groove with a plane that is 50 mm wide and 3-4 mm deep. The resulting ridges will subsequently serve as support for the window frame and contribute to better sealing of the window. Having completed the selection, all four sides of the box are connected to each other.
The corners are first fixed with wood glue, and then two holes Ø12-15 mm are made at the ends of the boards so that the drill goes through the top board and goes 10 mm into the end of the bottom board. Then wooden rods of the appropriate diameter are inserted into each hole. These rods provide immovable fixation of boards connected at right angles.
Scheme of the casing of a wooden window.
Typically, window frames are inserted into the wall directly during the construction of the walls, and frames are inserted after the roof is finished. The box must be inserted with the selected side facing outwards. Because the box is quite long time are subject to significant loads, especially on their upper part, then in order to avoid warping, temporary spacers are inserted into them before installing the frames.
These spacers are vertically inserted 25-30 mm boards, 10 mm longer than the distance between the transverse boards of the box. The lower part of the boards is cut straight, and the upper part is cut at a slight (4-5º) angle, so that the spacer can be inserted more tightly into the box, and subsequently it can be easily removed from there. The number of spacers depends on the width of the span and is taken at the rate of 1 spacer per 40-50 cm of width.
- Warmth and silence
- absence of drafts and natural light in the house,
- sun protection and impact resistance,
- self-purification and artistic expression -
A window acquires all these properties primarily thanks to a double-glazed window.
In recent years, double glazing has evolved from a simple product into an innovative, complete the latest technologies energy saving, sun protection, self-cleaning, safety.
Today, some double-glazed windows can not only partially or completely replace a heater or air conditioner, but also make your home artistically expressive.
In the esthete's arsenal of tools:
- stained glass pattern,
- decorative binding,
- colored glass,
- built-in blinds of the desired shade,
- glass frame in the color of the profile and much more.
The production of double-glazed windows, especially with special coatings, is a multifaceted and complex process. The finest coatings, invisible to a non-specialist, make the glass unit heat-saving, sun-protective, and self-cleaning. Therefore, it is so important during the manufacturing process not to scratch its functional layers and to assemble a reliable structure that will last for decades.
First stage. Opening and preparation.
At the very beginning, an order arrives at the workshop. Exactly according to its dimensions, the glass is automatically cut and the edges are cleaned from sputtering using high-tech equipment.
It is important!
If the edge is not processed, the glass unit cannot be reliably sealed, dry air or argon gas cannot be “sealed” inside. (Inadequate adhesion of primary and secondary seals). Over time, this will lead to condensation inside the glass unit. If the edge is untreated, the coating under the frame will begin to oxidize, and the glass will become covered with streaks and change its appearance, not for the better.
In parallel with the preparation of glass, the production of ready-made forms of the spacer frame takes place. A molecular sieve is poured inside, absorbing moisture inside the glass unit. Thanks to this, condensation between the glasses does not fall out in the future.
Making double-glazed windows is complex technological process, which involves different areas of work and equipment. Automation, the use of expensive software systems, and highly qualified employees guarantee the production of double-glazed windows with a quality mark - with the STiS marking.
How to make a double-glazed window with your own hands? Currently, the installation of plastic windows is very popular in construction. They are characterized by high tightness, strength, and long service life. Double-glazed windows reliably protect the room from the penetration of cold and noise.
Making a double-glazed window with your own hands
You can make the bag yourself in a home workshop if you don’t have special industrial equipment. It is necessary to very carefully seal the glass unit and carry out all work with extreme care.
Materials and tools:
- glass;
- glass cutter;
- roller quick cutter;
- wiper;
- metallic profile;
- connecting corners;
- desiccant;
- sealant.

First of all, you need to cut the glass to the appropriate sizes. For this purpose, the home workshop should have a large, durable table with a smooth surface. You need to cover the table with thick cloth.
You need to buy a good glass cutter. You need to prepare a large ruler 1.5 m long in advance. Large-sized glass is cut out using a roller cutter. For the manufacture of the structure, glass with a thickness of 4 mm is used. Their sizes depend on the size of the window opening.
After preparing the necessary tools and materials, glass cutting begins. After cutting the glass, they must be washed and cleaned. Liquid glass cleaner is used to clean glass.
Glass must be perfectly clean and transparent.
Then spacer frames are made. To do this, you need to cut a special metal profile of the required dimensions.
The prepared profile is bent at right angles using connecting corners. This way you get a frame.
Before bending the profile, it is pre-filled with desiccant. To do this, install a corner at one end of it. A desiccant in granular form is poured through the hole at the other end.

In this case, the profile is filled with desiccant so that 1/4 of it is unfilled. Then its free end is closed with a corner. You need to install the next section of the profile on the connecting corner and fill it in the same way.
In this way the spacer frame is assembled. Then they create another frame of the same type, since the result should be a two-chamber double-glazed window.
Then you need to transfer the clean glass to the table. At the same time, you need to be very careful not to get it dirty. After this, you need to remove the protective film from the end side of the spacer frame that covers the special layer with butyl applied to the profile.
This layer is made in production; it is applied to both sides of the profile. Then remove the protective film from the top surface of the frame. Then you need to put a second glass on the frame, which should be on the same level as the first.
Next, the above procedure is performed for the next frame. After this, it is necessary to compress the bag so that the butyl is tightly connected to the glass. This completes the first stage of sealing the double-glazed window.
After this, the outer end of the bag is filled with polyurethane and polysulfide sealant. A special spatula is used for this. After this, you need to wait 12 hours until the sealant dries. After hardening, the sealant should become like rubber. Then the irregularities are sanded down. The glass unit is ready.


