Not so long ago, a chaise longue was considered exotic, and only wealthy people could afford it. We saw sun loungers in colorful magazines and American films, but even with a strong desire, an attempt to buy something similar for ourselves would have turned out to be a failure - there were simply no sun loungers for sale.
Well, everything passes sooner or later, and the information revolution generously gifts us with new opportunities. Now anyone can find a manual on the Internet on how to make a sun lounger with their own hands. However, such plans often turn out to be difficult to implement, especially for a beginner. They require use large quantity expensive instrument, and therefore remain unfeasible for many.
This master class is a pleasant exception to the rule. The chaise lounge presented by the author has a simple design and a clear system for folding and adjusting the backrest tilt. If you approach the issue of choosing materials correctly, you will need a very modest arsenal of power tools and as a last resort, you could very well borrow some of them from friends and acquaintances.
In addition, given the fact that the chaise longue is made of natural wood, it can easily also be used at home, instead of a couch or armchair in the living room. It folds and unfolds quickly and has a completely finished appearance. A beautiful textile mattress will complement the look, and the chaise lounge will fit perfectly into the interior of your home.
In order to make a chaise longue with your own hands, you will need:
Materials:
Pine board 20 - 30 mm thick;
- slats with a cross section of 30 x 30 or 40 x 40 mm for the manufacture of a backrest folding system;
- natural or mineral oil for wood processing, drying oil or varnish for woodworking;
- screws and small nails;
- glue for gluing wood materials;
- metal one-piece loops for fixing the back: two larger ones and a smaller pair;
- a ready-made mattress with ties to secure it or fabric, batting, foam rubber and threads for its manufacture.
Tools:
Miter saw, circular saw or hacksaw for wood;
- a sander if you are using old or unsanded boards;
- screwdriver or Phillips screwdriver;
- electric drill;
- a clamp with a device for drilling pocket inclined holes (optional, but greatly facilitates the work);
- paint brushes;
- construction tape and square;
- pencil.
Step one: create a sketch and layout of the chaise lounge
A model of the product is simply necessary if the product itself consists of a large number of parts. It will not allow you to get confused in their countless list and will significantly speed up the entire work process. In addition, you will have the entire list of parts and their exact size. Well, what would we do without this?
But everything comes before a sketch. This hand-drawn sketch on a piece of paper gives birth to an idea and lays down the basic outlines of the image of the future product. This is where we should start.
In your case, the computer model of the chaise lounge is already ready and you can safely use all the dimensions indicated in this master class as a basis. But first, write down on paper the entire list of parts that you have to make. Indicate their dimensions opposite and only then start working.


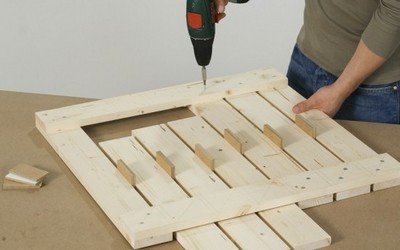
Step two: making parts
The detailing you have collected should be transferred to the material in the form of markings. Use a pencil for this to easily correct any mistakes that have crept in. Also use a construction square. Especially if you plan to use help for sawing boards hand hacksaw. It will allow you to mark angles of 45 and 90 degrees, and there is no such thing as too much precision.
So, mark the parts and start making them. Cut the boards into pieces of the length indicated in your list. You will need:
Two longitudinal frame parts 1850 mm long;
- five transverse frame parts 470 mm long;
- four blanks for legs 280 mm long;
- four to five boards for the base of the sun lounger, 1270 mm long;
- two long side boards for the base of the sun lounger, 190 mm long;
- two small slats for supporting the backrest when folded, 580 mm long;
- three bars for making a backrest 43 mm long;
- four to five boards for the base of the backrest;
- two slats for the backrest folding system, 230 mm long;
- one horizontal rail for the backrest folding system, 460 mm long;
- six small pieces of slats for the backrest folding system - three on each side.
All specified dimensions should be clarified, since the author indicated them in inches. They also depend on the thickness of the boards you use. To find out the dimensions for your case, always start with general values and gradually move on to smaller details.


Step three: assembling the sun lounger
Start by assembling the chaise lounge frame. Remember that any frame is usually assembled using screws. This ensures relative strength of the entire structure. However, it often happens that screws alone are not enough. Then glue is also used. Such combined connections serve very well and do not require repair for a long time.
Assemble the chaise lounge frame using glue and screws and secure the legs. Use small nails to secure the base parts to the frame. At the same time, make the back panel.
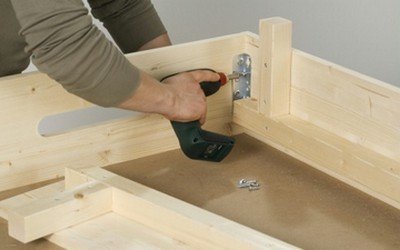
Inside the hole for the backrest on the sides, screw two support rails on which the backrest rests when folded and on which the rail sections (teeth) are attached to adjust the backrest tilt. Fix the teeth themselves.
Connect the backrest to the frame using a pair of one-piece metal hinges. Also make a U-shaped piece for the back and secure it in place with smaller loops. Check the backrest adjustment.


Step four: protecting the wood
Any furniture is subject to wet cleaning sooner or later. Untreated wood can hardly tolerate such treatment, and the result is often zero. Therefore, wood must be treated with suitable paints and varnishes.
The author decided to leave the wood unpainted so that it could be seen that it was made from natural wood. In this case, the most reasonable option would be to varnish the chaise lounge with a matte or semi-gloss clear varnish.
Since furniture is usually used very intensively, you should choose a varnish that will provide the most durable and wear-resistant coating. For example, profile furniture varnish. Apply it to the surface of the wood in several layers and let each one dry thoroughly.
Camping is a great way to relax. Some go to the village, others go to the country, where comfortable sun loungers await them, allowing them to forget about environment and take a little nap. Such attributes relieve tension from the spine and almost all muscles; you just have to choose the most comfortable option for yourself: a rocking chair, a regular folding chair or a lounger.
The easiest way is to buy it already ready-made chaise lounge, choosing it to suit the interior of the dacha or to suit your individual needs. But not everyone has the financial means to do this. A handmade model is more valuable and fully suits the taste of its owner.

Kinds
Making homemade sun loungers is not difficult. Before starting work, you need to choose the type of furniture you want to bring to life. There are several of them:
- Armchair. As a base, you can take elements from a crib or cot. Armrests are made upon request.
- Sun lounger. The creation process takes about four hours. The product can be made of plastic or wood, which is ideally sanded and varnished.
- Rocking chair. Its back is at an angle, so it is possible to lie down, relax, and take a nap. At the same time, it is important to make the bottom of the attribute strong so that it does not become loose when swinging.


In addition to the distribution of products across appearance, there are variations in the types of structures:
- Monolithic. When it is created, all elements are fastened together, so disassembly is impossible. This chaise lounge is strong and durable, but the backrest is not adjustable and the product as a whole does not fold. As a result, problems may arise with its transportation.
- Portable. The reliable and compact folding attribute has a special mechanism that allows you to easily adjust its position.
- Soldered with inserts. This practical product will decorate any interior thanks to its attractive appearance. But inserts made from other materials do not guarantee durability.


If the chaise lounge is made of durable materials, it can be supplemented with a blanket, pillows and other items for a comfortable rest.
Possible materials
When choosing the material for making a sun lounger, you need to take into account its location. This could be a summer cottage, a beach, a special place by the pool or even at home. The following options exist:
- Wooden. This design is durable, comfortable, environmentally friendly, and differs in shape and appearance. The only drawback is the heavy weight. To make it easier to carry the chaise lounge, wheels are attached to the legs.
- Plastic. The products are lightweight, inexpensive, and easy to care for. One of the negative aspects is its fragility.
- Fabric. The attributes are convenient and compact. The frame can be made of boards, metal, profile pipe.
- Made from rattan. Against the backdrop of nature, such sun loungers look incomparable. They are environmentally friendly, but expensive. If you have the skills to weave, it’s easy to make such an attribute for relaxation.
- Made from PVC. The same lounger with a fabric base, but the frame is based on PVC pipes.
Making a sun lounger yourself is not difficult; you need to correctly determine the dimensions of all the elements and spend several hours assembling them.

Manufacturing diagram of various options
Before you start making a recreational attribute, you need to draw its diagram. She plays important role, because it determines the dimensions of the elements for the product, their shape, quantity and other details. You can make such a scheme yourself, but not everyone can do it. Therefore, we will give an example of such a scheme. A high-quality chaise lounge (fabric) will be obtained according to this drawing with dimensions.

All that remains is to find the materials to create a lounger. There are also other drawing options different types sun loungers.
From a wooden lattice
This chaise lounge is quite durable, reliable, and its backrest is adjustable. For such a model you should take wood slabs from coniferous species, as they are resistant to climate change. Here is a diagram with the indicated dimensions:

All work is carried out in stages:
- A frame is created from bars, it is fastened with metal corners.
- Boards are attached to the outside, and legs are attached to them.
- The slab is sawed using a jigsaw and a wooden lattice is made.
- The adjustable backrest is separated from the main part of the attribute and secured to it with a door hinge.
- A fastening strip is attached to the headboard area, and a stand is attached to it with screws.
- The finished product is sanded and varnished.


If the lounger will often move from one place to another in the future, it is better to attach wheels to its legs, because the weight of the attribute itself will be considerable.
Fabric on frame

Work on the frame occurs in the following order:
- A ready-made base is taken from a cot or crib. If this is not available, slats are taken required length or cut and polished.
- Holes are drilled in the main frame, the other is equipped with cutouts (4 pieces) to adjust the backrest tilt.
- Holes are made at both ends of the slats to install the seat.
- Circular cross members lubricated with glue and installed in the holes.
Now you should prepare the seat itself. To do this, you need to fold the base of the product and measure out a piece of fabric. It should sag to accommodate the owner comfortably. On sewing machine All edges are processed. Then the cloth is wrapped around the transverse round crossbar and nailed on both sides with small nails. The attribute is ready and you can enjoy your vacation.


From pallets
This is the easiest option for creating a sun lounger. This product is lightweight (easy to move around different places) and practical (you can put a mattress on it for more comfort). The work occurs in the following order:
- Pallets are dismantled, all the nails are pulled out.
- A frame is made from two even boards. They are laid edgewise and parallel to each other, and the rest are sawn in half and attached to the base. The result is a seat with two support legs behind.
- To create the front legs, a board from a pallet is sawn into two equal parts. Next, using bolts, they are screwed to the base of the seat and tightened with nuts and washers. A cross bar is necessary to strengthen the legs.
- The back is created from two boards, which are connected to the seat frame using bolts, nuts, and washers. This should be done under equal angle. After that on support boards The boards for the back are attached with screws. Behind it, a block is attached to the rear legs - this is necessary for the strength of the structure.
The final step is to sand the attribute with an emery sheet.


To prevent the boards from rotting, the product is varnished.
Made from polypropylene pipes
The design of such a chaise lounge is identical to the fabric one, only wooden frame here replaced by polypropylene pipes. To create the product, you need 2-inch pipes, fittings in the form of the letters “g” and “t”, 8 and 6 pieces, respectively. The assembly process has several stages:
- First, a vertical bar is made. Take a T-shaped connector and use it to fasten 30 and 45 cm pipes. L-shaped fittings are put on the ends. The lower vertical is also fastened and the two sides are connected.
- Important point: the horizontal crossbar must be solid and have a length of 66 cm. It is mounted closer to the connection with the letter “T”, which must be directed towards the inside of the structure. The other side is two 30 cm pipes, fastened with a T-fitting. This tee must be rotated 45 degrees from the oblong side. The final result is a rectangle.
- For a rotating seat, a 5-centimeter pipe is inserted into the triple connecting element, which is secured with the same part. This will be the basis of the horizontal frame.
- The long sides of the horizontal frame are made in the same way as the vertical ones. For the crossbars, take a tube 30 cm long and another, consisting of 2 x 20 cm with a tee fitting. The result is a rectangular figure within the same figure.
- The seat will be between a short section horizontal section and oblong vertical. After adjusting the tilt level, a support is inserted at the back.
The frame is ready, which means it is now necessary fabric base. To do this, take a thick canvas and attach it to the base.


"Kentucky"
This leisure attribute has a number of advantages: compact, convenient, easy to fold, light weight, durable and reliable, and takes up little space when folded. In appearance it resembles a chair with high back. Unusual way the assembly looks original. To do this, you will need bars, galvanized wire (diameter 4 mm) and the same brackets for fixing the wire (16 pieces), wire cutters, and a hammer. The process goes like this:
- A protective coating is applied to the bars. But the parts must already be ready for assembly.
- Holes are made. However, they should be a couple of millimeters larger than the wire.
- The bars are assembled in an interesting way, which makes the whole design look creative. Here is the diagram:

At the end of the entire process, the chair carefully rises and unfolds. This folding product looks stylish and modern.

Original ideas
People with creative thinking do not always want to see on their territory simple sun loungers, so there are several original ideas creating models for recreation.
From birch logs
This design has unusual look, so you have to work hard. For such a lounger you need birch logs with a diameter of 75-120 mm. But you need to consider what larger diameter lump, the more the finished product will weigh. Before you start, you should stock up on the following tools:
- electric saw;
- drill;
- set of drills;
- self-tapping screws;
- staples.

When arranging a place to relax near a private house, it is impossible to do without a sunbed. This is where the ability to make a comfortable lounge chair with your own hands will come in handy. It is a folding lounge chair on which you can sit in a reclining position.
Sun loungers come in metal, plastic and wood. Often these materials are combined with strong textile inserts, or complemented with light pads in the form of pillows and mattresses.
When you decide to make a chaise longue for your dacha with your own hands, choose wood as the material of manufacture. It's easy to use. Fully wooden lounger It will turn out to be reliable, strong, and will serve you for a long time. Detailed description how you can make a sunbed with your own hands, diagrams, design drawings and photos will help you avoid problems at work.
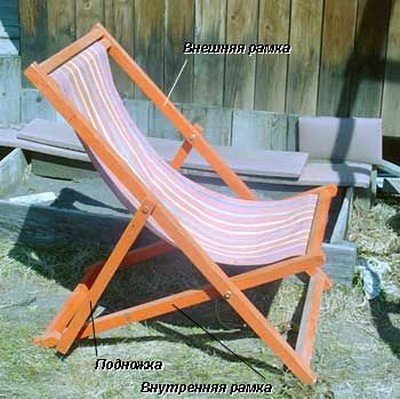
Lounge chair for relaxing in the garden or by the pool
On such a chaise longue for a summer residence, it is convenient to sit in the shade of plants while reading a book or take a place in a sunny meadow to get a beautiful summer tan. Despite the fact that this is a very simple design, the lounger can be installed in three positions: completely horizontal or with two options for raising the backrest. Moreover, for lifting one of the most simple designs. But we know what simpler mechanism, the less susceptible it is to breakdowns.

Even an inexperienced craftsman can make such a chaise lounge with his own hands. It will have convenient parameters even for a tall adult: width – 60 cm, length – 215 cm.
Materials and tools
The material from which we will make the lounge chair will be pine beams and boards. Their dimensions, along with a list of tools and fasteners, are presented in the list:
- 3 bars 4000x100x50 mm;
- 4 boards 4000x80x25 mm;
- 2 studs for attaching the back to the frame;
- drill with drills;
- self-tapping screws;
- sandpaper;
- wood putty;
- paint (color of your choice);
- wood glue to strengthen fixed joints;
- roulette;
- square;
- marker;
- saw or power saw.
Description of work
Before starting work, carefully examine similar drawings to understand the logic of subsequent actions.

- First of all, we assemble the frame from the timber. We take 2 parts of 2150 mm each and the same number of 500 mm each. We make connections using a drill using self-tapping screws. To increase reliability, pre-coat the joints with glue.
- Let's start working with the stationary part of the surface. We cut a board with dimensions 4000x80x25 mm with a saw into 60 cm pieces. In total, 13 such parts need to be made.
- Leaving centimeter gaps between the boards (60 cm long), we fasten them to the frame with self-tapping screws. We control the angle of connection of the planks at 90 degrees.
- Let's start installing the legs of the chaise lounge. For greater stability, the legs in the seat area should be made double. For them, we take 4 bars 35 cm long. We glue them in pairs, then fasten them to the base with glue and self-tapping screws. Any excess adhesive should be wiped off immediately. This will help in the future to avoid problems with processing these areas of wood.
- On the side of the headboard we also attach single bars-legs 35 cm long. Then we attach second bars to them, which are 20 cm shorter than the first ones. We fasten them so that the lower edge of the parts coincides (as shown in the figure).

- Let's start creating the back of the chaise lounge. The frame of this part will be assembled from pine beams measuring 100x50 mm. Prepare 2 parts of 880 mm and 3 parts of 390 for the back frame.
The dimensions of the backrest base are chosen so that it can fit inside the main part of the chaise longue (with small gaps for free movement).
- Back covering. If you want to give the product a more attractive look, attach the trim strips in the direction of the length of the frame. In this case, round the top edge of each board on both sides. Maintain a distance of 10 mm between the slats.
- To secure the backrest to the frame so that it can move freely, you need to prepare the holes. Measure 70-80 mm from the edge of the last seat board. At the indicated distance, use a drill to make holes that pass through the frame of the backrest and chaise lounge. Place a pin in them on each side.
- The mechanism for raising and fixing the moving part is based on placing bars in special recesses that will not allow the backrest to fall down. The first selections should be made on both sides of the main frame of the sun lounger, retreating 7-8 cm from the hairpin. The dimensions of the recess should be 10 cm wide and 5 cm deep. We make the second recesses at a distance of 20 cm from the first, 5 cm deep and 5 cm wide.
If you place the first support bar, 60 cm long, horizontally in the first recess, the back of the chaise lounge will lock into the “chair” position. The person sitting on the chair will be able to sit comfortably. To change the level of raising the backrest, you should move the first block onto the shortened legs, and insert the second support block (60 cm) vertically into the second recess. You can fully unfold the chaise longue by removing the second bar and lowering the backrest. In this case, the small frame will stand on the first block placed on the shortened component parts legs

- Finally, start finishing the chaise lounge. Use putty to smooth out any uneven surfaces and hide the screws. After drying, sand the corners and surfaces with sandpaper so that there are no sharp parts, burrs or roughness. Cover wooden product stain, this will protect the material from harmful influences. Paint the lounge chair the color of your choice.
The garden chaise lounge for the dacha is ready. You can equip it with a picturesque corner of your garden plot and enjoy a pleasant holiday.
Compact sun lounger: comfort wherever you want
A folding chaise longue, of course, cannot be called a sun lounger; it is more like an armchair. But the product has a number of other advantages. The design is very simple, so making it yourself will not be difficult.
The chaise longue is light in weight and compact, so you can easily move it to a new place. And if you show diligence in your work and care when choosing materials, the product will serve you for a long time. personal plot dachas for more than one year.

What do you need to make a folding lounge chair?
Before starting work, prepare:
- For the back frame: 2 parts – 1219x38x19 mm, 1 – 610x38x19, 1 – 648x38x19, 1 – 610x64x19.
- For the seat frame: 2 parts – 1118x38x19 mm, 4 – 603x38x19, one – 565x38x19 mm, one – 565x64x19 mm.
- To support the back: 2 parts – 381x38x19 mm, wooden dowel with a diameter of 12 mm and a length of 648.
- 2 pieces thick fabric 1372x578 mm each.
- 2 wooden dowels with a diameter of 12 mm, length - 559.
- 4 bolts with nuts 50x6 mm.
- 12 washers.
- Screws 50x4 mm.
- Glue.
Work sequence
The joints must be additionally glued. After pressing the parts, immediately remove excess glue.

- Consider in detail the drawings and diagrams with the dimensions of the chaise lounge. They will help you understand the principle of its folding.
- Drill pilot holes, then countersink them for screws.
- Assemble the frame for the back of the chaise lounge. Attach the bottom bar 50 mm from the bottom edge. Leave a distance of 10 mm between the 610x64x19 mm strip and the top piece to secure the fabric.

- Assemble the upper part of the seat frame in the same way as the backrest. Attach the first bottom strip, 203 mm away from the bottom edge of the side strip. We fasten the next 3 boards with a gap of 13 mm from the previous one.
- We connect the frames of the seat and backrest by tightening them with bolts and installing washers under the bolt heads. We also place washers between the frame posts.
- We use bolts and washers to secure the support strips for the backrest.
- We place the round dowel on the glue in the drilled hole of the planks without gaps.

- It's time to make a fabric seat. Place 2 pieces of fabric together right sides inward, sew, retreating 60 mm from the edge. On one side we leave a section of about 100 mm unsewn.
- We turn the workpiece inside out and sew the sides along the length.
- We lay cavities (for wooden dowels) along the width on both sides and stitch them.
- We thread the dowels through the long holes of the fabric.
- After completing the finishing work with wooden base(sanding, coating with a protective agent, painting) put the seat in place.
A folding chaise lounge for your dacha is ready. Drawings and images helped create a practical, comfortable, lightweight chair for outdoor recreation.
Probably everyone who has their own dacha or a private house, you will want to relax in your yard in the summer or spring. This will help country chaise longue (lounger), lying on which you can relax your tired body after gardening work or get a golden tan under the warm sun. The design of the lounger allows you to sit comfortably half-sitting or half-lying. This chaise lounge can also be useful as a guest lounge. sleeping area, you just need to make a bed for it.
The author suggests making one like this do-it-yourself sun lounger, the model is simple and does not require special skills in its manufacture.
We will make the lounger from wood, it is durable, hardy and natural. Such a country lounger is quite easy to move. You can store it simply by placing it upright against the wall of a house or barn.
So, let's prepare necessary materials:
- wooden boards 400x2.5x8 centimeters – 4 pcs.;
- wooden blocks 400x5x10 centimeters - 3 pcs.;
- mounting pins – 2 pcs.;
- wood putty for sealing seams;
- varnish or paint for processing the deck chair.
For the manufacture of country chaise lounge we'll need one like this set of tools:
- saw (hacksaw);
- jigsaw;
- drill;
- a screwdriver or a shaped screwdriver;
- square, tape measure, marker, sandpaper.
The first step is to make a strong frame for the sun lounger. For such a frame, we cut out four parts from timber - two long longitudinal ones of 215 centimeters each and two short transverse ones of 50 centimeters each.

Next, we assemble the seat - we cut the board into uniform bars 60 centimeters long, a total of 13 of them will be needed. The cut bars are screwed to the frame with self-tapping screws, leaving gaps of 1 centimeter between the pieces. All subsequent parts are also fastened with self-tapping screws.
We also make legs for a country chaise lounge from bars. Single legs 35 centimeters long are attached to the headboard, and double legs are attached to the legs for greater reliability of the product.

After this, we make a frame for the back of the product - we twist the frame from two bars of 88 centimeters each and three of 39 centimeters each. The frame should fit into the main structure of the lounger with small gaps. We fix the boards on the frame for the backrest perpendicular to the seat boards, rounding the ends for aesthetics using a jigsaw.


We drill at the base of the lounger through holes At a distance of 9 centimeters from the edge of the seat, we attach the backrest structure to the base of the chaise lounge. The backrest is fixed to the frame on both sides with pins; it should rise and fall freely.

In the frame of the lounger under the backrest, you need to cut 2 grooves on both sides into which the support bars will be inserted. The backrest will take two different positions. We cut the first pair of grooves, each 5x10 cm, 9 centimeters from the stud. We make the second pair of grooves 5x5 centimeters at a distance of 20 centimeters from the first.

Now, in order to change the position of the backrest, you need to use a support beam 60 cm long. The beam is initially inserted horizontally into the first groove. In order to make a reclining position, the beam is removed from there and inserted vertically into the second groove.
How nice it is after a hard day at work to retire to the garden or sit on the lawn by the pond in order to relax, unwind and enjoy the sounds of nature. And what subject garden furniture most people associate with comfortable stay? Yes, a lawn chair! A comfortable portable extended chair, in addition to its direct functional value, will act as an effective element of the exterior, emphasizing the style. summer cottage. There is nothing difficult about making a garden sun lounger with your own hands. We have selected for you several options for easy-to-make sun loungers. Among them, it will not be difficult to choose a suitable model, which anyone can build.
This chaise lounge can be safely used instead of a bed: a flat surface, an adjustable backrest. What else do you need for an afternoon relaxation?! The only drawback of this design is that it is very problematic to move it around the site yourself.
Sun loungers of this design are very popular both among vacationers on the sea coast and among owners of suburban areas
But there is a way out! We suggest considering the option of a chaise lounge equipped with rollers. To make a sun lounger you need to prepare:
- 18 mm thick slabs of laminated spruce wood;
- Wooden beams 45x45 mm (for the frame);
- Boards 25 mm thick for cladding the sides;
- Jigsaw and screwdriver;
- Drills with a diameter of 40 mm for wood work;
- 4 mounting brackets for beds;
- Countersunk head screws;
- 4 rollers 100 mm high;
- Sanding sheet, grit 120-240;
- Varnish or paint for woodwork.
Plates of the required size can be purchased at a carpentry workshop or at the construction market. When choosing slabs, it is better to give preference to products made from coniferous trees, since they are more resistant to precipitation.
The size of the sun lounger depends on the wishes of its owner. In most cases, the design is made with dimensions of 60x190 cm. Having decided on the dimensions of the sun lounger, we make two long and two short sides from wooden blocks. We assemble the structure frame from them, securing them together using fastening angles. We cover the outer side of the frame with boards.
On long slats at a distance of 5-8 cm from the corner, we attach the legs of the chaise lounge, the material for the manufacture of which was bars 5-10 cm long
We fix the legs to the boards using screws 60 mm long.

We mount the wheels: we install rollers in the center of the short legs of the chaise longue, fixing them with screws 30 mm long, equipped with a semicircular head with a diameter of 4 mm
To make a wooden lattice, use a jigsaw to cut boards measuring 60x8 cm from the slabs.
We attach the slats to the bed using self-tapping screws, leaving a gap of 1-2 cm. To maintain the gap, it is most convenient to use special spacers
When planning to make a chaise lounge with an adjustable backrest, the lattice should be divided into two parts: the lounger and the headboard. We place both parts on connecting boards and fasten them together using a door hinge.

To arrange the fastening strip between the long beams of the chaise lounge frame, we fix the transverse rail. We fix the support stand on the mounting strip, fixing it on both sides with screws
The finished chaise lounge can only be processed by walking grinder, and open with varnish or paint.
We invite you to watch a video that shows how this chaise lounge model is assembled:
Option #2 – fabric chaise lounge on a frame
Another equally popular chaise lounge model that can be folded into an almost flat shape.
It is convenient to move a light chair around the site, choosing open sunny meadows for relaxation, or, on the contrary, shaded corners in the garden hidden from prying eyes
To make a folding chaise longue you need to prepare:
- Rectangular slats with a thickness of 25x60 mm (2 parts 120 cm long, two 110 cm long and two 62 cm long);
- Round slats with a diameter of 2 cm (one piece is 65 cm long, two are 60 cm long, two are 50 cm long);
- A piece of durable fabric measuring 200x50 cm;
- Nuts and furniture bolts D8 mm;
- Fine-grained sandpaper and round needle file;
- PVA glue.
It is better to make slats from hardwood species, which include birch, beech or oak. To make a sun lounger, it is better to use fabrics that are highly durable and resistant to abrasion. For example: canvas, tarpaulin, denim, mattress teak, camouflage.
Cut the slats to the required length. By using sandpaper carefully sand the surface.

According to the diagram, where A and B indicate the main frames, B represents the stop-regulator, we assemble the main structural elements
In the long slats of the main frames, at a distance of 40 and 70 cm from the corners of the structure, we drill holes with a diameter of 8 mm, and then grind them using a round needle file.
So that you can change the position of the backrest in the chaise lounge, we make 3-4 cutouts in frame B at a distance of 7-10 cm. To arrange the seat, we drill holes with a diameter of 2 cm, stepping back from the two ends of the slats. We install crossbars into the holes - round slats, the ends of which are pre-lubricated with PVA glue.
Let's start assembling the sun lounger: we connect parts A and B using screws inserted through the upper holes. Using the same principle, we connect parts A and B, only through the lower holes
The frame is assembled. All that remains is to cut out and sew the seat. The length of the cut is determined by the possibility of folding. A cut that is too short will not allow the chaise longue to fold, and a cut that is too long will sag when folded down. To determine the optimal length, you need to fold the lounge chair and measure the fabric: it should be slightly stretched, but without force.
We nail a piece of fabric with processed edges to the round slats located on parts A and B. To do this, we wrap the edge of the cut around the crossbars, and then fix them with small nails with thick heads. An option is possible in which “loops” are made at the edges of the cut and put on the crossbars.
Option #3 – Kentucky folding chair
The original chair is assembled entirely from blocks. If necessary, the chair can always be folded and stored.
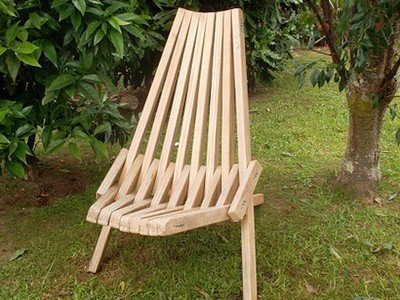
The advantage of this garden chair the fact that when disassembled it does not take up much space, while the design is designed in such a way that it allows you to completely relax your muscles
To make a chair we will need:
- Wooden blocks measuring 45x30 mm;
- Galvanized wire D 4 mm;
- 16 pieces of galvanized staples for fixing the wire;
- Fine-grained sandpaper;
- Hammer and wire cutters.
For making a chair, bars measuring 50x33 mm are also quite suitable, which can be obtained by sawing a 50x100 mm board into three equal parts. The total length of the bars should be 13 meters.
Instead of galvanized wire and staples, you can use galvanized studs, the edges of which are secured with eight nuts and washers.

To determine the required quantity and length of wooden blocks, it is convenient to use a summary table. According to the drawing, we make through holes
The diameter of the holes should be 1.5-2 mm greater than the thickness of the wire used. Having prepared required amount bars, you should carefully process all the edges, sanding the surface with fine-grained sandpaper.
Let's start assembling the structure.
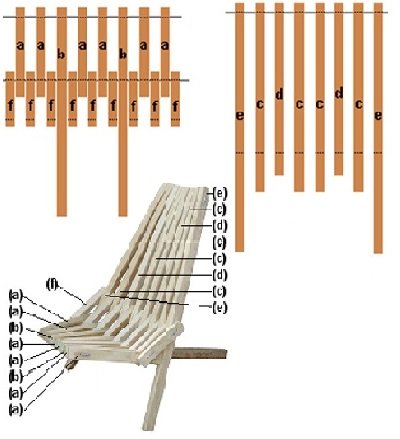
For clarity, we use the assembly diagram of the seat with dividers, as well as the back of the chair. The dotted lines indicate the locations of through holes with wire threaded through them.
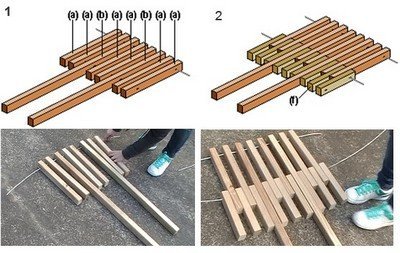
On flat surface According to the diagram, we lay out the bars for arranging the seat. Pass wire through through holes

Using the same principle, we assemble seats with dividers, connecting wooden blocks pieces of galvanized wire
The main structural elements have been assembled. We take the ends of the wire, holding the sides of the structure, and carefully lift the chair.
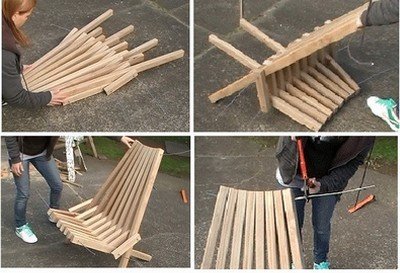
All that remains is to cut off the excess wire with wire cutters, and then bend and secure the ends with galvanized staples
Chaise lounge for the garden: 8 DIY models
The garden chair is ready. If desired, it can be coated with a semi-matte woodworking varnish. This will significantly extend the service life of such a popular element of garden furniture.


