Ventilation in the bathhouse is mandatory structural element. Without full air exchange and fresh air flow, even the highest quality wooden building can become completely unusable in 2-3 years. However, even in this short period of time, steamers will have to enjoy such “delights” as dampness, bad smell, lack of fresh air.
Therefore, the installation of a ventilation system must be approached with all responsibility. It is not difficult. Moreover, in most small private baths (especially with the “Russian bath” mode), natural ventilation is the most optimal. And its construction, unlike its forced analogue, will not require the installation of expensive fans. And in some baths it is generally created “on its own” - only through a suitable design of the steam room.
How does the natural ventilation system work?
Natural ventilation is driven by air convection, which occurs when there is a difference in pressure (temperature) in the room (bath) and outside.
According to the laws of physics, heated air in a room always rises, and cold air descends to the floor. the main task ventilation in the bathhouse - ensure an influx of fresh air (cold) and displace exhaust (warm). Therefore, when planning natural ventilation The inlet opening is usually located below the exhaust outlet. Then warm air, rising up, goes out through the exhaust shaft. At the same time, a vacuum (low pressure) is created in the room and fresh cool air is drawn in through the inflow near the floor. Gradually it warms up again, rises and displaces a portion of exhaust air through the hood. This ensures continuous convection and natural ventilation.
Vents, vents, and a stove chimney can be used as hoods in a bathhouse with natural ventilation. The flow of air is carried out through the crowns of the walls (in log baths), slightly open doors, and ventilation holes. Both supply and exhaust openings (vents, vents) are equipped with shutters or adjustable grilles. This helps control the air exchange in the room and prevent drafts.
There are several options for natural ventilation. Each of them has its own advantages, special functionality and some restrictions on use.
Option 1. Burst ventilation - ventilation
In small Russian baths, burst ventilation is common. This is ordinary ventilation, which is performed either after bath procedures or between visits to the steam room. Burst ventilation promotes rapid air change and drying of steam room surfaces.
During burst ventilation, the role ventilation holes perform a door and a window located on opposite walls. To change the air, they are opened for a short time after steaming (or between visits to the steam room). Depending on which direction the pressure difference is directed, air will move from the window to the door or vice versa.
The role of burst ventilation is to freshen the air in the steam room, but not to cool the walls. Therefore, the ventilation time is short - 1-2 minutes is enough.

Option #2. Ventilation with outflow through the chimney
A stove-heater with a chimney can become a driving force for ventilation. When fuel burns, exhaust air is drawn into the furnace ash pan and exits through the chimney. In order to allow fresh air to flow in, make a gap of about 5-10 mm at the bottom of the door. Or they don’t close it tightly during procedures. In log-house bathhouses, when the fire burns in the stove, air from the street is drawn in through loosely fitted lower rims.
Ventilation by means of air outflow through the chimney is only possible while maintaining the fire in the stove. If fuel combustion is not maintained during vaping (for example, in black saunas or in a short-term oven), air change will not be performed. A more versatile ventilation system will be required.

Option #3. Air exchange through vents
Air exchange performed through special vents is a universal type of natural ventilation. It allows you to gradually change the air in the steam room several times during the steaming period (ideally 5-6 times per hour). With proper planning of such ventilation, drafts and a decrease in surface temperature will not be observed.
The exhaust vent is usually located under the ceiling, above the top shelf. It measures 15-20 cm and can be square or round. The hood is closed with a removable plug or a sliding damper (door), with which you can change the size of the hood and the degree of air exchange.

A few more rules:
- It is not advisable to place the ventilation holes at the same level opposite each other. There is a high probability that fresh air entering the steam room will immediately fly out into the hood. This excludes full air circulation, but leads to the formation of a draft.
- The linear dimensions of the hood, ideally, should coincide with the dimensions of the inlet opening. Or be more. If the size of the hood deviates downward, new clean air will not enter the bathhouse.
- If you want to increase the outflow of exhaust air, the size of the hood makes the supply vent larger. Or they arrange 2 hoods for 1 supply hole.
For influx clean air in the steam room, an inlet opening is installed, as a rule, 0.2-0.4 m from the floor surface. It can be on the same wall as the hood, or on the opposite side. It is advisable to be near the stove so that the incoming air has time to heat up and enters the steaming zone already warm. The supply opening is covered with a ventilation grille so that air is drawn into the room in separate streams and not in a continuous stream.
Step-by-step installation instructions
The classic operating procedure is as follows:
- Two holes with transverse dimensions of 100-200 mm are made in the walls of the bathhouse. It is advisable to form the vents at the construction stage, so that later you do not have to carve them into the finished walls. One hole is made behind the stove (or next to it), at a distance of 20 cm from the floor. The other is on the opposite wall, diagonally, at a distance of 20 cm from the ceiling.
- Boxes are installed in the holes. They can be bought ready-made - made of metal or plastic. In log baths, it is better to use wooden boxes made from boards.
- A ventilation grille is placed on the supply opening, and a damper is placed on the exhaust opening. If one of the holes faces the street, an insect net is installed on the outside of the box.
But this order of work is not the only correct one - it all depends on what kind of structure you have and what kind of air duct scheme you have chosen.
Advantages and disadvantages of such a system
Among the advantages of natural ventilation, the most significant are:
- simple device and easy installation;
- low cost - natural ventilation does not require the installation of expensive forced fans;
- economical operation - allows you to avoid spending on electricity;
- reliability – the absence of mechanical devices makes natural ventilation practically “eternal”, not subject to breakdowns and not requiring repairs.
There are also disadvantages:
- dependence of the ventilation strength on the temperature difference in the steam room and outside;
- autumn and winter cold air, coming from the supply openings, reduces the temperature in the steam room, drafts may occur;
- smells from the street.
Agree, the shortcomings are insignificant. In a small bathhouse located on its own site, natural ventilation is the most rational decision. If there are no swimming pools or large washrooms inside, there is no point in overpaying for mechanical fans (for forced air exchange). If for some reason natural ventilation does not cope with the functions assigned to it, you can transform it into mechanical ventilation at any time - just install fans on the openings!
State standards for room ventilation are regulated by SNiP 41–01–2003; the document establishes the minimum rate of air exchange in rooms depending on their purpose and features of use. In residential premises, ventilation must perform two tasks - to provide favorable indicators of the percentage of oxygen in the air and to remove exhaust gases.
SNiP 41-01-2003. Heating, ventilation and air conditioning. File for download
For a bathhouse, ventilation tasks become more complicated; it must additionally remove moist air as quickly as possible (providing rapid drying of wooden structures) and regulate the temperature in the steam room. There are times when it is necessary to quickly reduce the temperature in the steam room before taking procedures for small children, the elderly or big people. Bake long time continues to give off heat, it takes a very long time to wait for the bathhouse to cool down on its own. By ventilating a room, you can quickly set the desired temperature and maintain it within the specified limits the entire time people are in it.

Ventilation valve prices
ventilation valves
What types of ventilation are there and how to calculate them
Ventilation can only exist in cases where there is an influx of fresh air into the room and an outflow of used air. You can often come across the concepts of “supply” or “exhaust” ventilation. These are not entirely correct concepts; there cannot be only supply or only exhaust ventilation, it is always only flow-exhaust. Why are these concepts used? This emphasizes that the supply or exhaust of exhaust air is carried out in a forced way, and, accordingly, the removal or entry of fresh air occurs naturally.

Supply – exhaust ventilation

When calculating the parameters of ventilation systems, the initial data takes into account the volume and purpose of the premises, the presence of special conditions based on air indicators, the presence or likelihood of the presence of carbon monoxide or other chemical compounds harmful to health. Based on these data, state regulations establish the frequency of air changes per hour; it can vary from 1÷2 to ten or more.

Next, engineers determine the parameters and location of the channels to ensure the necessary air intake and removal, taking into account weather conditions and climate zone. If natural ventilation cannot provide the required frequency of air changes, then use coercive systems, supplying/extracting air with electric fans. Baths have their own characteristics for each type of ventilation; let’s look at them in more detail.
Prices for supply and exhaust ventilation
air handling unit
General rules for ventilation in a bathhouse
The principles of ventilation in a bathhouse largely depend on the architectural features of its design. If the floors have slots for draining water, then supply air can also be supplied through these same slots; there is no need to make a special hole.

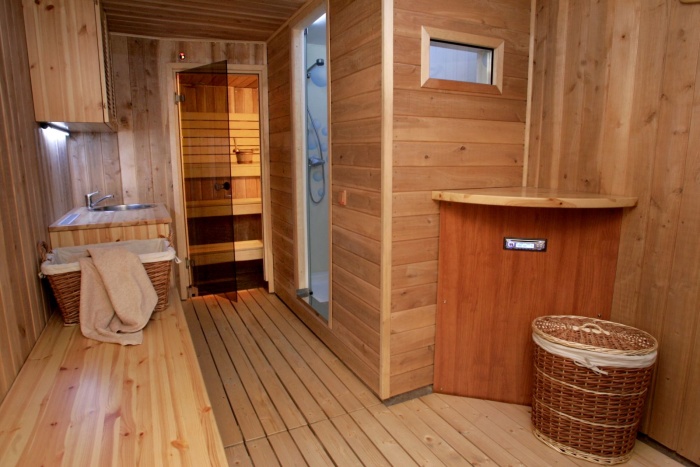
Quite often, small windows are installed in the bathhouse; when opened, they “turn” into exhaust vents. In addition, if the furnace firebox is located directly in the steam room, the room can be ventilated even easier - open the firebox and, by changing the position of the damper, adjust the frequency of air changes.

Photo - stove firebox and open door for room ventilation
These are the simplest options for a steam room (by the way, the most effective and low-cost), but there are cases when the furnace firebox is located in another room, there is no window, and the floors are solid without cracks. It is this kind of bathhouse that we will focus on in our article. Why do you need ventilation in the bathhouse?
- For better air mixing throughout the entire volume. Natural convection of air masses is not able to equalize the air temperature in height; the difference in values under the ceiling and near the floor can reach tens of degrees. This negatively affects the comfort of acceptance water procedures.
- To bring in fresh air. If one person is steaming in the steam room, and the stay time does not exceed 20–30 minutes, then the oxygen concentration in the air will not have time to drop to critical values. And if several people steam at the same time in a steam room for a long time, then the flow of fresh air becomes mandatory.
Quite often, developers go to two extremes: in order to save heat, they abandon ventilation altogether or make it too strong and unregulated. Both extremes have negative consequences; ventilation should not be neglected, it is cheap, and the positive effect is very impressive. But it should be done correctly, taking into account as much as possible the characteristics of the premises, temperature requirements in the steam room, materials for making walls and cladding.

In the case of a complete lack of ventilation, the risks of oxygen starvation and, if the furnace firebox is located directly in the steam room, increase in carbon monoxide poisoning. In the case of strong unregulated ventilation, the heating time increases significantly, and warm air is quickly removed from the room. But this is not all the problems - quick removal warm air automatically causes an equally rapid influx of fresh air - the floors will always be very cold, and this increases the risk of contracting colds.

Uncontrolled ventilation can lead to cold floors
The flow of fresh air into the steam room is arranged in two places: behind the stove or under the sun loungers.

There are many diagrams of air movement on the Internet, most of them were made by amateurs, you should not pay attention to them. Fulfill only two conditions: air flow at the bottom, exhaust at the top, placement of ducts diagonally in the room.


This is quite enough to ensure normal air circulation and mixing. Everything else is just speculation; it can only confuse inexperienced developers, significantly complicate the ventilation system, making it expensive and unreliable. There are options with two different-level exhaust valves, with two supply valves, etc. The holes for air removal are located at different heights.

One right under the ceiling, used only for complete ventilation of the bath after finishing the water procedures. The third is made 30÷40 centimeters below the first and is used during washing. Some craftsmen connect them together with internal air ducts, install several control dampers, etc. We assure you that these complications do not have any visible effect on the comfort of staying in the steam room.

A few words should be said about the ventilation ducts in the bathhouse; they are often suggested to be used in steam rooms. In large buildings, ventilation ducts serve to connect several different rooms to a common ventilation system, no matter whether it is natural or forced. This is completely justified from both technological and economic points of view.

What other rooms can be connected with ventilation ducts to the steam room? Weird question. Then, why make complex channels under the wall sheathing? Isn't it easier to make ordinary holes in the walls and insert ordinary pieces of pipes and grilles with elementary valves into them? Of course, we will tell you about a real, effective, simple and cheap way to install ventilation; we will not lay any ducts anywhere. This is a universal option, perfect for both “budget” and expensive exclusive doubles.
Prices for air vents
PVC air vent
Video - Ventilation in the bathhouse
Natural ventilation of the bath
The most accepted option for most baths, minimal in cost and safety and quite effective. The specific locations of ventilation openings should be taken into account the size of the rooms, the location of shelves, the stove and the material of the building. The general rule is that the openings should be located at different heights, as a rule, the inlet (supply) is 20 cm from the floor and the outlet (exhaust) is 20÷30 cm from the ceiling. When selecting holes, you need to consider where the holes will be located on external walls. It is advisable that they do not stand out too much on the façade walls.

The dimensions of the holes are approximately 300÷400 cm2, it is better to make them larger rather than smaller. In case of too rapid exchange of air, leading to a decrease in temperature in the steam room, the channels should be covered with control dampers. For improvement appearance It is better to use decorative grilles; they can be purchased in specialized stores or made independently.
We wrote more about this type of ventilation in the article “. We'll tell you how to organize natural ventilation, how to calculate and make ventilation holes.


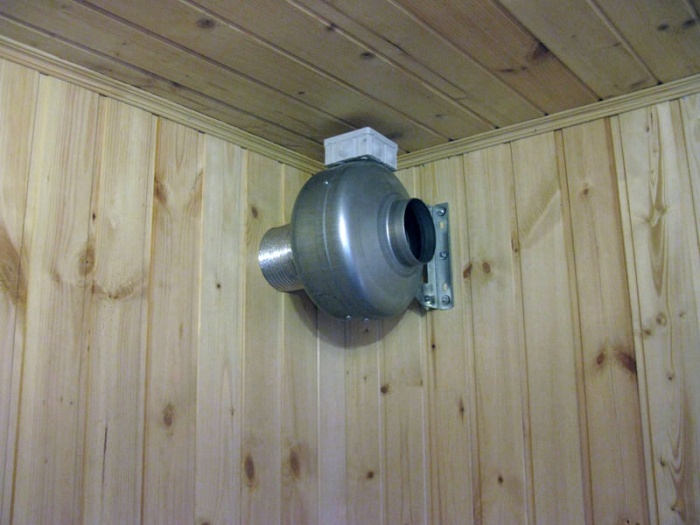
The ventilation system is somewhat complicated and installation of electrical equipment is required. Another problem is related to the microclimate in the steam room. There, high temperature and air humidity are the main enemies of any electrical equipment. Fans must have reliable protection housing from moisture, during connection you should strictly follow the recommendations of the PUE. And in order to comply, you need to know them.


Forced ventilation - elements
The advantages of forced ventilation are that the rate of air change in the room is significantly accelerated and the control parameters are expanded. Natural ventilation is very dependent on weather conditions, and in some cases it can become ineffective. Especially if the wind is directed at right angles to the exhaust vent. Forced ventilation works with the same effectiveness in any weather and regardless of the direction and strength of the wind.
How to calculate forced ventilation in a bathhouse and what type of ventilation it is? How to choose fans? We answered all these questions in the article “. There is also a detailed step-by-step instruction on installation of ventilation and advice from professionals.
How to make ventilation in a bathhouse with your own hands
Initial data. Architectural features baths do not provide for the flow of air through floor cracks, doors, windows or furnace fireboxes. It is necessary to make holes for both air inlet and outlet. Internal and outer skin There are no walls, the bathhouse is built from sawn timber.
Step 1. Decide on the location of the input and output channels.
We have already mentioned that it is better to place the inlet channel near the stove at a distance of about 20 centimeters from the floor level. The outlet channel is diagonally under the ceiling. This position of the inlet and outlet openings will ensure the distribution of air flows throughout the entire volume of the room. In addition, the incoming air will not cool the flooring. Channels should be easily accessible. There are recommendations to make an outlet hole in the ceiling. We are against such a solution; humid air will certainly cause great damage to the entire rafter system.

Step 2. Purchase or make your own grilles and valves.
They can be of various sizes and geometric shapes: round, square or rectangular. At the same time, take into account the materials of future cladding of external and interior walls, think about how the decorative grilles will be attached to them.

Important. Be sure to install grilles with adjustable clearances; only they can ensure smooth adjustment of the frequency of air changes in the room.
And one more thing - the holes on the outside of the bath should also be closed. Moreover, the closure should be as airtight as possible, preventing moisture from rain or snow from getting on the crowns of the log house.
Step 3. Make holes in the walls.

The most labor-intensive operation will have to be done manually. You need to pre-drill holes around the perimeter in the marked places. The closer they are to each other, the easier it is to hollow out the wood later. When the holes are drilled, take a chisel, chisel and hammer in your hands and begin to destroy the beams remaining between the holes. The holes for ventilation should be made 1-2 cm larger around the perimeter than the pipe being inserted. The fact is that this pipe then needs to be insulated to prevent the appearance of condensation on wooden structures.

Use only a sharp chisel and a chisel - you will have to cut the timber across the grain, this is quite difficult. If the thickness of the beam is 20 centimeters, then it is better to make half the depth of the hole from the inside of the bathhouse, and the other half from the outside. If you have extensive experience using a gasoline saw, then you can cut out the hole. But we immediately warn you that working with a gasoline saw in such conditions is very dangerous. You will have to cut with the end of the bar; when you grab the tree with the lower part of the chain, the saw will be pulled out of your hands. This method of using a saw is strictly prohibited by safety regulations, remember this.
If there is a need to separate the inlet hole in the wall and in the bathhouse, then buy a pipe with an elbow. It is advisable not to use round pipes, and rectangular, they occupy less space under the lining of the internal walls of the steam room.

Be sure to seal the joints between the elbow and the pipe with silicone and wrap it with tape for reliability.

Metallized adhesive tape
Step 4. Place foil or plastic film And mineral wool, the layer of cotton wool should be dense, without gaps. It will not be possible to make the edges of the hole absolutely even; be careful that the waterproofing is not damaged by the sharp protrusions of the timber.
Step 5. Insert the pipes into the holes in the log house. They should fit in with little effort, quite tightly. In order to increase the reliability of sealing and fastening, be sure to use foam around the perimeter of the hole and pipe. Polyurethane foam eliminates all invisible gaps in thermal insulation between the pipe and the wall and firmly fixes it in the desired position.
We recommend foaming the holes and after covering the walls, the foam will eliminate the gaps between the wall and the vapor barrier. As the foam expands, the vapor barrier will press tightly around the uneven hole, all possible small damage will be automatically closed.

The exhaust pipe may not be insulated; warm air escapes through it. But we advise you to do all the operations for her, just in case. Firstly, you will lose a little time and money. Secondly, you will provide additional and reliable protection against penetration wooden structures atmospheric moisture.
Once both holes are prepared, you can begin covering the walls and installing decorative grilles with adjustable throughput parameters.

Important. When installing steam room ventilation, we strongly advise you to ventilate the space between the wall cladding and the aluminum foil. The work is carried out according to the algorithm described above with one difference. Ventilation should be either constantly closed (during water procedures) or constantly open (during ventilating the bath). Using foil as a vapor barrier for walls has many positive aspects. But there is one problem - the difficulty of removing condensation between the sheathing and insulation. An ordinary hole solves all problems and completely eliminates damage to wood.
Prices for hoods for baths
heat-resistant fan
Video - DIY ventilation
How to make a hole in a log house using a crown
If you do not want to make holes for ventilation manually, you can drill them with a special metal crown. They are sold in stores and are inexpensive. The only problem is that the crown requires a powerful low-speed drill or a hand-held drilling machine; ordinary drills can quickly fail due to the heavy load. Another limitation is that the maximum diameter of crowns is rarely more than 120 mm. But for most baths, small volumes of this size are sufficient.


Step 1. Select a bit of the appropriate diameter and secure it in the chuck. Mark the drilling location.
Step 2. To ease the cutting force, be sure to lubricate the bit with machine oil. Lubrication must be repeated periodically. Once the bit is about two-thirds deep, stop drilling, remove the bit and re-lubricate its internal and external surfaces.
Step 3. Mark the center of the hole with any thin drill bit. Insert the crown into the shallow hole and begin drilling the beam.
Step 4. Drill as far as the crown height allows. Carefully monitor the operation of the electric tool and do not allow heavy loads. Loads are regulated by the force of pressing the crown against the beam.

Step 5. The crown no longer works - take it out and gradually remove the cut wood with a chisel or chisel. It can be removed quickly, start gradually chipping away the holes in the corners. Do not cut the log across the grain with a chisel; chop it only along the grain, this makes it much easier to do the job.

Repeat the operations until the hole becomes through. If the timber is so thick that the drill cannot get through one side of it, move to the other. To do this, you need to find the center of the hole already made as accurately as possible. The crown has its own centering drill, but its length may not always be enough to reach reverse side. You'll have to find the center yourself. To do this, install a thin wood drill in the drill, insert it into the existing hole from the centering drill of the crown and very carefully make a through hole. The more accurately you drill the center, the easier and faster it will be to work on the other side of the wall.
Prices for annular drill for wood
hole drill bit for wood
Video - How to drill a hole with a crown
Heated sauna ventilation
Enough original way ventilation devices, not only fresh air is supplied to the bathhouse, it is immediately heated. This is very important in winter; it not only improves the comfort of your stay, but also speeds up the heating of the premises and saves firewood.
Air intake is carried out at the bottom of the bath and using electric fans supplied to the air intake duct.

The stove has a metal chimney, a special screen is installed around the chimney, and air from the air duct enters the screen channels. The screen performs two functions: it protects the limbs from burns and serves as a radiator to heat the air coming from the air duct. The heated air exits the screen into the steam room.
If desired, you can improve the design a little. Place a tee with a damper on the air duct. This will allow you to take in both air from the bathhouse and from the street - the possibilities for regulating the microclimate parameters in the room are significantly expanded.

Video - Ventilation in a steam room with heated air
A high-quality ventilation system is an essential element of a steam room. The absence or improper organization of ventilation in the bathhouse is dangerous to human health. A properly equipped system will protect people from carbon monoxide and improve the comfort of staying indoors. We will talk further about the features and technology of installing a ventilation system in a bathhouse.
Characteristics of proper ventilation for a steam room
Proper ventilation in the bathhouse performs several functions at once:
- provides the room with oxygen;
- improves the comfort of staying in the steam room;
- deletes carbon monoxide;
- allows for economically efficient use of firewood;
- distributes air flow evenly;
- protects the building from the formation of mold or mildew.

The most the best option ventilation in the bathhouse is supply and exhaust. For these purposes, arrange:
- supply opening - through them an influx of fresh air is organized into the steam room, a fan with a ventilation tube is installed, additional air flow is provided by open vents or through the door;
- exhaust hole - removal of heated air from the room, through a firebox, blower or devices that improve draft.
To improve the supply and exhaust ventilation system use various ways. We invite you to familiarize yourself with one of the most effective ventilation systems:
1. The supply openings are located at the bottom of the room, next to the firebox.
2. Exhaust holes are strictly on the opposite side from above. It is possible to organize two holes at once for better air control.
3. The height of the exhaust opening determines the level of draft. If the ventilation opening is low, further strengthen the system with a ventilation pipe.
4. Using special dampers, the air supply from the room is controlled.
5. The air in the steam room is renewed every 2-3 hours.
In addition, the individual parameters of the ventilation system are determined by the type of room and bathhouse option. For example, in a Russian bathhouse, periodic ventilation will help to renew the air. In addition, the size and installation location of the firebox is taken into account; in relation to this parameter, two types of ventilation are organized.

How to make ventilation in a steam room with a separate firebox
We offer an option for organizing ventilation in a steam room, the firebox of which is located in an adjacent room. This scheme is popular in ordinary Russian baths. A furnace tunnel is used to lead the firebox into the adjacent room. Among the advantages of this arrangement of the furnace, we note:
- no trash in the steam room;
- the door to the room opens only upon entry;
- possibility of installing heat-resistant glass for admiring an open flame.
To install supply openings in a room, two methods are used:
1. Arrangement ventilation duct V underground space. Bringing it out in front of the furnace room, installing ventilation grilles on the duct.
2. Floor ventilation supply.
Install the hood on the opposite wall, diagonally in relation to the supply opening.
The main quality of organizing proper ventilation is that the supply openings must coincide in area with the exhaust openings.

Ventilation diagram in a steam room with an indoor firebox
If the stove-heater is located directly in the steam room, then the organization of ventilation occurs differently. In this case, air flows through the ashpit solve the issue of natural ventilation. This method is appropriate if the fire in the stove is constantly on.
If chimney There is no room in the bathhouse, and the stove operates in short-term mode; a more advanced ventilation system is used. Familiarize yourself with the technology of arranging a ventilation system in a steam room:
1. Build a special brick podium on which the stove is installed. With its help, a ventilation duct is connected to the stove.
2. Lay the ends, build another box of bricks. As a result, the first structure was installed at the top of the stove channel, and the second - to the steam room door.
3. On the wall adjacent to the regular room, build doors where the masonry passes through. They warm up the next room, if necessary.
4. A stove is installed on the podium; it can be mounted on a corner or on steel pictures. Finish the oven with brick, install a brick screen with two convection valves.
5. The exhaust ventilation system operates due to the furnace firebox.

Correct installation of the ventilation system is based on its correct adjustment. General rules for controlling the ventilation system:
- at the beginning of the furnace fire, all openings, both supply and exhaust, are closed;
- wait for the increase temperature regime, then adjust the ventilation holes with the valves;
- if it is necessary to increase the volume of oxygen in the room, open the inlet;
- Upon completion of work, open the doors for better ventilation of the steam room.
Steam room ventilation photo:

To determine the temperature and humidity in the room, use special instruments. An alcohol thermometer or electric type. Please note that the use of the mercury version is strictly prohibited. Use a hygrometer to determine the humidity level.
The operating principle of the ventilation system is based on the following factors:
- by heating the oven, the air gradually heats up and exits through the convection door;
- the bottom door remains open until the oven is completely warmed up;
- close the door from below and work with the top hatch;
- during the vaping process, only the blower installed on the box opens;
- After using the steam room for its intended purpose, ventilate the room well.

Do-it-yourself ventilation device in the steam room
The main functions of the ventilation system in the bathhouse:
- air supply during bath procedures;
- high-quality room drying.
The ventilation system in the bathhouse should not:
- violate the temperature of the room while taking bath procedures;
- separate temperature flows, that is, cool air is closer to the floor, and warm air is on top;
- remove unexhausted air from the steam room.
In addition, the lack of ventilation leads to the appearance of unpleasant air in the room, the formation of mold and mildew, which are harmful to human health.

Let us highlight three main types of ventilation in the steam room:
- a natural option is to supply air flows through a pressure difference;
- mechanical option - air supply using special mechanisms, when measuring these characteristics with instruments;
- a combined option - creating artificial pressure with fans and hoods.
There are two types of air transportation in a room: supply and exhaust. For these purposes, equip a hole located diagonally with respect to the inlet.
It is not recommended to install an exhaust vent in the steam room on the ceiling; this ventilation system increases the time it takes to warm up the room. It is rational to install the hood under the ceiling, additionally equipping it with a damper to regulate the draft.
In addition, provide a ventilated floor in the bathhouse. Thus, the period increases flooring, since it is in constant contact with water. Recommendations for arranging floor ventilation:
1. During the installation of the foundation base, ensure ventilation of the floors and build vents from the basement.
2. Build ventilation holes on opposite walls to ensure air flow. Install grilles on them to prevent rodents from entering.
3. The finished floor should be slightly higher in level than the ash pit is located. Thus, it will function as a hood.
4. Install wooden boards with a small gap, at least half a centimeter.
5. After taking bath procedures, ventilate the room well and dry the floors.
Another way to organize a ventilation system in a bathhouse is “According to Bast”. In this case, fresh air enters the room from the furnace space, and exhaust comes from an opening located near the door. For these purposes, build an exhaust duct made of wood, lined with foil inside.
Build a ventilation duct under the floor, next to metal sheet preventing heat from entering it. The size of the structure should not exceed twenty percent. Adjusting the flow of fresh air through such a system is quite simple. It is enough to open the ventilation hole and the blower. In addition, it is possible to avoid the accumulation of unpleasant aroma in the steam room. This method of organizing ventilation is appropriate if the firebox is located directly in the steam room.

DIY methods for organizing ventilation in a steam room
We offer five of the most popular organization schemes supply ventilation in the steam room:
1. Scheme No. 1.
Install the inlet under the stove 50 cm from the floor, and the outlet on the opposite side, thirty centimeters from the ceiling. Forced movement of air masses is provided by a fan. Thus, it is possible to ensure uniform heating of the air. The height of the first hole regulates the draft force of natural ventilation.
2. Scheme No. 2.
Two ventilation holes are located on one wall, always opposite the stove. The inlet is installed at a distance of thirty centimeters from the floor, and the outlet - thirty centimeters from the ceiling. Install a fan in the outlet, the cooled air entering the room collides with the stove, heats up and goes outside.
3. Scheme No. 3.
Place the inlet hole behind the stove, at a distance of about twenty centimeters from the floor. The inlet is installed at the same height, only near the ceiling of the opposite wall. A hood is installed in the second hole. The principle of operation of the system is based on cooled air entering the steam room, passing through the oven and being drawn out by a second hole.
4. Scheme No. 4.
This method is relevant for a steam room with a floor that has holes for water drainage. The inlet is installed behind the stove, and the outlet is a drain pipe through which the air is discharged outside.
5. Scheme No. 5.
Relevant for a bathhouse with a constantly running stove. The inlet is installed opposite the stove, and the ash pit with a chimney serves as an outlet
If you need to increase the temperature in the steam room, just close all the plugs. After taking bath procedures, they are removed. It is quite possible to organize these ventilation schemes yourself, without purchasing expensive devices and special material investments.

How to make a vapor barrier for a steam room with your own hands
Vapor barrier in the steam room allows you to maintain optimal temperature premises. Special materials in the form of vapor-proof films, insulation and waterproofing will help create high-quality vapor barrier. The film protects the insulation from the penetration of water vapor, while not allowing moisture in the hot air to pass through.
A well-equipped vapor barrier and ventilation system increases the service life of the room itself and its exterior finishing. Since hot air rises upward, first of all, properly vapor barrier the ceiling.
For these purposes, use racks, boards, about 6 cm thick. They are covered on top with aluminum-based foil, high-density cardboard or wax paper impregnated with drying oil. After fixing one of these materials, the ceiling is finished with clay and insulated.
In addition, it will help to vaporize the ceiling edged board. Cardboard impregnated with drying oil is installed on the boards, which is then lined with wooden clapboard.
Expanded polystyrene boards are a modern replacement for soft clay and have good thermal insulation and performance characteristics.
The following are used as vapor barrier materials for steam room walls:
- roofing felt;
- aluminum foil;
- glassine;
- polyethylene based film.

Glassine and roofing felt are rarely used for thermal insulation of steam rooms. This is explained by the fact that when heated strongly, they release toxic substances and unpleasant aromas. The steam room is vapor-insulated with special foil materials. There are combined methods of steam and heat insulation. For example, NPP polypropylene, among its advantages we note:
- excellent resistance to moisture;
- resistance to increased temperature;
- laminated coating prevents the development of mold and mildew;
- combined thermal vapor barrier.
In addition, it is possible to use rolled vapor barrier in the form of rolled foil or fiberglass boards. To seal joints between vapor barrier materials, use foil tape.
The plates are installed on the ceiling with a small compensation gap of 20 mm. This reduces the impact of moisture on these areas. Please note that the vapor barrier in the steam room must be securely hidden behind the main finishing material, and a high-quality ventilation system is its complement.
Ventilation in the steam room video:
The old days, in which people did not care in which bathhouse they took a steam bath, have already passed. Nowadays, it is important that this room performs its functions efficiently and correctly. Important points is ventilation in the bathhouse. This applies to both the floor and the entire steam room. It has been proven that the well-known healing effect that can be obtained from all procedures in the bathhouse is impossible if ventilation is not provided. Moreover, ventilation is important in all rooms: steam room, washing room, locker room and rest room.
It is important to remember that this is not just a whim - it is a necessity. After all, it concerns your health, as well as the health of your family. How can you make ventilation in a bathhouse? Is there any specific scheme? How to ventilate the floor in a bathhouse? You will learn all this further.
What is the correct ventilation design?
What is ventilation in general? Simply put, ventilation is the exchange of air in a room. It's no secret that the product of human exhalation is carbon dioxide. If the room is not ventilated, that is, fresh air is not supplied into it, then it will fill with this gas. At this time, there will be little oxygen in it. Then the atmosphere becomes “stuffy”, it’s hard and unpleasant for you to breathe. There are many consequences of this phenomenon, including severe headaches.
That is why it is important to ventilate the room, whether in a house or a bathhouse. The ventilation system functions quite simply:
- Openings (intake vents) are made in the bathhouse through which fresh air enters. Most often these holes are located at the bottom.
- When it mixes with the atmosphere in the room, which is much warmer due to the operation of the stove, a distribution of air flow occurs throughout the entire bathhouse.
- Other vents are made on top, through which exhaust or “stale” air exits the room.
Note! The ventilation outlet should be larger in size than the supply hole. Otherwise, fresh air from outside will not flow inside.

This is how the ventilation of any bathhouse is arranged. It is important to ensure good air exchange to ensure a pleasant and comfortable stay. It is important to consider several points:
- exhaust vents should not be installed in the ceiling, as the room will cool down very quickly;
- the sizes of all ventilation holes are selected taking into account the size of the room (for 1 m 3 you need 25 cm 2);
- It is imperative to make valves on the holes, thanks to which you can regulate the flow.

Properly performed air exchange should constantly provide the room with fresh air in order to enhance the healing effect of vaping. In addition, due to it, after all procedures, the room can quickly dry out. Since we are talking about wooden bath, then moisture can damage the material. If ventilation is done correctly, you can avoid the following consequences:
- Temperature reduction due to the intake of cold air from outside.
- Negative impact on the distribution of heat flows.
- Removing hot and humid air from the steam room, which does not contain carbon dioxide.

But there may be more than one ventilation scheme. There are several of them.
Types of ventilation in the bath
Depending on the device, room ventilation may vary. There are 3 main types:
- Natural.
- Mechanical.
- Combined.
The natural ventilation pattern is the one we discussed above. Everything happens naturally, due to temperature differences, according to the principle of convection. In addition, this includes the effect of wind pressure through cracks in the wall, window and door openings.

If we talk about the mechanical system, then all the work is done by special devices (fans), which extract exhaust air and fill the bath with fresh air. Accordingly, a combined system is a combination of these two types together to enhance the effect.
Advice! It is especially important to ventilate the floor and bathhouse for those who have stoves powered by gas or liquid and solid fuel. To maintain the combustion process, these units take oxygen from the bath.
Is it necessary to ventilate the floor?
Why is it so important to make ventilation under the floor of the bathhouse? The thing is that this promotes air exchange in all sections. Most often, wood is used to make the floor in a bathhouse. Since it will constantly interact with water, it must be removed. If you do not dry the floor, then after 5 years it will simply become unusable. And no one wants this. How can you ventilate the floor in a bathhouse? Is there a specific pattern?
Yes, here's what you need to do to ensure quality ventilation of the base:

But in order for the floor ventilation system in the bathhouse to function as it should, it is necessary to provide a full range of ventilation. Let's find out how to naturally ventilate a bathhouse.
Arrangement of natural ventilation
Why are we looking at this view? Because it does not require large investments and is quite effective. To do everything correctly, you need to take into account some points and rules. So that you can understand how this scheme is made, look at the photo below.
Let's start by placing the holes through which air will flow from outside. They should be located at the bottom of the steam room, next to the stove. For what? So that it warms up and does not cool the room. Then you will need more fuel to heat it. In addition, vents do not need to be made with dampers; they must be open constantly.
The second hole, the exhaust hole, should be placed on the opposite wall or diagonally. It is important that it is larger than the bottom one. For what? For normal functioning. As for the placement, we said that it should not be done on the ceiling. Step back 30 or 40 cm and make it into the wall. But in this exhaust hole you can install an adjustable valve, which you can buy in the store. The air that will be drawn out of the steam room can be directed into the dressing room, saving on its heating. This is an option. In another case, it is brought to the roof through a pipe system.
In order for bath procedures to bring only benefit and pleasure, two conditions are necessary:
- high level of temperature and humidity in the steam room;
- the presence of sufficient oxygen.
These seemingly mutually exclusive tasks are solved by ventilation in the bathhouse in general and in the steam room in particular. Despite the fact that high humidity and temperature must be maintained in the steam room of a Russian bath, it is impossible to do without access to fresh (cold) air: oxygen is processed by our lungs, partially burned out by the stove, and carbon monoxide (CO) gradually accumulates in the steam room. chemical formula carbon monoxide).
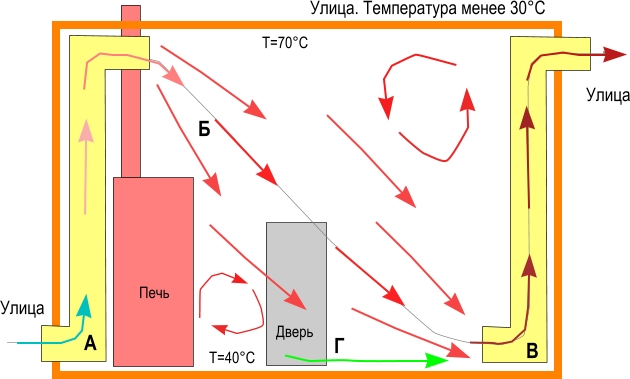
How to properly ventilate a bathhouse. In the figure, red arrows show the movement of hot air, blue arrows show cold air.
If you do not organize the replacement of “exhausted” air with fresh air, instead of improving health and increasing performance (this is what we go to the bathhouse for), you can get, at best, lethargy, weakness and headache, and at worst - a hospital bed or even a place in a cemetery.
Properly arranged ventilation ensures air circulation, while oxygen is supplied in sufficient quantities, and carbon monoxide and carbon monoxide are released into the atmosphere. After completing the bath procedures, with good ventilation, the vapor is actively removed outside the building, and the rooms that previously had high humidity dry out. If this aspect has not been given enough attention, after a couple of years in the steam room, and then in other rooms, the lining rots, the smell of mustiness and sweat appears and gradually intensifies, and the wood turns into dust. Now, I hope, it is clear whether ventilation is needed in the bathhouse...
 Warming up and ventilating the bath. Please note that the exhaust vent is located at a small height from the floor - usually no higher than 50 cm. With this scheme, exhaust steam is released into the atmosphere. Moreover, the floor in the steam room warms up well
 Ventilation in a bathhouse is not needed only in one case: if it is all built of wood and has not been insulated anywhere - neither from the inside nor from the outside. In this case, air exchange occurs due to the fact that the wood “breathes”. In this case, they also talk about the presence of natural ventilation in the bathhouse: any wood has pores and cracks through which air flows out/flows and temperature and humidity are regulated. But if the bathhouse is made of rounded logs or has insulation or moisture/steam insulation, then the creation of additional ventilation holes is necessary.
There are three types of ventilation:
- Mechanical ventilation. In this case, the inflow and outflow of air masses occurs due to artificially created air movement. Air parameters are controlled by technical means.
- Natural ventilation: circulation occurs due to the difference in pressure inside and outside the room. This method is only possible if there are “breathing” walls or thoughtfully arranged ventilation vents.
- Combined ventilation: simultaneous use of the natural movement of air masses and technical devices(in the simplest case - fans).
The video below shows the combined ventilation option.
In a specific case, during the construction of the ventilation duct, we used aluminium foil 100 microns thick.
Ventilation device in baths
In the very simple version, the ventilation system of a steam room or bathhouse consists of two (sometimes more) openings in the walls and/or foundation: supply and exhaust. The trick is in choosing the location of these holes and their sizes. Sometimes, to ensure more active air exchange, fans can be installed.
 Warming up and ventilating the bath. In the simplest case, the exhaust vent is located near the ceiling
 There is no single ventilation scheme for a bathhouse: they are too different, depending on design features, and the materials from which they are made. But there is general rules and several of the most common schemes, following which you can choose the optimal ventilation specifically for your case.
The dimensions of the ventilation holes are calculated based on the volume of the steam room: per one cubic meter ventilated area, the size of the holes should be 24 cm 2.
Despite the fact that the main task in the bathhouse is to maintain high humidity in the steam room and a sufficient temperature level, the ventilation holes should not be made too small: they will not provide the necessary level of air exchange. Exhaust ventilation openings must correspond to the size of the supply ventilation openings: if the proportions are not correct, the air exchange will also be insufficient. In some cases, to speed up the removal of exhaust air and speed up the drying of the bath, you can make two exhaust holes.

To ensure the required air conditions when heating the steam room, special covers/plugs are made on the ventilation ducts, which can be opened/closed from the steam room, thereby regulating the humidity/temperature/air exchange. Generally speaking, the presence of plugs or covers on any ventilation hole facing the street is mandatory: in winter, cold air actively tends to warm room and the presence of covers or regulators to delay it is necessary.
Where can there be supply and exhaust openings?
Most often, it is at least partially located in the steam room. In this case, the supply hole is made near the stove at a distance no higher than 30 cm from the floor. The incoming cold air quickly heats up from the stove and rises. It's quite popular, but not the most The best way organizing ventilation for the bathhouse. Much ventilation is more efficient in the case when the supply openings are located in the foundation under the floor (to prevent rodents from entering through them, the openings are equipped with metal gratings). This option solves two problems at once: it delivers fresh air to the bathhouse, and also effectively dries the floors and walls after completing the procedures. The floor boards, in this case, are not laid closely, but with a small gap for free passage of air. If you don’t want to leave gaps in the floor (although this is very good for a bathhouse), you can make several ventilation holes in the floor, covered with wooden grates. In this case, the air movement will not be so active; more powerful fans, but the circuit will remain operational.

When planning supply ventilation holes in the foundation, keep in mind that air into the bathhouse should come from the street, and not from the underground, otherwise it will have a musty smell. To organize air intake from the street, a box made of wood (often homemade), plastic or metal (ready-made) is placed in the hole, and it is also taken out near the stove. Typically, the inlet openings are located in an area that is protected by a metal or asbestos sheet from coals and firebrands.
Ventilation holes in the foundation are provided at the planning stage. If the foundation is already ready, but there are no holes for ventilation, you can ventilate the floor in the steam room differently: lay the floor boards on the joists, but not close to each other, but with a gap of 0.5-1 cm. In the gap between the rough (earth/concrete) floor and the finishing floor, an outlet is installed, which goes into a ventilation pipe that discharges exhaust air to the roof (but not to the attic). This option provides for the presence of only one supply hole, which is usually located below the heater. The exhaust pipe under the floor is installed on the opposite side of the room (but not opposite, but diagonally).
It is impossible to make an exhaust pipe in a steam room from plastic boxes for ventilation - they cannot withstand high temperatures, but use them in the locker room or washing department acceptable.
With this ventilation scheme in the steam room, cold air warms up near the stove, rises, then, cooling, falls down, seeps under the floor through cracks in the floor and is discharged through the outlet pipe. These two options effectively remove moisture after a bath; they can also be considered floor ventilation schemes in a bath.

Exhaust openings can be located on the wall opposite the supply opening (if both of these walls face the street) or on the same wall, but in the opposite corner. There is a scheme in which they are located at the top on the opposite wall (30 cm from the ceiling), sometimes they are located at the bottom (30 cm from the floor). If the exhaust vent is located below or on the same wall as the supply vent, a fan is needed to create air flow.
To ensure that ventilation in the bathhouse remains effective, you must not:
- make ventilation vents smaller than the calculated ones;
- Place the supply and exhaust openings one opposite the other - this way the incoming air is removed almost immediately without releasing oxygen, a draft is formed, which is contraindicated for a bath.
Steam room ventilation schemes
Let's consider several of the most common ventilation options in a steam room:


These are the most commonly used ventilation schemes for steam rooms in a bath; there are many more variations and combinations of them. Based on these four options for organizing ventilation, you can develop a scheme for your steam room.
Ventilation in the washing compartment of the bathhouse
In a washing room, high humidity is common, and to prevent the lining from rotting or creating an unpleasant odor, it is necessary to provide ventilation for the floors. It is arranged similarly to floor ventilation in a steam room: an exhaust hole is made between the rough and finished floors, which can be equipped with a fan. Exhaust pipe is displayed on the roof.
With this floor ventilation scheme in the washing compartment, the coldest exhaust air is removed, and the warmer air is lowered in its place. upper layers. In this way, an increase in the comfort of the people staying here is also achieved.

The principle of ventilation in all other rooms of the bathhouse is the same. We need to decide on optimal system ventilation specifically for your conditions and select/develop the most suitable scheme. Ventilation in the washing compartment differs only in that, due to lower air temperatures, plastic ventilation ducts can be used here (which cannot be done in a steam room) and fans can be installed that are not heat-resistant, but only those that can withstand high humidity (moisture-proof).
Ventilation of brick and Turkish baths
When planning a ventilation system for brick bath It must be taken into account that its efficiency should be several times higher than that of wood. Indeed, in this case you will have to dry not only interior lining steam room/washing room/locker room, but also walls: brick is a very hygroscopic material. To remove all moisture, it is necessary that the inflow/outflow of air during drying be very active, and the vents have reliable dampers that allow you to regulate the intensity of air movement.
When installing ventilation with its 100% humidity, exhaust ventilation must also be very effective: in an hour of operation it is necessary to ensure a six-fold change of air in the room. In addition, it is necessary to provide for the possibility of removing condensate, which forms during cooling in large quantities. This problem can be solved in two ways: install an air dryer in the pipe, which discharges condensate into the sewer system, or provide ventilation pipe a channel for draining condensate (it also goes into the sewer).
Conclusion: it is necessary to plan ventilation at the bathhouse design stage, placing inlet vents in the foundation. If necessary, you can make vents in finished walls, but this is quite troublesome and complicated.