When repairing and equipping a house or apartment, the most difficult and costly process is replacing the sewer system. Sewerage installation must be carried out in accordance with all rules and regulations; this is the only way to guarantee its high-quality and long-term operation. In this article we will look at how to do the wiring yourself.
Sewage installation
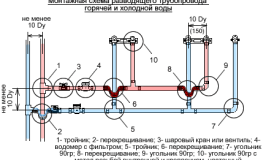
1 Sewerage layout and its connection with the home plan
Today, sewerage is an integral part of comfortable living. But what to do if the apartment or house you bought does not have a sewer system? In this case, you need to either hire a specialist to solve this problem, or solve it yourself. The second option will be discussed.
The sewerage system is closely tied to the layout of the home, so the first step is to draw up a diagram. It is necessary to take into account that all plumbing fixtures must be connected to a single pipeline. Through it, water will flow into the central sewer or cesspool. If the house or apartment is two-level, then it will be necessary to install risers.
Important! The sewerage wiring diagram is the most important part of the work. In this regard, it is better to entrust it to a design engineer.
When designing the wiring, the following points must be taken into account:
Number of plumbing fixtures;
Methods of water supply;
Depth of soil freezing;
Wiring diagram in an apartment or house.
2 Calculation of the angle of inclination
The main problem of wiring is to make the pipes straight and position them with a slope. This slope is necessary to ensure that the liquid flows in the desired direction. Also, the angle of inclination plays a big role in the process of self-cleaning pipes. The angle of inclination of the pipes is calculated according to the following standards:
Pipe diameter 40-50 millimeters – slope 3%;
Pipe diameter 85-100 millimeters - slope 2%.
So, for example, if the drain hole is located at a distance of two meters from the entry point into the riser, the sewer pipe for draining the water should be at a height of six centimeters in relation to the opposite end. The angle of inclination must be taken into account when installing each individual device. It is necessary to take into account that the further it is located from the central riser, the greater the slope.
3 Sewerage installation
Having figured out how to draw up a diagram, you need to consider how to lay out the sewerage system and what 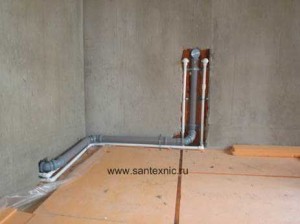 materials to use for this. For these purposes, polyvinyl chloride, polyethylene and polypropylene pipes. Cast iron pipes are rarely used, as plastic ones are more durable and easier to install.
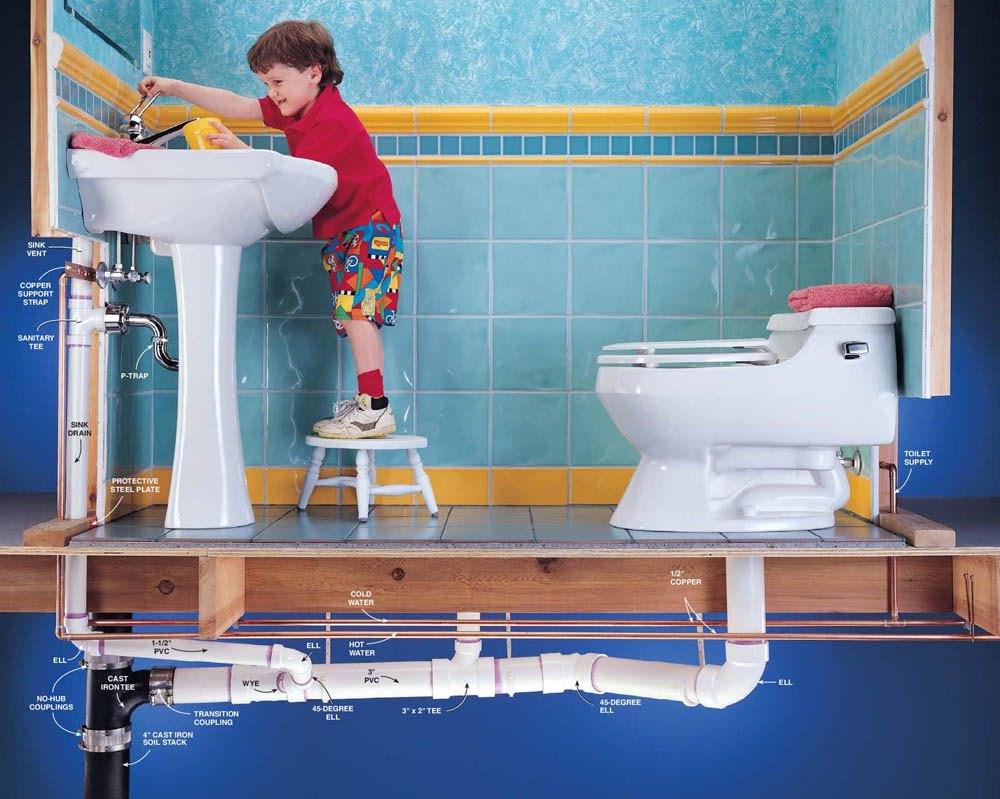
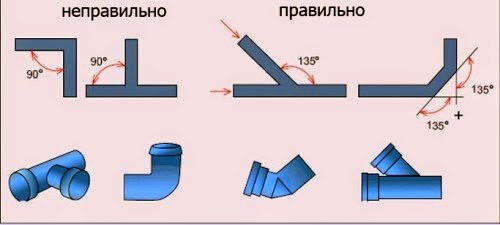
Do-it-yourself sewer installation is quite simple. To do this, each pipe section at one end has coupling. The other end of the pipe can be cut to the required length. Next, the prepared section is inserted into the coupling of another section and connected tightly. When making turns in the system, it is better to use connectors at 45 degrees rather than at 90. This is due to the fact that when right angle the liquid may stagnate, while with a gradual turn it will flow freely.
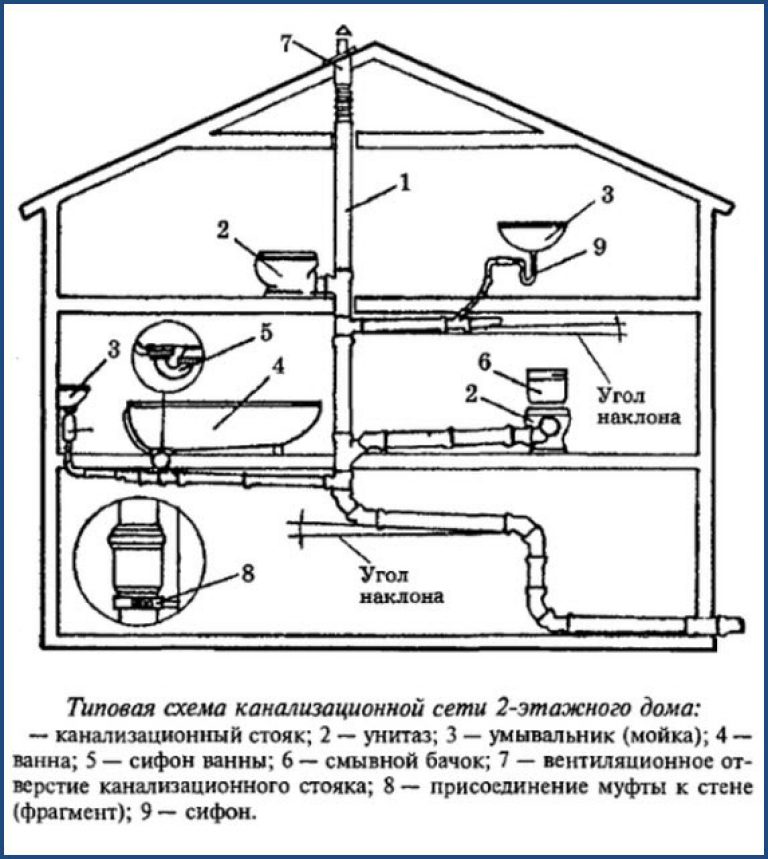
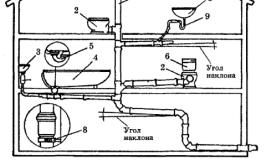
Sewerage in a private house with several floors and apartment buildings consists of the following elements: risers, collectors, exhaust pipes, networks inside the home and outlet pipes from bathtubs, toilets, sinks. The wiring diagram for almost all buildings is the same: it starts from the kitchen, runs through the bathroom and toilet and connects to the common riser of the house.
Note! Over time, the pipeline will decrease in diameter due to the accumulation of dirt and possibly become clogged. In this regard, it is necessary to do the installation in such a way that repair or replacement of pipes can be freely carried out.
Independent sewerage installation in a private house
Internal sewerage, first of all, is intended for the removal of wastewater that is formed during human use of water, as well as in the process of other household and sanitary-hygienic activities. The internal sewerage distribution in a private house is usually a gravity system, that is, a system in which movement Wastewater produced under the influence of gravity. This system is good because it does not require additional energy consumption.
What does a classic interior consist of? sewer system
To prevent odors from penetrating into living spaces. sewer pipes, almost every element 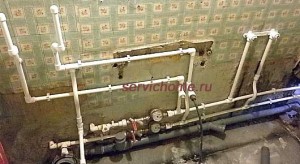 system (plumbing fixture) is equipped with a hydraulic shutter or, simply, a siphon.
In addition, the system internal sewerage requires provision of free air access, which in practice is achieved by installing ventilation risers or so-called fan risers.
Almost any internal sewage system of a private house consists of the following list of required elements:
Tanks for receiving waste water;
Installations for pumping or treating wastewater;
Collectors;
Pipelines;
Stoyakov;
Branch lines.
In country houses in which the bathrooms are located at an impressive distance relative to the riser, installing a gravity-flow internal sewerage system is not always possible.
In such cases, it is better to use a system that will consist of a special container, a pump and a switch. Through such a system, wastewater will be drained through a special pipe.
Means for sewer installation
Internal sewer network diagram
First of all, fully equipped internal sewerage distribution in country house requires the purchase of a sufficient number of pipes and fittings.
You should also buy reverse and air filter, if their presence is provided for by the project.
What other materials and tools may be useful for installation and wiring of internal sewerage:
A grinder equipped with a special disc for cutting pipes;
Hacksaw for metal;
Pipes 110 mm in diameter for installing a sewer riser;
Pipes with a diameter of 110 mm for draining wastewater from toilets and bidets;
Pipes with a diameter of 50 mm, necessary for draining wastewater from household and plumbing fixtures.
Advice! Outlet pipes of all types must be installed with a certain slope: pipes with a diameter of 50 mm - with a slope of 2.5-3.5 cm per meter, pipes with a diameter of 110 mm - with a slope of 1.2-2 cm per meter.
Installation of internal sewerage
Installation of sewer pipes is a long and labor-intensive process that requires compliance with certain sequences of actions, accuracy and thoroughness. How well the system is designed and installed will determine its further performance, as well as the reliability and duration of operation.
Naturally, in order to get a truly high-quality result, you need to turn to professionals who know all the intricacies of the process. However, do-it-yourself sewer installation is also quite possible.
Before you start installation work, it is recommended to install first 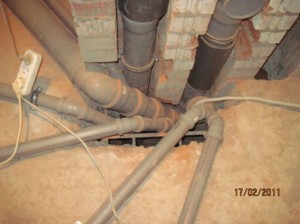 internal water supply and sewerage.
Both installation and subsequent operation of the sewer system require full compliance with these rules.
The sewage system must be installed in accordance with the approved project. When drawing up a project yourself, it is necessary to demonstrate it to a specialist to identify possible deviations from the norm.
If the project is approved, you can begin purchasing the materials necessary for installation.
Installation of sewer risers
Internal sewerage begins to be installed from the risers:
First, markings are carried out in accordance with the developed plan, and then they begin to install the sewer pipes with their own hands.
When installing the riser, they try to maintain its strictly vertical position, as well as to prevent fractures and distortions at the pipe joints.
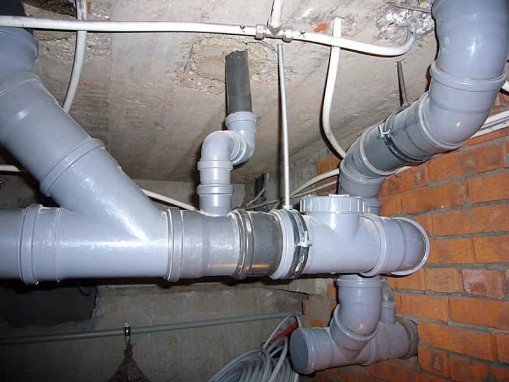
Pipeline installation is carried out by installing pipes with sockets up and starting from basement with the simultaneous arrangement of audits. Inspections are tee-type fittings that provide free access to areas of the pipeline that are in an area of increased risk of blockages.
Typically, inspections are installed at all places where the pipeline turns, at the beginning of the riser in each room, and also at the end internal system sewerage. When installing long linear pipelines, such fittings are placed at a distance of no more than 30 meters relative to each other.
If they plan to make the riser sewn up, then when installing the inspection, be sure to ensure that there is an inspection hatch intended for servicing the sewer pipeline.
At the end of any sewer riser, ventilation must be installed, which is vented to the roof or a ventilated attic in the form of an individual ventilation channel. For safety reasons, it is highly recommended not to vent the ventilation part of the sewerage system into the chimney network of the house.
Simultaneously with the riser, horizontal branch lines are installed on each floor.
Advice! The sockets of the risers should not be located in places where they pass through ceilings, as well as other types of building structures.
Installation of branch lines
After installing the sewer risers, drain lines from all sanitary fixtures (bathtubs, toilets and other equipment) are connected to them.
For this purpose, plastic or cast iron pipes, intended for internal sewerage distribution. Their diameter must be identical to the outlet diameter of each of the plumbing fixtures.
Sewerage distribution around the house requires a maximum length of drain pipes of ten meters, and their angle of inclination should be such that there is no difficulty in the free movement of wastewater to the riser (usually about 3 cm per linear meter pipeline length).
When laying sewer pipes, mechanical processing of pipes and pipes is carried out using hand saws for metal and fine-toothed hacksaws for wood.
The cut is made perpendicular to the central longitudinal axis of the pipe. Burrs formed during sawing must be removed and chamfered using a file with a large mesh.
If necessary, each component of the sewer system is treated with special lubricants (or soap solution). The use of machine oil, as well as its derivatives, is strictly prohibited.
If you follow the rules of SNiP, as well as all building codes and regulations during the installation of the internal sewerage system, you will be able to achieve its long-term operation without additional noise and frequent blockages, leading to exhausting cleaning, replacement of deformed pipes, as well as other types of troubles.
Sewerage installation in a private house: once and for all
A characteristic feature of a private house is the maximum autonomy of life support systems. IN ideal nothing is delivered to the site (except, perhaps, fuel once a year), nothing gets into the environment. And one of the most important elements of providing convenience is wiring 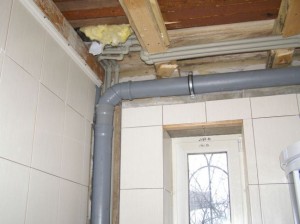 sewerage in a private house, made taking into account all the requirements of plumbing and common sense.
The rules for drainage installation are not too complicated, but they must be known and followed during the work. How to do this and get a working and durable system will be discussed in this article.
Sewerage layout in a private house A sewerage diagram in an apartment or country house is drawn up together with the design of the entire building as a whole. The type of system, placement of instruments and communications, and the order of drainage are determined.
Therefore, if there are no deviations from the original plan, the owner of the house can only install the pipelines and connect the final devices at the required stage of construction.
Since humanity has been laying sewer systems for more than one millennium, all principles and technological techniques have been worked out to perfection, and at the same time they are quite simple.
They are as follows:
Maintaining sufficient slopes of sewer pipes in all areas
Correct sequence of connecting devices
Selection of diameters appropriate for purpose
No sharp bends where dirt can accumulate
Installation of inspections, cleanings and other maintenance items
Proper disposal of biogases
Protection of external highways from freezing
Sewerage installation must be carried out in compliance with all sanitary and construction standards. These requirements are not complicated, but it is necessary to know them and fulfill them.
Otherwise, instead of an effective and working system, you can get a constant “ headache» related to the removal of blockages and sewer repair. Sewage in a private house is most often gravity-fed, that is, the movement of wastewater to treatment plant occurs under the influence of gravity.
Main elements of the internal sewer system
The internal system consists of such elements as:
- plumbing fixtures;
- collectors;
- pipeline;
- riser;
- branch lines.
To prevent unpleasant odors from entering the room, all plumbing fixtures are equipped with a siphon. Also, to provide access to the air pipeline, so that a vacuum does not form in it, a ventilation riser, the so-called -, is installed.
Internal sewerage wiring diagrams
Drawing up a sewer distribution diagram should be done at the design stage of the house itself. It is advisable to place the rooms where there will be water supply (bathrooms, kitchen, etc.) as close to each other as possible, so that we can limit ourselves to one riser.
On a note!
The simpler the circuit, the more reliable and efficient the system.
If it is not possible to place rooms with plumbing fixtures compactly, you will have to use a special pump or make several risers.
Video: How to lay sewer pipes in a private house
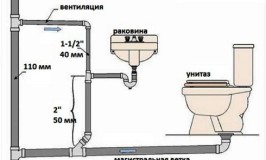
- For a drainage device from a sink, bathtub, sink, shower stall, etc. pipes with a diameter of 50 mm are used.
- The drain from the toilet is made from.
- A pipe of the same cross-section as for the toilet is used for the riser.
- For installation it is better to use plastic pipes, they are cheaper and easier to work with. At the same time, in terms of quality and durability, they are in no way inferior to, for example, cast iron.
- The pipeline must be laid with a slope: for pipes ∅ 50 mm - 2.5 - 3.5 cm per 1 meter, pipe ∅ 110 mm - 1.2 - 2 cm per 1 m.
- The riser must be equipped with revisions or a drain pipe.
On a note!
The location of the devices depends on the diameter of the outlet pipe: the larger the outlet, the closer this device should be to the riser. Usually the toilet is located closest.
Drawing up an internal wiring diagram
To draw up a detailed diagram you need: a sheet of paper, a pencil, a ruler and a tape measure. Armed with such a simple tool, let’s get down to work, which is performed in the following sequence:
- Drawing up a house plan - you need to take all the dimensions with a tape measure and transfer them to paper.
- Selecting the location of the riser or several, if necessary.
- Marking the locations of installed plumbing fixtures.
- The location and size of the pipes that will come from the plumbing are marked. devices to the central riser. In addition, it is necessary to note the installation locations - tees, crosses, etc.
Material for sewer installation
To install a fully functioning system, it is necessary to purchase a sufficient number of components, such as pipes, fittings, etc. Materials that will be needed for the installation of internal sewerage wiring:
- pipes – ∅110 mm for the riser and toilet, ∅50 mm for outlets from plumbing fixtures;
- tees;
- crosses;
- return and air filter (if provided for by the project);
- adapters with transition ∅110 to ∅50 mm;
- revisions.
Assembling internal wiring
Having the diagram available and having purchased the required amount of material, you can begin assembly. Installation of internal sewerage is not difficult, taking into account the use of plastic pipes.
The pipeline is assembled into a socket, and there is no need to use special tools. Installation of wiring begins with the installation of risers.
Installation of risers
Assembly is carried out according to the diagram:
- Marking is carried out in accordance with the plan.
- The installation is done strictly vertically, and without fractures or distortions at the joints.
- Work on laying the pipeline begins from the lowest point (for example, a basement), the pipes are installed with the socket up while installing revisions.
- At the end of the riser it is arranged ventilation tube, which is led out through the roof or into the attic. Sewage ventilation must not be vented through the chimney of the house.
- Simultaneously with the riser, horizontal outlet lines (beds) are also installed.
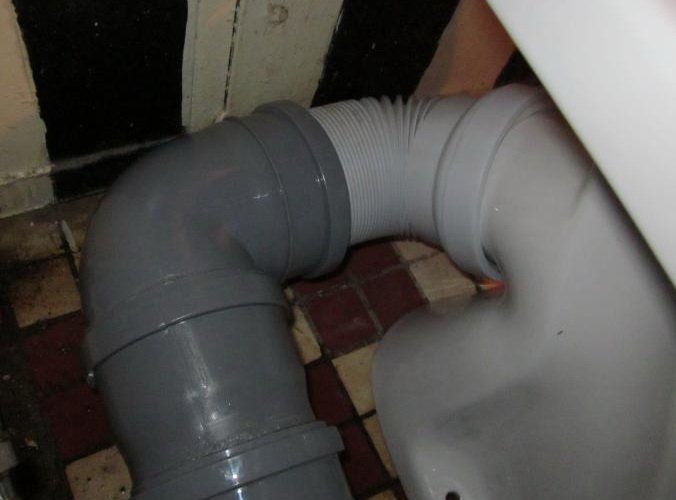
Installation of bends
Branch lines connect plumbing fixtures to the riser. They use plastic or cast iron pipes intended for internal sewage. The diameter of the pipes must match the outlet diameter of each device.
Cut pipes and pipes of the required length with a hacksaw for metal and wood with small tooth. Burrs must be cleaned and chamfered with a file.
If necessary, the connection elements are treated with special lubricants or soap solution. To avoid sagging, the pipes are attached to the wall with clamps.
Sewer installation, regardless of whether it is done in a private house or apartment, is a responsible job. If you make mistakes when drawing up a diagram or installation, the sewer will become clogged. If you are not one hundred percent sure that you can handle this on your own, it is better to turn to specialists.
Video: Example correct device sewer system of a private house
Everyone who builds his own a private house, is faced with the need to lay and connect various communications - gas, electricity, water, sewerage. Today there are a lot of the most popular ones on sale. different materials and devices - tools for laying sewerage in a private house. Today, for a person with hands and a head, it is quite easy to install a sewer system with your own hands. To do this you need the necessary materials and tools.
Materials for work
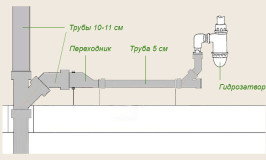
So, the first thing you need for work is sewer pipes. Currently, PVC pipes are mainly used for sewerage installations. They are mainly divided among themselves by quality and cost - from inexpensive domestic to expensive imported ones and differ in diameter. They also subdivide pipes for internal and external sewerage. For laying sewerage in a private house, pipes with a diameter of 40 to 100 mm are mainly used.
PVC sewer pipes use a socket connection, that is, on one side of the pipe there is a small expansion of the pipe with a rubber seal, into which the end of another pipe without expansion, the so-called smooth end, is inserted.
Technology
Before you begin installing a sewer system in a private house, it is best to first make a diagram of this wiring on paper, and then transfer this diagram to real conditions. First, you need to draw a diagram of the location of the plumbing equipment, and then develop a sewerage layout diagram based on it. When drawing up a wiring diagram, consider the following:
- For different sewer fittings, different pipe diameters are used - for a small washbasin 40 mm, for a toilet, common risers and external underground sewerage 100 mm, for everything else you can use a pipe with a diameter of 50 mm.
- To save money, it is better to place the toilet closer to the riser and sewer.
- When connecting pipes, angles close to 90° should be avoided, and when laying external sewerage they are unacceptable.
- It is necessary to provide for the possibility of cleaning sewer pipes; a special insert for cleaning, the so-called revision, must be installed in the riser.
- For convenience, in the bathroom, near the riser, you can install a drain collector, the so-called drain, which will be useful in the event of a water supply or sewerage break; you can also install a couple of such drains in the yard to collect rainwater.
Using the drawn diagram, you can now calculate the number of pipes of the required diameter and fittings to connect these pipes. Pipes are usually sold in sections of a certain length, so it is better to immediately determine exactly how long the pipe sections should be in order to purchase pipes for the entire scope of work at once.
It is also better to calculate the shaped parts with maximum accuracy, so that later you do not have to run to the store again, unless, of course, your store is located in a neighboring house. You also need to immediately select special seals for connecting plumbing equipment. To attach pipes to the wall, you also need to buy special anchors.
So, when everything you need has been purchased, you can begin installing the sewer pipeline. When installing, you should adhere to the following principles:
- The slope of pipes with a diameter of 50 mm must be at least 3 cm per 1 meter, and for pipes with a diameter of 100 mm - at least 2 cm per 1 meter.
- Installation of pipes without a slope or with a reverse slope is not allowed.
- The pipe socket should be located first in the direction of water movement.
Installation internal networks Do-it-yourself sewer installations begin with the installation of fittings in places where plumbing equipment drains. After this, we begin the installation of the riser with the corresponding outlets. Then we begin the installation of the intermediate part, which can be pre-drawn on the wall with a pencil for convenience.
When connecting sockets, it is best to lubricate the seals with soapy water or dishwashing detergent. To cut pipes, you can use a metal or wood saw with a fine tooth. To make it easier to insert the smooth end into the socket, it is better to make a chamfer on the smooth end, that is, trim the end of the sawn pipe at 45°.
IMPORTANT! Plumbers who professionally install pipelines and sewers have a special tool for this, like a huge pencil sharpener. Well, for those who make sewers with their own hands, you can make a chamfer using an angle grinder or extreme case just a knife.
External sewerage
Before you start laying out the external sewer system with your own hands, you also need to sketch out a simple circuit sewerage on paper. When installing external sewerage, you must be guided by the following principles:
- It is necessary to protect pipes from freezing - for this they are either buried to the freezing depth or insulated.
- Not acceptable sharp corners turn.
- The slope of the pipes must be maintained.
To lay an external pipeline, dig a trench the width of a shovel bayonet and the depth of freezing. The bottom of the ditch must have a certain specified slope. Before laying the pipes, sand is poured into the bottom of the trench in an even layer, after which the pipe laying begins.
If the trench is not dug to the freezing depth, then expanded clay is poured onto the pipeline or insulated with foam plastic. The trench is filled in on top, making a small mound. This is done because over time the earth will shrink and a hole will form in place of the trench, which will then need to be filled up.
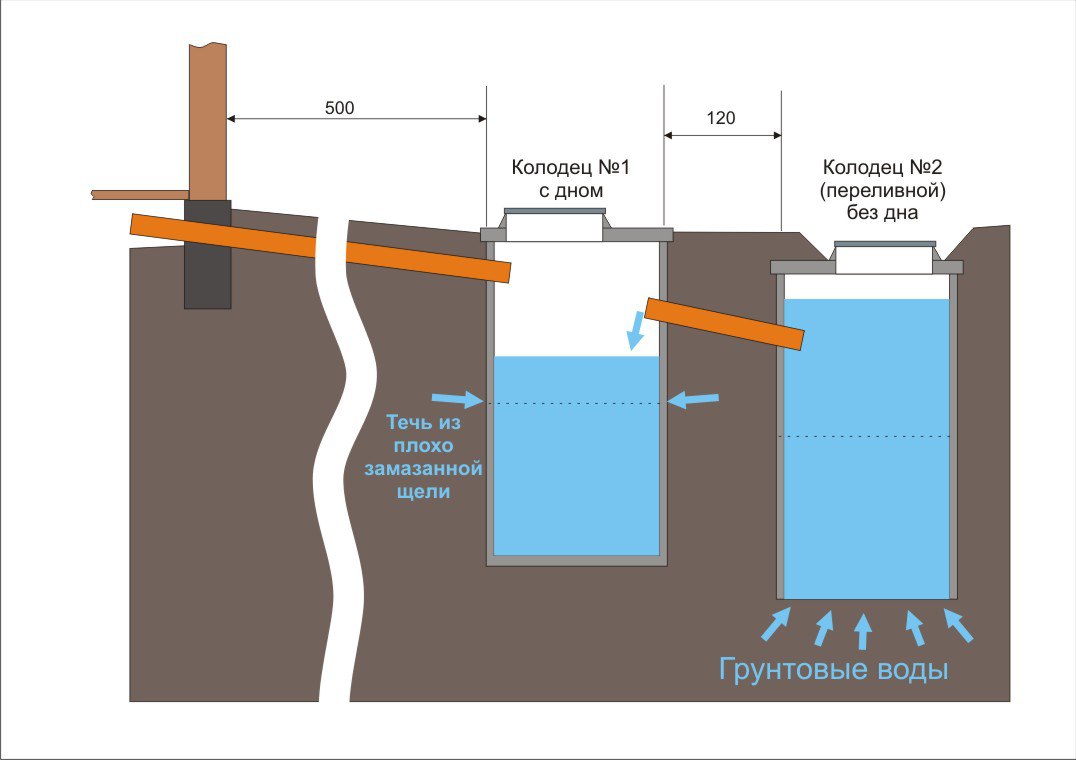
If there is a central sewer along your street, then it is possible to install your pipe and connect to the network central sewer. If this is not possible, then you will have to build a drainage hole near the yard with your own hands.
The drainage pit is usually made from concrete rings with a diameter greater than 1.5 m, and the more such rings there are, they will larger diameter, the less often such a pit will have to be cleaned. It is advisable to choose a place for the pit at the lowest point of the yard.
After choosing a location, we order an excavator or dig a hole to install the rings with our own hands. Then we order rings. It’s best when the rings are delivered to you and installed, since you still have to order them later crane for installation, etc.
By sanitary standards bottom drain hole needs to be concreted. Usually not everyone does this, but we must remember that in order to legitimize a private house, a conclusion from the sanitary and epidemiological station on the drainage pit is required. You can also order a solid concrete bottom along with the rings. To pump out the drainage pit, a concrete cover is installed on top of the rings, which is ordered together with the rings. This cover has a hatch for pumping out the pit.
On the external sewerage pipeline you can install check valve to avoid overflow of the pit and backflow of water into the house.
A country house without amenities is nonsense these days, because installing a sewer system does not require huge expenses. The modern market offers any elements of drainage systems, including many low-cost solutions. And if also construction works do it yourself, then the price of a comfortable stay will generally be extremely low. The only thing that is required for this is a competent approach to sewer construction, compliance with all SNiP requirements and quality control of the work performed at each stage. Otherwise, comfort will turn into a headache in the fight against blockages and leaks.
Requirements for the sewage system of a country house
It is best to install sewerage in a private house using plastic pipes.
It is best to draw up a sewerage layout diagram at the stage of designing a house.. This will allow you to correctly determine the placement of equipment and determine the type of wiring. Installation drain system directly during construction. For long and trouble-free operation of the sewer system, it is important to comply with the requirements for the construction of systems of this type:
- All pipelines through which wastewater flows by gravity must have the required slope from the house to the drainage point.
- Correct selection of sections of drain lines.
- Compliance with the principle of consistency when installing equipment.
- Maximum reduction of sections of highways with turns and elevation changes.
- Installation of inspection elements in problem areas of sewer pipelines.
- Installation of ventilation structures.
- Sufficient depth of the pipeline (below the freezing point of the soil), proper thermal insulation or heating.
The sewer system can have either a gravitational distribution (wastewater moves by gravity) or a forced one (using circulation pumps). Most often, owners of houses located significantly far from water collection points or the central sewer line are forced to install a system with pumps.
Wiring elements
The sewer system of a private house consists of several elements that ensure its proper functioning:
- Wastewater drainage lines;
- Sewer well;
- Collectors;
- Pipeline.
- Wastewater treatment system;
- Equipment for forced drainage.
The presence or absence of certain elements will depend on the specific sewerage scheme, as well as the need for additional equipment.
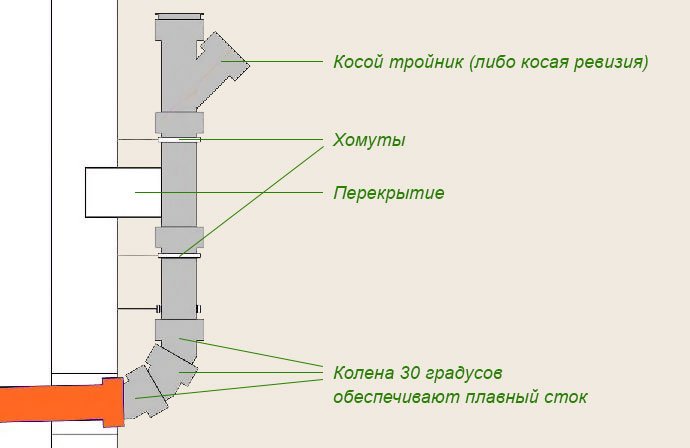
Sewer risers
When installing the riser, be sure to install inspection elements to make it possible to clean it
The most important element of the sewer system is sewer riser . Typically, one such central element is used, but in the case of a wide network of outlet pipelines, it is possible to install several risers, from which wastewater is discharged at the lowest level.
The most important requirement for installing this element is a sufficient flow area and vertical installation. In addition, any sewer system must be based on two connection points. A fan ventilation riser is installed at the highest point, and an outlet is made at the lower level. If these conditions are not met sewage will stagnate with the spread of unpleasant odors throughout the house. Another unpleasant factor is that the gas pressure in the pipelines will increase, affecting the valves of the equipment.
Please note that combining vent risers with a ventilation system is prohibited by SNiP standards. According to their rules, it is also impossible to drain several risers into one ventilation shaft, but one exhaust outlet can be removed, but its pipeline must be 10 cm higher than the top point of the roof.
Installation of risers is carried out from the lowest point, installing pipes with sockets up. When installing them, do not forget about the presence of inspection elements in places at risk of blockages. Even if there are no problem areas, and the pipeline is a straight line, it is necessary to provide one inspection fitting at 20-30 m of the pipeline.
If it is necessary to connect the sewer outlet of the plumbing below the riser placement mark, it should be installed level, without turning
The toilet and bidet are connected with a pipe with a diameter of 110 mm
Wastewater drainage lines
For sewer installation, it is best to use plastic sewer pipes. They have many advantages over metal or asbestos-cement products. Most often, Ø110mm pipes are used for sewer risers, as well as for connecting bidets and toilets, and Ø50mm for connecting other equipment.
Horizontal sewer pipelines are installed immediately after installing the riser, making connections using 110/50mm fittings. Connections to plumbing equipment must have the same outlet diameters as the pipeline, that is, to connect toilets and bidets, the outlet line must have Ø110mm. When performing installation, the required slopes must also be observed - for 50 mm pipes it must be at least 30 mm per 1 m of pipeline, and for a 110 mm pipe - 20 or more millimeters per linear meter.
In this case, the following conditions must be met:
- The length of the sewer outlet line should not exceed 10 m. Otherwise, it is necessary to install an additional sewer riser.
- The distance of equipment from the riser should obey the following rule - plumbing fixtures with Ø110mm outlets should be installed closest.
- It is not allowed to change the slope by different areas one outlet pipeline.
- If a 90° rotation is necessary, it is performed by installing two 45° elbows at a certain distance. In this case, it will be possible to avoid the formation of blockages.
When laying pipelines, it is not allowed to place pipe joints where they pass through walls, ceilings or foundations.
The lower sections of the outlets must be equipped with inspection fittings, and the upper sections with ventilation valves.
Riser release diagram
Ventilation valves
Very often, it is difficult for the riser to exit into the attic or install it above the roof level. In this case, its open end will allow it to spread unpleasant odors sewerage throughout the house. If this hole is blocked, then during the draining process it is impossible to avoid a vacuum in the riser, which will break the water seals of the siphons and elbows.
In order to stop the flow of gases from the sewer and at the same time restore atmospheric pressure in the risers during drains, use ventilation valves. When installing such a device on a riser located in a bathroom or toilet, it is necessary to ensure a sufficient distance from the valve to the ceiling for free access required quantity air.
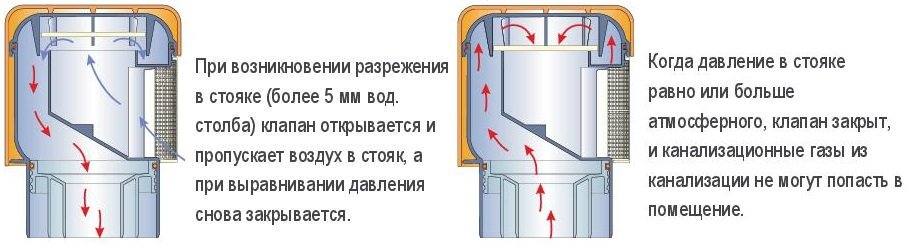
Ventilation valve operation diagram
Discharge of wastewater into the sewer
The outlet of the riser is arranged using two 45° or three 30° elbow fittings, connecting it to the external sewage drainage line. In this case, the installation location of the outlet should be 20-30cm below the freezing point of the soil, and the slope of the outlet pipeline should be at least 2cm per 1m of pipe. To collect wastewater, a storage or filtration sewer or septic tank is installed.
We install it ourselves
In order to independently install a sewer system in a private house, you first need to draw up detailed diagram. To do this, it is better to take paper with millimeter markings and put a house plan on it, taking into account the scale. Next, the location of plumbing fixtures is marked on the drawing and the installation location of the riser is determined. After this, pipelines with all fittings are drawn onto the plan. If the house has several floors, you need to draw up the same drawing for each floor. With it, determining the total length of the pipes is quite simple, and the diagram will significantly simplify the calculation of the required number of fittings.
Scheme of installation of sewer pipe slopes
After purchasing all necessary materials work is carried out in the following order:
- Siphons and water seal elbows are installed on plumbing fixtures.
- Connect a Ø50mm pipe to the siphon.
- Using two 45° elbows, the outlet is connected to a horizontal outlet pipeline.
- A branch line is led to the riser with a slope of 30 mm for every 1000 mm of pipeline length. Its value is quite easy to maintain if the pipes are secured using special clamps.
- With hidden installation, each turn of the sewer system is equipped with an inspection. A tee with a special oblique hatch for servicing the pipeline is also installed on the riser on each floor of the building.
- The toilet is connected to a horizontal line Ø110mm using a rectangular tee and an angle fitting.
- To allow the pipe to pass through the walls and ceilings, a metal sleeve is installed in them, and the pipe is protected with insulation. The sleeve must be fixed with sand-cement mortar.
- If it is necessary to switch from a 50mm pipe to a 110mm pipe, use a 50/110 reduction.
- Install the ventilation valve.
- Connect the inner pipe to the outer one (several 30° corner fittings are used for smooth rotation).
When connecting pipes to each other, all their joints must be processed silicone sealant or with a special adhesive composition. This will not only give the pipeline strength, but also increase its tightness. Such work is of particular importance when pipes are hidden (under the floor or panels).
Add site to bookmarks
- Kinds
- Choice
- Installation
- Finishing
- Repair
- Installation
- Device
- Cleaning
Is it possible to install plumbing fixtures yourself?
- Installation of water supply in a private house
- Installation of sewerage in a private house
- Conclusions about self-installation plumbers
Although it is now the 21st century, many residents of the private sector still do not know what a sewer or central water supply. Many people still have wells on their territory, which are the source of water supply. And there’s no need to talk about plumbing. After all, most do not even have basic sewerage, and toilets are located on the street. All this makes the life of a person living in a private house difficult and not comfortable enough. Installing plumbing in a private home is a task that, perhaps, anyone can handle.
When repairing plumbing, it is not necessary to turn to professionals, having basic knowledge and tools, such as an adjustable wrench, wrench and others, you can do it yourself.
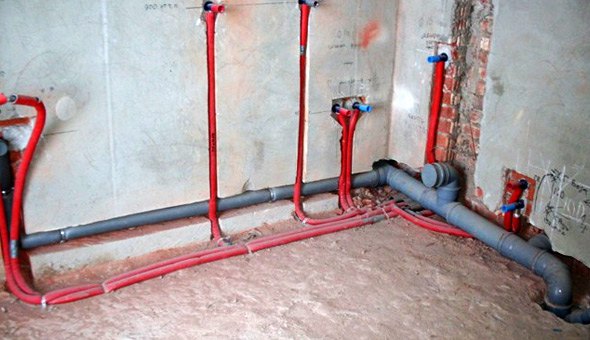
Plumbing refers to both plumbing fixtures (toilet, sink, bathtub) and the installation of appropriate communications: water supply and sewerage. Now this has become possible. The most important thing is to follow all the rules and regulations when installing plumbing, water supply and sewerage.
Installation of water supply in a private house
It’s worth starting with the water supply, because people constantly need water. We will talk specifically about cold water supply. Although, if desired, you can install a boiler, which will provide heating in the house. There is also nothing supernatural in this procedure.
So, to install a water supply in a private house you will need the following tools and materials:
- shut-off valves;
- plastic pipes;
- pumping station;
- spanners;
- pliers;
- shovel;
- Bulgarian.
The installation process is quite simple. First you need to decide what kind of plumbing fixtures will be installed in the house. In this example we will give general rules and installation sequence.
So, first you need to develop a water supply diagram for a private house. It must contain all external and internal pipe wiring components. Now available for purchase pumping station.
Often it comes with a plumbing installation diagram. It clearly indicates how pipes are installed in the house from start to finish. Next, you need to decide on the location of the station itself and dig trenches for the water supply pipes, through which water from the well will flow into the house.
In this case, it is very important to ensure that the pipes lie below the freezing level of the ground. If this is not possible, then you need to insulate them. For this purpose, special fabrics are used, for example, fiberglass.
The pumping station itself is installed in a place where its noise will not be heard by people.
In any case, it is located in the house. It is best if it is a basement or ground floor. Basically, the documentation for the pumping station indicates the noise level created by it.
Once the station is installed, you can begin installing the pipes. This matter must be taken responsibly. Installing a water supply system in a private home is a very important matter, and if something goes wrong, problems may arise with the flow of water into the house, and this is unacceptable. Therefore, perform the installation efficiently.
So, after the installation of water supply in a private house is completed, you can think about installing other plumbing fixtures. The sewage system of the house plays an important role. Especially if there is no access to the central one.
Return to contents
Installation of sewerage in a private house
Let's consider installing a sewerage system for a private home. First, you also need to decide on the sewerage scheme. It must be correctly compiled so that there are no problems with installation later.
Basically, the sewage system in a private house is divided into external and internal. The external one is the pipeline and treatment systems, and the internal one is the plumbing fixtures themselves.
Now you can begin installing the sewerage system of a private house.
- The cesspool should be located close to the road so that the sewer truck can drive up to it at any time without any problems.
- Lowest point cesspool should be located 1 meter from the soil freezing line. In this case, the collector into which all waste will flow must be installed at a slope at a depth of at least 0.7 meters.
Moreover, if it is not possible to lay the pipes below the freezing level of the ground, then it is better to insulate the collector.
Installation of sewerage in a private house is carried out using pipes. If previously cast iron options were most often used, now preference is given to plastic ones. They have a number of advantages over metal. The most important thing is that they are not subject to corrosion. The pipes are installed by inserting one into the other. Their joints are sealed with special materials.
The depth of the trench must be calculated in advance so that all pipes rest on undisturbed soil. It is very dense and prevents bending of pipes.
For risers and the collector, it is worth choosing pipes of a larger diameter than those coming from the plumbing, that is, from appliances located in a private house.
As you can see, installing sewerage, and indeed all plumbing, in a private house is a very difficult task. In order to do everything competently and efficiently, you need to be guided by all the rules and regulations provided for in the work plan.
Many people are unable to do this task. No matter what kind of plumber everyone considers himself to be, it is still better to entrust further work in the house itself to real professionals.


