Good day!
Today we will talk again about how to make a barbecue with your own hands. But this time the material for its manufacture will be gas cylinder.
Some will say that it is difficult, cumbersome and not aesthetically pleasing. However, if you approach this issue creatively enough, you may end up with something like this:
So, whoever decided to use this material to make a barbecue, read the article further. Here we will look at how to make such a grill. Below is a diagram of such a barbecue.

How to make a barbecue from a gas cylinder with your own hands?
It is best to use a 50 liter gas cylinder for barbecue. Before you start making the barbecue, the cylinder must be prepared. This process includes complete release of gas from it and washing.
CAUTION - FLAMMABLE AND EXPLOSIVE!!! Within the framework of this article, it will not be told about the release of gas from the cylinder and its analysis. Since this requires special preliminary preparation, and understanding of tool operation and safety precautions. We recommend that you familiarize yourself with the materials on YouTube videos by entering a similar request. It is important to understand all the points and nuances before you start sawing a barbecue balloon. You need to be extremely careful, and it is advisable to watch the video with two people. The moments regarding the analysis of the cylinder require not only the presence of training, but also the ability to work with the tool, and spark arresters in the form of water may also be required. All the nuances can be found in many videos, and special training.

When the valve is opened (in some cylinders, after releasing gas, it is enough to unscrew it with a key. But this is rare!)
Next, pressurized water is fed into the cylinder. In this case, the bottle must be shaken well. The water in the bottle remains for several days, after which we drain it. This is necessary so that no special substance from the gas remains on the walls. The fact is that this plaque remains after the release of gas and is also combustible and explosive.
Then….
You can start making barbecue. To do this, we need the following tools and materials: grinder, drill, welding machine, steel pipes for legs, metal hinges and a handle for the lid.
The circumference of the cylinder is 96 cm, so it is very convenient to divide it into 4 parts. A weld that runs along the entire length of the cylinder will help to do this. We retreat from it on both sides by 24 cm and draw a line. Next, mark the holes for the skewers. Along the perimeter of the cylinder we find transverse seams (welding rings) and retreat 3 cm from them. These are the extreme marks. We mark the intermediate ones at a distance of 8 cm. This will give us space for 6 skewers.
Now, using a grinder, we saw the cylinder along the two longitudinal lines outlined earlier. The thickness of the metal is 3 mm... so cutting it is easy. It is best to start cutting first along the longitudinal lines, and then along the transverse ones.

Cross cuts must be made at a distance of 10–15 mm from the welds, since in these places the metal is double, and therefore. the indentation will save time and part of the grinder circle. In addition, the lid of the barbecue grill will lie much better on the bottom layer.
Once you have cut the wall, you need to make cuts for the skewers. A little lower we make cuts or drill holes for air passage with a drill. We make similar holes in the lower part of the grill. We leave only the bottom of the grill and its lid without cuts or holes.


To prevent damage to the metal of the cylinder from high temperatures, it is necessary to weld a corner measuring 32*32 around the perimeter of the cut edges. Using clamps, the corner can be pressed to the body without gaps. This corner can serve as a support for a grill or skewers. The corner must be welded inside the body next to the hinges.

On last stage we make legs on which we install the grill itself. The height of the legs should be such that it would be convenient to work at the grill. Usually this is somewhere around 20-30 cm. Pipes are optimal for the legs. You can also use a channel. The configuration of the legs can be very diverse, it all depends on your imagination and capabilities.

Here, in general, is the whole procedure for making a barbecue from a gas cylinder. If you are a master of gas welding and cutting, or a friend of yours who has these qualities makes a barbecue for you, then you can show your imagination and add some decorative elements to your product.

If you need to have not only a barbecue, but also a smokehouse, then you will need to attach a chimney pipe to one side wall, and weld a firebox to the other wall. When you close the grill lid, you will have a wonderful smokehouse.
If you paint your grill, it will look much better and will last longer.
Before using the grill, you need to heat it several times so that the smell of gas disappears completely.
You can also put cast iron grates on the bottom of the grill. This will provide additional ventilation inside the grill. In addition, hot grates will save coal, since they are also involved in the frying process.
Drawings and photos:
It would seem that everything is clear even without drawings for making a barbecue, but why invent a bicycle when it has already been invented. If you have ready-made drawings of a barbecue from a gas cylinder, then making it will be much easier. At least you will have a choice of the most interesting option.
Below are some interesting drawings of a barbecue made from a gas cylinder.


And these photos show, in my opinion, quite interesting and original designs of barbecues


Master class: grill from a gas cylinder in three hours
If the description and pictures about making a barbecue from a gas cylinder are not enough for you, then watch this short video.
It shows quite clearly how to make a completely acceptable barbecue from an ordinary gas cylinder.
Reading time ≈ 10 minutes
Many people like to relax in nature with family or friends, have picnics and get-togethers in the fresh air. And, of course, traveling out of town is often accompanied by cooking kebabs or grilled vegetables. To make your vacation pleasant and memorable, you need a good ambience. You can make it yourself using available materials, for example, an unnecessary gas cylinder.
Types of barbecues
Today in stores you can find a huge assortment of country barbecues and smokehouses for every taste. But it is not at all necessary to buy such a product, because you can make it from a gas cylinder, barrel and other materials with your own hands. Before you understand which design is right for you, you need to know what kind of barbecues there are:

The material for a homemade barbecue should be:
- Durable and reliable.
- Fire resistant.
- Keep warm.
An excellent option is a standard barbecue from an old gas cylinder; it can be easily made using drawings and the necessary tools. Designs of what configuration can be made:

You can use metal knitting needles, curly handles, rods or other details as decoration. The design of the building depends on your imagination, the main thing is that the barbecue fits into the landscape of the dacha area. The video master class shows how to make a barbecue container with step-by-step instructions and drawings.
Features and Benefits
You can purchase a ready-made barbecue in the store, or you can make a structure of any configuration and size from a gas cylinder with your own hands. Is it worth using just such a container, and is it safe? According to advice experienced craftsmen suitable for making old cylinder volume 50 liters. In this case, the optimal length is considered to be about 85 centimeters, and the diameter is from 30 centimeters.
Let's consider the advantages of models such homemade barbecues:

A do-it-yourself barbecue made from a gas cylinder has several disadvantages:

How to safely disassemble a cylinder
The preparatory stage for creating a homemade barbecue is to disassemble the old metal cylinder and purchase all the necessary tools. Before you start cutting the body of the future barbecue, you need to make sure that there is no gas or gasoline left inside. Gasoline is a special mixture of hydrocarbons in liquid form that remains in a container. How to carry out this work safely:

What tools and materials do we need:
- Door hinges for securing the lid.
- Adjustable open-end wrench.
- Metal pipe for chimney.
- Hammer with screwdriver.
- Clamps.
- Electric drill.
- Apparatus for welding work.
- Bulgarian.
Secrets of mastery
The entire process of building a homemade barbecue can be divided into several stages, in each of which the following instructions should be followed:

Dutch oven with lid
You can make a barbecue grill yourself from a propane cylinder without spending a lot of time and resources. old gas burner you can not throw it away, but make a homemade brazier using the drawings. 
 Following the advice of the masters and clear instructions, we proceed to manufacture:

Brazier on low legs
To bring to life your idea of creating your own mini roaster for your garden, you can use an old metal container, for example, a gas cylinder. First, pay attention to the marking indicating the volume and dimensions.

Let's get started:
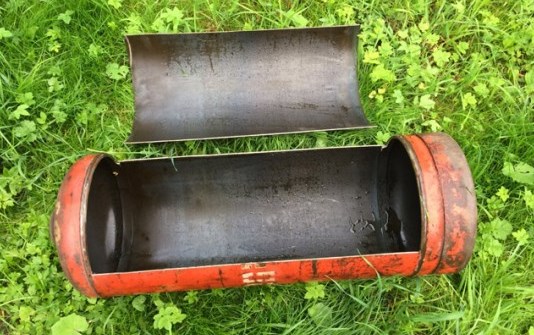
- We cut out the cover in the case, leaving the sides intact, as in the photo. So the coals will not scatter in the wind.

- Make sure that the rings are exactly at the seams.

- Now we have the body and lid of the future mini-smokehouse ready, two separate parts.

- We connect the cover to the body with two metal loops. They must then be well welded so that they do not fly off during operation.

- Fastening is first done with aluminum rivets, as in the photo.

- On the cover we apply markings for the location of the handles. They must not be made of flammable material.

- To avoid deformation of the cylinder, we attach a corner inside the body. It should also be well welded and serve as a support for the skewers and grate for placing grilled products.

- We shorten the legs so that the grill can be transported in the trunk of a car.

- It's time to weld the lid to the hinges.

- The handles are welded to the outer surface of the lid, which we place on the hinges.


- We install limiters on the cover to fix it in the open state.

- Several holes need to be drilled in the bottom to allow the passage of burnt coal and for better traction. On the opposite side of the holes we cut out slots to fix the skewers inside.

- The design is ready for use!

The entire creation process can be seen in the video master class.
There are many options for making barbecues, smokehouses and barbecue ovens of various configurations. However, the most universal way is to use an old propane tank. Instructions and advice from experienced craftsmen will tell you how best to make such a design and help you avoid common mistakes.
To make a barbecue from a gas cylinder, you first need to understand the device. To cook kebabs, fish or vegetables over an open fire, different devices are used: barbecue, grill, tandoor, etc. Barbecue is in many ways similar to these devices. However, it is more similar to a grill. It’s easier to make a barbecue with your own hands, since it is not equipped with a lid and requires the use of skewers for cooking. A mobile barbecue and grill are made according to very similar schemes. Both designs are equipped with a grille and often have a lid.
A high-quality barbecue and similar devices are quite expensive. If you make a barbecue from a cylinder with your own hands, the cost of construction will be lower. As a result, you will not have to spend a large amount. Other advantages of this solution:
- significant length (about 120 cm), which allows you to cook in one go a large number of products;
- relatively simple installation process;
- a minimum of materials used, since the barbecue is made from a propane cylinder;
- the basis of the structure is heat-resistant metal (3 mm thick wall);
- the presence of a lid protects food and fire from precipitation; in addition, it can be used to regulate the flame.
However, there are also disadvantages. For example, the volume of the cylinder is quite large, which makes it difficult to use in a small yard. Another disadvantage is the significant weight. It is difficult to move such a barbecue. This work is best done together. Propane cylinders are distinguished by their considerable length and wall thickness.
Another disadvantage is the unattractive appearance. It is not recommended to paint the structure, since it is constantly exposed to high temperatures, but if desired, you can choose Decoration Materials with suitable properties. They also note the impossibility of using firewood. The whole point is that a barbecue made from a gas cylinder is not high enough. Considering that the free space is also limited by the grate, it is not possible to put firewood inside.
Tools and materials
To get an idea about the structure of the barbecue, it is recommended to look at the photo/video. First you need to prepare tools and materials:

First, you need to draw up drawings or sketches, which will indicate the overall and auxiliary dimensions, as well as information about the characteristics of the finished product. Based on the developed documents, the type of support is determined: brick or metal legs. In accordance with this, it is prepared additional material(corner, pipe). If you are making a barbecue from a gas cylinder with your own hands, first initial stage determine the method of opening the lid. For convenience, a metal handle is used.
Preparation for work
Tip: Before you start cutting, you should make sure that there is no gas inside, otherwise the likelihood of an explosion increases.
Vapors of a gaseous substance may remain in the cylinder. To make sure that the container is empty, it is filled with water. If it is necessary to release gas and its vapors, follow the instructions:
- The container is turned upside down, then the valve is opened and it is completely emptied.
- Condensation remains inside. To remove it, the outlet of the balloon is lubricated with soap. Thanks to this, the process of condensate release will proceed more clearly: the liquid foams, and splashes appear under pressure.
- The structure must be freed from gas residues, for which water is poured inside. How to do this safely if there is still a valve installed at the inlet? You need to lay it on its side. Further work should be carried out together with an assistant. So, one person saws off a valve with a hacksaw, another pours water over the cut area, which helps cool the metal. As a result, the risk of sparks and ignition of residual gas is reduced.
- Now it is possible to pour water inside. This is done using a hose; it is also possible to use a funnel.
- At the initial stage of filling, it is recommended to shake the container, which will allow you to wash its inner walls, removing any remaining condensation.
- After filling the container with water, it is recommended to leave it for several days.
- The liquid is drained, and this should be done as far as possible from residential buildings due to the unpleasant odor.
If you plan to make a barbecue from a gas cylinder with your own hands, you can consider using a hammer. Use it to knock down the valve. However, this method is more dangerous. Due to the significant impact force, more sparks may occur. It is unlikely that it will be possible to eliminate their appearance by spraying metal.
Cylinder cutting
When the water has been removed from the container, you can proceed to the main stage - making a barbecue. To do this, remove rust from the gas cylinder, if any. Then they move on to cutting. If the hole layout is already ready, cut the metal with a grinder. To protect the flame from the wind in the future, it is better to leave the side rings. The cut should be as close to the weld as possible. Dimensions as in the drawing below. 
To make straight cuts, you must first mark them. If you need to get an open one, just cut it in half. In this case, the cut will also take place along the side rings. To make a barbecue from a gas cylinder with your own hands, you need to study the drawings, photos and videos of the entire process before starting work, because such a design is somewhat more complicated due to the configuration of the hole. 
All step-by-step instructions can be seen in the video.
You should be guided by the parameters: horizontal lines run along the center of the cylinder, along; vertical - parallel to the side rings at some distance from them (10–20 cm). Working with a grinder, move from the center of the cylinder to its edges. Considering that the length of the product is significant, the grinder disc may burn out. To avoid this, it is recommended to not cut the metal completely in some places. In these areas, the walls are removed with a chisel. To create the possibility of blowing the flame, holes (up to 10 pcs.) are drilled at the bottom and in the side rings.
Attaching the support
The barbecue is characterized by a round base, so you need to think about where the structure will be located. If you make a support from brick or stone, you will end up with a stationary product that cannot be moved when necessary. The preferred option is metal legs; they can be made from pipes or corners. If there is an unnecessary metal item, for example, a support from an old sewing machine, it is used to install a barbecue.
There are two ways to attach the base to the bottom of the structure:

Or you can use legs from an old sewing machine. 
The height of the legs can be any. It all depends on personal preference. You need to be guided by convenience. Legs that are too low will not allow you to stand level at the barbecue; you will have to constantly bend over. It is better to focus on the average height of adult family members. At the same time, we must not forget that the cylinder is characterized by a significant height.
Welding hinges, lids, handles
Having secured the grill to solid foundation, move on to the next stage. To avoid the hassle of opening a hot lid, it is recommended to weld it to the bottom of the structure. If it is not removable, use loops. They are welded or secured with bolts and nuts. Rivets - not too much suitable option, because they can withstand average temperatures and can melt when exposed to an open flame. 
If you place the hinges in one direction, the cover can be removed in the future if desired. By welding them in the opposite direction, they act differently:
- the hinges are fastened on one side;
- then put on the lid;
- install the hinges on the lid on the other side and begin to weld them to the barbecue.
In this case, the design will be non-separable. To freely use the barbecue grill, fix the handle. It is located in the center of the metal cover. This element can be welded, which is more reliable, or connected using standard fasteners. The second option involves the need to drill two holes on the cover. This is where the handle is installed. It is desirable that it be made of metal. Wooden elements quickly burn out and can rot, as ready product will remain in the open at all times.
If the structure is used only as a barbecue, you can also weld a grate. It is usually located directly above the rounded bottom. The structure can also be used as a barbecue, in which case it is better not to attach the grill. A store-bought barbecue with a handle is installed on the ribs of the former cylinder. In this position, closing the lid will be difficult due to the protruding elements of the large grille. It is also made removable, but then you need to weld the corners near the edges. A grate is placed on their lower shelves. 


Well, and a video of all the work done.
You can even try to make everything in the form of a steam locomotive, as in the photo below. 
To prevent the lid from completely swinging open, you can weld a metal rod or chain. Due to this, this element is limited in movement. It is allowed to paint the barbecue, but it is better to do it outside. Interior still remains hidden from view. Use paints that are resistant to high temperatures. They must withstand up to 800?C. It is recommended to apply paint only after the surface has been coated with a special primer.
Holidays outside the city, whether it is a summer cottage or a picturesque glade in the forest or near a pond, very often involves cooking barbecue. Of course, for this you can get by with a few bricks and a couple of metal crossbars, but the real pleasure of cooking meat on skewers can only be obtained next to a convenient and practical barbecue. A good design can be made from thick sheet metal. If you don’t find one on your farm, then you shouldn’t rush to the construction market. You can make an excellent device for cooking meat with your own hands from a regular gas cylinder.
Features of a barbecue made on the basis of a container for liquefied gas
Cylinder for domestic gas is an excellent basis for many homemade designs. Good solid metal, almost finished form and several standard sizes make it possible to obtain a potbelly stove, an indirect heating boiler, an autoclave and other equipment necessary for the household with minimal labor. Thick walls of the container from under liquefied gas able to withstand high temperature, so it is ideally suited for making a smokehouse, barbecue or grill. Other advantages of the design are also known:
A brazier built from a tank for household gas has practically no drawbacks. Some consider large dimensions to be a minus, but what prevents them from taking a smaller cylinder, for example, 27 liters? The negative aspects include perhaps the semicircular shape of the bottom, which is not very convenient during the ignition of firewood. On the other hand, with this configuration, the coals will be closer to the edges of the skewers. Due to this, the outer pieces of meat will be better baked, which, when cooked on a traditional rectangular roaster, often remain raw. Experts believe that the spherical walls of the brazier are not entirely suitable for cooking barbecue, as they interfere with processes that help the rich aroma of baked meat “open up”. In the future, we will touch on this issue, revealing the secret of how to avoid the disadvantages associated with the round shape of the bottom.
Preparatory activities
Before you pick up a welding machine, you need to select a gas cylinder and prepare it for work, draw up a rough sketch of the future barbecue and stock up necessary tool and materials.
What kind of cylinder can I use?
Any gas cylinders are suitable for making a barbecue cylindrical. The best option is quite capacious and the most common 50-liter container for household propane-butane. If you want to get more mobile and lightweight design, which can be transported in the trunk passenger car, you can take a standard 27 liter cylinder. It should be taken into account that the width of the working space portable barbecue may not be enough due to the spherical shape of the sidewalls.
Gas cylinders are made of high-alloy low-carbon steels 30XMA, 45, 34CrMo4, 30XGSA. High content alloys and a decrease in the number of alloys in the metal makes the alloy more durable and improves anti-corrosion properties.
An ideal option for a stationary barbecue would be a 50–80 liter car gas cylinder. It has an increased diameter, so it will be much more convenient to light firewood. In addition, such a vessel has increased capacity. Its width makes it possible to use the entire length of a standard skewer, and this will allow you to cook dinner for a large company. The only caveat is that finding an unnecessary car gas tank will not be easy, and buying a new one will not be financially feasible.
Gas cylinders are made of high-quality alloy steel with a thickness of 3 millimeters or more, therefore, even if the container long time stood in the open air, it will most likely be usable. If the vessel is heavily rusted, then you should not waste time on it - finding a workpiece in good condition will not be difficult.
How to protect yourself from explosions
Even if the valve of the container you are using is completely unscrewed and gas does not come out of it, do not rush to take up the grinder. Despite the fact that the pressure inside the cylinder is equal to atmospheric pressure, most likely there are unsafe substances left in it - propane-butane and condensate. The latter is drained by turning the vessel upside down, and in order to completely remove the explosive contents, the container is filled to the top with water and left for several hours. Only after this requirement has been met and the liquid has been drained can you begin cutting and welding the metal.
Schemes and drawings
A barbecue made from a gas cylinder is so simple construction, which does not require careful design. Nevertheless, at the preparatory stage it is recommended to draw up a small drawing or sketch of the future structure indicating the dimensions of all its elements. This will make it possible to determine how much and what kind of rolled metal will be required, and will also allow you to correctly plan individual processes. Perhaps the drawings and diagrams presented in our gallery will help you in working on the barbecue.
Gallery of drawings and diagrams
 Diagram of a barbecue with a supporting structure
  Drawing of a barbecue from a 50-liter gas cylinder
  Construction of a barbecue made from a gas cylinder
  Heated air movement pattern
Materials and tools needed for work
In addition to the gas cylinder itself, you will need:
- sections of steel pipes and angles;
- metal handles for the grill lid;
- door or furniture hinges;
- pipe with a diameter of 100 mm with a 90-degree elbow, if you plan to install a chimney;
- grate that you will need for a barbecue;
- bolts with nuts or rivets.
In addition, you should prepare decorative elements, intended for refining the structure, as well as primer, paint and solvent that will be needed for painting it.
If we talk about tools, we are sure that everyone interested in building a homemade barbecue will have them:
- welding transformer or inverter;
- Angle grinder - angle grinder (colloquially “grinder”);
- electrodes Ø3–4 mm;
- cutting and cleaning disc for angle grinders;
- electric drill;
- a set of drills for working on metal;
- clamps for fixing metal parts;
- long metal ruler;
- scriber;
- core;
- adjustable and gas key;
- set of wrenches.
If after manufacturing the grill will be painted, then additionally prepare a brush attachment for a drill or grinder, as well as brushes or a sprayer with a compressor.
Making a barbecue with your own hands from a 50-liter household gas cylinder
Installation work is best carried out in a well-ventilated area or outdoors. The place where the assembly will be carried out must be fairly level, otherwise it will not be possible to ensure the correct geometry of the structure and the grill will be unstable.
When carrying out plumbing work, it is important not to forget about safety rules and be sure to use protective equipment and special clothing.
Step-by-step instruction
- Unscrew the valve. To do this, use a gas or adjustable wrench. Sometimes shut-off valves It sours so much that there is no way to unscrew it. In this case, the tap can be cut with an angle grinder. Using the same tool, cut off the lower support rim - with it the structure will look unaesthetic.
- Mark the cutting areas. The diameter of the 50-liter propane-butane tank is 960 mm, which allows it to be accurately divided into four parts. It is convenient to take the longitudinal seam as a reference point. Having placed the cylinder on flat surface, from the welding line in both directions, measure a quarter of the diameter - 240 mm and apply horizontal markings that will divide the cylinder in half. An indent of at least 30 mm is made from the line of fastening of the upper and lower parts of the vessel, after which circular lines are drawn. The distance between them is divided into equal intervals of 80–100 mm, on which the skewers will be placed. After this, mark the grill cover. Its length should be less than half the diameter, so 100 mm is measured from one of the longitudinal lines towards the horizontal welding seam. A parallel drawn strip will indicate the location of the cut.
- Having installed a cutting disc on the grinder, cut a line that divides the diameter of the cylinder in half. After this, the slot is marked into equal parts and the hinges are welded. Their number can be from two to four (depending on size). After this, the cover is cut out along the circular marks, as well as a longitudinal line, which is located at a distance of 140 mm from the horizontal seam.
Don't rush to cut out the entire lid at once. Subsequently, this will entail a lot of inconvenience associated with its correct orientation, setting gaps, etc. Doing this without an assistant will be problematic. If you immediately weld the hinges along the first cut line, you will be able to save a lot of time and nerves in the future.
- In order for the top door to be held in the desired position and not break the hinges when tilted, it is necessary to weld stoppers along the cutting line. They can be made from 20–30 mm pieces of steel angle with a shelf width of 40–50 mm. The fixing stops are mounted on both sides - this will prevent the lid from warping.
The distance at which the door will recline can be changed by unbending the latches to the desired angle. At the same time, choose a position in which you can easily reach the lid handles without bending forward too much, and at the same time will not allow the structure to slam shut spontaneously.
- In order to prevent the door from falling inward when closing, a limiter must be welded around the perimeter of the circular cutouts. To do this, a strip 30–40 mm wide is cut from sheet steel 1–3 mm thick. It is secured from the inside of the cylinder with an intermittent seam.
Instead of limiters, you can use a length of chain required length, welding it at one end to the grill and the other to the lid.
- Below the hinges, a series of Ø12–14 mm drillings are made for skewers. Previously, these places were marked along the diameter dividing line. On the front wall opposite each hole, slots or triangular cutouts are made on which the skewers will be placed.
- Install handles for opening the lid. For this, factory-made products with linings made of wood or fire-resistant composites are best suited - they will not allow you to get burned. IN as a last resort, the handle can be made by bending a piece of metal rod or fittings into the shape of the letter “P”.
- At the next stage, holes are cut in the bottom of the grill to allow air to enter the combustion zone. To do this, turn the structure upside down, measure 100–120 mm in each direction from the longitudinal seam and draw horizontal lines. Setting aside 100 mm from these marks, strips are obtained in which cuts are made every 50 mm. Instead of slots, you can make drillings. In this case, holes with a diameter of 10–12 mm are made in a checkerboard pattern.
Cutting through the bottom to supply air is impractical for a number of reasons. Firstly, this will weaken the welding seam, which makes the structure more rigid, and secondly, the holes will quickly become clogged with fat deposits mixed with ash and ash, and will cease to perform their functions.
- The hole for the valve must be welded. If the grill is also planned to be used as a smokehouse, then the opening is expanded to the diameter of the chimney. After this, a chimney is welded to the cylinder.
At this point, the main part of the work is considered completed. All that remains is to install the grill on the legs and decorate it interesting decor or simply paint the structure with heat-resistant paint.
Installation of barbecue supports
There are several options for installing the barbecue on legs, which is facilitated by the fairly thick metal of its body. The first and easiest method is to weld four pieces of steel pipe or a corner directly to the body. Of course, the connection points must be carefully verified, and during the work, use a square and building level, otherwise the design will look askew and untidy. Everyone makes the height of the barbecue for themselves, but there is also a standard recommendation - the distance from the ground to the plane where the skewers are laid should be no more than 1 m.
It is worth noting that the method described above cannot add presentability and convenience. If you want to get a stylish, practical structure, then for this you need to make a frame-type support. To do this, from the profile metal pipe A pair of side posts are made 20x20x2 mm. In its upper part, a semicircular bed is welded from a metal tire, curved in the shape of a cylinder. Between themselves, both parts of the structure are fixed with the same metal profile so that a kind of underframe is obtained. The cylinder is placed on the prepared bed and secured by welding. In order to make the brazier more mobile, metal wheels can be attached to the legs.
A brazier made from a household gas cylinder can be taken with you when outing into nature. In order for it not to take up much space in the trunk of a car, the supporting structure is made collapsible. All that is needed for this is a 40-centimeter piece of pipe with an internal diameter of 18-30 mm and a 3-meter pipe with a diameter of 16-28 mm. The main requirement is that when pairing them, the gap should be small, otherwise the brazier will be unstable.
By cutting a short piece into four equal parts, couplings are obtained, which are welded to the cylinder at the installation sites of the supports. After that, the brazier is installed on the legs and through drilling is performed to fix them inside the couplings. The pins inserted into these holes allow you to easily carry assembled structure- the tubes will not fall out. Additionally, carrying handles can be welded to the sides of the portable barbecue. By the way, during transportation of the structure, all legs, firewood (or packaging of coals) and lighter fluid can be placed inside. Such optimization will save a lot of space in the trunk.
Gallery of ready-made homemade barbecues
 Side walls structures can be designed in the form of a funny pig
  Steam locomotive styling
  Support structure can be made from an old sewing machine
  Brazier with bottom shelf and firewood box
  Styling a barbecue like a submarine
  The shelf located under the grill will be very useful during cooking.
  Universal building with barbecue, smokehouse and barbecue
  Additional work surfaces make the design more practical
  Is this still a barbecue or is it already a steam locomotive?
How to bring a design to perfection
The ease of manufacture and other advantages of a BBQ from a cylinder are somewhat overshadowed by the conclusions of barbecue experts that the meat in them is not as tasty as in traditional-type braziers. A thorough study of the problem revealed several points of failure.
- Due to the rounded bottom, the layer of coals in the center and at the edges differs in height. This heterogeneity leads to the fact that firewood located on the periphery burns out much longer than in the middle of the stack - the heat in the center settles much faster.
- The spherical walls emit infrared rays not towards the kebab, but towards the coals, which further enhances the effect described above.
- Unlike a flat-bottomed design, the supply of oxygen to a barbecue made from a round container is uneven.
Eliminating the shortcoming that prevented us from getting the “correct” kebab turned out to be quite simple. Refinement of the barbecue requires the installation of a longitudinal air duct along the entire length of its bottom. To do this, you will need a steel corner measuring 80x80 mm and 900 mm long. Holes with a diameter of 12–15 mm are made in both of its shelves in increments of 50 mm. The air duct is welded into the bottom so that both its edges remain outside. The essence of the improvement is more clear from the presented figure.
How to paint it “cheaply and forever”
A metal structure must be painted for both aesthetic and practical considerations. Unprotected steel will quickly rust, which will not add either beauty or durability to the structure. Any heat-resistant paint intended for car mufflers is best suited for painting a barbecue, but its high price and complex application technology do not allow us to call this option ideal. Silicone-based paints, specially created for painting, have the same disadvantages. metal furnaces, fireplaces, barbecues and grills.
A cheap and practical material is Kuzbass varnish and similar mineral compositions based on bitumen resins.
The coating should be done in 3-4 layers, with complete intermediate drying after each application. Of course, paint inner surface There is no need for a barbecue - a coating of soot, on the contrary, will contribute to obtaining an ideal product.
The disadvantages of this method are long drying times and unpleasant, toxic fumes. In addition, the paint remains fragile for a long time, so it requires careful handling. The first 2-3 firings are best done “idle”. This will eliminate the odor and make the coating more durable and safe. When mineral composition baked, it will be very difficult to damage it. Practice shows that such a composition does not require updating for decades.
Video: how to build a barbecue from a gas cylinder in three hours
Many options for barbecues built on the basis of a gas cylinder allow you to build a practical, functional and original design. It can be placed under a canopy or in a gazebo, installed outdoors or made completely mobile. A properly built grill produces soft and even heat, which makes the kebab soft and juicy. Therefore, all that remains to be wished is good company and bon appetit!
An old gas cylinder is one of the most useful things in the household. They make a lot of things out of it: stoves, potbelly stoves, barbecues and barbecues. and all because the form is almost ready. There are still minor alterations that only take a few hours. For example, you can make a barbecue from a gas cylinder with your own hands in three to four hours (this is if you don’t make the legs).
Safe disassembly
Before you start working with the cylinder, you must remove any remaining gas from it. The operation is simple, but it reliably prevents possible troubles: the container is filled with water. It displaces all vapors and residues.
First, unscrew the tap and connect water hose and water is supplied under low pressure. When the entire volume is completely filled, you can start cutting the metal.
Cylinder markings
Most often they take it for a roasting pan propane tank for 50 liters. It turns out optimal size for preparing 6 servings of shish kebab. These products are standard, so the markings will be common for everyone.
The outer diameter of the cylinder is 96 cm. It is perfectly divided into 4: it turns out to be 24 cm. There is also a mark against which it is convenient to make markings: this is the longitudinal seam. It is worth setting aside all distances in relation to it: then everything will be smooth, without distortions.
First, we set aside 24 cm from the seam in both directions, draw lines. Having placed the cylinder horizontally, seam down, on one of the lines we make markings for skewers. We retreat 3 cm from the circular seams on the right and left, and then put marks every 8 cm. We get 6 marks. They will need to drill holes with a diameter of about 1 cm.
From the line on which the markings were made we put 10 cm upward (from the middle seam it will be 34 cm). This is where the lid of our grill will end.

Next we mark the lid itself. This will be the distance between the first line you marked and the one you just drew. Between them, departing 3 cm from the circular welds, we draw lines. We drew a barbecue lid on the cylinder. It takes up less than half the diameter (in the photo it turned out below).
Making a grill from a gas cylinder
We carry out all these manipulations with a cylinder filled with water. We marked it, and first of all we cut it along the line to which the lid will be attached (look at the photo below). Just remember: when cutting the balloon, do not reach 3 cm from the circular seams.
Once you have made a cut along the entire length of this line, stop. There is no need to cut further yet: we will immediately weld the hinges.
If you first cut off the entire lid, it will be difficult to weld the hinges: you will have to somehow fix the lid, keep it at the same distance. It is impossible to do this alone; you will need an assistant. Stopping after the first cut along the line, it is easy to do everything alone.

Having welded the hinges, we continue to work with an angle grinder - we cut off the door, but it turns and does not fall. Now you can empty the water from the tank.
Next to open lid did not fall back and did not break the hinges, we weld pieces of the corner along the cut line between the hinges (look at the photo below). A width of 3-4 cm is enough, and cut off the corner as you like - 40*40 mm or 50*50 mm. Such stops are needed on both sides of the cover - right and left.
The distance to which the lid will open is changed by straightening the corners. Choose a distance so that it is convenient for you to close it - you don’t have to lean forward to reach the handle. But at the same time, you shouldn’t push it too far forward, so that it doesn’t slam shut and hit your hand.

We weld a piece of the corner between the loops - this will be a stopper for the lid
The remaining bottom rim is easy to remove if you make an incision. It is advisable not to touch the side (circular) seams. They contain sealing rings that rigidly hold the entire structure of the barbecue. That is why, when marking the lid, we stepped back a few centimeters from them: so that the grill was durable and reliable.
We attach a handle to the lid. She can be anyone. If there is something suitable in the stash, we use it; no, we can simply weld a piece of appropriately bent fittings. It would be advisable to add another piece of wood so that you can handle it with your hand.
The next step when making a barbecue from a gas cylinder is necessary to ensure that the lid does not fall inside. To do this, we cut out a strip about 3 cm wide from metal 1-3 mm thick. And weld it to the cutout in the cylinder.


On the other side, on the welded plate opposite each of the holes, we make cuts. This is also a place for skewers.
The next step is to cut holes in the bottom for air to enter. The design of the brazier is closed, and without this, firewood and coals will burn badly. Therefore, we turn the grill upside down, and set aside 10 cm from the seam on both sides. Next, from each of these lines we set aside another 10-12 cm and also draw lines. It turned out that at an equal distance from the central seam, we have two strips 10 cm wide. In these strips, we cut holes for air supply every 5 cm with a grinder. If you wish, you can drill holes instead of making strips, but there should be a lot of them, and making the strips will take less time.

About why holes are not made at the very bottom. Firstly, it is undesirable to touch the seam. It gives rigidity to the structure. Secondly, any holes at the bottom quickly become clogged with fat mixed with ash and ash. Then this mixture smokes heavily, and air flows through the clogged holes very poorly, you have to constantly fan the firewood and coals and often clean the holes.
The final touch is to cut off the tap and weld the hole.

The barbecue itself from the gas cylinder is already ready. It remains to attach the legs. How - read a couple of paragraphs below.

What should be the result: a brazier from a gas cylinder with a lid
Simple design
The option described above is convenient, but rather complicated to manufacture. Everything can be made easier. The easiest way is to cut a propane tank in half lengthwise, cut skewer-like indentations along the edges, drill holes in the sides for air intake and attach legs. That's all the work.

If you want to make a grill with a lid, the second half is welded onto the hinges. And so that the lid does not fall through, a strip of metal 3 cm wide is welded to it along the outer and side sides (in the previous version, the strip was welded to the body, and not to the lid).
To prevent the open lid from falling, a piece of chain is sometimes used as a stopper. A segment of the desired length is welded to the right and left. But the option with stops at the back is much more practical: the chain gets tangled and dirty: when the lid is closed, it ends up inside the grill.
Barbecue from a barrel
It is advisable to find a barrel of almost the same volume - 50-60 liters - this is the optimal size. Moreover, its diameter should not be too large: skewers are usually 50-60 cm long. In order for them to lie tightly on the frying pan, there should be at least 10-12 cm of free length. So it turns out that the diameter of the barrel should not be more than 40-50 cm.

Brazier from a barrel with a lid. Manufacturing down to the smallest detail coincides with the process when using a gas cylinder
If it is wider, there are two options - make skewers according to the required dimensions or weld a corner on the far side from the inside on which to rest their tips. You won’t be able to win much, but 5-6 cm, depending on the size of the corner, can be won back.
Barrels must have walls at least 2-3 mm thick. Of course, you can’t use fuel containers. Nothing can burn them out to such an extent that you can cook food.
The sequence of manufacturing a brazier from a barrel is no different from those described above. It just goes away by itself preparatory stage- There is no need to fill with water. With very different sizes, you will need to make adjustments to the markup - in the direction of decreasing or increasing - see for yourself.

From the barrel, you can also make the simplest brazier - weld the legs to the cut along the container and cut along the edges of the recess for the skewer
They make very functional braziers from barrels - they add a container for coal or firewood (also with a lid) next to it. One of these is in the photo.

Although, no one bothers to make the same from a cylinder: next to a 50-liter propane tank, attach the same design, but already 27 liters.

Brazier from a pipe and with a pipe
Building a brazier from a pipe is a little more difficult. In the sense that you will need to weld the ends. All other operations are no different. Even the designs are exactly the same.

Braziers from a pipe - manufacturing will take a little more time: you need to weld the sides
But when using a pipe, there are advantages: since we will weld the sides anyway, why not make a door (in the photo on the left). You can use the old one from the stove - you can put firewood through it, as well as regulate the air supply while the coals are “preparing”.
Barbecue with a pipe
To ensure better traction and so that the smoke does not interfere with those nearby, you can attach a chimney pipe to the side of the barbecue from a cylinder, pipe or barrel. This will add more work, but not very much. But it will be more comfortable to use: the smoke is good on barbecue, but they don’t feel like breathing at all.

Barbecues with a pipe are more comfortable - the smoke goes up. You can also arrange everything in different ways.
Making legs
They can be from a corner, round or profile pipe, fittings, strips of thick metal. Use what you have on the farm. Some ideas are in the photo below.

The simplest legs made from a pipe and a corner were welded to the bottom. You can make spacers at the bottom and place a shelf on them
Almost the same can be done from thick steel strips.

Comfortable legs for a barbecue made from a propane cylinder can be made from a profile pipe. They can be shaped like an inverted "T" and welded to the middle. You can make a support in the form of a frame by making a shelf (or several shelves) at the bottom for firewood, bowls, etc.

You can make the legs from round pipe and/or fittings. If you want to have a portable grill, then small pieces of fittings are welded to the body, and pieces of pipes of suitable diameter are placed on them (the internal diameter of the pipes is slightly larger than the outer diameter of the fittings). You can do the opposite: weld pieces of pipes and insert fittings.

Just keep in mind that with such legs it will be difficult to move it: the legs will fall out. To avoid this, cut a thread.
See a video example of making one of the homemade barbecues from a propane cylinder below.


