The hanger in the hallway is not only a place to place clothes. It can be a design element and decoration, and additional features in the form of a shoe rack or a mirror will allow you to avoid buying a few more pieces of furniture. What can be a wall hanger in the hallway and how to make it yourself?
Types of hangers
Wall hangers in the hallway can be of various shapes and sizes: from a small board with hooks for small room to models with cabinets, cabinets and shoe racks for more spacious ones.

materials
Most often, hangers are made of wood or metal. The material must be strong and durable. Metal options more durable, they can be found not only in apartments, but also in offices. Of the wood species, beech, birch, and pine are most often used. Wood goes well with glass, metal, mirror surface.
The hanger can be either a traditional shape, or in the form of a tree that retains its natural shape, with twigs and knots, or deer antlers. wooden models may be artificially aged.

Wall hangers made of natural wood are pleasant to the touch and environmentally friendly. Designer models from valuable breeds can be quite expensive.
Hangers are also made from laminated chipboard. This is a cheaper option than natural wood but less durable. Wood and chipboard are coated with various varnishes or paints.
Metal models can be both chrome-plated and painted. There are also forged options that can fit both classic and modern interior. Metal hangers in the hallway are strong and durable.

Stylish forged hangers are sold in ready-made, they are also made to order, which is quite expensive, but you will get a unique product. Forged models can be covered with black enamel or decorated with gold, silver, bronze, patinated. They are made with floral patterns, images of animals and other subjects, so you can find an option that suits any style of the room.
How to choose a hanger
When choosing this piece of furniture, you need to consider several points.
- Outerwear, especially winter or rain-soaked clothing, is heavy, so the hanger must be durable.
- Metal models should be light.
- Count the optimal number of hooks so that all family members can hang their clothes.
- Also consider the height of all family members.
- Hooks with balls or other massive elements at the ends are inconvenient if you plan to hang your coat on eyelets.
- Heads of nails, self-tapping screws or other fasteners must be hidden.
- When buying, be sure to look at the build quality.
- For hats, a model with a shelf is convenient.

Design
The appearance of the hanger should match the style of the hallway. Models made of chipboard and metal are made for almost all styles. Can be found original variants for high-tech, loft, minimalism, urban style, Provence and others.
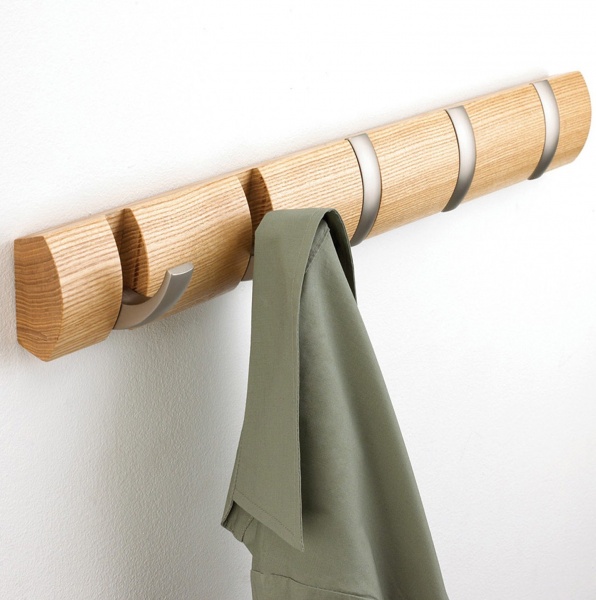
Designers offer various original options, some of them are shown in the photo below. Hangers with folding hooks are interesting and practical; they can be either large throughout the wall or compact for a small hallway.
In the design of the hanger in the hallway, such unusual elements as metal pipes, valves, hooks. The hooks themselves can be made in the form of hands, clothespins, piano keys

DIY hanger
And if you want to show your creative abilities or you are not attracted to the models presented in stores, you can make a hanger in the hallway with your own hands. In this case, you can use a variety of materials:
- tree,
- chipboard,
- horns,
- metal pipes,
- door handles,
- furniture parts,
- platbands for doors.

It is important that in the end you get a strong and robust construction. How to make a simple hanger with your own hands, look at the video.
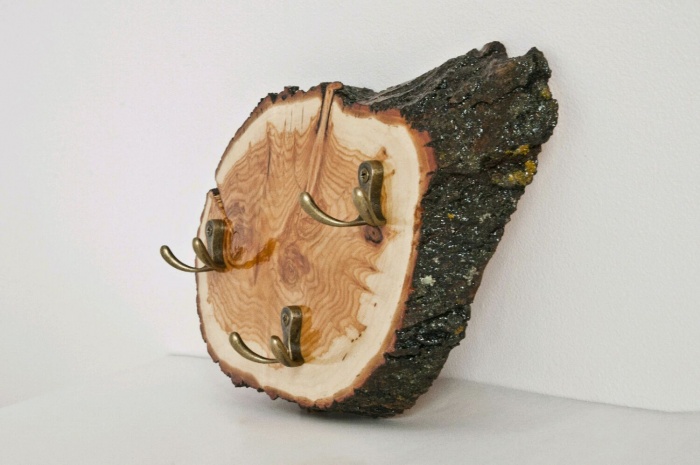
From the antlers of an elk
For a hanger made of elk or deer antlers, the antlers themselves and a wooden base are needed. This may be a saw cut of a tree is enough large diameter or more complex composition of several wooden parts as in the photo.
Advice! Nice looking wood product garden trees — different breeds have a different shade.
If you find horns in the forest, they must be processed correctly:

If elk or deer antlers have lain on the ground all winter, they are darker in color. Fresh horns after sanding have an ocher color.
To attach the horns to the base, 3 holes are drilled in them. For fastening use screws with a length of 80-100 mm.
From cuts
Such a hanger can be made from slices of wood of different diameters. If the garden needs to get rid of the old fruit tree, you can give him a second life in this way. Of course, the wood should not be rotten and without large cracks.
Simple hanger made of chipboard
For its manufacture, you can use a furniture shield. Such boards are sold in furniture or hardware stores. Metal hooks are also needed. If you want to make a shelf, you need two boards. Brackets or corners are required to mount the shelf. Of the tools you will need:
- drill,
- tape measure or ruler for measuring distances.
First you need to lay out the hooks on the board and mark the places of the holes for their fastening. To do this evenly, you will need a ruler or tape measure. On the other board, mark the places where the brackets are attached.
Hooks and corners (brackets) are fastened with self-tapping screws. Holes are drilled under them so that the chipboard does not crack when twisting. At the same time, a drill is taken 1-2 mm thinner than a self-tapping screw.
The shelf can be hung either separately or attached to the board with hooks. The hanger is attached to the wall with dowels and self-tapping screws.
Vertical hanger
A tall vertical hanger will fit in a small hallway where there is no wardrobe. Make it easy.
Lining, boards or trim for doors are suitable as a material. The last option needs to be strengthened cross bars, since the platbands are not designed for hanging heavy clothes on them. It is to these planks that the hooks will be attached, so for them you need to choose a tree or a strong pressed beam. Platbands in this case play a more decorative role.
It will be more convenient to first mount the crossbars on the wall, and then attach them to them decorative boards. It is not necessary to place them in parallel, you can make the hanger expanding upwards. Then on the wall, mark the places for attaching the boards.
Hook selection
You can use not only ordinary hooks, but also come up with more original solution, for example, take or hammers. To make the hanger more spacious, it is better to choose triple hooks, they are available different design. Hooks should match the base material: silver or chrome is suitable for light wood, copper, gold or bronze for dark, aged wood.
Advice! Choose hooks with two holes for fastening. So they won't spin.
If there are two rows of hooks, it is best to choose them of the same design, but different sizes. Larger ones are placed in the top row.
Conclusion
Not a single hallway can do without a hanger. This element can not only perform its immediate function, but also serve as a decoration. On sale you can find many models, or you can make your own unique hanger yourself.
You can do without a hanger in the hallway or corridor only if there is a large closet, and then not always. In private houses, it is more convenient to have "duty" clothes at hand - to jump out into the yard. Those that are mounted on the wall are more convenient: they take up less space. One thing does not please: the prices for worthy specimens are considerable. Therefore, we will tell you how a wall hanger is made with your own hands. The models are different, different techniques are used, but they have one thing in common: they are easy to make, especially with detailed photos process and explanation. There are also diagrams and video tutorials.
From boards in the form of a tree
We need a hanger in our small hallway. I don’t want to buy the usual one in the form of a bar with hooks - I don’t really like them, and my little daughter won’t get it. Other options with a set of parallel boards are also not inspiring. There is a switch on this wall, so it won’t work without fitting, and it’s not clear what kind of look it will be. Therefore, it was decided: I make a wall hanger with my own hands in the form of a tree - a trunk, branches. It fits into the interior. I will process the wood with stain and varnish on water based, the color should be close to the color of the front door.
So, two unedged boards 25 mm thick were bought at the sawmill. They are marked - on one trunk, on the other - branches.
We take an electric jigsaw and cut out blanks along the applied contours. Next is the turn of very dusty work - we grind the wood, at the same time adjusting the thickness of the joints with the "branches". Used a drill with a rubber nozzle and sandpaper. First large grain, then medium and small.

Sanding is a dirty business
After the result was satisfactory - it became smooth and the wood pattern showed through well - it was the turn of the stain. This is mahogany color, applied in four layers. After drying, they covered everything with a water-based varnish. Three coats were applied with breaks of three hours.

Nails 200 mm were used as hooks. They were cut to desired length(different ones - longer for the top of the hanger, shorter for the bottom). The caps and the rod were polished for smoothness, and a thread was cut into the thickness of the board (25 mm) on the lower part. Holes were preliminarily made in the “branches”, “hooks” were screwed into them.

Now it remains to fix all the details on the wall. The walls are concrete, so we fix them with dowels. First we put the barrel, we drill holes through it. We set aside the wood for now, insert plastic plugs for dowels into the holes. Having put the "barrel" in place, we fasten it. Using the same technology, we fasten the "branches".

It turned out well, and the color almost exactly matches the door. The plans are to build a small shelf for shoes and bags. All costs for the manufacture of this hanger - about $ 6 for boards and $ 2 for nails, about the same amount was spent on dowels. Stain and varnish were, and consumption is small.
Simple wall hanger made of chipboard
The task is to make a cheap clothes hanger on the wall (for rented apartment). IN hardware store bought two boards made of laminated chipboard () called " furniture board". Two, because the price turned out to be low, and in the accessories department, where they were looking for hooks, they found good brackets for very little money. We use them for the second board - we will make a shelf for small things.

From the tool you will need a screwdriver or screwdriver, a drill, a set of drills. Still - a tape measure and a pencil - mark the attachment points of hooks and brackets.
After the boards were unpacked, there were spots of glue on them, some other, incomprehensible stains. All this can be eliminated with a solvent. We take a soft white (not colored) rag and wipe everything well.


Next, mark with a pencil the places for the screws. Remove hooks, drill holes. Drill - 1-2 mm smaller in diameter than the diameter of the self-tapping screw. The hole is necessary so that the work goes easier, and also so that the surface does not crack when twisting. We put the hooks in place.
It's time for the shelves. I set aside the same distances on one side and the other, attached the brackets, marked the holes for the fasteners. Drilled holes, installed brackets. All.

Now we mount it on the wall. The technique is the same, but with dowels: we apply, mark the attachment points, drill. Drill - according to the size of the dowel. We insert the plug of the dowel into the hole, put the hanger / shelf on the wall, fasten it.

This do-it-yourself wall hanger was made in two hours (together with a shelf).
Hanger with shelf
You can take the idea as a basis, use any other "hooks" and stops. This DIY wall hanger is made from two 25mm thick planed boards, two carpenter's squares and five hammers.

Wood needs to be dry, otherwise cracks may occur. Instead of squares, even triangular pieces of a similar board can be used. Important condition- Availability right angle. And instead of hammers, you can even fix knots or, for example, cut wooden hangers, yes, any hooks. This one is just a gift.


Spare parts - hammers and squares
The two boards must be the same length. An exact match is important. Having adjusted the length, we process the edges with sandpaper. There is a drill - we take a nozzle, fasten the emery and grind first with a large grain, then with a medium one. Then we start marking. First, mark where the stops will be attached. Divide the remaining distance by six, put marks - there are five of them. Just by the number of "hooks".

Ruthlessly cut off the handles on the hammers. We cut it slightly obliquely to get a slight slope.

Using a drill, make holes in the center. The drill diameter is 1-2 mm less than the fasteners used, the hole depth is not less than the length of the self-tapping screw.

Two boards must be connected at right angles. The installation step of the screws is 10-15 cm. We mark the places on the sidewall, transfer them to the end. High accuracy is required. We apply one to the other and transfer the marks with a finely sharpened pencil. We make holes according to the markup.

Drilling holes
We fold the boards at an angle of 90 °, connect them with self-tapping screws. First we twist the two extreme ones, then one in the middle, and then all the rest. The length of the self-tapping screws is at least 75 mm (triple the thickness of the board).

According to the marking, we drill holes for the hooks.

Installing the corner brackets. Since joiner's squares were used, there were no holes in them. They were drilled - two on the top and bottom on each bar. On one stop, 8 screws are obtained. We take them small - more than 20 mm, so as not to pierce the wood. Therefore, a large number of them are required.

The wooden wall hanger is ready. It remains only to paint and hang on the wall.

Based on this homemade hanger, other options were made.


With larger shelves
Video lessons
A few simple homemade hangers for "handy" in video format.
Drawings and ideas for DIY


Easy DIY hanger

The entryway is the first thing guests see when they enter your home. Therefore, it makes sense to decorate the walls of the hallway in a non-standard and interesting way, thereby forming the first unforgettable impression. Original wall hangers in the hallway are an important and integral element of the interior. There is always something to hang on hangers-hooks: outerwear, bags, umbrellas and other accessories. Some design ideas help to move away from traditional solutions and transform the hallway!
Wall hanger in the hallway: types and features
Hanger in the hallway - simple and extremely useful design in the interior. If it is not possible to place a closet or a wall in a small hallway, then a wall hanger will be the best solution for storing things and keeping usable space free.
In the traditional version, the wall hanger is a bar on which hooks or pins are located. But even so simple design designers are constantly improving, changing, supplementing with new features and surprising with a completely unusual design. Often, the classic model of the hanger is made more spacious, equipped with additional recesses for small accessories and keys, trays for things, slots for correspondence and shelves for hats, movable elements are mounted, instead of a standard rectangular hanger, they give the hanger a curved, figured or stylized shape. Many models of wall hangers are hinged mini-hallways that are attached to the wall.


wall hanger in the hallway can also be made in the form of separate hooks located on the wall in a certain or chaotic manner. This option is even more compact and flexible, which allows you to arrange a hanger even in a very limited area. The main difference and advantages of individual hooks is in mobility individual elements. After all, even a small wall hanger in the hallway can not always fit into the existing space. Modern designer hooks for outerwear are very popular and are used in the interior not only for functional purposes, but also for original decor, which emphasizes the style and uniqueness of the room. In hooks, a lot of attention is paid to design - unusual shape hooks, non-standard materials, bright colors and eye-catching decor. Such a hanger becomes the visual center of the hallway interior.


Types of fastening hangers and hooks
There are four main types of attachment:
- classic with screws;
- adhesive;
- suckers;
- magnetic.

The most reliable and common method of fastening is with screws. With this method of fixing, hangers and hooks can withstand a large load. For permanent use in the hallway, for heavy outerwear, it is better to choose this type of design. Fixing hooks with suction cups or adhesive tape is suitable for use in the bathroom, kitchen or nursery, where the load on the hanger will be less than in the hallway. Hangers of these types require smooth surface, For example, ceramic tiles, and the main advantage is that they do not spoil the wall. The magnetic method is used extremely rarely, since installation is a prerequisite metal surface in the hall.

Use in different interior styles
Wall hangers in the hallway and coat hooks are selected according to the style of the interior of the room. For a classic hallway, hangers made of wood or metal are suitable, preferably with a discreet design. In an interior dominated by calm pastel colors and natural materials, such wall hangers will look very organic, only emphasizing the classics.


In the interior modern styles you can safely experiment with the shape of wall hangers or hooks. Any brave design options favorably emphasize the relevance and originality of the interior. Stylized figures, abstract forms, non-standard designs - than brighter design, especially unusual composition you can compose.

Into the interior industrial style, rustic or loft hangers from water pipes or wrench hooks.


A high-tech hallway can be decorated with futuristic metal structures.

Minimalism and Scandinavian style will withstand any design of hangers, but the main condition is their small size and the absence of unnecessary decorative details.

More photos of the original wall hangers and hooks for inspiration:


A wall hanger is the first thing that visitors who cross the threshold of an apartment pay attention to. This piece of furniture is designed to accommodate outerwear, hats, as well as things that are not convenient for indoor use, such as an umbrella, bag, sunglasses.
In contact with
Classmates
Benefits of using a hanger
When planning to make a hanger with their own hands, craftsmen are wondering: how to make it meet all needs and have an aesthetic appearance? Because the skillfully chosen design of this product already from the threshold dips the household into the atmosphere home comfort and comfort. But the hallway does not always contribute to the placement of huge and clumsy cabinets, sometimes a wall or floor hanger will fit better and more organically into the interior.
The main types of hangers, depending on the fastening:
- floor - is a structure standing on the floor and which consists of an upper compartment where hats and outerwear are located, and a lower compartment designed for bags, umbrellas and other things;
- wall-mounted - is a structure made of a board with hooks, which is mounted on the wall. As a rule, wall hangers are combined with shoe cabinets;
- ceiling - this element of the interior is attached to the ceiling and has weight restrictions;
- mobile - this type of hanger does not provide for its fixed placement. It is used only as an addition to the main hanger. If necessary, you can always get a mobile hanger to hang outerwear or things that did not fit on the main hanger.
Tools needed in the work of making a hanger with your own hands
Do-it-yourself hanger in the hallway is very simple. But before starting work on its manufacture, you need to take care of the following list of tools and materials:
- grinder;
- self-tapping screws;
- jigsaw;
- Confirmates - this is a special connecting screw, which is used to tighten wooden parts various products. Such screws are widely used in furniture production;
- or chipboard;
— furniture edge- this is a material in the form of a narrow strip, which is used to glue the end side of wooden furniture parts.
depending on the flight of fancy, the list of materials from which you can make a hanger increases.

Materials for making hangers
Today, there are many artificial and natural materials from which you can make a hanger in the hallway. But at home, it is a wooden hanger that looks most organic and comfortable. It is environmentally friendly as it is made from natural materials, durable and proper care- also durable.
Note!
The different structure of the wood, as well as the use of special furniture dyes, make it possible to give the product almost any color.
In addition to wood, hangers are made of metal, plastic, they can combine several different materials. But such hallways are most often found in the premises of large corporations, international companies, etc., as they are more in line with the office style.

Stages of creating a hanger
Before you start work, you need to think carefully about what kind of hanger will be, where it will be attached, you need to think not only original design, but also that the new piece of furniture also remains practical and comfortable. To do this, it is advisable to draw a product on a piece of paper, so it will be easier to see what the end result of the work done by yourself will be.
After completing the inventing stage, you need to make a list necessary materials to make hangers. At this stage, it is necessary to decide what material the hanger will be created from, calculate how many consumables and basic materials are needed to make it.

hanger scheme
Features of the manufacture of hangers
In the manufacture of hangers of any type, it must be taken into account that clothes can be different, large or small, children's or adults, lush or narrow. Therefore, to make the hanger more practical, you need to select different hooks for clothes, and it is also desirable to place them at different heights. In addition to clothes, it is customary to leave various things on hangers, such as Cell phones, bags or keys. In order for these things not to be lost, it is possible to provide in the design for them the necessary niches, a shelf or a special hook, which will only be used as a hanger for keys or for bags.
wall hanger
To create a simple wall hanger, use ordinary boards, which can be purchased at any hardware store or supermarket. The process of creating a wall hanger looks like this:
1) Purchased boards are carefully sanded and cleaned with sandpaper or grinders;
2) Then the surface of the boards is primed with a water-based varnish;
3) In order for the surface to be smoother, when all the boards are dry cleaning and can be repeated;
5) Then, as the boards dry, use a screwdriver and self-tapping screws to connect them together. This is how the basis for the hanger is obtained;
6) Then, to add more functionality to the future hanger, a mirror is attached to it with a special glue;
7) As a rule, all wall-mounted wooden hangers are made with top shelves to accommodate hats. For this purpose, pre-prepared boards are screwed with the help of confirmations to the base of the hanger;
8) Well, the last final step is to attach the clothes hooks to the frame of the product.

floor hanger
Most often, such a hanger is made of chipboard or chipboard. This gives an advantage in the choice of color, since the variety of shades of such wood materials is very large. In order to beautifully and correctly make blanks for a future hanger, special furniture machines, therefore it is recommended to contact any furniture workshop, where they can quickly and efficiently cut a wood board, as well as stick an edge on its end sides. Then, the ready-made basic elements can be connected together with a screwdriver and confirmations in accordance with the layout. And at the very end, attach hooks for clothes. And all the clothes hanger with your own hands is ready.
Special hangers
As noted above, in addition to clothes, hangers in the hallway are also used to place various wardrobe items and accessories that should always be at hand when leaving the yard. Therefore, it is also important to provide special places in the design of the hanger where you can put or place various small and not very objects, for example: glasses, keys, umbrellas and, probably, one of the main elements of women's wardrobe - bags.
Note!
Bag hanger is necessary element any hallway, as a rule, is placed at some distance from the place of located clothes, in order to have uncluttered access to the bag if necessary.
It is also advisable to place the keys in a special secluded place on the hanger in order to to a stranger it was difficult to find them, and the owner always knew where they were.
Do-it-yourself hanger in the hallway video:
In contact with
See inaccuracies, incomplete or incorrect information? Do you know how to make an article better?
Would you like to suggest photos for publication on a topic?
Please help us make the site better! Leave a message and your contacts in the comments - we will contact you and together we will make the publication better!


