Roller blinds are suitable for connoisseurs simple shapes, clear lines and laconic design. They cope excellently with the main purpose of the curtains - covering the window opening from sun rays and curious glances, but at the same time they take up a minimum of space and do not overload the interior with an abundance of draperies, multi-layer structures, ruffles, flounces, puffs and other decorative elements. In addition, you can create unique roller blinds do it yourself - step by step instructions are included.
But before we tell you how to make roller blinds, let’s get acquainted with the principle of their operation. Like everything ingenious, the principle of their design is as simple as possible: a smooth fabric with a sewn-in weighting agent is hung on a window and, when the cord is tensioned, it is simply wound onto a drum.
Advantages of roll structures:
- The window opening is tightly closed, eliminating the possibility of looking into the room from the outside.
- Can be mounted on a regular cornice, metal-plastic or wooden frame - in any case, such curtains take up less space than standard curtains.
- When mounted on a frame, they do not block access to fresh air when ventilating the room.
- They are suitable for any room and will be an excellent alternative to blinds, which many still consider to be an exclusively office decorative element. Fabric curtains look more comfortable and “homey”.
- Can be used either separately or in combination with other textiles - curtains, drapes, lambrequins, tulle.
- A huge selection of textiles and their colors allows you to find the optimal solution for any interior style.
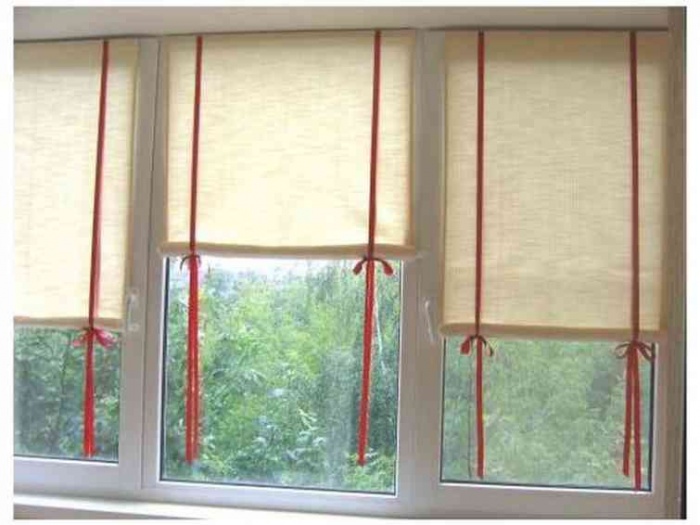
Fabric roller blinds can be installed separately on each sash
Roller blinds in different styles kitchen interior:


But such curtains also have their disadvantages. Unlike the same blinds, you can only adjust the direction and intensity of light by partially raising or lowering them - you can create light twilight only with the help of a special fabric with inserts of varying degrees of transparency. In addition, any textile absorbs odors and requires regular care– numerous washings, cleaning and ironing, especially when it comes to the kitchen. But the most significant drawback is malfunctions of the mechanism and frequent distortions of the fabric when opening/closing the window, so let’s look in detail at how the mechanism of roller blinds should work.
Types of structures and lifting mechanism
The main element of roller blinds is a rod with a round cross-section that collects the fabric into a roll, and a decorative cord or chain, the tension of which drives the roller. The curtains are held in a straightened state using a weighting agent, and when folded they are secured with garters or other decorative elements. Depending on the type of structure, the rod can simultaneously play the role of both a load and a roller if it is placed below, or it can be attached to a cornice or frame.


Although the operating principle of all roller blinds is the same, their designs may vary. additional elements, the purpose of which is to improve the appearance or provide more comfortable operation. Perhaps the most practical addition is the use of special guides or magnetic tapes, which eliminate distortions and gaps when operating the curtains. A closed box in which a roller with a fabric roll is “hidden” also looks good - in addition to its aesthetic function, it also protects textiles from various damages and dust accumulation.

Curtains with a closed box are called cassette curtains
The lifting mechanism control systems also differ:
- Chain - adjustment of roller blinds is carried out manually using a regular cord, rope or plastic chain thrown over the drum and attached to the lower edge of the curtain. When the cord is pulled, the roller begins to rotate, winding or straightening the curtain. But to hold the canvas you need to additionally use clips, garters or other holders. Despite the simplicity of the device, such a system is considered the most reliable and affordable.

Chain mechanism – simple and durable
- Spring - the system is installed at the top or bottom of the curtain and closes quickly when the spring straightens. In this case, the material is fixed automatically and does not require additional manipulations with the holders. True, springs wear out quickly and require frequent replacement.

Fabric roller blinds with a spring mechanism can be installed both at the top and bottom of the window
- The electric drive system is the most expensive and difficult to operate system, but the easiest to operate. The fabric in such curtains is rolled up by an electric motor, which can be started remotely or by clicking a switch button. This lifting mechanism simply irreplaceable for large and high openings, on ceiling or roof windows.

Diagram of the device of electric curtains
The simplest mechanism for roller blinds, you can make it yourself from a round block of wood or a metal rod, equipping it with a cord or a plastic chain, which can be purchased along with mounting hardware. But if you want more functional curtains - spring or electric, then you should buy a ready-made system and attach the material you like to it.
On a note! Roman blinds are also often called roller blinds. But this is not entirely correct. When closed, they are really similar, but when lifted, the rolled structures wind the fabric onto a shaft, while the “Roman” ones gather into horizontal folds.
Materials for practical curtains
Do roller blinds You can do it yourself from wooden planks or thin bamboo slats. This material does not fade in the sun, reliably protects from light and is resistant to mechanical damage. But it has two significant drawbacks: noise effects in drafts and impressive weight (even light bamboo requires deep holes for reliable fixation of the structure - adhesive tape will not hold it for long). In addition, despite all the environmental friendliness and natural beauty of wood, such diversity color solutions like textiles, it cannot boast.

Therefore, the most popular materials for roller curtains are fabrics: polyester, linen, cotton and nylon. Combined fabrics have also proven themselves to be excellent - fiberglass, polyester with the addition of viscose, satin or cotton, screen (polyvinyl chloride with fiberglass). All these fabrics are quite practical, easy to wash and last a long time. You can choose any shade and ornaments, depending on the style and color scheme of the room.
It is worth paying attention to the degree of transparency - thin fabrics that transmit light well are suitable for the living room, kitchen and office. But for a bedroom or nursery, it is better to give preference to thick curtains that will reliably protect sleep from the bright rays of the morning sun, the light of lanterns and the glare of headlights at night.

Blackout curtains - best protection from bright light
Important! Please note that when the curtain is lowered, its reverse side is visible from the street. Therefore, it is worth choosing double-sided fabric, or sewing two single-sided layers into one fabric.

Types of fabric roller blinds according to the degree of darkening of the room
Fabrics with light effects:
- Transparent and translucent fabrics (cotton, satin, silk) scatter the sun's rays well, but do not darken the room well, so for rest rooms it is advisable to combine them with thick curtains or drapes.

Transparent and translucent roller blinds will protect from prying eyes during daylight hours when the lights in the room are turned off
- “Blackout” - light-proof textiles with complete blackout are ideal for bedrooms, attic or ceiling windows, and home theaters. Such curtains will provide ideal relaxation even on a sunny summer day.

“Blackout” – fabric with a complete blackout effect
- “Dimout” – delays light by 70%, therefore it is considered universal solution for the bedroom, living room and nursery. But for the kitchen, where it is important good lighting during the day and do not require complete blackout at night, it is better to choose a thinner fabric.

Dimout: medium dimming
- “Day-night” or “zebra” - this textile is created by alternating matte and transparent stripes, which allows you to adjust the degree of darkness in the room according to the principle of blinds.

Roller curtains made of fabric with a day-night effect
Important! Roller blinds for the kitchen can be made from fabric impregnated with special compounds that reduce the absorption of fat, odors and other cooking costs. For living rooms Curtains with an antistatic effect are suitable, repelling dust and reflecting heat. Such textiles help create an air layer near the glass, which traps the cold in winter and the heat of the sun's rays in summer. But for impregnated fabrics, dry cleaning only is recommended.

In the kitchen it is better to use fabrics with dirt-repellent impregnations.
Sewing curtains yourself is a real savings when decorating a room, because on each window you can win about 2-3 thousand rubles (compared to ready-made models). Therefore, we will consider in detail how to make roller blinds with your own hands.
Correct measurements are the key to success
In order for roller blinds to tightly cover the window, it is important not only to carefully measure the parameters of the opening itself, but also to take into account the following nuances:
- Decide on the area that the curtain should cover - it can be the entire opening, just the glass, or individual flaps (the latter option is convenient for ventilation, but more labor-intensive to implement).

Options for attaching roller blinds to windows
- The length of the fabric cut is calculated as the sum of the height of the window (or opening), an allowance of 3-4 cm for processing cuts and 15 cm for “pockets” for the rod and weighting material.
- For the width of the canvas, measurements are taken of the glass or frame plus an allowance of 3-4 cm (15-20 mm on each side) for bends.

Measurements for a curtain covering a window opening
Materials and tools for work
To make roller blinds with your own hands and assemble the structure practically from scratch, you will need the following set of tools and Supplies:
- Aluminum rod, section of cornice or wooden beam with a circle cross section of 2.5-3 cm - this is the future roller on which the canvas will be wound. It is important that its length is approximately 1.5-2 cm less than the width of the fabric (seam allowance).
- Mounting to a frame or window opening, for example, a wooden strip with a pair of self-tapping metal corners for a regular frame or double-sided tape (option for a plastic window).
- Sewing machine and threads.
- Cut the fabric according to the measurements taken.
- Velcro or teasel tape along the length of the plank.
- Plastic/metal rings and a decorative fastener (silk, satin ribbon or decorative cord), the length of which is 3 times the length of the curtain.
On a note! The manufacturing process can always be simplified: buy a ready-made mechanism with a drum, brackets and chain in hardware store and attach to it with adhesive tape the fabric processed in the studio according to your measurements (some rollers already come with a special “Velcro”). This way you can create unique design curtains according to your design with a minimum of labor costs.

Accessories for roller blinds
Step-by-step instructions for sewing curtains
After taking measurements and preparing everything necessary for work, you can begin assembling the curtain itself. It is most convenient to do cutting and sewing on a flat and smooth surface - a tabletop, wide ironing board or semi.
DIY roller blinds - detailed master class:
- The fabric is cut according to pre-made measurements. If this is a material with a one-sided pattern, you need to sew two cuts with the right sides facing each other along the length and on one side in width, then turn the resulting “bag” inside out and sew it up. If the canvas is double-sided, it is enough to process the edges taking into account the allowance. After this, the fabric is steamed with an iron, Special attention paying attention to the corners.
- At the bottom of the future curtain you need to baste a “pocket”, place a weighting agent in it and then stitch it on a typewriter, closing it on all sides.

On a note! If the curtain material is not impregnated with any by special means and is not intended for dry cleaning, you should take care of how to remove the weight before washing. The simplest option is not to sew the “pocket” tightly, but to close it on one side with a small zipper, buttons or hooks.
- The wooden holder bar can be wrapped in fabric, fixing it furniture stapler or thread and needle. The second option is to simply glue one part of the teasel tape to the front side (the second needs to be sewn to the top edge of the curtain).


On a note! If the manufacturing process homemade holder seems too long, you can always replace it with ready-made fasteners and a cornice pipe onto which the fabric is placed.
- Hooks are screwed into the wooden plank, to which a ribbon or decorative cord is tied. The fastener is pulled along the length of the fabric, brought out through rings sewn to the top of the curtain, and secured to a hook screwed into the wall. When the cord is pulled, the curtain will roll onto the roller.


Curtain with decorative cord
Important! In order for the fabric to be easily collected into a roll, the rings should be suspended at a distance of 15-20 cm from the sides and 5-7 cm from the bar. For this, 2 narrow strips of fabric are used, which are sewn to the top of the curtain. Another option is to do through holes in the fabric itself and close them with decorative eyelet rings. In this case, you can use two ribbons instead of a long cord, tying them into beautiful bows.
- Now you need to hang the holder on the window. To do this, attach a strip wrapped in fabric to the frame, glass or window opening. To mark the mounting location, it is advisable to use a level so as not to spoil the appearance of the structure. IN wooden frame holes are drilled for self-tapping screws or corners are attached to metal-plastic windows You can use double-sided tape or special plastic fasteners.

Attaching roller blinds to plastic windows
- All that remains is to combine the two parts of the teasel tape and hang the fabric with the weighting agent on the decorative strip.
On a note! If the roller blind unevenly unfolds, you should replace the bottom bar with a heavier one.
Video manual for making fabric roller blinds
To ensure that your handmade roller blinds fit harmoniously into the interior of the room, use the designers’ recommendations.
- For rooms facing south or east, cold-colored fabrics are ideal. Emerald, turquoise, violet, ash pink will bring a little coolness and dispel the blinding light. But it is better to decorate windows on the north and west sides with curtains in warm colors.

Cold and warm shades of colors
- It is advisable that the color of the fabric be either darker or much lighter than the walls, otherwise the curtains will be “lost” against the background of the decoration.

Bright curtains will be an excellent accent element
- When choosing an ornament, you should not copy a pattern that is already present in the interior - choose a similar one in shape or color. But if the pattern is applied to the entire surface of the walls, it is better to choose monochrome curtains, but in one color scheme with decoration or other interior elements.

Spectacular striped pattern of curtains “Day-Night”
- Although the design of roller blinds is quite laconic, it can be diversified using various decorative elements, for example, lace, flounces, fringe, playful bows, metal chain. Even a weighted rod can be an interesting accent for window decoration.

Forged rod as a weighting agent

- For living rooms, you can use various combinations, combining roller blinds with both thick curtains and transparent organza curtains and veils. Or you can limit yourself to a spectacular lambrequin - it all depends on the interior style and your personal preferences.
An interesting ensemble of roller blinds and curtains:


- If you want to turn a window into an original picture, then remember the photo printing technique - with its help you can apply any design to the fabric.


Fabrics with photo printing will be the highlight of the interior of any room.
Roller blinds – perfect solution for a modern interior. We hope that our tips helped you not only decide on the color and model of the lifting mechanism, but also inspired you to create your own. If self-tailoring doesn’t appeal to you, you can always buy a ready-made model or order your favorite curtain design from the craftsmen.
Russia, Moscow region, Moscow +79041000555
DIY roller blinds: step-by-step instruction+ video
Takes ~5 minutes to read

Save
Every housewife dreams of the interior of her home changing from time to time. There are many ways to do this. The simplest and cheapest is to change the curtains. They can be purchased at any market or store. This will be easy to do, since the choice of curtains is huge. But the best solution I will sew the curtains myself. Even someone who has never sewed such products can easily cope with this task. You will learn how to make roller blinds with your own hands by reading the step-by-step instructions of the article to the end.

Save
Disadvantages and advantages of such curtains
Advantages:
- No light leaks through them, nothing is visible through them, that is, no one will be able to look into your window.
- They can be hung anywhere.
- They take up little space.
- Fresh air flows easily and freely through the roller blinds.
- These curtains are suitable for any room.
- Roller blinds can be hung either independently or in addition to others.
- Their selection is huge.
Flaws:
- Roller blinds absorb unpleasant odors.
- They need to be constantly looked after.
- After some time they may become warped.
- The mechanism that raises the roller blind quickly breaks down.

Save
How to sew roller blinds on plastic windows with your own hands
To sew roller blinds with your own hands, you need to choose the right fabric. When choosing a fabric, you need to consider that it is:
- Natural;
- Moisture-repellent;
- Reflected the light.
To make roller blinds, you can use fabric of one color or multi-colored and with a pattern. It will depend only on you and your choice.
Making it yourself: step-by-step instructions (photos and videos)

Save
To make roller blinds with your own hands you will need:
- Textile.
- Cord.
- Rope.
- Ribbon.
- Weighting agent (metal or wood).
- Rod shaft (wooden beam or metal tube).
- Screwdriver.
- Self-tapping screws.
- Drill.
- Iron.
- Sewing machine.
- Fasteners

Save
Save
Master Class
- Let's determine the width of the roller blind. Measure the length of the roller and subtract one centimeter from the resulting length.
- Now let's determine the length of the curtain. To do this, measure the distance from the roller to the window sill. Add twenty centimeters to the result.
- Now make a curtain pattern. Measure on the fabric the width and length that you obtained when measuring. Cut out the resulting rectangle. There should be two such rectangular segments.
- Fold the pieces right sides inward and sew on three sides. You should end up with a bag.
- Turn the resulting bag inside out and iron it with an iron.
- Let's move on to attaching the weighting agent. Its length should match the width of the curtain. This is necessary so that the roller blinds do not hang on plastic window. Attach the weighting material, tuck the fabric and sew, departing five millimeters from it.
- Now you need to prepare the tapes. With their help, the curtain will hang rolled up. Cut a ribbon eight centimeters wide from the fabric. And the length of the ribbon depends on the height of the window and is calculated using the following formula: 2* height of the window opening + 30.
- Fold the resulting ribbon lengthwise, right side inward, and sew. Then the tape must be turned out, ironed and sewn open side. DIY roller blinds are ready.

Save
DIY mechanism for roller blinds
First option.
To make the mechanism you will need:
- Staples;
- Video clip;
- Duct tape;
- Screwdriver.
Manufacturing stages:
- Let's start with the staples. If the curtain is located inside the frame, then the staples are placed three centimeters below the top of the curtain. If the curtain will be located outside, then the staples must be secured five centimeters above the window opening. Bracket with round hole is installed on the right side, and with a square hole - on the left side.
- The distance between the staples should be the same as the length of the roller. If so, secure the roller.
- Now we attach the curtain to the roller. Place it face up and place the roller at the top of the curtain. Wrap the edge of the fabric around the roller and secure it with adhesive tape.
- Throw the ribbons over the roller and secure them in the center with a stapler.
- Insert the curtain roller into the brackets. The roller blind for the plastic window is ready.

Save
Second option.
For it you will need:
- Bar.
- Sticky double-sided tape.
- Glue gun.
- Special fastenings.
- Cord and hooks.
- Wooden slats.
- Weighting agent.
Manufacturing instructions:
- First you need to saw off wooden slats. Its length should be one centimeter less than the width of the curtain.
- Cover it with the same fabric from which the roller blind was made.
- Glue adhesive double-sided tape to the bottom of the block.
- On back side The block needs to be attached with special fastenings.
- Insert a weighting agent into the sewn roller blind.
- Attach the roller blind to the prepared cornice.
- Take the cords, tie them and lead them through the special holes. Then line them up and tie a knot.
A video on making curtains and a mechanism will help you cope with this task.
How to make with garter ribbon
To make such a roller blind you will need:
- textile;
- sewing machine;
- iron;
- weighting agent;
- block and lath.

Save
Manufacturing stages:
- First you need to make a pattern from the fabric. Measure the desired width and length of the future curtain. Cut out the resulting rectangle and sew it on three sides. Turn the fabric inside out and iron it.
- Insert the strip into the unstitched side, and then sew it up. This will be the bottom.
- Attach the top of the roller blind to the block.
- Now prepare the ribbons. They should be twice as long as the roller blind itself. There should be two of these tapes.
- Attach the ribbon to the block.
- The roller blind is ready.
Do-it-yourself roller blinds
To make roller blinds you will need:
- fabric for sewing;
- paper template;
- a simple pencil;
- a piece of soap or chalk;
- ruler;
- adhesive pad;
- fringe;
- special glue for fabric.

Save
Master class on making them:
- First you need to make a pattern. It is done in the same way as for regular roller blinds. But there is a difference - you need to leave an allowance of 25 centimeters. This is necessary to finish the edge.
- Now make a template. It is made from plain paper. Its width is equal to the height of the carved edge, and its length corresponds to the length of the roller minus one centimeter. On the resulting rectangle, make the pattern you like.
- The rectangle must be folded like an accordion. Draw the desired pattern on the first strip. Using this pattern, cut the remaining stripes. So, the pattern will be the same across the entire width.
- Make a drawstring. Insert the tube into it and sew up the edges.
- Place the paper template under the drawstring and secure with pins. Trace the pattern with a piece of chalk.
- Glue the fringe along the bottom edge.
- Attach the resulting roller blind to the roller.
Now you know how to make roller blinds with your own hands, as well as how to make roller blinds yourself without the help of a specialist. Good luck!
Roller and Roman blinds
These types of curtains are similar only in the way they are attached window opening and use in the interior. The principle of operation and appearance are different.
Roman blind mount which is similar to the roll mount, similar to the roll mount in its appearance on the window. Mounting both of them is possible outside and inside the window opening, as well as on the ceiling.
Usually rolled and Roman blind mount which happens right in window hole, require ideal flat surface opening. When installing curtains externally, it is possible to hide the shortcomings of recent renovations. Both take up minimal space, are practical, easy to dismantle and durable to use.
Their difference lies in the mechanism for raising and lowering the curtain fabric.
Qualitative making roman blinds provides for coordinated operation of the cornice with the lifting shaft, braid and control rope. This ribbon braid, fixed in a special way in the fabric, is raised using blocks.
If in a roller blind the fabric is rolled into a roll, completely hidden in the box when raised up, then making roman blinds involves gathering fabric into beautiful drapery folds.
How to sew Roman blinds yourself
These days there is a wide variety various types curtains Different styles exert their influence on certain models that are irreplaceable for creating an interior.
As you know, how many people have so many opinions. This well-known judgment also applies to choosing the style of curtains. When choosing from all the variety, the main thing is to decide what you want to achieve by choosing this or that model.
If practicality and aesthetics appearance is the determining factor for you, then pay attention to Roman blinds. They will perfectly protect you from prying eyes and will not create complete darkness in the room, letting in the sun's rays, making the room light, light and uncluttered. This is a great alternative to classic curtains. This solution will bring freshness and novelty to your interior.

You can make such curtains yourself. To create them they are used various materials: from wood to textiles. In the following master classes we will look at options for curtains made of textiles. Roman blinds, following the instructions, you can create them yourself.
Master class No. 1

To create these curtains you will need:
- 2 blinds
- 2 yards of fabric (the amount of fabric depends on the size of the window)
- Construction gun with liquid nails
- Fabric glue
- Scissors
- Sewing machine
Often, the work uses a method without seams, and only special glue is used. But in order for your curtains to look neat and finished, you should lay a seam. You need to fold the fabric into two equal parts and fold the edges in half. Iron and stitch.

Now let's take care of the blinds. Remove all connecting parts.

Leave the inner center thread in place.

Remove the white circles from the bottom of the blinds and any slats. It should look something like this:

Let's take measurements. In this case, a fabric 108 cm long is used, every 18 cm constitutes a crossbar for future curtains.
Use a pencil and draw out all the measurements on the wrong side. Glue the crossbars along the lines. Use fabric glue.
Try to glue carefully, do not apply a lot of glue, because when it dries and hardens, lines from it may show through on the outside.
Straighten the material so that there are no wrinkles and then glue the crossbars, making sure they are level.

We secure the frame and pass the threads through the holes in the crossbars. In some places you will have to separate the fabric and glue, but this will not destroy the entire structure.

Attach the top of the blind to the fabric (you can use a liquid nail gun for this).

Glue the bottom piece, but first thread the thread through the holes and tie a knot.

Glue the dangling tails to the wrong side.

Almost finished, just left to close top bar cloth.

Take a strip of fabric of the appropriate size, trim the edges and glue it to the crossbar with liquid nails.

Ready!!! Quick and easy solution!


Step by step lesson #2
The next master class is an excellent solution, captivating with its originality. This window design will not leave any guest indifferent.
These are not real Roman blinds, just a convincing imitation of them, since they do not go down or up, but if you have no one to hide from and protection from sunlight is not a priority for you, then this solution is suitable for you.

You will need following materials and accessories:
- Textile
- Fabric glue
- Wooden crossbar
- Self-adhesive paper
- Printer
- Construction stapler
- Hammer
- Nails
- Measuring tape
- Buttons
1: First we need to make an image that we will transfer to our curtains. Here is the stencil - download the PDF file.
2: Print on self-adhesive paper and cut out all the parts.

3: Cut the curtain fabric by adding 10 cm in width to the window width, and the length of the product is 2/3 of the window height. Since the product will be assembled, the exact length is at your discretion.
4: Tuck all edges of the product and iron. When folding, measure the width of the frill so that the edges are equal.

5: Tape all edges. While they dry, arrange all the printed parts according to your preference.

6: Iron all the pieces. Don't strive for perfection; it's not necessary here.
Tip: If you remove the paper before it cools, the image will turn out blurry. Allowing the paper to cool will give you a clearer design.


7: Tuck the short edge of the fabric around the wooden crossbar and secure with a staple gun.

8: Make folds as you wish, the length and number of folds is up to you.

9: Sew or pin the folds, if the fabric is heavy, do both steps.

10: Secure the product with nails or screws in place.

Voila!!! All is ready!!!

Master class No. 3

The next master class will take you some time, due to the labor-intensive manufacturing process.
You will need materials:
- Tape (length depends on the size of your product, but minimum 2 spools of 5 meters each)
- Curtain material
- Threads to match the color of the ribbon
- Sewing machine
- Pins
- Measuring tape
1: Unwind the entire spool of tape. Working from the middle (mirrored) will make the process easier. To find the middle, just connect the ends and straighten it out. Determine the center on the fabric and connect to the center of the ribbon.

Pin the tape at 15mm intervals. Go in two directions at once. Pin with pins strictly vertically.
2: Making the corners. Do not cut the tape under any circumstances, just roll it 90 degrees. In the place where the pin is pinned, you fold the tape back around it; if the pins are pinned horizontally, then a straight line is formed. Then you make a 45 degree angle, holding the angle and pulling forward, something like this...


Just pin this corner. Now do the same on the mirror side.

Now you see what you have to do. Each time you complete one corner, you go back and repeat on the opposite side. Now measure an equal distance from the 45 degree corners to the beginning of the corners of the square. Again, make sure the pins are pinned straight as they are used to create 45 degree angles. Decide on the dimensions of the rectangular piece, paying attention to the symmetry of both sides. Lay out the ribbon the way you like and pin the corners.

Continue by creating a design something like this.

As you can see, one coil was not enough. Therefore, repeat all the steps with the second coil, on the bottom of the product.
Note: Make sure that the dimensions (location, length, and squares) of the top part match the design of the bottom part of the product.
Having finished with the “squares”, you form a frill around the perimeter of the product. Pin and repeat the same with the other part. Once you've finished pinning, it should look something like this...

Time to stitch, choose suitable color threads and forward. This will take some time as there are a lot of angles. You must remember that you cannot flash channels.

After sewing work finished, iron all the products, carefully straightening the tape, thread the plastic rods into the channels:

All work has come to an end, all that remains is to hang up your wonderful roller blinds and enjoy their stunning look.


roller blinds
You can sew them yourself. Roller blinds can also be installed on plastic windows in no time.

For work we will need the following tools and materials:
- two pieces of fabric different designs– for the front and back sides of curtains
- two wooden bars long with window frame– one for fastening, the other for weighting the curtain.
- ring screws – 5 pcs.;
- hook screws – 3 pcs.;
- cord;
- scissors;
- centimeter;
- sewing supplies.

STEP 1. We measure the window frame and, according to calculations, cut out two pieces from the prepared fabric required sizes, leaving 3 cm of margin in width and 10 cm of margin in length for seam allowance.
We sew two pieces of fabric from the inside out, leaving one end unsewn. We turn the curtain inside out, finish it and iron it.
Roller blinds have a back side and a front side.
Let's choose which side of our curtain will hang to the wall and spread it on a flat surface with the front side down.
Now let’s sew “pockets” for the slats: to do this, we fold the edges of the curtain (3 cm on top, 1.5 cm on the bottom), stitch and insert the slats.

STEP 2. The top bar sewn into the curtain is fastening. Through the fabric, carefully screw two ring screws into it from above, and from the front side of the curtain - the other two ring screws. Let's step back 5 cm from one edge of the bar and screw another ring into it.

STEP 3. To roll roller blinds you need a cord.
Let's unwind and cut two cords - one equal to triple the length of the curtain, the second exactly the same plus another half the length of the curtain.
We thread the cords into the rings on the fastening bar.
It is important to remember that the longer cord should be tied to a ring that is located further from the common side ring.

STEP 4. We pass the cords along the back of the curtain, bring them to the front side, pass them again through the ring screws, bring them out through the common side loop and tie the cords together.

STEP 5. To hang roller blinds on plastic windows, you must first screw two hook screws into the frame. The main thing is that the hooks are exactly opposite the top of the rings on the curtain.
If we have completed this task, we hang the curtain.
You need to screw another hook screw into the side of the frame to wrap the curtain cord around it when it is rolled up.

The second option for roller blinds
Opening a roller blind
- When calculating the width of the new curtain, you need to add approximately 2.5 cm from the sides, which will be used for hemming and processing of cuts. Before you start cutting, you need to measure the distance from the curtain rail to the window sill.
- At the bottom edge of the roller blind there should be a drawstring for the rigid strip; therefore, when calculating the length, it is necessary to add approximately 5 cm to the bottom edge for the drawstring for the strip and 1.5 cm of fabric for hemming and processing the cut. To strengthen the upper edge, a rigid braid is attached to it.
- If the edges cause the material to pull together at the edges, it is best to cut them off to avoid warping in the finished product. If you select for sewing curtains dense fabric, then when cutting, you should never tear it apart, as some impatient dressmakers do; it is better to use scissors for cutting. When the fabric breaks, the direction of the threads is distorted, and the finished curtain may turn out deformed. Curtains should be cut only in the direction of the fabric threads.

Sewing roller blinds
- Before you start sewing, you need to iron the hem on the product. If you do this before sewing, the processed edges will be clearer and neater, and the processing of the product will take much less time.
- To heat-treat the edges, you will need a metal pattern and an iron with a steamer. The side cut needs to be wrapped half a centimeter around the edge of the tailor's pattern and ironed. Carefully moving the pattern, iron the fold along its entire length, after which the edge of the curtain must be folded over the pattern another 2 cm and iron the edge again. The hem must be stitched on both sides of the curtain.
- The bottom edge of the product should be folded 2.2 cm along the edge of the metal pattern and ironed, after which the ironed edge should be folded one more time so that the bar can fit inside.
- The drawstring needs to be ironed, stitched and the strip inserted inside.
- Sew 2 ribbons to the top of the curtain.
- The top edge of the finished curtain must be attached using special brackets to top bar, iron the finished product and the curtain is ready.
Now you can hang your hand-sewn roller blinds on the window.
Roller blind without insertion into the bottom edge of the rigid strip

Roller blinds can be an interesting alternative to blinds, and craftswomen will be pleased with the opportunity to sew roller blinds with their own hands without much effort. Such decorations lack the pomp of classic curtains, do an excellent job of sun protection and give the interior lightness.
Difference from Roman blinds
Quite often, roller blinds are confused with Roman blinds. And this is not surprising, because in appearance they are very similar (especially when open). Distinctive feature these functional types window decorations - lifting mechanism. Roman ones are raised using a system of cords (chains) and form horizontal waves-folds. Rolled - carefully wound onto special rods.
Roller blinds are easier to make with your own hands. Making them does not require a lot of knowledge and skills; even a novice seamstress can do it.

Roller blinds look stylish and neat, do not take up much space
Advantages of sewing roller blinds
Roller blinds are stylish, interesting view, which is suitable for almost any room. Despite their practicality and functionality, they are able to refresh the interior and add a touch of sophistication and originality.
The undeniable advantages of sewing this type of curtains include:
- the ability to use different materials, choose an option that is ideal for the created environment;
- simplicity of execution - easy to sew and install on windows of any type;
- have a simple control mechanism.

Fabric selection
Various manufacturers offer wide choose special fabrics for sewing roller curtains with your own hands. Among them you can choose: transparent, natural, jacquard, with or without a pattern, for children. A special place is occupied by light-proof materials Screen or Black-out, which will provide one hundred percent protection from sunlight and are perfect for creating a cozy atmosphere in bedrooms. For bathrooms, you can choose polymer materials that are not afraid of high humidity and temperature changes.
The peculiarity of such special materials is the presence of protective layers that provide increased resistance to fading, excellent antistatic properties, and resistance to deformation.
Before using such fabrics, you should read the operating instructions (can they be washed; if so, at what temperatures; is dry cleaning recommended, etc.).
If you want to make roller blinds with your own hands, you can also use ordinary curtain fabrics or thick linen. Such materials will not provide high antistatic and dirt-repellent properties, but are cheaper.

Bright shades of fabric for roller blinds can bring positivity and dynamics to the interior
Color solutions
When choosing the color of roller blinds, it is worth considering that they can be combined with the overall interior or become interesting color accents. By choosing a translucent fabric with an openwork pattern, you can get the effect of stained glass windows. The illusion of foliage will be created by green fabrics with appropriate patterns. Stylish in modern interior models with a metallic shade will look.
It is also important to consider the location of the room:
- for northern windows it is better to choose warm, golden, pink, cream, pastel colors;
- To the south, shades of a cold range (gray, light blue, dark blue) are more suitable.
You should not choose a fabric that matches the wallpaper: this will make the windows merge with the walls. It is advisable that the shade of the curtains be in harmony with the color of the furniture upholstery.

Sewing pattern for roll construction
Sewing roller blinds yourself
Before you start sewing such products, you should measure the window opening and take into account the method of fastening: on the cornice, in the window opening, on the frame.
In the first case, it is necessary to add about 10 cm to the measured width to ensure reliable protection from the sun's rays.
We offer several simple options self-made roller blinds, which differ in the method of fastening and the mechanism for raising the canvas.
Cutting and sewing fabric
- When cutting, the dimensions obtained when measuring the window should be added in width - 2.5 cm for allowances, in length - up to 15 cm for “pockets” and allowances.
- Cut out two fabrics (for the front and wrong side curtains). They can be from the same fabric or from different ones.
If the fabric is dense and there is no need for special light protection, then you can use one sheet.
- Fold the fabric face to face and stitch on three sides (from the inside out!). Important!
If the window is large and it is necessary to sew two strips in the center, then you need to make sure that the seam falls on the frame binding. This way it will be less noticeable.
- Turn the fabric inside out, carefully sew up the remaining side and press the seams.
Further actions depend on the method and mechanism of fastening.
Mounting on a cornice
In this case, you need to do the following:
- sew two “pockets” on the curtain: on the top - for the curtain rod, on the bottom - for the weighting (wooden or metal) strip. Next, sew plastic rings on top on both sides;
- Screw in hooks on the sides of the window opening from above. After this, you can hang and arrange a mechanism for raising the curtains;
- take two cords (one for three lengths of the finished model, the second for three lengths of the curtain and its width);
- tie the end of the first cord to the hook, pass through the bottom of the product and thread it through the ring;
- fasten the second cord in the same way, but pass it through both rings in sequence;
- gather the cords together and fasten them.
Lifting mechanism: when the cords are pulled, the curtain will be wound up due to the counterweight.

Making a roller curtain with your own hands
Beam mount
In this option, it is necessary to prepare a wooden beam, which will be attached from above into the window opening or to the frame. For greater aesthetics, you can wrap it in fabric, and then attach one piece of Velcro tape to the bottom.
As in the previous case, a “pocket” should be made at the bottom of the curtain for the weighting agent. Carefully sew the second part of the Velcro tape on top.
The fastening tapes are cut out and sewn separately. You can use ready-made decorative cords or ribbons; their length should be equal to two curtain lengths plus 15-20 cm.
Fasten this beam to the window, first passing the fastening tapes on both sides.

Roller blinds for plastic windows
It can be installed on a plastic window directly on the frame. In this case, the lower weighting material should be wooden. The top fastening can be done using double-sided adhesive tape.
If you decide to make roller blinds yourself, don’t be afraid to experiment. Connect your creativity. You can not only choose interesting material, but also try to combine various options manufacturing of such products.
Pursuing the goal of refreshing the interior, sewing new curtains will simultaneously demonstrate the creative abilities of the housewife. A successful experiment would be replacing classic curtains with a current roller model. There is no need to be afraid of the complex lifting mechanism.
The proposed master class will help you create original roller blinds with your own hands. There are options for attaching textiles to windows without drilling. Further information will reveal the secrets of mastery.
Characteristics of roller blinds
Laconism and practicality are the distinctive features of roller blinds. This model is especially appreciated in the kitchen interior. Roller curtains in small rooms are designed to preserve space and not visually clutter up the space. Finished goods during assembly they are wound onto the shaft. There are three options for the location of the structure:

The advantages of interior design with roller blinds are as follows:

The cost of finished models, especially with a cassette design, is quite high. It is much cheaper to design roller blinds yourself. The principle of their operation is as follows:
- The role of the cornice is played by a shaft, which is fixed above the window opening or directly on the frame. There is a canvas on it.
- The material itself is held in place by ribbons or cords that are located at the top of the curtains. They allow you to adjust the degree of opening or closing of the roller blinds.
- There are sewing options when several transverse “bars” limit the height of the product’s opening.

The mechanism for installing curtains without drilling is presented in the following video:
Preparatory stage: measurements, choice of fabric, related materials
Before you start taking measurements, you should decide where the curtains will be fixed and the model itself, whether it will cover the entire window opening or just the glass. The procedure consists of simple steps:
- First, all window sizes are recorded.
- The length of the product is determined by the height of the window with the addition of 15 cm for pockets and 2 cm for seam processing.
- The width is equal to the dimensions of the window, which are increased by 2 cm.
An approximate measurement diagram is shown in the photo below:

The choice of fabric takes into account the desired degree of shading of the room.

Important! When mounted on window sashes, roller blinds are clearly visible from the street. Therefore, the material is selected with a double-sided pattern, or a cut is purchased whose length is twice the required size.
If roller blinds are intended for the kitchen, it is recommended to find an antistatic fabric that can repel dust. It is less susceptible to contamination, making textile care easier.

In addition to the material, for original curtains you will need:
- Two slats, the length of which corresponds to the size of the window.
- Furniture stapler.
- Hook screws – 3 pieces.
- Ring screws – 5 copies.
- Strong tape or cord.

Self-production
There are several options for making curtains yourself; let’s look at the most popular ones.
Method 1
To create roller blinds with hooks, you need:

To place on a plastic window ready-made curtain without drilling, hook screws are screwed into the frame, which are placed in accordance with the location of the upper rings on the roller curtain strip. You will need to fix another hook on the frame, which will serve for winding the rope when the roller blind is rolled up.


