Brick kilns– a source of healthy atmosphere and fresh air (thanks to draft and constant renewal of indoor air), there is no need for additional installation radiators, such structures accumulate heat well and warm the air simultaneously in several rooms.
Firewood as fuel is cheap, especially if your house is located in a suburban area. And preparing them yourself is very good for health.
During construction, it is necessary to strictly follow all instructions, follow masonry technology, monitor the horizontality of the rows and the verticality of the walls. This will avoid distortion of the structure and possible breakdowns.
The optimal location of the stove is in the center of the house.
- Heating;
- For cooking (predecessors of modern stoves);
- Cooking and heating (combination of the two previous models);
- Special (the design is intended for special needs - drying clothes, etc.).
Heating stove with oven - step by step
It is advisable to carry out construction in the summer, at a constant air temperature.
For construction you will need: 220 bricks, three doors for the firebox (13x13 centimeters), a cleaning door (14x14 cm), a cast iron stove (38x35 cm), an oven (32x28x42 cm), a valve (27x13 cm), a sheet of asbestos cement, a grate - grate (20x30 cm), steel strip 4 mm thick (35x25 cm).
Laying instructions:
Before laying, we must build a foundation. We select the type of foundation after examining the type of soil and level groundwater. We wait for the foundation to completely harden and begin construction.
We print out the drawing, prepare the tape measure and building level. Before construction, it is recommended to lay out the stove without mortar as a practice to avoid mistakes in the future. We will number the rows along the course of the laying for convenience. Be sure to use plumb lines and check the quality of the brick (no chips or cracks). Soak the bricks in water.
- We lay out the first two rows according to the drawing, continuous. To do this you will need 10 bricks for each row.
- In the third row, we lay the ash pan and install the blower door (we attach it to wire and special metal fasteners).
- 4: we build this row, checking the order, building up the walls.
- 5: we build a brick ceiling over the blower door, lay the grate (don’t forget to leave a small gap from the metal grate to the brickwork, pour sand into the gap).
- Next, we take an asbestos cord and wrap it around the frame of the combustion door. We build the sixth row, clamping the door fastening with bricks.
- The seventh and eighth row - we build up the walls, observing the order, again checking the drawing.
- In the ninth row, we lay bricks on top of the firebox door, creating a ceiling above it. In this row we begin to build a smoke collector and finish it by the eleventh row.
- To separate the cooking area and the smoke exhaust channel, we lay a strip of steel, which will additionally support the bricks laid on edge. We fix the cast iron hob(row number 12).
- From the thirteenth to the fifteenth row we lay out the bricks “on edge”. We cover the cooking chamber with a layer of asbestos cement.
- Sixteenth row - we build the bottom of the first channel, which will be located horizontally.
- In the seventeenth and eighteenth rows we install a cleaning door and build up the walls of the oven.
- Nineteenth row - we block the door from above with bricks. We form a jumper in the center of the smoke circulation.
- The twentieth row according to the drawing (we build the walls of the furnace by tying the previous row).
- The next two rows (21-22) are the construction of a cleaning hole and the completion of the smoke circulation masonry.
- After this, we install the oven, and up to the 27th row we carry out the masonry according to the drawing. In rows 27 and 28 we leave space between the bricks to clean the oven.
- Then we completely cover the furnace and install the valves (29-31).
- From the thirty-second row we build a chimney and take the chimney to the street.
How to light a brick stove with wood?
We inspect the furnace and pipes for cracks. If there are any, cover them with a clay solution. We clean the stove from combustion products. We prepare the firewood. We warm up the chimney. We put firewood in the firebox, leaving the ash door ajar for air access. To ensure even burning of the firewood, stir it with a poker as it burns. It is optimal to add additional firewood after the formation of the first coals.
Making a wood-burning stove for your home: Instructions for building a brick stove
This stove is optimal for heating two rooms or a house with an area of 30-40 sq.m.
The stove has three smoke channels located vertically. Their length is more than four meters. It has two firing modes - summer and winter.
For work we purchase:
- solid ceramic bricks grade M175 - 400 pieces;
- fireproof bricks – 20 pieces (ШБ8);
- two-burner cast iron stove 70x40 cm;
- valves 28x18 cm - 2 pieces;
- fire door 27x30 cm;
- 2 blower doors 15x16 cm;
- masonry tools (trowels, containers for mortars, etc.).
We build a foundation for the furnace and begin laying out the first row. It is the most important, as it determines the dimensions of the furnace. The thickness of vertical seams is no more than 8 mm.
Second row: we bandage the initial row and lay the foundation for the fireproof cutting.
Third row: we form a chamber for collecting ash and install the ash door.
Fourth row: we continue the construction of the ash collection chamber. And in the future we will line the combustion chamber with fireclay bricks. In the same row, we fasten the cleaning door and form the lower horizontal channel.
Fifth row: we cover the blower door with one solid brick, since its length is only 14 cm. We continue the construction of a horizontal channel and a fire separation between the stove and the walls of the house.
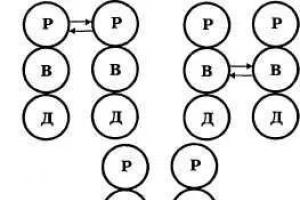
Sixth row: we overlap the cleaning door and the horizontal lower channel. At the same time, we see two vertical smoke channels of 12x12 cm being formed.
Let's designate the left channel as number 1 (it will be directly connected to the chimney), the right one as number 3 (a long channel for the passage of gases and heating the stove in winter). The dimensions of the release channel are 25X12 cm.
Seventh row: we continue to form the channels and install the combustion door.
Eighth row: we tie row number seven and form the second vertical channel of the oven.
We install the summer valve. If it is opened, the smoke will flow directly into the chimney without overheating the room. If the valve is closed, the flue gases will enter channel number 3 and travel along a long path, heating the entire furnace structure and, accordingly, the room.
The ninth row is similar to the eighth. We are preparing a support for installing the locking cover of the fire door.
Tenth row: close the combustion door and connect channel 1 and channel 2. Here the transition of flue gases from the second channel to the first will occur when firing in winter mode.
We cut out slots for the grate from fireclay bricks and place them inside the oven. We insulate the back wall with mineral wool.

Brick stoves are natural heaters that do not require large material and labor costs. With good draft and full air regulation, the house will always be clean and warm. Installing a brick stove by professional masons is expensive, so you can organize the process yourself.
Kiln masonry projects allow you to assemble brick structures without the help of specialists. The Russian cooking and heating stove and the Buslaev stove (of the “Swedish” type) are very popular. Below is a detailed description of each type of construction.
Assembled according to the “Swedish” type, it is considered the best option for a brick house. Its assembly scheme is quite simple and reliable.
A properly installed structure will protect the house from the cold even in severe frosts.
What will you need for masonry?
The assembly of brick kilns according to Buslaev’s scheme differs from others in its extreme precision. To make a high-quality brick heater, you will need the following materials:

- red brick – 550 pcs.;
- clay – 235 kg;
- sand – 115 kg;
- grate (252x300 mm) – 1 pc.;
- steel: angle steel (5x45x45x360 mm) and roofing (0.35 m2);
- nails – 1 kg;
- wire – 3 kg;
- view with hole (d = 220 mm) – 1 pc.;
- view chamber door (140x215 mm) – 1 pc.;
- steam valve (140x180 mm) – 1 pc.
The design also includes large-sized elements - an oven, a cast-iron stove and doors. You will need 3 types of doors:

- combustion chamber (280x300 mm);
- for the cooking chamber (520x390 mm);
- blower (140x140 mm).
Oven dimensions – 600x400x350 mm, stove – 965x560 mm (2 burners).
Features of the Swedish stove
Brick stoves, assembled according to Buslaev’s “Swedish” type, heat up quickly and can retain heat even in a large room.

Brick stoves designed according to this scheme are heated exclusively in winter. A five-channel oven with one outlet will have dimensions of 1160x900x2100 mm.
Brick construction works equally well on different types solid fuel.
If you heat the stove at least 2 times a day, the heat transfer will be 4500 kcal/h.
Swede styling technology
A brick stove for a home must be installed strictly on a waterproofing foundation. Buslaev's stove weighs more than 750 kg, so assemble it directly on concrete floor it is impossible: over time the surface will deform, which can lead to malfunctions of the stove and even a fire. Therefore, the concrete foundation must be covered with waterproofing material.

Brick kiln designs involve the penetration of groundwater into the lower layers of the foundation, causing the brick to begin to become damp and eventually collapse. Therefore, it is better to protect the structure with roofing felt or roofing felt. Immediately after waterproofing work, marking and ordering begin.
First row
The first row is made of solid masonry, and the outer row is laid out only with solid bricks. It is very important to check their integrity and strength - this moment can play a role decisive role when operating furnaces. You can also use halves inside - the main thing is that there are no thick cracks left and the seal is maintained.
Second row
Similar brickwork, but this time it requires the installation of a blower door, which will be located under the firebox. The firebox is the space in the furnace in which combustion occurs.
Third and fourth row
The third row is laid in half a brick with the obligatory preservation of openings for installing the blower and cleaning department (120x120 mm). The fourth is assembled according to the same principle.

But from this moment it is necessary to start forming a blower chamber measuring 200x300 mm. It is usually located on the left and back of the oven.
Fifth row
At this level you need to install a grate. It is installed in special openings made in bricks. A temperature gap of 10 mm should be left along the perimeter of the grate and lowered to the grate within 20-30 degrees of inclination. Then mounted combustion door ovens.
From the sixth to the ninth row
Layout starts here oven. The bricks are laid on edge over the entire area of the stove. Steel sheets are fixed around the oven to protect against burning. From the seventh to the ninth row, an increase in the width of the channel is formed, which is laid at back wall on right. The clay mixture is placed on top of the oven. The oven and fire door are fixed in the structure.
Tenth row
The hob is mounted and the channel is expanded with gradual rounding of the corners. Using a level, you need to check that the cast iron plate lies horizontally, without deviations.

The space between the stove and the stove wall is filled.
Eleventh row
Two quarter-length brick walls are formed and their masonry is carried out. This is also where the cleaning and installation of the cooking chamber door takes place. Using a strong sheet of steel, beams are created for the flue partitions. Channels 160x200 mm are formed from them.
Twelfth row
Support beams are constructed from strip and angle steel for brick vault, after which it is created forced ventilation in the form of a channel 150x100 mm. Brick stoves are also formed here.

The brick is ground into a cone shape to narrow ventilation duct, and the small stove must be covered with a steel sheet.
Thirteenth row
The outside of the chimney (in the front part) is cleaned and curtain partitions are installed. The masonry itself is carried out in half a brick, the valve and cornice are mounted. In this case, it is necessary to maintain 30 mm margins on each side. Above the channels, the masonry is also ground into a cone.
Fourteenth row
The indentations increase by another 30 mm, after which the formation of the cornice can continue. Above the large stove it is necessary to install metal corners and a strip that will block the small stove.

The Russian stove also heats well big houses. The peculiarity of its design is the installation of a stove bench: conventional brick ovens do not have such an element. Modern options stoves for the home are decorated with relief tiles, and there is a small fireplace inside.
What will you need for masonry?
To build a furnace you need to prepare:

- fire-resistant bricks (flat) – 1700 pcs.;
- cement mortar - approximately 80 buckets;
- clean fine sand and clay mortar;
- view with a half-door and a latch with a hole of 26x24 cm.
Before installing brick kilns, it is important to check the correctness of the drawings, order, and quality of tools. The condition of the entire structure and the house will depend on this.
Construction technology
A Russian brick oven is laid exclusively on a solid foundation. In this case, there are three options: brick, monolithic reinforced and rubble concrete. The foundation must be covered with roofing felt to protect it from the influence of groundwater and other moisture.
Management
As already mentioned, the heating furnace is built from refractory bricks. For perfect brick joints, you can cut each block by three quarters and install them in the corners of the masonry - this will ensure the correct dressing. On the second and third rows, opechka walls are erected. The fourth level is laid only with solid bricks, and at the base the corners need to be ground off to form arched supports.
For a large house, you can make a wide arch. The entire brick structure is assembled on wooden form. To do this, using 20 bricks beveled at an angle, a vault of the oven is built. The thickness of the side walls should be 1 brick, the front and rear walls should be 2 bricks. Next, the laying of the vault begins, the stove is assembled, and the fireclay level is assembled. At the corners there are bars in 1/2 and 3/4 parts. It is necessary to pour sand between the walls and cover it with solid masonry.
On the next row, the hearth is assembled and placed under the stove. It is advisable to fill the cavities between the fireclays with fine sand. A recess for coals is made on the left side of the hearth. After this, the cooking chamber and hearth are installed. A perforated steel arc is installed between the hearth and the crucible, into which a copper wire. Subsequently, it is buried in the solution.

Next, the brick walls are built up, with the obligatory formation of a compartment for cleaning ash. A half-door is installed opposite the view. The chimney is constructed in identical rows of six bricks. After construction, the brick oven must dry out, and only then finishing occurs.
The hearth is the heart of buildings not connected to centralized networks. It generates the heat necessary for life and provides energy for cooking. The microclimate in the building and its service life directly depend on its productivity and efficiency, and this is very important factors operation of the unit, do you agree?
The article we presented describes in detail how to competently build a brick stove for your home. Construction schemes are provided hearth and home, thoroughly disassembled technological nuances. We offer carefully selected, scrupulously verified, practice-proven information on the selection and installation of brick stoves.
Beginning stove makers and country property owners who want to supervise the work of hired craftsmen will be helped by the information we offer, based on construction requirements. Photographic images and video tutorials will be an excellent help in mastering the material.
It is not easy to understand the abundance of constructive brick ovens. However, owners of suburban real estate who want to equip their house with a brick unit should study this difficult issue. It is better to determine in advance the optimal option for its purpose and design than to rebuild and modernize.
Brick stoves are divided into types according to the following aspects:
- Purpose.
- Type of gas movement.
- Performance.
- Frequency of combustion.
- Geometric data.
Ideally, a stove that is perfect for you personally is selected according to two or three of the most important criteria. Let’s look at what should be classified as significant aspects in your opinion, which will become the basis for choosing the optimal brick unit.
Image gallery
Calculation of heat loss will make it possible to determine the productivity of the furnace, which should be slightly greater than the calculated value, but not more than 15%. If the power of the brick unit exceeds the specified limit, a different design should be selected.
To facilitate the process of choosing the most suitable brick stove for masonry in a low-rise building, nomograms have been developed. The graph presented below, which simplifies the calculations for selecting a stove, was created for rooms with one outer wall.
Image gallery
Ready-made brick stove for a summer cottageVery modest requirements are put forward for a do-it-yourself brick dacha stove. Long breaks between visits, a relatively small volume of the heated room, maximum efficiency and the use of local fuel - all these criteria indicate the choice in favor of a wood-burning stove. Contrary to popular belief, it can be done without the services of a master stove maker. Let's take a closer look at how to design and build a small brick oven for a summer cottage with your own hands.
Preparing for work
It is unlikely that you will be able to make a complex and highly efficient stone stove for a brick cottage with your own hands without construction experience. There are too many nuances and secrets hidden in the work of a professional stove maker. But small in size and simple in design, a vertical stone stove for a summer residence can easily be built even by an untrained person. The main thing in this process is to do everything very carefully, carefully and in accordance with our recommendations.
Selection of building materials
Since the described small brick stove for a summer house is heated with wood, it is not intended for intense and prolonged heating - it can be made of ordinary, not refractory brick. Although, it is better to use heat-resistant material for the combustion chamber.
List and required amount materials:
- red ceramic solid brick - 700 pcs.;
- grate - 1 pc.;
- combustion door - 1 pc.;
- ash door - 1 pc.;
- soot removal channel doors - 2 pcs.;
- valve - 1 pc.
For a stove for a wood-burning cottage with your own hands, you need to choose a solid ceramic brick that does not crumble from the average blow of a hammer, and at the same time produces not a ringing sound (this is a superheated brick), but a booming sound. It is desirable that the side edges of the bricks be smooth.
For the solution you will need clay. Stove makers prefer to choose “fat”, from which the solution turns out to be soft, like butter, and plastic, like soft plasticine. Such clay for building a do-it-yourself stove for a summer cottage can be found in construction stores or, after consulting with local residents, simply dig in the area.
Tool
WITH good tool oven for country house builds quickly and easily. For work, you should prepare a level, plumb line, trowel, mason's hammer and dishes for preparing clay mortar. To cut bricks you need a grinder.
Preparing the foundation for a brick oven for a summer residence
No matter how small a brick stove you make for your own summer cottage, its weight is several hundred kilograms. Therefore, you cannot place it on the wooden floor of the room, but you will need a foundation.
To choose the right location for the foundation, you need to project the plan of the stove onto the ground so that its pipe fits between the floor beams and the roof joists. If there is a chimney in the wall of the house, then the stove for country house should be located near it. When building a new house, a stove for a dacha can be built into the wall between the rooms. This option is very convenient: both rooms heat up equally quickly, but there will never be smoke in one of the rooms, even under the most unfavorable conditions.
The depth of the foundation must exceed the freezing depth of the soil. However, if country house has its own deep foundation, then a combined foundation can be made for the stove for the dacha. To do this, four light ones are dug vertically into the ground. concrete bollards, for example those that are used for fences. The posts should protrude from the ground just below floor level.
Between them, directly on the surface of the soil, half a brick is poured with a gravel or sand cushion. Then a layer of roofing felt or other sheet waterproofing is laid. A reinforcing metal mesh is laid on top, and a concrete foundation with reinforcement is poured on top of it. The top of the foundation must coincide with the floor level and be perfectly horizontal!
Let's start building the oven
On top of the foundation you need to lay another layer of waterproofing, and on it - a metal sheet. The dimensions of the sheet should exceed the projection of the stove by 10-15 cm. Moreover, on the side of loading firewood it is better to make a larger outlet. Then random sparks from the blower will fall not on the wooden floor, but on the metal.
During operation, the garden stove heats up quite strongly. If the nearby wall is made of wood or other flammable materials, it must be protected with thermal insulation. The simplest protection can be a sheet of asbestos, painted with heat-resistant paint or covered with a thin plaque. Asbestos cannot be kept open, as its dust is considered very dangerous to inhale. Instead of asbestos, a do-it-yourself summer cottage stove can be insulated from wood with a solid slab mineral wool. The material must be heat resistant. Facade construction wool is not suitable for this, since it has too low a temperature limit.
Preparing clay solution
The country stove is built on clay, not cement. The clay solution is prepared from good clay and clean river or sea sand. If the clay is not purchased, but was dug somewhere in the neighborhood, then it is worth checking its quality first. To do this, we make several test batches with different proportions of clay and sand. Roll the finished clay dough into small balls, rollers, cakes, and leave to dry for two weeks at room temperature.
Dried products need to be tested: throw them from a height of human height, try to crush them with a board under the weight of a weight, etc. The composition of the most durable clay sample is taken as a standard. In the figure shown, the best batch corresponds to samples “b”.
Preparing bricks and clay
The stove for the dacha is built with your own hands from pre-soaked bricks! To do this, it is kept in water for at least 8 hours. During this time, all the air will come out, and the clay will adhere well to the brick in the masonry. You need to prepare very little clay so that approximately 20-25 pieces are enough for laying. bricks. Without the necessary experience, you won’t be able to put in more at one time. The thickness of the clay mortar in the masonry should not exceed 5 mm.
Features of stove masonry
In order for a stove in the country, laid with your own hands, to serve for a long time, each row should be checked for right angles and horizontal surface. The laying sequence is visible in the order drawing.
The cast iron doors of the blower and combustion chamber are secured using steel wire, which is embedded in the masonry. The cuts are made with a grinder. IN as a last resort, you can do it the old fashioned way - with a mason's hammer, but this may result in a lot of waste for scrap. The area for the grate should be slightly more sizes the grate itself. Then, when heated, the metal will not move the brick.
The solution is applied to the wet brick. Experienced stove makers do this not with a trowel, but with their hands. A good solution spreads as easily as soft butter spreads on bread.
Important Note
If during laying the brick sank lower than necessary, it should be removed, the mortar cleaned and laid on a fresh one. Otherwise, the new stove at the dacha will smoke heavily and leak soot. Unlike cement mortar, bricks cannot be moved in clay mortar!
When building a stove for your dacha, try to make the inner walls as smooth as possible. Then soot will not linger on them, and it will be easier and less likely to need to be cleaned. The outside of the country stove should also be neat and beautiful. External seams should be carefully embroidered with a needle or finger. There should also be no gaps in the places where arches and horizontal partitions are formed. It is better to lay such rows slowly, one per day, so that the lower rows have time to set, and the upper rows do not creep.
Bottom line
Despite the small size and simple design, For small houses brick country stoves are very popular as they show very good results. They heat up quickly and are warm enough to last all day. A small brick stove for a summer residence is characterized by its low cost and accessibility for self-made, but with permanent residence in winter time You will have to heat it twice a day - in the morning and in the evening.
Despite the development of modern heating technologies, brick kilns are quite often used for heating a house, and this is understandable - they not only effectively heat the home, But and give a feeling of comfort and home.
Stove heating has a number of advantages, thanks to which wood-burning brick stoves have not lost their popularity for several centuries. The most important advantage- the ability of ceramic bricks, from which stoves are made, accumulate and release heat for a long time.
At the same time, radiant energy useful for the human body is released into the space, giving a feeling of warmth and comfort. With regular heating during the cold season, the house is always warm and dry, and due to the stove draft, natural ventilation. In hot weather, the stove, on the contrary, cools the rooms by removing excess heat into the ground and air through the foundation and chimney.
In addition to creating a comfortable microclimate, a brick oven can carry additional functions, the presence of which depends on the design:
- cooking - boiling, frying, stewing and baking;
- drying clothes, shoes, food;
- heating beds for sleeping;
- opportunity to admire the open flame.
Furnaces that provide several functions are called combined. These types of stoves include fireplace stoves, as well as several popular basic models, including the Russian stove.
U stove heating there is also flaws, these include inability to heat effectively remote premises . Therefore, in large houses, they usually install several stoves with separate or combined chimneys or combine stove heating with other types of heating.
IN compact houses, consisting of one or more rooms, the stove is usually located in the center, so that its walls are located in all rooms. The hob and oven are placed on the kitchen side, the stove bench is in the bedroom or children's room, and the open fireplace is in the living room or dining room.Review of brick kilns
The most popular and time-tested basic designs are widely used by stove makers: they make small adjustments to them, adjusting the size and functionality to the customer’s wishes. However, the principle of their operation remains the same, so all brick stoves can be divided into several groups.
Video: DIY masonry master class

It is distinguished by its massiveness, large dimensions and wide functionality.. It consists of an open firebox, which in some cases is closed with a damper, as well as long smoke channels running along all the walls of the stove and heating them well. Sometimes a Russian stove is equipped with another firebox with hob.
, in addition to heating, allows:
- prepare a variety of foods - boil, fry, stew, bake;
- dry clothes and shoes;
- warm a bed or bed used for sleeping and resting.
The efficiency of the Russian stove is not too high - up to 60%, in addition, its firebox requires certain skills. Moreover, it is necessary to heat a Russian stove regularly in winter, avoiding interruptions and cooling the body of the stove. With periodic heating, condensation forms in a cooled stove, the brick absorbs it and cracks the next time it cools and freezes.
In the summer, the Russian stove is heated regularly or periodically for cooking, while using the “summer” mode, directing the smoke using a damper directly into the chimney. The body of the stove does not heat up.
Advantages of the Russian stove:
- multifunctional, solves a whole range of problems;
- with regular heating in the cold season, it creates an even microclimate in the house without temperature fluctuations;
- decorates the house and gives it a unique national flavor.
Flaws:
- large weight and dimensions - the construction of a massive foundation is required;
- large volume of materials for masonry, high cost of construction;
- complex maintenance, the need to regularly clean the ducts and chimney with your own hands;
- not very high efficiency.
Dutch

The Dutch oven is a fairly popular design. heating stoves, sometimes they are equipped with a hob. This is a stove channel type- for effective heating of the walls, it is equipped with smoke channels with vertical arrangement. Passing through them, the smoke completely burns out and transfers heat to the brick.
The design feature of the Dutch oven is its small footprint, which makes it popular among summer residents and owners of small houses. Moreover, the stove can be made to any height, so it can successfully heat two floors. The shape of the stove also varies from square and rectangular to round, but in any case its height is much greater than its width, so the Dutch stove is often compared to a column.
Advantages of the “Dutch”:
- savings on space and materials - it requires two to three times less bricks than a Russian stove, and the cost of its construction is significantly lower, it can be easily folded with your own hands;
- The Dutch oven has rather thin walls and warms up quickly;
- it can be heated after long breaks, immediately bringing it to full power;
- with modest dimensions, the “Dutch” can heat a house with an area of up to 70 square meters.
However, it also has disadvantages:
- Its efficiency is low - about 40%;
- the optimal operating mode is smoldering, which is why the “Dutch oven” is sometimes called a brick oven long burning;
- to ensure good draft, cleaning the stove from ash and soot should be done regularly;
- If you don’t close the view after firing, the stove instantly cools down, so it requires close attention and skill in heating.
Swedish

The Swedish oven has more universal design compared to the “Dutch”, while its efficiency is much higher with a compact size. A standard Swedish stove is multifunctional; it has a hob, an oven, and two niches for drying shoes and clothes, and some craftsmen complement the Swedish stove with a fireplace or a bed.
This is a duct-type stove, which also implements the principle of a bell-type stove - afterburning of flue gases under the arch of the firebox. The stove effectively heats two adjacent rooms, usually a kitchen and a room; a Swede cannot cope with heating a large house.
Advantages of the “Swedish”:
- fast warm-up;
- efficient fuel combustion;
- the special design of the channels allows the lower part of the stove to be heated, making the floors warm;
- the ability to prepare various dishes;
- in the niches located on top it is convenient to dry vegetables, fruits and berries, as well as reheat food;
- You can also dry clothes and shoes in them;
- If desired, you can build a heat exchanger into the stove and heat water for household needs.
Disadvantages of the "Swedish":
- for laying highly heated elements, it is necessary to use fireclay bricks, which increases the cost of its construction;
- to avoid heat loss through the lower part of the stove, you need to make good thermal insulation;
- It is not recommended to completely cool the stove in the cold season, since igniting a cold, damp stove leads to gradual destruction of the masonry.
Bell-shaped
Photo: bell furnace  One of the most modern developments is . Their difference is the ability to heat up evenly from all sides and retain heat for a long time. Unlike ducted stoves, bell-type or dome stoves do not have winding, narrow channels, so they are no less susceptible to the deposition of solid particles and narrowing of the chimney.
The principle of their operation is as follows: smoke from the firebox rises up, under the hood, where it lingers until it cools, after which it descends down the walls, heating them. The stove can have a whole cascade of hoods in which the smoke gradually cools, so the efficiency of such stoves is very high.
Advantages of bell-type furnaces:
- simple design and a large number of material required for masonry, low price;
- the stove can be heated from a cold state, while it quickly heats all adjacent rooms;
- if you forget to close the damper, the stove will not cool down like a Dutch oven, thanks to the so-called gas view, which prevents reverse draft;
- if desired, it can be equipped with a hob and heat exchanger;
- Even a novice stove maker can build such a stove with his own hands.
This stove has virtually no disadvantages, which is why it is very popular among summer residents and owners of country houses.
Bell-type stoves are an excellent choice for a summer residence, country house, cottage. Thanks to any possible number of cascades, it can heat several rooms at once, including on two floors.Long-burning stoves made of bricks - is it possible?
Any homeowner faced with stove heating, tries to reduce labor costs, including the time spent on heating the stove. Therefore, many are interested in the possibility build a brick stove with a long burning mode.
However this impossible for several reasons. The long burning mode implemented in industrial metal stoves involves slow smoldering of wood, which releases a large amount of smoke containing carbon monoxide. Industrial stoves equipped with a long-burning mode have a sealed firebox, so fumes cannot enter the room.
In addition, to ensure slow smoldering of firewood, it is necessary to limit the flow of air into the firebox. In brick stoves this can be done by covering the vent, but it is inconvenient to regulate the air supply in this way.
Partially, the long-burning mode can be implemented in the “Dutch” and Russian stoves. But you should not rely on the effectiveness of this method; it is better to choose a brick stove design that allows you to retain heat for a long time, or purchase one - their price is lower than that of brick models, and their efficiency is almost as good as them. 
Basic masonry techniques
Having made a decision, the first thing you need to do is choose a design that meets your needs, find an ordering diagram and a description of the masonry, after which you can start purchasing material and purchased elements. Laying a brick stove requires knowledge of basic work techniques.
- A brick oven requires a foundation, the dimensions of which exceed the dimensions of the oven floor by 100-150 mm on each side. It can be made of reinforced concrete, or made of concrete blocks or rubble stone. The main requirement that must be observed is that the foundation for the stove should not have a rigid connection with the foundation of the house, otherwise seasonal shifts in the soil may cause damage to the stove or pipe.
- To lay a stove with your own hands, two types of bricks are used: red solid bricks made of ceramics and fire-resistant fireclay bricks, yellow tint. The most heated surfaces are laid from fireclay bricks - the firebox, smoke ducts, and a fire-resistant masonry mortar based on fireclay clay is used. The price of these materials is higher than that of ordinary bricks, so fireclay is used only where necessary. All other elements of the stove and the chimney are made of ceramic bricks, and a solution based on stove red clay or a purchased composition that includes heat-resistant cement is required.
- Purchased elements - grates, doors, views and hobs- placed in accordance with the diagram. The doors are secured using annealed steel wire at least 30-40 cm long. One end of it is inserted into the holes intended for this in the door frame, and the other end is secured between the bricks on the masonry mortar. The slab and grate are placed on the previous row of masonry in the grooves selected in the brick. To compensate for the different temperature expansion of brick and cast iron, asbestos fabric or cord is used.
- The chimney of a brick stove is usually also made of brick, but you can also use a ceramic block chimney industrial production. He's different for a long time service, increased resistance to condensate containing carbonic acid, creates stable draft, does not clog.
- To give the stove an aesthetic appearance, it can be lined with finishing stone, clinker, or tiles. The finishing gives the stove not only beautiful appearance, but also protects it from the harmful effects of water and dust, and, although the price of such a stove is slightly higher, its service life is significantly increased.
Video: DIY stove laying
Choice correct design ovens and high-quality masonry- the key to its long and safe operation. A wood-burning brick stove, built with your own hands, will decorate any home; moreover, this heating method is reliable and allows you to create comfort and a favorable temperature regime.