Not a single residential building can do without a full and reliable roof, which provides protection from cold, wind and precipitation. The process of arranging the roof and its construction for last years have undergone many changes - the construction market is expanding and supplementing modern materials, allowing to increase the reliability and efficiency of the roof.
What is a soffit
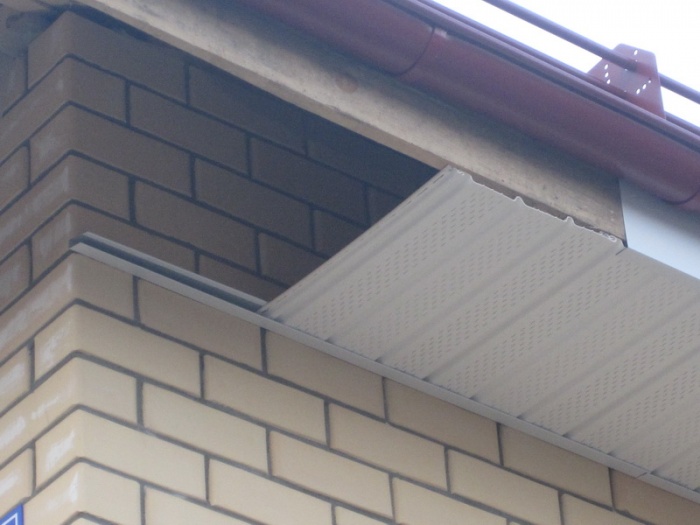
One of the relatively new materials are soffits - special panels that are used for filing roof eaves.
Soffits have a mass positive qualities, so they are often chosen for the full arrangement of the roof by the owners of private houses. In this article, we will talk about how to hem the roof overhangs with a soffit.
The device and types of spotlights
Structurally, spotlights are panels that visually resemble siding. The width of the spotlights can reach 80 cm, and this indicator allows you to easily mount these elements with your own hands. Production material - plastic, galvanized steel or aluminum.
There are the following types of soffits:
- perforated. This type of soffit has holes all over its surface. Due to the holes, the roof is ventilated, for which such elements are installed on the cornice overhangs. Perforated soffits provide reliable protection of the structure from various external factors, without interfering with normal air exchange.
- Partially perforated. Partially perforated soffits, as their name suggests, have holes in only one or two sections. This design allows you to adjust the intensity of ventilation of the roof. Partially perforated spotlights are quite versatile, so they are used not only for filing cornices, but also, for example, when finishing ceilings on a porch or in a gazebo.
- Non-perforated. This type of soffit is made in a monolithic form, and there are no holes on their surface. As a rule, those elements of the roof that are constantly exposed to atmospheric precipitation are hemmed with soffits without perforation. In addition, such panels are suitable for finishing ebbs and facing gables.

Before you hem the roof of the house with spotlights, you need to correctly select the material. When choosing soffits for self-assembly you need to pay attention to their size. The width of the spotlights can vary from 30 to 80 cm.
It is much easier to work with wider products, therefore, in the absence of experience in carrying out such work, it is worth paying attention to them. You also need to understand that weight is very important - light elements are much easier to install, and when choosing materials for self-assembly, lighter parts should be preferred.
Options for filing a cornice with a soffit
As mentioned above, installing spotlights is easy. Before you hemming the roof eaves with a soffit, you should only prepare yourself - choose and purchase the material with which the eaves of the house will be sheathed, prepare tools and study the installation technology.

The set of tools needed for filing looks like this:
- Hacksaw or well-sharpened knife;
- self-tapping screws;
- Screwdriver;
- Marker;
- Measuring devices;
- Ladder.

There are the following options for filing roof eaves using spotlights:
- Diagonal hemming. Using this technique, when lining the roof with a soffit, the panels must be installed parallel to the roof overhang. Mounting profiles in this case are attached directly to the rafter legs or filly. Hemming the roof in a diagonal way is possible only if the roof slope is less than 25 degrees, and the length of the overhangs does not exceed 6 m. This hemming technology is also not very convenient - you have to fix the soffit in hard-to-reach areas, which takes a lot of time and materials.
- Horizontal Binder. In this case, the spotlights are installed parallel to the ground. To mount the elements on the cornice overhangs, you need to create a wooden or metal box to which the panels will be attached. Horizontal wood roof filing is used much more often due to its simplicity, convenience and economy - required amount there are much fewer spotlights with this technology. See also: "".

When purchasing spotlights, it is imperative to select guide strips for them, which will cost a considerable amount. Hemming the cornices with a soffit is also expensive, so it would be better to do the work yourself - the savings will be significant.
Roof soffit installation
Hemming the eaves with soffit can only be done after the roof is installed, but before the installation of the drainage system - mounted gutters will complicate access to the roof eaves.
The algorithm for filing the roof of a house boils down to the following points:
- Preparation. The preparation process includes checking truss system for matching the length of all legs. If the length of all rafters is the same, then a cornice board is attached to their lower edges for filing the roof overhangs, and fasteners for the drainage system are attached to it, in turn.
- markup. At this stage, you need to measure the required dimensions of the roof overhang. Knowing its length and width, you can prepare the right amount of soffit panels and guide rails.
- Lathing installation. A beam with a section of 50x50 mm is attached to the wall of the building flush with the cornice with the help of anchor bolts. Exactly the same bar is fixed on the inside of the windboard. These bars are connected by horizontal slats, resulting in a solid frame for filing the eaves.
- Soffit installation. On a pre-mounted box, two J-profiles are installed into which the spotlights are inserted. Cut panels can be inserted into the installed guides. Individual panels are attached to each other with special fasteners, and for fixing to the crate, self-tapping screws and a screwdriver are used.

When installing, it is worth considering the high coefficient of linear expansion of vinyl soffits due to temperature changes. Of course, even in the case of polymer products, the degree of expansion is small, but it is enough for the material to be damaged when it gets cold or overheated. To avoid such risks, when tightening the screws, it is enough to leave a small gap that will allow the spotlights to move when exposed to temperature.
Conclusion
Soffits are an excellent material that has a lot of advantages and perfectly copes with the tasks assigned to it. Soffit panels can be called one of the best answers to the question of how to properly hem the roof of a building. Sheathing the roof of the house with the help of such panels provides high-quality ventilation of the roof and prevents moisture and foreign objects from entering it. All this allows you to extend the life of all elements of the roof.
Today, soffit manufacturers unanimously claim that installing their products is easy and simple. After all, such products already have all the necessary locks, holes and fixtures, and the accompanying technical documentation covers each step in detail.
And is it true, are there subtleties and nuances in this process that it is better to know about in advance? Let's tell you this: competent installation of spotlights is really available to any handy craftsman, but in order for the roofing to serve for a long time and look presentable, it is important to be theoretically savvy as well.
Therefore, we have tried to compile for you an understandable and detailed instructions with illustrations to help you be confident in every step.
Let's start from the very beginning. So, you need to hem the roof overhang before you start laying the roofing material. Also, the walls should first be thermally insulated so that there are no unprotected areas between the walls and roofs.
And first of all, the crate is calculated and mounted.The simplest and most common way of filing a roof with spotlights is horizontal. For this task, bars are pre-attached to the rafters or their continuation in the form of fillies, forming the frame of the box.
At this stage, it is extremely important to control the future filing plane with the help of a level and a plumb line. Here are a few options for exactly how to place the battens on the overhang of a standard roof:
It cannot be said that the horizontal or diagonal arrangement of the crate is better. Here, rather, it all depends on which overhang seems more aesthetic to you and whether you plan to place communication cables in the spotlights and build in fixtures. Then horizontal version more appropriate, of course.
We go further. It is necessary to lay the crate along the perimeter of the overhang, parallel to the wall, and a galvanized profile or wooden slats. If you prefer wood, then make sure that such bars are dry enough, with a moisture content of no more than 15-18%, without knots and bends, and if metal, then choose either aluminum or corrosion-resistant steel.
Between the rails there should be a distance of no more than 30-40 cm. If it so happens that the overhang still exceeds 40 cm, you will need to install an additional rail - between the inner and outer. But if the distance exceeds 40 cm, then strengthen this place. But vertical bars should not be connected with transverse bars, although this practice occurs.
From the side of the frontal board and the wall, nail two boards, on which you will then fix the spotlight strips and additional elements. With an overhang length of more than 80 cm, take three attachment points. In this case, the boards must be of sufficient width for the installation of spotlights and additional elements more than 100 mm wide.
Stage II. Preparing and trimming soffits
Now let's take care not to damage the panels themselves before they are installed. So, newly acquired spotlights must be laid on a flat, flat surface. Store packages with them in stacks of packs, but no more than 15 together in one stack.
If the site is open, then it is better to open the packages. If you do not heed such advice, then at the end there is a risk of getting parts that are not quite even, which then simply cannot be inserted into the grooves. Imagine how unpleasant it will be to find this defect already during the installation process.
Next, the soffit panels must be prepared so that the length of their panels is 50 mm less than the overhang from the wall to the front board. Cutting the spotlights themselves is not difficult, just be sure to use safety glasses.
For circular saw use a fine toothed blade in reverse or other suitable tools:

A word of advice: if it is more convenient for you to work with metal shears, then try this: do not cut along the entire length of the scissors at once, but use their blade only ¾.A knife is also suitable for cutting. Draw a small groove with it in the right place, and then bend and straighten the soffit several times until the panel breaks. You don't need to cut straight through.
Remember that panels can only be cut starting from the fastening part. Here are some tools that are more convenient to adjust the length of vinyl spotlights:

Here is the process of working with popular aluminum soffits:

Unfortunately, not everyone knows that working with metal spotlights has its own peculiarities. So, they cannot be cut with an abrasive wheel, i.e. grinder. Because this leads to damage to the polymer coating and rapid corrosion of the metal.
Up to the point that even manufacturers do not give a guarantee for spotlights that were cut with a grinder.Punching shears, multifunctional cutters or special drill bits are much more suitable for this task.
Stage III. Fixing chamfers and profiles
Now we proceed directly to the installation of spotlights. Let's look at the tasks for which special profiles and chamfers are needed, which are always included:
- J-profile is the main suspension element. They are framed by a cornice overhang and two panels of spotlights are joined along the length.
- An L-shaped panel is needed for the front bar. It is produced in sizes of 15.20 or 25 cm, less often - 45 cm. This bar allows you to hem the roof at an angle.
- J-bevel is a J-profile wind plank. It allows you to hem an overhang perpendicular to the wall, and is available in sizes 15, 20 and 25 cm, sometimes 40 cm.
Here's how to work with the J-bar. You need to install it parallel to the wall of the house, and for this, measure the distance between these strips and subtract 6 mm to change the size of the panels with temperature.Next, install the cut panel into the grooves and nail the bar so that later the fasteners do not interfere with the free expansion of the material. Connect the panels together in the castle.
Lay the panels in a horizontal or inclined position. Keep the distance between the fixing points at 30 cm. And at the angles of rotation from 45°, install two J-bars that will be connected back walls and H-profiles.
Here is where all these elements are specifically fixed:

The J-bevel method is more aesthetic, because all the fasteners are hidden so well. Here's how to work with it:
- Step 1. From the side of the wall, install the J-profile, directly on the board, using self-tapping screws in increments of 50-60 cm.
- Step 2. Next, fix the finish bar along the top line of the frontal board. If necessary, trim the excess to fit the length of the flat part. Step 3. Then the J-bevel must be inserted into the finish bar and secured. This will avoid the waviness of the chamfer itself.
Concerning finishing bar, you can do without it if you use short drain hooks. Such hooks are attached directly to the frontal board, and the J-bevel is fixed with self-tapping screws. If the end or front board will remain open for the sake of decorativeness, then use two J-profiles.
Also, if the J-bevel needs to be rotated, then follow this instruction:
- Step 1. Start installing spotlights on the roof eaves from the corner, and for this, mark the fold line in advance where the plank will be bent at the turn where 150 mm remains from the edge.
- Step 2. Now cut the groove to the fold and leave only the rolling at the bottom shelf.
- Step 3: Make a 45° cutout on the bottom shelf. Now bend the chamfer so that the edge of the bottom shelf is outside. Now the short edge of the plank does not need to be attached to the crate, because. it will be pressed against the frontal board by the next bar.
If you will additionally pass holders or cables later, then in such a casing you need to leave a hole 5 mm larger than you need for a drill. It is also necessary for contraction and expansion.
Stage IV. Inserting and fixing soffit panels
Let's note a few more important points. To install the soffit yourself, you will need to arm yourself with a screwdriver, roofing pliers, a tape measure, a level and a jigsaw with a metal file.
Don't forget to also purchase a special scratch corrector for metal panels(if you install just such), because anyway somewhere the surface will be damaged, and you will need to protect the coating in this place.
Insert the panels themselves into J-profiles with a small gap:

Fix the spotlights with self-tapping screws and a special rivet. It is advisable in this regard to use fasteners with a painted head. Also pPanels are allowed to be fixed using self-tapping screws with a press washer.
For open overhangs, you need to use the F-profile:
- Step 1. Using a level, make a mark parallel to the roof belt at the edge of the wall and nail the profile to the back wall of the house.
- Step 2. From these vertical marks, back up 2 cm and draw a chalk line.
- Step 3. Install the F-profile along this line so that the top edge is on the line. It is very important to do everything right here, because it is this profile that forms the back support of the spotlights.
But for a closed overhang, you still need a J-profile:
- Step 1. Measure the distance between the J-profile and the F-profile, from front to back.
- Step 2. Cut the panels according to the measured length and subtract 3-5 cm to allow for possible expansion. For this purpose, it is better to use solid panels, except for those places where ventilation will be equipped - perforated soffit is also suitable there.
- Step 3. Cut the panels to length and insert them at one end into the support on the wall that you installed - F-profile or J-profile. Align the profile and fix it.
- Step 4. Once the first panel is installed, fasten the lock of the second one. Close the slit edge.
- Step 5. Manually fit the panels to each other. If the width is at least 45 cm, additional intermediate supports are not needed.
Corners are made using a J-profile or an H-profile. Fold both profiles back to back to create additional support for the soffits.

Next, be careful not to stretch the soffit panels too tight, otherwise their shape may “lead”. Therefore, withtry not to pull horizontal panels skins during installation, it is better to simply press down and pull them up until they are fully engaged.
In practice, you will immediately understand what and how, and this video clip will help you prepare for the process:
If everything worked out, the nailed panels will hang without tension. If the panels are still stretched, friction will occur in the locks, and the profile runs the risk of changing shape, deforming, in a word.
Stage V. Important subtleties of using fasteners
Let's take a look at which mount is best suited for this task. So, for the installation of spotlights, anti-corrosion screws or nails are needed (but only anti-corrosion). The fact is that the spotlights will have direct contact with the open atmosphere all 365 days a year. And on particularly rainy days, the humidity is quite high.
The head of nails and screws in diameter should not be narrower than 8 mm, and the leg should be 3 mm. The movement of the panel during the installation process must be free. Whether you did everything right, an ordinary penny coin will help to check, which, if everything is done correctly, will fit between the cap and the panel. And between the fastener and the surface of the panel leave at least 1 mm:

Try not to hammer the nail deep - you need to leave 1 mm between the siding and the bottom of the nail head. It is better to nail nails at a distance of 40-60 cm from each other - so that the panels can move freely.
Behind hit them right in the center of the slot, and in no case at the end, otherwise you will ruin the skin panel. At all joints and limiters at the end of the profiles, be sure to leave a minimum gap of 5 mm, and if you work in cold weather- then all 6 mm.
Stage VI. Forming the corners of the hemming
The design of the corners completes the entire process of installing spotlights. Rotation is implemented both at a right angle and diagonally. Diagonal docking looks more impressive, but more difficult to perform.
At the joints of the panels, either an H-profile or two J-profiles are used to bypass the corners. So, in the diagonal version, a J-profile is used, and the soffit panels themselves are cut off so that the corners fit together.
If you don't need to hide the fasteners at all, install a simple docking bar:
- Step 1. With make markings: attach the bar to the place so that there are minimal gaps between the additional elements. Cut off all excess.
- Step 2 Fasten the plank to the crate with screws and mark the panels that are adjacent to the H-profile so that the joint looks symmetrical in the end.
- Step 3. Remove construction debris and remaining protective film touch up any scuffs and scratches.
The profiles themselves need to be mounted on the crate in order to create additional support. Here's what straight and diagonal corners look like in filing cornices with spotlights:

If all the rules were followed when installing spotlights, the entire overhang of the roof will look neat, organic and holistic. In addition, spotlights have an important function that they will perform only with high-quality installation. And thanks to our master classes and illustrations, you will be able to understand the intricacies of such a process, and be confident in the result.
Did you manage? Show how it turned out!
The procedure for arranging the roof is not only the manufacture of the rafter structure, the direct laying of the roofing material and the installation of gutters, but also the process of filing its eaves. To do this, on the overhangs of the gables and cornices, a filing is made of wooden lining, planed board, vinyl or metal siding. But today there are more comfortable material for filing roofs called roof soffits.
The need for roof lining
A properly built house requires that its roof extend from the wall to a distance of at least 50-70 centimeters to protect the walls of the facade from rainwater. In this case, an overhang is formed in the roofing plane, which is covered with roofing material from above, and hemmed from below. Hemming the roof will not only help to give the house a finished aesthetic appearance, but also solve the issue of roof ventilation in the space under the roof or between the insulation and the roofing material. This is especially true when constructing the roof of the attic floor.
In suburban housing construction, at present, for the most part, two types of roofs are built - attic and attic. Thermal insulation in the case of a cold attic roof is placed in the attic of the house, in the insulated attic - between the rafters. Since the house is able to "breathe", the wet steam from the premises will pass through the insulation, although it should not linger in the thermal insulation layer. In this case, condensation forms, and the properties of the insulation deteriorate.
In addition to reducing the quality of the material, the elements of the subsystem will also suffer from moisture - wooden beams begin to rot, metal parts - to corrode. Important role various waterproofing films play a role in solving this problem, but it is important not to neglect the creation of ventilated roof overhangs and providing draft for ventilation from the eaves to the ridge.

When filing the roof, the spotlights are mounted with a gap of about 10 - 15 millimeters. In this case, a draft of the air flow will be created, which comes from the lower mark of the overhang into the space under the roof, heats up gradually and rises to the ridge, after which it exits through the ventilation holes. Thus, continuous air circulation and effective weathering of moisture are ensured, which allows the roof to remain dry. Good ventilation can extend the life of your roof by preventing mold and mildew.
It is customary to carry out filing of overhangs not only for practical reasons to ensure good traction in the under-roof space. This is also necessary to protect the roofing pie from the settlement of insects, birds and rodents, because no one would like to observe such a picture.
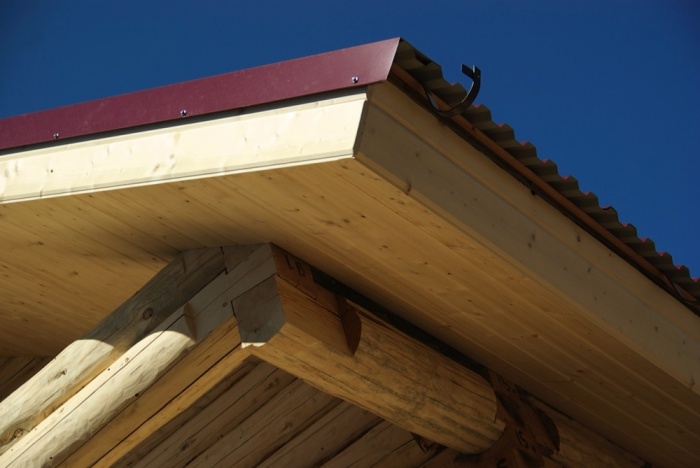
Traditionally, roofing was done using wooden clapboard. However, you should think about the shortcomings of wood - it must be periodically treated with a special solution against decay and fungus, and tinted. In addition, the lining is able to absorb moisture and blacken over time, so it is not the best option for filing the roof.

Vinyl siding, which is intended for the walls of facades, looks unattractive after hemming the roof, and its appearance will only worsen when making holes for ventilation, which is not provided initially. Galvanized metal siding is not protected from corrosion, and since it is placed on the overhang of the eaves, where condensate often accumulates, it has a fairly short service life. Brown rust spots appear very quickly on this material, which is especially noticeable if the color of the roof lining is white or fairly light.
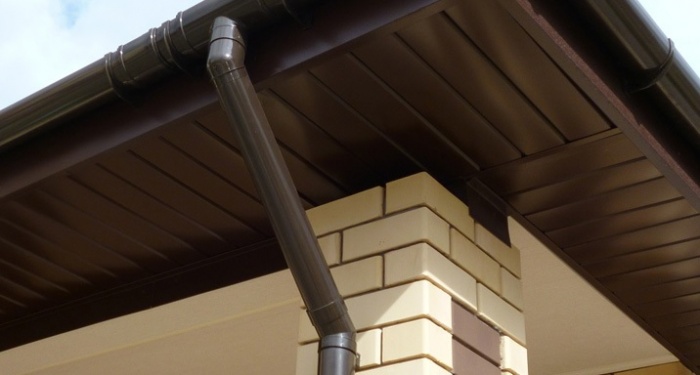
Fortunately, progress has not stood still for a long time, and now there is a more practical material for filing the roof - roof soffits, which are distinguished by good visual compatibility with the roof, facade materials And drainage system, and are also characterized by a democratic price. In addition, the price of spotlights for the roof is democratic.
The concept of a soffit for filing a roof
In the construction industry, soffits are panels designed to cover various horizontal surfaces that face down. Soffits are the same siding or lining, but with a special structure that allows air to pass through and does not interfere with its free circulation, which helps protect the roof from dampness, fungus and mold. It is the presence of perforation that is the main difference between spotlights that are used on outdoors, from other decorative panels.
These panels are fixed to the box along the edge of the roof. The panels are joined together by a locking connection, which makes it possible to hide their fasteners. The length of the spotlights is most often 3 - 3.6 meters, and the width is 22 - 30.5 centimeters. Specific sizes of roof soffits vary by manufacturer. American and Canadian manufacturers often make a triple profile 30 centimeters wide and 3.6 long running meters, which is considered the most optimal size for hemming the roof. Soffits of domestic manufacturers may differ in dimensions.

Before you hem the roof, you need to choose one of three types of soffits:
- Solid. This material is perfect for covering the ceiling of your sundeck, porch or garden gazebo. With constant access to all internal surfaces air roofs, all open structures will not require repairs for a long period and will retain an excellent view.
- Fully perforated, which is recommended for roofs that are covered with non-profiled materials, such as rebate or shingles. Perforated spotlights are indispensable for filing the protruding parts of the roof: overhangs, cornices, ridges, gables and peaks.
- With perforation in the center, which provides effective ventilation of the space under the roof. At the same time, a composition is formed on the overhang of the cornice with the alternation of two continuous strips and one perforated strip. Regardless of the presence or absence of perforation, the cost of the soffit is the same.
Advantages of soffits for filing a roof
The undeniable advantages of spotlights over traditional materials they have the following properties:
- Mechanical durability - resistance to damages, blows and influence of an atmospheric precipitation. This ensures that the appearance of the house remains unchanged throughout the entire period of use. They do not change their color and do not fade under the influence of sunlight and high humidity and also do not rot.
- Versatility. Soffits can be used to hem the ceilings in the room and the under-roof space. The wide range of colors of the product allows them to be combined with various types finishing and roofing materials, as in the photo of spotlights for the roof.
- Ease of care. Soffits do not need updating and painting throughout the entire period of operation. To recreate appearance they should be washed periodically with water and detergents.
- Flawless appearance. Soffits are able to easily hide wiring and various communications, and interlock connection allows you to hide the joints of the panels and components of the facade.
- Resistance to biological factors. Soffits, unlike facing materials that are made of wood, are not affected by fungus and do not become moldy.
- Ease and convenience of installation. Installation work due to the use of spotlights can be carried out at any time and in a wide temperature range. Products do not crack and do not corrode at temperatures from minus 60 to plus 120 degrees Celsius.
- Ecological and fire safety. All soffits are made from non-toxic and non-flammable materials, which allows them to be used in special construction with increased requirements for fire safety and resistance to aggressive influences.
Types of soffits for filing the roof
Let's look at what types of soffits exist for filing a roof today.
Plastic spotlights
The most common type of soffit is plastic, as its price is small. Vinyl soffits have good performance- they are wear-resistant, elastic, do not fade, resistant to sudden changes in temperature, easy to install, finishing the roof with plastic soffit is produced almost without waste. Such products are white, brown and colored. White soffit is an elegant, calm vinyl material that costs less than colored and brown soffit.

Brown soffits emphasize the character and personality of the house, because they often match the color of the roof, and are more resistant to ultraviolet rays, since the sun acts more strongly on dark surfaces. Colored vinyl spotlights occupy the golden mean between white and brown goods in terms of cost. It is often customary to use spotlights complete with siding so that the cornice filing does not stand out against the background of the facade.
Steel spotlights
Metal soffits are the most durable material used for eaves and come in a wide range of colors. They perfectly withstand mechanical loads, are often supplied with the roof, as they are made from polymers along with metal tiles. The guarantee of such a product, of course, surpasses all its competitors.

These soffits are perforated and without perforation, filing with a metal soffit guarantees your home high-quality anti-corrosion protection for many years. White, colored or brown products can be used on open verandas and gazebos in the country. The cost of a metal roof soffit is acceptable for a material of this quality.
Aluminum spotlights
Aluminum soffit today occupies a leading position in sales and hemming of cornice overhangs, as it has established itself as a high-tech and practical material at a reasonable price. Soffit panels of this type are used in private construction and original architectural projects.
The light weight of aluminum soffits is a big advantage, which results in ease of installation, which allows even high-rise buildings to be hemmed. If you have started renovations or decided to give the facade its original look and hide defects, then perforated brown aluminum spotlights are best suited for this. In addition, aluminum soffit panels do not have the ability to expand at temperature, like plastic.
Copper spotlights
Roofing, the lining of which is made of copper, will last longer than other materials due to the auto-extinguishing corrosion of the copper sheet and exemplary resistance to aggressive environments - more than 100 years. Such spotlights are connected to each other with a lock that hides the fasteners. Perforated copper soffits close horizontal spaces on the street, and without perforation they are usually installed inside the premises.

Copper soffits are quickly covered in air with an oxide film, which gives them a characteristic yellowish-red tint. During operation, they become gradually brown, and then covered with a patina due to weathering and acquire a malachite-green hue. Therefore, true connoisseurs of antiquity buy only copper.
The procedure for filing the roof with soffits
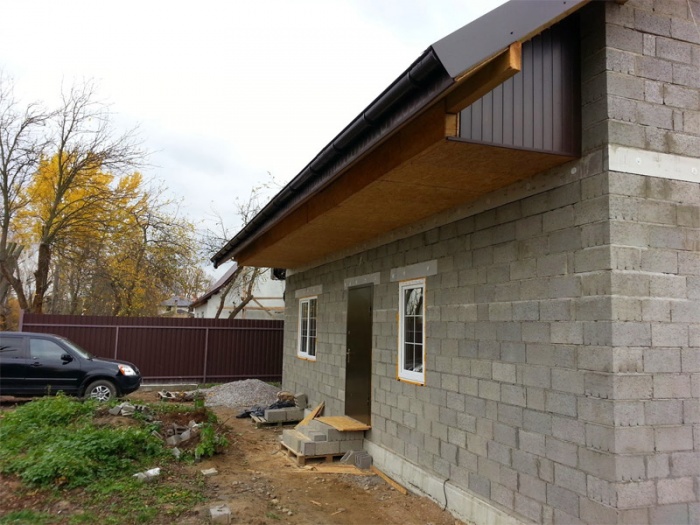
Before you hem the roof with spotlights, it is necessary to insulate the walls of the house from the outside. Most of all, this is true for the most common boxes that are sewn not directly along the rafters, but in a horizontal direction. Correct measurements are the key to successful filing of overhangs and eaves of the roof with spotlights, so before starting to file the roof with spotlights, make quality drawing which will help you navigate general information and sequence of actions.
By itself, the procedure for installing spotlights is considered quite simple, but remember that they must necessarily fit into the overall appearance of the house. The design of the box itself can be individual, depending on the specific design of the roof, but there are two most popular options that include common filing elements:
- Hemming along the rafters, when an angle is selected for filing, which coincides with the angle of the slope. This technique is intended for the most part for roofs that have a small angle of inclination, while the installation of spotlights is carried out on the rafters parallel to the plane of the walls. If the bottom plane of the rafters is not level, it must be leveled to ensure high-quality filing of the roof. To do this, you can screw on the sides of the rafters with screws cutting boards with a thickness of at least 4 centimeters, and a length of at least 10 centimeters. First, the first and last boards are screwed, between which the threads are pulled and the rest of the boards are fastened. In the areas of convergence of the slopes on all sides of the corner rafters, the boards are fastened.
- The most common solution is when a horizontal box is installed to the wall from the edge of the rafters, while the frame for filing the roof with spotlights is made of boards. One edge is fastened to the bottom of the rafters, the second - to an additional board, which must be lowered and attached at the point where the rafters and the wall touch. The board in the corners of the convergence of the slopes should be laid flat, because in this place there will be a joint on which the ends of the boards are fastened. Such a joint should extend up to the angle of convergence of the walls from the angle of convergence of the slopes, as a result of which a rigid structure independent of the wall is formed. It is recommended to pay due attention to the reliability of the fastening created, it can be done with screws, but it is better to use metal plates and corners.

Installation of soffit panels is carried out on such a crate. To fix the details of the spotlights to it, you should use self-tapping screws that are equipped with a press washer. To install the first strip of soffit, you need to determine the starting point of the installation, retreat from it by about 77 centimeters and horizontally beat off the line throughout the entire perimeter of your house.
The initial strip must be installed directly below it. To make corner elements and equip the edging, installation of external and internal elements of spotlights is required. Make sure that the bottom end is below the edge of the starting strip. Corner parts are recommended to be fixed on the self-tapping screw with the upper groove, other self-tapping screws should be installed in the middle part of the grooves. In this case, the openings should be surrounded by edging or trim.
Parts should be joined at right angles. Soffits are installed to the top of the original strip. Details of spotlights need to be joined into a lock. Before installation last panel set the end strip. Undercut wall panel until the desired length is reached and, holding the cut end in the last strip, mount the wall panel. It remains to hem the eaves and overhangs of the roof.

For high-quality installation of soffits for the roof, it is necessary to use nails: start hammering them from the middle part of the soffit panels towards the edges, but not all the way to avoid gaps. Finally, cut the panels using a circular saw. The action is carried out in low temperature regime. For cutting small parts, special metal scissors are most suitable.
Thus, after the erection of the roof frame, it is necessary to make sheathing with spotlights. Since rain, snow, cold, wind, insects, birds and rodents penetrate this area of the roof, it is recommended to choose the sheathing material very carefully. Thanks to the emergence of such material as soffits, roof filing allows not only to protect yourself from bad weather and its harmful effects, but also to solve the issue of high-quality ventilation in the space between the insulation and the roof.
The arrangement of a pitched roof is always accompanied by a process such as finishing the roof eaves. These works may not seem so significant, but the further operation of the roof depends on how correctly their implementation is.
Usually, corrugated board, lining or panels specially designed for this are used as materials for sheathing cornices.
What are roof overhangs and what are they for?
A roof overhang is the surface at the bottom of the roof that protrudes beyond the walls themselves. It is needed in order to protect the walls and foundation of the house from moisture getting on them during heavy rainfall. As a rule, the width of this part varies within one meter. Building regulations allow not to file this part of the roof.
But still, it is best if the overhangs are processed, since a strong wind that enters through the holes in them can easily tear the roof off the building. In addition to the practical function, the sheathing of the overhangs also performs a decorative one, since it is always better to remove wrong side roof and aesthetically process its edge.
Before you make eaves under the roof, you need to complete the work on the construction of the roof, finishing home and install finishing material on the cornices last.
Types of overhangs
If you look at the roof, you can see overhangs from all sides. two of them are cornice, two are gable.
Eaves overhang
This is the lower surface through which air enters the roof structure and ventilation occurs. On roofs with an attic, air passes directly there, and on mansard roofs, into the roof structure itself, where the air cavity is located. After the air passes through the entire roof, it exits through the ridge.
If the overhang is clogged with boards, then ventilation will not be carried out, but birds, mice and insects can get into the roof structure. Thus, overhangs are formed. But not close, but with a small gap for the passage of air.

Usually the issue of leaving a gap is solved by similar actions:
- Leaving a gap between the filing and the wall of the house. For filing from corrugated board, the gap is left small, from half to one centimeter. When using lining, you need to leave from a centimeter to one and a half.
- If the overhangs are made of metal, then you need to install ready-made metal gratings that are mounted on the finish.
- If the sheathing is carried out using boards, then it is necessary to leave gaps up to 1 cm between them.
- If it is decided to use soffits, then perforated material is used, which is created for ventilation purposes.
Important! The area of the ventilation opening should be greater than or equal to one five hundredth of the area of the roof structure. For roofs covered with bitumen, such holes make even more.
Gable overhang
This is the side part of the roof slope, which is adjacent to the walls of the house. Ventilation in the case of him is not important, the main thing here is protection from exposure environment. If there is a strong wind with rain outside, then it is necessary that the gable-type overhang does not let moisture in with the wind, as there is a risk of wetting the roof insulation, which will cease to perform its main function. That is why tightness is in the foreground when designing this part.

Sheathing methods
Roof overhangs can be designed in various ways, for example, in a perpendicular and parallel direction from the overhang. Various whole materials or their elements can also be used. Consider the methods of fastening the material:
Rafter stitching
If the roof has a slope of no more than 30 degrees and a small part of the extension, approximately 50 cm or less, then this sheathing method can be used. To begin with, a crate is formed, which is attached to the rafters, the material is already mounted on it in parallel, perpendicularly or along the end of the rafters.

Horizontal Binder
This design method is very good with a strong roof slope. To perform cladding work, you need to build a kind of box that is attached to the rafters and the wall. To quickly drain water that has fallen on the overhang, it is necessary to mount the beam on the rafters a little lower than the one that is attached to the wall.

Important! With an overhang of more than 45 centimeters, another additional one is laid between the bars.
All beams are reinforced with boards that are nailed perpendicular to the wall.
Materials for sheathing the eaves
When choosing a material for the roof eaves, you need to pay attention not only to its functional side, but also to the decorative one, since the sheathing that is inappropriate in style will look extremely unattractive.
Boarding
Boards must be taken only conifers and certain dimensions. The width should be at least 5 cm and not more than 25, and the thickness should be about 2 cm. In order to prevent future damage to the tree, the boards must lie under a canopy for about a month before installation. It is also necessary to carry out treatment with an antiseptic and decorative coating varnish or paint as needed.
With a perpendicular arrangement of the boards, their attachment points are located on each side, in the case of a long overhang - additionally in the middle. If the board is attached parallel to the wall, then the fasteners are installed every meter. Be sure to leave a gap of about a centimeter between the boards so that the natural ventilation of the roof is carried out.
Clapboard finish
Unlike regular board, lining - the material is completely ready for installation and processed. Before installation, the lining must also be left under a canopy for one month. Installation is carried out in the same way as in the first case. The only exception is that you do not need to leave gaps between the elements. Special metal gratings for ventilation are then attached to the lining.
Important! Sheathing of the overhang is made only with moisture-resistant clapboard.

PVC siding trim
To finish the roof eaves with siding, only those panels that have a special moisture resistant coating. In addition, you will need to purchase all additional elements decor - special finishing strips for finishing edges, corners for masking joints, grilles for ventilation. Panels are attached perpendicular to the wall using three or four fasteners. It is better not to fasten the panels along the overhang, as they can break due to the fact that they are not very rigid, for example, like wooden boards.

Profiled sheet finishing
This material can be laid in such a way that a large area is immediately hidden. Be sure to leave small gaps of about a centimeter between the sheets of corrugated board so that the panels do not bend with temperature changes. Ventilation is carried out by installing ventilation grilles over the entire surface of the finish.

Sheet metal finishing
For the purpose of sheathing the eaves of the house, copper, aluminum or galvanized or polymer type steel can be used. The length of the sheets used can be up to 6 meters, and the thickness is from 0.6 to 0.8 cm. Ventilation can be carried out by installing additional grilles or by installing perforated sheets. Steel sheets must be processed on the cutting line by special means to prevent metal corrosion.

plywood finish
Such material for overhangs can be used, but only on condition that it is water-repellent. Plywood has rigid sheets, so it is easy to mount it, resulting in reliable coverage, but it must be painted, because without processing it does not look particularly attractive. Ventilation is carried out with the help of special gratings.
Soffit trim
Soffits are called strips of various materials, which are made for processing roof eaves. Thanks to a wide range of colors and materials, you can choose those soffit panels for execution that, in appearance, will fit into overall design exterior.
In addition, the kits have a variety of additional parts that speed up and simplify the sheathing of the cornice with your own hands. There is no particular difficulty in installation, you just need to cut the strips to size and fix them according to the existing grooves.
Additional finishing of the edge of the cornice
Any type of overhang has uncovered parts of the structure. For a cornice overhang, such elements are the ends of the rafters, and for the gable - the ends of the battens. They, as well as the overhang made, need to be designed, while protecting them from atmospheric influences.
Important! Eaves overhangs need to be decorated with gutters.
These elements can also be decorated with different materials, depending on what type of material was used. Usually, together with a set for processing the overhang itself, an edge finishing material is also offered.
Before decorating the cornice overhang, all rafters must be cut vertically at the same level. Then the ends are combined with the help of a strapping board, on which the front is attached. A gutter will be subsequently mounted on the latter.

The gable-type overhang is processed with the initial cutting of the ends of the crate that extend beyond the walls so that they are parallel to the wall. An end board is nailed to these ends. roofing material she is covering up.
Roofing and wall cladding work usually ends with the filing of overhangs. This procedure gives the building a finished and neat appearance. A house with an unlined overhang gives the impression that it is still under construction. In this article, we will dwell on the issue of filing an overhang with the help of spotlights.
Do the overhangs need to be hemmed?
Some homeowners try to save on almost any construction work, therefore, they often neglect elements that are optional in the design. Especially for such readers, we will immediately say that filing the overhang with spotlights is advisable not only from a decorative point of view.
The overhang is the part of the roof that protrudes from the wall for a certain distance. Thus, this element provides protection for the foundation and walls from precipitation. At the same time, the overhang itself does not have such strength as the rest of the roof, which rests on the wall. Without filing, a strong wind will blow directly into the roofing "pie" and the coating will take on all the load. Along with the wind, water can also enter, which definitely will not favorably affect the life of the insulation. Installing spotlights will create an airtight barrier in the way of water and wind.
 An unsewn overhang is a vulnerable spot of the roof.
Another reason to hem the overhang is small animals that simply love to settle in cozy nooks and crannies at home. Such living creatures include not only birds, but also much less pleasant "neighbors", for example, mice.
What else is hemmed with overhang?
The article is devoted specifically to sheathing with vinyl spotlights, but it is worth saying a few words about the materials that can also be used for this type of work.
- Boards- most a budget option hemming material. Planed or edged boards. When mounting on a cornice, ventilation gaps must be left. Negative features are deformations under the influence of changes in humidity, in addition, wood is prone to mold and decay, so it must first be treated with antiseptic agents.
 Overhang filing with boards.
- clapboard- profiled sheathing board, there is no need to make gaps at such a board: special grilles are installed for ventilation.
 Some types of coatings require the installation of ventilation
gratings for air circulation inside the roofing "pie"
Wood material for acclimatization should lie outside for a month under a canopy to minimize shrinkage and expansion.
- Decking- profiled metal sheets, can also be used for filing the overhang. They are easy to install, as they immediately cover a large area. At the same time, the material has a sufficiently large weight, which loads the structure, and requires additional ventilation.
 Decking is a material that is easy to install, but heavy.
- wood boards- in most cases, moisture-resistant plywood and OSB are used for filing. The material is practical and can be attached immediately in large pieces. At the same time, the disadvantage is not a very attractive appearance, therefore, to give the overhang a neat appearance, it will need painting.
- PVC panels (vinyl)- the material is not afraid of frost, ultraviolet and moisture. Maintains an attractive appearance for a long time. Such panels are usually called vinyl. They are produced by co-extrusion and have a two-layer structure. Soffits are made from PVC for filing an overhang or siding panels, which are also used for these tasks.
Types of overhangs
In the design of the roof, two types of overhangs are distinguished: frontal and eaves.
- Frontal- Part gable roof which is located in front of the house. The front overhang has a slope corresponding to the slope of the entire roof. This place is taking serious wind loads, air currents can drive water into the roof. To prevent this from happening in these places, the roof is hemmed with sealed elements.
- Eaves overhang located on the side of the roof, has a horizontal arrangement. This overhang is important from the point of view of ventilation of the roofing "pie". The air from the bottom of the overhang must pass through the ventilation gap and exit through the outlet of the KTV (ridge point valve) or ridge. Air circulation ensures the removal of condensate, respectively, the insulation does not get wet and does not lose its thermal insulation properties. For this reason, the filing of the cornice overhang requires the installation of soffits with ventilation holes.
 Scheme of ventilation of the cornice overhang through a perforated soffit.
Soffits or siding?
Often, siding is used instead of soffits for filing overhangs, let's try to figure out how these coatings differ from each other.
- Soffits are a special additional element, which is designed for filing an overhang. The part can be made of different materials (steel, PVC, aluminum), the choice usually depends on the siding material used to sheathe the walls of the house. Usually the useful area of the soffit is larger than that of ordinary siding. Soffits are perforated and solid. The former are used for filing cornice overhangs, where ventilation is required, solid - for frontal ones.
 Perforated soffit has holes for
air penetration into the roofing "pie".
You can read about other additional elements for siding in the article “Additional elements for installing siding”.
- Siding- panels used for cladding the walls of buildings. They are not designed specifically for filing overhangs, but due to their lower price they are often used for this purpose. True, such savings are not always advisable, since when filing cornice overhangs, you have to additionally purchase ventilation grilles and cut holes in the siding for them. It is not recommended to leave openings without gratings, as debris will fall into them, as well as birds and insects. Ventilation is not done on the front overhangs, so in these places the use of siding panels is more justified, but it will still require adjustment in size.
 An ordinary siding panel does not have holes, therefore, for installation
it on the cornice overhang, additional holes will be required.
Soffit calculation
The length of the soffits usually exceeds the width of the overhang (the elements are attached from the wall to the edge of the overhang so that the mounting holes fall on the roof sheathing), so the planks will need to be cut to a specific size. To correctly calculate the total need, it is necessary to measure the area of \u200b\u200bthe overhang. When cutting soffits, consider auxiliary elements and a gap of 1-2 mm.
Moldings, J-bevels or two J-profiles can be used as auxiliary fasteners. The calculation of these elements is made by measuring the perimeter of the roof. When filing cornices, the number of perforated planks is calculated separately, the standard ratio is 1 to 2. Total area ventilation holes on soffits should be equal to 1/150 of the ventilated volume, taking into account the existing ventilation holes.
 Mounting options for spotlights with various additional elements.
Installation instructions
Soffits are mounted in two ways: horizontally and along the rafters.
- Mounting to rafters- with this method, the spotlights are in an inclined plane, the crate is fixed on rafter legs, then the binder itself is attached to it. This installation method is used only on roofs with a slight slope.
 Sheathing on rafters is made on
roofs with a slight slope, not more than 45 degrees.
- Horizontal mounting- under the overhang, a box is formed from timber and boards, which has a plane parallel to the ground. This method is preferable with a roof slope of more than 45 degrees.
 Installation of spotlights on a horizontal box under the slope.
Preparation for the installation of spotlights includes cutting off all protruding truss elements. The rafters should protrude the same distance from the wall. Then a strapping and frontal board. From the front side - end board. Consider step by step instructions for fastening spotlights using two J-profiles.
 Another way of plating using a J-bevel that overlaps the frontal board,
when using two J-profiles, the frontal board is covered with another soffit.
- J-profile is cut to the length of the slope. For cutting, it is more convenient to use a grinder, but a regular hacksaw is also suitable, only the process will take longer.
- J-profiles are fixed against the wall and on the edge of the cornice with self-tapping screws.
- Soffits that are pre-cut into right size(taking into account profiles and a gap of 6 mm), are installed in profiles, first an edge is inserted into the groove near the wall.
- The soffits are screwed onto the screws to the crate. Vinyl tends to expand under the influence of temperatures, so the self-tapping screw must be tightened, leaving a distance of 1 mm from the cap to the soffit. Subsequent soffits are joined using locking elements.
- When mounting with two J-profiles, another row of spotlights is fixed on the frontal board.
 Docking spotlights with the help of locking elements.
Conclusion
The filing of overhangs is necessary to protect the roofing "pie" from moisture. Soffits allow you to quickly mount a coating that goes well with a facade finished with siding. This additional element provides the necessary ventilation of the roof space.
Building yard
Soffits for filing the cornice overhang: features and installation


