Cladding surfaces with clapboard is carried out in several interconnected stages, each of which requires a special approach. Careful implementation of all technological procedures is a guarantee that you will be able to obtain reliable coverage, different excellent properties and environmental friendliness. The material is ideal for any type of work.
Lining is a board (of different thicknesses) that is made from various types of wood. The material got its name because of its original place of use. Namely, train cars, internal surfaces which were lined with small wooden slats, which created an excellent microclimate. Currently, wood products are returning to their former popularity, which decreased slightly when plastic and MDF options began to appear.
 The modern construction market offers a wide range of types of lining
 It is necessary to take into account that covering walls with clapboard with your own hands requires a balanced approach. Therefore, it is important to pay attention to the product at the stage of its purchase. Pay attention to the following points:
- Correct storage of purchased goods. Packages must be stored horizontally on a support.
- The humidity level of the warehouse should be within normal limits.
- It is not allowed to place the product in an open space, exposed to sunlight.
You should also pay attention to the expiration date on the label.
 All information about the storage and shelf life of the lining must be indicated on the packaging of the material
This precaution is necessary in order to mitigate possible risks. The fact is that work with the lining is carried out only after they are completely convinced that the material meets all standards.
On a note! You should purchase the product with the required reserve, which is equal to ten percent. To obtain the exact number of elements, preliminary calculations are carried out, and a diagram is drawn up. It is important to consider that the width of each fragment is measured according to the internal depth. That is, it is necessary to subtract the depth of the groove (10-12 mm).
 It is necessary to purchase material with a margin of 10%
 Material processing
After purchasing the required number of products and fasteners, the question immediately arises: how to properly cover the walls with clapboard? But this is not a priority task. You need to know that the material needs pre-processing, because no actions other than manufacturing are performed in production. Therefore, the following manipulations are performed:
- Coniferous wood types require complete degreasing. All resin stains are removed. The boards are washed well with acetone (a 25% solution is required). Next, wipe thoroughly with rags previously soaked in water. After all actions, the products are dried.
- To obtain the same surface shade, each fragment is treated with a pre-prepared mixture. It consists of hydrogen peroxide and acid (oxalic). The solution is prepared based on the type of wood.
- All damage, even minor ones, are repaired with putty. It is better to choose a mixture for wood. You can buy it at the store or prepare it yourself.
- If it is necessary to change the shade, then use stain or other special impregnations that preserve the texture of the wood.
 Processing the lining allows you to extend its service life and change the color of the material
 Of course, you can find products that will be pre-treated, but their cost will be significantly yours.
On a note! Pre-treatment cannot be skipped. This would be a gross violation of the technology of covering surfaces with clapboards.
There are two main options for covering the surface with clapboard: adhesive and frame. The first requires a perfectly flat plane. Therefore, the preferred method is the construction of a sheathing. In addition, it allows you to create extra space to insulate the room.
 The construction of the frame provides additional opportunities for insulating the room
 To attach the lining to the wall you will need:
- Tool. In this case, you need to prepare: a drill with various attachments, a level (plumb bob), a hammer, pliers, electric jigsaw or a hand saw.
- Slats for the frame. A solid wooden beam with a cross-section of 30*60 mm is ideal for this purpose. The substrates are immediately prepared. They are used to level racks.
On a note! If the surface has a significant slope, then setting up a wooden beam will be a rather complicated procedure. In this case, a metal profile is used.
- Fasteners: self-tapping screws, dowels, nails, clamps; if required, then additional elements for the frame (suspension).
You should know that before covering with clapboard, even if you use frame method, required preliminary preparation surfaces. The procedure is simple; the old decorative layer is removed, and all defects are well covered. Additionally, priming is carried out.
Creating a sheathing
The lathing is carefully attached to the wall. The order of placement of the slats is determined by the selected laying scheme of the lining.
 Scheme for creating sheathing for lining
- The timber is treated with fire-resistant impregnation and protection against mold. Wood paneling assumes that the wall will be dry.
- The slats should be perpendicular to the decorative boards.
- A uniform distance is established between the slats, the step of which is 40-50 cm.
- Be sure to leave a gap between the ceiling and floor. This is especially important for wooden houses, which are subject to constant shrinkage.
- The evenness of installation of the frame for cladding with wooden lining is carefully checked. To do this, use a building level and plumb lines.
- If an empty space is formed between the wall and the lath, then it is filled with prepared dies.
 The empty space between the slats and the wall is filled with wooden dies
 On a note! Lathing makes it possible to finish the walls with an additional layer of insulation. It is fixed directly between the posts.
Selecting a fixation option
Immediately determine the method of fixation. After all, paneling can be done different methods:

 Installing the lining on clamps allows you to make the fastenings invisible
 The necessary fasteners are selected based on the specific situation. Currently, clamps are becoming increasingly popular.
Fastening decorative material
Fastening the lining begins with the material being brought into the room and left for two days. This time is necessary for the product to fully acclimatize. If installation is carried out immediately, then there is a high probability that the elements will begin to warp - the structure will become deformed. Work is carried out only at positive temperatures and humidity, which is at least 60%.
 The lining is first brought into the room and left for two days.
 The general technique is:
- Often, boards are installed horizontally. Therefore, the first element is installed at the bottom so that the tenon points upward.
- Fixation starts from the corner, which is located away from the main entrance to the room.
- The first board is well checked for level, horizontal and vertical plane. If even small deviations are allowed, they will become very noticeable when the top panel is attached.
- The first fragment is fixed. The possibility of deviations is checked again.
- Next, the following elements are installed, which are first grooved and then fixed.
But how to cover a wall with clapboard vertically? The procedure is no different from the previous version:
- The elements are placed from the far corner. The first fragment is exposed and secured.
- The following elements are inserted into the groove and fixed. It is important to check that the joint is completely connected. To do this, lightly tap the rail along the edge.
- For this method, a wider rail is used. It creates a beautiful surface with fewer joints.
If you have experience, you can finish the walls in one day (even taking into account the frame). When the installation is completely completed, attach decorative elements: corners and baseboards. The surface is well impregnated with stain and varnished.
Exterior decoration of the house
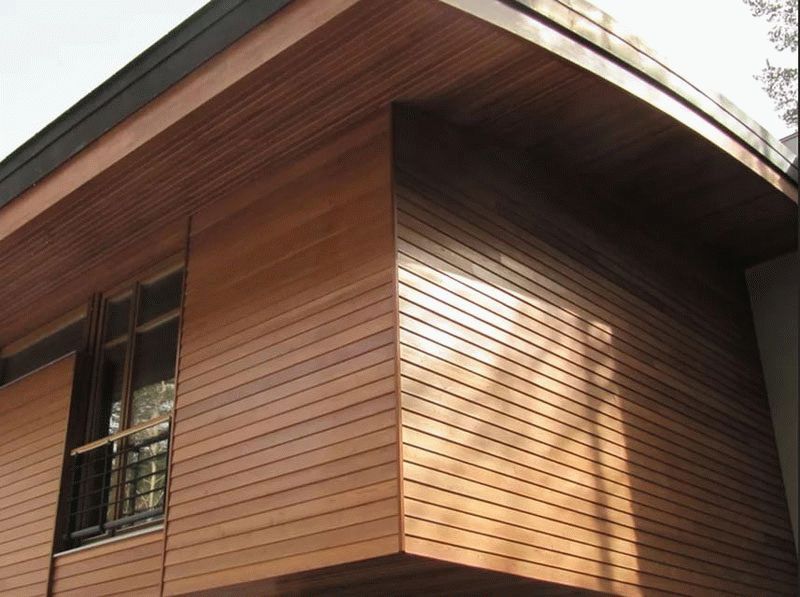 Decorating the house with clapboards on the outside
 Cladding the house with clapboards on the outside almost completely replicates interior work. The procedure is divided into three stages: marking, installation of sheathing and cladding. But there are some nuances:
- Two racks must be installed at each corner of the house.
- Window and door openings are framed with a profile (beam).
- For the work, we use high-quality boards that do not have falling knots.
- Fixation is performed end-to-end.
- The elements are attached with the groove down. This helps prevent precipitation from accumulating.
If you understand the basic rules and study the chosen fixation method well, then the work is done quite quickly. The result will be a surface that will bring the comfort and warmth of natural wood into the interior and will delight you with its beauty for many years.
Currently, many owners of private houses can afford to decorate the walls of a building with clapboard. As examples, numerous photos of wall coverings with clapboards are posted on the Internet. This material has all the thermal insulation properties of natural wood, and also has excellent frost-resistant properties and is not susceptible to various weather influences and sudden temperature changes.
Such high-quality finishing of the house allows you to create a favorable and healthy environment inside the building. It should also be noted that clapboards made of wood, unlike metal and plastic panels, buildings are sheathed not only on the outside, but also on the inside.

Work order
Wooden lining can be used to decorate residential premises made in virtually any style.

Wall finishing with clapboard is carried out in the following sequence:
- Preparing the structure, starting with insulation and waterproofing works from outside the building.
- Selection of finishing materials and profiles or wooden beams for lathing.
- Installation of electrical wiring in the room.
- Leveling the surface, installing lathing and insulating material on it.
- Finishing the premises with this material, according to the scheme initially determined by the owner of the house.
- Installation of sockets and electric lamps.
- Device corner profiles, baseboards and door frames.
Materials
Lining is boards of different thicknesses, made from various types of wood. These products received this name due to their original use in railway. Initially, railway cars were trimmed inside with small wooden slats.

The modern market has made significant changes, and plastic and MDF panels have appeared on sale, but despite these innovations, cladding walls with clapboards in an apartment or private housing construction still remains in great demand.

Today on the finishing materials market there is a huge amount of different types of lining, which are sold by numerous companies. For this reason, you must carefully select the product before paying for it.

When purchasing, it is important to pay attention to the following points:
- The packaged material must be stored horizontally on a special substrate.
- The air humidity in the room intended for storing goods must correspond to the standard.
- Products located on outdoors under sun rays, loses its qualities and properties.
Information about the shelf life and shelf life of the product must be indicated on the label; you must also pay attention to this when purchasing the material. Compliance with all these rules and precautions significantly reduces the risk.

It is also better to purchase this product with a small margin to avoid the need to re-purchase it.
Installation of facing products
Currently, finishing teams use two methods for covering the surface of walls. These options are also used by homeowners who decide to carry out landscaping on their own. We will consider further how and how to finish the clapboard with your own hands.

The first option is as follows, you need to prepare perfectly flat surface, after which the finishing materials are attached to the surface using an adhesive mass.

Another option is to cover the surface using a lathing frame, to which the finishing product is attached. This method also involves additional insulation walls, special insulation. That is why this option is considered more preferable.

In addition, it is necessary to determine in advance what type of clapboard surface finishing, horizontal or vertical, is most suitable for the home owner.

You can also use combined cladding options in the interior of your room. This is when part of the areas are finished horizontally, and part of the materials are attached using vertical installation, thus combining wall decoration.

Once the owner has decided on the options, you can begin installing the finishing panels. To begin, prepare necessary tool and the material for the frame is an electric drill, a screwdriver, levels, a hammer, pliers and an electric jigsaw or an ordinary hacksaw for metal, as well as metal profiles for sheathing and all kinds of dowels, screws, nails, screws and so on.

The frame of the sheathing is attached to the surface in the most careful manner. Profiles are placed vertically or horizontally, depending on the chosen method of fastening the panels.


- The profiles must be assembled and fastened perpendicular to the panels.
- Between the metal slats it is necessary to maintain approximately half a meter distance.
- It is mandatory to leave gaps from the floor and ceiling.
- The installation of profiles is constantly checked using a level.
After completing the assembly of the sheathing, it is filled with insulation specially prepared for this purpose.

Now you need to start installing the lining itself. At this point, the owner has already chosen the option of installing the material, and the finishing panels themselves usually begin to be mounted on the surface of one of the solid walls. 
Photo of wall covering with clapboard


The only logical option for finishing a log frame or timber house– wood paneling. Of course, the walls of the bathroom and toilet can be partially or completely tiled, and an apron can be made of tiles at the sink and stove of the kitchen working triangle, but no more. All other surfaces must comply general style. And the most common way is to decorate the walls with clapboard wooden house. The installation itself does not take much time, and the choice of wood species and panel profiles is very large.

Interior decoration wooden house clapboard fits organically into the rustic style
Grade of lining
Under the general name “lining” in the catalogs of manufacturers and sellers there are at least a dozen varieties of wooden cladding boards. And since there is no single standard, and each domestic manufacturer works according to their own technical specifications, then they all differ from each other in size and profile type. Even in determining the grade of lining based on the quality of the wood and the cleanliness of the surface treatment, there are certain “liberties” of interpretation.
Important! Determine which lining is best for interior decoration at home should only be based on their own ideas about class and quality. “Premium” or “extra” is from the evil one. Sellers are simply trying to attract buyers with such big names.
According to the “old” domestic GOST (for profile parts made of wood) there are two grades. They conventionally divide products into “transparent” and “opaque” coatings. Essentially, there are two grades - I and II.
Eurolining (which was not necessarily brought from Europe) must comply with the European standard DIN 68126, and there are three grades - A, B, C.

The prefix “euro” does not mean high quality – there is also a second grade here
Selection of lining
Conventionally, the entire range of linings can be divided into four large classes:
Domestic profiles. The simplest one is a quarter board. It is rarely used, since there is no convenient “tenon-to-groove” connection. The more common profiles are “standard” and “collective farmer” (“calm”). In the first case, the bevels at the ends of the front panel are standard (at an angle of 45°), in the second - rounded.
Eurolining. It is distinguished by a deeper groove and the presence of a “shelf” in front of the elongated tenon. There are also two design options: standard eurolining has beveled chamfers along the front surface, “soft line” – rounded.
Imitation of timber. By the type of profile, this is a typical “standard” lining, but only more powerful. And although there is overlap at the edges of the size ranges, the difference lies in the purpose. Imitation of timber is used when, when finishing, it is necessary to preserve the style of a “timber” house. Therefore, this type of panels is installed mainly horizontally (and the lining is often installed vertically).

The imitation timber is wider, and it completely replicates the laying of its “full-length” counterpart
Block house. The scope of application is the same as that of imitation timber. But in this case, the front surface of the panel has an oval profile, which, when installed, repeats the relief of the wall made of rounded logs. For interior decoration, the thinnest panels are chosen. They are mounted exclusively horizontally.
If the finishing of the facade is mainly done using lining made from coniferous species wood, then the choice for the interior is much wider. In addition to the “popular” pine or larch, you can find offers for the sale of lining made of cedar, oak, linden, ash and even exotic overseas species.
For living rooms There are no restrictions on operating conditions and humidity conditions. The only room where high humidity and “wet” conditions are dangerous for wood is the bathroom. In this case, it is better to use factory-treated lining - the usual technology of “painting” with antiseptics only protects upper layer, A vacuum impregnation in factory conditions they make the wood in the “mass” invulnerable to moisture and fungal attack, including from the underside surface. Another modern version“factory” protection – heat treatment of panels.
Good to know! Impregnation is one of the most effective methods impregnation, since during the impregnation process air is removed from the pores of the wood, and an antiseptic solution is “pushed” into its place under pressure.
There are also such types of lining profiles as “land house”, finca and a whole subtype of “wooden wallpaper”, which differ from ordinary lining and eurolining in the complex relief of the front surface. These are decorative wooden panels, which are used in doses - for finishing small areas.

The “brick” lining has a relief similar to brickwork
On our website you can get acquainted with the most popular projects of wooden houses from construction companies presented at the exhibition of houses “Low-Rise Country”.
Technology
Finishing with clapboards inside a house can be divided into several main stages: preparation, installation of sheathing, fastening of panels, installation of additional profiles.
Preparation and installation of sheathing
Cladding interior walls of a wooden house occurs along the lathing. And this is one of the few possibilities for hidden installation electrical networks. Of course, you can stretch cables and wires under the floor surface or in the attic along the ceiling, but the vertical sections to sockets and switches must be pulled along the walls. And this is not brick or construction concrete blocks- already in a log or timber standing house It is very difficult to cut a channel, especially considering the constant “breathing” of a wooden house.
And here the main thing is to correctly lay the cables and install the socket boxes. The peculiarity of a wooden house is that all power circuit cables are hidden wiring on a combustible basis must pass in metal pipes(steel or copper). These are the requirements of the PUE. And the thickness of the walls should ensure localization of the cable in the event of a short circuit - the walls of the pipe should not “burn out” from the arc. Therefore, neither plastic nor metal corrugation is suitable here.

As an alternative to hidden wiring under the lining - retro style with open wiring on ceramic insulators
On our website you can find contacts of construction companies that offer house insulation services. You can communicate directly with representatives by visiting the “Low-Rise Country” exhibition of houses.
The first stage of preparatory work is pipe laying, installation metal boxes for sockets and switches. And based on the diameter of the pipe and the height of the boxes, the cross-section of the timber for the sheathing is selected.
The lining must be delivered in advance so that the wood can adapt to operating conditions. Usually they are kept for several days, even if the wood is seasoned and has its own normalized moisture content.
Necessarily! If the lining is packed, then it must be unpacked.
During this time, the timber for the sheathing must be treated with an antiseptic.
The next stage is marking for the sheathing. The lining is usually mounted vertically, and the house block and imitation timber are installed horizontally. The sheathing is made perpendicular to the panels.

Combined wall decoration with clapboard in a wooden house
Note! Sometimes the lining is laid diagonally. In this case, the sheathing can also be made vertical, but with a smaller step.
The spacing of the sheathing timber depends on the thickness of the panels - the thicker it is, the wider the pitch. The recommended layout range is 50-80 cm. And the specific value is chosen so that from corner to corner the sheathing bars stand at approximately the same distance.
Video description
Laconic and accessible about the three main mistakes preparatory stage explained in the following video:
Installation of lining
Decorating the house with clapboards in each room begins from the corner, which is “in plain sight.” At this point, both walls should converge equal, and preferably intact, panels. But if the trim ends in a very narrow strip at the other corner, it will look unattractive. Therefore, before starting installation, it is necessary to calculate the number of whole panels and the width of the “remainder”. If it turns out to be narrow, then installation should begin with a trimmed panel.

Along the perimeter of the plane to be sheathed, small gaps should be left to the adjacent surfaces
The first panel is positioned with a groove from the corner outward. If the panel is intact, then place the tenon in the corner. Fastening to the sheathing from the tenon side is carried out with thin nails, which are driven in at such a distance from the corner that their heads can be covered with a decorative corner.
From the groove side, the lining is secured to the sheathing with clamps.
The next panel is inserted into the groove first. If you are tiling a bathroom or toilet, do not push it all the way, leaving 1-2 mm to compensate for changes in size due to fluctuations in humidity.
Video description
The entire sequence of work is clearly shown in the video:
Important! It is also prohibited to connect lining panels end to end for the interior decoration of a seasonal home.
Features of interior finishing with block house and imitation timber
Only thin and narrow panels of this type of lining can be mounted on clamps; other standard sizes are mounted on nails or self-tapping screws. But if the wooden house is for seasonal use, and in winter there are “visits” in it, then in any case it is better to choose traditional mechanical fasteners.
There are two options for fastening with self-tapping screws:
open method– for “thick” panels;
through the base of the tenon, or hidden method (for panels of medium thickness).

Fastening through the base of the tenon is more difficult, but this method is the most reliable for thick panels
To decorate the corners of a block house, one of four techniques is used:
washed down the panels at an angle of 45°;
through the docking bar with a side equal to the thickness of the panel in the wave;
using a wooden corner or two boards connected at an angle;
panel adjustment on one side of the wall under the profile of the other wall, but for this the layout relative to each other is shifted by half the width of the panel.
It is the latter joining option that allows you to obtain the most reliable simulation of the room inside wooden log house from rounded logs. Although the execution of a figured neckline will require some skill in marking and fitting. And it will take longer.

This method of decorating corners requires precise marking and mastery of the tool.
Conclusion is a last resort...
There are also options for finishing a wooden house: with slatted panels made of fiberboard and PVC. But they are used extremely rarely - only when there is an urgent need to make repairs at the lowest possible cost. Fiberboard is less resistant to high humidity, and the laminated surface is easily damaged. Plastic lining in a wooden house it will naturally look only in the bathroom or toilet.
Cladding walls with clapboard is widely used both for interior decoration of loggias and country houses. Wood allows the walls to breathe. made using such material will give a feeling of calm and comfort. Proper cladding will allow you to make it more comfortable.
Classification
There are several classifications of this material. When choosing which one to buy, you need to start first of all from your goal, then choose the right option from those proposed.
Divided depending on the type of wood used.

It is made from the following species:
- Deciduous;
- Coniferous.
The second option is not recommended for use in rooms where large temperature changes are expected. These are saunas and baths. Because of high temperature Resins may be released onto the surface of the wood, which makes the finish sticky and not very aesthetically pleasing.
In addition, these substances can cause burns. An exception to this rule is considered. It belongs to finishing materials highest category. The cladding is expensive, but it will last a long time without creating problems.
Coniferous species include spruce, larch, pine, eucalyptus, cedar. These trees are considered "soft".
Deciduous trees– alder, aspen, linden, ash. Linden is considered a particularly valuable species. When exposed to high temperature, it releases a pleasant, unobtrusive aroma. It has a beneficial effect on the nervous system.
Quality is determined depending on the class. There are four of them:
- Extra or Premium;

Extra class- the most expensive type. It is distinguished by impeccable execution. It is usually made by gluing, since otherwise the price of such material would be very high. It is perfect for creating expensive decorations. You will not notice any flaws either on its surface or inside.
Class A also called . The distribution by class is determined by GOST. When choosing, you should review it yourself.
Extra class and Class A are not much different from some manufacturers. You will not find any obvious defects on boards of this category. There are no black falling knots or blue stains on it. If there are defects, they are minor and do not affect the quality of workmanship.
Class B – a budget option. This type or loggias. Defects are usually in the nature of a small manufacturing defect. This category is available to most citizens.
Class C- the lowest-grade option. There are many defects on the surface such as slight rot, blue discoloration, falling black knots and cracks. If it is used, it is only for finishing unimportant utility rooms.
By profile type they are distinguished:

- Standard;
- Softline
- American;
- Block house;
It is an imitation of rounded timber. This finish is perfect would be better suited For country house. It will give the look of old log houses.
Softline received this name because of its slightly rounded edges.
Gives the impression that the panels are overlapped. It can be used for both interior and exterior work. Tightly fitting panels prevent moisture from getting inside.
Advantages
You can praise wooden lining endlessly. This is an environmentally friendly material.
He doesn't highlight any harmful substances, so they can even be used to cover rooms where children or people with allergies live.
This is a durable material. At correct processing Over time, it does not lose its original appearance. It will not be scratched or burst.
Various tree species and a variety of paints and varnishes will allow you to create a finish of any color.
Cladding with clapboard, in contrast, is not so exposed to harsh external and internal factors. She's not afraid of small ones mechanical damage. It will retain its original appearance.
Horizontal or vertical cladding
Do-it-yourself wall cladding with clapboard begins with choosing the laying direction. There are horizontal, vertical, diagonal and mixed.
Horizontal Vertical Diagonal
Christmas tree Brickwork Frame
Horizontal direction finishing is traditional for Russia. It expands the space. But the main disadvantage is the accumulation of moisture and dust in the joints. To avoid this, it is necessary to direct the grooves downwards. In this direction, it is recommended to start from the ceiling to the floor.
Vertical direction widely used for decoration in Finland. Using this method, we can visually increase the height of the ceiling. This is especially true if we . In this case, it is necessary to start installation from the corner, and the most difficult one.
Diagonal and mixed The direction is distinguished, first of all, by aesthetics. It is much more difficult to install. A unique design can also be achieved by combining various varieties tree.
We build the sheathing
 Do-it-yourself clapboard cladding begins with installing the sheathing.
For fastening it to brick and concrete walls Dowels are used; for wooden ones, nails or screws are used.
It is very important to mark the surface before installing the frame. The quality of the finish itself depends on a properly constructed structure.
The lathing also has the function of leveling the walls. To do this, place wedges or chips under the timber. The frame can be made of either wood or metal profile. Do not forget to treat the surface with protective compounds.
A prerequisite is the use building level. The more often you use it, the less you will have to redo.
Most often, 50×25 mm timber is used as a base.
 Fastening the frame elements depends on the chosen direction of the lining. The bars should be located perpendicular to the panels.
The standard lathing pitch is 50 cm. It is convenient to place insulation sheets inside such pockets.
You can use a fishing line and a plumb line. If you're going, experienced craftsmen It is recommended to place the ribs of the structure at the level of the knee, hip and chest. This will ensure optimal structural rigidity.
The video shows how to install the frame:
Self-cladding
Or the walls are unacceptable when using raw lining. First you need to dry it.

Finished panels are most often fastened in a hidden way. Installing the first board is very important. It lays the foundation for the entire structure. It is fixed in several places and the slope must be checked using a building level.
In the horizontal direction, we begin the installation from the ceiling, in the vertical direction - from the corner in which the greatest trimming is implied. The bottom board is usually trimmed. The baseboard will help hide this.
After the first panel is secured, the next one is inserted into the groove. It is secured in the same way.
The joints between the planks, as well as the panels themselves, must be carefully treated with special compounds.
Video - do-it-yourself wall covering:
Even if you are not a professional, if you follow all the rules and formalities, you can easily cover the walls!
Approximate cost of work
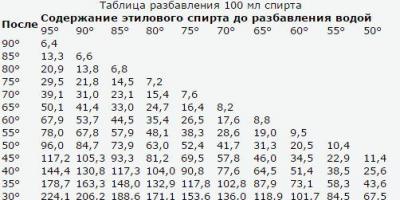
The cost of the material depends on the breed and. Approximate price in the table:

The cost of the cladding goes for square meter. Price of work - approximately 300rub/m2.
Modern technologies do not stand still; more and more materials are appearing that are actively used in construction and repair. Drywall, plastic, OSB are in demand and widely used, but wood still remains a popular material and does not give way to its position. This is explained by high performance characteristics and the absence of equivalent competition - high environmental friendliness, non-toxicity and quality are not duplicated by any material. Lining remains very popular and in demand; it is used for cladding walls, ceilings, doors and window slopes. The material can be used for external and internal work.
Types of lining
Lining is a well-processed planed board with high characteristics, having a natural degree of moisture, the same type of joining elements - tongue and groove.
Benefits or weak sides materials depend on the type of wood. Pine is considered the most popular and cheapest material. It comes in a wide variety of colors. Pine lining is easy to process and install. By using modern means you can change not only external characteristics lining, but also increase the durability of the material. To prevent the board from darkening and losing its visual appeal, it is recommended to cover the surface of the product with varnish or paint.
Linden lining is actively used for finishing saunas and baths. It heats up very slowly and does not release resin, has high moisture resistance, and is practically not susceptible to rotting or the appearance of mold or mildew.
Oak lining has a considerable cost, but is in high demand. The material is very resistant to rotting, easy to process and can be installed without problems. Using oak lining you can create an interesting image in the interior. To preserve the material, it is necessary to subject the oak lining to staining and etching.
The lining is famous for its large assortment and variety of colors. It is possible to easily choose the shade of the material to match certain interior. If dominance is necessary yellow color, you should opt for aspen or spruce. Alder or larch will give a brownish tint. The latter material has very high characteristics, but is one of the most expensive types of lining.
Wood planks have a large list of advantages:
- natural wood is environmentally friendly;
- appearance a room lined with clapboard is stylish and solid;
- it becomes possible to level the surface of the room;
- the aroma of natural wood appears in the room;
- the lining is easy to install and connect to each other;
- is resistant to mechanical loads;
- easy to clean.

But along with the advantages, there are also disadvantages:
- the material is expensive;
- For durability, the surface should be carefully maintained.
Main characteristics of the lining
In addition to the type of wood from which the lining is made, the material is divided according to the following criteria:
- Degree of humidity. Lining is dry or natural humidity has differences not only in cost, but also in characteristics. Dry lining is obtained by removing moisture from the board and costs a third more than untreated boards.
- Shape, dimensions of material. There are four options for boards: lining, eurolining, block house and facing board. The choice of one material or another depends on the purpose of the lining.
Lining is a very practical material and the opinion that it is destroyed under the influence of the sun, temperature changes or rodent activity is incorrect. At proper care the material can last more than twenty years. Manufacturers treat wood with special materials that make the lining resistant to environmental influences.
- extra;
- class A;
- class B;
- class C.
Extra class is characterized by very high quality wood, there are no visible defects, the profile surfaces are uniform and smooth. Class A is also of high quality, has no damage, but may have knots. Class B has some external defects in the form of knots, chips, and uneven color. Class C is characterized by low quality, may have knot holes, various damages surfaces.
The most expensive is Extra-class and category A. If there is no financial opportunity to purchase lining of this class, you can select good examples of classes B and C. The main thing is to carefully examine the boards for defects. Minor defects found in the boards can be repaired using putty. Ultimately, it is possible to hide some of the imperfections of the lining.
Features of fastening the lining to the base
The lining is attached in advance installed frame. Provided that the surface of the walls is perfectly flat, you can attach the material directly to the wall, but when installing the sheathing, the quality of the fastening will be higher, and it also becomes possible to lay a layer of thermal insulation. You should use a level, in which case the surface will be perfectly flat. The frame can be a beam or a metal profile. But it is still preferable to use wooden frame, since when using metal for the base, the wood may become deformed.
Profile installation can be done in several ways:
- horizontally is the most popular option, besides, certain types of lining are attached only this way;
- vertically - practiced when covering the ceiling; it is recommended to cover the surface in the direction away from the light;
- diagonally - decorative method, practiced to decorate a room;
- mixed method of laying lining - placing boards in different directions makes it possible to decorate the room and create a pattern.
The choice of option depends on many factors. Based on the purpose of the room, its characteristics and the expected result, one or another cladding option is used.
How to make your own sheathing
First you need to prepare slats, which you can make yourself or buy on the market. The optimal distance for the slats is considered to be half a meter: this is convenient for installation and allows you to fasten the lining as securely as possible. Depending on the type of room, a vapor barrier and thermal insulation are installed under the frame. Apply mineral wool for these purposes it is not recommended in areas where there is high temperature.
It is recommended to treat the planks with antiseptics and preparations to kill insects that destroy wood. The lining must be brought into the room on the eve of fastening, as otherwise installation work may damage the material.
Material processing
Making the sheathing, purchasing material and fasteners is only part of the task. It is necessary to properly prepare the material for fastening. Most often, the lining does not undergo any pre-treatment, and the one that is processed is very expensive. Therefore, before covering, you need to do the following:
- lining made of coniferous trees must be degreased, for this purpose acetone is used, after treatment with a disinfectant, the boards should be wiped with sponges soaked in water, after all manipulations, the boards are dried;
- to ensure surface uniformity, each board is treated with a special mixture of oxygen peroxide and oxalic acid;
- the slightest damage must be repaired with putty or wood mixture;
- To change the shade, stain or impregnation is used for wooden surfaces.
Pre-processing cannot be ignored, as this would be a violation of technology.
Preparatory work: construction of the frame, preparation of the base surface and material
Before starting work on covering the lining, it is necessary to install the sheathing. Most often, vertical or horizontal lathing. With the horizontal method, the direction of the board should be set correctly so that moisture or condensation can flow down freely and not accumulate.
You can attach the lining different ways, the most popular are:
- fastening with clamps is the most safe way, in which the destruction of the board surface practically does not occur;
- fastening with nails - nails are driven into a groove or tongue, care must be taken not to damage the lining;
- fastening with a stapler;
- fastening with self-tapping screws.
Each of the options has its own characteristics and can be used at the discretion of the master. With any method, the first and last boards are attached with nails with small heads that are recessed into the material.
Fastening with clamps helps create a perfectly flat surface. This option is suitable for lining with eurolining, regular board It is preferable to fasten with screws. Attaching the lining with staples happens quickly; the main thing is to keep the stapler under right angle and bury the bracket in the material as much as possible. Fastening with nails makes sense if, at the end of the work, the surface will be covered with other materials.
The surface of the lining must be treated after installation. This will extend the life of the product and make it more attractive. The following procedure is recommended: coating with a primer, antiseptic impregnation, finishing coat paint or varnish.
The procedure for performing work on finishing walls with clapboards with your own hands
After the surface of the lining has been processed, the sheathing has been placed, and thermal insulation materials, proceed to installing the lining. You should decide on the mounting option for the lining. It all depends on personal preference, but it is worth remembering that horizontal paneling makes the room more spacious. The vertical cladding method allows you to visually increase the height of the ceilings.
Horizontal cladding begins with attaching the lining from the ceiling to the floor. The grooves should be directed toward the floor to prevent debris and dust from collecting. The first sheet is fixed on the frame bars and attached through a groove or tenon with any material chosen for fastenings. Every three to four boards, the evenness of the resulting wall is checked using a building level. The last board is adjusted using a hacksaw. The surface of the installed lining is wiped clean from dust and debris. If necessary, the lining is painted, but the appearance of the boards is attractive without additional intervention.
Vertical cladding starts from the corner of the room. The first board is nailed and covered with a corner for decoration. Installation goes like this horizontal version fastenings The end board is cut to size using a hacksaw.
Necessary materials and tools for do-it-yourself clapboard wall cladding
In addition to materials, you need to prepare certain tools, there are not many of them. To cover the walls with clapboard, you will need:
- wooden beam;
- dowels or screws;
- surface treatment solutions;
- building level;
- centimeter or tape measure;
- fishing line;
- file;
- axe;
- wedges;
- screwdriver;
- pencil and marker.
You can sheathe the room with clapboard on our own. This is not difficult to do; you need to stock up on material, which will require ten percent more than what was calculated and tools. If you still have questions about how to decorate walls with clapboard yourself, you should watch the video. There you will find answers to all your questions.