How to make slopes on windows? This question worries many who, after replacing window structures, are faced with such a problem. Indeed, serious work remains to be done to make the surfaces reliable and beautiful. It is worth considering that slopes perform not only a decorative, but also a protective function. Therefore, it is necessary to approach this with utmost care. If you make mistakes or do the work poorly, a lot of troubles will arise.
Window slopes are an integral part of any room. Some believe that minimal attention can be paid to such a design. But this is a misconception that leads to aesthetic and practical problems. The fact is that internal slopes perform a number of important functions:
- Maintain a certain microclimate. Slopes prevent heat from escaping from the room to the outside, as well as preventing cold from penetrating inside. Naturally, protection from moisture, which leads to the formation of condensation, cannot be ruled out.
- Extend the service life of all structures. That is why such finishing must be carried out in a short time. Of course, you can still delay installation indoors, but outside, installing the slopes is required within a minimum time.
- They create an excellent decorative component. Installing slopes on windows can be considered one of the main components of a harmonious interior. You can install beautiful metal-plastic frames, but if they are not properly refined, they will lose their sophistication.

Therefore, when performing all the work yourself, you must comply with all technological nuances and rules. Then you can be sure that you will get a reliable and durable coating that will please the eye.
Design Features
The design of slopes has its own characteristics. The fact is that it is necessary to take into account the main nuances that must be done when working with your own hands:
- The structure should be finished so that the edge of the frame is covered quite a bit.
- It is necessary to take into account the location of hinges and opening doors.
- The foam is trimmed flush with the frame. If you remove more of the substance than required, the structure may become distorted. Also, any bulging residue will interfere with the finishing process.
- Special attention is given to the assembly seam. The option that will be used for cladding the window slopes depends on its thickness.
- The sealing process is very important point. All places must be well coated.

But how to finish the slopes, the location outside the room? The technology is almost completely consistent internal work. But the obligatory and most important rule will be to install a low tide.
Finish options
It is customary to distinguish two main cladding options, which differ in the materials used.
Cladding with panel products
This technology assumes that materials will be used that are cut into panels of the required size.

When choosing this method, the following features should be taken into account:
- Quality of material. It is necessary to carefully select the products used. The fact is that if you install a low-quality option, then problems will begin to arise during the installation process. For example, cheap plastic is characterized by the fact that it crumbles and cracks when cut, and after installation it does not remain good for long. appearance.
- Correct insulation and processing technology. When installing panel products, voids often arise, which can serve as an opportunity for the development of fungus and mold. Such places are a source of cold penetration. Therefore, surfaces require pre-treatment and installation of insulation, the choice of which depends on the specific situation.
- Careful measurement. Main mistake, which can happen is inaccuracies in measurements. If you do not take into account the location of the parts, wide joints will form that cannot be hidden even with decorative moldings.
- Finishing. Installation of slopes made of panel products must be combined with correct selection decorative elements. For subsequent finishing, you can use special profiles and corners, as well as putty external joints. When installing overhead fragments, it is important to make the correct trim so that all joints are equal.
On a note! To produce the most accurate parts for window slopes, two methods are used. The first is simply measuring and transferring data to the material, the second is creating stencils. This method is much more accurate, but requires more time, because it is necessary to perform a stencil at each stage of the work.
Application of the solution
Such work involves applying a certain layer of prepared mortar to the windows yourself, which completely covers the entire surface of the slopes. This option is considered the most traditional. Its distinguishing feature is its low cost.
Finishing can be carried out according to two main scenarios:
- Traditional. The surface is finished with a mixture that is leveled at a certain angle.
- With additional insulation. This technology involves the use of foam plastic, which serves as the base. In fact, this option can pose many problems. Improper installation of insulation is a guarantee that numerous cracks and peelings will appear.

Preparatory activities
Before wondering how to properly make slopes, you should thoroughly prepare the surface. The amount of work depends on the specific situation. There is a general order that must be followed:

Slope manufacturing technology
How to finish the slopes? There are basic materials that are used for such work:
- plastic PVC panels for walls;
- sandwich panels;
- plaster.
Each option is selected based on several reasons:
- Distance from wall to window frame. That is, the thickness of the assembly seam.
- Width of plots.
- Financial expenses.
Considering that the master must perform all the work himself, the option that will be most acceptable is chosen.
PVC panels for walls
 PVC panels are the most popular finishing material window slopes
This material is used most often, especially if needed. There are several reasons for this:
- Cheapness. Modern technologies allow us to produce products that are accessible to everyone.
- Practicality. If you choose materials that do not belong to the category of economy, then they are unpretentious in operation and last quite a long time.
- Easy to install. The work is completed quickly, without the use of complex tools.
Installation of slopes made of plastic panels is carried out according to the following instructions:

But the window decoration is not finished yet. A number of finishing manipulations should be performed. They consist in the fact that all joints are well coated with sealant. Decorative corners are installed on the outside. They must be trimmed correctly in order to join at an angle of 90 degrees.

When a dilemma arises about which slopes are better, many proposals and opinions may arise. But it is undeniable that it is better to make slopes from sandwich panels. They combine everything positive traits PVC materials, but have additional advantages:
- The products include a reliable layer of protection (one or two), as well as a layer of insulation. This avoids the need to use additional material.
- They are resistant to various influences, due to which their service life is practically unlimited.
- Have excellent decorative look. Indeed, such panels are superior in appearance to wall products. Besides this material can be made in a fairly wide size, which is ideal for large openings.
Making slopes on windows with your own hands using such products is quite simple. It must be taken into account that this option is excellent in cases where the thickness of the installation seam is minimal. Three-layer material is used for work.
Let's look at how to install slopes from sandwich panels. Everything is done as follows:

Using plaster
Previously, there were no questions about how to make slopes on windows. After all, there was only one option, which was to use plaster. This method is quite convenient and practical, but requires skills. This need arises due to the fact that it is necessary to correctly display all the planes and maintain the angle of inclination. Although, if you practice a little and understand how best to apply the mixture, then plastering work will not cause any particular difficulties.
General technology is this:

The result is an excellent coating that is highly reliable. The undoubted advantage of this option is that each section made can be repaired and the decorative layer can be changed.
Conclusion
Summarizing the above, we can conclude that there are various options finishing of window slopes, which depend on the specific situation and financial capabilities. The main thing is to initially carry out all the work efficiently, observing all the nuances.
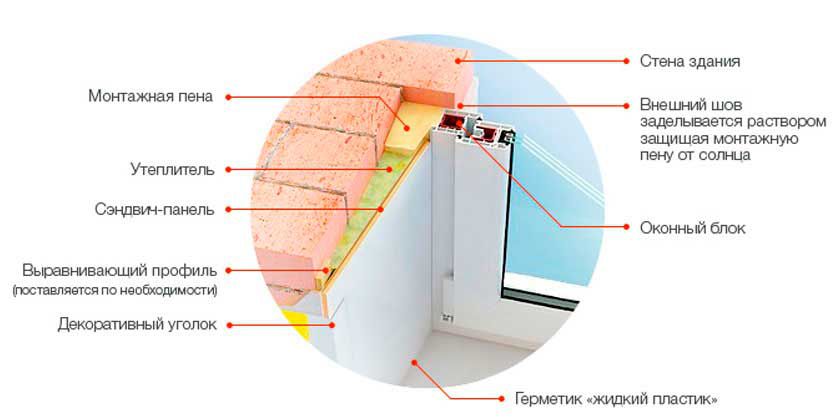
On one installation PVC frames With double-glazed windows, the work with the window opening is not completed - you need to create a frame for it, both from the outside and from the inside. There are several ways to do this, differing in the materials used and working methods. Do you want to learn more about them and understand how to properly make slopes on plastic windows? Then here you will find enough detailed description of these methods with step by step instructions for the execution of work.

But first, let's look at several reasons why there is a need to install slopes on plastic windows.
- First reason– protection of the edges of the frame and the mounting foam on which it rests from damage by dampness and temperature changes. Without slopes, the installation seam of the window will gradually begin to collapse and become unusable.
- The second reason– protection of the window opening from cold, rain and drafts, high-quality slopes made of metal, plastic or any other material will provide reliable thermal insulation at the installation seam and will not allow water to penetrate inside. Also, slopes partially play the role of sound insulation
- Third reason– decorative. A plastic window in an opening without slopes does not look very beautiful both from the inside and the outside. Therefore, it is framed with metal, plastic, plasterboard or plaster.

On a note! The main types of slopes for plastic windows There are four: metal, plastic, plasterboard and plaster.
Among the many available methods of glazing balconies, frameless is considered the most elite. The design contains minimal amount elements, but each of them is subject to the highest quality requirements. Read more in .

During the construction of private housing in villages, towns and suburbs, slopes made of metal have become very popular. This is largely due to their advantages over other materials.


Before we move on to describing the steps to install metal slopes, let’s consider the tools and materials needed to complete this work. For your convenience, they are summarized in the table below.
Table. Installation of external metal slopes - tools and consumables.
| Name | Why is it necessary? |
|---|---|
| Roulette | Taking measurements |
| Self-tapping screws | Fasteners for metal slope. It is desirable that the color of the caps matches the color of the product |
| Screwdriver | Fixing and tightening screws |
| Long cue ball for self-tapping screws | Working with metal slope fasteners in hard to reach places when installing the starting profile |
| Set of drills for metal and concrete | Creating holes in slope elements and walls for fastening |
| Metal cutting scissors | To adjust metal slopes to window dimensions |
| Sealant and mounting gun | Processing joints between individual slope elements, as well as between the slope and a plastic window |
| Construction knife with retractable blade | Cutting packaging of metal slopes for windows |

Important! Also, don’t forget to prepare a large enough workbench on which it will be convenient to trim individual elements metal slope. In addition, if the upper border of the opening is high, take a stepladder.
Now let's move on to a direct description of the actions that must be performed to install external metal slopes on plastic windows.
Step 1. Unpack the set of slopes for plastic windows. Check that all its components are in stock and without defects. In this case, the kit consists of fasteners, a lower ebb, one upper and two side slopes, and starting profiles for them.

Step 2. Measure the width and height of the window opening. In this case, one must also take into account how correctly the window is installed - in some cases they are mounted in a plane that is not parallel external wall home and decoration. A similar factor must be taken into account when adjusting the lower ebb and other slopes further.

Important! It will also be useful to “try on” individual slope elements on plastic windows, installing them in the opening without fastening them.
Step 3. Transfer the measurement results to the lower ebb, which, as a rule, is initially slightly larger than the width of the window opening. You will later cut this part to fit right size, formed side “ears” at the edges.

Step 4. Using metal scissors, cut the bottom trim to the width of the window opening, leaving trapezoid-shaped “ears” at the ends. Then fold them up as shown in one of the photos below. Also, during the trimming process, leave a triangle on the outside of the ebb - it will cover the corner of the opening.

Prices for construction scissors for metal
Construction shears for metal

Step 5. Check whether the bottom flashing is now the right size for the window opening. If everything is in order, mark the holes for fasteners and drill them (if they were not made in advance, as on the product in the example in the photo).

Step 6. Align the bottom ebb with the width and secure it in the opening using self-tapping screws.

Step 7 Try on the F-shaped starting profiles on the side surfaces of the window opening to see if they are suitable in height. Mark with a pencil the place to which these products reach in height.

Step 8 Install on the upper horizontal part of the window opening the starting profile required for fastening top bar metal slope.

Setting up a starting profile
Step 9 Insert the corresponding slope element into the upper starting profile and secure. If necessary, first trim the part to form the “ears” necessary for reliable fixation of the side starting profiles in the opening.

Important! Factory-produced metal slopes, as a rule, have a special plastic film, protecting the product from scratches and other damage during storage and transportation. When installing, remove the film from those surfaces where it will be impossible to get rid of it later. Remove the remaining film from other places only after the installation of the slopes has been completed - this way you will reduce the chance of accidentally damaging the elements during the work.
Step 10 Using vertical “ears” on the upper and lower elements of the metal slopes, secure the starting side profiles.


Step 11 Mount the left and right slopes on these starting profiles, secure them with self-tapping screws or metal rivets. Then, if desired, seal all joints and crevices with sealant to completely eliminate any possibility of water getting into the window frame.

Video - Exterior window decoration with metal slopes
Internal slopes made of plaster for a plastic window - step-by-step instructions
When decorating plastic windows indoors, owners of houses and apartments have a desire not to resort to plastic or metal products - these stand out too much inside the room and are more suitable for the outside. In this situation, the slopes are made of plaster - it can later be painted either neutral White color, or to match the decor of the living room or kitchen.
Important! Keep in mind that slopes made of plaster are inferior in durability to ebbs and platbands made of plastic/metal and that they are not suitable for rooms with high level humidity.
Step 1. Protect glass and frames from plaster by temporarily covering them with plastic film. It is also advisable to use masking tape in some places - this way you will free yourself from the need to subsequently clean the window from any pieces of plaster that have fallen.

Step 2. Using a pencil, take initial measurements of how the plaster will be applied. The mixture should partially cover the plastic window frame itself - this will minimize any possibility of a draft. In this case, plaster slopes are also made at dawn - the surfaces are located at an angle, expanding from the window into the room. This ensures better illumination of the room.

Step 3. Complete the marks using laser level or its usual bubble analogue. In this case, it is necessary to indicate several points for screwing in the screws and drill holes there - the fasteners will become a kind of substrate for the beacons installed in the middle of the opening planes.

Prices for popular hammer drill models
Hammers

Step 4. Treat the surfaces of the window opening with primer, preferably in two layers. It will ensure better “adhesion” of the plaster to the main wall.

Step 5. Prepare beacons for insertion into the opening. In this case, purchased factory-made products are used, which are quite cheap, but at the same time very convenient to use. Trim them to the appropriate height or width of the window opening.

Step 6. Prepare a sufficiently dense and good solution for attaching beacons to the surfaces of the window opening. Apply several “cakes” of the mixture onto each of them with a spatula. Then mount the beacon, using the heads of the screws that were screwed in earlier as a backing - further than them metal product it won't work. Lightly drown the beacon in the solution.

Step 7 Using the same principle, install a beacon on the top of the window opening.

Step 8 Install “formwork” around the perimeter of the window opening, along which the edges of the surface with the “dawn” will be aligned. In this case, the master applied the old rule for these purposes, fixing it with screws and dowels.

Step 9 Prepare a plaster mixture to form slopes. Mix all its components in a bucket using a mixer or drill with a special attachment.

Step 10 Perform an initial sketch of plaster on the surface of the window opening, but without much leveling - just form required amount sweep on top and sides.

Step 11 Take a wide spatula and, leaning it against the plaster, the beacon on one side and the rule on the other, level the mixture and make it smooth. Repeat this operation on the other sides of the window opening.

Important! Before the mixture dries completely, craftsmen often remove metal beacons so that they do not remain to rust inside the slopes. The grooves remaining after this are rubbed with the mixture and smoothed with a spatula in the same way as in the previous operation.
Step 12 Small parts and work out defects using narrow spatulas. After this, you can leave the plaster to dry. Then remove the protective plastic film from the window. The final touch is painting the new plaster slope in the desired color.

Video - How to make slopes yourself. Plastering slopes
Prices for popular types of plaster
Plaster
Plastic slopes on a wooden window
One of the most commonly used ways to make internal or external slopes on a window is plastic panels. Let's take a quick look at one of the most simple ways their installation - using starting and other profiles. Such plastic slopes can be successfully used for both internal and external exterior finishing PVC windows.

Step 1. Cut off any excess polyurethane foam in the opening that will interfere with the installation of slopes. Then determine the dimensions of each surface in order to accurately prepare sections of starting profiles based on the obtained values.

Step 2. Using the data obtained at the previous stage, cut pieces of starting profiles of appropriate sizes.

Step 3. Secure the starting profiles around the entire perimeter of the window opening with self-tapping screws.

Step 4. Try it on corner profiles, joining their ends with the starting ones. Measure desired length and cut the product. Then join it with the starting profiles at the corners of the opening, but without fixing it with screws.

Step 5. Mark points along the edge of the opening opposite the frame (in this case, the edge facing the room), drill holes in the wall in these places and insert dowels. The latter will be secured with profiles framing the plastic slope on the inside.

Step 6. Install profiles framing inner edge window opening. Fix them on the dowels installed earlier using self-tapping screws.

Step 7 Insert plastic panels between the starting, corner and framing profiles. For better mounting on the wall, first apply polyurethane foam in the form of a zigzag line. To seal the joints between the panel and the profiles, treat them with sealant.

Slope made of plasterboard sheets - step-by-step instructions
Another option for slopes on plastic windows is made from sheets of plasterboard. This design is quite strong and durable, plus it is paintable. But at the same time, it has considerable mass, and its installation requires some skills in working with this material. As a rule, such slopes are used if both the walls and the ceiling in the room are also finished with plasterboard.
Important! Slopes made from plasterboard brands that are resistant to temperature changes and high humidity may also be suitable for exterior finishing window opening.
Step 1. Take the dimensions of the window opening and calculate the slopes of what height and width will be needed. Mill the sheets of drywall so that their edges are at an angle - this is necessary for gluing the material into corners, which will then act as slopes for the plastic window.

Step 2. Clean the edges of the plasterboard strips, cut at an angle, from dust and then connect them to each other to create ready-made vertical or horizontal slopes for the window opening. To ensure that the product retains its shape while the foam hardens, tie it with adhesive paper tape as shown in one of the images below.


Step 3. Install a frame made of metal profiles or wooden slats near the edges of the window opening. Fix it well, because the structure will take the main load from the plasterboard slopes.

Step 4. Fill the space between the frame elements with polyurethane foam. It is also advisable to apply it to the narrow strip between the frame and one of the metal profiles.
![]()
Step 5. Install a plasterboard slope, level it in height/width and check the position using a building level.

Step 6. Finally secure the plasterboard slope in place using the appropriate screws.

Step 7 Repeat the previous two operations several more times and install plasterboard slopes on the remaining surfaces of the window opening. After this, they can be painted in a color that matches the finish of the rest of the room (or the facade, if we are talking about work on the outside of the house).

Now you know how to install slopes on plastic windows from the outside and inside with your own hands, and with several different ways. Choose one of them based on both your own preferences and practical considerations.
Installation of plastic windows assumes that the installation opening will be subject to a certain impact. This will lead to numerous defects appearing: cracks and holes from fallen plaster, exposure of the base of the walls, bulging excess foam. The best option In order to correct this situation, it is believed that slopes are made of plastic. This material is ideal for such work. But the most important thing is that all the work can be done independently, which significantly saves the family budget.
Finishing window slopes inside with plastic is universal solution, which is currently becoming increasingly popular. This material is used for indoor and outdoor work. The fact is that such a product has excellent specifications, which are as follows:
- Easy to install. If you compare the surface covering process with other options, its advantages will immediately become noticeable. Finishing windows with your own hands does not require any special skills; the main thing is to understand the basic principle and follow the rules.
- Durability. Indeed, this material has an excellent service life. If installed correctly, plastic slopes will last for many years. The only thing that can happen is that you get tired of this coating.
- Easy to care for. Modern options materials do not require special conditions. They are quite resistant to any detergents, do not absorb odors and dirt. Of course, this does not mean that strong chemicals can be used for washing. Everything has its own measure.
- No impact from moisture. Finishing slopes with plastic avoids destruction. The fact is that metal-plastic windows often contribute to the appearance of condensation. This leads to the fact that gypsum or plaster options quickly become unusable.
- Availability. The material has a price that will be affordable for anyone who is planning to install it.
Plastic panels for slopes have good technical characteristics Of course, if you set yourself a goal, you can find some disadvantages of such a product, but they are completely offset against the background of the advantages.
Which material to choose?
Before you face the dilemma of how to make slopes on plastic windows, you need to consider the types of material that are used for such work. It is customary to distinguish two main types used for installation:

Installation of slopes
Regardless of what material is chosen, a standard set of tools and consumables is used for the work. You may need:
- Starting profile.
- Wooden beam.
- Internal and external plastic corners, platbands.
- Insulation.
- Waterproofing tape and sealant, polyurethane foam.
- Spatula and dry putty.
- Capacity.
- Electric jigsaw.
- Screwdriver and level.
- Construction glue gun and “liquid nails”, self-tapping screws.
 Standard set of tools for slope installation
 Accurate pepper additional elements depends on how the plastic slopes will be installed on the windows.
Option #1
This option is used when the assembly seam is a small gap. That is, the distance from the frame to the adjacent wall is minimal. This creates some difficulty, because it is necessary to take into account the location of the hinges and opening doors. Therefore, work is carried out according to certain instructions:
- Before installing plastic slopes, excess foam should be trimmed. This is done using a construction or stationery knife. It is necessary to eliminate a common mistake - deleting too large quantity foam substance, because the cut should be flush with the surface of the frame. Otherwise, the existing balance will be disrupted, which will require additional efforts.
 Trimming excess polyurethane foam
 - Areas of plaster that are susceptible to falling off are removed. There is no need to remove the entire layer, just the damaged fragments. The surface is cleaned of residual dust and dirt.
 Removing damaged areas of plaster
 - Do-it-yourself installation of plastic slopes assumes that all areas will be treated with a special primer. It is better to choose penetrating compounds that contain antiseptic components.
 Treatment of window slopes with penetrating primer
 On a note! To prevent the formation of mold and mildew, special substances are used. This procedure should not be neglected, because such problems are the scourge of plastic windows.
- Next, it is fixed wooden slats. It must be mounted along the outer perimeter of the opening. Dowels and screws are used for fastening. It is better to make a structure that will be installed on the vertical and horizontal (upper) sections, so that the racks do not come into contact with the top bar.

- Now a very important procedure is carried out: it is necessary to trim the mounting foam to form a groove in which the panel will be installed. It must be taken into account that each fragment must submerge by 0.8 - 10 mm. Trimming is done directly next to the frame to create a stronger fit. After all, finishing slopes with plastic with your own hands requires that all gaps be minimal, or better yet, absent.
 The foam is trimmed as close to the window frame as possible.
That's it for the first time preparatory stage ends. It is necessary to perform high-quality cutting of parts. This is a very important point; if it is done incorrectly, then you will no longer be able to install PVC with your own hands efficiently.
Detailing can be done in two ways: take measurements and transfer the data to the material, or make a stencil. BUT! Each of the methods must take into account that 10 mm will be needed for insertion into the groove, and the thickness of the elements themselves must also be calculated, because they will form a common perimeter.
 Cutting the plastic panel must be done very carefully
- Using a hacksaw or electric jigsaw Plastic cutting for slopes is carried out. Numerous burrs may remain along the edges; they are removed with sandpaper.
- Pre-installation is in progress. It will help determine whether there are defects. If the plastic is double-sided, then the reverse part is marked and should be sanded a little. This will allow you to achieve better adhesion, because the installation of plastic slopes with your own hands is carried out using polyurethane foam, which adheres to smooth surface the material will be much worse.
- Now the parts are installed one by one in the required place. They are first inserted into the groove made. Careful alignment is carried out using a level.
- The outer edge of the element is moved back and foam is poured into spots. Extreme care must be taken, because excess substance will lead to warping of the fragments.
- The parts are fixed together using masking tape. It is glued to the joints, as well as along the perimeter of the walls.
 When pouring polyurethane foam, it is important not to overdo it with its quantity.
 It takes a day to dry completely. Then a series of additional finishing activities begins. They consist in the fact that window slopes are treated with sealants, and decorative corners are adjusted. They are seated on glue.
External bevels also need to be trimmed. It often happens that platbands are used, they need to be installed around the entire perimeter. If you exclude the use of such products, then the sealing is done using putty, which will be hidden by the wallpaper.
Option No. 2
Plastic slopes They can also be installed with their own hands using a technology that is significantly different from the previous one. It lies in the fact that fastening is carried out much faster, using a starting profile. Any PVC materials are used for work.
 The starting profile allows you to carry out work on installing slopes several times faster
 On a note! Sometimes you can find the abbreviation PVC. This designation is considered equivalent to PVC, but it was used in Soviet GOST standards for plastic coatings.
The initial stage begins with preparation. It consists of cleaning the surface and removing all defects. It is necessary to carefully apply the primer to all areas. The general technology for further work is as follows:

Sometimes a significant question arises: how to trim window slopes with plastic if they are large. For this option, there are special wide panels that eliminate the need for grooves.
Installation in progress:
- To achieve the best effect, start installing the fragments on the windows yourself from the sides.
- Each part is inserted into the starting profile. If there are protruding excesses, they are cut off with a stationery knife.

- The material is fixed using polyurethane foam. It is poured in small quantities. It should be taken into account that next to window frame the void will be greater than at the edge. Therefore, the foam is distributed in such a way that swelling is not observed.
- The panels are fixed with masking tape, which is glued to the walls. Finishing window slopes with plastic is considered complete, but finishing measures must be completed.
- When the coating is dry, you can begin installing decorative corners. Particular attention is paid to external modules; they are joined and cut at 45-degree angles. Installation is carried out using glue.
- All joints are additionally treated with sealant. Options are selected that will match the color of the installed material.
 The final stage of slope cladding is the installation of decorative corners
 On a note! The use of silicone should be avoided. This substance is not suitable for work on visible surfaces. The fact is that such a composition very quickly turns yellow and becomes covered with dirt.
VIDEO: do-it-yourself installation of plastic window slopes
Exterior cladding with plastic
How to make plastic slopes outside a room? Indeed, this material can be used on the outside of windows. But for work, only sandwich panels or sheet plastic, which have high strength indicators, are used. The general technology is no different from the internal one, but requires more thorough insulation and sealing.
In fact, slopes made from plastic material- This perfect solution. There is no doubt that the development of technology will make it possible to obtain new products that will displace other options.
Many people are accustomed to the fact that window slopes need to be puttied or plastered. This was done until plastic panels appeared; since then, installing window slopes with your own hands has become much easier.
Installing window slopes with your own hands - choosing panels
After windows have been installed in your home, the main and main problem remains the slopes. And no matter how carefully and efficiently the installation team works, chips and cracking on the slopes will always happen. In addition, a plastic window is much thinner in size than an old wooden one. For this reason, after installation there remains a strip of unplastered wall, which in any case must be sealed. For these purposes, it is best to arrange plastic slopes.
It should be immediately noted that installing panels is a very labor-intensive process. If you have very little idea about this, it is best to turn to professionals for help. But if you have made a firm decision to do everything yourself, we will tell you about it in detail.
It is important to know that quality PVC slopes quite thick. 8–10 millimeters of thickness is enough so that the slope does not sag and has a rigid fixation near the window frames. In addition, PVC slopes of this thickness have high thermal insulation properties, and if you use mineral wool during installation, then your home will not be afraid of the most severe frosts.
Plastic slopes are easy to wipe, for this reason they are recommended to be installed in rooms with high humidity, for example, in kitchens, loggias, balconies, etc. Plastic products do not “collect” any mold or dampness on themselves. This is their undeniable advantage.
Plastic panels have other advantages:
- Perfect look. Plastic slopes have a smooth, uniform surface.
- When using these products, no streaks or stains are formed. And you can clean them with water and any detergent.
- Plastic panels have long term operation.
- Installation is quick, after installation there is a minimum of dust and debris, they do not require puttying or painting.
- Excellent moisture resistance of the material used.
- High vapor permeability.
How to install slopes - preparation for installation
Before you start installing the window slope, you must check the evenness of the installation of the inserted window. This is necessary in order to immediately correct all inaccuracies (if any). If the window is installed incorrectly, the plastic panels will clearly show all the flaws in the installation of the window unit. Before you begin installing window slopes with your own hands, you need to carry out a whole range of preparatory work:
- trim off excess foam;
- if necessary, knock down the remains of the plastered slopes;
- test for strength brickwork in the area of the window slope for integrity;
- punch a hole for the window sill;
- cover the foam with a vapor barrier material;
- patch up through holes(if available) foam or cement mortar;
- Remove the protective film from plastic windows.
The installation of plastic slopes must be approached with full responsibility and knowledge of the matter, otherwise the installation of window slopes will be done incorrectly, which will affect the heat transfer of the room and visual perception. Plastic panels are installed only after the window sill has been installed. It is important to understand that installing slopes and window sills are two interrelated processes.
Plastic slopes, as a rule, are installed using a U-shaped profile (starting profile). It is screwed to the edge of the window block with metal screws, the step of which is 1 cm. It is recommended to perform this operation along the marked line on the window profile. There are a variety of starting profiles that are snapped into place before installing the window on plastic frame. If you decide to use this type of profile, then when purchasing it is recommended to clarify whether the starting and window profiles.
How to install slopes on windows - practical methods
There are several options that are most often found in the practice of builders. One of them is foaming. This method is good because the foam, which is located in the body of the slope, significantly increases the strength plastic product for deflection. Polyurethane foam is also an adhesive and thermal insulation material. Installation is quite simple - on wrong side Foam is applied to the panels and they are installed in place. If you are installing slopes with your own hands, you must remember that the main task is to correctly align the slope with a plumb line.
There is one caveat - so that the foam, as it expands, does not deform the panels, they must be pressed against the wall for some time with something heavy.
Another method of fastening plastic panels, which is strongly recommended by the manufacturers of this product, is screwing it to the profile on the outer edge of the slope. By choosing this option, you must understand that you will need to close the corner of the end. To do this, you need to cut strips of the required width from PVC panels. Using a specialized rail that has a snap-in corner, plastic panel must be firmly fixed in the desired position. If you decide to use a regular mounting rail, then in this case the panel is secured to the rail with a stapler.
After you have secured all the panels, the top and sides of the ends between the wall and the slope must be closed with special ones. These corners will “extend the life” of your wallpaper in the window area.
A method for simple plastering of slopes
Initially, the surface is primed, then a layer of plaster is applied, and the corners are leveled. Rules are used to level the surface. Each new layer can be applied only after the previous one has dried. This, by the way, is the main drawback of the method - time is spent not so much on work as on waiting.
A special flat strip is installed to the top of the panel. It serves as a beacon to ensure that the slope is perfectly level. On the sides of the slopes, the slats are installed vertically. To achieve maximum accuracy when installing, use a plumb line. It is best to level the applied solution with a special mortar. After using the plaster mixture, the final step is to apply fine putty and rub it in after drying.
I would also like to note the fact that installation of slopes is not a type of service for which the price is so high that you can save money. Therefore, many people prefer to hire specialists who, in exchange for your money, will save your time. All you have to do is enjoy the beautiful view and cleanliness at a minimum cost. However, even masters need supervision, so this knowledge will certainly be useful to you.
Installation of plastic windows is always associated with the need for a number of additional finishing works both inside the apartment and from the facade. As for the latter, not only compliance with the general architectural style, but also high-quality heat and moisture insulation. The finishing is the same internal slopes It should not only be beautiful, neat and harmonious in relation to the existing interior design, but also be as reliable, practical and durable as possible.
How to make slopes of plastic windows with your own hands?
Interior decoration window opening It is not particularly difficult, but it requires a certain skill and excellent knowledge of the properties of finishing materials. But it is likely that there is no need to call a specialist for this work - if you did the repairs in the house yourself, then you will certainly be able to handle the slopes perfectly. All that is needed for this is the tool, material and time necessary to prepare for and carry out repair activities.
The most popular materials for finishing window slopes:
- tree;
- cement-lime mortar;
- plastic;
- MDF (fibreboard);
- finishing sandwich panels;
- drywall.
Wood makes the interior lively and colorful, but it requires special care and is expensive. MFD is relatively new finishing material, which has managed to earn many positive reviews. However, buying high-quality fiberboard is not so easy, and it costs a fair amount. However, like the increasingly popular sandwich panels, which provide much higher reliability and durability of the finish than the latter.
Most buyers prefer materials such as drywall, plastic and plaster. As for the first, its low cost, ease of installation, practicality and reliability in operation speak for themselves. Plastic provides an excellent opportunity to create something truly beautiful and original. interior solution at the cost of relatively little effort and resources. The most reliable, but also the most labor-intensive option is cement mortar. You will have to tinker with it quite a bit, but it is worth it: high-quality slopes will last for decades.
Where should you start finishing?
Slope finishing is the most final stage installation of plastic windows. Before this, it is necessary to install the window sill. Well, if you are doing general repairs, then in addition to installing the latter, it is very advisable to complete the finishing of the ceiling and walls. Otherwise, you risk ruining the appearance of the new slopes or, even worse, damaging their structure.
In order to finish the slopes yourself, you will need a tool. Feel free to add to the list of what you need:
- building level;
- tape measure, square and pencil;
- assembly knife and/or scissors
- hammer and pliers;
- a set of screwdrivers (flat and Phillips);
- hammer drill and screwdriver;
- construction stapler;
- hand saw, Circular Saw and/or jigsaw;
- set of spatulas;
- several containers.
How to make slopes on windows using plaster?
Slopes should be carefully prepared for plastering. Both the result itself and its reliability and durability directly depend on this. It is necessary to provide free access to the windows, clean the base structures from construction debris, dust, easily peeling materials and foam residues, and also widen the seams. After this, the base for the plaster must be primed - this will ensure normal adhesion and prevent the development of harmful microorganisms.
The primary task when plastering with cement mortar is to ensure high-quality adhesion of the latter to the surfaces of the window opening. And for this you need to spray. The solution must be brought to a liquid consistency, after which it is taken in small portions onto a trowel and thrown forcefully onto the finishing surface. After the entire slope area has been treated, the spray, which can be done using a spray bottle, must be allowed to dry. After this, you can proceed directly to plastering. 
The next move is to install rules along the outer perimeter of the slopes, that is, on the plane of the wall. You can make them yourself: for this you will need even wooden blocks or strips of plywood. To prevent displacement, they are securely fixed with dowels or with a plaster mixture. The rules also act as beacons, so their installation should be treated with special attention and care. 
When installing the rules, you should ensure equal openings of the side and top slopes: if their angles are different, this will negatively affect the light transmission of the window and the overall aesthetics of the interior.
Plastering: highlights
In order to evenly apply and level the solution, you will need a device such as a spoon. Make it as easy as shelling pears:
- A smooth wooden batten is made with a length exceeding the depth of the slope by approximately the thickness of the rule. The mulch must ensure that the solution is applied to the base of the window frame by at least 5 mm.
- A nail is driven into the center of the end of the lath, and its head is cut off so that about 5 mm of metal remains above the end. The cut area is carefully smoothed and covered with a plastic cap to prevent damage to the frame. Another option is to make a small cutout at the end of the hammer, thanks to which it, as in the case of a nail, is able to move along the frame, acting as a rule.
- In the middle of the fry, a handle is attached to one of the edges. During operation, the end of the screed protruding beyond the slope rule will act as a stop.
To apply plaster, the mortar is installed in the lower (side) corner of the slope, after which a thick solution is poured onto the wall. A few centimeters in height or to the side, and the little one moves, cutting off excess plaster and leveling the plane.
In order to ensure the coveted 90° slope angles and a perfectly smooth edge, a perforated corner with a plastic mesh along the length is used, which is mounted strictly according to the level and is ultimately hidden under the plaster. It must be attached as securely as possible in order to prevent displacement and deflection during the application of plaster. The second option is to use a corner without a frame - it only allows you to check the corner, and after the latter is completed, it is removed.
Upon completion of leveling the solution, the latter must be allowed to dry, after which it is grouted.
Installation of plasterboard slopes on windows
GKL boards must be moisture resistant to prevent the destruction of the constituent components of the material under the influence of temperature changes and condensation. If wall plasterboard is used, it must be coated with several layers of primer or a special moisture-resistant compound.
The first step is to decide how exactly you will install the drywall - with profiles or with glue. If the distance from the edge of the window frame to the base of the slope is too large, it is best to use wooden blocks beveled in accordance with the accepted clearance angle. With a small gap between the plane of the future slope and the wall, more suitable option is an adhesive mixture. Installation of profiles or bars is carried out on dowels. The space between the gypsum board slope and the wall should not be filled with air - this will negatively affect the thermal insulation of the opening. Therefore, it must be filled with mineral wool or foam rubber. In some cases, polyurethane foam is used to fill narrow cracks and gaps, but it must be handled carefully - when it dries, it expands in volume and can break drywall.
Next, you need to fix an L or F-shaped profile around the perimeter of the window frame. In the first case, it will be applied with the upper horizontal bar, in the second - vertical, and the remaining part of it will be installed inside the slope for additional support. All that remains is to cut out the necessary pieces of drywall and fix them in the opening.
If you are going to install gypsum plasterboard with glue, the solution must be prepared in such a way that it sets as quickly as possible. In this case, it is necessary to control the sunrises. The plasterboard cut along the edges of the joints, which will become the corners between the side and top slopes, must be made at an angle of 45 degrees. This will ensure high-quality joining of the plates. Installation of gypsum boards on profiles or bars is carried out using self-tapping screws. Finally, after finishing the corners of the slopes, the gypsum board is primed, followed by finishing plaster and painting or wallpapering. 
As you can see, traditional methods of finishing window slopes are within the power of anyone. home handyman. When working, you should not forget about cleanliness and safety precautions, and then the appearance of your finished windows will bring only joy and satisfaction.