Installing windows in a house made of logs has its own characteristics. The standard technology for a wooden building is not applicable: unlike a brick or concrete structure, it shrinks significantly, and the height of the log house decreases by at least 4 cm for every 3 m of height. When lowering the walls press on plastic windows, which leads to deformation of the frame and jamming of the wings, and the glass can simply be squeezed out. How to solve this problem?
Casing box installation
A window in a round log house can only be installed using a special casing box (it is sometimes called a pigtail). This is a wooden frame that is not firmly attached to the main wall, but is connected to it with the help of sliding elements. It will not prevent the vertical settling of the log house, will not allow the logs to deform, and will also protect the frame from their destructive effects during the shrinkage process.

Okosyachka in wooden house from rounded logs can be made in several ways:
In all cases technological gap can not be closed with mounting foam: it is not elastic and will not allow the log house to calmly lower. You can use mineral wool insulation. It will protect the building from the cold, and at the same time the log house will gradually decrease, killing insulation material until the gap disappears completely.
Do I need a pigtail if the building was built more than a year ago? Yes, you still can’t do without it, since the tree retains the ability to “breathe” all its life. When heated or high humidity wood expands, and when cooled - narrows, in addition, this process depends on the temperature inside and outside. All these movements negatively affect the frames, so it is better that the insertion of windows in the house from rounded logs was initially carried out in accordance with all the rules.
In all installation options, insulation material must be laid between the casing and the wall. It will avoid bridges of cold.
Glass installation technology
When the casing is installed, you can proceed directly to the installation, the technology as a whole does not differ much from the usual one. Important to consider next moment: windows are usually initially laid in the project, so window openings should be a few centimeters larger than the planned size on each side - this will allow you to put the casing without problems and will not reduce the illumination in the room.
Installation in the finished casing is carried out as follows:
The installation itself does not take much time. However, it is often required to dismantle the old frames, and after work to remove the debris. All this affects the final cost of services, although wood has long been the cheapest material in suburban construction.
Design
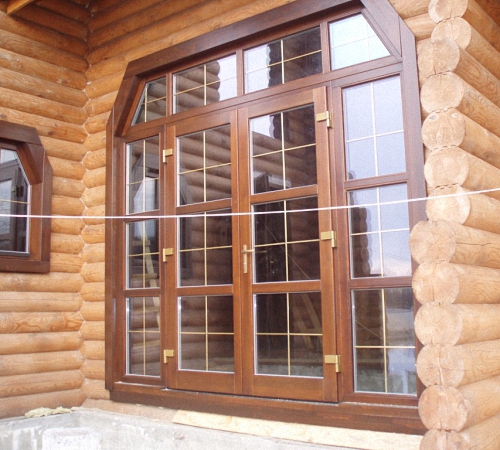
White plastic windows in a house made of logs - nice solution but not everyone likes it. Many connoisseurs of eco-style prefer to either install modern wooden frames or mask plastic so that it does not violate a single architectural ensemble. For this, a wood-like film or decorative overlays that externally copy wood can be used.
To close ugly gaps that often remain after installation, you can use wooden architraves with carved pattern. They will give wooden structure the look of a classic Russian hut, while the “plastic” will retain heat perfectly. The windows themselves look beautiful, and additional decorations will make them part of the overall design.
Another interesting solution for a wooden building - window openings of a non-standard shape: they may not be rectangular, but square. In all cases, installation rules must be observed, even if complex solutions have to be found for this.
They return the once lost popularity in the class of individual buildings. Tired of reinforced concrete-brick sarcophagi, people are returning to the traditional material for our latitudes - wood. But return to traditional materials does not at all mean blind copying of the construction techniques of the past - modern house from a bar (rounded wood) - this is an alloy innovative technologies with centuries-old experience in wooden architecture, among the main features of which is the installation of metal-plastic windows in wooden houses.
Installation of windows in wooden houses: wooden or metal-plastic
Advantages wooden windows undeniable:
- they harmoniously and naturally fit into the interior of any wooden house, whether it is a profiled beam or a rounded log, while maintaining its originality and style
- ecological cleanliness

![]()

- support natural ventilation - air circulation between the room and the street
- treatment with antiseptics significantly increases the life of wooden windows
But at the same time, over time, an array of wood, under the influence external factors(especially when the manufacturer used low-quality wood) can crack, change its geometry (they say - the tree led). In addition, the tree requires periodic painting, they have poor maintainability.
Metal-plastic windows are reliable, durable, significantly superior to wooden ones in terms of tightness and sound insulation. They are durable and do not require special care(no need to additionally insulate for the winter and paint), they hygienic treatment is not a big deal.


And if in the "stone" construction of the metal-plastic version of windows today there is practically no alternative, then plastic windows in a wooden house are doubtful for some developers. There are two main reasons:
- aesthetics - namely, how the plastic window and the wooden wall will be combined, whether it will look foreign. In fact, many manufacturers have had a model line of windows specifically for wooden houses. In them, plastic, both in color (shades can be selected in a variety of ways, from light honey to moraine wood), and in texture are practically indistinguishable from natural wood.
- do not let air through - because of which a musty, suffocating atmosphere is obtained in the house, natural ventilation. This situation is indicative of a brick (reinforced concrete) house, and for a wooden house, such a statement is only partly true.
In fact, wooden walls are responsible for the main air exchange and humidity control, the volume of air circulating through the frames of wooden windows is relatively small. Therefore, metal-plastic windows installed in a wooden house will not have a drastic effect on habitability in terms of air quality, but they will help reduce heat loss.


How to put plastic windows in a wooden house: a sequence of operations
Do-it-yourself window installation features in a wooden house are due to the fact that wooden houses, especially in the early years, have a high structural mobility. This is due to the fact that the wood begins to lose stored moisture, while decreasing in volume. The worse the wood was dried beforehand, the more noticeable this process will be.
There is a shrinkage of the house, which is especially active in the first year and lasts 3-5 years. At the same time, the height of the wall per meter of masonry, due to the drying of a log or beam, can be reduced to 1.5 cm. If you simply install a metal-plastic window, then due to compression of the foam layer in the first year, subsidence will be imperceptible. But already in the second year, problems may arise with opening the window, and in the future it will, at best, be blocked, but most quickly - the glass, unable to withstand the pressure, will simply burst.
Even after the end of the active phase of shrinkage, the walls of the house, depending on the season, may fluctuate slightly - with high humidity (in autumn), the tree takes on water and increases in volume, the walls “grow up”. In summer, the tree dries up and the wall sags. That is why the installation of windows (both wooden and metal-plastic) in a wooden house will require special design- casing (pigtail).


Casing installation makes the windows independent of bearing walls, eliminates the possibility of loading the frame when the wall is warped and shrinks:
- the pigtail blocks the movement of logs (beams) in vertical plane in the window opening
- does not interfere with vertical shrinkage
- the casing bears the entire load
- additional reinforcement of the wall in the area of the cut out opening
To install the windows, they pre-mark and cut out the opening, which is 5-8 cm larger on each side, so that it is possible to install a pigtail.
The simplest version of the casing is to cut a vertical groove 5x5 cm in size at the ends of the logs, into which a beam of the same size is inserted. (Fig. 2). But this option is effective when installing a wooden window.
A more reliable option (just for PVC logs), in which a comb is cut out at the ends of the logs, and a window carriage with a corresponding groove width is already put on (installed) on it. Alternatively, the spike can be cut on the carriage, and the groove in the logs, this is not important (Fig. 3). It is important that during shrinkage due to the crest, the logs will slide (move) inside the groove, without vertical displacement and without creating pressure on the frame (window).
The window carriage is vertical bars 15x10 cm in size, at the ends of which cutouts 5x5 cm are made - horizontal jumpers are inserted into them, boards 15x15 cm in size with spikes at both ends.
Installation order:
- the bottom jumper is laid
- gun carriages are stuffed on a comb with tow
- the upper jumper is inserted into the upper gap and lowered into the grooves
- the resulting structure is fastened with self-tapping screws without capturing the crest (!), otherwise there is no point in installing the casing. The gaps between the logs and the obkosyachka are foamed (they are clogged with tow).


Installation of the window begins with the installation of the window sill:
- so that the window sill is securely fixed, for him in wooden doorway cut shallow (5-10 mm) grooves
- using plates (plastic or wooden) and a level, level the window sill
- fix the window sill with self-tapping screws. To plastic window sill when tightening the cap of the self-tapping screw, it did not crack, they put a rubber (washer) gasket. Holes for self-tapping screws are drilled in those places that will later be covered with a plastic window.


Advice! In a wooden house, it is optimal to install a window either in the middle of the wall, or slightly moving it to the outside, but not back to back!
After that, proceed to the installation of PVC windows:
- prepare the window (remove double-glazed windows and sashes)
- with the help of bars align the frame horizontally
- top and sides fix the window with anchors
- foaming


After mounting the frame and subsequent checking it horizontally and vertically, double-glazed windows are inserted into it and closed with glazing beads, after that, the sashes are inserted and the fittings are adjusted. All gaps between the opening and the frame are foamed, it is better to fill the gap between the window sill and the frame with silicone sealant.
Installation order plastic window in a wooden house is presented in detail on the video
Metal-plastic windows: we take care of them correctly
The fact that PVC windows do not require significant maintenance does not mean at all that they do not need attention. And if the care of a double-glazed window is no different from the care of ordinary glass (an exception is that alcohol-containing cleaning solutions on the rubber seal), then the care of the remaining parts has its own subtleties:
- plastic care – we immediately exclude aggressive chemical and abrasive detergents. To care for plastic, degreasing detergent compositions are used, or just a warm soapy solution, which is applied with a soft sponge (but not with its hard surface)


- seal care – at least 2 times a year (preferably in autumn and spring), the seal must be cleaned using an ordinary soap solution. Rinse the seal with a cloth or soft sponge, wipe it dry and lubricate with silicone grease
- furniture care – Lubricate all moving parts at least once a year. Fittings manufacturers usually designate lubrication points with special icons - “droplet” or “oiler”. Machine oil is suitable for lubrication (for sewing machines) without acids and resins


- drainage holes - drainage channels are located in the lower part of the frame, they divert water (moisture) outside the frame. It needs to be checked regularly to make sure it doesn't get clogged.
Wooden houses, baths, saunas and cottages have important advantage- they are completely environmentally friendly, because they are made of natural material. A wooden frame is “alive”, it “breathes”, it shrinks and grows old, that is, it lives its own life. A house made of natural wood circulates air, purifies it and gives it healing properties, thanks to phytoncides and resinous substances natural array pines. These same features of buildings made of lightly processed wood create some difficulties. For example, when it is required to install windows in a log house and doorways, as well as when finishing sagging walls, but subject to the installation technology, all these problems can be solved.
Which windows are suitable for wooden walls
The walls of solid wood houses tend to be in some movement. This is influenced by the time of year, seasonal changes, air humidity and environment- the frame swells or shrinks, sitting down. Some conventional window and door installation standards are acceptable for log cabins, so a different frame recess design, known as casing, is needed here. It allows you to minimize movement wooden walls houses, bathhouses and other residential buildings made of logs.
However, not everything is so complicated, since the main shrinkage occurs during the first 3 years - under its own weight, the space between the logs is compacted and the wood naturally dries. Sometimes during this time the log cabin sags by 10-15 cm, respectively, the window and door opening decreases. Therefore, it is natural that wooden windows in a log house are more suitable for a new structure made of natural wood, and plastic windows for older houses, then they will be less subject to excessive pressure and deformation.
If the construction of a house has been going on for more than one year, stage by stage, then even unprepared "live" wood will sit down during this time, and installing windows in a wooden log house will not be a problem. IN last resort, you can install temporary frames with a film that prevent the penetration of precipitation into the window opening. And after a while in wooden frame you can put window frames with double glazing to protect against adverse weather factors. These can be frames made of specially prepared dry wood, or made of plastic that is familiar to city dwellers.
laminated under natural wood modern plastic windows will organically fit into the design of the log house, increasing the thermal insulation of the house. The experience of installers from Finland shows that a plastic window in a log house or double wooden frames can be inserted into a pigtail without any problems, while it is possible to combine different materials for window frames.

What is important to know about installation technology
Today they make prestigious two-storey houses different type. They are built in an eco-style according to the traditions of their ancestors and according to the projects of modern architects and designers. Increasingly, they began to offer wooden houses and saunas similar to Finnish ones, also in fashion stylization country houses under the Russian tower. No less interesting are the large estates in scandinavian style- made of wood and glass. It doesn’t matter if the building is pompous or small cottage do it yourself from wood - the technology for installing wooden windows in a log house is approximately the same.
Of course, damp wood is not very suitable for building walls. wooden house. The Finns use only dried and specially prepared wood for export houses, and also develop a special technology for houses that are quickly assembled. According to the technology, window frames are not placed in a log house for at least six months after the assembly of prepared structures, and even later in "live" wood. But even in this case, some shrinkage is taken into account - do not leave the building without windows.

The exposure time is required for the shrinkage of the log house and the final formation of wooden walls, and in about a year the log house will acquire shrinkage close to the maximum parameters. However, it is not possible to accurately specifications shrinkage (as a percentage or in millimeters), since everything depends on the type of wood and its degree of moisture.
Today, several options for installing windows in a log house have been worked out:
1. Most reliable method- installation of the casing (casing), where the window is inserted. The casing is a one-piece rectangular structure made of solid wood up to 40 mm thick, in which the lower bar forms a window sill, and platbands are attached to the ends. For a long time they were made from solid wood, giving the required shape, where the grooves for the window frame were formed. Today, the casing is being made much more technologically advanced and looks more aesthetically pleasing, and a glue beam is used for its manufacture. The finished casing design is quite expensive, so they often use a more affordable technology for installing a window in a log house, that is, fastening to cranial bars.
2. There is another option - the window frame is attached directly to the beam with special fastening strips. Simple Methods are used, most often, in log cabins of baths and saunas, and in residential buildings- more complex and reliable. Using building level, the window frame is set in compliance with the distances and foamed with sealant. However, the installation method with sealing in the new walls of houses is not used. Foam is recommended to be used to seal the lower part of the frame and window sill - this plane is less susceptible to deformation when a wooden window shrinks in a log house.
3. Often, special (cranial) strips are used, inserted into the grooves, which move freely at the ends of the window opening. This counteracts jamming during shrinkage without the formation of gaps. The cranial planks are able to slide in the grooves due to the design, so the window will not experience pressure when it shrinks. The difference of the method is in attaching the casing to the cranial bar, and not directly in the opening.

Tip: Remember that even after the initial shrinkage of the log house, the compaction of wooden walls will continue for some time. With significant precipitation and in a climate with a high level of air humidity, the base of the log house will continue to absorb water, increasing the log house in volume. In hot and dry summers, the tree gives off moisture, giving a significant shrinkage. That is, natural changes in the size of a log house, for example, from pine, will be noticeable up to 5 cm, but this figure also varies depending on the time of the log house. Installing windows using special technology reduces the likelihood of warping, displacement of the base and jamming of the sashes and reducing heat loss.
Basic conditions for the use of casing
1. Log house casing makes it possible to prepare the installation of a window in a formed box, which minimizes the pressure of the log house window frame through natural process wood drying.
2. Properly made log house casing prevents distortions in the form of shrinkage consequences.
3. There should be a small gap above the frame, approximately 50 mm, and it is insulated along with side gaps.
4. A simplified casing can be made of boards of a smaller thickness of about 20 mm, where the forming slopes will be attached, and the bottom board forms a window sill.
5. The casing is fixed with self-tapping screws on the cranial beam, and the gap is insulated under the platbands.
6. Casing from the outside looks quite compact and neat, and inside you can put another frame.
7. Competent use casing installation technology helps to counteract window depressurization.
8. Fastening of external architraves allows the use of synthetic seals, including rubber, to prevent moisture from penetrating into the window space.
9. In case of difficulties and questions - how to insert windows into a log house, it is recommended to contact specialists.

The main problems when installing doors and windows in a log house
1. According to the experience of installing houses made of natural wood, even a structure made of specially prepared and well-dried material will shrink up to 5 cm in the 1st year. In steady rainy weather, the house will swell again. "Live" or non-dried wood with a high percentage of moisture gives a much greater amplitude per year.
2. Installation of windows or doors in a wooden frame is a technologically simple process, and specialists have no problems. However, difficulties and problems with an unprofessional approach arise much later, when the windows in the bathhouse or in the house begin to warp due to pressure during the natural drying of the wood. That is, it is much worse when problems emerge during the operation of the building.
3. high humidity air can lead to the fact that window sashes or vents do not open due to swelling of the wood with increased pressure from the shrinking logs. Sometimes it is enough to trim the adjacent planes of the sashes a little, and it is worse if the window cannot be opened for the entire period of operation. It is for this that a small clearance in the casing or the correct sliding structure is important - in order to avoid such troubles.
Tip: It is important to use dry and high-quality timber, preferably from conifers wood. Before cutting window openings, it is important to strengthen the boards on its sides so that they do not part.

Instructions for processing a window opening
To perform the work, you will need a chainsaw, nails, studs, timber, edged board, square, plumb and polyurethane foam.
1. On the wall of the log house, the contours of the window (door) opening are marked using 4 strips. It is important to correctly mark the lower part of the window - about 80 cm from the floor.
2. Boards are selected a little more than the height of the opening to secure the studs with washers.
3. We make holes in the uncut crowns at the corners of the planned opening, similarly in the fixing boards.
4. We mark the vertical with a level and attach boards along it, which we connect to the logs with the help of studs and tighten the boards.
5. We put metal washers under the nuts to prevent the nuts from cutting into the boards, we fix the boards on both sides of the marking.
7. We turn to the processing of sawn logs and fasten the edges together with jumpers.
8. We form a window block from lintels and jambs in pairs, and outside we form grooves for the size of the spikes.
9. window block we begin to form with the installation of jambs, we connect the jumpers with nails with sticking logs.
10. To check right angles, use a square, which can be formed before the final fixing of the block.
Tip: To dispel doubts, it is advisable to watch a video about installing a pigtail, and only after that proceed to the installation.
Step by step installation of windows
Today, there are several ways to install window frames in a log house, but we will look at the simplest example.
First you need to visually imagine in a section what a window in a log house looks like - the scheme for installing a window in a log house is shown in the figure below.

These are a casing with grooves, a shrinkage gap with a sealant, an outer and inner casing, a spike with a sealant, a window with a tide, a lower interventional sealant.
The pigtail is made after the formation of the opening:
- prepare a beam 150x40 under the top of the window opening, it should be the width of the opening, cut out 2 rectangular cutouts from both ends for a pre-formed comb;
- install the board on top of the carriage bar, securing it with self-tapping screws;
- we make an opening of 3-5 cm more than the height of the inserted window, for filling with a sealant or foaming from below;
- the gap between the log and the salary board in the window opening should be about 5 cm (for shrinkage), which is filled with insulation;
- when the window is inserted and fixed, a platband is attached to the pigtail so that the structure has an aesthetic appearance;
- do not forget to check before installing the platbands and the final installation both vertical lines of the window frame along the plumb line and horizontal lines along the level, since this will not be possible to fix later;
- it is necessary to impregnate everything with an antiseptic wooden surfaces to counteract wood decay.
The process of installing plastic windows in a log house
The step-by-step process of installing PVC windows looks about the same as in the example with natural wood:
- we form a window opening;
- install a pigtail;
- we are completing the installation of a plastic window in a pigtail according to the technology.

The optimal distance of the window sill from the floor is 80-90 cm, and if the design in the interior plans to use a window sill in the form of a tabletop, for example, in the kitchen or in a teenager's room, then it is better to think over its design and installation in advance.
Tip: Remember that wooden frames partial shrinkage is also characteristic, and PVC windows have a rigid and stable base - they cannot be placed in a fresh frame, and it is imperative to use a pigtail. It will make it possible to maintain sufficient autonomy of the double-glazed window from the log house, so installation on foam and without a joint is unacceptable in this case!
Two types of pigtails:
1. Simple design- a groove 50x50 mm for a bar is formed at the end of the opening (not suitable for installing a PVC window).
2. A more reliable option is when in the end logs on window openings a crest is formed, on which a frame with a groove is subsequently placed, otherwise called a “carriage”, and here, during shrinkage, movement along the guides without deformation will be ensured. This is a construction of a bar 100x150 mm, which exceeds the size of the window by 5-6 cm, in the center of which a groove of 50x50 mm is selected, the carriage is attached to the ridge.
Next, we assemble a pigtail from a 150x40 board, as described above, respectively, cut grooves in it that are put on a comb - this is the upper part of the opening where we put the PVC window. Be sure to overlay the planks with tow (in rolls) and fix the gun carriages, and top bar fix the pigtails with self-tapping screws to the gun carriage.

After the right angles, vertical and horizontal lines in the openings are verified, the pigtail is framed, they proceed to the installation of plastic windows. Monitor the quality of fastening and tightness so as not to disturb the thermal insulation of windows in a log house. Do all the steps according to the instructions attached to the PVC windows. When buying plastic windows, pay attention to the mounts that are mounted at the end. The frame is leveled and mounted with fasteners to the pigtail, do not forget about the place for polyurethane foam under the windowsill It remains to hang the sashes and cash out.
Tip: Pay attention to how the window is screwed to the board - in no case to the ridge, otherwise the meaning of the movable fastening of the window to counteract shrinkage is lost.
It is known that wooden windows in houses built from timber are rightfully considered the safest and most practical solution that favorably affects the microclimate in the dwelling.
Fundamental in the presented case is that during its shrinkage window system and the walls behave the same way. The decisive role here is played by their installation according to technology.
Features of installing windows in a wooden house
The assembly of windows in a timber structure has certain features. As you know, wood shrinks. In houses made of chopped logs or during the first 5 years, shrinkage is about 10-13% of the height of the building, while it shrinks no more than 2%.
If there is warping of window structures, the formation of interventional gaps in the walls or cracking of a double-glazed window, this indicates a violation of the technology during the installation process.
- In houses made of chopped wood, logs, planed or profiled timber, it is advisable to install a window support after shrinkage of the house (not earlier than 1.5 years after construction).
- The installation of windows after the construction of the log house is not rational due to the lack of the possibility of calculating the shrinkage of the walls. This indicator depends on the moisture content of the timber.
- In houses made of glued laminated timber, windows can be installed immediately after erection of walls and installation of a roof of the house.
- The installation of windows must be carried out exclusively by means of sliding joints - support bars and casing. Tying window blocks and pigtail construction to logs or timber is strictly prohibited. Tight fastening during shrinkage leads to a violation of the integrity of the window modules and walls of the building. In fact, the window system must balance separately in relation to the wall.
- In the upper part above the window frames, it is necessary to provide for a shrinkage margin - a gap of 6-7 cm. Miscalculations of spare gaps can lead to poor closing of windows or interventional gaps in the walls.

Scheme of installation of wooden windows
Window opening preparation
Before mounting the box, prepare a window opening. The opening should be rectangular in shape without cracks, recesses, distortions and other flaws. From all its surfaces it is necessary to remove construction waste, dirt, dust and deposits.
In order to avoid distortions in the future, accurate measurements of the external, internal and lateral sides of the opening are required.
In the case when the skew of the opening is significant, and it is not possible to correct it, it is recommended to expand the window parameters in such a way that highest level the outer opening exceeded the width by 2.5-4 cm, and the height by 1-2 cm.
To carry out the extension makes it possible to install an additional profile on the window. This will prevent the appearance of gaps between the box and the hole in the areas of maximum skew.
In addition to the option of expanding the size of the opening to correct the skew, there is such an option as increasing the parameters of the window frame.
siege
A special design, which is a wooden box without a bottom crossbar, the purpose of which is to securely fasten the window and maintain the shape of the window frame, regardless of the degree of shrinkage of the house, is called casing or pigtail.
There are several types of this design:
- Whole. It is made from specially processed solid material.
- Adhesive. The individual components are made of typesetting boards, connected by means of micro-grooves and glue. All burrs and small knots are removed.
- Mixed. Part of the casing is made in one piece, and the other part is made using glue. Upon completion of installation, the pigtail is varnished. This type is suitable for the use of large window sills.
An okosyachka is made according to the size of each window. However, if it is planned inner lining, then a selection can be made for it. When facing on both sides, sampling is not performed.
The assembly of the casing can begin after the preparation of the window opening.
Its production is carried out as follows:
- Grooves are made in the base, which is adjacent to the window opening. A beam of the same size is inserted into them, acting as the side of the casing.
- First, a beam is placed at the bottom of the opening, which will prevent the displacement of the side elements.
- A seal is placed under the beam from linen tow.
- Sealing material is placed in the recesses and install the side boards.
- The final step is fixing the top board of the structure.
- A space is left on top of the pigtail for the wood to dry out and fill it with a sealant. So in the process of drying the logs, the window opening will not be affected by the load.
Window installation
The window is installed in the following sequence:
- A waterproofing layer is laid on the lower part of the opening. and sealing material.
- Install the window frame and fix it with the help of linings or wedges made of wood.
- Using a building level or plumb line, adjust the horizontals and verticals. In this case, attention should be paid to the actual horizontal and vertical, and not to the sides of the window opening.
- On each side of the opening, in increments of 50 cm, drill holes.
- With self-tapping screws fix the box.
- Perform isolation of the space between the box and the wall sealing material.
- Next, mount the frame. It is installed in the grooves of the box and attached to it with screws.
- Window blocks are installed on the box with hinges(separable and inseparable). The difference between them is the possibility of removing the hinge. Detachable are convenient in areas where there is no possibility of raising the window transom. Even fastening of the hinges contributes to the even hanging of window transoms. They are fastened with screws.
- The sash is locked by means of a locking element or a latch. After checking the opening and closing of the transom, fix the frame using nails.
- Next, proceed to the installation of window sills. They are mounted from the inside so that the side edges go into the walls by 4.5-5 cm on both sides.
- Immediately before installation, using a lime-gypsum mixture, align the bottom of the window opening.
- The window sill is fixed with wedges. After installation thermal insulation material finally fix it.
- Installation of ebbs is carried out from the outside of the opening- for the entire width of the frame penetration into the base.
- The gaps between the casing of the base and the box, as well as the upper and sides of the window, are closed with a casing. It is advisable to use the same type of wood from which the house is built as platbands.
- All parts of the casing are interconnected. To do this, use spikes, nails or adhesive solution.
- Preliminary marking of placement fasteners (the step is 10-12 cm).
- So that in the process of fastening the platbands they do not move, the design can be put on glue.
- The final step is to fix the platbands with nails or self-tapping screws., and closing the gaps between the base and the platbands with sealing material.
- For the manufacture of casing, wood with a moisture content of at least 10% is used., otherwise cracks form inside the structure over time.
- In the manufacture of pigtails is strictly prohibited use metal fasteners.
- Building foam cannot be used as a sealing material when assembling the casing. In this case, the wood is bonded, which prevents its natural shrinkage.
- In the process of installing windows, it is important to properly drill holes for them. The optimal distance from the window sill to the floor is 85-90 cm.
- Experts do not recommend installing windows without installing a pigtail, even if the house was built many years ago and the log house is completely dry. This is due to the fact that throughout the entire life of the tree has a tendency to shrink.
- To provide greater efficiency and heat retention wooden windows should be installed closer to the outside of the window opening.
- As the material for the window sill, you must choose hard rocks tree. The window sill made of glued wood has the longest service life, the window sill made of solid wood has the shortest service life (as a rule, the product is warped).
- The corners of the window opening should be 90 degrees, and the diagonals should not differ by more than 10 mm. If the hole in the base is larger than the allowable value, more sealing material will be required. If you do not ensure the evenness of the corners, warping of the box is possible.
- It is important to correctly calculate the depth of the window in the opening so that the dew point isoline, equal to 10 degrees, passes in its inner part. Then the formation of condensate on inside there will be no window.
From logs or timber, then when installing windows, you may encounter such an unpleasant surprise as shrinkage of a log house.
As you know, a wooden frame shrinks within 2-3 years. The space between the logs or beams is reduced due to their own weight, the sealing of the insulation between the crowns and the drying of the log wood itself.
Depending on the height of the walls of the bath, during the first year, shrinkage can reach 10-15 centimeters. It is clear that a window tightly inserted into such a log house will undergo significant deformations and may even be destroyed under the weight of settling logs.
What to do? Leave a bathhouse for 2 years without windows? Or is there still some way out?
Installation of windows with the help of a salary (casing, pigtails)
There is, of course, a way out. Over the long centuries of building log cabins, ways have been devised to insert windows so that shrinkage does not affect their integrity. For this, the windows are inserted into the salary, which can move freely relative to the logs during shrinkage.
This method is called the installation of windows in the salary or in the "casing".
The window opening in the upper part of the window does not reach the frame 7-10 cm. This space is filled with compressible insulation (moss, tow, jute) and is closed from above with platbands. During shrinkage, the insulation is compressed, and the inserted window is protected from the destructive effect of the vertical load of the descending window rims.
If you have already prepared window openings, then you can proceed to the installation of the casing.
Types of salary (casing)
 In order for the window to move freely during shrinkage at the ends of the logs of the window opening, you can make a rectangular groove 50x50 into which to insert the bars, and fix the windows to the bars.
This is a fairly simple method that is ideal for wooden windows. They are attached to the bars with nails or mounting foam. However, this method is not suitable for plastic windows.
It is better to install plastic windows in a special carriage, which is a 150x100 bar with a 50x50 groove selected in it along the length, which is mounted on a comb formed at the ends of the window opening logs. The comb is a rectangular protrusion 50x50, that is, just the size of the groove.
What such a comb looks like is shown in the figure below:

Casing installation
Casing (pigtail) is performed after the window opening has been prepared.
First you need to prepare a 150x40 board for the top of the window opening. The board must be taken along the width of the opening and at both ends cut out two rectangular recesses that will help install the board so that the previously formed comb enters these grooves.
This is what the board looks like:

The board is installed on top of the gun carriage bars and attached to them with self-tapping screws.
The height of the opening should be 3-5 cm more than the height of the mounted window to enable it to be foamed.
The distance between the overhead log and the board of the window opening formed with the help of the flashing must also be at least 5 cm in order to allow the log cabin to shrink. This space should be filled with insulation.
After inserting the window and fixing it with nails or mounting foam on top, the pigtail can be covered with platbands to give a beautiful appearance.
The scheme for installing a window in a log house is shown in the figure below:

You can also watch a video showing the process of installing a U-shaped pigtail with your own hands (click the triangle to play):
Now you know, how to install windows in a log house.
In the following articles, we will learn how to sand logs after caulking and shrinkage, as well as talk about how to perform interior decoration and how to choose the right doors for a bath.
Latest publications:

Even correctly laid out brick oven need to be repaired over time. High temperatures, traction violation, mechanical damage masonry - all this leads to the appearance of defects that require elimination. After all, good traction and the absence of cracks in the walls - ...


