The service life of any roof depends on how well it is arranged, and the installation of a soft roof is no exception to this rule. There are many types of such coatings, but they all need to be used. solid foundation. Before proceeding with the work, it is necessary to analyze the conditions in which the installation of a roof made of soft tiles will take place. The lower limit of the temperature range is +5C, since lower temperatures are no longer suitable for work. The fact is that the fastening of the coating sheet (shingle) occurs with the help of nails and a self-adhesive layer applied on the back of the shingle.
This method of installation is the simplest and most reliable solution, but its disadvantage is that one of the elements of the technology is the sun's rays, gluing individual sheets into a monolithic carpet, making the roof airtight.
It is worth saying that even in frost, do-it-yourself installation of a soft roof can be done. For example, through the use of a kind of greenhouse mounted above the target section of the roof. The technology in this case is the same as in the usual case, since the temperature inside the volume limited by the film is maintained through the use of heat guns.
Roof structure - picture
In the general case, speaking of the base, they mean truss system. After its installation, the vapor barrier is installed. As a rule, this is a special film, with which the roof structure is fitted from the inside. It is fixed with wooden planks that can be used for fastening inner lining attic.
Before the roof soft tiles, heat-insulating material is also laid, it must be between the vapor barrier and the base of the tile.
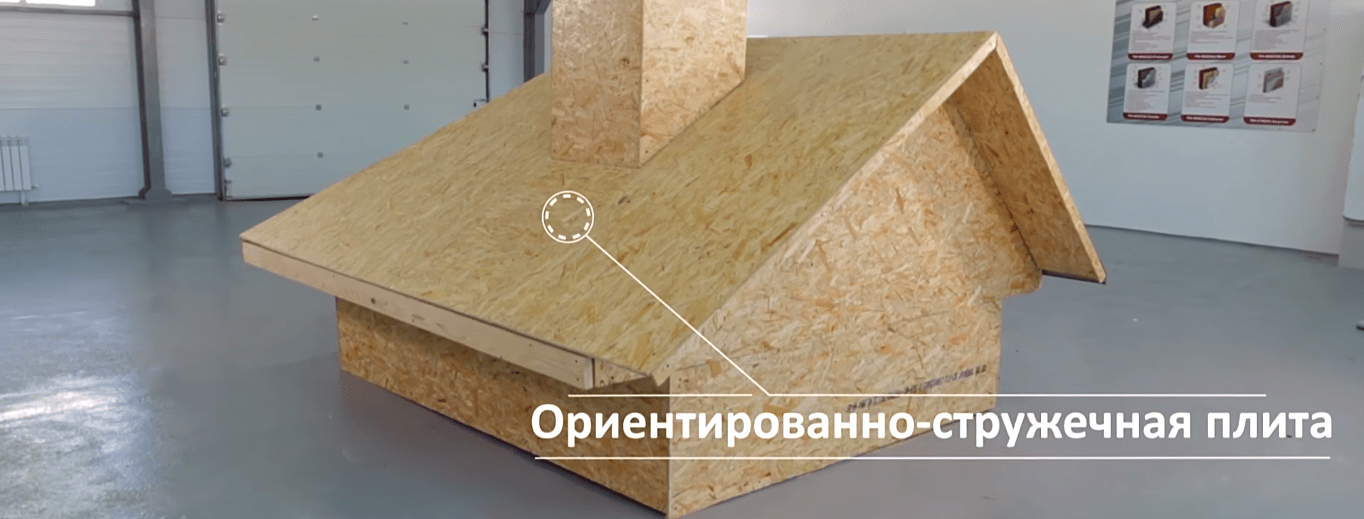
For the installation of a soft roof, any material can be used that "makes friends" with nails, and also has a smooth and smooth surface. Another requirement is the ability of the material to withstand the considerable weight of such a roof. An OSB board (OSB), as well as a tongue-and-groove or edged board or moisture-resistant plywood, is suitable for the role of the base. 
The cost of installing a soft roof also depends on what plays the role of the foundation. However, regardless of the type of material used, the possibility of thermal expansion must be taken into account, therefore, in any case, appropriate clearances must be left.
Creating a ventilation gap

The presence of an air gap allows you to solve problems such as adjusting the moisture content of the insulation and the material of the crate, and also reduces the amount of ice that forms on the roof in winter. The attractiveness of this element is also in the fact that in summer it provides a decrease in temperature inside the roofing cake.
When do-it-yourself soft roofing is done , then you need to ensure that the width of the air gap is at least 5 cm. The holes for the inflow of fresh air are best located at the bottom of the roof, and the hood at the top.
Creating an underlay

Lining is a special material that is laid over the entire area of the roof. Its installation starts from the bottom-up from the edge of the cornice overhang. The rolls are unfolded with an overlap of more than 10 cm, and for fixing every 20 cm, they are fixed with nails.

In the event that the roof slope is large (at least 18 degrees), it is allowed to lay insulation only along the ridge and along the eaves, as well as where chimneys are located or adjoining a vertical wall.
Installing slats
The installation technology of a soft roof involves the use of eaves and gable strips, which are designed to protect the crate from rain moisture. The first of them are mounted on cornice overhangs directly on top of the lining. Such elements are also called drips. Planks of this type are laid with an overlap of more than 2 cm, and fastening is carried out using roofing nails arranged in a zigzag pattern along the installation line.
Gable strips are mounted on the end parts of the roof, with an overlap of at least two centimeters. Both types of products are fixed with nails located at a distance of 10 cm along the laying line.
After the installation of the planks, the valley carpet is laid, which makes it possible to increase the water resistance. Its color is chosen to match the color of the tiles, and the edges are fixed with nails spaced 100 mm apart. After completion of this stage, a soft roof can be laid katepal - its installation begins with cornice tiles.
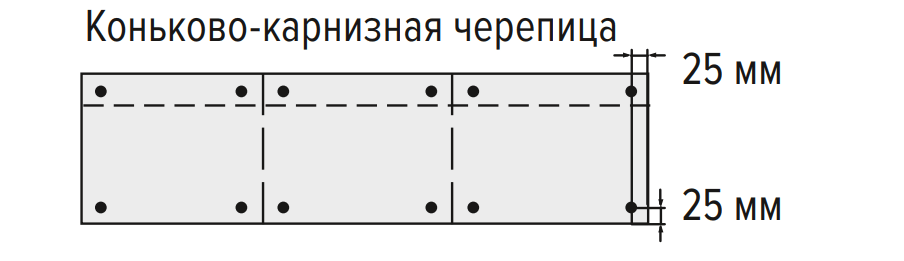
Cornice tiles
 Cornice tiles - photo
 It is laid on top of the fixed planks on the cornice overhang. For its fastening, galvanized nails are used, driven into the base material at a distance of 25 mm from the edge of the material. Another option is also possible, which is also suitable if a soft roof is made by hand. We are talking about a pattern from an ordinary tile. Making it is very simple: you need to take a shingle and cut off the petals from it. In this case, the installation of tiles goes “joint”, and the indentation from the cornice overhang should be more than 2 cm.
Laying ordinary tiles
The first thing to note is the possibility of various color deviations, since the tone may vary slightly in different packages. To avoid this, you need to mix 5-6 packs.
Do-it-yourself installation of a soft roof starts from the middle of the cornice overhang and is carried out in both directions.
The protective film from the shingles must be peeled off right before installation, since sheets without it are no longer recommended to be stacked in packs.
The shingles are fastened with nails. As a rule, only 4 nails driven in above the tile groove are enough, but for a slope of 45 degrees (and above), it is better to use 6 nails.
 Laying ordinary tiles - picture
 The very first row of tiles is positioned so that the lower edge of the material is only 10-15 mm from the lower edge of the tiles located along the cornice overhang.
The “petals” of the shingle should cover the joints of the cornice tiles. Do-it-yourself soft tiles are mounted so that the "petals" of the next row with their tip are at the level or above the cutouts of the previous layer.
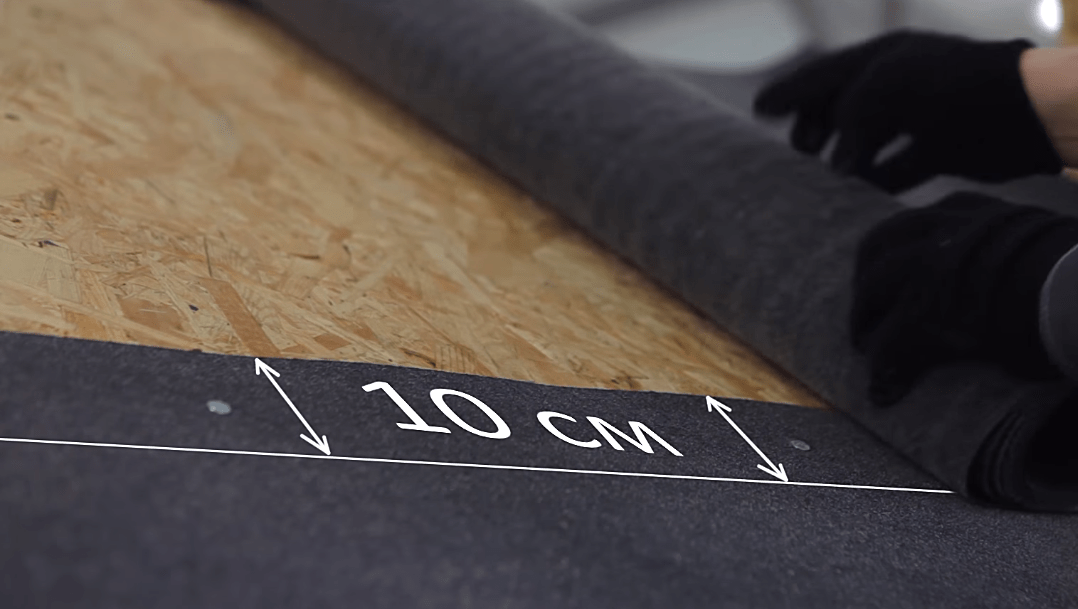
At the ends, the material must be cut along the edge of the roof, and also reinforced by gluing. Minimum Width layer should be 10 cm. The situation is similar in the valleys, where the tiles must be cut to get open lane 15 cm wide. In this case, the edges of the material are also smeared with special glue by 10 cm.
When cutting shingles, it is better to use a small piece of plywood that allows you to cut the material without fear of damaging the layer below.
Installation of ridge tiles
To perform work with the roof ridge, you will need to prepare a scaffold. They greatly simplify the work, but after dismantling them, you must not forget to glue the petals at the attachment points.
Do-it-yourself installation of a soft roof in this case is carried out with an overlap of 5 cm, and four nails are fixed. The laying of the ridge layer can only be started after the installation of ordinary tiles is completed.
Ridge tiles are obtained by dividing the eaves at the places of perforation. After that, each element is bent in half and mounted with the short side along the roof ridge.
Roof connections
Passages through the roof can be organized in different ways. In the event that their diameter is small, it is recommended to use special rubber seals. This applies to antenna inputs and other types of communications, but pipes are insulated differently. Here, the possible heating of the pipe is taken into account, due to which a slightly different technology is used.
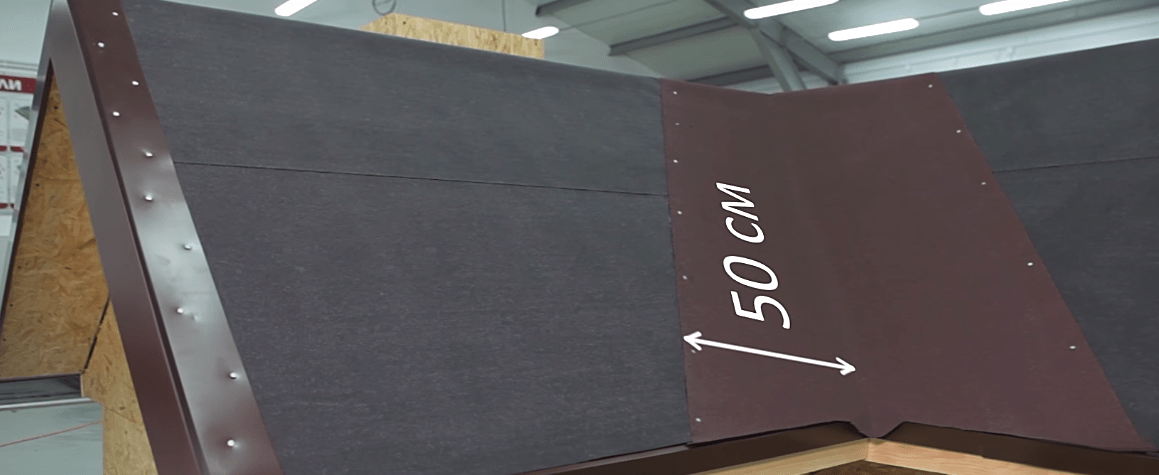
First of all, a triangular rail is nailed along the perimeter of the place of contact between the pipe and the base of the roof. The most common option is 50x50 mm. The next step is the installation of the lining carpet, the overlaps of which must be smeared with glue. The pipe itself is glued with insulating material so that it covers at least 30 cm of the pipe and 20 cm of the ramp.

When a soft roof is created with your own hands, this stage is often the final one, but one more operation is required - to fix the junction bar around the perimeter of the pipe. The metal apron is fixed over insulating material and all seams are sealed with silicone adhesive.
Adjacency to a vertical wall is carried out in a similar way. The only exception is the triangular bar, which does not create a perimeter, but is mounted along the wall.
The main questions discussed in this article will help a layman to quickly understand the course of the matter. Moreover, many difficult points are described here, which a beginner in construction will easily miss. On our website there is also additional information telling what a soft roof is. Editing technology, video work of professionals and helpful tips allows you to sort out this difficult issue in the shortest possible time.
Soft roofing materials are becoming more and more popular. What causes increased demand, because the price of such a roof is not the lowest? Masters choose this type of coating, as it is practical to use, durable and very easy to install. Novice craftsmen can easily cope with the installation of such a roof with their own hands. What types of soft tiles are there, what are their advantages and how the technology of laying soft roofs is mastered, read right now!
A little about the features of soft materials
If anyone thinks that a soft roof - new material in the construction market, we hasten to recall that the "progenitor" of flexible coatings was an ordinary roofing material. Consider the three main types of flexible roofing:
I. Bituminous roll materials
Rolls of bituminous coatings are an improved roofing material. They are fastened by fusing to the prepared roof surface. More the new kind rolled roofs - polymer membranes. These coatings are glued to the roof in whole or in part (at the joints).
Roll materials are advantageous to use for large industrial buildings, as they are quick to install and relatively low cost. The slope of the roof for rolls is 3-9 degrees.
II. bituminous tiles
Unlike bituminous rolls, tiles have better characteristics and are available in shingles (strips, tiles). The free side of the tiles is tiled to create the visual effect of a ceramic coating.

The main advantage of shingles is that they can be laid on surfaces with any slope, which is especially important for the roof of private houses. The plates are glued, starting from the bottom, with the upper edges. Additionally, the shingles are fixed with self-tapping screws. When the sun heats the surface shingles, the plates are fused, forming a continuous sealed surface.
III. Roofing mastic
This is a liquid type of roof. The material is supplied either immediately in liquid form, or requires heating to certain temperatures. Mastics are poured onto the reinforcing mesh and brought to solidification, forming a monolithic surface. This type of roof has excellent characteristics, but is only suitable for flat roofs so we won't talk about it in detail today.

Valuable properties and disadvantages of soft materials
We list the main advantages of a soft roof:
- Flexibility and elasticity roofing material. This property allows you to hide complex roofs With minimum consumption coverings, practically without waste and additional seams;
- Ease of installation. Bituminous materials are very easy to install. You can lift light tiles or rolls onto the roof and spread them yourself. The installation technology can be mastered by any owner who has such a desire;
- Minimum weight of the roof. The material is light in weight. This reduces the load on the truss system;
- The absence of noise effects, as, for example, with corrugated board. Rain, hail and wind are practically inaudible when in contact with a soft roof;
- Availability and ease of repair of the roof if necessary. It is easy to move on bituminous tiles, as it does not slip. If any section of the coating has become unusable, you can only replace it without affecting large areas;
- And, it is impossible not to note the practicality and durability of the coating. Bituminous materials withstand temperature changes and mechanical stress, for many years they do not lose their quality and decorative effect.
Some of the difficulties that arise when choosing a soft roof include increased requirements for the crate (it must be solid and perfectly even) and possible additional material costs (there are expensive and cheaper coatings). Another drawback is the combustibility of shingles. However modern technologies reduce this risk factor.
We are mastering the technology of installing a soft roof: instructions and diagrams
The device of a soft roof consists in laying bituminous plates or rolls on a prepared base. We will describe the stages and features of the installation of materials as detailed as possible.
What is a rafter system for soft tiles?
The device of the truss system for flexible coating practically does not differ from the base for solid materials. Mauerlat, rafter legs, runs, racks and other elements are installed according to standard rules. The main nuance is the crate, which needs special attention. Soft roof must be laid on a flat, continuous surface, therefore moisture-resistant plywood or other similar materials must be laid on the counter-lattice:

Consider the optimal roofing pie for a flexible roof:
- rafter legs standard sizes and fasteners;
- Roof insulation (if you are making a warm roof);
- Roofing vapor barrier film;
- Boards of the counter-lattice laid perpendicular to the rafters;
- crate OSB boards or plywood;
- Special lining material for tiles - lining carpet;
- Soft roofing;
- Gutters, skates and other finishing details.
From the inside, the roof is insulated with any materials and a fine cladding is performed. Let's consider all the stages in order.
I. Preparation of materials and tools
At this stage, it is necessary to calculate the truss system, purchase everything necessary for the roofing pie and prepare the tools.
You will need: a pencil, a tape measure, a folding ruler, a soft tile knife with a straight and hook-shaped blade, a beater, a hammer, construction pistol, spatula for mastic, thermal building hair dryer, metal shears, screwdriver.
II. Vapor barrier installation
Vapor barrier is necessary to prevent fumes from entering the roofing materials warm air from the premises. For a warm roof, the vapor barrier is mounted from the inside of the attic to the rafters. Rolls roll out parallel to the eaves, starting from the ridge. Overlap - 10-15 cm with inside, the overlap on the walls is also very important. Fix the film with a construction stapler. The joints are closed with adhesive tape on a metal basis:

An aerator is installed for ventilation:

Adjacency installation rules:

III. Insulation installation
Installation of insulation helps to establish the optimal thermal regime inside the building and prevent heat loss from the living space. Before laying the insulation, it is necessary to form a rough filing from the inside - wooden planks over the vapor barrier membrane. The choice of the type of material and the thickness of the insulation layer depend on the climate and the characteristics of the building. For residential buildings in central Russia, for example, experts often use mineral wool with a layer of 20 cm.
Several layers of material are laid in the body of the rafters with a spaced seam for a better warming effect. Sheets are joined closely so that there are no gaps. The layer thickness at this stage should be 15 cm. Next, we mount a beam 50x50 mm perpendicular to the rafters (step 50-60 cm). Between the bars, the final layer of thermal insulation is laid - 5 cm. This technology eliminates cold bridges.
IV. Installation of roof vapor barrier
The vapor diffusion membrane protects the insulation from moisture and dust, without preventing the release of vapors into the external atmosphere. The vapor barrier is laid along the cornice, directly on the insulation layer with an overlap of 10-15 cm. construction stapler, overlaps are glued with a special tape.
In order for the roof to last as long as possible, ventilation of the under-roof space is simply necessary. It helps to remove the steam coming from the room and equalizes the temperature over the entire surface of the roof. To ventilate the attic, it is necessary to make an air gap of at least 5 cm between the insulation and the base of the roof. Parallel to the rafters, an additional layer of counter-beam with a section of 50 mm is installed. We make gaps of 5-10 cm between the bars. This will ensure the necessary air circulation.
V. Foundation device
Under a flexible tile the solid basis from moisture resistant plates is carried out. When laying, we mount the plates in a run-up with a gap of 3-4 mm. The gap is necessary to compensate for the expansion of the plates under the influence of moisture and air.
We mount aprons on the base with an extension of 2-3 cm beyond the edge of the plates. We fix the planks in increments of 25-30 cm using self-tapping screws. The overlaps are treated with sealant. You can then mount drainage system roofs according to the standard scheme, which we described in previous materials.
VI. Waterproofing
The base slabs need additional waterproofing. To do this, you can use roll lining materials. Installation of rolls starts from the eaves. We lay the insulation parallel to the base apron with an overlap of 15-20 cm. All joints should be sealed bituminous mastic:

If the angle of the roof slope is more than 30 degrees, then continuous waterproofing can be omitted. It is enough to seal the seams of the base and lay the rolls (about 50 cm wide) in the valleys, cornice overhangs, windows, ventilation holes etc.
VII. Tiling
On the roof, it is necessary to make markings according to the instructions that are given to a specific roofing material. About methods of laying soft tiles in valleys:
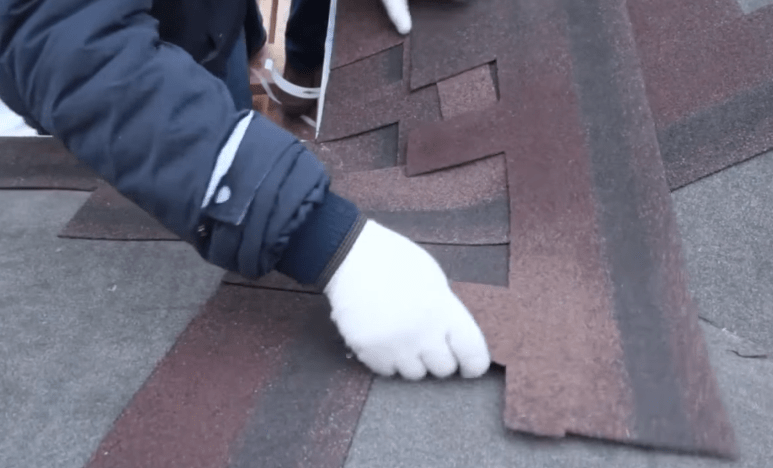
- Method "Pigtail". Necessary condition for laying tiles in this way - the same slope of adjacent slopes. The material spreads on the slopes and covers the valley with an approach to the adjacent slope. The same is then performed on the adjacent slope;
- Undercut method. Initially, tiles are laid on a slope with a smaller slope and length. On the adjacent slope, a line is drawn parallel to the axis of the valley. Each row of tiles is driven through the valley to the adjacent slope and cut along the line. The valley zone should not be pierced with nails (30 cm from the corner). On the next slope, we begin laying in the same way, marking a parallel line from the opposite side by 5-10 cm.
According to the markup, we begin laying soft tiles from the eaves. We cut the first strip (shingle) along the line and glue it at a distance of 1 cm from the edge of the cornice overhang. We fasten the tiles with roofing ruffed nails, the length of which is 25-30 mm. Each nail should penetrate both the top edge of the new shingle and the material already under it. On steep slopes, the upper edges of the slabs are fixed with an additional two nails.
Ridge elements are cut from tiles. We lay them in the predominant direction of the wind with an overlap. Each element is fixed on both sides with nails and glued with bituminous mastic. For better bending, it is recommended to warm up with a building hair dryer inner surface each element.
Mounting the ventilation ridge
To install the ventilation ridge, we do not bring the base of the roof to its line, leaving 10 cm. Then we mount 50x50 mm bars along the ridge in 30 cm increments. We mount another row of the same bars behind the previous ones, according to the markings. Next, we mount the apron and fasten the insect net. We install waterproof plywood on the bars, which we close with an apron and tiles. Now you can install .
So, independent installation of soft tiles is quite feasible, and it is much easier to lay hard materials. Choose quality materials, tune in to fruitful work and go for it! We wish you successful work.
The process of installing a soft roof is relatively simple, it is quite possible to do it yourself, without the help of specialists.
Soft roofing is a good alternative to traditional roofing materials.
Its advantages over them: flexibility, ease of processing and low price.
You will learn about where to start installing a roof, as well as the advantages of this type of roof and the surface requirements for them, in this article.
What is a soft roof?
Sometimes it is also called flexible or shingles. This is due to the fact that it is made from bitumen.
But do not be afraid and turn away from this roofing material - this is not a roofing material, but a modern and popular (in some countries) material.
Soft roofing is much stronger and more durable than conventional roofing material. Everyone knows that bitumen is a very unstable material: it breaks, melts and collapses.
However, thanks to modern developments, it was possible to achieve an increase in its resistance to negative influences.
TechnoNIKOL, Shinglas soft roof manufacturer, guarantee from 10 to 55 years of flawless service.
Modern bitumen-based soft roofing is not prone to tearing, but high or low temperatures environment do not cause destruction.
Thanks to the introduction of modifiers (various rubbers), it was possible to add flexural strength and resistance to negative temperatures.

Thanks to the technology of processing the bitumen melt with oxygen, the melting point has been increased to 90-110 degrees Celsius.
Now, even in the strongest sun, the roof will not melt.
In addition, resistant and durable fiberglass is used as a reinforcing layer in the production of soft roofing. This allows you to increase its strength.
As the upper protective layer, stone dressing is used, as a rule, basalt chips. It performs not only protective, but also decorative functions; for this, dyes are added to it.
Summarizing all of the above, we have the conclusion: a modern soft roof is a durable and beautiful material which is easy and simple to work with. Of course, if you know how. To do this, there is an instruction that will help you figure out how to work with this material.
You can get acquainted with the rules of work on the video available here.
It is worth remembering that laying a soft roof on roofs with a slope of less than 11 ° is highly discouraged. Since there is no guarantee that with such a bias it will perform its functions.
On such small slopes it is worth using welded materials.
Let's start installation
Since it is quite easy to work with a flexible roof, self-assembly is quite simple, which cannot be said about other types of roofing.
However, if you decide to do the work yourself, then you need to know how this is done.
After watching the video, you can see that the technology of laying a soft roof is different from the traditional one, which uses sheet roofing materials.
Therefore, we will consider this point in more detail. And from the very beginning - from the preparation of the foundation.
To work, you need a minimum set of tools: a hammer, a knife, a spatula, a tape measure and a cord for marking.
From Supplies: galvanized roofing nails, with a wide head and mastic, for gluing roofing elements. Technonicol mastic.
Foundation preparation
The soft roof device does not have its own rigidity, unlike, for example, a metal profile or slate. Therefore, the roof surface must be solid and durable.
An excellent solution to this issue would be the use of moisture-resistant plywood or OSB. The thickness of the sheets is selected based on the distance between the rafters.
The step of the crate device also depends on the distance of the rafters, the larger it is, the more often the crate is stuffed. Sheets of plywood or oriented strand board are mounted on self-tapping screws.
Be sure to scroll the edges so that they do not wrap over time.

It is worth noting that the use of plywood or OSB, as mentioned earlier, great option, but far from the only one.
It is possible to sew up the roof with a solid edged or tongue-and-groove board, 30 mm thick. Naturally, this option is longer and, in the case of using a grooved board, more expensive.
But if there is a desire and an opportunity, why not do it.
Please note that all of the above applies to a simple roof, but if an attic is being made, then the whole range of works is carried out: insulation, hydro and vapor barrier, and only then, having stuffed the counter-lattice, a solid surface is arranged under the soft roof.
A ventilation gap is also required to remove the resulting moisture. Therefore, a gap is left in the eaves and slots are made in the ridge for aerators.
It is worth paying attention to the ventilation pipes. If the pipe is wider than 50 centimeters, then it is better to make a ramp behind it.
Such a solution will prevent sediments from accumulating behind the pipe and they will be discharged without hindrance. How it looks, you can see in the video.
Lining
For example, consider the installation of a shinglas soft roof.
After preparing the base, they begin to work with the substrate, it is also called the lining carpet.
This is a rolled material, which is an indispensable part of a soft roof and gives additional protection from moisture, and also facilitates work with roofing elements.
The substrate is fastened with roofing nails and at the joints - with technonikol mastic.
Roofs with a slope of less than 18 degrees are completely covered with a substrate. Roofs with a slope of 18 to 90 degrees are allowed to be covered partially.
With partial use of the substrate, only the following are covered: cornice, pediment edge, valley, hip, ridge, exit points for dormer windows and ventilation pipes.
For clarity, it is worth watching the video.
Solid underlayment device. Rolls roll out horizontally. Start from the bottom and go up. Horizontal overlap - at least 15 cm, vertical - at least 10 cm.
The junction is additionally glued using technonicol mastic or any other mastic.
Partial installation of the lining carpet.
The roof is lined around the perimeter and in difficult places - a ridge, a valley, and so on.
Use the entire width of the lining material.
The lining is glued to the base and punched along the edge with nails. The distance between the nails is no more than 20 cm. If the material is joined, then the overlap is made at least 10-15 cm.
Complex elements, such as valleys, hips, junctions of ventilation pipes and dormer windows, are carefully glued with the full width of the lining roll.

For better adhesion, technonikol mastic is used. Slots are made in the lining on the ridge for aerators.
After the carpet is installed, cornice and pediment strips are installed. Start with eaves. They are fastened directly to the lining, fixed with roofing nails.
Then the pediment strips are fixed in the same way. Nails are struck at a distance of 15 cm.
Tiling
It is removed before installation.
Laying a soft roof (including with your own hands) begins with a cornice and a ridge. A universal ridge-cornice tile is fixed along the entire length.

The edges of this roofing element are glued with technonicol mastic and nailed with roofing nails. Nails are struck at a distance of 15-20 cm from each other.
Then guide lines are beaten off with a coated cord, for reference. Shingles are laid over them.
Color of shingles may vary slightly.
So that it does not happen that one part of the roof slope differs in color from the other, it is necessary to open all the packages before starting work and use the elements from them in turn.
So the difference in color, if any, will not be noticeable.
After all, shingles from different packages will be mixed.
Installation of the first row of elements starts from the middle and alternately moves in both directions. Each shingle, especially the outer ones, is well glued with technonicol mastic.
Roofing nails, with wide caps, are hammered in specially provided places. For each type of tile they are different.

Therefore, the instructions for the purchased roof must be read. Having reached the ridge, do not forget to leave slots for aerators.
When laying along the edges of the roof - you need to adjust the size of the tiles. This is done simply. The elements are cut to size with a sharp knife.
In the same way, soft tiles are cut when tracing dormer windows and ventilation pipes, valleys and hips.
To cut the shingle, a small sheet of plywood is used, which is placed under the cut element. It is necessary in order not to damage the already laid shingles.
Final stage
This includes the installation of a ridge and aerators. The latter are used for ventilation devices. Air moves up from the eaves, so the aerators are installed as high as possible.
Best in the skate itself. The method of fastening aerators is the same as for tiles. Aerators are fastened with nails. After installation, they are covered with ridge tiles on top.
A roof covered with bituminous tiles is aesthetic, durable, and easy to use. Its great advantage lies in the possibility self-assembly. There is nothing difficult in how to cover the roof with a soft roof with your own hands, since the weight of the material is small, installation is carried out on an adhesive base with additional fixation with nails.
Currently, this type of coverage has become popular among property owners. A do-it-yourself soft roof made of bituminous tiles has a very attractive appearance, it is characterized by increased moisture resistance and a long period of operation.
On the reverse side of this roofing material there is a self-adhesive layer. Thanks to its presence, the arrangement of a soft tile roof with one's own hands can be done in the absence of appropriate skills.
Features of flexible roofing material
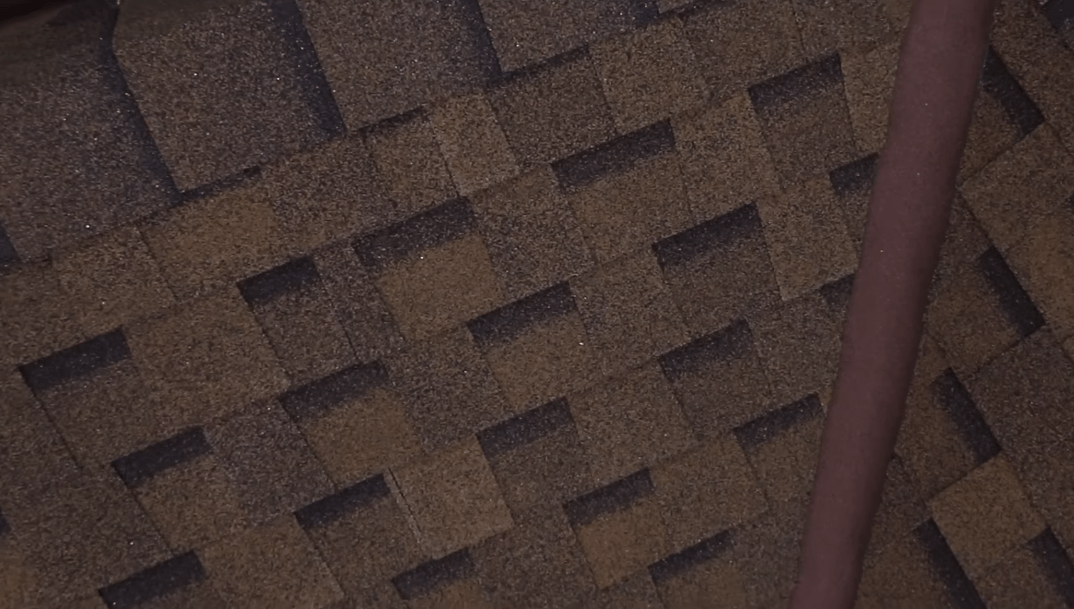
Soft tile is a tile with a figured edge. It is made of fiberglass, which is impregnated with polymer-modified petroleum bitumen. When arranging the roof, the material is overlapped so that an imitation of a shingle coating made of wooden chocks is created.
The fiberglass included in such a tile can be ordinary or reinforced with polyester. During the manufacturing process, the material is coated on the outside with a special dressing made from basalt or stone chips, due to which the roof has a rough surface and a certain color.

The advantages of bituminous tiles include:
- Aesthetic appearance. Since the material is produced by a variety color solutions and shapes, it is possible to give the house a harmonious image.
- Long service life. A soft roof can be operated for at least 70 years, and during this period the costs of its installation will pay off in full.
- Flexibility. Elastic products allow you to arrange a soft roof of complex shapes, with many decorative elements.
- Resistant to adverse weather conditions. A soft roof is able to withstand exposure to ultraviolet radiation, precipitation and other environmental factors while maintaining performance.
The technology of laying tiles is simple and therefore even a home craftsman can easily equip a roof from a soft roof with his own hands for a country cottage, country house, gazebos and other buildings.
Installation of a soft roof
Before you make a soft roof with your own hands, you need to make sure that there is a solid foundation. According to the installation technology this material, work can be done under specific weather conditions.

- Performing installation at an air temperature of less than plus 5 degrees, the self-adhesive layer available with reverse side shingles, can not melt on their own. To do this forcibly, you will need to use a building hair dryer or gas burner. But the melting of bitumen will affect the timing of the installation of a soft roof.
- When this material is laid at a temperature exceeding 25 degrees, the self-adhesive layer begins to melt strongly and flow down the slope. At high temperature regime roofing is deformed.
- If you perform installation work in conditions high humidity, this will negatively affect the durability of the crate, rafters and the tiles themselves due to decay.
The do-it-yourself instructions for installing a soft roof, compiled by manufacturers, prescribe that this should be done only at an air temperature of 5 to 15 degrees, when the weather is dry.
Do-it-yourself roof framing
First of all, you need to make a reliable crate. According to the installation technology of soft roofing, there must be a solid base, which will give the soft roofing the required strength and rigidity.
The presence of the crate guarantees an even distribution of the load on the rafters, so it is made of three layers:
- Control gratings. It is built from wooden bars, having a thickness of 3-4 centimeters, and mounted on top of the waterproofing along the rafter frame legs. This layer serves to create an air gap between the coating and the rafters.
- sparse crate. This part of the base for soft material is made of edged board size 20x150 millimeters. The elements are fixed perpendicular to the bars of the counter-lattice with an interval of 30-50 centimeters.
- Solid battens. It is built from moisture-resistant plywood, edged boards or OSB boards. They are laid solid with a small gap equal to 1-3 millimeters, which serves to compensate for the thermal expansion of the crate.

Before laying a soft roof, the wood elements must be made smooth so that they do not damage the tiles. better use material conifers with 20% humidity. So that the tree does not begin to rot, the products must be treated with antiseptic compounds. To eliminate the risk of fire, the crate is impregnated with fire-resistant preparations.
Underlayment carpet laying
There is a certain order on how to properly lay a soft roof. It is mounted on a solid crate. Before laying a soft roof, a lining bituminous carpet resistant to mechanical stress is placed on top of the base. It protects the roof structure from leaks and damage.
According to the installation technology of the lining carpet:
- with a roof slope of less than 15-18 degrees, it is laid out over the entire area of \u200b\u200bthe slopes with a 15 - 20-centimeter overlap so that moisture does not linger in case of snow melt;
- if the angle of inclination is more than 20 degrees, the lining is laid only in places where precipitation can collect - such additional waterproofing is used to protect the joints of the soft roof on slopes with a vertical surface, valleys and ridge;
- roofing material cannot be used for lining, as it is fragile and will not last long.

According to professionals, products recommended by manufacturers should be used as a lining layer, since it is guaranteed to be compatible with purchased tiles.
How to cover the roof with soft tiles
Installation must be carried out when it is calm and dry outside. When laying on a previously operated truss frame check status first wooden elements and change those that are deformed or rotted.

Installation work is carried out in a certain order:
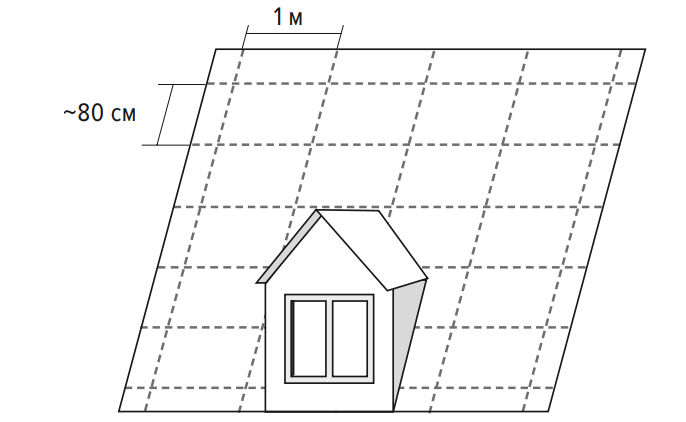
- Using a pre-prepared drawing of a soft roof, mark the surface of the slope with horizontal stripes with chalk, marking the location of the rows of tiles.
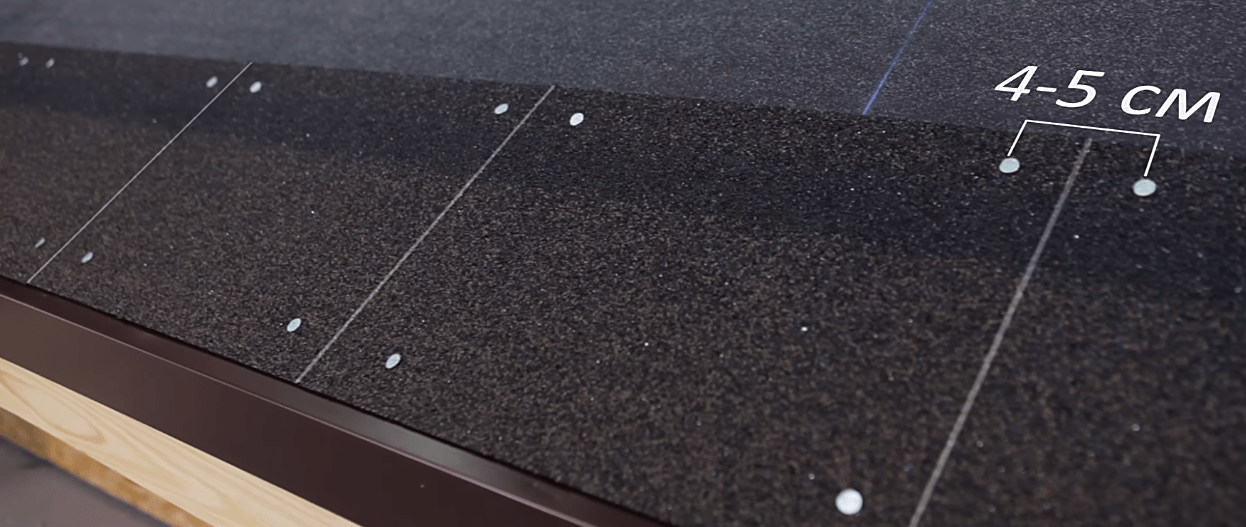
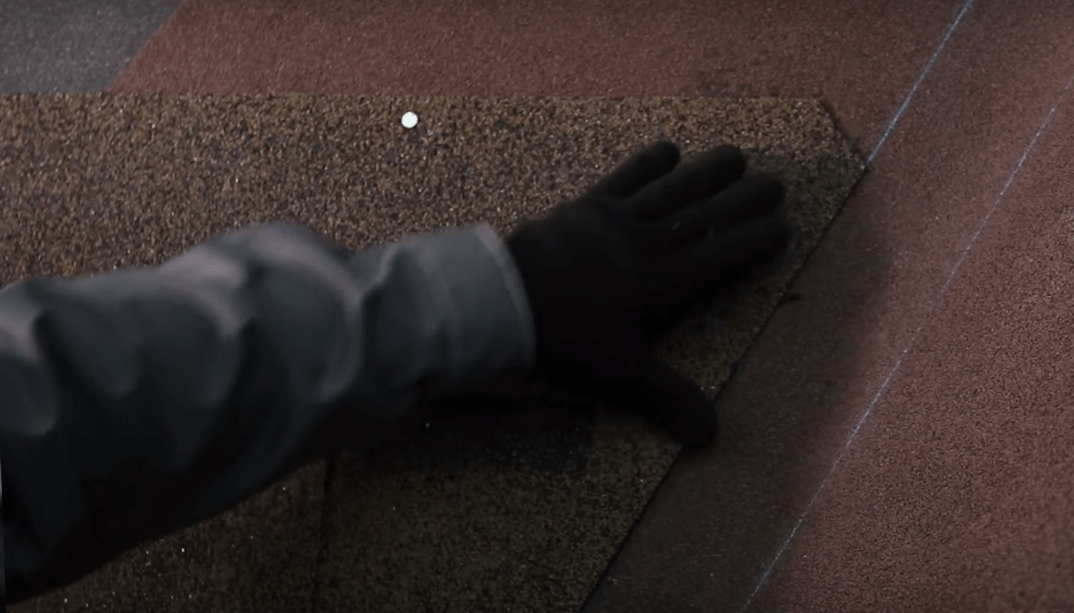
- Laying begins from the bottom of the slope, fixing the roofing with special nails. If fastening is carried out thanks to a self-adhesive layer, you need to remove the protective film from the tile and press the product to the base. Nails are driven in no closer than 2.5 centimeters from the edge, flush with the surface of the tile.
- The next row starts on the left side. 143 millimeters are cut off from the tile on the left, shifting the pattern diagonally.
- To start laying the third row, a fragment 286 millimeters long is removed from the product from the left edge so that the pattern of the material moves in a diagonal direction.
- After completion of work, a ridge element and valley junctions with a vertical surface are formed with a ridge element.

To ensure the proper functioning of the roofing from bituminous tiles and to prevent the "greenhouse effect", it is necessary to equip the ventilation system and thereby prevent the rotting of the truss structure.
Soft roofs include bitumen-based roll materials, as well as a piece coating that externally imitates tiles. Soft roofs are widespread due to reasonable prices and the ability to do the work from and to with your own hands. Another important plus is the light weight of soft roofs, due to which the load on the rafter system and the foundation of the bath is significantly reduced.
It is worth choosing the type of soft roof, starting not only from the external design of the bath, but also from the angle of inclination of the slopes.
Roll roofs
Laying roll materials is most often done on flat roofs and single-sided with a slight slope. Roofs with a large slope are usually not covered roll materials, since the appearance of the bath will be unpresentable.
| Material | Description |
|---|---|
| The most famous roll coating is roofing material. It is glued to the base with bituminous mastic. The material is the most budgetary, easy to install, but the service life of roofing material does not exceed ten years. | |
| Built-up roofing material - a material that differs more good quality compared to its "predecessor". A layer of bitumen has already been applied to the basis of the built-up roofing material. The material during the installation process is heated with a burner and rolled into several layers. | |
| Stekloruberoid - material with a fiberglass base, resistant to temperature extremes and UV rays. A coarse or fine fraction is applied to the surface of the material. So, for example, S-RK glass roofing material, which is laid top layer, on the front side it has a sprinkling of a large fraction, and on the wrong side - a fine one, similar to dust. At S-RF glass roofing material, which is also laid with the top layer, the sprinkling is scaly. And sprinkling of the smallest fraction on both sides of the C-PM glass roofing material, which is laid with the bottom layer of the coating. Laying is carried out by welding or mechanical fixation of the material. The service life of roofs made of glass-ruberoid does not exceed 10-12 years. | |
| Membrane materials - the most modern of all of the above, have a much longer service life, high waterproofing properties. Membrane materials are not susceptible to climatic factors and the action of sunlight, mechanically strong, light and elastic. In addition, you can choose the shade of the material yourself. |
Bituminous roofs
Piece bituminous tiles are an economical material with high decorative and soundproofing properties.

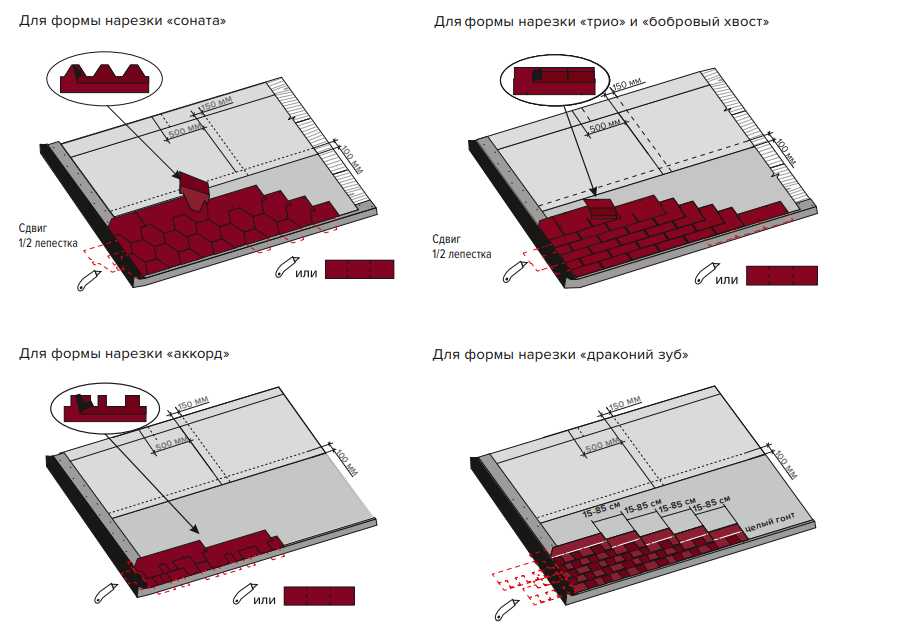
Flexible multilayer tile TechnoNIKOL SHINGLAS “Dragon tooth”
rich color palette shingles allows you to implement a variety of design solutions, to create your own unique design of the roof.

Flexible tile TechnoNIKOL SHINGLAS “Modern Brix”
Soft shingles small size can be laid on roofs of any configuration, including tented and domed ones, while the amount of waste is always minimal. Caring for a bituminous roof is not difficult - it must sometimes be cleaned of snow and accumulated fallen leaves. And roof repairs are carried out as simply and quickly as possible - you just need to remove the hardware and replace the defective element.

The top layer of bitumen shingles is a sprinkling of natural materials such as basalt. The rough surface of the shingles allows snow to be retained on the roof and prevents its avalanche. In addition, coarse dressing provides mechanical strength to the coating.

Flexible tile Docke, collections "Cologne"
Roofing must comply with the quality of GOST 32806-2014.
Laying can be done independently, having a minimum set of tools and following the instructions.

Prices for shingles
shingles
A step-by-step guide to laying shingles
Soft shingles are laid only on a solid base, always hard, dry. As a base, it is recommended to use plywood sheets of increased moisture resistance or OSB-3 with a thickness of 11 or 12 mm (for some types of tiles, the use of plates with a thickness of 9 mm is acceptable). The recommended dimensions of the plates are 1.25 x 2.5 m.

It is also permissible to make a continuous crate of grooved or edged boards with relative humidity less than 20%.


The slabs are mounted on top of the crate of the "inch" board, mounted in 100 mm increments. A prerequisite for the installation of a continuous crate is the observance of the spread, that is, at one point of the roof, 4 corners should not converge at once.
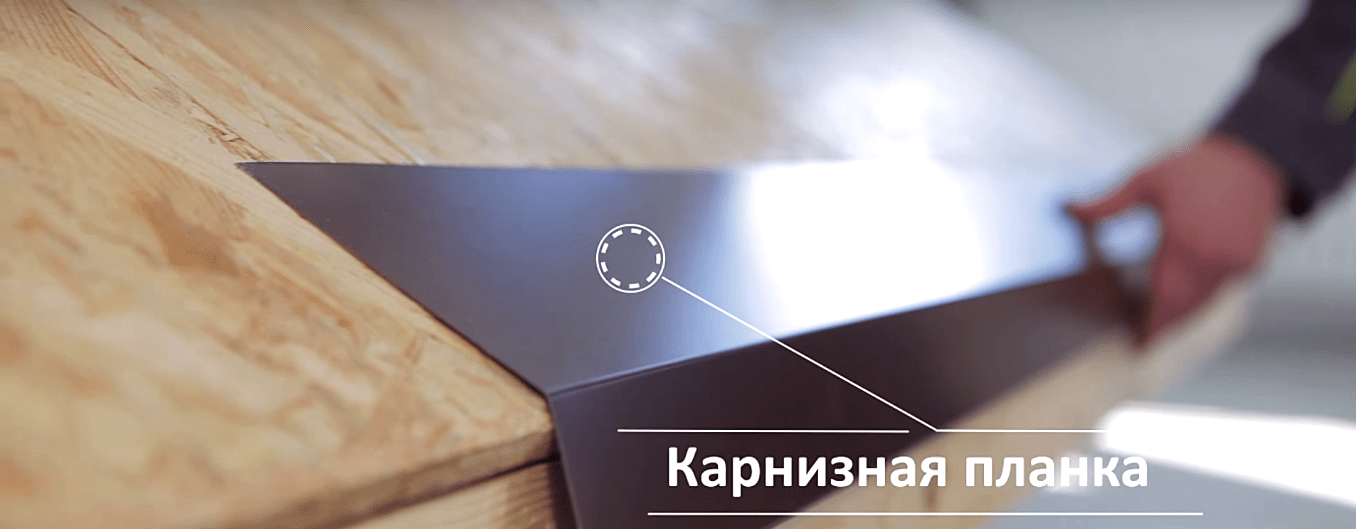
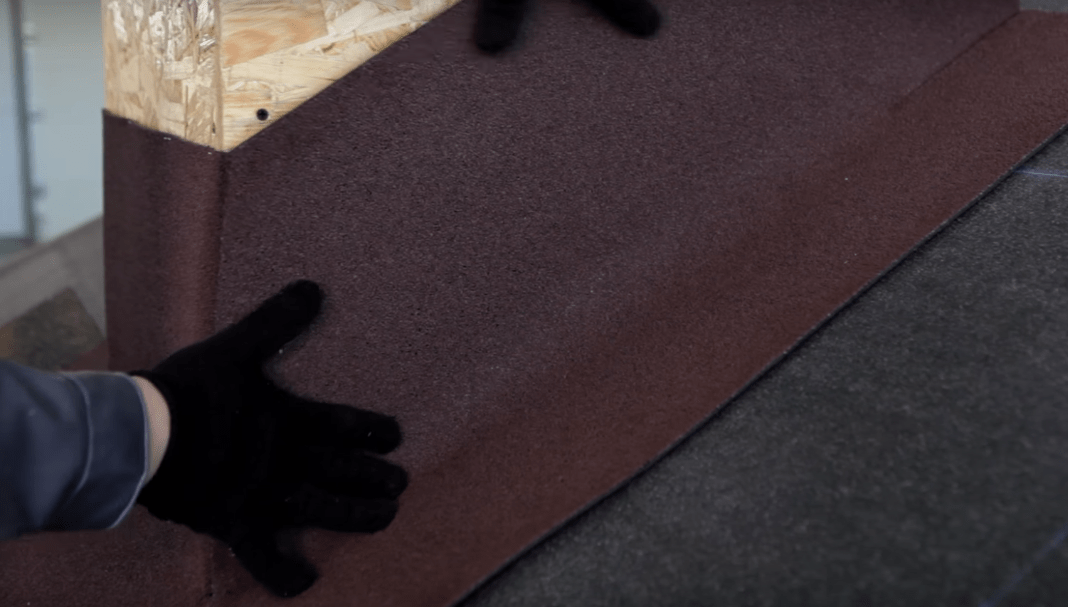
Stage 1. Before laying flexible tiles, it is necessary to fix additional elements, the first of which is a cornice strip. The element is necessary to drain water and strengthen the roof structure.

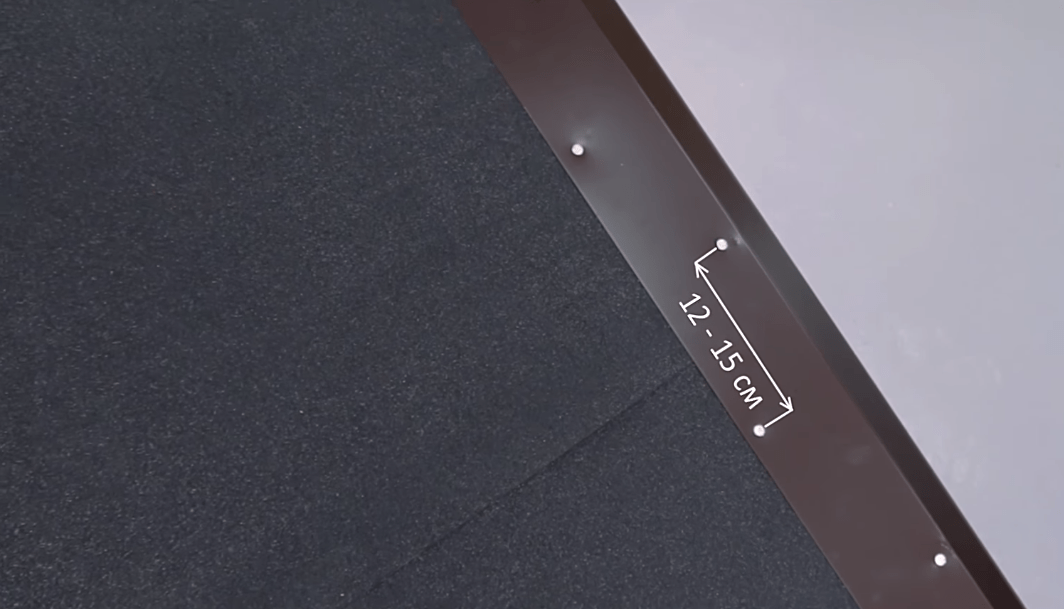
The bar is laid with an edge on the edge of a continuous crate and fixed with roofing screws. Hardware is driven in in a checkerboard pattern, observing a step of about fifteen centimeters. The overlap of the ends of adjacent planks is not more than five centimeters.

Stage 2. Lining carpets are used to provide additional tightness of the roof.


The first roll is rolled out parallel to the cornice strip, and the lower edge of the carpet should not reach 2-3 mm before the bend of the strip. The lining layer is fixed with roofing screws along the edges at the top and bottom. It is important that the carpet is laid with a slight tension to prevent the appearance of wrinkles and waves on the surface of the material.

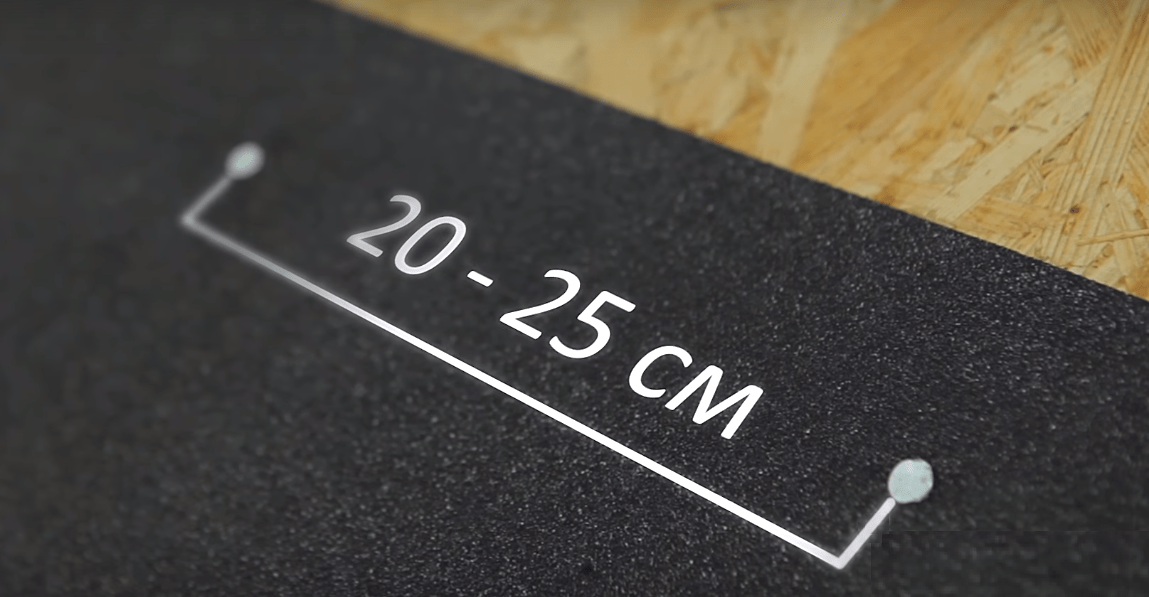
The second row of material is laid with an overlap of the first 10 cm and fixed with nails along the upper edge, keeping the distance between them from 20 to 25 cm.

Between the canvases (in the place of overlap), a fixing mastic is applied with a spatula with a layer 1 mm thick. If the mastic is applied too thickly or previously diluted excessively with a solvent, swelling and smudges may appear on the roof.

If the lining carpet has adhesive strips along the edges, then additional mastic is not needed.
On a note! If there is a junction of slopes (valley) on the roof of the bath, then the lining carpet is first spread along the junction, and only after that the rolls are rolled out parallel to the cornice strip.
The total width of the lining carpet on the valley should not be less than 1 meter, that is, 50 cm in each direction from the junction line of the slopes. It is desirable that the lining carpet on the valley does not have joints, but if this cannot be avoided, then the layers are laid from the bottom up with an overlap of 30 cm and the junction must be smeared with mastic.

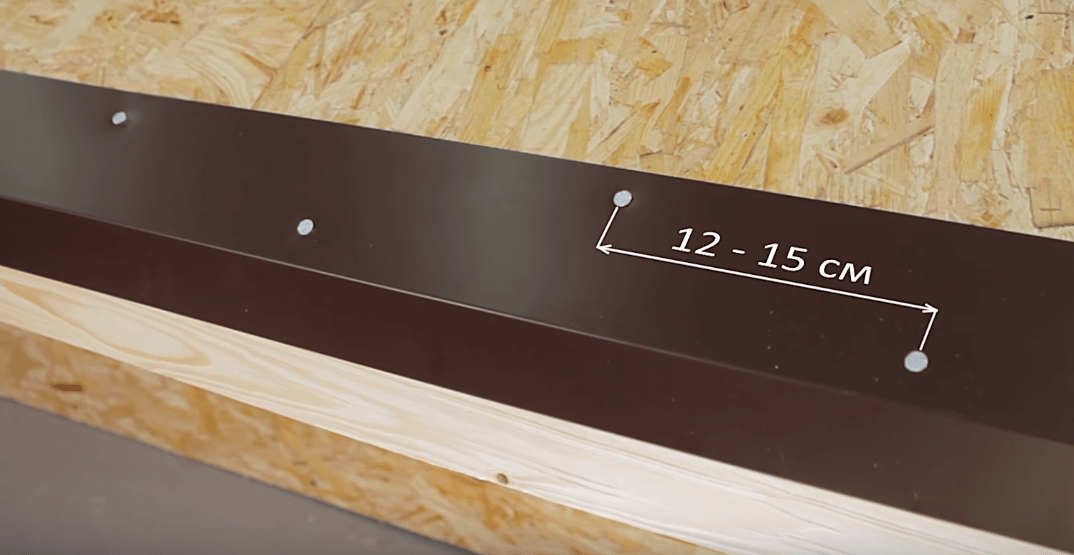
Stage 3. On top of the lining layer, gable strips are attached, which are also called wind strips. Fixation is carried out with nails. The hardware is hammered in with a hammer in a checkerboard pattern, a step of 12-15 cm. The end overlaps of the planks are 3 cm.
Stage 4. Design of valleys.
Moisture resistant plywood prices
moisture resistant plywood
Method 1. Open
A valley carpet is laid over the lining carpet.

The width of the valley carpet should also not be less than 50 cm in each direction from the axis of the slope joints. Bituminous adhesive mastic is applied to the wrong side of the carpet (strips 10 cm wide along the edges of the material).
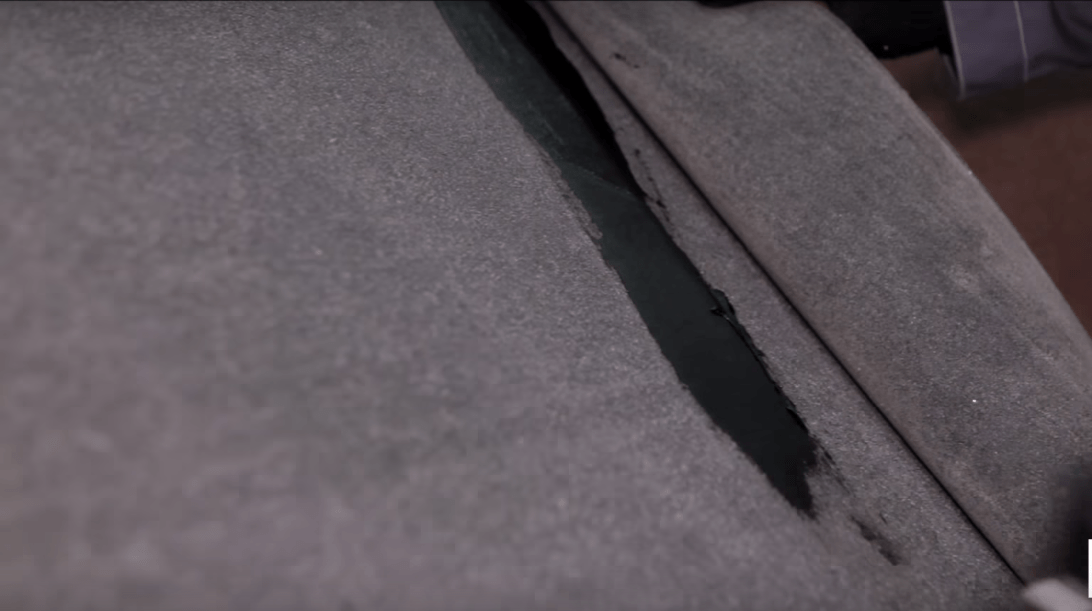

The material is fixed around the perimeter with nails in increments of no more than 25 cm and indented from the edge of the carpet by 3 cm.

Method 2. With pruning
The design option for the valley does not involve laying a carpet. The shingles are cut and overlapped directly at the junction of the slopes.

Stage 5. You can go directly to the laying of shingles.

The first row is the starting one. Distinctive feature starter row shingles - no slots. Whole strips are glued, stepping back from the bend of the eaves strip by 2 cm. Additionally, the shingles are fixed with twelve nails each (6 nails along the upper and lower edges).

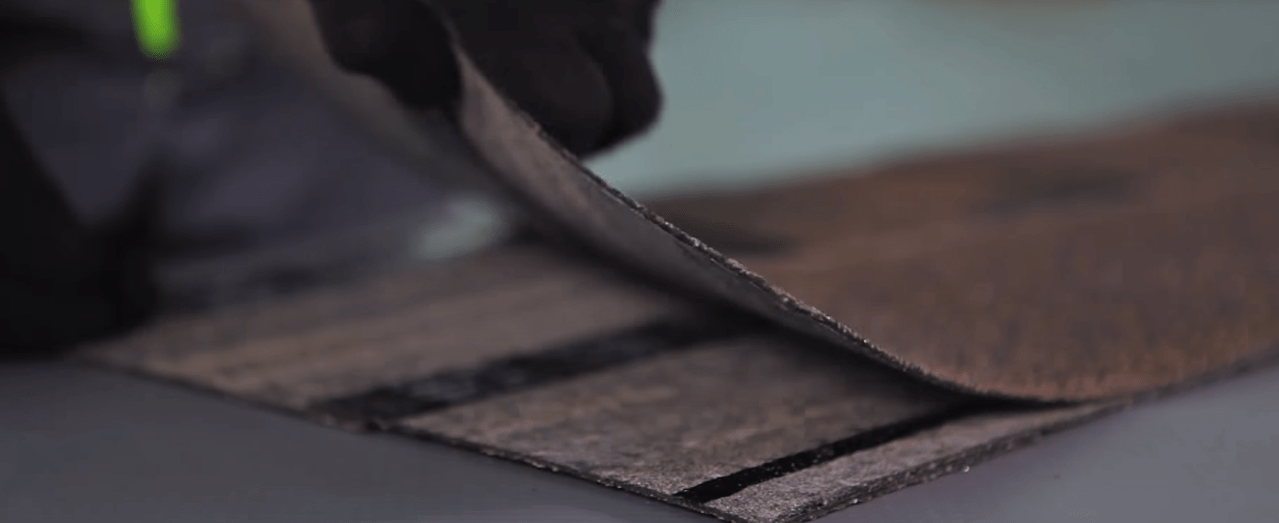
On a note! If you have not additionally purchased bituminous shingles for the starter row, simply take a sharp mounting knife, a strip of ordinary shingles, lay it on a plank of a suitable size and cut the petals (teeth, triangles, etc., depending on the shape of the shingle cutting). Bituminous shingles with a “dragon tooth” shape can be left uncut.
Flexible tiles can be mounted in all weather conditions, but if the outdoor temperature is below zero, then it is desirable to apply roofing material in small batches to the roof from a warm room.
Important! Don't forget to remove the shingles from cardboard boxes and mix with each other. So the roof covering will be more uniform in shade. You need to mix at least 5 packages at the same time.
The second row is started by moving the shingle of the second row relative to the shingle of the first row by half a petal horizontally and stepping back 2 cm from the bottom edge of the starting row.

The edge of the shingle, which will be laid on the wind bar, is cut at an angle of 45 degrees. The wind bar is smeared with mastic before laying the tiles.

The “dragon tooth” shingles are displaced by 15 cm. That is, the fastening of the lower row must be blocked by the petals of the overlying row.
If the shingle has a protective film on the back, it is removed by pulling in the direction from the top edge of the shingle to the bottom.

Some collections of tiles have protective film not provided, shingles are simply folded into packages wrong side to each other. If the strips are difficult to unstick, they can be slightly warmed up with a building hair dryer and gently bent in different directions.
Nails for fastening tiles are galvanized with wide caps, the length of the hardware is 30-45 mm, the thickness is 3 mm. Hardware is hammered in a strictly defined order, which is recommended by the manufacturer, depending on the shape of the shingles and the angle of the roof. The greater the angle of inclination of the roof, the more nails are used to fix the coating.

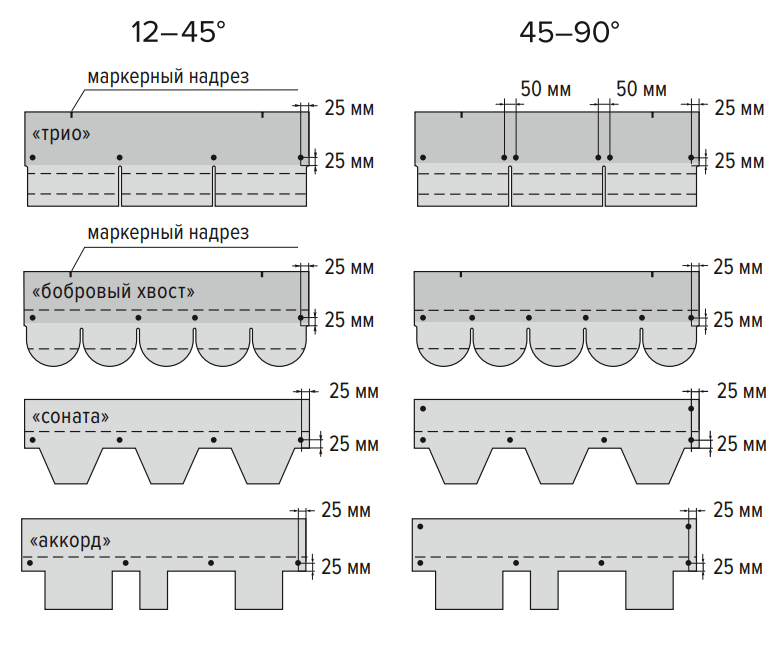
Schemes of the location of hardware depending on the angle of the slope

It is important to drive the nails perpendicular to the shingle so that the head is flush with the roofing material, not too deep into it, but not above the surface of the shingle.

The nails of the overlying row must simultaneously fix the underlying shingles. This is necessary for the durability and reliability of the roofing.

Tiles are laid over the valley carpet by cutting the corners of the shingles and smearing the wrong side with bituminous mastic. It is recommended to drive nails into the shingles at a distance of 30 cm from the central axis of the valley.


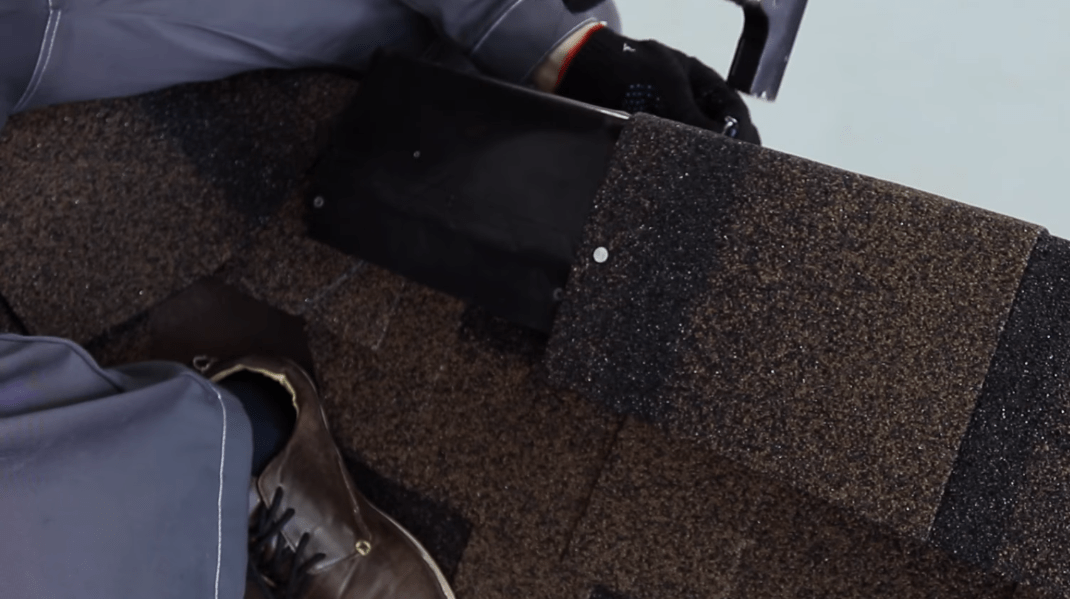
Stage 6. When the bituminous tiles are laid to the very ridge, they proceed to the design of the junction with the pipe.
Be sure to keep in mind that walking in shoes on the laid roofing in hot sunny weather, as well as negative temperature air is prohibited. Scaffolding and other devices are used to move along the roof.
The junction is made using a valley carpet.
- A pattern for the front side of the pipe is cut out of the strip (the tile should be covered with a carpet by 20 cm, and the material should go 30 cm onto the pipe). A thin layer of adhesive mastic is applied to the reverse side of the pattern with a spatula. The pattern is pressed tightly and smoothed so that there are no bubbles and irregularities.


- Next, the right and left patterns are cut out, smeared with mastic, glued in place, leading the edges under ordinary tiles.
- Lastly, the back of the pipe is closed, the canvas along the upper edge is fixed with metal strips.

If the pipe is more than 50 cm wide, it is recommended to make a slope behind its back wall to prevent rainwater from stagnating.

Instead of a valley carpet, the junction can be made using metal elements.
Video - Finishing the chimney
Stage 7. To decorate the ridge, ridge-cornice tiles are used.

Each shingle is cut into 3 pieces before installation. Ridge elements are laid from the bottom up (for hipped roofs) and fasten with four nails in the corners. The overlap of the elements is 3-5 cm, sufficient to make the heads of the clogged hardware invisible.

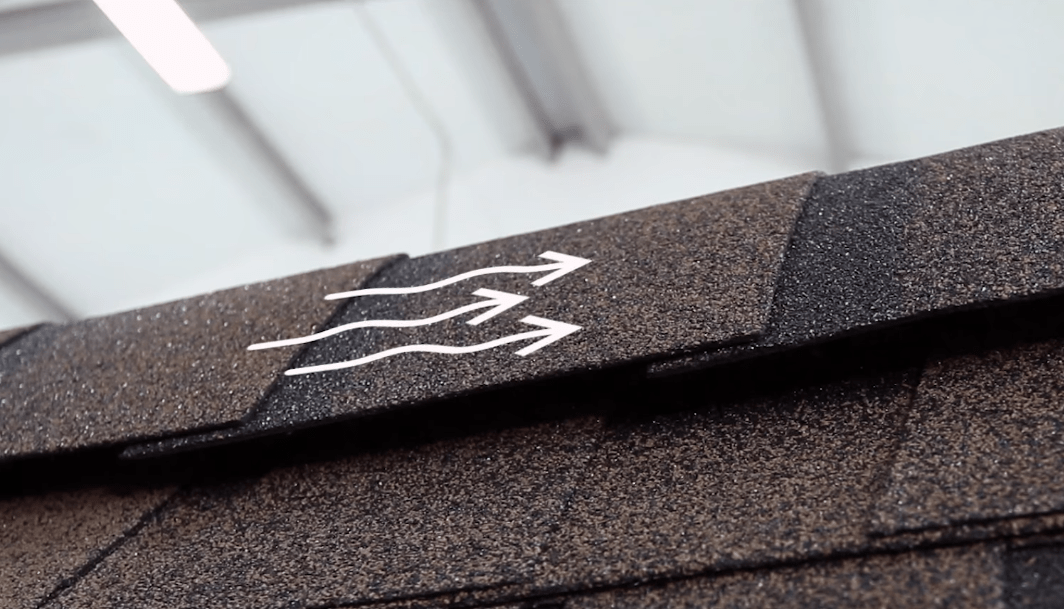
It is recommended to lay an aerator on a ridge with a slit 3-8 cm wide and located horizontally.

This is a plastic element necessary to ensure ventilation of the under-roof space.
Each element is bent along the central axis, applied to the ridge of the roof and fixed with nails, which are driven through the factory holes of the element. The connection of adjacent elements is carried out similarly to the designer, by snapping the existing fasteners.

The laying of tiles on top of the aerator is carried out, taking into account the direction of the prevailing wind direction for the area.
They begin to fasten the ridge-cornice tiles from the side where the wind most often blows. Fixation of the roofing material is performed using roofing nails of increased length.

Video - Installation of a soft roof
Answers on questions
How to arrange the junction of the bath porch canopy to the facade?
If the roof adjoins the wall (this may include the adjoining of the bath roof to the wall of a residential building), regardless of its shape, it is necessary to waterproof the joint using a valley carpet.

Procedure:
- put the lining carpet on the wall by 5 cm, smear with fixing mastic from the wrong side, press firmly;
- if the adjoining roof is located at an angle, then in the lower part, fix a plastic wall-turning flashing with self-tapping screws. If the connection is horizontal, the tide is not installed;
- lay the valley carpet in such a way that it goes 30 cm onto the wall, and 20 cm onto the lining carpet;
- smear the valley carpet on the reverse side with mastic, glue and level so that there are no bubbles or folds;
- fix the upper edge of the valley carpet with a metal rail with holes into which screws are screwed;
- lay flexible shingles, smearing the edges of the shingles with fixing mastic (at least 10 cm from the edge).
Prices for valley carpets
valley carpet
How to move along the slope of the roof during the installation of the coating?
For safe and convenient operation scaffold brackets are installed at a height. The brackets have holes through which nails are driven in for fixing. A board is laid on top of the bracket, which is fixed with self-tapping screws. The length of the board is chosen so that the free ends extend beyond the brackets by at least 150 mm and not more than 300 mm. The cross section of boards for working on the roof is 200 x 40 mm.
The upper part of the bracket is installed under the petals of bituminous tiles. For fastening, it is recommended to use nails 10 cm long and 5 mm thick, 3 nails for each element. The nails must be driven through the battens into the rafters.

One bracket can withstand 140 kg. The distance between the brackets should be no more than one and a half meters (only one roofer can be on these one and a half meters).


To remove the brackets, you simply need to bend the tabs of the shingles and pull out the nails, then put the shingles back in place and fix them again. Brackets must be lowered from the roof carefully, without dropping them down.
Important! Walking on wet, icy boards is prohibited. Working on a roof in extreme heat or cold is strongly discouraged.
How to install a roof penetration?
Roof penetrations are installed to pass ventilation pipes and antennas through the roof.
General installation principle:
- on roofing make markup of the installation site of the element;
- shingles are cut according to the markup, the cut out part is removed;
- in the crate, a hole is cut to fit the size of the passage element;
- if necessary, the hole is closed with a fine mesh;
- the penetration contour is lubricated with fixing mastic and pressed to the installation site;
- screws are screwed into the holes of the element contour;
- install the upper penetration element.

There are also penetrations that are mounted with a slight difference - the edge of the passage element is closed with tile petals, smeared with bitumen from the wrong side.
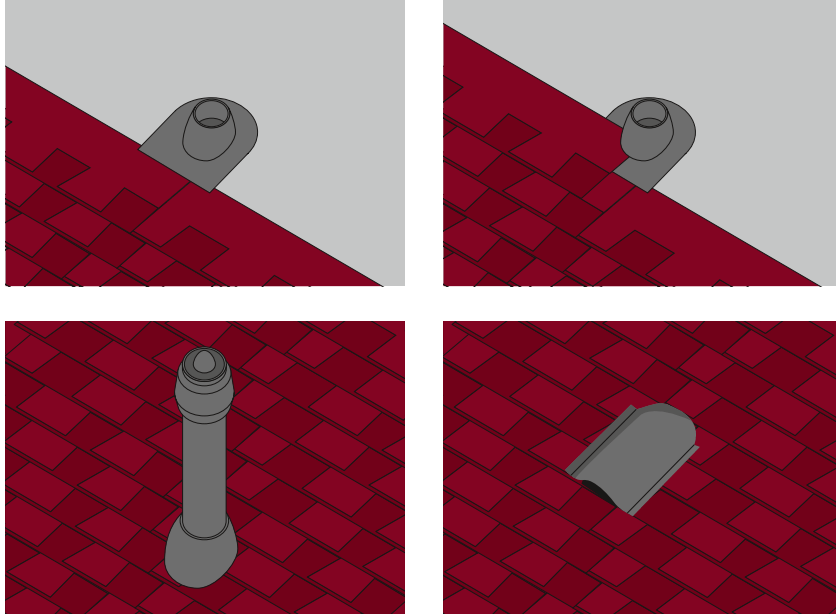

Installed penetration option ventilation pipe. The base is covered with shingles
What snow retainers to install on a soft roof?
To prevent uncontrolled snowfall from a soft roof, the simplest snow stops are installed in the form of corners on a long leg. Snow guards are metal and plastic, it is recommended to opt for the former because of their greater durability.
The installation of snow stops is carried out simultaneously with the laying of shingles. The hooks are fastened with self-tapping screws to the crate, treating the attachment point with mastic. From above, the leg of the snow retainer is closed with bituminous tile petals.

The distance between the corners is approximately 60 cm. Minimal amount rows of snow stops - 3. On steep roofs, it is desirable to increase the number of rows or even fasten corners over the entire area of \u200b\u200bthe slope.

How to take care of your roof
Care instructions are very simple:
- it is necessary to periodically visually inspect the coating;
- snow removal from the roof is carried out with a wooden shovel. Moreover, not all the snow needs to be removed, a layer about 10 cm thick should remain on the roof;
- it is necessary to clean the gutters and pipes in time, eliminate blockages;
- if moss or lichen began to grow on the roof, it is removed, and an antiseptic with an algicidal composition is applied to the coating.


Manufacturers of soft tiles usually provide a guarantee of at least 10 years for the coating. The coating is ideal for both hot southern regions and cold northern ones. The coating is environmentally friendly, does not require maintenance, ideal for any facade of the bath. Soft roof - perfect solution for baths and saunas!


