You can make wooden windows yourself. The main thing is to maintain the tightness and geometry of the structure. It is believed that it is impossible to achieve the same quality as windows made on machines, but this is not so.
If you make windows yourself, it will cost much less than ordering a ready-made double-glazed window. This is especially true when you need to replace an old window that has become unusable in your dacha. Soundproofing and heat-saving properties wooden windows lower than plastic ones, but they are environmentally friendly. The window frame can be made in two versions:
Before making a wooden window you need to choose a material. The main attention is paid to this stage in the manufacture of windows, because the quality of the product depends on it. Oak windows are expensive, but they are considered the most durable. Oak is quite difficult to process, but it is beautiful in finished product. In addition to oak, the following are also used for making windows:
Separately, we can highlight windows made of larch; they look beautiful and last a long time. Using this breed, you can be sure that the windows will have:
Larch secretes special substances - phytoncins, which kill pathogenic microbes. It also contains antiseptic substances that fight the appearance of fungus. Larch is the best option for windows in rooms with high humidity. You can use not solid boards, but, for example, laminated veneer lumber. This material is practically not subject to shrinkage. This means that after installation the windows will not move anywhere. Making wooden windows with your own hands involves the use of special tools. There are not so many of them:
If necessary, these tools can be replaced:
But since the main thing in making frames is a high-quality and precise fit, it is better to purchase a good tool. After everything necessary tools will be ready to make a wooden window with your own hands, you need to take measurements and make good drawings. Having a drawing, it is very easy to calculate how much material will be needed. And then proceed directly to making the box.
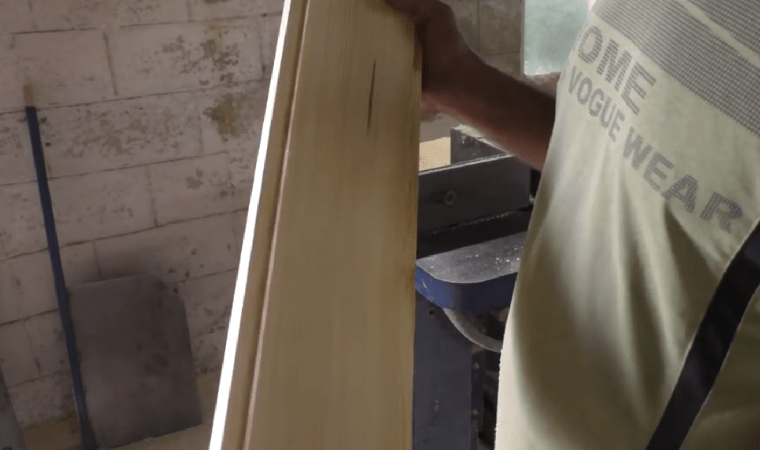
Making a wooden boxPine is usually used to make a wooden box - it is one of the most affordable and inexpensive materials. An alternative to pine is oak, but it is too expensive, and people usually make their own windows from cheaper materials. The board for the window frame needs to be thoroughly dried and checked to ensure there are no knots, cracks or other deformations on it. It should also be taken into account that the box fixed in doorway, the main load will go on. The board should be 150x50 mm in size. To make a wooden box you need:
The peculiarity of this type of fastening of the window frame is that the board is mounted without taking into account its mobility due to temperature changes.
Making a window frameFor the manufacture of window frame you need to take a beam, the dimensions of which depend on the design of the window. The standard is 60x40 mm. The shape of the profile is determined by the number of glasses, thickness, and size of beads. The single-glass profile has two rectangular grooves: one for glass, and the second for installation in a box. If the profile is double-glazed, then it has another groove for the second glass. The profile shape is made using a milling cutter or electric planer. The glass should be 4 mm thick, and the glazing bead should be 10 cm thick. To assemble a frame from prepared boards, you need to cut them strictly to size and diagonally along the edges, at an angle of 45º. Using self-tapping screws, the profile is given additional immobility, but the caps must be twisted so that they sink into the wood.
GlazingTo ensure that the glass fits exactly and the cold does not pass through it, you need to correctly calculate its dimensions. Measurements must be taken to the nearest millimeter. Glass cutting is carried out with a diamond self-tapping screw, the edges should be polished with fine-grained sandpaper. When working with glass, remember the following safety precautions:
Preparation and insertion of glass occurs as follows:
For final installation, the window must be inserted into window unit and fix them in the grooves using self-tapping screws; they should enter the wall through the frame. You can perform this procedure with a mounting gun; it will shoot the metal dowels into the wall. The cracks need to be filled with polyurethane foam, and after it dries, the wall must be plastered. Finish the work by installing the ebb and window sill.
Wooden window repairDespite the fact that today everything more people installs in their homes plastic windows, wooden structures there is still a lot left. And over time they require repairs:
You can watch the video for more details on how to make a wooden window. |


Wooden windows have always been popular due to such positive properties of wood as: high heat-saving characteristics, environmental friendliness and durability.
One of the advantages is also that making wooden windows with your own hands is a completely doable task even for a non-professional.
Of course, now they use more, which are cheaper and also have their undeniable advantages, but still, wooden windows are a classic and they will always be popular.
Material for wooden windows
The most popular material for making a wooden window frame in our latitudes is pine. It is characterized by accessibility, low price and practicality. In terms of material characteristics, pine is superior to oak, but it is more expensive and therefore, for the first time, it is better to choose pine windows.

Process of creation
The basic requirements for the board are as follows. Firstly, it must be well dried, and secondly, it must not have knots or deformations. These conditions are important, since the box will experience the main loads, so its strength should not be in doubt.
Box made of laminated veneer lumber
The technology for making wooden windows with your own hands involves the use of laminated veneer lumber to make the frame. In this case, the box has the most robust construction. Glued laminated timber consists of combining individual boards into packages and gluing them along a plane. The boards in our case will be made of pine.
The size of the board is 15*5 cm. They are connected to each other by gluing. Then four holes are drilled and wooden pins are inserted into them. This connection will ensure the rigidity of the structure. The box is installed motionlessly in the opening, using self-tapping screws and dowels, and then the gaps between the opening and the box are filled with polyurethane foam.
Tool
We need to briefly dwell on the tools that will be needed to make a window.
- Electric planer needed for planing boards.
- Cutter for cutting boards.
- Rulers, corner, tape measure and some other measuring tools.
- Glue.
- Glazing beads, surface planer.
- Sealant.
- Protective equipment - eye protection glasses and regular work gloves.
If the window will be made for a summer house in which you do not live in the autumn-winter period, it will be enough to limit yourself to a thin double-glazed window.

Window frames
Helpful information:
pay attention to inexpensive windows made of “Krasnaya Gorka” wood: frame made of two-layer laminated timber (pine) 57x60 mm, single-chamber double-glazed window.
Window frame
If you decide to manufacture wooden windows with double-glazed windows, then you need to start by designing the window frame. The minimum beam that you will need to make the frame should measure 6*4 cm and will depend on the thickness of the window.
Profile for one window glass must have two rectangular folds, and a window with two glasses is one more. The production of the frame begins with careful processing of the timber. Then, using a surface planer, we make all the markings, after which we begin the installation of folds (grooves).
Making folds for the frame
The folds are made so that when the frame is assembled, they are in the same plane. Otherwise, the glass will be poorly sealed. In general, the dimensions of the grooves depend on the thickness of the glass and the type of seal.
Note!
If putty is used as a seal, the folds have a smaller width than when using glazing beads.
It must be remembered that strongly narrowed folds will allow the wind to pass through. The thickness of the grooves is also influenced by the width of the strapping beam.

Final frame assembly
The window frame is assembled in such a way that the tenons fit tightly into the grooves. For a tighter connection, a tenon must be installed. To do this, you need to first drill a hole along the diameter of the spike and lubricate it with glue.
In addition, at the end of the frame boards, to improve the connection, you can use a dowel. Her appearance will resemble a double dovetail. To do this, a hole in the form of a trapezoid is made at each of the connected ends, into which a key is then inserted. Before completing the assembly, the joints are smeared with glue, and after assembly, the remaining glue must be cleaned off with a knife. When manufacturing a window with a sash, installation of fittings will be added to the above work.
Glass preparation
To prevent the window from blowing out, you need to carefully adjust the glass to the dimensions of the frame. To do this, you need to cut it with a diamond glass cutter. Before work, for safety, you need to wear glasses to prevent glass chips from getting into your eyes and gloves to avoid cutting your hands. Glass cutting is carried out with a ruler, which must exceed the length of the glass. After we have drawn a line with a glass cutter, we move the glass to the edge of the table and, using pressure, break off the excess part. The glass should break off according to the cutting done.

Inserting glass
Anyone who has an idea of how to make wooden windows should know how to correctly insert a window into a frame. First, let's try on the cut glass by inserting it into the frame. If the glass is cut correctly, then we take it out and begin to prepare the folds.
To do this, you need to apply sealant to them and insert the glass into the frame. We secure the glass using the top bead and secure it with a thin nail. When using a larger bead, you can use self-tapping screws to attach it to the frame.
When making windows that consist of two halves, another beam with the same grooves is installed in the center. One half of the window is made with a thinner frame and is attached to the main one using hinges. In addition, a handle is attached to such a frame, and a groove is cut out for the closing mechanism.

Double wooden window
Manufacturing of vents
Vents in wooden windows are an integral part and come in several types: mortise, split and sliding. The latter represent a rather complex mechanism and are difficult to implement on your own. The first option is made together with window frame and here maximum accuracy is needed.
The most the best option The vents in wooden windows are split, which are made separately from the window, and then, when finished, are inserted into the frame.
Note!
When making a split window, you do not need to use any special fastenings and special skills in performance.
The technology for manufacturing such windows differs slightly from the procedure for installing the window itself, only for smaller sizes. The difference lies in the installation of the opening mechanism, which usually consists of hinges, and the attachment of additional fittings, in the form of a handle with a closing device.
Final work
After completing all the work, the manufacturing technology involves lubricating the window surfaces with an antiseptic. After this, the window is placed in the opening and secured in the grooves. Then we fasten with self-tapping screws that pass through the box and fasten them to the concrete. Holes in concrete are most often made using mounting gun.
After we have secured the window, we fill the cracks with sealant. You need to wait for it to dry and then plaster the sealing areas. The work is completed by installing the ebb and window sill. Thus, you can see that making a wooden window with your own hands is not an impossible task, and this distinguishes them favorably from metal-plastic windows.
Making wooden windows with your own hands video:
In contact with
See inaccuracies, incomplete or incorrect information? Do you know how to make an article better?
Would you like to suggest photos on the topic for publication?
Please help us make the site better! Leave a message and your contacts in the comments - we will contact you and together we will make the publication better!
Modern windows are mostly double-glazed windows made up of prefabricated panels. These windows are easy to use, but also have some disadvantages. So, for example, if one of the glasses is accidentally broken, replacing it will not be easy, especially if it is of a non-standard size. In addition, companies that produce double-glazed windows often close, and many models, when it comes time to replace the glass, are discontinued.
For those who are interested in how to make wooden windows yourself, photos and detailed instructions, posted on this page, will be very useful. The photo shown below shows a real home-made double-glazed window, the manufacture of which does not require any special skills or significant financial investments. If the glass in such a double-glazed unit breaks, a replacement can be easily found in any hardware store, and if condensation collects between the glasses, then it will be enough to change the sealant and replenish the desiccant.
Double-glazed windows that have an air gap not filled with any noble gas suffer significant convective losses due to the circulation of air flows between the panes. Noble gases have a large mass, which significantly slows down diffusion. But as the glass unit ages, gas tends to be lost, and in a bag filled with air, you can add a desiccant and change the sealant without special tools.
The most common material from which wooden window frames are made is pine, which today is considered the most practical, inexpensive and accessible wood. A reasonable substitute for pine wood is oak wood, but for craftsmen making wooden windows for the first time in their lives, it is still better to choose less expensive tree species. Wooden beams for wooden windows must be dried according to all the rules, and in addition, they must not have any branches, cracks or other damage. It is important to remember that the boxes, when they are fixed in the window opening, take on the main mechanical load. If laminated timber is used for the manufacture of all elements, then its strength will be sufficient to withstand deforming loads.
Tools for work that will be needed
If, for example, a 150x50 mm board is used to make a box, then a 15 mm deep groove in the shape of the letter G will need to be made in the blanks for it. For the block, you will need to make four blanks and then connect them using glue (preferably carpentry glue) , and additionally drill holes in the right places and insert a three-centimeter wooden rod, which will provide the connection at a right angle with immobility and the necessary rigidity.
The finished box is fixedly fixed in the prepared window opening. To do this, you should drill holes in the wall, drive in dowels and secure the finished structure with self-tapping screws. If between ready-made block and there will be gaps in the walls, they need to be sealed construction foam. It should be remembered that when installing the box, the mobility that it can acquire due to temperature changes is not taken into account.
Making a frame from wood.
The main feature of the project presented here is the window frame, which pushes the glass apart and provides free space for the seal and wooden beads that hold the glass.
For those who are planning to make their own windows from wood, the drawings presented on this page show how to make a frame for ten-millimeter glazing beads that will securely hold four-millimeter glass. The gap between the glasses is about 1 cm, and no metal parts are used to push them apart. It should be borne in mind that a seal for wooden windows, the width of which is equal to the width of the glass, will not be the best option for such a design: it is better if the cross-section of the seal is equal to the cross-section of the groove.

Making a window box
The best sealant will be a material that does not suffer from exposure sun rays. Often a silicone sealant is used for this, but it should be noted that it is not the best for such purposes, since it is difficult to remove from the surface of the glass. You can make a frame from pine wood, or you can use wood white oak or other preparations. Before cutting the material for the window frame, you should carefully measure the perimeter of the window opening and increase the result by another 10%.
Assembly of frame parts.
To assemble the binding shown here, you will need to saw the material at an angle. Joints consisting of grooves and tenons hold the structure more tightly, but continuous grooves are better suited for sealing. To connect frame parts together, it is best to use screws with a flat head and large threads. Screws with flat heads are best recessed into special holes.

Assembling a window frame with your own hands
Glass cutting.
The process of cutting glass is not inherently complicated, but it is important to take into account some of its nuances. First of all, you should take care of observing safety precautions: reliably protect your eyes and hands from possible surprises. The glass must be durable and completely intact. Before cutting, the glass is thoroughly cleaned and then lubricated with a small amount of fat.
Experienced craftsmen It is recommended to always cut glass in one cut. When you press on the glass, a sound is heard, after which the glass is moved to the very edge work surface and click on it. To make such a double-glazed window as discussed here, you need to take measurements accurate to the millimeter.
After cutting, the edges of the glass are processed for polishing with sandpaper.
Assembling the window structure.
First, the glass for fitting is inserted into the frame, and then removed and sealant is placed in its place. The glass is placed back into the frame and wooden window beads are installed, and then the window is painted and equipped with handles.
When attaching glazing beads, the screws must be tightened slowly, starting from their middle. This is necessary so that too much pressure is not applied to the fragile corners of the frame.
Based on the fact that the window should be easy to repair if necessary, you should not paint over the heads of used screws, but many people prefer that they are not visible. The ideal way to hide screws has not yet been found, so everyone chooses what suits them best.

Installing a window frame in a timber house
A desiccant must be placed between the glass panes. To do this, a hole is added at the top of the window sash, which is later caulked with a wooden dowel. If you have a compressor at hand, you can fill the gap between the glasses with dry air. The pins are painted before installing the window and repeat this procedure after it.
The window discussed here does not fog up even after a year, and if you need to replace the glass, it will not cause too much difficulty. Such windows can be installed even in rooms with high humidity (that is, in the bathroom or kitchen).
Additional information.
Screw holes can be covered with decorative handles. If you use standard screws, you can also scrape paint out of their grooves.
For reliable sealing, experienced craftsmen insert glass, having first applied a sealant to the joints between it and the structure. To make the window more resistant to weather conditions, you can apply window putty over it after the sealant has dried. It is important to know that some modern window putties can be difficult to remove from glass, so it is much easier to work with traditional window putties.
It is best to paint windows a few days after the putty is applied.

Wooden window options
How to make laminated plastic windows
Specialized technologies are used to produce laminated window blocks. A special film is applied to the plastic profile, which is attached to the surface with glue. The film consists of several layers with embossing on its surface, and to apply it to plastic surface, you must use laminating equipment.
Lamination is necessary not only to make windows look more aesthetically pleasing: in this way they become more resistant to all kinds of atmospheric phenomena, durable and remain extremely easy to maintain. There is a film whose surface resembles natural wood. On such decorative film Dust and dirt are practically invisible, so plastic windows laminated to look like wood, photos of which can be seen below, are incredibly practical.
In addition, film-coated windows are resistant to temperature fluctuations and weather conditions. The structure covered with PVC film is not sensitive to precipitation, and the film itself retains its color even under prolonged exposure to sunlight.
Another undeniable advantage of laminating with PVC film is the wide range of its colors and textures, among which there are suitable option for any occasion.
Wooden window shutters
After installing the shutters, the room becomes additionally protected from cold and atmospheric conditions. Wooden shutters for windows, photos of which can be seen at the end of the page, are made external or internal, and in structure - single- or double-sided, panel or panel. Anyone can make such shutters themselves.

Window shutter design option
What is needed to make shutters
To make window shutters from wood, you will need boards 100-200 mm wide and more than 20 mm thick. Veneered boards made from hardwood trees are considered the most suitable, but smooth fugue is also quite suitable.
In addition, you will need to take care of the availability of tools for woodworking: a hacksaw, drill, screwdriver, plane, chisel, etc. You will also need measuring tools: a level, a tape measure and a carpenter's corner. For the final stage of work, you need to purchase drying oil, brushes and paint, as well as an antiseptic.

Assembling shutters for windows
Making simple shutters

How to make ordinary shutters from boards
- Measure the existing opening along the external and inside, then draw up a diagram for cutting the boards and cut them.
- To prepare boards for end connection are rallying them. Smooth jointed boards can be installed with glue, but in addition you need to strengthen it with a batten so that it covers the resulting gaps.
- It is easier to join the shutter fabric together using the locking method: select a groove in the end part, and provide a tenon on the opposite side. Experienced craftsmen recommend buying ready-made tongue and groove boards, which are used for flooring.
- After rallying, the canvas must be additionally strengthened with transverse jibs and overhead ties.
- Hidden bonding of the shields is carried out using threaded rods. To do this, use a thin drill to drill holes in the end sides of the boards, and then drill them out until the diameter of the stud is reached. After this, the boards are strung on studs and tightened with bolts, and their ends are generously coated with wood glue so that there are no gaps left.
Manufacturing of panel shutters
- A panel is a thin board inserted into a frame frame. Such shutters not only look beautiful, but are also very durable. IN construction stores ready-made panels and profiled beams with optional grooves are sold, but you can order necessary details and directly from the carpenters.
- The panels can be made smooth or decorated at your discretion. They may have layouts made of tongue-and-groove timber or selected moldings. Panels can also be floating, figurine and can have a frame decorated with carvings. If desired, you can also make wooden frames on the windows. Carved templates, photos of which can be seen a little lower, allow you to decorate a window very beautifully.
- The tightening frame is made of strapping bars, which should be 5 mm thicker than the panels. The bars are planed and polished, and then connected using tenons with eyes.
- When the frame is assembled, the panels are coated with glue and inserted into it. The sashes should be fixed on the plane until completely dry.
- On the sides of the shutters and platbands, it is necessary to hollow out sockets for mounting hinges with a chisel. After inserting the locking elements, you can attach the shutters to the slopes. The sashes are leveled and then secured in the hinge sockets using screws.
- The final stage of work is impregnation of wooden structures with drying oil or another agent that prevents rotting, and then covering them with varnish or paint.
Options for wooden windows Installing a window frame in a house made of timber
Carpentry work for the manufacture of windows is considered to be one of the most difficult, requiring considerable skill and understanding window design. Do not delude yourself and think that a wooden window can be made on your knees with a couple of simple carpentry tools. In the process of making a window out of wood with your own hands, a carpenter has to spend a lot of time and effort preparing the material and making additional hanging elements, from glazing beads to awnings and fittings. Therefore, wooden windows simply cannot be cheap and at the same time high quality if they were made by hand.
How to make a wooden window
In addition, you will need equipment for cutting grooves, cutting chamfers and internal transitions, otherwise it will simply not be possible to make a high-quality wooden window. To build a window you will need:
- A circular saw;
- Wood milling machine and manual;
- Grooving and slotting machine;
- Hand drill, tape measure, set of carpentry clamps.
The window can be completely blind, for example, if you plan to glaze in a barn, garage or utility room. For residential premises, as a rule, a ventilation system is used using a window and an opening flap. General form The window device is shown in the photo. If you have the tools, equipment and prepared material, you can make the main part of the window frame in a day, if you have a clear idea of how to make a wooden window with your own hands and drawings for making the main parts.
For your information! In order to make a window with an opening sash, you must first prepare a set of awnings and two window locks.
It is clear that before making a window out of wood, it is necessary to take the dimensions of the window opening and the box into which the window block will be inserted. In this case, a window with an opening sash will be made, measuring 130x110 cm.

What is the best material to make a window from?
In order to make a wooden window quickly and efficiently, first of all you need to select quality material. Forget about oak, larch, Karelian pine, all kinds of options for making a window frame from laminated veneer lumber. In order to make a wooden window soundly the first time, you need to buy a well-dried pine blank without knots, without fiber defects and traces of damage to the wood by microflora or bark beetles.
To make a wooden window frame we will need:
- Three blanks, 115 cm long and 40x140 mm in cross-section, for vertical window posts;
- Two blanks 140 cm and cross section 40x140 mm for horizontal crossbars;
- Two blanks of 50 cm and two blanks of 110 cm, with a cross-section of 40x50 mm, for the manufacture of an opening sash.
For your information! All workpieces must have ideal geometry, without “propeller” or cracks.
If wooden blanks long time stored outside, before starting work, allow the material to sit and gain its original humidity. Wooden planks and beams should not be dried in the sun, in drafts or in a warm, dry room. It is clear that processing wooden blanks protective compounds you need to do it in advance, then put the material in line and dry it thoroughly. If possible, for the first experiment it is better to make a supply of blanks, since often due to errors it is necessary to redo or restore connections or entire elements of the wooden window frame.

The procedure for making a wooden window
If you have at your disposal necessary equipment, then cutting the material for a wooden frame on a window is quite easy to do in 2-3 hours; you will need a circular saw and a groove cutting machine.
The operating procedure is as follows:
- Quarters are stretched on vertical and horizontal blanks;
- Wooden beams are end-faced and cut to size for assembly;
- At the ends of the workpieces, an undercut is made gusset into the frame;
- A recess is cut out on the central cross member and the left pillar to accommodate the opening sash.
All that remains is to assemble the wooden window frame, make a window, install awnings and fittings. In order to install the awnings and make locks, you will need to spend at least 4 hours. About the same amount it took to make the main part of the frame.

We make a wooden window frame
The first operation of carpenters involved in the manufacture of wooden windows is called cutting quarters. On clear language this means making rectangular cuts at the ends of the blanks, which, after assembling the frame, will be used to install glass. The dimensions of the groove are 10x12 mm.
On the side vertical racks sampling must be done at the corners of the wide side of the beam facing inward of the frame. On the central vertical post, quarters are selected along all four edges of the beam.
This can be done using a circular saw, a hand router, or any end mill. If the wood is very dry, then before cutting the corner grooves, it is necessary to remove a small chamfer from the edges. This will avoid chipping.
After milling the quarters, it is necessary to trim the vertical posts and horizontal crossbars to size. That is, the vertical posts are cut to a landing size of 104 cm. The design height of the window is 110 cm. The thickness of the horizontal crossbars of a wooden window is 40 mm. In order to ensure that the vertical post is inserted into the upper corner of the horizontal beam, you need to make a 10 mm cut in it, the rest of the body is 30 mm. The same selection must be made for the lower corner and horizontal beam.
The vertical post must be installed in the upper and lower recesses on the crossbars. This means that the size of the rack is 1100-2x30 = 1040 mm or 104 cm. In a similar way, you need to trim the second side and central rack of the wooden window.

Let's make side cuts in the horizontal beams of the window for the sidewalls.

Everything is more or less clear with the side posts; all that remains is to choose a place for the grooves in the upper and lower crossbars for installing the central post, onto which the opening sash of the wooden window will be locked.
For the opening sash, we selected four wooden blocks, two 110 cm and two 50 cm. At the ends of the upper and lower horizontal beams, we already made 40 mm cuts. We set aside the width of the future sash from the edge - 45 cm.

We will make two cuts on each cross beam hand hacksaw to a depth of 10 mm and cut a groove 40 mm wide.

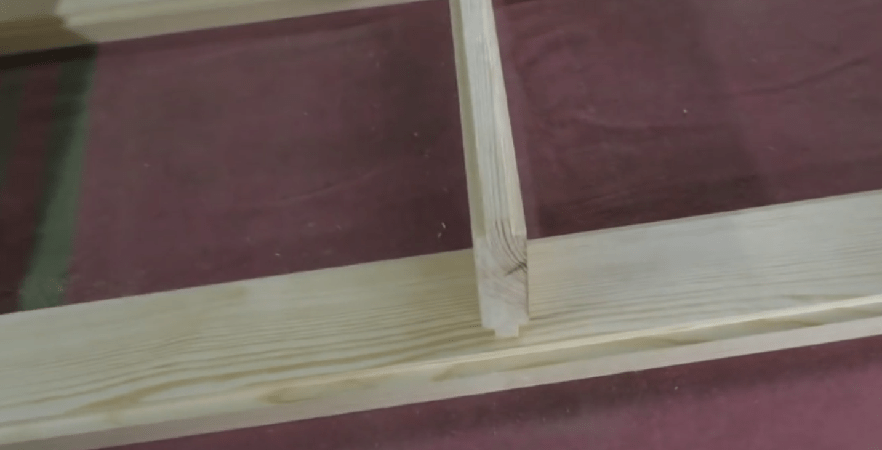
We assemble a wooden window frame using self-tapping screws.

We make an opening sash and install it on the frame
Unlike the frame, the wooden frame of the sash will be assembled using tongue-and-groove joints. This connection option will ensure high rigidity of the frames and guarantee the absence of deformation and sagging of the sash. If you try to make it with self-tapping screws or even with corners, the sash will still deform and break the glass.
First you need to cut out the grooves in the horizontal sections with a milling cutter. Best suited for these purposes end mill or a groove cutting machine, but if they are not available, the grooves can be made manually with an ordinary chisel and mallet.

Tenons 40 mm long are cut out on the vertical posts of the sash. Before making the tenons, it is necessary to make a selection of quarters under the glass, as was done earlier for a large box.

We assemble the frame on tenons, having previously coated the joints with wood glue. After an hour and a half, the assembled sash frame is doweled and polished along the plane of contact of the sash with the main one wooden frame window.

The size of the sash frame is 50x1100 mm. In order for the sash to close into the window opening, it is necessary to cut a sample around the perimeter of the frame to a size of 1040 mm.

The frame of the wooden window sash is almost ready, now it easily fits into the main frame. All that remains is to make the awnings and install the locks. Small window hinges can be used as canopies, but their installation is quite time-consuming and requires careful cutting of secret grooves for the canopies. In addition, the strength of a conventional canopy for a heavy sash is not enough, and making three hinges will be unsightly. Therefore, barrels with pin fastenings are used as canopies.

You can install the barrel in a couple of minutes, but only if you have the appropriate device for drilling holes in the frame and sash. The problem of installing a barrel is that how to perform perfectly accurate drilling in a wooden beam of a frame at an angle of 45 o, the drill diameter is 6.8 mm, the thread on the barrel is M8. There is no point in trying to do this by eye; it is better to spend an extra hour but achieve a high-quality result.
In order to make the device, you will need an oak block with a cross section of 40x40 mm. One side wooden block cut along the entire length. The block is displayed on drilling machine and drills exactly diagonally.

WITH reverse side a quarter of 6x12 mm is selected along the edge of the bar. This is necessary so that the device fits tightly and rigidly on the edge of the sash and frame of the wooden window.
Before drilling the sash and frame, you need to make markings for installing the barrel. To do this, we put a mark on the frame for installing a canopy, step back up the rack by 13 mm and transfer it to the side of the sash along which the drilling for the mating part of the barrel will be done.

After drilling the holes, all that remains is to screw the screws of the barrel into the frame and into the sash, after which you can hang the sash on the installed canopies.


We cut in the handles and do the finishing
All that remains is to make the handles and execute finishing wooden window. For convenience, it is best to use balcony handles with hidden locks made of domestic steel; aluminum ones will not work; they last for 2-3 months, no more.
We fix the sash to the frame using clamps. On the front part we mark points for the output of the lock handles. From the points we transfer the line to the end plane of the sash. To install the lock, you need to mill the grooves. It will be most convenient to cut the groove using hand router with an 8 mm drill. The depth of milling the groove is 28 millimeters, you can’t drill less - the lock won’t fit, more - too, it can break through wooden beam through.

At the second stage, you need to mill out a shelf to hide the mounting flange of the lock. Next, you need to drill holes for installing handles and secure the “ears” of the handles to the wooden plane of the sash.

To install the mating part of the lock, you need to obtain an entry point for the lock tongue on the frame. To do this, simply turn with a little force to make a dent on the surface of the central pillar. We cut a groove along this dent and install a metal lock plate.

Conclusion
Before assembling the window, it is necessary to thoroughly sand the entire surface of the frame and sash, especially the ends and places where the quarters are removed. After sanding we process wooden surface impregnation, varnishing and installing glass. After the varnish or oil-paraffin impregnation has dried, we sew up the glass with glazing beads and install locks and strips, and the wooden window is almost ready.