With the advent of drywall sheets on the construction market, designers have been able to create any complex shape, including arcuate walls. However, before making a semicircular plasterboard wall, you need to study in more detail the properties of this material and the sequence of work.
The process of creating a rounded corner using wireframe
Before you mount such an arcuate structure, you need to learn the basic rules for working with drywall:
- Rounded surfaces can only be created using wireframe steel profile, wooden bars in this case it is better not to use
- Gypsum board is not characterized by high strength, so it is better to bend according to a pre-made template
- To create a large bend, the material must be wetted; in this form, small radius bends can be created.
- The size of the sheet should match the height of the wall to be rounded, this will make the installation process a little easier.
So that in the process of creating a semicircular plasterboard partition there are no unforeseen situations, you should prepare the necessary material in advance:
- Plasterboard sheets
- Metal profile of several types
- Self-tapping screws and dowels
In addition, any construction or finishing process is carried out using a specific set of tools:
- Screwdriver or electric drill with a nozzle
- Scissors for cutting metal
- Plumb or building level
- Ruler and tape measure
- Rope or construction cord
- Marker or pencil
Work on creating a rounded corner from drywall is carried out in a certain sequence:
Data-lazy-type="image" data-src="https://remontcap.ru/wp-content/uploads/2017/09/stena-iz-gipcokartona3-250x166.jpg" alt="as make a semicircular plasterboard wall" width="250" height="166">!}
Jpg" alt=" how to make a semicircular drywall wall" width="670" height="225" srcset="" data-srcset="https://remontcap.ru/wp-content/uploads/2017/09/163..jpg 300w" sizes="(max-width: 670px) 100vw, 670px">!} 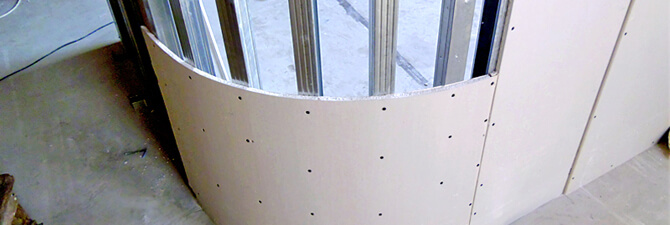
Fastening drywall to a pre-rounded partition
For the correct answer to the question of how to make a semicircular drywall partition, it should be understood that the quality of the process performed depends on proper preparation walls and plasterboard.
Before sticking drywall, the wall must first be rounded. If the wall is brick, then outer corner knock down with a perforator and align well. WITH concrete wall act in a similar way, but it should be noted that concrete is much stronger and reinforcing elements come across in it.
Jpg" alt=" how to make a semicircular drywall wall" width="700" height="700" srcset="" data-srcset="https://remontcap.ru/wp-content/uploads/2017/09/z2..jpg 150w, https://remontcap.ru/wp-content/uploads/2017/09/z2-300x300..jpg 200w" sizes="(max-width: 700px) 100vw, 700px">!} 
To prepare a drywall sheet, it must be bent. To do this, you need to make a template in accordance with the shape of the wall and choose one of the bending methods.
Dry bending
On one side of the drywall sheet, cardboard is cut, trying to draw the strips parallel to each other. The material is laid on the template, and the space formed during bending between the parts of the sheet is filled with putty. The edges of the sheet can be pressed with bars to keep the shape. The workpiece is left for 24-48 hours to dry. After this time, the material can be used for its intended purpose.
Jpg" alt=" how to make a semicircular drywall wall" width="500" height="415" srcset="" data-srcset="https://remontcap.ru/wp-content/uploads/2017/09/13e9e16fbce8992ec94da8c864de25e0..jpg 300w" sizes="(max-width: 500px) 100vw, 500px">!} 
wet bend
With this method, one side of the sheet is rolled with a needle roller so that water can get to the core of the material. Then the sheet is moistened with water and left for 15-20 minutes to soften the gypsum in the middle layer. The workpiece is placed on the template, the edges are fixed and left to dry completely. This takes approximately 24 hours.
The use of this method has a limitation: the minimum bending radius is 30 cm. Therefore, to create more round shapes, it is better to use the dry method.
Jpg" alt=" how to make a semicircular drywall wall" width="502" height="458" srcset="" data-srcset="https://remontcap.ru/wp-content/uploads/2017/09/fda7642e655f4682e99b0ab1e95f1dcb..jpg 300w" sizes="(max-width: 502px) 100vw, 502px">!} 
To stick folded sheet, the rounded drywall wall must be primed and dried. Then, with separate strokes, you need to apply mounting glue to the wall, attach the workpiece to it and gently press it.
In the process of pasting the wall, you need to make gaps between the floor and the material of about 1 cm. This will allow air to circulate freely, creating optimal conditions to dry the glue.
With the help of drywall, even simple House master can make a rounded wall with your own hands. This is possible with the observance of the installation technology, as well as with the correct application of the advice and recommendations of experienced craftsmen.

Our topic today is the technology of making a plasterboard wall. We have to find out what and how to make the frame of the future partition, how to properly sheathe it and prepare it for fine finish. Let's get started.
First, a few words about the materials from which plasterboard walls are built in apartments and private houses.
frame
This is done in two cases:
- under wallpaper. They are firmly glued to the GKL shell, and when you try to remove the coating during the next repair, you have every chance to tear the kraft paper from the gypsum base. A layer of putty will allow you to remove the wallpaper without damaging the wall;

- For leveling the surface at the level of the seams, in the event that they remain visible after puttying. If the factory edges of the PLUK (thinned with rounding) allow you to display reinforced seam on the same level with the surface of the sheet, then the rectangular edges of the sheets cut in place do not provide such an opportunity. A millimeter layer of putty will completely hide the seams.

A few subtleties of putty:
- When mixing putty, pour gypsum into a container of water, and do not pour water into a container with dry mix. The price of non-compliance with this requirement is insoluble lumps at the bottom, which will leave grooves when puttying;

- The manufacturer's instructions for the dosage of water and dry gypsum mixture must be strictly followed. Too liquid putty will constantly drain from the spatula, and you will not be able to apply too thick a thin layer on the wall;
- When sealing joints, close at a time no more than 1-2 kilograms of dry mix. Gypsum putty is suitable for work no more than 45-60 minutes and is produced rather slowly;
- Be sure to wash both the dishes and spatulas after working out the next portion of gypsum. Otherwise, the seized putty from the previous portion, again, will leave grooves in the finish;

- When applying the second layer of putty to the seams and when filling the entire surface of the plasterboard, use a wide spatula, applying narrow gypsum to it;

- If it is difficult for you to apply a uniform layer of millimeter thickness - putty the wall in two layers “on a peel”. The final coating thickness will be the same.
Prefinishing
Preparation for fine finishing consists of three stages:
- The wall is polished in bright oblique light. Lighting will let you see the slightest putty defects. For work, you can use a manual grater, vibration or disc grinder;

- The surface is then cleaned of dust. This can be done with a vacuum cleaner (preferably industrial, its filters will completely trap gypsum dust) or with an ordinary whisk;
- GCR is primed with penetrating soil using a wide brush or roller (see Do-it-yourself drywall primer).

Attention: wallpaper can be glued immediately after the primer has dried, but painting with water-dispersion paint must wait at least two weeks. If the gypsum hydration processes are not completed in the putty, the seams will stand out in a shade, regardless of the number of layers of paint.
Problems and Solutions
How to make the walls in the drywall hall absolutely impervious to sound?
Make the frame of the partition double (with a minimum distance between the rails and uprights) and sheathe it in two layers. This design will provide maximum sound insulation due to the acoustic decoupling of the two sides of the skin.

How to build sliding walls drywall (with sliding door)?
In the same way, but with an increased distance between the frames. In the role of a jumper, a beam is mounted above the opening, with a section of at least 100x50 mm: it will have to take the load from the weight of the doors.

By the way: a double frame with a gap is also used in cases where communications need to be laid in the wall large diameter(ventilation or sewer). Racks of frames for greater rigidity are interconnected by horizontal jumpers.

Is it possible to make a wall as rigid as possible without increasing its thickness?
Yes. Here are the most simple ways achieve this:
- Insert into the rack profiles along a bar with a section of 5x5 cm;
- Insert PS profiles into each other and mount them in pairs;

- Reduce the spacing between posts to 300 or 400 mm. The main thing is that the width of the GCR remains a multiple of this step.
How to install a door in a wall made of plasterboard?
This is done when mounting the frame:
- Make a gap in the bottom guide to its width;

- Expose one of the racks adjacent to the door and fix it;
- Gather door block and wedge the door leaf in the box to avoid rubbing jambs with it in the future;
- Apply a strip to the rack polyurethane foam and pull it with self-tapping screws to the door block set strictly vertically;
- On the opposite side, fasten in the same way and pull the second rack to the guides;
- Connect the racks with a horizontal jumper.

How to do possible installation on drywall partition hanging furniture?
Place wooden mortgages (timber or thick plywood) into the frame from the side of the shelves or cabinets.

Conclusion
We hope that our advice will help the reader in the repair and decoration of their homes. You can see more clearly how drywall partition walls are assembled in the video in this article. Good luck!
When arranging your home, it often becomes necessary to build new partitions and internal walls. It can be a full-scale redevelopment, and the desire to split an existing room into two parts or form rooms in a new building, which is made in a single space. For the construction of new internal partitions drywall and metal profiles are used. This material is so convenient and easy to use that it is possible to build drywall walls with your own hands without even resorting to anyone's help. However, despite the above statement, in the process of forming walls from plasterboard, there are many nuances that should be taken into account. Only in this way can a reliable and durable design be obtained as a result.
Work materials
First, let's decide what we need to build a wall of materials and what tools we have to work with.
To ensure the strength and correct configuration of the wall, the frame should be erected initially. It is performed from metal profile, which is specially designed for drywall and a range of accessories for its installation.
Basically, a profile of two main sizes is used:
- D - to form a plane on which drywall (smaller) will be fixed;
- W - to build a common wall frame (larger).
In addition, for each size there are profile options such as support (C) and guide (U). The guide variant is a simpler version of the U-shaped profile with smooth walls; the supporting profile is inserted into it with the butt end. The support profile, in addition to the U-shape, has a special ribbing made by pressing to acquire greater bending rigidity.
As a result:
- CD - size 60 * 27 mm, the main load-bearing element of the frame;
- UD - size 28 * 27 mm guide for fixing the CD profile;
- CW - size 50*50, 50*75, 50*100 mm rack profile for forming a wall frame;
- UW - size 50*40, 75*40, 100*40 mm guide for CW profile.
- In addition, there is the UA profile, which is a variant of the CW profile with a thicker wall and reinforced.

To build a simple partition with a width of 50, 75, 100 mm, only CW and UW profiles are used. For wider walls with utility lines, the CD and UD profiles are used, while two parallel guides are mounted on each side of the wall at the required distance.
To fix the profile in the frame, you need a straight hanger and a universal connector (crab). You can do without the latter. The elements will be twisted with flea screws with a “drill” tip and self-tapping screws for fastening drywall to metal with a countersunk head and a piercing tip (3.5X35 mm). In the course of describing the technology for erecting a drywall wall, it will become clear how many self-tapping screws of each type are needed. To fix the entire frame to the main walls, you will need plastic dowels with impact screws.
Drywall sheets for building a wall are selected with a thickness of 12.5 mm, always with a wide chamfer on the sides. If the wall is formed in the kitchen or in the bathroom, then a moisture-resistant GKL is selected. You can distinguish them by color, because the moisture-resistant sheet is green, the usual one is gray.
As a result, you will need to build a wall:
drywall, CD, UD, CW, UW profile, wooden beam or AU profile, self-tapping screws, dowels, sealing tape, mineral wool, metal corner.
If you do not fully understand the specifics of profile types, read about their designations and differences.
Tools
You will need the following set of tools and measuring instruments:
- roulette;
- level (80cm, 120cm), rule;
- plumb;
- fishing line, rope;
- screwdriver or drill with reverse;
- perforator;
- metal scissors;
- construction knife;
- grater for drywall.

The beginning of the formation of the frame of the plasterboard wall
So, with the assignment of profiles and the choice of tool completed, you can start planning and placing the future wall. The floor and adjacent walls to which the new wall will be attached must be at the stage immediately before finishing, that is, the floor is flat with a screed, the walls are plastered. For example, consider the formation of a wall from a UW, CW profile. On the floor we make markings for the placement of the future wall. The following points are taken into account:
- Almost nowhere you will find perfectly right angles between the walls in the rooms. This is especially true for old buildings. The distance between them in different ends may differ by several centimeters. When marking a new drywall wall, this should be taken into account and tied not to one wall, but to both, which run in parallel. Distances are averaged. So you can avoid the visual curvature of the resulting room.
- If, in addition to erecting a wall, all walls are plastered with plasterboard, then the frame is first displayed, or at least the markings of the sheathing so as to create the most right angles, and after that you can only start building the wall.
- Outlining the first line of the wall location, it is taken into account that the guide profile will be equal to it, and not the resulting wall. To this mark will be added the thickness of the plasterboard, a layer of putty and finish.
Having decided on the first line on the floor, you can transfer it to the ceiling and walls. For this, a plumb line is used. If it is possible to use laser level, this will greatly simplify the task.
Important:All profiles that are attached directly to the floor, ceiling and existing walls are mounted using a sealing tape between it and the supporting surface. The UW profile guides are fixed to the floor and ceiling first. They are fixed with dowels and impact screws every half a meter and along the edges.
CW-profile support posts are attached along the edges of the rails. Racks are also installed in places where a door or window opening will be formed, which are necessary during the construction interior wall from drywall. It is best to fix the profiles first on the bottom rail. Then it is threaded into the upper guide and installed strictly vertically in level. Only after that it is fixed on the upper guide. When arranging these profiles, the margin for sheathing with plasterboard strips over the profile is taken into account. Profiles are set front side inside the opening. The racks are fixed to the rails using self-tapping flea screws.

The structure of the plasterboard partition.
Support profiles along the perimeter of door and window openings it is necessary to strengthen with the help of wooden bars, which are inserted inside the profile and fixed with self-tapping screws. The bar is selected according to the width of the profile. If the AU profile is used, then you can do without bars.
The next step is the installation of vertical support profiles CW along the entire length of the frame. The first profile from the adjacent wall is installed at a distance of 550 mm, all subsequent ones are strictly at a distance of 600 mm from each other, measuring the distance from the middle of each profile. Be sure to check the vertical installation of profiles.
In order to designate the top of the doorway and the horizontal edges of the window openings, the same UW guide profile is used. A piece of profile is cut off 30 cm larger than the width of the opening. On the front side, on the bend of the side bends of the profile, marks are placed at a distance of 15 cm from each edge. The distance between the marks is equal to the width of the opening. The sidewalls of the profile are cut at an angle of 45 degrees, starting from the side of the edge of the profile to the marked mark and to the base of the profile. After that, the edges of the profile are bent, and a U-shaped design is obtained.
The resulting workpiece is put on with bent edges on the racks on the sides of the opening and rises to the required height. It is fixed with self-tapping screws, with which the edges of the profile are screwed to the racks. The obtained oblique ears are also screwed, which were formed on the main horizontal part of the workpiece. In the same way, the perimeter and window openings are formed.
This completes the formation of the frame. You can proceed to the process of fixing drywall sheets. Sheet sizes are standardized: 1200x2000 mm, 1200x2500 or 1200x3000 mm. In most cases, the ceilings in residential areas are higher and are at least 2.75 m, so one sheet in height may not be enough. It is necessary to add small strips of drywall.
The first sheet, which will be installed close to the edge, most often to the adjacent wall, must be removed from the side chamfer. To do this, a strip 50 mm wide is cut along its entire length on one side.

The result of the work
How to cut drywall?
For this, a regular construction knife with replaceable blades is used. The sheet must be placed on a flat, solid surface. The cut line is marked with a pencil and the top layer of cardboard is cut with a knife. After that, the sheet is shifted along the notch line to the edge of the support and gently breaks. Returning the sheet to its original position, it unfolds on edge and bends. On the second side, the cardboard is also cut, but not through. Turning the sheet over and shifting it to the edge of the support, you can finally chop it off.
To ensure a gap that can be subsequently repaired with putty, a bevel-bevel is formed on the cut edge of the sheet with a slope of 22.5 degrees or close to it. A special drywall planer is used for this. Also, a chamfer is made on the edge of the sheet, which will be adjacent to the GKL strip located above or below the sheet.
Fixing drywall sheets
The sheet should be fixed to the metal frame using self-tapping screws 3.5x35 mm. First of all, the edges of the sheet are fixed, and then along the edges and along the midline. For this, there is a special marking marking the position of the screws every 250 mm. The distance between the screws can vary from 10 to 25 cm, but no more. The self-tapping screws are screwed in so that the caps go a little deeper into the GKL and do not stick out above the wall level.
Important: Sheets are fixed at a distance of 10-15 mm from the floor. This is necessary to ensure the integrity of the structure during operation.
Having fixed the first sheet, the remaining distance to the ceiling is measured and the corresponding piece of plasterboard is cut off. A chamfer is also formed on it from the sides, where it will dock to the bottom or top sheet and to the ceiling.
Subsequent sheets are installed entirely without chamfering and in a checkerboard pattern. That is, after the first row, a whole sheet of drywall is installed under the ceiling, and the missing part is below. Thus, one side of the wall is sheathed.
Laying wiring and installing sockets, switches
Before sheathing the second side, you can, if necessary, lay wires. To pass through the rack profiles, holes of 35 mm in size are made in them, strictly in the middle of the profile at the required height. It is desirable that the edges of the hole be concave to one side and bent so as not to damage the wires later. The wires are mounted in accordance with the requirements in a corrugated pipe.

Soundproofing plasterboard walls
For this, mineral wool is used. This will make the drywall wall not so transparent to sound, because without soundproofing, all the noise from one room will be heard in another. Easier to use roll version of this material with a width of 600 or 1200 mm. The second option is cut in half lengthwise. Cotton wool is laid tightly between rack-mount profiles without gaps. There is no need to additionally fix it. For reliability, you can form horizontal jumpers from wooden beam along the width of the wall, on which mineral wool of a shorter length than the height of the ceilings will rest. This method is suitable for places where there is a risk of moisture getting inside the wall. However, sufficient ventilation of the interior must also be ensured.
Completion of the plasterboard wall
After that, you can sheathe the second side of the wall. After the second side of the wall is sheathed, you can start filling all the end surfaces.
Between the sheets of drywall there is a distance of 100 mm formed by chamfers, which is somewhat recessed. The joints are glued with a sickle mounting grid and compared with the general level of the wall with a starting putty. Finishing putty compares all installation sites of self-tapping screws or the entire surface, especially if the wall is subsequently painted or pasted over with thin wallpaper. With the help of abrasive meshes and a grater, the putty layer is finally compared. After that, the wall is ready for cladding with any suitable material.
Video: do-it-yourself plasterboard wall formation
Hello, hello, our brave plasterboarders. Today you will find a cool tutorial on the topic of drywall partitions. Speaking specifically, we will disassemble a single-layer partition on a single frame - C 111 according to the Knauf classification, because. such partitions are most widespread. Let's deal with general principles their installation, how to form a doorway, an external corner and pairing several partitions with each other. As an example, we will take a corner partition with a doorway, such as pantries and dressing rooms (essentially nurseries for moths) are usually enclosed to store pickles / jams and all sorts of junk that is long overdue to be disposed of.
Please note that work with drywall can only be carried out after the plaster and screed in the apartment have completely dried.
To begin with, let's get acquainted with the special profiles that serve to form the frame of the partitions. These profiles are called rack-mount. To be more precise, there are exactly rack-mounted PSs (CW), and there are also special wide guides PN (UW) for them. Dimensions of guide profiles: 40×50, 75, 100 mm. In our example, profiles with a width of 100 mm will be used. The letters C and U in their bourgeois name indicate the shape of their section. As you can see in the picture, the guide shelves are straight, like the horns of the letter U, and the rack - with roundings, like the C. By the way, the shelves are called the side edges of the profiles, and the walls are the back. The second letter of the overseas name means that the profiles are rack-mounted, i.e. wall from the German "Wand".
Rack and guide profiles Knauf

They are in paired version.
Once again, we repeat that you can only use a profile with a metal thickness of 0.55-0.6 mm, for example, Knauf. They are good not only because of the rigidity, but also because their design allows you to insert them into each other, thereby achieving their elongation and reinforcement on the sides of the doorway. Profiles from other manufacturers may not be able to do this. In the walls of the PN there are already ready-made holes with a diameter of 8 mm for dowels.
Dimensions of rack profiles: 50×50, 75, 100 mm. For single-layer partitions, the 50th posts are rather weak, so we advise you all to take the 75th or 100th. In the walls of the Knauf rack profiles there are 3 pairs of closely spaced holes with a diameter of 33 mm for laying wires.
- Guide profiles KNAUF PN 100×40 mm
- Rack profiles KNAUF PS 100×50 mm
- Sealing tape Dichtungsband
- Separating tape
- "Dowel-nails" (another name " Quick installation”) 6×40 mm
- Cord breaking device
- Laser level or bubble level
- Rule aluminum 2.5 m
- Gyproc plasterboard sheets 3000x1200x12.5
- Seam putty (we work with Danogips Superfinish)
- Reinforcing tape for seams KNAUF Kurt
- Roulette
- Hammer
- Stationery knife (or special knife for cutting the Civil Code)
- Perforator + drill
- Screwdriver and cutter
- Self-tapping screws for metal 3.5 × 25-35 mm (black, frequent pitch)
- Self-tapping screws with press washer 4.2×13mm or shorter
- Metal shears or grinder
- Mineral wool ISOVER, KNAUF Insulation, URSA, Rockwool, Shumanet, etc.
- Narrow and wide spatulas
On the next slide on the left - a self-tapping screw with a press washer, it serves to fasten the profiles together. There is an option with a drill and without. They are designated, respectively, LB and LN. On the slide - option LN. In our case, they are needed only if there is no cutter. On the right is a drywall screw. More precisely, it is all the same for metal, but it already serves to fasten sheets of the Civil Code to the profiles. Therefore, most often it is called that - a drywall screw. Has a secret, so-called. carob, head. Designated - TN. There is also a TB, with a drill at the end, but you can do without it, 0.6 mm steel TNs will easily be taken.

Self-tapping screws for mounting structures made of plasterboard
Do-it-yourself instructions for installing a plasterboard partition.
Step 1. Markup
For example, let our partition be a continuation of an existing wall. It is highly desirable to pre-align the beacons. We draw a line-the continuation of the wall on the ceiling, we make a right angle with a simple square. This line is the inner border of our future partition, taking into account its final dimensions. But we first need to mount the frame, and for it the dimensions are different. It is not necessary to draw your own lines for the frame, you can make everything easier. How? Find out very soon...

Marking lines on the ceiling
For now, we transfer the lines from the ceiling to the floor using a plumb line and a cord breaker, or a laser level.

Transfer markings to the floor
And now in front of you is the very simplified way of marking the PN.

Mark holes for fasteners
The bottom line is that pieces of drywall are sewn onto the guide profiles cut to size, which are already set along the lines. With this approach, the risk of error will be minimal. We mean that later, when the Civil Code sheets are sewn on, the rule will not “jump” at the wall/partition boundary. Pieces of GKL should be sewn flush with the walls of the PN. We expose the profile with these pieces along the line and put marks with a pencil or marker where we will have holes for attaching the PN to the base.

From a different angle
Step 2. Fixing the PN
Then, according to our marks, holes are drilled in the base, and a sealing tape is necessarily glued to the profiles. Its absence is capable of completely ruining the entire soundproofing of the future partition. With it, the adjunction to the base will be very tight, which also affects the crack resistance of the structure. The fastening itself is carried out with dowel-nails using an ordinary hammer. Fast and strong.

Attaching the profile to the dowel-nails

Guides on the floor

Near the opening

On the ceiling
We do not unscrew the pieces of GKL from the profiles until we fix the PN at all the necessary points. Often there are situations when the holes available in the PN are not enough. In these cases, they should be drilled independently, and you can do it in one go - through the profile to the base. The main thing is to carefully monitor that the boundaries of the GKL pieces clearly coincide with the marking lines. After fixing the guides on the sides of the doorway, I advise you to check them with the rule and make sure that they lie exactly on the same line.
You need to make at least three attachment points per profile. Even if it is 30 cm long. Usually, the fastening pitch is made in the region of 50 cm. If the floor is uneven, the pitch is reduced. Sometimes you even have to divide the PN into several segments. We do the same on the ceiling. Then we unscrew the pieces of GKL, but do not throw them away, they will still be useful to us ...
Step 3. Mounting wall substations

Fastening racks to walls
We cut the rack profiles in height, insert them into the guides close to the walls and drill holes in the walls right through them. Try to maintain a step of about 50 cm, no more. We hammer the dowel-nails into these holes again. Do not forget to glue the walls of the profiles with sealing tape! And control them by the rule, they should not be bent. By the way, the height of the substation must be less than the height of the ceilings in the room, at least 1 centimeter. They should not support the ceiling.

The length of the racks is 1 cm less than the height of the ceiling
As you can see, there is some distance between the rack profile and the floor.
Step 4 Installing the frame posts
The rack profiles of the frame are installed in increments of 60 cm. If tiles are laid on the partition, then in increments of 40 cm. The profiles of the doorway are extraordinary, and they do not affect the pitch of the remaining substations. The slide shows the profiles set at 60 and 80 cm from the wall. Near PS just forms a doorway.

Partition frame posts
To reliably form an opening, the side PSs are made double, that is, one PS is inserted into the other. Of course, this is done in such a way that the holes in the walls of these profiles coincide in height. Inserting the PS into each other is not an easy task, sometimes you have to walk on them with your feet so that they snap into place along the entire length. It turns out that on the slide you see 3 profiles, but in fact there are 4 of them.

PS are set in one direction - with the wall to the corner from which the plasterboard sheathing will begin. Weight Limit door leaf, which can withstand a pair of PS-100 - 40 kg. Rack profiles are installed strictly vertically. Their length should be 1 cm less than the height of the ceilings. And the holes in all profiles must be at the same height. Profiles can be fixed to the rails using a cutter or self-tapping screws with a press washer (temporarily). Before patching the GKL, all self-tapping screws must be unscrewed.

Racks in place
Yes, PS are installed in one direction, because the fastening of sheets should begin from that part of the profile shelf, which is closer to its wall. If you do the opposite, the screws will jam the profile shelf, and it may bend. On the slide you see an almost finished partition frame. Let's take a look at how the outside corner is formed correctly...

Forming the outer corner

Frame from another angle
One of the rack profiles is turned with the wall outward, and the second one stands with a shelf towards us. A distance equal to the thickness of the GKL was left between them, we laid it at the stage of fixing the PN. Thus, a sheet of Civil Code with inside partitions will wind up, as it were, into its depths. At the end of the article, the outer corner of the fully finished partition will be shown in section.
Step 5 Jumper

Jumper from PN
It remains for us to make a jumper for the doorway. It is made from a guide profile by making an oblique incision of its shelves and bending a part of its length by 5-7 cm. The slide clearly shows how it will look. That is, you will need to cut a piece of PN 10-14 cm longer than the width of the opening. Cut and fold it symmetrically. On each side, the jumper is attached to the side posts with 2-3 LN screws.

Installing a jumper in the frame
Now our frame is completely finished. It is possible to pass electric cables through the frame. But you should not bring them inside the profiles, as they can be pierced with TN screws when sheathing the GKL.
Step 6. GKL sheathing

Sheathing the frame with drywall

BEFORE jumpers
There are several rules here.
- We have already mentioned the first one - you cannot join sheets on the side profiles of the opening.
- Secondly, cruciform joints of the “+” type are unacceptable, only of the “t” type.
- Thirdly, the joints of the sheets from the inside and the outside should be horizontally shifted by a profile step, and vertically by at least 40 cm. On the slide you can see the very pieces of drywall that we used for marking. Now they serve us as props. After all, the sheets of the Civil Code cannot be placed directly on the floor, they must be raised above it by about 1 cm.
- And they should not reach the ceiling either, about half a centimeter. This is the fourth rule.
To fix the drywall to the double posts of the opening, you can use small metal drills. Otherwise, very often the screws just jam inner part profile. First, drill holes through the gypsum board, then screw the screws into them. Of course, sheets can only be joined horizontally on profiles, which means that we must make jumpers from PS at the joints. See how they look on the next slide.

PS jumpers
These are segments of conventional rack profiles. To fix them, again, you need to start from the side of the shelf, which is closer to the wall. In the matter of mounting the jumpers, it is desirable to have an assistant who will hold the sections of the profiles while you turn the screws in them. As soon as all the jumpers are placed, it is possible to lay soundproofing plates (mineral wool) between the profiles. We like ISOVER the most. When laying, we try not to leave unfilled areas. It should be cut off with a margin of about 5 cm so that it abuts against the profiles and thus keeps in the frame. When working with mineral wool, be sure to use goggles, a respirator and gloves!

Sheathing process

Sheathing process 2

Finished skin
The step of the screws is about 20-25 cm. On the jumpers, it is advisable to twist them more often, after 10-15 cm. Make sure that the heads of the screws are deepened into the sheet, but do not pierce the cardboard. If the cardboard is pierced, the screw should be twisted. More importantly, the screws must enter strictly at right angles. They must be at least 15 mm from the edge of the end edge of the sheet and at least 10 mm from the longitudinal edge. By the way, GKL can only be mounted in a vertical position! If the premises are planned stretch ceiling, under it in the partition it is desirable to mount mortgages from PS, into which we recommend additionally inserting a beam of the appropriate size.
I also recommend screwing self-tapping screws into the jumpers on both sides of the partition, and not just from the side of the joint. It is advisable to adjust the location of the sheets on the outer corner so that they lie on it with the factory edge. Then when we install on it protective corner, it will deepen, and the plane will not deteriorate. Of course, all progressive mankind has long been using a special corner-proof paper tape, Sheetrock, for example. But we know that it’s hard to find one in our country, so our Stone Age has dragged on, and we still use outdated metal corners. So, the partition is assembled.
And here are the promised pairings:

Right outside corner

Cruciform conjugation

T-shaped interface
And here is the video from Knauf:
In contact with
The layout of any living space is a purely personal matter, and what one likes may not suit others radically. In order to be able to make your own adjustments, reshape the space for yourself, there is a simple but reliable way that involves the use of drywall sheets, which even a beginner can work with. The main thing is to know exactly how to make a wall from this material.


Peculiarities
The house is a real fortress for everyone, therefore it is so important to equip it in such a way as to feel confident, comfortable and good in it. Buying a new home or changing the number of occupants of an old one may require redevelopment of the space so that everyone is comfortable in it. In an old house, additional space may be needed if there is a replenishment in the family or one of the relatives needs a personal closed space in which to be alone.
The issue of planning in new buildings of a free type becomes especially acute., where there are no clear boundaries of the room, and each tenant can make the design that he likes. erect brick walls it is possible, this has its advantages, because such a design will last a long time and nothing will happen to it. But it is not easy to build such piers, and most importantly, it requires a large number materials. For those who have never laid a brick, it will not be easy to cope with this task and make a high-quality and durable partition.

In view of all these circumstances, one of the most simple and convenient options is the construction of plasterboard walls. Such designs are easy to make on your own and even non-professionals can do this process. In this matter, it is important to know what is needed to build a wall and what difficulties you will face.
Plasterboard wall has a number of important advantages compared to brick - it is easy to install, does not create a lot of weight on the floor due to the frame of thin profiles and plain sheets, the thickness of which does not exceed a centimeter.

Another factor that can be considered an advantage of such structures is the possibility of erecting partitions, walls and partitions without obtaining the appropriate permission for redevelopment, which will speed up the process and eliminate unnecessary procedures. For work on creating new boundaries of the premises, it is necessary to determine what and where will change, mark the territory and calculate how much materials will be needed.
Drywall sheets are quite compact in thickness and when stacked one on top of the other, a lot of material can be brought at once. Its weight is also small.


In order for the new walls to be warm and not let in sound, insulation and sound insulation are placed inside the structure. It is possible to conduct wiring in it, install a switch and a socket so that the functionality of the room does not suffer from its redevelopment.


When planning the alteration of large-scale objects, it is important to understand how justified the use of this or that material will be, therefore it is simply necessary to clearly understand what the pros and cons of drywall are and what exactly it will allow you to create in a residential area.

Advantages and disadvantages
The use of drywall made it possible to obtain fantastic opportunities that were previously extremely difficult, if not impossible, to implement using brick as the main material and building walls, partitions and partitions from it.
From this material indoors you can make:
- a wall that will divide the room;
- a partition that will allow you to zone the space or give decorative effect due to the intricate design;
- complex decorative design and achieve original forms and invoices in the room.


A feature of drywall is the ease of working with it. In order to build a wall, you need to form a frame and sheathe it with sheets. frame structure can be both from metal profiles and from wood. The resulting structure is sheathed with drywall on both sides.
Sheets can be ordinary, waterproof and flame retardant, their choice will be dictated by the place where the new wall or partition is being created. When one wall is sheathed, glass or mineral wool so that the piers not only help to divide the room into two parts, but also perform the function of heating and sound protection.


Among the advantages of this material are:
- ease of installation of structures of any type and complexity;
- the ability to erect structures of any shape and type;
- when carrying out work on the construction of walls or partitions, you do not need to have any special or expensive tools;
- inside the wall, you can put wiring, a telephone cable, an air duct, which makes it also functional;


- the resulting wall will be absolutely even and smooth, therefore, the work on its alignment will be reduced to grouting the joints between the plates and puttying the entire surface for further decorative work;
- after all preparatory work the finished wall can be painted in any color, wallpapered or even tiled.


This material also has its drawbacks, which include:
- change in the properties of the material upon contact with water, drywall can swell from this;
- any load must be thought out in advance and the place of attachment of the picture, sconce, lamp or lamp must be initially strengthened;
- too heavy objects should not be installed on this surface, which should be initially taken into account when planning and determining the places of each decor element.


So, with the help of drywall, you can make a wall of any shape and appearance, which can only be imagined, while the sound insulation and heat in the room will be at high level, because for this, the corresponding filling is placed inside the structure. Sockets with switches will allow you not to limit the possibilities of a new space.

Materials and tools
When planning the construction of a drywall wall, you need to choose the right materials and have everything with you. necessary tools so that the work process takes as little time as possible and does not take a lot of effort and energy. In order for the wall to be strong enough, a frame is erected for it from a metal profile. There are different profiles for different purposes.
Most often, for such structures, two options are used:
- Profile, but which will be attached directly to the drywall itself. It is smaller and conventionally designated as "D".
- A profile with which the main frame of the wall will be erected. It should be more powerful and larger, conventionally designated as "W".

For each of the above profiles, there are two more options, one of which is a support and is designated as "C", and the second is a guide and has the designation "U". The guide profile is simpler, it has the form of a U-shaped structure and smooth walls. The support profile is inserted end-to-end into it. It also has an additional difference from the guide in the form of ribbing, which gives greater strength to the material and does not allow spontaneous bending.


As the main load-bearing element frame, you need to use a supporting and smaller profile, to which a drywall sheet will be attached. Its size is 60 by 27 millimeters. As guides for fixing this design, you need to use a narrow guide profile with dimensions of 28 by 27 millimeters. In order to form a wall frame, you need to take a supporting and large profile with dimensions of 50 by 50, 50 by 75 or 50 by 100 millimeters. As a guide for this design, a large guide profile with dimensions of 50 by 40, 75 by 40, 100 by 40 is used.
There is another version of the profile, which is a thicker and reinforced version of the large supporting profile. For building simple walls only wide profiles are used, but for more complex structures, in which it is planned to lay any communications, it is already necessary to use thin profile options.

In order for the profile to be connected into a frame, you need to have a direct suspension or use a universal connector. The twisting process is carried out using small flea screws, which have a drill at the end. In addition, they use special self-tapping screws for metal, which have a countersunk head. To fix the frame to the wall, you can not do without plastic dowels and impact screws.
The optimal thickness of drywall sheets for the wall is 12.5 millimeters. A mandatory element should be a wide chamfer on the side of the sheet. Depending on the room, you need to choose the appropriate material - a moisture-resistant sheet is needed for the kitchen and bathroom, and for a regular rooms fit and normal. hallmark color will serve - for moisture-resistant sheets it is green, for ordinary sheets it is gray.


Thus, the crate of a drywall structure is most often made of a metal profile, but in some cases wood can also be used. Depending on the type of construction, it will be possible to choose one or another material and choose its thickness.
Tools that will be needed during the construction of walls from drywall sheets:
- tape measure not less than 3 meters long;
- level by 80 or 120 centimeters;
- plumb lines;
- fishing line with a rope;

- network or cordless screwdriver, impact drill with nozzles for self-tapping screws;
- perforator;
- scissors that can cut metal;
- construction knife for cutting drywall sheets;
- plasterboard grater.

frame
In order to make quality and flat wall from drywall, first of all, the construction of a metal frame will be required, on which the sheets will already be attached. In order for the installation to be carried out correctly, certain patterns must be taken into account. The first step will be marking the territory where the construction of the structure is planned. The next step is to check the evenness of the corners.
Due to the fact that the walls in the room are often not very even, when building a new wall, you need to focus not only on one wall, but also take into account two opposite sides. If the walls have too uneven corners, the easiest way is to cover each of them with drywall, which will align them. Only after that, approach the installation of a new profile.


To level the racks, a laser level is best., but if it is not there, you can apply a simple plumb line. Before mounting the profile for walls, ceiling and floor, you need to paste it over with a special sealing tape. It will help in cushioning and soundproofing. Before you start fastening the profiles, you need to make a clear marking of the places on the floor, wall and shelf, where the base for the frame will be attached.


When everything is ready, you can begin to fix the guide profile, taking a step up to one meter. If the mount goes to wooden surface, then the distance is 50 centimeters and the clutch goes with the help of self-tapping screws. If work is done with concrete surface, then the frame is screwed with dowels in increments of 75 centimeters. In this case, it is important to make holes in advance.


Both the carrier and the rack profile can be attached to the wall, but it is important that it be solid. If the height of the ceilings is more than three meters, then longer materials will have to be used for the construction. In the event that a door is planned in a new wall, it is important for it to leave an opening of the desired width on the floor. In the case of standard door dimensions of 80 centimeters, it is important to make the opening 8 centimeters wider in order to be able to install the door frame.
The rack profile is installed from the doorway and determines its width. The first place for fixing the profile is the floor, then the level of the entire structure is checked and it is attached to the ceiling. Racks can be installed with any step, it depends on the drywall sheets. Most often they are installed as a fastening tool for sheets at the edge and in the middle of the entire structure. The joint of two sheets should lie clearly in the middle of the profile.


If racks are installed frequently, then the strength of the wall increases, it will withstand a lot, but the cost of work also increases. As for the profile framing the doorway, for greater rigidity it can be placed wooden block or carrier profile. You can also use cross braces, which are also reinforced with a bar and installed where there is a horizontal drywall joint.
The doorway on top is additionally equipped with a jumper. The installation height depends on the dimensions of the door. If it is two meters, then you need to install the jumper at a height of two meters and five centimeters. They make it from a rack-mount profile, which needs to be cut off longer - not 20, but even 30 centimeters. Stepping back 10 or 15 centimeters from each side of the profile, you need to make an incision at 45 degrees. The bevel should look outward.


The sides that were trimmed need to be bent down and attached to the structure U-shape. The vertical parts must be put on racks and secured with metal screws. When working with drywall sheets, it is important to use only special self-tapping screws that have a press washer. It is she who helps to easily pass through the canvas, while not damaging the cardboard and allowing the hat to deepen to the required distance.


Step by step installation instructions
If you need to create drywall construction with your own hands, you need to properly organize the progress of work. The first thing that is needed is to level the floor and walls to which the structure of the future wall will be attached. Only after that you can make markings on the floor, taking into account both parallel walls for derivation right angle for construction. In case nearby standing walls will also be covered with drywall, then initially a crate is erected for them, and after that the installation of the frame for the new wall begins.
According to the markings that are applied to the floor and walls, only the profile needs to be leveled., and the width of the entire wall will increase after the installation of drywall and putty. Be sure to note the location of the doorway, if any. After marking is completed on the floor, the next step is to mark the wall and ceiling. To do everything perfectly accurately, it is better to use a laser level. If this is not available, a simple plumb line will do.

When everything is ready, it is erected metal carcass. The first profile is fixed to the floor with dowels. The second stage is the construction of part of the structure on the ceiling. When both parts are ready, they are combined into general design with support legs CW. If there is a door or a window, you need to use the same racks for them. Installation takes place from the bottom up, the front side should be directed inside the window or door openings.
The next step is the installation of vertical supports from the same CW profile with a distance of 55 and 60 centimeters from each other. When everything is ready, all the supports are checked by level. After that, work is underway to install horizontal edges with a UW profile. When all these works have been completed, you can begin fastening drywall sheets.


Based on the fact that given material It has standard sizes 2 by 1.20 m, 2.50 by 1.20 m and 3 by 1.20 m, for different ceilings different sizes will be required. If the room is not high, then the sheet will most likely have to be cut, the same principle is used for ceilings over three meters, when the length has to be increased.

In order to cut the sheet, use a construction knife.
The cutting process consists of the following steps:
- laying the sheet on the surface, which should be as even and firm as possible;
- you need to draw a line along which the incision will go with a pencil;
- you need to cut carefully and only the cardboard itself;

- the sheet is shifted to the edge of a flat support to the drawn line, by pressing it is necessary to make a break along it;
- flip the drywall over and draw the same line with reverse side on which to make the same incision;
- move along the notch line, press and completely break the GKL.


The next step is to attach drywall sheets to the finished frame.
For this you need:
- On the first sheet, the side chamfer is removed, for which a strip of 55 millimeters is cut off.
- Sheets are fastened from the bottom corner of the wall. It is important to make a small indent from the floor of 10 or 15 millimeters.
- Fastening the sheet to the crate using self-tapping screws 3.5 by 35 millimeters. The edges are fastened first, and then they move to the middle. The width from the self-tapping screw to the self-tapping screw should not exceed 25 centimeters. Hats need to be slightly deepened into the surface of the sheet.


- After installing the first element of drywall, you need to measure the distance left to the ceiling and cut off the appropriate piece.
- Formation of a chamfer on a sheet.
- Install it on the frame.
- It is important to fasten the following sheets in a checkerboard pattern, but there is no need to cut the chamfer. This is how the whole sheet is fastened, without trimming. Mounting goes from ceiling to floor. Thus, the entire side of the future wall is sheathed.


When work on one side has been completed, it is important to consider whether wiring and telephone cable will be needed in the new room. If yes, then the next step is to install them. For wiring, you need to prepare corrugated pipes and run wires into them. After that, it is necessary to make holes in the profile with a diameter of 3.5 cm and thread pipes with wires into them. It is important to determine the holes for the sockets and the switch and make them in advance.


To build quality wall, you need to supplement its inner part with appropriate materials, which will have sound insulation and will make it possible to feel confident and comfortable, as if behind a stone wall. This must be done correctly by using rolled mineral wool 6 or 12 centimeters thick. Cotton wool fits tightly between the profiles, this will be enough for a good fix. After everything is done, you can put up a second wall.


The technology of its sheathing is the same. Once all installation work is completed, the a new stage, where the finished wall is subjected to the processing process:
- joints between drywall sheets are glued with a sickle;
- wall treatment with starting putty;
- processing the wall with finishing putty, leveling the places where the screws are located;
- grouting putty with sandpaper;
- decorative wall decoration.


A false wall can be prepared quickly enough, it all depends on the skill of the master and his experience. A beginner can also assemble such a structure, it just takes him more time.
Interior walls will serve for a long time, the main thing is to monitor the conditions of their operation. As a decor for such elements, you can use paint, wallpaper or tiles, it all depends on the room, interior and the desire of the owners themselves.


Design
Drywall - very comfortable material for work, especially for creating interesting and unusual images in the interior. This becomes possible due to the fact that the sheets can take a wide variety of shapes, they can not only be cut, but also bent, for which it is enough just to wet the sheet and give it the desired shape.
You can use this material anywhere.- both in a private house and in an apartment, and in each of the cases, the design can be completely different. Options for exactly how a particular space may look may differ in style, shape, and texture. It is possible to build structures with plasterboard in the bathroom, bedroom, corridor and any other room, only the finishing material will differ. For rooms with a high level of humidity, moisture-resistant sheets are used.

The false wall is completely similar to the usual one, moreover, it can be equipped with a door and fully serve its owners to separate certain areas of the room. To fulfill such an idea, when designing, leave room for an opening and later place doors in it.


For space zoning, it is not necessary to build entire walls, you can limit yourself to a small partition, which will look spectacular with lighting from above and decorative boxes. The implementation of the partition is not a continuous canvas allows you to give the design lightness. Complete with shelves will help add comfort and hide small things in a secluded place. This option is best suited for the living room, but you can use it in the hall.
A distinctive characteristic of drywall is the ability to apply any decoration methods to it. To create a cozy atmosphere in living rooms you can glue the wallpaper on the finished wall or paint it in any color and even overlay it with natural or artificial stone. The latter option is especially well suited for a fireplace, which can also be made from plasterboard. In the kitchen or bathroom, the option of painting is also suitable, but you can also lay tiles to precisely protect the walls from excess moisture and create a full feeling of a real brick wall.


When planning the construction of a plasterboard wall, it is initially necessary to prepare the room. There should not be anything superfluous in it, because it will not be easy to place a sheet 2 or 3 meters long in it. The room must be clean enough to drywall sheets they didn’t get dirty with anything, because then it will be necessary to get rid of the stains so that they do not show up on the surface of the wallpaper or paint.

It is important to plan the room correctly, take into account the heating system, and if necessary, bring the batteries into the new living space. It is necessary to take into account the light that will overlap new design. If the windows are located only on one side, it is important not to completely block access to them.
If it is not a wall that is formed, but a partition, it is better to do it with shelves, and not a solid structure, which will allow you to divide the space, make a storage area, and provide light access to the second part of the room.


Examples in the interior
A plasterboard wall can become a real highlight in the interior, the main thing is to approach the process of its design correctly, choose the right materials that will help decorate the room and emphasize its features.

In the bedroom, using drywall, you can create an original and unique design. The wall by the bed is decorated with ornate lines, soft shapes give comfort and promote good rest. The presence of shelves allows you to store small things there and use them as a place for lamps.
For the living room, especially when it borders on the kitchen and is not separated by walls, you can use the original semicircular design, which rises from the wall to the ceiling. The space is divided into two zones. In this case, use white color best of all helps to increase the space of both zones.


A plasterboard wall can be designed with a doorway to divide the space between two rooms. Doors can be single or double, with glass or deaf, it depends on the design of the room.
How to make a drywall partition, see the following video.


