Among all options inexpensive finishes, probably there is no more versatile material than. They are suitable for decorating ceiling surfaces, walls, and at the same time, they have enough an impressive list positive qualities. But not everyone knows how to sheathe walls or ceilings with plastic. This article will discuss in detail the installation of plastic on walls and ceilings, as well as a video demonstrating the installation process.
What is required for work
It is easy to assemble a plastic wall or ceiling cladding with your own hands, and at the end of the material there is a video demonstrating this. To facilitate the preparation and the work itself, there is also detailed instructions, after reading which, incomprehensible moments should not remain.
Before attaching plastic to the ceiling or walls, it is necessary to calculate the required amount of material. This is easy to do - you need to divide the surface area by the area of \u200b\u200bone plank. They are different and specific data on the selected varieties are on the packaging or on the product price tag.

In addition to the coating material, it is necessary to prepare the material for assembling the frame. It can be made from wood or metal profiles. The number of components depends on the type of structure, its complexity and is calculated in each case individually. After the components necessary for installation are purchased and ready for installation, you need to check the availability necessary tool. You don't need too many tools:
- Hacksaw for metal
- screwdriver
- Building or laser level
- Roulette
- Hammer
- In some cases - construction stapler and plumb
After the materials and tools are ready, you can proceed to the next stage of work - surface preparation. In videos that show how to knock out a ceiling with plastic, this stage of work is often omitted, but it is necessary.
Preparation
This is a simple operation and consists in the fact that the entire area that will be hidden under the plane of the new coating must be treated or impregnated with a bactericidal effect. Such processing is carried out so that mold does not appear under the future coating or fungus does not develop. Before that, all traces old finish and peeling fragments of plaster or putty are removed using improvised tools, like a spatula.
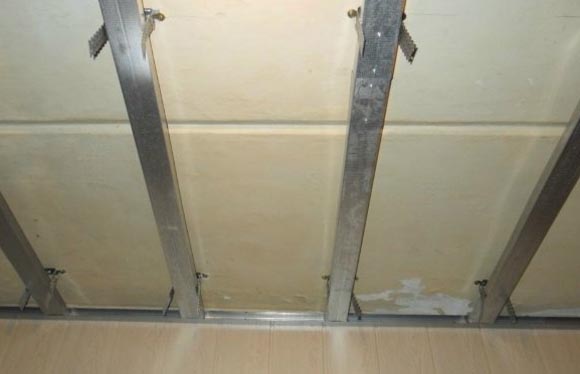
frame
To fix the skin is necessary. Regardless of where the plastic will be mounted - on the ceiling or on the wall, such a frame is required. Without it, there will be nowhere to attach fragments of the coating, and in the video below, which demonstrates how to hem the ceiling with plastic, attention is also paid to the frame.
The distance between the elements of the crate is from 30 to 40 centimeters. At the same time, if installation is carried out on the ceiling, the distance should not exceed 30 centimeters - otherwise, the coating may sag under its own weight.

Mounting panels on the wall
After assembling the base or batten, you can begin to fix the details of the outer covering of plastic panels. This process is slightly different from how plastic is mounted on the ceiling.
It all starts with the corner or the final part. As a rule, this is a plastic corner or a special element that covers the end of the part. The first plank of the cover is inserted into it. If the length of the plank reaches the overlap and a solid surface is assembled, a decorative plinth of a special shape is installed at the top, into which the end of the plank is inserted.

When the first part is installed, it must be fixed. You can do this with a self-tapping screw, clamps or staples from a stapler. Next, the next cover element is inserted, with a protrusion into the groove of the previous panel. You need to insert tightly, until it stops. This is how the entire coverage area is assembled with the obligatory fixation of each detail.
It is inserted with force, one side into the final corner or end piece, and the other into the previous panel. If necessary, the fragment is adjusted in size to the desired dimensions by sawing off or cutting off the excess part. Below is a video that shows how to mount the plastic on the wall and ceiling - after assembling the crate, these processes differ slightly.
Floor mount
Asking the question - how to make a plastic ceiling, you need to take into account some points of this work. Firstly, it is better to do this work with an assistant - it will be much easier, since everything will have to be done on weight, but otherwise, you can assemble a plastic ceiling with your own hands and there is nothing complicated about it.
Secondly, you need to take into account the distance that will be required to install the fixtures. Their ceiling part should not touch the ceiling. This - important point, since everything should be taken into account when marking, even before you hem the ceiling with plastic and assemble the crate.

Usually, this distance is about 10 or 15 centimeters. It can be a little more or less, in accordance with the dimensions of the room and the design of the lighting devices, but, in any case, no less than the lighting required for installation.
Next comes the assembly of the frame. It is assembled in much the same way as on the wall, differing only in the shape of the parts used - the end part of the panels is inserted into a plinth fixed to the wall, in which there is a special groove for this. It is installed first, strictly horizontally, according to the pre-applied markings. Here you will need building level, and even better - laser.
After the crate is installed, it is possible to sheathe the ceiling with plastic, and in order to make it easier to understand the intricacies of this process, below are several videos that detail all the stages of work.
There are many materials that can be used to finish ceilings, but the most practical and easy-to-use option is PVC panels. And they become even more attractive for the reason that it is quite simple to install them yourself, so there is no need to involve a team of builders. Our article will tell you how to fix PVC panels to the ceiling and how to choose them correctly.
PVC panels - what is it?
PVC panels - finishing material made of polyvinyl chloride - a plastic that does not burn well and has chemical resistance. Now consider the design of PVC panels.
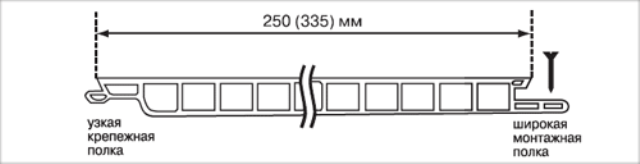
PVC panels for ceiling
They consist of two thin sheets plastic, interconnected by many stiffening ribs. Along the length of the PVC panels, there is a large mounting shelf on one side, and a small mounting shelf on the other. The first is used to fasten the PVC sheet to the ceiling frame, and the second is used to connect the installed sheets to each other.
So why have PVC panels become so popular? Below is a list of the advantages of this finishing material.


Choice of PVC panels
So, you know what kind of material it is, now you need to select PVC panels and purchase them. First you need to decide on the size. At the moment, in hardware stores you can see plastic panels either in the form of lining or in the form of rectangular slabs with the dimensions shown in the table below.
Table. Standard sizes PVC panels.
How do you know if you have good material in front of you? How not to unknowingly purchase low-quality PVC panels that will crack during installation or lose their color after a couple of years of service?
Ceiling panel prices
ceiling panels

When going to the hardware store, you should pay attention to the following points. For small rooms, PVC panels of the "lining" type will be the most suitable. They should also be preferred if you want to have a plastic ceiling stylized as wooden planks. A for larger rooms, it is better to take panels or sheets of polyvinyl chloride. As for the thickness, it is mostly the same for all types of PVC sheets and is 10 millimeters.
- The stiffening ribs of PVC panels should not be visible from front side. Also count their number - the more ribs, the stronger and more durable the panel design.
- The surface of the material must be perfectly flat, without any defects, chips or damage.
- Mounting and fixing shelves must be flexible enough and not break when you try to bend them.
- Try pressing lightly on the PVC panel. If a crack or dent appears on the surface, then you have a poor-quality copy, which it is advisable to refuse to purchase.
- Take a few panels and try to put them together. Good material fits smoothly and without gaps.
- pay attention to appearance purchased PVC panels - copies from all packages must be plain and have the same texture. In some situations, PVC sheets from different batches have slight color differences.

What to look for when buying PVC panels: 1. The number of stiffeners: the less there are, the more unstable the product.
2. The ribs of plastic tiles must be intact and straight.
3. The surface of the PVC panel should be evenly colored, smooth and without unevenness.
4. Two panels must be properly connected in the place of the docking groove.
In addition to the PVC sheets themselves, you will need to purchase an installation profile. It consists of two "shelves", one of which is attached to the frame, and the other is connected to the plastic panels. Both starting and finishing PVC sheets are attached to the installation profile.. When choosing it, you should pay attention to the thickness of the plastic and whether the profile has any bends or defects.

Do not forget to also buy a ceiling plinth - it not only serves decorative element future ceiling, but also closes the gap between the wall and the ceiling of PVC panels. Usually such skirting boards are called fillets, they are made of plastic and attached to glue.
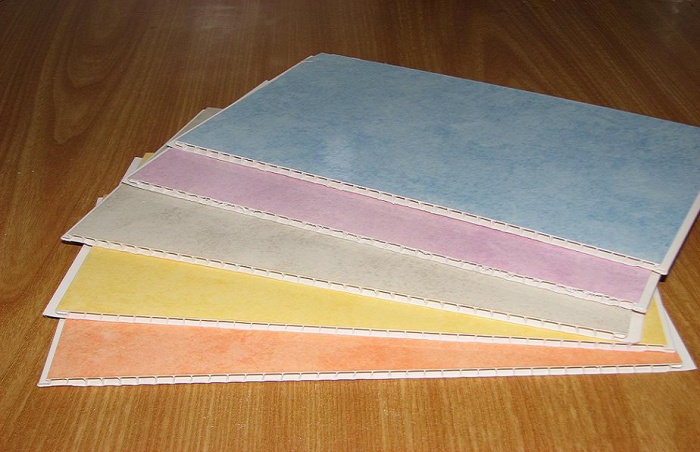
As for the appearance of the purchased PVC panels, you must determine it yourself, based on design project decoration of the room and your own taste. Your attention will be presented with many options for panels of various colors and textures. Here we can advise you to use a color matching table so that the appearance of the ceiling blends well with the color of the walls and furniture.

Required Tools
Now you need to make a list of the tools that you will need to fix the PVC panels to the ceiling. You do not need something complicated or very expensive, everything listed below can be found in any hardware store.
- Perforator- necessary for the installation of the frame.
- screwdriver. If you wish, you can also fasten plastic panels to a profile or timber using a perforator, but it is very heavy, and it is very inconvenient to use it for such tasks. Therefore, the presence of a screwdriver will greatly facilitate the work and increase the speed of installation of PVC panels. And if you fasten them not on self-tapping screws, but with the help of brackets, then instead of a screwdriver, take a construction stapler.
- To control the accuracy of marking and the location of plastic panels, you will need square, level and paint thread.
- Pencil or marker for drawing lines and marking PVC panels in the order they are laid.
- Roulette for measurements.
- Electric jigsaw or Circular Saw – for cutting frame profiles and plastic panels.
- stepladder. Of course, you can always get by with a table or a stool, but this is unsafe and inconvenient.
- rubber mallet, which can be useful for fitting PVC panels to each other during installation.

In addition to tools, you need to purchase material for the frame. This can be either a metal profile (UD-27 for the main and CD-60 for the guide), or wooden beam. Also, do not forget to purchase fasteners (self-tapping screws, staples or glue), drill bits for a puncher, nozzles for a screwdriver, dowels and hangers for a profile.
Prices for PVC panels
PVC panels

Preparation
It is worth noting that even before visiting hardware store it is worth starting the preparatory work. The first thing you need to do is create a plan. For this measure the length and width of the room and draw a diagram of the future frame.

Then calculate how many sheets and what sizes you will need to make false ceiling.
Important At the planning stage, it will not be superfluous to mark the lines along which you will cut the profile of the frame and PVC panels. At the same time, they can be marked with a pencil and marker, indicating in which order they should be laid.
Remember that good and careful planning is the key to quality work and reliable insurance against various troubles and the need to redo everything anew.
The second point of preparation removal of old finishing materials. If the ceiling was previously covered with a thick layer of plaster or paint, then all this must be removed, otherwise heavy pieces of the old finish can damage the frame or the panels themselves.
Final stage preparatory work – marking the line of the future frame. To do this, use a tape measure to measure the height of all corners of the room. Find the one in which it will be the smallest. From it down, you should measure 50 millimeters and draw a strictly horizontal line (control it with a paint thread and a level). The same line at exactly the same height should be drawn on the opposite wall. According to them, the suspended ceiling frame will be installed in the future.
plaster prices
plaster

Frame installation
On the lines drawn, every 50-100 millimeters mark holes drilled with a puncher. After that, dowels are inserted into them. Through the holes drilled in the wall with self-tapping screws (for example, a 6x40 mm self-tapping screw), the main frame, made of their UD-27 profile, is attached with a cover to the wall. At the same time, do not forget to use the level and ensure that the frame elements are located strictly horizontally.

Then, with the help of suspensions and the CD-60 profile, guide rails are created, to which the PVC panels will be attached. The optimal distance between them is 500 millimeters. The metal profile CD-60 is installed with a cover to the floor, the ends of the rails should be inserted into the profile of the main frame.
Advice! Alone, it is very difficult to properly mount the frame and install PVC panels, so this work should be done together with a partner. It will also be useful to have the help of a person who will supply and receive tools, cut and bring plastic panels.
Having finished with the installation of the frame, check it several times for horizontality and the absence of a difference in height - the future ceiling made of PVC panels should be perfectly even, and this largely depends on how well the crate is installed.

An alternative to a metal profile can be a frame made of wooden beams. This design will cost less, but it is susceptible to moisture. The technology of its installation is in many respects similar to the technology for metal profile.
- We draw two strictly horizontal lines on opposite walls.
- We drill holes on them with an interval of 5-15 centimeters.
- We insert dowels into the holes.
- We fix the beam of the main frame to the wall using self-tapping screws and the above-mentioned holes.
- We mount guides made of wooden beams with the help of suspension brackets.
- We fix the guides to the main frame with the help of corners.
- We check the entire structure with the help of a level and a tape measure.
It is worth noting that for wooden frame more optimal fasteners for plastic panels will not be self-tapping screws wrapped with a screwdriver, but staples that require a construction stapler. Also, metal fasteners can be replaced with "liquid nails" - a construction adhesive that can firmly hold together plastic panel and frame even under relatively high loads.
Prices for "liquid nails"
liquid Nails

Important! If there is an additional load, such as a large chandelier or a second level of suspended ceilings, the frame must be reinforced. To do this, it is necessary to mount more guide rails, reducing the gap between them. This is mandatory not only for a wooden frame, but also for a metal profile structure.
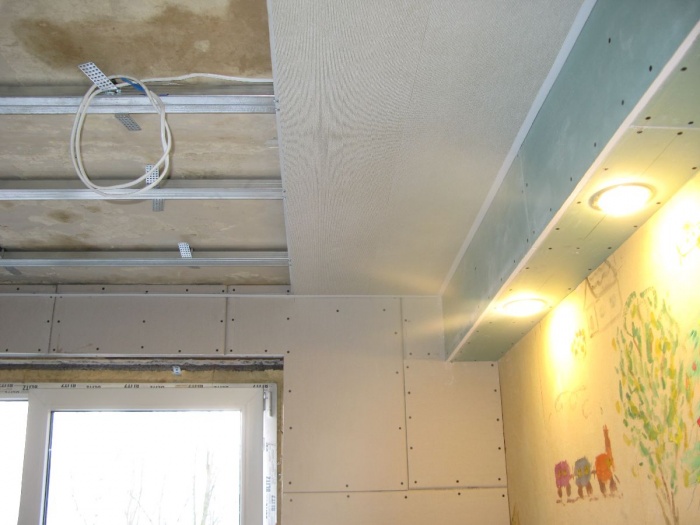
Fixing PVC panels to the ceiling
First, mount the installation profile by attaching its large “shelf” to the guide rails using self-tapping screws. It can be installed both around the entire perimeter of the room, and in places where PVC start and finish panels are attached.

Now it is necessary to cut the PVC panels according to the previously developed plan and the applied markings. At the same time, many experts advise making the length of the sheet a little less than the width of the room, since PVC can expand even at low temperatures, which means that the “back-to-back” installation can lead to future deformations of the false ceiling.
Advice! Also, you should not install PVC panels in a room with a low temperature, especially since under such conditions this material becomes brittle.
If you are planning to make recessed lighting for a false ceiling, it's time to make cutouts for fixtures in PVC sheets.

Once the material is fully prepared, you can begin to attach the first (or start) panel. To do this, you and an assistant need to insert the launch panel into the installation profile from the side of the mounting shelf, and then fix it with self-tapping screws on the rails. At the same time, make sure that they do not go too deep into the PVC, otherwise there will be a risk that the screws will damage the sheet.
Next, carefully “join” the next panel using the mounting shelf with the starting one, and fix it with fasteners. Thus, the PVC panels are alternately fastened to each other. Connect them together with great care to prevent damage. Also, you can not leave gaps or cracks, PVC panels must fit snugly against each other. If necessary, you can make a "fit" with the help of gentle blows of a rubber mallet.

Before installing the last PVC panel, measure the remaining uncovered ceiling space with a tape measure.- often the plastic panel does not fit completely there, therefore it must be cut off. At the same time, make sure that the cut is as even as possible, and there should be no gaps between the PVC finish panel and the installation profile.

The final stage - landing on glue ceiling plinths. After that, the suspended ceiling made of PVC panels can be considered finished. Further, it is already possible to carry out the installation of lamps, wall decoration and cleaning of construction waste.
Video - We make a ceiling from PVC panels
As you can see, fixing PVC panels to the ceiling is a fairly simple task that does not require you to have much knowledge and experience in construction. Because for self-finishing rooms and in particular the ceiling plastic panels are the best possible option.
The construction market is now replete with a wide variety of finishing materials. Main advantages modern innovations is ease of use and reliability. However, this is not always about practicality in terms of price. In this matter, undoubtedly, finishing materials made of PVC are leading in terms of profitability. Polyvinyl chloride panels make it easy and simple to sheathe walls with a ceiling in any room. At the same time, you should not worry about costly leveling the base of the wall or worry about exorbitant prices. installation work. Making the same false ceiling with your own hands using PVC panels is not difficult, even without having years of experience repair work.
What will be required?
So, now we will consider exactly the option of mounting a false ceiling using PVC panels as a finishing material. This will require necessary minimum tools, PVC panels and required mounting hardware. More specifically, you will need the following tools:
- screwdriver or low-speed drill;
- tape measure, bubble level, water level;
- hammer;
- miter box, hacksaw, construction knife.
PVC panels are used as material. According to generally accepted standards, panels can be 25 and 50 cm wide. The main parameter when buying is the area of \u200b\u200ball elements in the package. When counting required amount you should calculate the area of \u200b\u200bthe room in which the suspended ceiling will be installed, and increase the resulting amount by 10-15%, taking into account the trimming of the material.
To fix the panels on the ceiling, use special fasteners and form a frame. By themselves, PVC panels are quite fragile and soft, so for reliable fastening you will need a strong frame with frequent crates.
U-shaped is used around the perimeter of the room plastic profile, into which the edges of the panels will wind up. As an alternative, you can choose a color-matched ceiling plinth for PVC panels, which is already equipped with a U-shaped groove. In high-quality execution, such a plinth is a prefabricated structure, in which the U-shaped groove is assembled from two parts to facilitate installation.
For the crate, you can use a wooden beam measuring 20X40 mm or a metal profile as for drywall. In the bathroom or in the kitchen, a wooden beam will not work due to high humidity. However, thanks to more easy installation wooden beam and fastening the panels themselves to it, it can be used in a bedroom or living room. The second parameter for selection is the price of the material, in this matter it is only necessary to check the availability and price in your region. When using wood in any form in construction, it must be treated with antiseptic impregnations and fire retardants before installation. The latter is necessary to improve the refractory properties of wood.

PVC panels of various standards
In addition, there are plastic or aluminum profiles especially for PVC panels. If the sheathing will be carried out along the ceiling with small differences up to 4-5 mm and with a minimum lowering of the false ceiling, the installation of PVC panels on the ceiling may turn out to be completely simple. The profiles are made with a special groove in the center for fastening to the base and for fixing the clips that will hold the sheathing panels.
Of the hardware, you will definitely need plastic dowels and nail-screws for them (an alternative can be anchors with a wedge for driving). They will fasten the frame elements and profiles around the perimeter to the walls and ceiling. The frame itself is assembled using screws with a drill tip for a metal profile and wood screws for a beam. PVC panels can be fastened either with screws with a press washer or with special metal clips. The approximate number of all hardware can be calculated after the method of fixing the ceiling is chosen, and after reading the installation instructions.
Preparation stage
Even considering that the ceiling is out of sight, it should be cleaned of all elements that may subsequently fall off or sprinkle on the mounted suspended ceiling: damaged plaster or putty between the plates, whitewash, old finishing material, etc. The entire surface of the ceiling is primed.
Only after that you can start marking for the installation of the perimeter and frame. To do this, draw a line on the walls throughout the room, which will indicate a single level of the future ceiling. The ceiling should be lowered, taking into account what lighting will be used, availability concealed wiring or other communications, as well as irregularities in the ceiling itself. For wiring, you should take into account the mandatory presence of a gap between the upper edge of the frame and the ceiling of at least 1.5-2 cm. As a guideline from which the lowering will be measured, you should choose the lowest place on the ceiling.

As soon as the first mark is placed, you can transfer it to all four walls along the edges using a water or laser level. To outline the line around the entire perimeter, you can use twine, richly painted over with bright chalk. By pressing the edges of the twine against the wall along the marks, you can slightly take it away and let it go. As a result, the chalk will remain on the wall.
When the perimeter is outlined, you can begin to mark the location of the supporting elements of the frame. Profiles or beams should be placed perpendicular to the future direction of PVC panels and at a distance of 40 to 60 cm. At a greater distance, suspended ceilings from panels may sag slightly during operation.
Advice: No matter how much you would like this, there are still cases when both the floor and the ceiling of the premises in multi-storey buildings of mass development are not leveled, and it is extremely expensive to fix this. In this case, it is better to deviate somewhat from binding to a strict level and draw a perimeter line with a certain slope so that the difference between the planes of the ceiling and the floor is not visually striking.
Frame installation
Option 1: plastic crate
A plastic U-shaped profile or a plinth with it is attached around the perimeter of the entire room so that its lower border runs along the previously drawn line. To join the profiles in the corners, use a miter box and a hacksaw. This is the only way to get a beautiful cut and a minimum gap. The profile should be fixed every 25-30 cm. Further, to facilitate the process of mounting the frame, you can pull a thread or fishing line across the ceiling so that it forms a plane along with the upper edge of the profile.

Option 2: wooden frame
Wooden beams are attached to the ceiling with dowels and impact screws, every 60 cm. In order to bring them to the same level along the bottom edge, you can use wooden linings between them and the ceiling.

Option 3: metal profile
The metal profile, as in the case of drywall, is attached using U-shaped elements located every 60-80 cm. The so-called "pawns" are most conveniently attached to the ceiling with anchors with a driven wedge, and to the profiles using screws with a drill tip.
There is no need to mount jumpers between the carriers of the frame, however, they will be needed in places where it is supposed to fix something heavy, for example, a chandelier.

At the end of the installation of the frame, laying is performed power cables for lighting. When using PVC panels, wires must be laid in corrugations to ensure fire safety. In places where spotlights will be installed, it is enough to leave loops 10-15 cm long.
Installation of PVC panels
Now, when the frame is ready and brought to a single level, you can proceed with the installation of suspended ceilings. This is the least troublesome and at the same time responsible process. The first strip of material is inserted into a U-shaped profile. Some masters cut off a latch along the edge at the first strip. As soon as the strip is in place, it is fixed with screws or clips to the supporting profiles of the frame, without missing a single one. You can cut a strip of the required size using a hacksaw or simple knife. The material is fairly easy to cut.
Important: PVC panels should be cut to a length slightly less than the distance between the walls. There must be a gap between the strip and the walls, about 4-5 mm from each end.
The next strip is applied to the lock at a slight angle and led into it along the entire length. After that, the second side is pressed against the frame and also fixed with screws. In order to tightly bring the strips together, you can use a bar or a piece of the same PVC panel, which is inserted into the groove and gently hammered all the way with a hammer.
The main thing is not to bend the strips of material in any case and not to apply too much effort during installation. PVC panels are quite fragile and even inaccurate hand pressure can leave a dent that cannot be removed. Installation is best done with a partner or using simple supports with crossbars.
The main difficulty may arise when installing the last strip. In one embodiment, you can turn the strip with the lock in the other direction and cut it along the length from the side of the groove to the desired width. Further, having attached tightly to the previous panel, the last element of the ceiling is also fastened with screws. When using collapsible skirting boards, it is easier and more reliable to simply cut the strip to the width and snap the lock with the previous strip, as in all other cases.

If it is planned to install spotlights in the ceiling, it is naturally more expedient to think it over in advance and insert spots “on the ground”. Read more about installing lighting in a plastic or any other ceiling -.
Completion
After all the stripes are installed, you can proceed to finishing. When using a U-shaped profile around the perimeter, a plinth is installed separately. It is best to fix it on liquid nails. At the same time, it is better to apply them only on one side of the plinth. That is, the plinth is attached either only to the wall, or only to the ceiling.
In the case of a collapsible plinth, the mating part simply snaps into place. In the corners, you can use special adapter sleeves or cover the gaps with a sealant of a suitable color.
In pre-marked places, holes should be made for the output of lighting wires or for the installation of spotlights. The same work can be done during the installation of the ceiling. At the very end of the work, the fixtures and all the equipment necessary for them are installed directly. It is advisable to adhere to generally accepted standards, and in the case when a suspended ceiling is mounted in the bathroom, then install low-voltage lighting fixtures with a converter instead of the usual circuit using 220 V. However, the fact that the ceiling of PVC panels is not afraid of moisture to a certain extent can be guaranteed to be secure themselves from the effects of moderate flooding by neighbors from above.
Suspended plastic ceiling is one of the most practical and hygienic interior decoration. The material from which plastic panels are made, PVC has a glossy surface on which microbes and harmful bacteria have practically no opportunity to multiply. In addition, this material is environmentally friendly and does not emit an unpleasant odor.
The listed qualities of plastic often determine the areas of their application. As a rule, these are kitchens, bathrooms, balconies and loggias. Plastic is practically not afraid of moisture and frost. Installing a plastic false ceiling with your own hands is very simple and this work will not cause difficulties even for a beginner.
Before you begin to familiarize yourself with the installation secrets, familiarize yourself with the sequence of operations. The list is simple, but you cannot rearrange the items. It looks like this:
- Calculation of materials of the suspended structure
- Marking the level of the future ceiling
- Installation of battens and embedded parts for lighting devices
- Installing the start profile
- Ceiling cladding with PVC panels

Installing plastic ceilings will require a tricky set of tools that every household master probably has: an impact drill or puncher, a level for marking the horizontal plane of the ceiling (water or laser), a tape measure, a pencil, a ruler, a paint chopping thread, a saw for metal and hammer.
Important to remember! To speed up the cladding process, it is recommended to use an electric screwdriver with a magnetic cross head.

Calculation of materials for the ceiling
To calculate a plastic suspended ceiling, you need to calculate the area of \u200b\u200bthe existing ceiling. To do this, multiply the width of the room by its length. You can measure with a tape measure with the help of one partner, which will be needed for other operations.
It is necessary to add 5-10% of the total area to the figure obtained. This is the necessary margin to compensate for the costs of cutting PVC plates. The most popular size is a width of 25 cm, a length of 3 m. However, other sizes can be found on sale.

As a crate, you can use a wooden beam 40 x 40 mm or 40 x 60 mm. If the climate is quite humid, then you can use the UD-27 wall or gypsum ceiling profile and the CD-60 load-bearing ceiling profile. They are made of galvanized metal and are not afraid of corrosion and deformation from excessive moisture.
The number of UD-27 profiles is equal to the perimeter of the room. The bearing ceiling profile TsD-60 is placed at intervals of 600 mm from each other. 300 mm recede from the edge of the wall and calculate the number of pieces. Usually the width of the room in meters is divided by 0.6. The length of the profiles is 2.5-3m.
To make suspended plastic ceilings look beautiful as a guide or starting profile, you can use a PVC profile with a decorative plinth. It can be made in a monolithic form, or the plinth can be attached to the profile groove separately. Its amount is also equal to the perimeter of the ceiling plus 3-5%.
In order for the joining of the plinth in the corners to look aesthetically beautiful, the plinth can be cut in a joiner's miter box at an angle of 45 degrees or you can buy ready-made plastic corners. The frame is fastened to the ceiling with dowels at intervals of 50-60 cm. Galvanized self-tapping screws with a press washer 25 mm long are used to fix the PVC plates to the ceiling.

Installation of a ceiling made of plastic panels
Installing plastic on the ceiling begins with markings. First determine the horizontal plane of the future ceiling. To do this, use a laser or hydraulic level. The minimum height of the ceiling can be lowered by the thickness of the beam or metal profile.
If more is required, then the galvanized TsD-60 ceiling profile is suspended on straight or U-shaped suspensions for plasterboard ceilings. Under the timber, you can put wooden dies.
The laser level is fixed on the wall with a dowel, stepping back from the existing ceiling the required distance. The device is installed in the horizon using its regular bubble levels. When turned on, the laser beam will mark the horizontal plane of the future ceiling on the walls.

Using a paint thread with blue, you need to “recapture” this level on the walls. After that, the axes of the ceiling profiles are marked on the ceiling. To do this, you can use a ruler, chalk and a building corner of 90 degrees.
According to the line marked on the walls with dowels at an interval of 0.5 m, the wall profile UD-27 is mounted. P-suspensions are attached to the ceiling with an interval of 60 cm with dowels. Their perforated legs are lowered down at an angle of 90 degrees. Carrier profiles are attached to them with 12 mm galvanized self-tapping screws.
If it is planned to install an overhead chandelier, an embedded part is mounted on the plastic ceiling on the existing ceiling.
You can make it from a piece of plywood and straight hangers, fixing them in the corners. Having bent the legs to the required height, the part is attached with dowels to. Do not forget to drill a hole in the center of the board and bring the lighting wire into it.
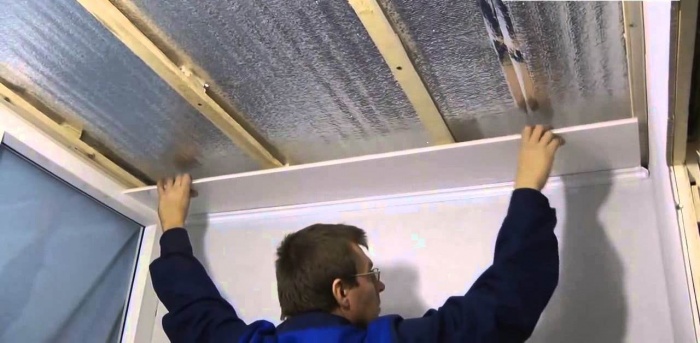
A guide profile along the perimeter is attached to the wall-mounted UD-27 profile with self-tapping screws with a press washer. The plate for plastic ceilings is made in such a way that there is a spike on one side of it, and a groove on the other. The first plate is cut to size and the spike is cut off. After that, it is brought into the guide grooves of the starting profile with a cut spike against the wall and pushed all the way.

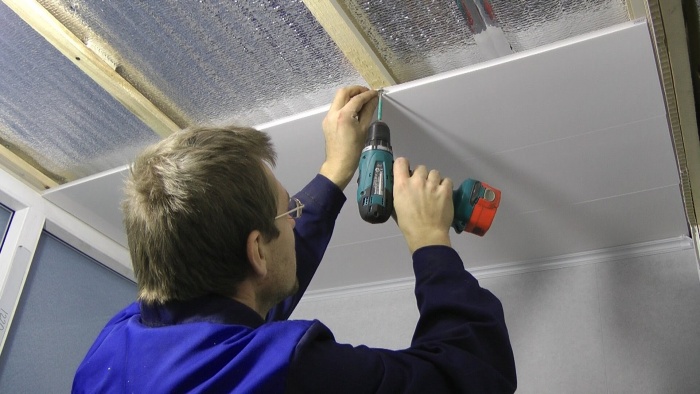
With self-tapping screws with a press washer, the first is attached to the ceiling profiles in the upper wall of the groove. The second trimmed plate is inserted with a spike into the groove of the first. In order to reduce the joint between the second panel, they tap the heel of the palm. It is also convenient to do this with a hammer through a wooden plate.
The whole process is repeated until the last panel is laid into the plastic ceilings. It may have to be cut not only in length, but also in width. At a distance of 1-1.5 cm from the cut, it is necessary to drill holes in the front layer of the plate. It should be the diameter of the screw head.
The self-tapping screws will go in and fix the last plastic ceiling panel. Do not forget to drill a hole for the wire in the plate on which the overhead lamp will be located. The plastic ceiling is ready and if you still have questions, then the video on installing plastic ceilings will help answer them.
From time to time it becomes necessary to repair the ceilings in the apartment. Inexpensive and practical option- PVC panels for the ceiling. This type of design is ideal for rooms with high humidity(kitchen, bathroom, hallway). Installation is quite simple and it is easy to carry out even for a person far from construction, with a certain tool.

The cost of installing a suspended ceiling made of PVC panels with your own hands, compared to other types of ceiling surface finishes, is significantly lower. ceiling finishing process PVC panels includes several stages, some of which can be divided into several more points. Let's consider each of them in more detail.

Preparatory stage
It can be roughly divided into three points:

Purchase of necessary materials
The choice of panels is a rather serious process, since there are many types of these products and they all differ in size, patterns, and texture. When choosing, pay attention Special attention to the product width. For rooms with a small area, panels with a width of no more than 250 mm are suitable; for large rooms, it is advisable to choose options with a width of more than 250 mm.
For advice, it is better to contact the sellers of a specialized store, as a rule, they are well prepared and can provide high-quality advice on the choice of materials for mounting a ceiling made of PVC panels.
Bars must have a cross section of at least 30 * 30 mm.
As ceiling plinth in the design of the PVC ceiling, you can use plastic specially made for this purpose, which has a groove for installing panels into it. The plinth should be taken with a small margin of about 1 m more than the perimeter of the ceiling, because during the installation process it will have to be cut at an angle and you can make a mistake.

If you plan to make a metal frame, you will need to purchase:

Tool
Working with PVC ceilings required:
- Roulette
- Pencil or fine marker
- Construction level
- Construction corner
- Lace
- Metal shears
- miter box
- Electric jigsaw or wood saw
- Bulgarian with a disk no more than 2 mm.
- Impact drill or hammer drill with drilling function (for concrete ceiling)
- screwdriver
- Extension

Tip: For convenience, the extension cord must have several outlets, this will allow you not to switch the power tool during operation.
Surface preparation for installation

For installation, it is necessary to free the ceiling from everything that may interfere with its implementation. Remove old lamps, chandelier. It is necessary to determine in advance where they pass electric wires and mark these places with a marker or pencil. Clean the surface from dirt and dust.
Frame manufacturing
The frame can be made of wooden bars or metal profiles 60 * 27 mm. For wet rooms, it is advisable to use a metal structure, since it is less susceptible to corrosion under the influence of moisture. Also the installation system metal frame ideal for leveling the ceiling, because it uses hangers that allow you to lower the frame by 3 - 4 cm.

It is advisable to use wooden bars in a dry room and with a fairly even draft ceiling. A combination of these two methods is also possible; for this, fastening with metal suspensions is used in a system of wooden bars. The method is impractical, because you have to use bars with a cross section of at least 5 * 5 cm and perfectly even.
Metal carcass
The metal profile frame must be installed at a distance of no more than 4 cm from the draft ceiling.
In the resulting gap, it is convenient to hide the wiring.
First, a starting profile 27 * 28 is attached to the wall along the perimeter of the entire ceiling, at a distance of 3 - 4 cm, so that later the main profile 60 * 27 can be inserted into it. Depending on the material of the walls, fastening is made on self-tapping screws or on dowels - nails. When mounting on a dowel - nails, you will need to drill a hole in the profile and in the wall and, pressing firmly, hammer the dowel with a nail.
Important: Dowel - nails used for mounting the starting profile must have a cylindrical skirt. Only in this case is it possible to use through-hole technology.
The starting profile is mounted strictly according to the level, starting from any corner of the room and moving around the entire perimeter. If the profile is set exactly, the start and end points must converge and thus close the perimeter.

The next stage is the placement of metal suspensions. To do this, it is necessary to mark the places where the main profiles will pass. It is convenient to use a lace for marking. The main profile is fixed at a distance of 40 - 60 cm from each other strictly parallel. Suspensions must be installed at a distance of 80 cm from each other. Suspensions are mounted using self-tapping screws or dowels - nails, in the holes provided for this, and immediately bent to facilitate the installation of the main profile in them.
The last step is to install the main profile. To do this, the profile is cut to the required length with a gap of 5 mm on each side, inserted into the starting profile and fastened with self-tapping screws with a press washer to the hangers. The level controls its horizontal location, as well as a strictly rectilinear location.

Tip: In the process of fixing the starting profile, do not neglect its horizontal position, because in the future this will lead to an incorrect location of the main profile and, as a result, you will have to start installation again from the very beginning.
Frame made of wooden beams
It is installed by analogy with metal, with the difference that the fastening of the bars is carried out by the through-mounting method without the use of suspensions. To level the plane, it is permissible to place wood chips under the bars. First of all, the extreme bars are installed, then they fill the middle at a distance of 40 - 60 cm from each other.

Panel mounting
First of all, ceiling plinths are measured and washed down at an angle of 45 degrees. Their fastening can be carried out using self-tapping screws ПШ 13 mm or using liquid nails. Skirting boards are installed around the entire perimeter so that the panels mounted later fall exactly into their groove.

Installation of PVC panels on the ceiling begins with determining the length of the workpiece. To do this, measure the distance from one wall to another, then subtract 2 cm from this distance and draw a strictly perpendicular line on the panel with a pencil and a building corner.
Then, with the help of a grinder, they cut it off. Next, install the first panel in the grooves of the ceiling plinth and move it all the way to the wall. As a result, it should turn out that the first panel on three sides went into the grooves of the ceiling plinth. Only after that, it is possible to fasten the panel to the bars or profile.
Tip: There are two ways to attach PVC panels to the ceiling when making a wood frame. The first - on self-tapping screws with a press washer, the second - with a stapler, on staples. Both methods are equally effective, but fastening with a stapler is more convenient and faster.
Subsequent panels are cut to size and installed so that the ends are in the grooves of the baseboards and each next panel is included in the lock of the previous one. last panel it is necessary to cut to length and then, having measured the desired distance, cut to width and then install.
You can learn more about the installation process by watching the video description of the process.


