Wood sanding is very milestone at finishing furniture. You can’t do without grinding before painting, you won’t get high-quality and beautiful product. I must say right away that I use a whole set of power tools for grinding. This grinders, grinding disc, drum with replaceable skin, SHLPS - belt grinding machine. There are also nozzles for a drill and a manual belt grinder - a machine. And with all this set, manual grinding still takes a lot of time.
ABOUT homemade devices I wrote a post. Grinding electric tools greatly reduce the time of work, and in many cases give a better result than grinding by hand. But sanding isn't just for flat surfaces. Corners, edges, milling, other places you won't get big tool still have to be sanded by hand. And the main thing is to buy a set of tools for home use expensive, and sometimes there is simply nowhere to place it.
Perhaps everyone knows the main device for grinding by hand, this is a wooden block wrapped in sandpaper. Such a bar is used for sanding flat surfaces. Usually the skin is nailed with small nails on the sides. But sandpaper This consumable, it often needs to be changed. Each time tearing off nails and nailing on a new one is not enough pleasure. A specially made bar will help here, more precisely, not just a bar, but a block with elements holding the sandpaper.
![]()
There are several options for attaching the skin. A fairly simple way to fix the sandpaper with wooden wedges on both sides of the skin. For this in wooden bar two gashes are made, and for these gashes it is necessary to make or pick up wedges. Moreover, the cuts themselves and, accordingly, the wedges can be of very different shapes.
I use not only smooth bars. For sanding bent parts, I make the sole of the bar of the appropriate shape. Often, the concave part of the part cannot be sanded out by anything else. In the old manuals carpentry suggest using files for fine-tuning curly parts. But I don’t use files, they clog quickly, and it’s difficult to clean them.
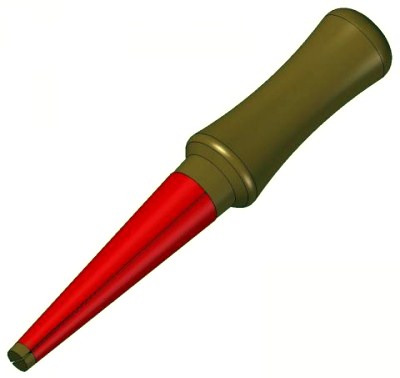
For sanding curly edges, where it is difficult to climb even with my hands, I use the same skins. For finishing, instead of a file, I take large skins 25-30 No. I pick a long bar desired shape e.g. round, flat, oval. I wind the sandpaper and process the details like a file. You can make such a device for permanent work. For example, as in the picture, the skin is fixed on the working part of the tool, and if necessary, it is easy to change.
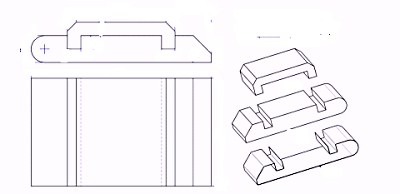
In the pictures you see options for bars with different working surfaces. For sanding grooves, straight and rounded. Most use wooden wedges to fix the skins. But you can attach skins in other ways. Sandpaper is fixed with special spring paws with teeth, as, for example, on the same grinders. I even saw such devices in stores. You can choose and make for yourself any option, any shape and size.
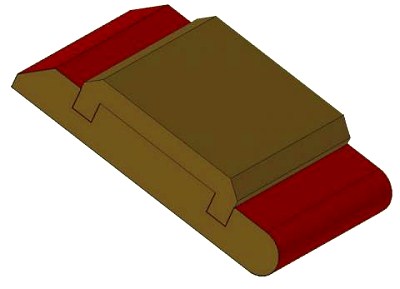
Another option is the skin is attached between two platforms, upper and lower. In this case, the sites must be included in each other.
Try to sand along the fibers, when sanding across, they remain deep scratches, which then need to be sanded again.
Start sanding with large sandpaper, I use #20-25.
After leveling and sanding the parts with coarse sandpaper, finish grinding with fine sandpaper No. 12 or No. 10. I rarely use finer sandpaper. An overview of the power tool in the article.
Sanding wood most often includes two stages - preliminary and final. the purpose of the first is to remove traces of rough processing (sawing, milling) of the material, visible irregularities or old coating, and the second is to achieve a leveled smooth and clean surface.
Particles of aluminum oxide (electrocorundum) with additives (usually chromium oxide) are mainly used as solid particles of the skin intended for pre-treatment of wood by grinders. This skin has a reddish-brown color. Grains of softer garnet are also used, which wear out faster, but with the same size as electrocorundum, they give very smooth surface. Pomegranate skin dyed Orange color. For the final sanding of wood, sandpaper with particles of silicon carbide is best suited, which has a higher hardness than the previous two materials. This skin is gray or black in color. It should be noted that when processing with silicon carbide after grinding with aluminum oxide, slight changes in the color of the surface color of the wood are possible. Abrasive particles are glued to a substrate, the material of which is most often strong paper or cotton fabric impregnated with polyester, as well as polyester or phenol resin.
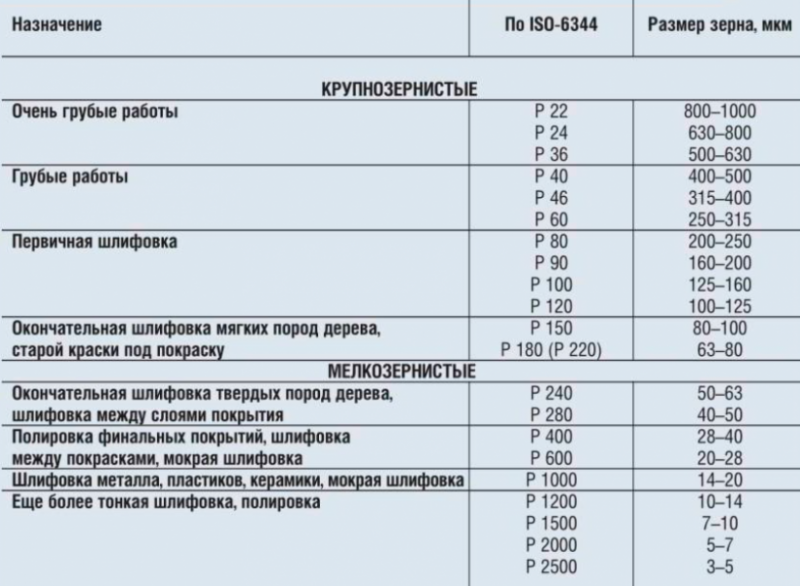
The grain size is chosen in accordance with the purpose of grinding (see table. 1). According to the European FEPA requirements, which are implemented in the ISO-6344 standard, the skin is marked with the letter P followed by a number equal to the number of meshes of the sieve with which the abrasive is sifted during its manufacture, per square inch. The larger the number, the finer the grain size. By the way, in our country the P 400 skin is often called “null”.
To achieve a high-quality surface, the wood is sequentially sanded with sandpaper with different size particles. Classic scheme: R 80-R 100-R 120-R 150-R 180 (for softwood) and R 80-R 120-R 180-R 240-R 280 (for hard rock wood), and it is recommended to switch to an adjacent or close particle size value from table 1. When grinding wooden parts with a shaped profile, it is recommended to select an elastic base that would ensure a tighter fit of the skin grains to the surface to be treated. Skins with such a base are produced by companies such as Mirka, Dremel, Metabo, CIBO, Norton, Bosch, Inox, etc.
The final result of the surface after grinding also depends on the density of the grains on the skin (filling density). As the density increases, the filling is open, semi-open and closed. Moreover, the denser it is, the higher the grinding performance and better quality processed surface. However, when sanding soft woods, the sawdust of which quickly clogs the gaps between the grains, semi-open and even open fillings may be optimal, since in this case the sawdust is better removed from the skin, thereby extending its service life. Quite effective skin with a stearate coating that protects it work surface from rapid clogging with grinding products. Abranet Ace Max has recently become a versatile material that can be used in a variety of wood sanding applications.
Due to the mesh structure, it practically does not clog when processing resinous wood species and does not heat the surface of the part. In addition, its strong aluminum oxide grains provide high cutting performance when sanding hardwoods. These features eliminate the need to press hard on the abrasive during operation, which is why Abranet Ace Max has an extremely long service life compared to traditional paper-based or cloth-based sandpaper. When choosing a grinding speed, remember important point: although its increase increases the productivity of the process, but at the same time, the gaps between the particles are faster clogged with sawdust. Clogged gaps increase the area of friction, provoking the user to push harder on the grinder to get the expected result. in turn, leads to an increase in heat generation and even to the appearance of "burns" on the wood, and also reduces the life of the skin. Based years of experience abrasive material manufacturers select optimal values grinding speed ranges for industrial equipment when processing wood products. As for users household tool, then they have to choose the range of speeds on their own, by trial and error.
To assess the quality of the surface obtained after grinding, a profilograph-profilometer device helps, according to the readings of which its roughness coefficient is calculated, for example, the arithmetic mean value of the scratch depth Ra at a certain length of the machined part. The lower the Ra value obtained, the lower the roughness and, consequently, the higher the surface quality.
An operation similar to grinding is brushing. This is the processing of wood with a rotating nozzle with a rigid or elastic bristle, mounted on special machine. The bristle hairs remove the softer fibers from the top layer of wood, and the surface becomes three-dimensional, as the hard areas remain unchanged. Depending on the desired processing result, the hairs are made from fiber, synthetics, wire and other materials. Among other things, such a machine allows you to quickly and efficiently remove surface dirt, remove old paintwork, brush soft annual rings on a cut of a tree, create certain decorative effects: to make the surface of wood matte, glossy, aged, etc. It is especially convenient to process with its help curved surfaces of a large area or wooden details complex shape: balusters, legs of carved chairs, carved architraves and etc.
Is indispensable tool when finishing wood. Today I would like to talk about what types sandpaper for a tree exist.
long time ago sandpaper for wood used for grinding a variety of surfaces. Among them are stone, metal, glass and, accordingly, wood. Processing, gives it a complete and beautiful view. Therefore, sanding is a permanent action in the manufacture of absolutely any product.
If you make or other paraphernalia for the home, then for sure you will apply varnish on wood. If this is done on a rough surface, then the raised villi will not allow the varnish to lie flat and specifically soak into the pores. In order to be performed correctly, it is required to sand the entire area of \u200b\u200bthe workpiece.
Sandpaper for wood is divided mainly by the type of grit. The paper itself is covered with sharp small particles, which accordingly grind the surface. The grain size of paper varies, and for each type of work, a specific grain size should be used.
 Sandpaper 40 - 60K is used for processing rough surfaces in order to smooth out large nervousness. Sandpaper 80 - 120K is used in the middle stage, when the workpiece has a more or less optimal appearance. Sandpaper 160 -320 is already used for finishing and finishing wood. After its use, the part takes on an even and smooth appearance.
 |
Usually when processing, use all types emery paper for wood, step by step. It is also used in power tools, and in particular in grinder. Using a grinder allows you to speed up the processing process and not make much effort.
 there are different types, among the frequently used ones is a vibrating and my favorite belt sander. Which one to use, everyone chooses for himself, but after working with this and other tools, my choice settled on tape machine. Therefore, if you often sand, I advise you to buy this useful power tool. I am sure you will never regret it and save a lot of time in your workshop.
How to skin a tree, what is needed for this, how to skin a tree correctly, today we will consider in this article. So, you decided to learn how to skin a tree, which means you decided to do something with your own hands, whatever furniture or other wood crafts. Yes, sanding wood in the process of making wood furniture is not the last place, let's take a closer look at the question of how to sand wood with your own hands.
Before sanding a tree, you should prepare the necessary tools.
Wood sanding tool
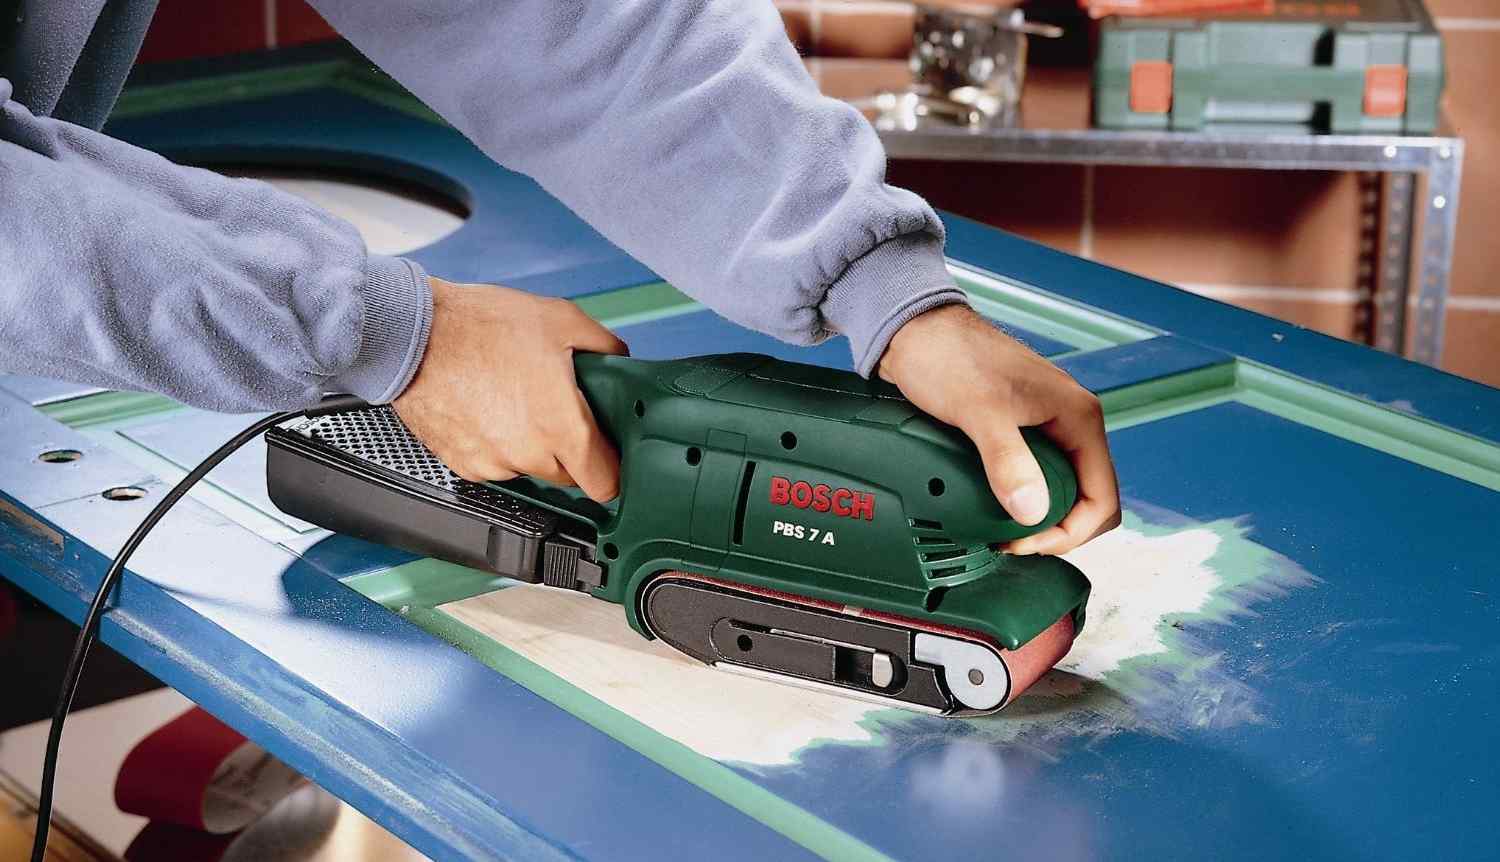
- Belt sander
- Vibratory grinder
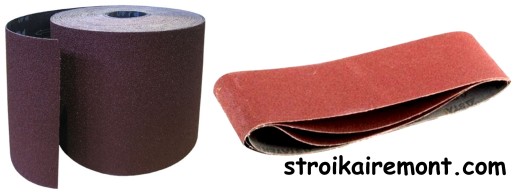
- A set of skins of different grain sizes
- Putty and spatula
- abrasive sponge
 Rough sanding
Before perfectly sanding a tree, some work should be done. The very first thing is to look wooden surface blanks. If there are chips and cracks, then everything should be carefully puttied.
Next, you should go through everything with a coarser sandpaper, grain size 80 - 100. This work is best done belt sander. The wood should only be skinned along the grain of the wood, if you do it across the fibers, you will be left with stripes that will ruin the entire appearance tree.
Wood finish skin
After you have finished sanding the tree with a coarse sandpaper, you need to sand everything with a finer sandpaper. To do this, use a skin with a grain size of 120-180. For this job, it is best to use a vibrating grinder.
Removing fluff and polishing wood
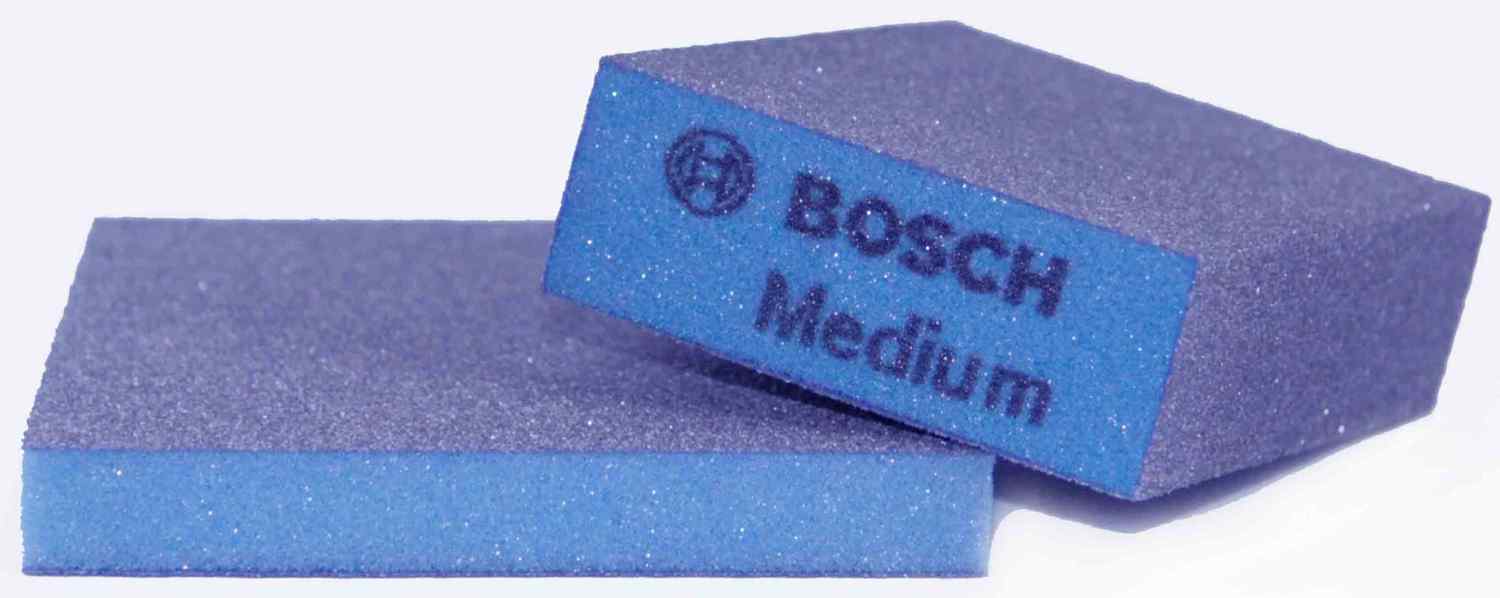 After the skinning of the tree is finished, you should once again carefully examine everything, if there are any bumps, drops or raised villi of wood somewhere. For the final sanding, a soft abrasive sponge should be used, which not only removes fine lint from the surface, but also slightly polishes the wooden surface.


