The attic is a traditional room in almost every country house. Its functionality is unusually wide. Eg, this room used as a storage room or workshop, some homeowners even decorate the attic as a living room or bedroom. In fact, the functional purpose of such a room depends solely on your own imagination, as well as financial capabilities. However, despite the wide variety of design options for the attic space, it is worth knowing that the attic ladder with a hatch is an integral part of it. If you do not build this structure, you simply will not be able to get into this room. Creating an attic staircase is a fairly simple matter, for which you don’t even have to turn to professionals in the construction industry.
Classification of structures
Actually, the most labor-intensive process in organizing the attic space is the design of the staircase segment. Before creating a project for a specific staircase for your home, you must first decide on the design category. The following options exist:
- foldable;
- stationary;
- portable.
Temporary solution
Portable models will be placed in a separate category, however, it is quite extensive. The variety of portable products is incredible. Meanwhile, we should not forget that the daily use of such a product can never become safe or comfortable enough, and the staircase itself is not able to compete with stationary and folding models in terms of operational and technical characteristics. 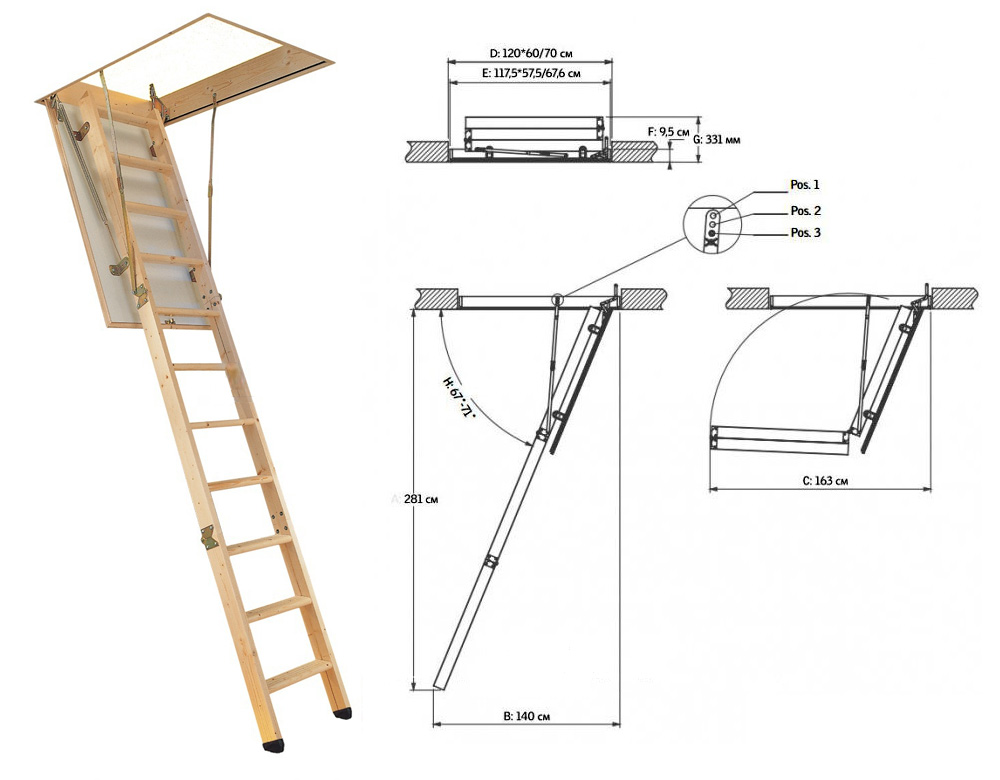
Selection of building materials
In the process of creating an attic staircase with your own hands, namely its preliminary drawing, it is worth paying attention to what building materials are usually used in this matter. Despite all the variety of products in the building materials segment, any experienced builder will tell you that there are certain types of products that perform best in use. As a rule, all main structural parts are made primarily of wood, while fastening and fixing elements are made of metals. Thanks to the competent selection of materials, a do-it-yourself attic ladder, the drawing of which was made by a non-professional, will be much stronger and more reliable. 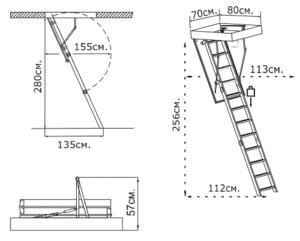
How to make your choice?
Due to the fact that building materials for folding stairs to the attic are presented in a variety of price segments, source materials and characteristics, it is quite easy to drown in a sea of information about them. To minimize the time spent searching and selecting the best options, you should follow a number of rules:
- Specify the type of functional purpose of the structure, as well as its main parameters, including design features, sectionality, width, etc.
- Choose building materials in strict accordance with how actively the product will be used and under what conditions.
- Identify negative factors that can reduce the service life of the product.
The main thing is to correctly define the function
Any specialist who has the required level of qualifications and experience in working with these types of objects will tell you that the final result largely depends on the correct definition of the functional purpose of the product construction work How to build a staircase to the attic with your own hands. This parameter allows you to calculate the indicator permissible load for each step of the product. The standard value of this indicator for a metal product is about 250 kGs, but wooden models designed only for 150 kGs. In addition, it is worth considering that the above indicators are valid for products made by professionals, while home-made objects have slightly lower parameters. In general, the permissible pressure on a step does not mean that it cannot withstand greater stress. However, if you overload the structure too often, it will become unusable in a fairly short period of time. 
So, the main criteria by which the optimal option is selected are as follows:
- area of free space in the room;
- functional purpose of the object;
- required angle of inclination of the product.
Figure 9.
What to consider when designing?
Most General requirements regulatory and technical documentation can be reduced to a number of simple and understandable conditions:
- the ergonomic range of product width is from 60 to 100 centimeters;
- the best height is three and a half meters;
- maximum number of steps – 15 pieces;
- the distance between adjacent steps should be about 20 centimeters;
- a comfortable step height for a person reaches about 20 centimeters, a deviation of 2 centimeters is allowed;
- If we are talking about a folding structure, then when creating the project, a permissible load of 15 kilograms is taken.
Tools
Having decided to independently carry out construction work, it is very important to stock up on a certain set of equipment, so that in the process of implementing the product project you do not stop due to the banal lack of a screwdriver or tape measure. So, the standard set of tools consists of the following items:
- polyurethane foam;
- bars;
- self-tapping screws;
- electric screwdriver;
- hacksaw;
- yardstick;
- anchors;
- screwdrivers.
 Building a staircase is not a difficult task
 Location Features
All the nuances of the location of the object in the room will become visible during the construction process. This is especially true if you are involved in the creation and subsequent implementation of the project yourself. Remember that the product cannot in any way reduce the comfort of the room. That is why stairs with hatches are not located in bedrooms, living rooms and kitchens. However, if necessary, you can diversify your staircase design interesting design. Thanks to this, the product can harmoniously fit into the overall interior of the room.
Project implementation technology
By following a certain technology, you can quickly and efficiently implement even a complex project. So, if you have chosen metal as the main material, then remember that the following steps are carried out:
- the drawing is applied to sheets of cardboard;
- cardboard elements of the future product are cut out;
- the hinge is marked on metal strips and special holes are prepared;
- the prepared parts are fixed together;
- the required angle is measured and the structure is moved apart in accordance with the obtained parameters;
- on metal sheets markings are applied to those places that will subsequently be covered with corners;
- elements are cut out using a special tool;
- given aesthetic appearance object;
- existing corners are rounded;
- The workpieces are fastened in pairs.

As you can see, the technology for implementing a staircase project with your own hands is quite simple. It applies not only to metal objects, but also to wooden products.
In order for the appearance of the attic staircase to be as attractive as possible, do not be too lazy to implement preparatory work on the surface building material. We are talking, for example, about applying a special primer before covering the surface with a paint.
Do not be afraid of difficulties, because the technology for constructing stairs may seem problematic to you only at first glance and require experience in the construction industry. Applying the optimal amount of effort will help you achieve maximum results.
Often the exit to the attic is located in one of the living areas of the house. And when designing such an exit, many designers and architects previously had to decide which room would have to be “offended” by an ugly staircase in the corner. On extreme case a stepladder was made, which was hidden in the pantry. And if necessary, the owners were faced with the task of pulling it out, carrying it to the hatch without hitting the TV on the way, putting it down and getting up.
And at the same time, it is desirable that the legs of the ladder do not move and the ladder itself does not fall until the person is in the attic. Until the modern market has offered a wonderful alternative to all these hassles in the form of a special type of hatch, behind which the staircase itself is hidden.
Why don’t you build something similar, because an attic ladder with a hatch is not such a complicated mechanism, and you can figure everything out if you want? Moreover, with our photo instructions, useful tips and video stories you simply have no chance of failing!
Of course, you can make an attic hatch for an ordinary stepladder. But ladders are the most inconvenient way to get upstairs, and also the most unsafe. Yes, it can be decorated somehow and even played with home interior, but still such stairs look rude and are frankly in the way. But sometimes, when there is neither time, nor desire, nor budget to build another option, this is quite acceptable. Moreover, later such a ladder can be replaced with a more convenient one, and a durable stepladder will work in any household, you must agree!
Modern designers are convinced that installing cold attic better, of course, is only a folding ladder, which can easily be hidden under a beautifully decorated hatch.
Such a staircase is really almost invisible, because a special plate is attached to its lower part, matched in color and texture to the ceiling. Look how light and graceful such stairs are in any home interior:
Do you like what you see? Then it probably became clear to you why no one hides modern attic stairs in the pantry anymore. They themselves hide behind a beautifully finished hatch, which is invisible against the background general design ceiling. And such cunning designs of the most different types you can easily build it yourself. Look at our photographic materials - you probably have the same parts and a couple of extra bars at home.
Basically, all “hiding” attic stairs are divided into two main types: folding and sliding. The first are blocks of three or four sections. They unfold using a special spring mechanism. Most often, such stairs are made of wood or a combination of wood and metal.
Some types of sliding stairs are scissor or telescopic stairs, which can withstand quite a lot of weight and fold like an accordion. This classification is also called differently: sectional scissor stairs. The stability of such a ladder is ensured by a special mechanism for opening the lid, which fixes the entire structure in the desired position.
In more detail, telescopic blocks are ladder structures in which the first section is attached to another. The sections move along guides, while unfolding or folding. But keep in mind that for such models the opening in the ceiling will have to be made quite wide.
Sectional stairs are primarily good because they have the opportunity to have railings and handles on both sides, thanks to which climbing the stairs will be much easier and safer. Whereas folding structures cannot be given such convenience, unfortunately.
But, if this is your first time deciding to make a hatch with a ladder, then give preference to a simpler, but no less reliable folding option:
In general, the whole structure looks something like this:

Step-by-step design instructions
The most durable and practical stairs are those that are made on a metal base with wooden steps. At home, of course, it is difficult to build something like this, but anyone can work with wood.
Step 1. Plan and design
So, first, carefully examine the schematic illustrations carefully prepared for you:


Do you have an understanding of exactly what the opening will look like? attic hatch and on which side will the ladder be attached to it? Then let's move on.
Step 2. Select fastenings for the hatch and ladder
It is the strength and quality of the mechanism that determines how easily the hatch will open and how much it will withstand the loads placed on it. The simplest mechanism that exists in this regard is hinges and latches. The only difference is how exactly you position them: on the long side of the sash, or on the short side, and where the hatch itself will open - up or down.
And here many home craftsmen resort to such tricks: they use not simple furniture hinges, but it adapts to car hoods, and the result is a hatch cover with a spring mechanism no worse than that of the most expensive industrial options. Such a spring helps lift a heavy ladder with a hatch and fix it in the desired direction.
Those. Every time you go up to the attic, you will no longer need to use much effort to lift the usually massive hatch cover.


In addition, a bracket that will help fix the open hatch in a certain position will not be superfluous. This way, you will not allow the hatch to open at a greater angle than it was designed for, and the lid that flies down will not accidentally hit a person passing by on the head.

You can also use a so-called gas lift for a massive attic hatch - such devices are actively sold today for heavy doors. All this will also help to easily open and close the hatch upward, and the gas elevator simply will not allow the lid to drop quickly and sharply.
After all, there are situations when a person decided to go down from the attic using a ladder, began to close the hatch cover behind him, and it simply slammed shut under its own weight. The result is a concussion and a rapid flight down. Think about it, because this is easy to avoid.
You can also use a steel chain to secure the hatch cover, as here:

Step 3. Install the spring mechanism
It is also necessary to consider not only its component elements for a folding ladder, but also the main spring mechanism. We are talking about a device that will ensure reliable fixation of the entire staircase structure in the closed position in the attic.
But keep in mind that the stronger and heavier this fixation turns out, the more effort you will then have to put in to open the ladder and unfold it. And the greater the load will be on the mechanism itself, but it does not last forever.


Another important point: the greater the slope of the ladder itself, the greater the load will be placed on the place where it is attached to the attic floor. The smallest load will be at an installation angle of 90 degrees. But you can’t install a ladder that way, of course, so the optimal angle you can aim for is in the range of 65 to 75 degrees.
Step 4. Making an attic hatch
Now think about the design of the hatch itself. It may have one roof or two (upper and lower), additional holding mechanisms and even remote control.
Here is the detailed one step-by-step instruction, which will be convenient for you to use:
- Step 1. Take the necessary measurements and draw them on the plywood.
- Step 2: Make it side walls by applying glue to the joints of the future hatch.
- Step 3. Fasten all parts with screws.
- Step 4. Again coat all edges with PVA and glue the bottom.
- Step 5. Hammer the staples to secure them using a construction stapler.
- Step 6. Make a spacer from the MDF board.
- Step 7. Place the spacer in the box - this will give you an idea of where to apply the glue.
- Step 8. Using screws, attach the spacer to the prepared frame.
- Step 9. Draw a line on the bottom of the box and follow the markings with staples again.
- Step 10: Nail the bottom to the spacer.
- Step 11. Place thermal insulation on the bottom of the box.
- Step 12. Place window insulation into the cracks of the frame.
- Step 13. Using a stapler and screws, nail the lid to the box.
Our master classes will also help you, which wonderfully illustrate the process of making attic hatches with stairs from different materials And different designs:


Continuation:

Step 5. Install the hatch and ladder into the opening
Whether you made the hatch and attic ladder yourself, or you decided not to bother and purchased a ready-made structure, in any case, now you will have to face the same difficulties in the process of installing them.
So, if the ceiling of your attic is made of concrete, the opening for access to the roof must be made in advance - cutting it out later will be difficult. But in wooden floor the hatch should be installed between load-bearing beams, the distance between which is at least 60 centimeters, but not more than 1 meter.
It is important that when a person ascends and descends along such a ladder, the entire load is evenly distributed between the beams, so the hatch with the ladder must be installed so that the lid opens parallel to the beams, but not across them. Like here:

Another example of installing a hatch with a ladder in a wooden ceiling:

As you can see, using wooden triangles (kerchiefs) a special niche was built in the corners of the hatch cover, into which the insulation will then be inserted.

In fact, all this is one day’s work for experienced craftsman and great practice for a beginner. Feel free to get started!
Installation of fire escapes for the attic
In a separate chapter we will note the arrangement of attic hatches with stairs, which have another purpose - to be fireproof.
Let us explain in more detail. At the moment of a fire, when the exit from the house is blocked, the only option is the attic hatch. It’s enough just to climb up it and get out onto the roof, and from there you can go down either along the wall of the house or wait for help.
That is why they often put so-called fire hatches to the attic, which help to evacuate the house at the right time. Therefore, for this purpose, the hatch and ladder are made exclusively from metal, and only occasionally from wood treated with propylene. Naturally, the last option is less reliable.
Such designs are mandatory in office buildings, government and commercial banks, hotels and educational institutions. And also in all those rooms where fire itself is more possible and predictable. And the hatch and ladder look like this:

In terms of their design, fire escapes with an attic hatch are not very different from ordinary ones, in just a few respects:
- The hinges here are mounted only on the top side, and never on the bottom.
- Also, the sash should only open upward.
- The box is made reinforced, corner type.
Types and groups according to fire resistance time
According to fire resistance, attic hatches are also divided into three main groups:
- First group. These are the best hatches in terms of protection from open fire, toxic smoke and gases. Their insulation consists of several layers, and the structure itself can withstand an entire hour of exposure to flame without losing its most important properties.
- Second group. Such structures have average fire insulation. Such a hatch can withstand fire for as long as half an hour without any special changes in its properties.
- Third group. X Good protection against fire, but the safety margin is small, only about 15 minutes. For a residential building, this is the simplest and most reliable option, because this time should be just enough for all household members to climb onto the roof.
Requirements for the manufacture of a fire hatch and ladder
Such products have special requirements for the gap between the hatch cover and attic floor: it should be minimal. And the box itself can even be made of wood, only if it itself has been previously impregnated with fire retardant compounds. But most often such stairs are made of metal with a thickness of 1-2 millimeters to 2 millimeters.
Naturally than thinner metal, the less it can withstand fire. Agree, if the walls are already on fire, and there is no way out of the windows or doors, then the stairs along which you can escape to the attic should certainly be intact, and not light up like a match.
And they often don’t know about such a moment. There are no special separate GOSTs for the production of such structures from stairs with a hatch. There are only recommendations and separate fire resistance tests. This includes such specific concepts as the material used to make a staircase with a hatch, the presence of a special seal that will not allow fire to spread, and heat-insulating material that does not support combustion. All this is spelled out in modern SNiPs 2.01.02-85.
And finally, we have prepared for you this nice bonus that will help you easily lift any objects up the stairs:

1. Introduction. (Fig. 1)
Introduction
Introduction 2. Making a hatch to exit into the attic and attaching an attic ladder 3. Making and assembling a folding wooden ladder 1. Introduction. Michail RybakovWhen arranging a private home, it is impossible to do without a staircase. . (Fig. 2, 3)
Depending on the area and number of floors of the room, these can be like luxurious staircases in private houses made of stone and concrete, covered with carpets and allowing several people to pass at the same time, there can be more modest structures, one and a half meters wide made of wood, metal or glass, or compact narrow screw ones space saving stairs
 Michail Rybakov
 Depending on the area and number of floors of the room, these can be like luxurious staircases in private houses made of stone and concrete, covered with carpets and allowing several people to pass at the same time, there can be more modest structures, one and a half meters wide made of wood, metal or glass, or compact narrow screw ones space saving stairs
Even living in one-story house, periodically there is a need for a ladder to climb to the attic. Articles on how to calculate the size of a staircase and build a staircase made of concrete and wood, what a decking staircase should be, are already on our website, and you can get acquainted with them by following the links: “Coatings for wooden terraces”, “Construction of porcelain stoneware steps for stairs" , "Do-it-yourself staircase. calculations and views." , "Do-it-yourself wooden staircase. methods of arrangement" , "How to install glass railings on the stairs." , "Design of a “living” green concrete house." , "How to make concrete floor on the ground in a private house." . (Fig. 4, 5)
This time it's time to explore the possibility of building an attic staircase with your own hands
 Michail Rybakov
 This time it's time to explore the possibility of building an attic staircase with your own hands
 Depending on the area and number of floors of the room, these can be like luxurious staircases in private houses made of stone and concrete, covered with carpets and allowing several people to pass at the same time, there can be more modest structures, one and a half meters wide made of wood, metal or glass, or compact narrow screw ones space-saving stairs. Even when living in a one-story house, from time to time there is a need for a ladder to climb to the attic. Articles on how to calculate the size of a staircase and build a staircase from concrete and wood, what a decking staircase should be, are already on our website, and you can read them by following the links: Coatings for wood terraces, Design of porcelain stoneware steps for stairs , Do-it-yourself staircase calculation and types, Do-it-yourself wooden staircase arrangement methods, How to install glass railings on the stairs, Design of a “living” green concrete house, How to make a concrete floor on the ground in a private house. This time it's time to explore the possibility of building an attic staircase with your own hands. Michail Rybakov
 Stairs for climbing into the attic can come in a variety of designs and models. If space allows, then install a flight of stairs or a spiral staircase. Very often, modular stairs or a transformer staircase are used to arrange access to the attic. Stairs of any design will perfectly serve as a device leading to the attic, but most often it happens that there is either minimal or no space for arranging an attic staircase. In this case, folding and sliding attic stairs come to the rescue. . (Fig. 6, 7)
They are made of metal or wood
 Michail Rybakov
 They are made of metal or wood
 Very often, modular stairs or a transformer staircase are used to arrange access to the attic. Stairs of any design will perfectly serve as a device leading to the attic, but most often it happens that there is either minimal or no space for arranging an attic staircase. In this case, folding and sliding attic stairs come to the rescue. They are made of metal or wood. Michail Rybakov
 At the same time, no less important point is the correct arrangement of the hatch leading to the attic. In this article, I propose to consider the manufacture of folding attic ladders and proper equipment for the opening and hatch cover.
2. Making a hatch to access the attic and attaching the attic ladder. (Fig. 8)
Making a hatch for access to the attic and attaching the attic ladder
 They are made of metal or wood. At the same time, an equally important point is the correct arrangement of the hatch leading to the attic. In this article, I propose to consider the manufacture of folding attic ladders and proper equipment of the opening and hatch cover 2. Manufacturing of a hatch for access to the attic and fastening the attic ladder. Michail Rybakov
 Before building and installing a staircase (folding or sliding), you must complete whole line preparatory activities. These activities include the preparation of material, tools, as well as strengthening the entrance opening leading to the attic. (Fig. 9)
These activities include the procurement of material, tools, as well as strengthening the entrance opening leading to the attic
 In this article, I propose to consider the manufacture of folding attic ladders and proper equipment of the opening and hatch cover 2. Manufacturing of a hatch for access to the attic and fastening the attic ladder. Before building and installing a staircase (folding or sliding), it is necessary to carry out a number of preparatory measures. These activities include the preparation of material, tools, as well as strengthening the entrance opening leading to the attic. Michail Rybakov
 * The list of tools consists of the following list: tape measure, square, pencil, hacksaw, saws, hammer, screwdriver, drill, (possibly a hammer drill), chisel, bolts, screwdriver, pliers. It may also be useful for household milling machine. (“Drill and screwdriver”, “Power tools. hammer drill, jackhammer”, “Power grinding tools”, “Jigsaws, reciprocating saws, planes, milling machines”).
* Add to list necessary materials included the following: wooden blocks and boards of individual size, plywood, polystyrene or foam plastic (for insulating the lid), vapor barrier film, ready-made canopies, hinges and lifting mechanism(implemented in construction stores in a large assortment), boards or beams (depending on the height, load and your preferences) for making strings and steps, sealant and seal (silicone or rubber).
Now let's try to make and install a hatch leading to the attic with a cover. To do this, we take measurements of the existing opening (we expand or narrow it as necessary). It is most convenient to use the attic exit opening with minimum size 1.30 m * 1.40 m, but since everything is individual, first of all focus on the capabilities of your ceiling surface and construction features the roof of your house. (Fig. 10, 11, 12, 13, 14, 15)
 * The list of tools consists of the following list: tape measure, square, pencil, hacksaw, saws, hammer, screwdriver, drill, (possibly a hammer drill), chisel, bolts, screwdriver, pliers. A household milling machine may also come in handy (Drill and screwdriver, Power tools: hammer drill, jackhammer, Grinding power tools, Jigsaws, reciprocating saws, planes, milling machines) * The list of required materials included the following: wooden blocks and boards of individual size, plywood, polystyrene or foam plastic (for insulating the lid), vapor barrier film, ready-made canopies, hinges and a lifting mechanism (sold in a large assortment in hardware stores), boards or bars (depending on the height, load and your preferences) for making strings and steps, sealant and seal (silicone or rubber) Now let's try to make and install a hatch with a lid leading to the attic. To do this, we take measurements of the existing opening (we expand or narrow it as necessary). It is most convenient to use an attic exit opening with a minimum size of 1 30 m * 1 40 m, but since everything is individual, first of all focus on the capabilities of your ceiling surface and the construction features of the roof of your house. 10, 11, 12, 13, 14, 15) Michail Rybakov
 It is most convenient to use an attic exit opening with a minimum size of 1 30 m * 1 40 m, but since everything is individual, first of all focus on the capabilities of your ceiling surface and the construction features of the roof of your house
 Michail Rybakov
 It is most convenient to use an attic exit opening with a minimum size of 1 30 m * 1 40 m, but since everything is individual, first of all focus on the capabilities of your ceiling surface and the construction features of the roof of your house
 * The list of tools consists of the following list: tape measure, square, pencil, hacksaw, saws, hammer, screwdriver, drill, (possibly a hammer drill), chisel, bolts, screwdriver, pliers. A household milling machine may also be useful (Drill and screwdriver, Power tools, hammer drill, jackhammer, Power sanding tools, Jigsaws, reciprocating saws, planes, milling machines) * The list of required materials includes the following: wooden blocks and boards of individual size, plywood, polystyrene or foam plastic (for insulating the lid), film - vapor barrier, ready-made canopies, hinges and lifting mechanism (sold in hardware stores in a large assortment), boards or beams (depending on the height, load and your preferences) for making strings and steps, sealant and a seal (silicone or rubber) Now let's try to make and install a hatch leading to the attic with a lid. To do this, we take measurements of the existing opening (we expand or narrow it as necessary). It is most convenient to use an attic exit opening with a minimum size of 1 30 m * 1 40 m, but since everything is individual, first of all focus on the capabilities of your ceiling surface and the construction features of the roof of your house. Michail Rybakov
 It is most convenient to use an attic exit opening with a minimum size of 1 30 m * 1 40 m, but since everything is individual, first of all focus on the capabilities of your ceiling surface and the construction features of the roof of your house
It is most convenient to use an attic exit opening with a minimum size of 1 30 m * 1 40 m, but since everything is individual, first of all focus on the capabilities of your ceiling surface and the construction features of the roof of your house
 * The list of tools consists of the following list: tape measure, square, pencil, hacksaw, saws, hammer, screwdriver, drill, (possibly a hammer drill), chisel, bolts, screwdriver, pliers. A household milling machine may also be useful (Drill and screwdriver, Power tools, hammer drill, jackhammer, Power sanding tools, Jigsaws, reciprocating saws, planes, milling machines) * The list of required materials includes the following: wooden blocks and boards of individual size, plywood, polystyrene or foam plastic (for insulating the lid), film - vapor barrier, ready-made canopies, hinges and lifting mechanism (sold in hardware stores in a large assortment), boards or beams (depending on the height, load and your preferences) for making strings and steps, sealant and a seal (silicone or rubber) Now let's try to make and install a hatch leading to the attic with a lid. To do this, we take measurements of the existing opening (we expand or narrow it as necessary). It is most convenient to use an attic exit opening with a minimum size of 1 30 m * 1 40 m, but since everything is individual, first of all focus on the capabilities of your ceiling surface and the construction features of the roof of your house. Michail Rybakov
  Michail Rybakov
 This will be required to create a sketch indicating the exact calculated dimensions of the future staircase
 To do this, we take measurements of the existing opening (we expand or narrow it as necessary). It is most convenient to use an attic exit opening with a minimum size of 1 30 m * 1 40 m, but since everything is individual, first of all focus on the capabilities of your ceiling surface and the construction features of the roof of your house. Next, we transfer the obtained measurement results onto paper. This will be required to create a sketch indicating the exact calculated dimensions of the future staircase. Michail Rybakov
 We begin to manufacture the frame of the future hatch. Rama plays vital role narrower in the design, because it is a load-bearing part to which the insulated cover and ladder will be attached. In this regard, the reliability of its device must be approached with special attention. (Fig. 18)
In this regard, the reliability of its device must be approached with special attention.
 This will be required to create a sketch indicating the exact calculated dimensions of the future staircase. We begin to manufacture the frame of the future hatch. The frame plays a critical role in the design because it is the load-bearing part to which the insulated cover and ladder will be attached. In this regard, the reliability of its device must be approached with special attention. Michail Rybakov
 So on wooden blocks(or boards) of the appropriate size, the corners are filed, so that when they are joined to each other, a frame with right angles is obtained. After this, they perform a kind of “fitting” of the frame to the attic opening and, after making sure that the corners correspond to 90 degrees, the joints of the corners are coated with glue. In order for the corners to maintain their “correct” 90 degrees, spacers or temporary gussets are installed in the corners of the frame and then parts of the frame are twisted with self-tapping screws. (“Mobile wooden house on skis with your own hands”, “Building a podium. Photo in the interior”, “How to make a wooden floor on the ground on joists”). (Fig. 19, 20, 21)
 Michail Rybakov
 In order for the corners to retain their “correct” 90 degrees, spacers or temporary gussets are installed in the corners of the frame and then parts of the frame are twisted with self-tapping screws (Mobile wooden house on skis with your own hands, We are building a podium photo in the interior, How to make a wooden floor on the ground on joists)
 In this regard, the reliability of its device must be approached with special attention. So, the corners are sawed on wooden blocks (or boards) of the appropriate size, so that when they are joined to each other, a frame with right angles is obtained. After this, they perform a kind of “fitting” of the frame to the attic opening and, after making sure that the corners correspond to 90 degrees, the joints of the corners are coated with glue. In order for the corners to retain their “correct” 90 degrees, spacers or temporary gussets are installed in the corners of the frame and then parts of the frame are twisted with self-tapping screws (Mobile wooden house skiing with your own hands, We are building a podium photo in the interior, How to make a wooden floor on the ground on joists). Michail Rybakov
 In order for the corners to retain their “correct” 90 degrees, spacers or temporary gussets are installed in the corners of the frame and then parts of the frame are twisted with self-tapping screws (Mobile wooden house on skis with your own hands, We are building a podium photo in the interior, How to make a wooden floor on the ground on joists)
 In this regard, the reliability of its device must be approached with special attention. So, the corners are sawed on wooden blocks (or boards) of the appropriate size, so that when they are joined to each other, a frame with right angles is obtained. After this, they perform a kind of “fitting” of the frame to the attic opening and, after making sure that the corners correspond to 90 degrees, the joints of the corners are coated with glue. In order for the corners to retain their “correct” 90 degrees, spacers or temporary gussets are installed in the corners of the frame and then parts of the frame are twisted with self-tapping screws (Mobile wooden house on skis with your own hands, We are building a podium photo in the interior, How to make a wooden floor on the ground on joists) . Michail Rybakov
 After this, the hatch frame can be attached to the base frame of the opening or secured to the ceiling elements with nails (nails of at least 100 mm must be used).
Important! The ladder will be placed on top of the manhole cover, so no braces can be left at the corners of the frame so as not to impede its rise. (Fig. 22)
The ladder will be placed on top of the manhole cover, so no bevels - spacers can remain at the corners of the frame, so as not to interfere with its rise
 In order for the corners to retain their “correct” 90 degrees, spacers or temporary gussets are installed in the corners of the frame and then parts of the frame are twisted with self-tapping screws (Mobile wooden house on skis with your own hands, We are building a podium photo in the interior, How to make a wooden floor on the ground on joists) . After this, the hatch frame can be attached to the base frame of the opening or secured to the ceiling elements with nails (nails of at least 100 mm must be used). Important!. The ladder will be placed on top of the manhole cover, so no braces can be left at the corners of the frame so as not to impede its rise. Michail Rybakov
 The manhole cover should be light, strong and warm at the same time. To do this, between sheets of plywood, plastic or other strong material(cut according to the size of the attic exit) a sheet of polystyrene foam and a vapor barrier are placed. This way, you can insulate the opening cover and avoid significant heat loss. A square of insulated plywood is framed with another frame made of boards. Here you can already experiment with the fastening.
Using ready-made canopies, the lid is attached to the frame. . (Fig. 23, 24)
All that remains is to attach a convenient handle and the selected lifting mechanism to the hatch cover (facilitating operation - raising and lowering the hatch cover)
 Michail Rybakov
 All that remains is to attach a convenient handle and the selected lifting mechanism to the hatch cover (facilitating operation - raising and lowering the hatch cover)
 A square of insulated plywood is framed with another frame made of boards. Here you can already experiment with the fastening. Using ready-made canopies, the lid is attached to the frame. All that remains is to attach a convenient handle and the selected lifting mechanism to the hatch cover (facilitating operation - raising and lowering the hatch cover). Michail Rybakov
 It is also better to seal the hatch frame with sealant or glue when attaching it to the harness. This will prevent drafts from occurring. The extreme edges of the lid can additionally be glued with rubber or silicone insulation. (“Insulation of the ceiling”, “Insulation of the walls”, “Methods of cladding and insulation of the walls of a frame house.”).
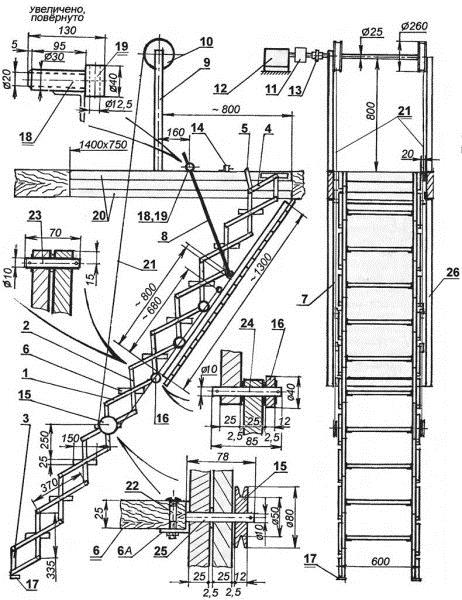
3. Manufacturing and assembly of a folding wooden ladder. (Fig. 25)
Manufacturing and assembly of a folding wooden ladder
Having secured the hand-made hatch in the ceiling opening, you can begin making a folding staircase. The first step is to measure the required length of timber for the bowstring. The staircase will consist of three parts. Each part is shorter than the previous one, starting from the top element. This necessary condition for convenience when folding the ladder. It is also necessary to take into account the moment of passage of the folded ladder into the opening frame. That is, when folded, the ladder will look like a three-dimensional set of wooden beams on the hatch cover, and in the process of closing the hatch, the ladder may cling to the edge of the opening. Therefore, even at the stage of drawing up the drawing, it is necessary to provide for the indentation of the stairs from the edge. (Fig. 26)
Therefore, even at the stage of drawing up the drawing, it is necessary to provide for the indentation of the stairs from the edge
Returning to the manufacture of the stairs, let us pay attention to the fact that after cutting the timber for the bowstring, we should end up with three pairs of beams of different lengths. Now we get down to making steps - crossbars. The crossbars are also cut from the board according to custom sizes your stairs. In order to securely and beautifully fasten the crossbars to the bowstring bars, with inside The bowstring beams are cut to the size of the step and about five millimeters deep. Having inserted the steps into the notch of the bowstring, secure them with a screwdriver and PSh self-tapping screws. Continue the procedure with all crossbars. (Fig. 27)
Continue the procedure with all crossbars
 The rungs are also cut from the board according to the individual dimensions of your staircase. In order to reliably and beautifully fasten the crossbars to the string bars, a cut is made on the inside of the string bars to the size of the step and about five millimeters deep. Having inserted the steps into the notch of the bowstring, secure them with a screwdriver and PSh self-tapping screws. Continue the procedure with all crossbars. Michail Rybakov
 The next step will be the assembly and fastening of the elements of the folding ladder to the frame of the attic hatch.
Hinges for connecting the folding parts of the stairs can be purchased ready-made, or you can make them yourself. Such devices look like two connected and freely rotating metal strips. They should be made of metal thick enough to support the weight of the ladder without bending. (Fig. 28)
They must be made of metal thick enough to support the weight of the ladder without bending.
 Continue the procedure with all crossbars. The next stage will be the assembly and fastening of the elements of the folding ladder to the frame of the attic hatch. Hinges for connecting the folding parts of the ladder can be purchased ready-made, or you can make it yourself. Such devices look like two connected and freely rotating metal strips. They should be made of metal thick enough to support the weight of the ladder without bending. Michail Rybakov
 The hinges must be fastened so that the bend (the junction of the metal strips) is located exactly on the strip of connection between the parts of the stairs. To do this, parts of the stairs are laid on flat surface, tightly joining each other. Fold the hinges with a tick and spread them exactly to the distance necessary to fix them to the parts of the stairs. It is better to fasten the hinges with bolts 6 - 8 mm. When using self-tapping screws, there is a high probability that they will quickly become loose, and the entire structure will have to be redone. After fixing the loops, be sure to check the result for synchronicity of bending.
Having connected the first two parts, we carry out the same actions with the third element. After connecting all three elements of the staircase with loops, check them again by folding and unfolding the structure.
The assembled ladder is attached to the hatch cover with metal corners. Using bolts, the corners are fixed to the surface of the stairs and the cover.
After securing the ladder, the final touch will be the installation of supporting hinges and a lock - a latch, which will hold the hatch cover with the ladder closed.
The hinges consist of four long strips (two for each). They are connected in such a way that when opened they remain at a certain angle, preventing the lid from folding back completely. A similar type of hinges can be seen in old wardrobes, trellises, and often in modern bedside tables and secretaries. (Fig. 29)
A similarity to such hinges can be seen in old wardrobes, trellises, and often in modern bedside tables and secretaries
 After securing the ladder, the final touch will be the installation of supporting hinges and a lock - a latch, which will hold the hatch cover with the ladder closed. The hinges consist of four long strips (two for each). They are connected in such a way that when opened they remain at a certain angle, preventing the lid from folding back completely. A similar type of hinges can be seen in old wardrobes, trellises, and often in modern bedside tables and secretaries. Michail Rybakov
 Springs that make it easier to use the stairs are present in finished products. In staircases made by hand, as a rule, no one bothers to install springs. But if you wish, you can always purchase such accessories at specialized points and install them according to the instructions. (Fig. 30)
But if you wish, you can always purchase similar accessories at specialized points and install them according to the instructions
 A similar type of hinges can be seen in old wardrobes, trellises, and often in modern bedside tables and secretaries. Springs that make it easier to use the stairs are present in finished products. In staircases made by hand, as a rule, no one bothers to install springs. But if you wish, you can always purchase such accessories at specialized points and install them according to the instructions. Michail Rybakov
 After assembling and installing the ladder, you need to take care of protecting the wood. That's all for this wooden elements treated with antiseptic agents and covered with toning substances. In this case, you can use stain, varnishes, and paints. (
Currently, every developer is trying to make maximum use of the entire available area of his home. However, getting into the attic without a ladder is almost impossible. Do-it-yourself attic staircase - best option for safe access to the attic.
Attic stairs can be located both indoors and outdoors. Of course, when the staircase is located inside, it is much more convenient to use - you don’t need to go out into the cold in winter or get wet in the rain in autumn.

There are several types of attic stairs, namely:
- folding;
- stationary;
- portable.

Stationary stairs with railings and wide flights are the most convenient, but their use is limited due to the impossibility of operation in small areas.
Portable stairs are used mainly as a temporary option and serve to access rooms that are rarely used. The main disadvantage of such a ladder is low safety.

Folding attic ladders are the middle link between stationary and portable ones. In terms of convenience, they are almost as good as stationary ones, but they take up significantly less space. In terms of safety, they are significantly superior to portable structures.
The choice in favor of one type or another depends on several factors:
- the area of the room where the staircase will be located;
- purpose of the attic space;
- possible angle of inclination.

Standard sizes
There are a number of standards that an attic ladder must comply with:
- the optimal width of the march should be about 65-110 cm;
- the height should not exceed 3.5 m. This is due not only to the fact that the rigidity of the structure is significantly reduced, but also to the fact that a fall from such a height can lead to serious injuries;
- the number of steps should usually not exceed 15;
- It is customary to make a distance of about 19 cm between steps;
- the thickness of the steps is usually 18-22 mm;
- The standard tilt angle is 60-75 degrees. A small corner requires a lot of space, and a large one is dangerous to use;
- the folding ladder must withstand a load of 150 kg;
- The steps should be installed parallel to the floor and they should not be slippery.
Manufacturing process
Making attic stairs with your own hands is not at all as difficult as it might seem at first glance. Of course, you won’t achieve the beauty that industrial models have, but it’s worth a try. Do-it-yourself drawings of attic stairs that you can make can simply be found on our website.

The hatch is the basis of any attic staircase
You can make a hatch with your own hands using the following materials:
- bars 50×50 mm;
- plywood.
The work order is as follows:
- we determine the location and dimensions of the future hatch;
Note!
TO overall dimensions 7-8 mm should be added to the hatch so that the lid closes easily and without squeaking.
- cut the timber into 4 pieces of the required size;
- we cut grooves at the ends of the beams;
- lubricate the grooves with glue and connect the beams, strengthening the joint with self-tapping screws;

- so that the diagonal does not go away, we screw the gussets;
- fix the plywood;
- we try on the hatch in the opening;
- to close the hatch well, we will cut a latch into the lid;
- To open the hatch, we will use a handle that is inserted into the hole and presses the latch.

Required tools and materials
To make your own attic stairs yourself, you must have the entire list:
- wood hacksaw;
- gun with polyurethane foam;
- a set of screwdrivers or a screwdriver with a set of bits;

- various screws, anchors;
- roulette;
- card loops;
- bars 20-30 mm thick.

These are only the basic tools that will be needed for self-production if you already have a ready-made wooden extension ladder 30 cm longer than necessary to the level of the opening.
Simple design
As an example, let's look at how to make an attic ladder with your own hands.
The instructions will help you understand the principle of operation:
- On the finished solid wooden staircase we attach 2 bars along the width, on the lower and upper parts. Moreover, we fasten the upper bar on the hinges, and fasten the lower one rigidly;
- We cut the stairs into 2 parts. measuring 2/3 of the length. The upper part will be longer, the lower part will be short;
- to add rigidity, we fix 2 slats diagonally;
- we connect both parts of the ladder with loops;
- using anchors we secure the top bar under the hatch;

- so that the lower part does not open, it is secured with a hook. The loop is located on the stringer above the cutting site.
- The finished attic ladder is pressed against the wall surface and fixed.

The main disadvantage that it has this design attic staircase, is its appearance and the fact that all fasteners and bars are visible. However, even such a DIY staircase to the attic will significantly simplify the difficulties of getting up and down from the attic space.
Folding design on bowstrings
To manufacture the structure, several steps must be completed:
- Let's divide the total height into 3 parts. The first part will correspond to the dimensions of the hatch, the second is slightly smaller, and the third will cover the remaining distance to the floor;

- measure the angle of the hatch using a small tool;
- we transfer the angle to the boards, thereby marking the steps;
- drill holes at the site of the future hinge between the sections;
- polish all edges;
- we cut the boards in the places where the hinges will be installed;
- we cut and grind the steps;
- under the steps we make small notches in the bowstrings;
- we insert the steps into the recesses, placing them on glue and fastening them with self-tapping screws;
- We connect the sections with special loops. To do this, be sure to place the sections on a flat surface;

Note!
It is recommended to work at heights with a partner.
This will not only help avoid injury, but will also significantly speed up the entire process!
The price of a hand-made staircase is significantly lower than the price of a factory design, so if financial issue It’s very difficult – be sure to try to do everything yourself.

Conclusion
Purchasing a ready-made staircase to the attic is the most simple option, however, if available necessary tools and basic skills it’s not at all difficult to do it yourself. In the video presented in this article you will find additional information on this topic.
For country cottages, private houses and simple country houses, equipped with an attic, the presence of a convenient and reliable staircase leading to the mentioned room is a common necessity of life.
At the same time, the staircase does not have to be capital and bulky at all - you can assemble and install an excellent folding structure, which will be in no way inferior to stationary stairs.

You can complete all the related tasks yourself, saving money and testing your own strength.
There are several types of stairs that can be installed to access your attic.
Stationary


A staircase with wide flights and railings is the most reliable, durable and easy-to-use design. However, the possibility of arranging such a staircase is not available everywhere - it certainly cannot be equipped in small areas.
Portable

They are used primarily as a temporary option, as well as for access to rarely used rooms. The main disadvantages of such a ladder are low safety and ease of use. Therefore, if possible, the use of such a design should be abandoned.
Folding

They are something between portable and stationary ladders. In terms of ease of use and safety, they are almost in no way inferior to full-fledged ones. stationary structures and have, at the same time, a significant advantage - they require very little space for their arrangement. Therefore, when self-production It is recommended to give preference to folding stairs.
Selection of materials
An equally important point is the choice of materials from which the stairs to the attic will be assembled. Wood is usually used to make the main elements of folding sectional stairs, and fasteners are traditionally made of metal.

Currently there are many various materials, types of controls and fasteners, which makes it possible to easily assemble a folding ladder that will best suit your specific room.
When choosing materials for the manufacture of attic stairs, you need to take into account a number of important factors. First of all, decide on functional purpose structure, its type, width, as well as the optimal number of sections.

The functional purpose of the stairs to the attic is very important in terms of determining the maximum permissible load on the steps. So, for example, factory-made wooden stairs can withstand an average load of 150 kgf, metal ones - 250 kgf. For homemade stairs, these figures are slightly reduced.
This does not mean that the steps will not be able to withstand a higher load, but it is definitely not worth loading them regularly, otherwise the structure will break very quickly.

The width of the stairs should not be greater than the width of the attic opening.
When choosing the dimensions of the attic ladder, be guided by proven and approved standards.


Remember: the steps must be installed strictly parallel to the floor surface. In addition, the steps of the stairs must be non-slip. To do this, you can stuff linings of any non-slip material over the base material.

Guide to making a staircase to the attic
There is nothing overly complicated about making your own stairs to the attic. Of course, an inexperienced craftsman is unlikely to be able to assemble a structure with the same attractive appearance as factory-made models, but it’s definitely worth a try.

Before starting work, create a drawing of the future staircase. If you do not have the necessary skills, order the creation of a drawing from a specialist or select suitable scheme from the options presented in open sources.

Tools
Prepare everything at once necessary equipment so as not to be distracted by searching for missing tools in the future.
You will need:

Also, before starting work, you need to buy or assemble an ordinary ladder. For self-assembled With this design you only need to fix the transverse steps between two long vertical posts and further strengthen the structure.
The finished staircase should be approximately 30 cm longer than the distance from the level of the opening to the attic to the floor.

You can also easily handle making a hatch with your own hands. The only materials you need are sheets of plywood and wooden beam 5x5 cm.
First step. Choose a location to place the hatch and determine its optimal dimensions. Add approximately 7-9 mm on each side to the dimensions of the hatch so that in the future you can easily close the lid without squeaks or other noise. Make the opening according to the specific dimensions.

Second step. Cut the wooden beam into four parts in accordance with the dimensions of the hatch.

Third step. Make grooves at the ends of the bars. Lubricate the prepared grooves and connect the bars into a rectangular (square) structure. Additionally strengthen the connections using self-tapping screws. Screw the gussets so that the diagonal does not move.
Fourth step. Attach the plywood cover to the resulting base and try on the product in the hatch opening.

Fifth step. Install a regular latch into the hatch cover. You will open the latch using a handle. Attach it to the lid and finally fix the product in the pre-aligned opening. Usually loops are used for this.

Simple folding ladder
Start making a folding ladder. It is assumed that you already have at your disposal the previously mentioned wooden extension ladder.

First step. Attach the width of the beam to the bottom of the ladder. Attach the same block to the top of the product. In this case, the lower bar must be fixed rigidly, and the upper one - on the hinges.
Second step. Saw the ladder into 2 parts. The upper part should have a length of about 2/3 of the total length of the stairs.
Third step. Attach a pair of slats to provide additional diagonal rigidity.
Fourth step. Connect the parts of the structure using loops.
Fifth step. Secure the top beam under the hatch using anchors.
Sixth step. Secure the bottom of the ladder with a hook - this will prevent it from opening spontaneously. Place the loop on the stringer above the cutting line.
Seventh step. Press the finished structure against the wall surface and secure.
The main disadvantage of such a homemade staircase is its not very attractive appearance - the entire beam and fastening elements remain visible. However, such a staircase copes 100% with the main tasks - ensuring a convenient and safe ascent and return descent.

An improved and more attractive version of the previous design. There is also nothing complicated in making such a staircase; it is enough to follow all the instructions step by step.

First step. Share a regular sideboard wooden stairs into 3 parts. Make the first part according to the dimensions of the attic hatch, make the second a little smaller than the first, and make the third such that the remaining space to the floor surface is completely covered.
Second step. Take a small tool and measure the corner of the attic hatch. Transfer the angle to the boards, thus marking the location of the steps.
Third step. Drill holes where the hinges will be located between the individual stair sections.
Fourth step. Sand the edges of the structures.
Fifth step. Saw the boards at the hinge points.
Sixth step. Cut and sand the steps.
Seventh step. Prepare indentations for the steps in the strings.
Eighth step. Insert the steps into the prepared recesses. Use glue and further strengthen the connections with self-tapping screws.
Ninth step. Connect the sections of the stairs using special loops. To do this, the sections must be placed on a stable, flat surface.

Tenth step. Check the operation of all sections. If you find any defects or deviations, try to correct them immediately.
Eleventh step. Sand everything down wooden surfaces and coat them with varnish.
Twelfth step. After the varnish has completely dried, install the structure in the attic hatch opening. If necessary, make final adjustments to the structural elements.

Thus, self-assembly stairs is extremely simple and accessible to almost every event. At the same time, the cost of a homemade staircase will be much lower compared to the price of a similar factory-made design. Follow the instructions and everything will definitely work out.
Good luck!
Also read the article on our website - do-it-yourself staircase to the basement.
Video - Do-it-yourself staircase to the attic