An elegant arch is an architectural element that can make any interior elegant and unique. A correctly chosen arch design will allow it to become the dominant point in the interior and collect the entire space of the apartment into a single whole. This article will tell you how to make an arch from plasterboard without the help of professional builders and unnecessary investments.

Peculiarities
Arched openings appeared in the East. Gradually get into the habit of replacing doorways decorative arches migrated to Europe. This method of designing interior passages not only solves the issue of increasing the space of rooms due to the absence of doors in them, but also decorates it, giving elegance and style to the home, refreshes a boring interior, adding an original touch to it.
Having decided to make an arch yourself, you should pay attention to plasterboard, since this type of material is the easiest to install (after all, serious knowledge and experience is required to form an arched opening from plaster or plaster), is available on the market and is inexpensive.

The main advantages of plasterboard arches are:
- light weight of the material (arches can be installed both on load-bearing walls and on not very strong partitions, without fear for the reliability of the structure);
- quick and easy installation;
- quality of the material - soft but durable material allows you to experiment when creating a unique style of space and cut out any fancy design shape;
- camouflage property. Plasterboard structures in the form of arches allow you to hide technical components and communications in the room;
- the ability to separate functional parts of one room;
- functionality (drywall openings may have niches for books or recesses for indoor plants).

Kinds
A classic plasterboard arch is a structure installed between adjacent rooms and supported on the sides by columns. Bypassing the usual plasterboard option, you can create an original asymmetrical shape that emphasizes the modernity of the interior.
According to the shape of the vault, arched structures are classified into the following main types:
- Roman. The most common type of arch. Its semicircular arch will be appropriate in any interior;
- square or portal. They are used to decorate wide openings;
- trapezoidal. Also often used when decorating wide openings;
- ellipsoidal. This type is similar to the classic design, but with a larger radius of curvature at the corners;


- gothic It has an ovoid arch with a pointed apex;
- Turkish. Elaborate design in oriental style;
- British. This type has strict forms. Will highlight the sophistication of any room;
- Thai or half arch. Asymmetrical vault: on the one hand there is a classic arch, on the other there is an arch in the form of a portal.


Modern designers, taking advantage of the excellent properties of the material, make completely original solutions. Interior arches are complemented with original lighting and LED lamps. These elements often play not only a decorative role, but also create additional local lighting in the apartment.
In addition to lamps, there is another design technique that adds beneficial features: design of shelves and niches both inside the structure and on its external sides. This idea helps create extra comfort, because on small shelves you can perfectly place souvenirs and family photos.

For various rooms
Plasterboard arches in modern interior- Not unusual. This architectural element allows you to abandon the usual doors, while creating a finished look for the doorway.
In small apartments there is often not enough space for open doors. For this reason, instead of a door, a beautiful and laconic arch is installed in the opening. Such arches act as a kind of border between adjacent rooms where there used to be a door, and actually expand the free space.

Choice in favor interior arch They also do it when redevelopment of the apartment is planned. For example, the exit from the kitchen to the balcony or from the living room to the kitchen can be designed in the form of an elegant arched opening. In this case, you have the opportunity to choose the shape of the opening you like (standard semicircle, trapezoid or other asymmetrical shape).

When it comes to expanding space, it would be useful to think about replacing doors arched opening in the hallway and in the corridor. These rooms serve more for connecting rooms than for comfortable living in them, so there is no need to think about preserving space when eliminating doors.
Often, in order to maintain the overall style of the apartment, all doorways are designed in the form of the same type of arches. This is not always true, and sometimes it will even overload the interior. But a couple of arched openings of the same shape in the upper part, one of which is complemented by an interesting configuration cut out of plasterboard on the wall, is a very stylish approach.

How to choose?
Previously, arches decorated only palaces and houses of wealthy people, but today this element can be found in any average apartment and even in a modern frame house(the wooden arch is cut down at the time of manufacturing the frame of the house itself).
When choosing an arch, you need to focus on its functional component. Arches can be active or passive. Passives are often found in residential buildings and perform the function of a simple transition, connecting two rooms. Their shapes are simple: ovals, portals or standard rectangles and trapezoids. Active arches require more complex shapes and often include additional decorative elements (shelves, lamps).

If you decide to replace a boring one metal door for an arch with a rounded top, experts recommend choosing a ready-made model, since in this case there is a question about the reliability of the structure.
Manufacturing
In order to make a classic arch with your own hands, you need to understand its structure and understand the subtleties of the technology for constructing this structure.
The curved arcs form the so-called vault of the arch. It may have a uniform coating or consist of various parts with gaps between them. You can revive a smoothly hemmed version of the arch vault using decorative relief and platbands on the edges of the arch.

The apex of an arch is the highest point of its arch. It serves as a strength element of the structure. Often the top is also an aesthetic fragment (for example, in oriental vaults). The wings extend from the tops downwards, their ends rest on supporting structures - beds, which can also be decorated decoratively.
The span of an arched vault is the width of the arc formed by the wings. The height of this arc from the center of the span to the apex is called the boom of the arch. An arched vault usually rests on pilaster semi-columns or goes inside the walls, resting on the blades (in this case, this vault is called a hanging vault). The portal is formed by a structure located below the pilasters and blades.

The apex, arch arch and portal are the main visible components of the structure. They are called an arched transom. Usually the fragment is designed in a single concept. The golden ratio of an arched structure is determined by the ratio F = (A + B) / B, if B≥A. This ratio in architecture is observed when A = 1/3 B. The arch will have the correct golden ratio if its height is approximately three times the width of the arch opening, otherwise you can get the effect of reducing the height of the room and spoil the overall interior.


Detailed calculations and assembly are described in subsequent sections. But besides installation work, it is also worth paying attention to finishing works: how to design and what is the best way to sheathe the arch to give it a beautiful look.
The following can be used as decorative materials for arch design:
- plastic, molding - budget and simple options;
- polyurethane is a flexible material used to form stucco on pediments, ceilings, and cornices;
- decorative rock– artificial or natural mineral. Most often used when designing arches in load-bearing walls or monolithic structures.


As for plastic, everything is simple. You can buy ready-made profiles in a store, choose the desired color, or paint it yourself and attach it with glue without much difficulty.
It is quite difficult to make polyurethane decor yourself, so they often resort to purchasing ready-made decorative elements. Stone cladding is an expensive but sophisticated option. The most commonly used stones are slate or shell rock. Acrylic artificial stone tiles are lighter in weight and can even be used for plasterboard partitions. As for texture, here, depending on the interior of the room and personal preferences, untreated surfaces and polished mirror versions of tiles can be used.

How to calculate?
When the task is to make an arch yourself, after the shape and size have been chosen, the master needs to first calculate the future product in order to determine the exact dimensions of the mounted parts. Do not be alarmed, since the calculations for this design are based on simple school formulas. When carrying out calculations, it is recommended to simultaneously draw a sketch of the future product on graph paper, after which the project is scaled to the specified dimensions of the product. As stencils, you can use thick cardboard or a profile sheet made of fiberboard. By attaching the template to the surface of the construction of a curved vault, you can more realistically assess the accuracy of previously performed calculations and, if necessary, correct it in time.

This article will consider an approximate calculation of a standard round arched vault for a straight doorway.
The main 3 parameters that should be known to the master are the width of the opening, the height of the future arch and the depth of the wall. There are two main methods of calculation: empirical and mathematical. The master himself decides which one will be more convenient for him. Calculation and drawing of the circumference of the arch must be carried out on paper on a scale 30% smaller than the real one.

When making an empirical calculation, you must first measure the door opening and transfer it to a sheet of paper. Draw the axis of symmetry of the doorway. Then they take a compass, place its leg on the axis point and make several different circles. The most suitable one is selected, and the remaining ones are removed using an elastic band.
When calculating the radius of an arch mathematically, the Pythagorean theorem is used:
R= L2 + (R2 – H2)
R= L2 + (R – H) 2


Transforming the formula, we get the following form:
R2 = L2 + R2 – 2HR + H2
Subtracting R we get:
L2 + H2 – 2HR = 0

After subsequent transformation we get:
Radius R as a result:
R = (L2 + H2) / 2H


Where R is the radius of the circle, L is half the chord of the arc (the size of this chord is equal to the length of the arch clearance). H – lifting height.

Due to the fact that the arch being made will include many fragments (in order to form them, you should take a board with the given dimensions), it is necessary to first calculate the dimensions of the element made from the board with the selected dimensions. The calculation is carried out from the reverse. It is necessary to calculate the maximum length of the part that will be made from an existing board with a certain width, taking into account the already known radius. Using the previous formulas, where all the relations are already known, you need to derive the following equality:

After the calculation has been completed and the project has been outlined, it will be possible to visually imagine what the structure will look like. If necessary, you can re-measure the parameters of the opening and easily correct the calculations, modify the drawing until it is appearance will not completely suit the master.
How to cut?
When the project is ready, we begin scaling the product on drywall. While maintaining the proportions of the product, they draw out the layout of the arch within the given parameters. Cutting out a piece of drywall the right size. To do this, use a special knife to draw along the drawn line and break off excess pieces of drywall with your hands.
You need to prepare two identical sheets. One of them is placed on a flat surface and a line is drawn through the center. Make a mark 2-3 cm above the bottom of the sheet and screw in a bolt or self-tapping screw. A rope is put on the bolt, the free part of which is tightened into a loop and a pencil is inserted into it. This system (similar to a compass) will allow you to draw an even bending line of the arch radius. Having determined the desired radius, pull the cord and draw a bend line with a pencil.


After this, the markings are repeated in a similar way on the second sheet of drywall. To avoid unnecessary steps, you can cut out the product blank on one sheet, place it on another sheet and trace it with a pencil along the contour of the product. This way you will get two identical pieces. It is best to cut products using special scissors for metal, carefully cutting off everything unnecessary.

Installation
In order to install a plasterboard arch in a doorway, you will need:
- plasterboard arch blanks;
- metal profiles;
- dowels;
- self-tapping screws of two types: 3.5×25 mm; 4.2×13 mm;
- metal scissors;
- pliers;
- screwdriver;
- perforator;

- roller with needles;
- construction tape or level;
- a simple pencil;
- gypsum putty;
- sanding paper;
- corners for walls;
- primer;
- cladding material (optional).

Before installing the frame of the structure, you should prepare the doorway. First you need to remove door frame and punch the opening up and to the sides to increase the space for the arch. The surfaces of the resulting opening are thoroughly cleaned, smoothing out rough irregularities, and removing dust and dirt.
Must be observed step by step instructions installation, then the arch structure will be securely installed and secured in the opening. First, guides made of metal profiles are attached to the upper part of the opening with dowels. Similar guides are also installed along the walls of the opening (to the level where the curved parts of the arch end).
After this, a product in the form of an arc is formed from the metal profile. Equidistant cuts are made along the edges of the profile using special metal scissors and the product is bent, focusing on ready-made plasterboard templates. Similarly, two such curved profiles are formed for each side.
You need to install a curved profile like this: attach the profile vertically to the guides with dowels, and attach it to the drywall using self-tapping screws. In order to assemble the frame more reliably, several pieces of profile are inserted between the arches inside the arch.

How to bend?
The next step in installing the arch is securing the arc-shaped part inside the structure. To do this, take a sheet of drywall. Carefully cut out a strip according to the width of the internal space of the arch, longer than it inner surface. When measuring the length, it would be a good idea to leave a margin of about 10-15 cm.
You can bend drywall using ordinary water. To do this, wet the bottom of the plasterboard strip and pierce it with roller needles. Next, you need to bend and attach this element inside the arch. This is done using adhesive tape and left to dry for some time. Homemade frame arches are ready.

How to putty correctly?
After the arch frame is assembled, all elements are securely fastened, and inner part completely dry, you can begin processing and external design of the structure.
To begin with, the entire surface of the arch is sanded using special paper, all irregularities are eliminated, and dust from sandpaper is removed. The surface of the arch should be smooth. The seams remaining from installation must be sealed with putty. Before filling the seams, you need to install prepared corner profiles (they give the corners of the arch rigidity and protection from deformation).

These corners can be attached on top of the putty, but then you need to apply another layer of putty on top, leveling all the joints. After the putty has dried, level the surface again. sandpaper. Remove dust and prime the entire outer space of the arch. When the soil is dry, carry out finishing putty structures and smooth out irregularities.

How to paint?
When all the dirty work is done, you should move on to decorative finishing.
When choosing a design, you should take into account the overall concept of the interior and its style. The fastest and cheapest finishing method is to paint the structure. water-based paint. This finish is very practical, because if the wall gets dirty, it can be wiped with a damp cloth; in addition, the arch will be very scratch-resistant. This type of finishing is also good because, if desired, the arch can be quickly repainted yourself.

Options in the interior
Arched vaults occupy a special place among architectural details when decorating a room. Smooth lines will bring a mood of comfort to any room and emphasize sophisticated style. If the choice is made to complement the interior with an arch, it is necessary to choose a design so that the vaulted structure fits organically into the space of the room and serves as a certain highlight in the interior.

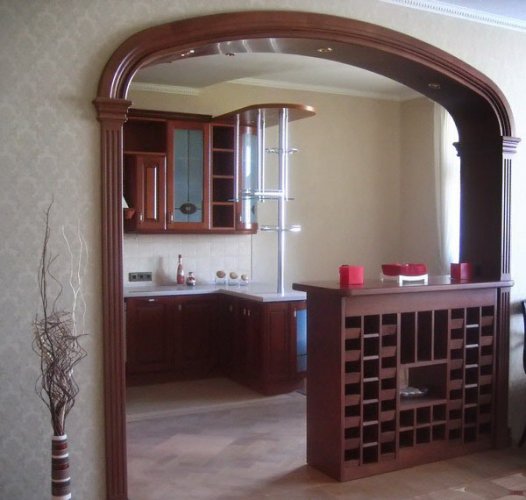
Arches look great in rooms with semicircular window openings. Vaulted structures will favorably complement the interior, which contains doors with a semicircular top. Arched openings are used not only in living rooms and hallways. The kitchen space is also decorated with arches. Here they will serve not only as a decorative element, but also fulfill their functional role (storage systems, niches in the form of arches).


The arch design, decorated with glass shelves, looks authentic in itself. If the space of the room allows, weightless glass shelves can be replaced with massive ones made of stone or wood or plywood. They serve great place for souvenirs and photographs.

The light framing of the inner and outer parts of the arch looks interesting. Where there is not enough light this will be especially useful. This applies to most corridors and hallways. Designers recommend using non-standard shapes of lamps for this to give the room additional sophistication. When decorating arched openings with light elements, you should not limit yourself, focusing on the material of the arch, because the lighting will look advantageous both with plasterboard arch, and with a wooden structure.


The most harmonious arch is considered to be one that has absolute symmetry or even smooth lines in the case of the initial choice of an asymmetrical shape. This arch will suit any interior. If you are choosing the shape of an arch for an interior in the Art Nouveau style, you should take a closer look at curved arches. Such an arch is not suitable for a classic interior design. But here this element would look appropriate with a lot of decor from plaster decorations in the form of columns and intricate curls.


An acre in the form of an ellipse or a wide portal has a strict but noble appearance. It is simple to implement, does not require frequent alterations and is appropriate in any space.
However, the arch in the interior modern premises is a rather controversial element. Some evaluate the arched vault as relics of past centuries. Others praise this elegant detail, hoping that it will never go out of style.
And since there is no arguing about tastes, there is no need to immediately abandon this design. Even in the modern world of designers, an arch is not a tasteless, outdated fragment of a home if it is combined with the overall style of the space. The arch has long become a classic. And the only thing that can ruin a classic is its unsuccessful use.
How to make an arch in a doorway? This question interests many owners of apartments and private houses.
It should be noted right away that an arched opening can only look ideal in rooms with high ceilings.
At low ceilings such a structure visually significantly reduces the opening. Therefore, you should think carefully before deciding to build an arch. If you accept it, then you can find a lot of materials to implement your idea.
Methods for constructing arches
How to make an arch instead of doors? Today there are such ways to create arches:
- For an arched opening, the wall is hollowed out according to pre-made markings. This method is more suitable for rooms with not very high ceilings.
- If the ceiling height is sufficient and doorways their upper part is sealed with pieces of plasterboard or plywood to give them an arched shape.
When chiseling a wall proceed as follows:

- All decorative trim must be removed, including the door frame.
- From the floor itself, a vertical line is marked on both sides of the opening to the height of the future arch. For accurate markings, use a level or plumb line.
- The width of the marked opening is measured and divided in half. The result is the radius of the arch.
- The center of the arch is marked on the upper horizontal line. A screw, self-tapping screw or nail is fixed to this point.
- A strong thread is tied to the screw, the other end is attached to a pencil. The excess thread is wound around the pencil, leaving a length equal to the radius of the arch.
- A mark is made on the vertical line from the center point downwards at a radius distance.
- A semicircle of the upper part of the arch is outlined.
- On the other side of the wall, the marking operations are repeated.
Now you can start chiseling using a hammer drill or other tool. The choice of tool depends on the wall material. It is recommended to drill as many holes as possible along the intended contour. They will help in the chiselling process. IN wooden wall The opening is cut out with a jigsaw or a hacksaw with a narrow blade. Final stage preparatory work– processing the edges of the resulting opening and decorating it with prepared materials.
For high ceilings do door arch It is possible if you follow this sequence of actions:

- The frame of the future arch is assembled in the opening from wooden or metal profiles.
- Marking is done on drywall or other material from which rectangles need to be cut. Their width is equal to the radius of the arch, their length is equal to the width of the opening. Using a large compass or thread and a pencil, the upper arcs of the arch are marked and cut out with a jigsaw.
- The resulting blanks are attached to the frame with hardened self-tapping screws. Their caps are recessed 0.5-1 mm into the drywall.
- The end of the opening is sealed. This can be done using fiberboard. This material bends quite well. You can use a strip of plasterboard 8 mm thick. It is rolled several times with a needle roller and sprinkled with water. Punctures are made to a depth of up to half the thickness of the drywall sheet.
- If there is no needle roller, punctures can be made with an ordinary awl. The distance between them is about 1 cm. They are made only on the side where the part will be bent. After some time (about 1-1.5 hours), the plaster gets wet and the strip bends quite easily. It is better to bend it on a wooden or plasterboard template. After drying, it becomes hard again.
- Drywall is puttied and the arch is decorated at your discretion.
Arch configurations
An arch in a house gives the rooms a certain personality. There are many configurations and forms of arched openings. Let's look at some of them:

- The classic version is suitable for rooms with a height of 3 m. Arch correct form has a bend radius of 45 cm or more. If you add it to the height of the doorway, then the total height of the room may simply not be enough.
- The Art Nouveau arch is often erected in standard apartments. Its radius exceeds the width of the doorway, so there are angles between the vertical elements and the arc. They can be made sharp or rounded.
- Romantic style is an arch option for large openings. There can be a horizontal insert between the rounded corners, or it can be installed at an angle.
The configuration of the arch depends on the desire and aesthetic taste of the owner of the home. An arched opening can be wavy, polygonal, illuminated, with various niches and shelves, with stained glass windows and so on.
Materials for arch equipment
The arched opening can be made from monolithic concrete, plastic, brick, metal, wood, chipboard, fiberboard, plywood, from plasterboard sheets and other materials. When using brick, concrete or stone, their weight must be taken into account. Such structures may require a special foundation and reinforcement elements for connection with the walls.

Metal is a material that fits into any style. But not every metal is suitable for these purposes. Option from of stainless steel is very expensive. Galvanized iron in interior spaces doesn't look. It is quite difficult to make complex figures from metal.
Wood is a beautiful natural material. It requires virtually no additional finishing.
The best materials to process and allow arches of any shape to be made are plasterboard, fiberboard and particle board. These Construction Materials can be finished with plaster, painted, covered with a layer of decorative or ordinary plaster, paste over with wallpaper, veneer with decorative stone.
Plastic is a material that is easy to process. Plastic structures do not require additional processing and finishing.
For the design of arches, ready-made structures from different materials are also sold.

- The appearance of the arch should correspond to the overall design of the room. Each side of the opening can be designed differently.
- Any work on the construction of arched openings begins with dismantling the door frame.
- For convenience and to speed up the marking process, it is recommended to use a full-size template. It can be made from cardboard.
- When constructing curved frame elements from metal profiles, slots are made on them that allow the workpiece to be bent. The slots are made in increments of about 5 cm.
- For work, a drill or hammer drill, a hammer, iron scissors and a hacksaw are usually used. Sometimes other tools may be needed.
- The frame is attached 10-12 mm deep into the doorway so that the drywall attached to it is flush with the wall after puttying.
- The assembled structure is treated with sandpaper and putty. Surfaces and corners can be covered with fiberglass mesh.
You can make an arch in a doorway in various ways. Each of them is selected based on a specific situation. It is necessary to take into account the construction skills possessed House master, as well as financial opportunities.
It is worth noting that it is possible to qualitatively install an arch in a doorway with your own hands only when all the features of this design are taken into account. The fact is that this finishing option has its pros and cons.
The advantages include the following aspects:
- Visual increase in space. In this case, two factors are combined at once. The first is that an opening without a door unites two rooms, this erases some existing border. The second is based on the shape of the structure.
- An excellent option for zoning. Indeed, an arch can be an excellent solution to the problem of dividing a single area.
- Nice decorative look. This design can decorate any interior. It should be taken into account that overall design must be harmoniously thought out.
We must not forget about the existing shortcomings. They lie in the fact that the peculiarity of this product is openness, since there is no door leaf. Therefore, there is a complete lack of sound insulation and the penetration of foreign odors, if we are talking about the border with the kitchen area.
 When designing an arch, you should think about the fact that the feeling of security will disappear
Existing options
What is special about installing an arch in a doorway? The point is that there are different kinds of these designs:
- Ellipse. This configuration is considered to be classic. It is made round. All transitions are very smooth.
- Round. This option allows you to expand the opening. This method is suitable for cases where zoning is required.
- Trapezoid. Assumes no rounded areas.
 Arch - various types of structures
 On a note! You can often hear that an arch and a portal are two different architectural elements. In fact, the portal is the most simple solution arched design. It is made in the form of a rectangle, sometimes supplemented with rounded corners.
Features of the construction of arches
You can make an arch in several ways, but you need to consider the height of the openings.
For low openings
This method of creating an arch involves pre-marking the surface. The marked area is cut out (hollowed).

The general technology is as follows:
- The opening is being dismantled. Deleted old box. Part of the crumbling plaster is removed.
- The height of the future structure is determined. Lines are drawn along two vertical sides. They must be equal and made exactly at the specified height.
- To obtain the radius of the arch, the existing width is measured. This value is divided in half.
- Between vertical posts a horizontal line is drawn. It should be located at a level that will correspond to the beginning of the rounding.
On a note! It is important to consider that the distance to the ceiling should not be less than 30 cm.
- The center is marked on the drawn line. The self-tapping screw is screwed in. A cord is attached to the screw, which must be equal to a given radius. A pencil is attached to the end of the rope. This tool marks the bend.
- According to the existing markup, cropping is performed. If the wall is strong enough, then slotting is performed. To facilitate the work, pre-drilling is done.
 It is necessary to comply with the requirements for the construction of the arch
 Thus, the necessary form is obtained. Next, it should be carefully processed. This is done by grinding. The resulting structure is processed with putty or plaster. They can serve as a finishing material.
For high openings
The door arch can also be done in a different way. It lies in the fact that plasterboard and a metal profile are used as the main material. The technology assumes that everything will be done according to an existing opening. The following actions are performed:

On a note! The created crate should be drowned to the thickness of the GKL boards used. Small errors are possible. They can be easily corrected with plaster.

On a note! If you need to install an arch very quickly, the best solution would be to use a ready-made structure. These products are made from various materials and have standard configurations.
After all the procedures, an almost finished design is obtained. All you need to do is install a fragment of a gypsum plasterboard that will close the open arc-shaped space. The procedure is performed as follows:
- The bending section is measured.
- The resulting size is transferred to the drywall.
- The required fragment is cut out.
- This part needs to be bent. To do this, it is cut into wrong side into strips.
- Carefully place into place and secure.
 Finished plasterboard arch
 The completed structure requires additional decorative finishing. It should be noted that drywall makes it quite easy to create an arch with your own hands. If you use wood as a material, you must have sufficient experience to correctly process and install such a product.
Fiberboards and plywood are used as substitutes for gypsum boards.
 Plywood is often used to create arched openings instead of drywall.
 There are some tips that will help you get a beautiful arched opening:
- The general appearance of the arch should correspond to the interior design.
- To get more original design– it is designed individually from different sides.
- Existing communications should be laid in advance.
Summarizing the above, it can be noted that there are various ways to make a door arch. You just need to be patient and adhere to certain rules and recommendations. Then everything will definitely work out.
An arched vault gives the room elegance, looks modern and stylish - they are classified depending on the shape, material, style.
Material

Style

Form

Interior arches are used to create the effect of a seamless space - this is a current trend modern design interior
note! Arched vaults are used in small apartments: they visually make the room more spacious and freer.
The most popular are plasterboard arches:

- The material allows you to realize any, even complex and asymmetrical, shape.
- Drywall can be handled by a person who does not have a narrow knowledge of construction - the material is easy to process.
- Drywall does not create additional load on the structure of the house.
- Such an arch can be decorated with all kinds of decorative elements: shelves, niches, spotlights.
- Drywall is an environmentally friendly, safe material. You can even use it in children's rooms.
- Compared to other materials for installing arches, plasterboard is the most affordable.
Attention ! To install an arched vault, you need to buy special drywall. It is distinguished by its smaller thickness, the presence of special reinforcing fibers, and high quality. For ease of installation, it is recommended to buy ready-made sets of arched frames. Lighting must be done at the stage of frame installation.
Stages of installation of arched plasterboard vaults

A popular design option for a doorway is an imitation arch. This design option can be used in the case of a high doorway. Pseudo-segments of the structure are attached to the edges of the opening and in the corners. The imitation is suitable for oriental-style rooms.

note! A common way to decorate arched openings is polyurethane stucco. An interior in classic, baroque, and empire styles will be decorated with such stylish decorative elements. The stucco molding is attached using special glue. The polyurethane decor is made in the form of overhead strips - moldings, protruding parts - sandriks, artificial columns.
The choice of arch option for a doorway depends on:
- Doorway parameters;
- Ceiling heights;
- The style in which the room is made.
Anyone can decorate this interior element with their own hands. The shape of an arched opening is practically not limited by anything except imagination, but quite often apartment owners, when renovating, limit themselves only to painting the plasterboard elements of the arch. Such designs look rather boring, creating a feeling of incompleteness. If the main style of the room is not minimalism, then the arch can be turned into a unique one decorative element, emphasizing the integrity of the interior.
Possibilities of decorative arches
With the help of arches you can make small room more spacious, and in a large one to make effective zoning. This architectural element in the apartment performs several functions at once:
- Space saving and its visual increase.
- Simultaneous functional separation of adjacent rooms and their visual unification.
- Creating a certain atmosphere in the house, emphasizing its style.
Types of decorative arches
Most often, arches are made of plasterboard. Flexible and plastic plasterboard allows you to quickly create a structure of almost any shape with your own hands. The finished element has high aesthetic characteristics. A plasterboard arch can subsequently be lined with almost any material, including wood, stone (most successful examples can be seen in the photo).
Arched openings can be divided into two types:
- Active - have a complex shape that provides maximum visibility into neighboring rooms; they themselves can decorate the interior.
- Passive - simple in form, often serve as a border.
Advice! It is advisable to determine the shape of the arch before the repair, as well as its subsequent design.
Simple passive arches include:
- Classic - with the correct arc radius. Optimal for any interior.
- Ellipsoidal - the arc can be in the form of a regular or irregular oval.
- Modern - an arc with a pronounced rise.
- Romance - the arc is cut off at the top, but rounded on the sides.
- A portal is a rectangular opening.
Complex active ones include:
- Eastern.
- Lancet.
- Horseshoe-shaped.
- Trapezoidal, etc.
Such arches can have uneven or figured edges, be located on several levels, and twist from one room to another.
Arch decor
An arch is, first of all, a part of the wall; therefore, when designing it, you should start from the finishing of the latter. An architectural element must fit harmoniously into the interior and be part of it. If there are several arches in the apartment, then they must correspond to the design of the room, be of the same shape or made of the same materials.
Advice! The wider the arched opening, the more attention should be paid to its design, color and stylistic matching of adjacent rooms.
Finishing materials
Depending on the style of the room and the arch itself, you should select the material for its design.
Paint, wallpaper, decorative plaster – simplest option do-it-yourself arched doorway design. An element decorated with such materials practically does not stand out in the interior. The color of the coating on the walls and the inside of the arch may differ if this does not contradict the style of the room.
Tree – noble, durable material. Most appropriate for interior decoration in classic style. Looks ideal on designs of simple shapes.
Polyurethane stucco – with its help you can decorate an arch of any shape and style with your own hands: from minimalism to baroque. The opening can be decorated with polyurethane columns, figured or flat moldings, all kinds of rosettes, bas-reliefs - the material has practically no restrictions on shape. Initially white elements can be painted in any color with acrylic paint.
Stone – natural or artificial. Thanks to a variety of textures and colors, it can be used to decorate arches different styles and forms.
Ceramics – tiles or mosaics can cover both the entire arch and its individual parts.
Glass – these can be blocks installed at the full height of the opening, at different widths, or in a ladder. This design of arches in high-tech style looks impressive. Often there is a design of arched openings using stained glass and colored glass, such elements are ideal for modern style.
Decorating an arch with artificial stone
When decorating arches is widely used fake diamond. This material is durable and aesthetic, it can imitate any natural analogue, which can be seen in numerous photos in magazines and the Internet. Natural stone, of course, can also be used for cladding, but the arch must be located in the opening load-bearing wall or monolithic partition. Drywall simply cannot withstand such a load, so it is better to use lightweight ones. artificial materials. Besides a natural stone It's quite expensive.
Advice! To cover plasterboard arches with your own hands, it is better to use light and flexible acrylic tiles. Its surface can imitate the texture of any stone and other materials.


