I really want to relax after the summer heat and physical labor near a picturesque place. Perhaps the first thing that comes to mind is water. Unfortunately, not all plot owners are lucky enough to have a pond in their dacha. Therefore, many summer residents set up a mini pond in their country house with their own hands. We will talk about this in this article.
Perhaps at first you will have questions: how to do it? what material? where to place it? But believe me, you can build a pond with your own hands. Moreover, we are talking about a small pond in the country - mini copies of reservoirs from 0.5 to 1.5 m3.
Design of the future pond
Thanks to today's technologies, the owner can build a pond of any complexity. For example, there are three possible options for a small pond: cover a hole in the ground with film and fill it with water; use a ready-made container that may be right at hand; Fill the walls of the hole in the ground with concrete and fill with water.
Option 1
To begin, create a design for your future pond on paper. Consider the width, depth and thresholds for planting. Start drawing outlines on the ground. This can be done with paint or sand.
 If you plan to have several tiers in the pond, then mark them and dig them out one by one.
 Purchase a film for your pond with a calculation of +0.5 m on the sides on each side of the pit bowl. You will also need to purchase: geofabric - a material that is laid on the bottom and walls of the bowl to protect the film from damage. Although you can use something from the bins: unnecessary carpet, old linoleum.
 Geotextile for ponds
 You can secure the film with crushed stone by placing it in trenches dug along the edges of the thresholds. Fill the pond with water gradually, taking breaks. Line the shoreline with stones and fill the bottom of the pond with small pebbles.
Option 2
First, decide on the shape of the container in which the water will be. Then dig a pit under it, stepping back 30 cm from the sides. Compact the bottom so that it is level. If you have chosen a multi-tiered plastic mold, then pour water gradually, and fill the space between the mold and the pit bowl with sand.
There are many more options for a small pond in the country. Can be used:
- Unnecessary bath. Apply the dimensions of the bathroom to the area, adding 10 cm on the sides. Dig the pit 20 cm deeper. Under the bathtub drain hole, make a drain using stones for drainage. Place crushed stone and sand at the bottom of the hole and compact it.
- Taz. We follow the path of least resistance and use the most budget option, because you can even use a leaky basin by covering the hole with film. Leave the edges of the basin above the ground. Under the bottom and between the walls of the basin and the pit, lay a layer of clay and sand solution. Pour soil into the bottom of the basin to plant duckweed and urut or whatever you choose. Such a pond will be miniature and beautiful.
 Pond from the bathroom
 And also tires, a barrel, a boat or even old wardrobe! Conveniently, some of these containers can be brought into the house for the winter. Indeed, making a pond with your own hands is not difficult!
How to make a pond from a bathroom (video tutorial)
Option 3
I think many will agree that to build a pond according to the third option, you need some, at least basic, builder skills. But at the same time, don’t let this scare you, because any summer resident or owner of a plot in the private sector is already a bit of a builder. And as a reward for your efforts, you will have an almost eternal piece of paradise in your yard.
Stages of constructing a reservoir at the dacha (video)
Take your choice of pond location seriously, because it will no longer be possible to move it. Now we can begin.
If you decide to make a pond without thresholds, this will greatly simplify the task. Dig a pit with slopes of 45 degrees. Compact the hole and fill it with sand.
Place PET or PVC film on the bottom without stretching it too much. Start pouring concrete from the walls, and then move to the bottom.
Try to complete this part of the work in one day to avoid cracks at the joints.
Press in the reinforced mesh. Pour the second layer of concrete as soon as the first one dries. Constantly check the horizon level. Add water when the concrete has completely hardened.
 Concrete pond
 Before deciding on an option for building a pond, decide which design idea will look especially natural on your site. If the house, paths and flower beds are designed in a strict style, feel free to create a pond of clear shapes. If you like everything natural, then any arbitrary shape will do.
Let's decide on a place
How to make all the inhabitants of the pond feel comfortable? If you have a large plot of land, then carefully study the area so as not to make a mistake with your choice. There are several secrets that we will share with you.
- The roots of old trees can interfere with the work, and over time, even with the walls of the reservoir. Also, falling leaves and fruits will force you to clean your pond frequently.
- Choose a place with the expectation that the pond will be in the shade for some time so that algae and microorganisms do not develop too actively in it.
- At the same time, the sun is needed for plants along the bank. So you'll have to look best option, taking into account these nuances.
- If your pond is small but deep, then make sure that it is always within sight when children are playing nearby. And why hide such beauty from view?
- The pond will look best in a depression. They almost always go down to the lake, river, or sea.
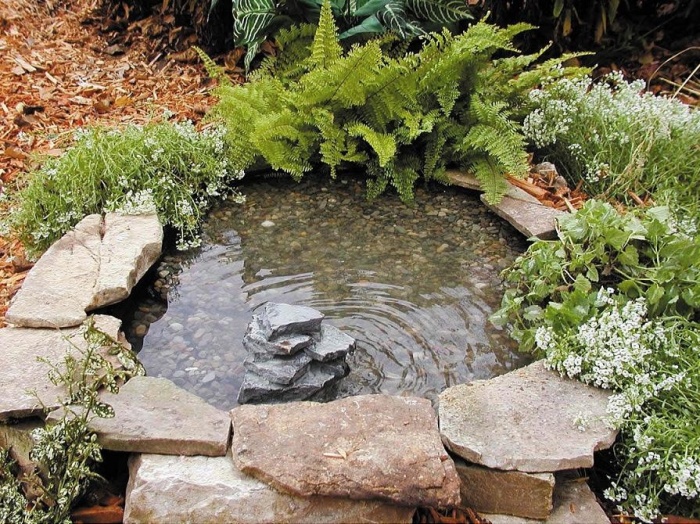
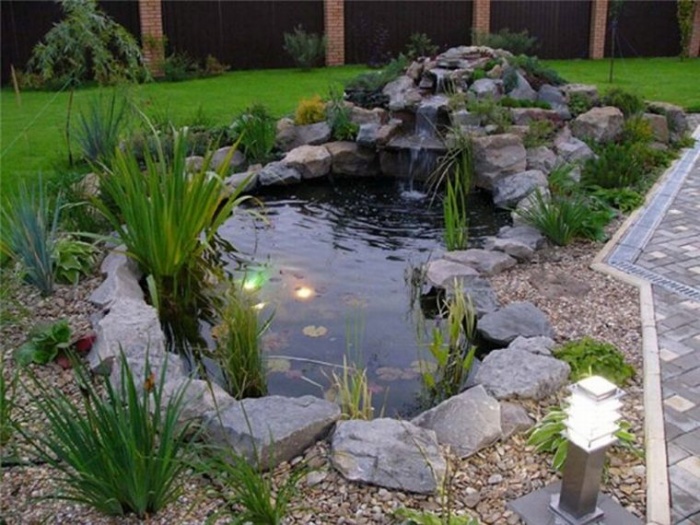
 Mini pond for the garden
 Let's think over a possible ecosystem
If you want fish to live in your pond and flowers to bloom, then several rules from this section will help you.
Plant selection
Decorative flowers in a pond do not suffer from temperature changes and can even withstand frost (of course, except for southern varieties of plants, which will need to be hidden for the winter). But still make sure that the water in the pond will be heated by the sun for at least five hours during the day.
The less light, the faster the mini pond at the dacha turns into a small swamp. Then it will look completely unattractive, a characteristic smell and flowering will appear.
In nature, an amazing process of self-purification has been launched, and at home, the owner must take care of the cleanliness of the reservoir.
As in a natural pond, plants in a home pond are divided into the following types:
- those that grow on the shore;
- those that grow in the humid zone at the border with water;
- floating on the surface;
- shallow water and those that grow at depth.
Although on the shore along the pond the air humidity will be higher than in other places, simple garden plants they can settle down there. But still, make sure that they do not look awkward or random next to other inhabitants of the pond. Begonias, aquilegias, impatiens and many other perennial plants that are used to decorate landscapes will be harmoniously combined.
An area with constant humidity, but without stagnant water is the best place for those who love moisture perennial plants. Among such stars are meadowsweet (meadowsweet), lysichiton, darmera, iris and many others.
 Irises also thrive in shallow water. They compete with susak, pontederia, shank
 The water lily can rightfully be called the deep-sea queen. She copes calmly harsh winters. Water lilies are not only beautiful, but also useful. They are the ones who can create the shade necessary for the pond. Other deep-sea beauties include lotus (however, it needs to be dug up for the winter, because in most of the territory of the former USSR the water does not warm up for almost 8 months, as needed for such varieties to bloom), watercolor, oronium, water chestnut and many other bizarre inhabitants of the depths.
Rivals for deep-sea plants are algae, which saturate the pond water with oxygen and support the vital activity of other organisms. Among them are swampweed, hornwort, etc.
Animal inhabitants
Insects, microorganisms and simple plants will grow in your pond on their own. You will have to take care of the fish yourself.
 Fish in a pond at the dacha
 But don’t think that you can’t get them. In fact, there is nothing supernatural here. Check the depth of your pond - it should be at least 90 cm deep. This is necessary for the fish, because this way they can survive the winter. And in summer the water does not warm up too much. Ponds of shallower depth are only suitable for growing ornamental plants.
By the way, in ponds with fish, a third of the water surface should be covered with greenery.
In the summer we all want to have a good rest by the water, but not everyone has the opportunity to go to the sea. Someone is holding summer rest on own dacha, but even in a small area you can create a zone for yourself comfortable rest using an artificial reservoir made by yourself.
Pond for a summer residence - where to start
So that the issue of constructing a reservoir does not seem so complicated, it is necessary to break the entire process into several stages and carry them out sequentially.
First, decide on the location for the future artificial pond and its size. summer cottage.
How to choose the most suitable site for a pond in your country house:

Important! It is easier to build a pond of a small area. If you are confused by the amount of work or financial side question, start with a small lake of minimum size.
Perhaps, later, having experience and skills, you will create a fairly large version of the reservoir at your dacha with your own hands; good experience in carrying out the preparation is shown in the video
Determining the size and shape of the future reservoir at the dacha
The depth of the reservoir, according to experts, should not be too great; for an artificial lake, a depth of up to two meters will be sufficient. The deepest part is usually made in 1/5 of the area of the entire reservoir.
When planning a pond, take into account the landscape of your dacha site. Designers advise doing it on a flat surface area, and if the topography of the dacha area is hilly, with slopes, in this case it is better to opt for a flowing stream or cascade.
You need to choose which version of the pond will fit most advantageously and interestingly into the landscape of your dacha site. Landscape designers offer a lot of design options decorative ponds, you just need to delve into the subtleties and nuances of various projects and choose the best one, optimally suited specifically for your dacha.

Varieties of shapes of water bodies
A reservoir can have clear geometric shore lines, especially if it is located on the territory near a mansion built in a strict aristocratic style, with alleys, paths, and flower beds of regular geometric shapes. In this option, a pond or lake will organically fit into the overall interior of the site.
A small pond can be made round or oval in shape, and moisture-loving plants can be used to decorate it.
If you want to get closer to the natural landscape, the coastline is made in a winding or free-form shape so that it resembles as much as possible a natural body of water in a country house.
It is necessary to think in advance about the design style of the artificial lake so that it matches the style of the rest of the dacha, complementing it.
Before you begin work at your dacha, you also need to consider how you plan to use your future artificial pond. If you want to get a place for swimming, then it will not be possible to breed fish in it. The decorative pond cannot be used for swimming sanitary standards and hygiene requirements.
When choosing the size of a future reservoir, keep in mind that an artificial pond is the same biological system as a natural pond or lake, with an optimal ratio of animal and plant life, a water purification system, and self-regulation of microorganisms.
It is easier to monitor and maintain the eco-balance in large artificial reservoirs; in small, as well as in small aquariums, maintaining the necessary balance is much more difficult. But in making it yourself, both financially and in terms of labor costs, it is much easier to do not big pond.

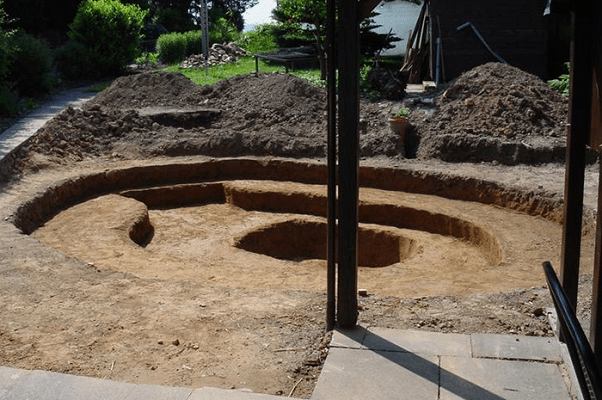
Shape of a pit for a pond at the dacha
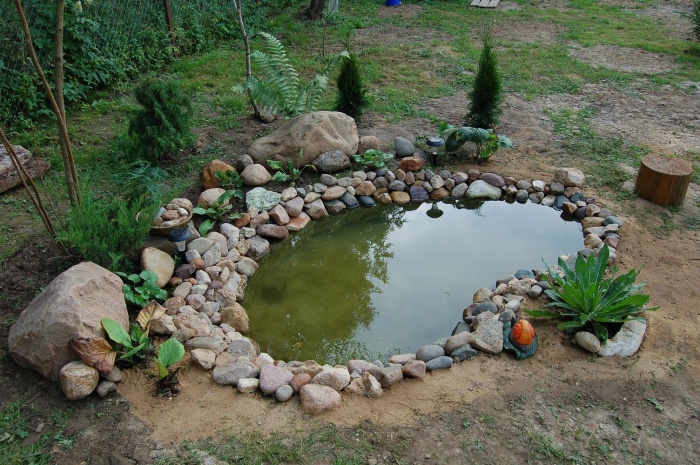
It is clear that in order to make an artificial pond in the country, first of all, you need to dig a pit of appropriate shapes and sizes. The foundation pit for a pond has its own characteristics. In shape, it resembles a deep plate with wide edges, as can be seen in the photo.

Along the edges of the pit there should be a shallow coastal zone, then there should be a protrusion that prevents the overflow of water from the coastal zone into the swimming area, and vice versa. A recess is made in the center to the required size.
To maintain ecological balance, the water in the pond must circulate, otherwise it will quickly become clogged, silt up and lose its decorative and attractive appearance.
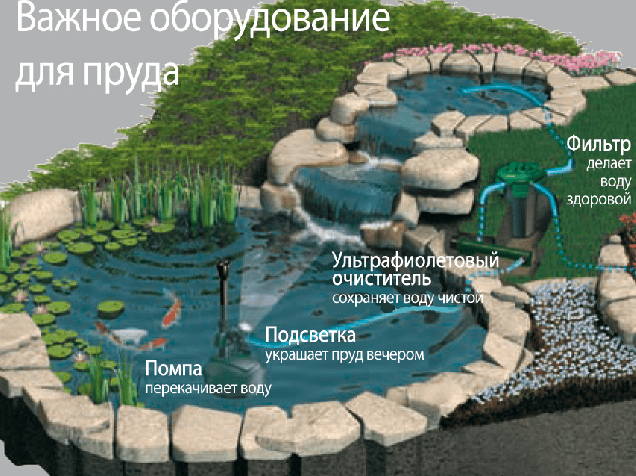
In a small pond at the dacha, to maintain cleanliness, a skimmer is installed, which allows you to clean surface layer water from contamination, and a UV sterilizer. To do this, they are installed at the bottom of the reservoir drainage pipes, through which water is pumped into the filter and back to the bathing area, as in the photo.
Materials for waterproofing the bottom of a reservoir
There can be several options for making a waterproof bottom of a reservoir:
- Using ready-made plastic mold. This choice of bottom greatly simplifies the procedure for making a reservoir for a summer residence, but it limits the possibilities for choosing the size, shape of the banks and the volume of the water space by the shape and dimensions of the selected container. Typically, such a container has a small volume of up to 4 m 3;
- The bottom of a reservoir at the dacha can be made of concrete, but this will be a rather labor-intensive procedure, and it will also require additional protection from frost to avoid cracking concrete base. In addition, if there is a need to remodel or dismantle the pond at the dacha, this will be quite problematic;
- One of the most budget options for the dacha there will be a pond bottom made of clay, but the process is quite labor-intensive. You will need to apply two layers of clay dough to the bottom of the reservoir bowl, and then strengthen the bottom with fine gravel, pressing it into the clay layer;
- The most optimal and most used method is to use a special film laid on the bottom of the pit.
Important! If the width of the film roll does not allow covering the entire bottom of the pit in one solid piece, it is necessary to weld the seams so that water cannot leak out of the reservoir.
When choosing a film, keep in mind that cheaper options have a significantly shorter service life, deteriorate faster when exposed to frost and sun rays, video
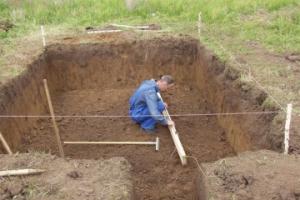
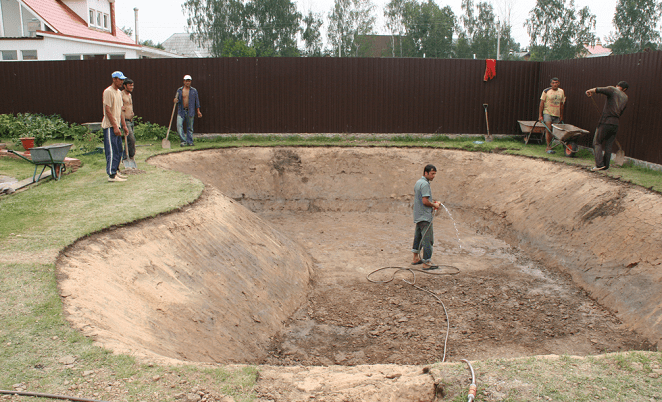
Excavation work
Digging a pit under a body of water 20-30m2 or more with your own hands is not an easy task. It may be easier to use equipment in the form of a small excavator. If the amount of excavation work is small, you may be able to do it yourself or hire several workers armed with shovels, video
The main thing is to correctly indicate the size and shape of the required pit.
We mark the boundaries of the future reservoir using a rope or hose; you can sprinkle the contours with sand so that they can be easily distinguished. Then, along the contour of the coastline, we dig a trench to approximately the depth of a bayonet, thus obtaining the first level of depth - the line of the swamp zone, up to 40 cm deep and 30-50 cm wide. Then we dig the next level inside with a gradual deepening towards the center of the pit, so that as a result It turned out to be a bowl, as in the photo.
The second level is made to a depth of 1 meter, the deepest third level is in the center of the pit.
Important! While digging a pit, check the level of the banks; they should be the same height.

Along the perimeter of the dug pit, another ditch is dug, up to 30 cm deep, so that the edges of the film can be laid and secured in it.
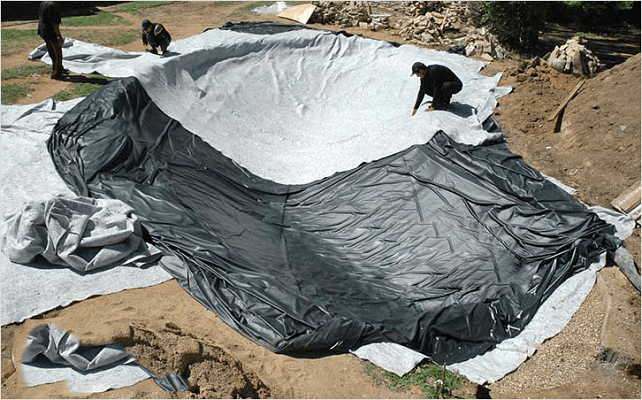
Film laying
Before laying the film, the bottom of the pit must be leveled, compacted, stones, tree roots, and debris must be removed. Then pour a layer of sand, 15-20 cm, carefully level and compact. After this, a layer of roofing felt or geotextile is laid, old linoleum can be used, and then the bottom is lined with film.
The edges of the film are secured with bricks or stones, and after that the reservoir is filled with water. Water is poured in several portions, if there are air bubbles under the film, they need to be removed during the process of filling the reservoir with water, take into account the experience of others in the video https://www.youtube.com/watch?v=JlxWYFNrkig. After this, the ends of the film are laid in the prepared ditch and secured with crushed stone or large stones.

Arrangement of a reservoir at the dacha with your own hands step by step
When you fill the pond at your dacha with water, measure how much water is required. This will be the capacity of your pond. In accordance with these data it will be possible to select required power pump, filters and other equipment for water purification in a pond at the dacha. Usually you can purchase it as a kit and install it yourself according to the instructions.
Then you need to strengthen the edge so that the earth does not crumble into the reservoir, and design the shoreline in accordance with your project.
You can place a large stone on the bottom; it must be round in shape so as not to damage the film and injure swimmers. You can also decorate the banks of a pond at your dacha with stones; it is better if large boulders alternate with smaller stones. In addition to stones, you can use driftwood in the design of a pond at your dacha, wooden structures, animal figurines and other options.
To decorate the banks of a reservoir in a dacha, moisture-loving plants with large leaves, for example, bergenia, as well as ferns, lilies of the valley, coniferous shrubs. In shallow water you can plant plants such as calamus, reeds, cattails, or water lily like in the video
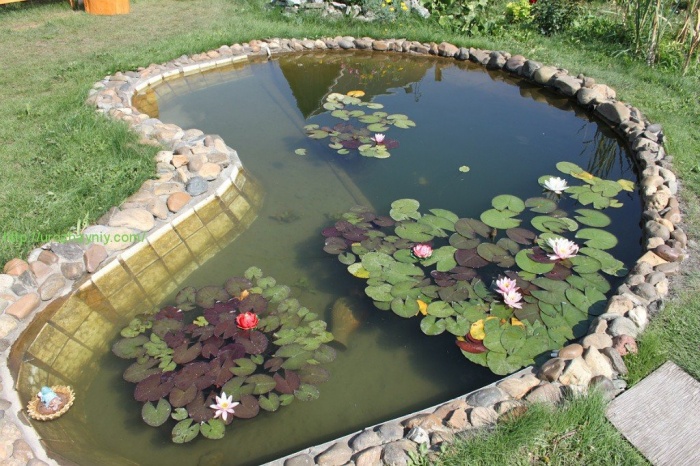
In the center of the garden pond there are water lilies and lotus. Interesting design solution there will be a creation floating in the center of the pond flower arrangement, as in the photo.

Usually, plants in special containers or pots are used to decorate decorative ponds; they are conveniently removed while cleaning the bottom and changing the water.
Conclusion
Anyone can create a reservoir in their dacha; the main thing is to carefully follow the recommendations of experts. Of course, you will have to spend time and money, but as a result you will get a wonderful place to relax and will enjoy spending time at your dacha.
Whether you like to swim or just relax near the water, relaxing on the shore of a body of water is one of the wonderful pleasures of summer. But not every summer resident has the opportunity to build a summer house near water. Therefore, sooner or later, each of us thinks about how difficult it is to make a pond on the site with our own hands. Ideally, we see a pond at the dacha not only as decorative element landscape design, but also as a small pond in which you can happily swim on a hot day.
 Let's start with the basics - what fundamentally distinguishes a pond from a swimming pool is the self-regulation system.
DIY swimming pond.
We will tell you the process of creating a pond step by step, and you can make a garden pond with your own hands - by building a cool oasis in the middle of the heat right on your summer cottage, where with every light breath of a fresh breeze our everyday worries disappear. 
A garden pond is a living organism.
The pond at the dacha imitates the process that nature uses to keep lakes clean. Everything from the size and shape of the pond, plant species and water circulation are designed to maintain the pond in a stable natural state. 
The problem that a pond owner faces is maintaining a balance between plants and water - the plants either die or cover the entire surface of the pond. Only a pond that represents a balanced ecosystem provides optimal water clarity and quality, and maximum enjoyment from swimming in the pond. 
The water in the pond must circulate among the roots of the plants to cleanse itself. Plants enrich the water with oxygen, which supports the vital activity of beneficial bacteria that utilize pollutants and potentially pests, and also create habitat for dragonflies, frogs and other aquatic inhabitants. The result is a stable, ecologically diverse system. Nature has revealed its technology to us and we need to use it carefully.
How to make a pond yourself. Principles of pond operation.
Water is a living biologically active component and all purification occurs due to the work of plants and beneficial microbes. For this purpose, the pond has a swimming area and a filtration area for plants. The filtration zone is actually the swamp part of our water zone, and just like in nature, it is this zone that guarantees the cleanliness of the entire reservoir. This zone must occupy at least 50 percent of the total surface area of the pond.  If you have noticed, in nature there are almost no tiny bodies of water with consistently clean surface water - they quickly become overgrown or silted up. Natural stable biological balance can be achieved in ponds with an area of 100 sq.m. Smaller ponds require more of our attention, because... Their biological balance is precarious. Therefore, to maintain cleanliness, these ponds include a skimmer and UV sterilizer, but still offer a chemical-free swimming area and support growth. aquatic plants.
It is useful to regularly enrich the water with oxygen by adding a small waterfall, stream or fountain to the pond. Although, an aerator can be used for the same purposes.
How is water purified in a pond?
 You can see that the process of filtering water in a pond is not complicated:
1. Water from the swimming area flows into the regeneration area.
2. Water circulates back to the bathing area.
Through drainage pipes under the plant roots in the regeneration zone and/or after the skimmer, water is pumped through the UV sterilizer to a waterfall, stream or to the bottom of the swimming area. The pipe leading to the bottom of the swimming area is raised slightly above the bottom so that the flow of water prevents the formation of silt on the bottom.
What should the shape of the pond be?
The pond bowl looks more like a soup bowl with large rims than a bathtub. The height difference should be about 30 cm for every meter of depth. It is this shape of the pond bowl that ensures the stability of the walls. The picture shows a cross section of a pond with a planting and swimming area:

After compacting the surface layer of soil in the pit, geotextiles and a sealed liner are laid on the bottom of the pond. In the plant area there are drainage pipes and gravel. In order to separate the swimming zone from the plant zone, a small mound is formed - its top is 3 cm lower from the surface of the water. You can make it from bags of sand or gravel. The mound allows water from the swimming zone to pass into the plant zone, where the water is filtered by plant roots, and at the same time protects the plants from fluctuations in the water of the swimming zone. 
This pond design will allow you to conveniently clean the swimming area without affecting the plant area. In addition to cleaning the water, the shallow waters warm up quickly and provide habitat for frogs and other invertebrates, which you will appreciate when they begin to eat mosquito larvae.  To imitate the natural contours of a pond, use a combination of different pond edge profiles. If you place plants on the terraces of the pond, it is better to do this in pots so that they can be easily removed when cleaning the pond.
What size pond is suitable for our site?
The optimal size of the pond is 1/10 of the area of your site.
What about mosquitoes?
One of the first questions that arises when you hear the word “do-it-yourself pond” is what about mosquitoes? Mosquitoes breed only in stagnant water, but the water in a pond will never be static, so mosquitoes will find it unattractive for their habitat. Even if at some point they appear, the ecosystem of the pond in the form of frogs will reduce their population to a minimum. 
Why make a pond at your dacha?
People who make a pond with their own hands make this decision because they want their pond to be a beautiful part of the landscape design and at the same time have a clean, attractive place for swimming on a hot day.
Is it possible to have fish in a swimming pond?
Unfortunately, fish, on the one hand, happily eat beneficial microflora, on the other hand, they are carriers of pathogenic bacteria, so there should be no fish in bathhouses. 
Is it possible to make a sandy beach on a pond?
The best solution for entering the pond is a walkway or ladder. For a beach entrance to the water, you need enough area, because... The angle of entry into the water is small. In addition, the sand quickly silts up - those beaches that we see are often simply trampled down to sand, most of the shore of the pond is usually densely overgrown with plants. 
Should I swim with frogs?
Yes, frogs are full-fledged and important inhabitants of the pond. Additionally, to purify the water in the pond, it is good to have bivalve shells or pearl barley, which filter water up to 40 liters per day. You can also get snails (coils, livebearers) - they eat dead plants and clean the pond well. 
What's the best place for a pond?
It is better to place the pond away from trees, because... falling, the leaves will rot in the pond. Moreover, growing roots can damage the waterproofing film or tilt the finished container. The illumination of the area should be about 5 hours in the morning, and the rest of the time should be in partial shade. The pond does not need high illumination because... leads to increased formation of algae and overheating of water in the reservoir. 
What to do with a pond in winter?
In winter, the pond, like natural bodies of water, freezes. There is no need to drain it. For the winter, all equipment (pumps, filters, skimmers) must be removed from the pond.
Does soil type affect the creation of a pond?
No, the composition of the soil does not affect it. There is a misconception that it is good when the groundwater level is high. In fact, groundwater at the freezing level, it’s more of a problem. When ice freezes, it can bulge the bottom of the pond. This is especially problematic if the pond is made on the basis of a rigid finished mold. 
DIY pond made of film.
The main question when creating a pond is how to make it waterproof. There are several types of pond waterproofing - film, clay castle, concrete and rigid form installation.
Installing a rigid mold is a simple and durable method, but they are usually produced small sizes up to 3.5 sq. meters. Their service life is 10-50 years.
Waterproofing with concrete is the most expensive; in addition, to protect it from frost, it requires additional treatment with a frost-resistant agent and liquid glass.
A clay castle is the cheapest in terms of materials, but the most labor-intensive. In order to waterproof a pit with clay, the compacted soil is covered with wood ash or soot. Then a 15 cm layer of clay dough is applied to the walls and compacted. When the layer dries, apply a second 30 cm. When the layer is almost dry, crushed stone is poured onto it, slightly pressing it into the layer.
The optimal solution for the construction of ponds with an area of more than 5-6 sq.m. - film waterproofing. 
How much film is needed for a pond:
Film length= length of the pond + 2 depth of the pond + 50 cm reserve for fasteners.
Film width= pond width + 2 pond depth + 50 cm margin for fasteners.
The film is available in widths from 2 to 10 m and lengths of 10-50 m. Knowing your needs, you can choose the optimal roll. Buy the film before digging a pit; this will allow you to cover it immediately when the pit is ready, preventing its edges from fraying.
Which film to choose for a pond.
PVC film for a pond is cheaper, but over time it is destroyed by ultraviolet radiation, its service life is 8-10 years.
Butyl rubber fabric is more expensive, but has protection from both ultraviolet and cold. The service life of such film is 50 years.
DIY pond construction photo.
A do-it-yourself pond begins with marking a pit. The curved shape can be marked with a hose. We remove the turf along the coastline and remove the soil with a bayonet - this will be the line of the swamp zone, then the next level of soil is removed inside the resulting border, and so on. As a result, our terraces will be 50 cm wide with slopes of 20 cm. When the pit for the pond is ready, all solid objects that can damage the film: stones, roots, etc. , we remove. We level and compact the walls and bottom of the pit.  Before work, the film is laid for several hours in a sunny place so that when it warms up, it becomes more elastic. Film installation is done in warm weather. Overlapping panels of geotextile or felt are laid on the compacted pit; they are needed to protect the waterproofing film from protruding roots and stones over time.
A waterproofing film is spread on top of the geotextile with a margin of 50 cm along the edges of the pit. The edges are temporarily fixed with stones. The film is allowed to sag a little, smoothing and leveling it to the shape of the pit. 
The film inside the swimming area can be protected with dry stones stacked on top of each other. 
Instead of stones, you can use bags of gravel or sand. But keep in mind that it is more convenient to care for a pond with film walls. – it is easier to clean it from silt and mud. 
Fill the pit with water in portions, removing air bubbles from under the film. 
When the pond is completely filled with water, securely fix the ends of the film in a trench, which is made at a distance of 15 cm from the edge of the pit. In a trench 20 cm deep, the edges of the film are wrapped in a roll and covered with stones and pebbles.
We make a pond with our own hands. Coastal decoration.
After you have made a pond with your own hands, before you start decorating the shore, you need to water it generously and wait 2-3 days, because... shrinkage is possible. In addition, during this time the water in the pond will settle.
We mask the film on the shore with crushed stones, stones, and snags. We plant plants in shallow water. A pond needs plants that saturate the water with oxygen. There are many suitable plants - reeds, crabgrass, iris, bathwort, marigold, arrowhead. Any plant that grows on the shore of a natural body of water will be suitable for your pond. Don't forget about algae, such as hornwort, which just floats in the water. Deciduous ornamental shrubs It is better to plant behind marsh herbs that are planted directly on the shore. 
Illumination adds additional charm to the pond. 
Floating flower beds look seductive on the surface of the pond. 
Pond safety.
If there are very young children in the family, then perhaps the construction of a pond should be postponed until they are older. It is necessary to consider visiting the pond by elderly people and school-age children. Make a convenient ladder to enter the pond, don't forget to clean it so it doesn't become slippery! It is better to cover all other sides of the pond, except the entrance, with plants. 
Pond care.
The new pond will take on its natural appearance over the course of a year - while it forms its own ecosystem. Small world your pond is very vulnerable. The pond may quickly heat up or freeze, water may evaporate, or the pond may overflow after rain. This puts stress on aquatic life that cannot immediately transition to a safer, more stable environment. 
Therefore, your pond, like any living organism, requires care. On a hot day, you need to add water, use a net to collect debris that floats on the surface, check whether the plants have grown or perhaps something has not taken root and needs to be replanted. However, a surprising number of life forms will colonize your new pond; they will quickly explore new waters and will stay if conditions suit them. 
The quiet splash of water is the most enchanting melody of a hot summer; water bewitches, attracts and seduces us with a playful play of light, transparent depth and invigorating coolness. A DIY pond will give your dacha a special charm.
Even in a small area, you can equip a quite decent artificial pond, sacrificing only a few beds. It won't cost much. In order to create a pond at your dacha with your own hands, you only need geotextiles, PVC film or polyethylene and a few days of free time.
Choosing a location for an artificial pond
When choosing a location for a pond, it is of great importance illumination. Since aquatic plants require enough sunlight, it should not be too shaded. But overheating the water too much is also undesirable, as this can lead to blooming of the surface.The most suitable area for placing an artificial pond is a place near the fence in the corner of the garden, which is illuminated in the morning, but is in partial shade at noon. The pond should not be placed near large trees: Expanding roots can damage the pit covering. And during leaf fall, you will have to clean the pond of leaves almost every day.
It is better to place an artificial pond in partial shade
Pit preparation
The size of the artificial reservoir can be any - it all depends only on the desire of the owner and the free space on the site. But it should be taken into account that a pond that is too large will require more care.1. With the help of driven stakes and rope, markings are made in the selected place according to the shape of the pond.

2. The turf is removed along the perimeter of the marking.
3. A small pit can be dug with an ordinary shovel. To prevent the walls of the pit from crumbling, its walls must have slight slope. There is no need to make the artificial pond too deep. Minimum depth bowls - 60 cm (plus 30-40 cm for backfilling drainage with crushed stone and sand).
4. If fish are planned to be released into the pond, its depth should be lower soil freezing level in this climatic region. Otherwise, the water at the bottom will freeze and the fish will die. In the central part of Russia, the soil freezes to a depth of about 1.4-1.5 m.
5. For planting aquatic plants, it is better if the edges of the pit are stepped. The size of each of these steps is 10-15 cm.

Stepped pit for a pond
6. All large stones and branches that can damage the not very strong film are removed from the bottom of the pit.
7. Fill the bottom of the pit with drainage: crushed stone, and then sand in each layer of 20 cm and compacted.
8. To protect against soil erosion, a layer of geotextiles. It can be replaced with any durable fabric: old carpets, blankets, old oilcloth or roofing felt. This protective layer is laid with an overlap of about 50 cm on the edges of the pit.

Laying roofing felt
9. Next, you can lay it on the bottom of the reservoir plastic film (its shelf life is about 3 years), PVC film (it will last longer, about 15 years) or durable butyl rubber. To prevent the film from being damaged when filling with water, it must be laid without tension.

A film is placed on the bottom of the pit
10. Excess geotextile and film should not be cut off immediately. The required form they will accept only after filling the pond with water. It is better to dig around the perimeter of the pit shallow trench, into which you can place the edges of the fabric and film and lightly cover it with earth.
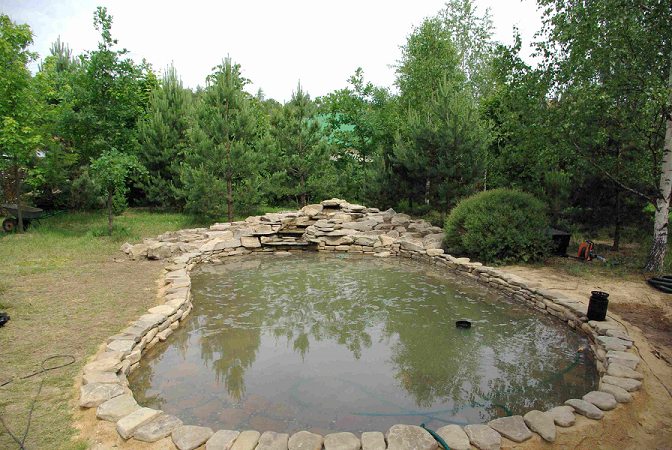
11. After filling the artificial reservoir with water, stones are laid along its edges, which will not only hold the material covering the bottom of the pond, but also serve as decoration. The edges of such an artificial reservoir can be decorate And decorative tiles, slate, sandstone or other suitable sized stones or bricks.

Stones are laid along the edges of the reservoir
12. The area adjacent to the reservoir can be filled with crushed stone or marble chips.

Decoration of the edge of the pond
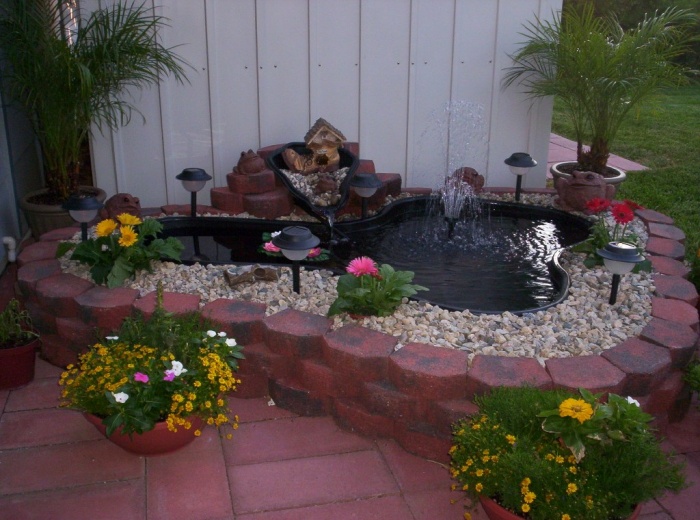
13. In the center or at the edge of the pond you can install a small artificial fountain.
14. Along the edges of the reservoir you can install several small lamps on solar powered.
Advice. If there is too little space on the site, a small artificial pond can be made from an old wheel or bathtub, buried in the ground and trimmed around the edge with stones (see photo).

A small artificial pond made from old bath

Pond from an old wheel
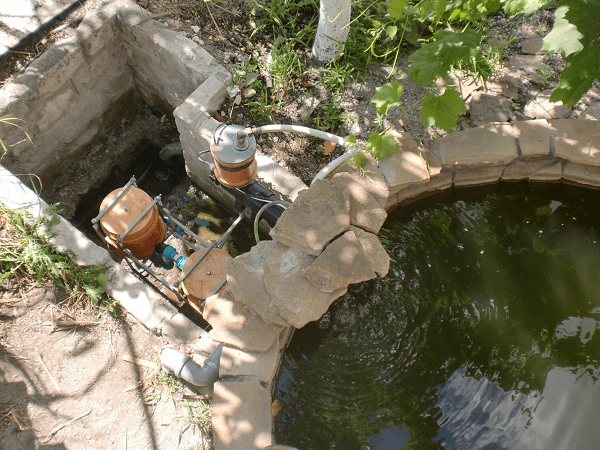
Pond cleaning
To clean a large body of water you can use the simplest system filtration: small pumping station With sand filter. Two pipes are installed into the pond: one serves to collect water, from the second, purified water will flow back into the pool. Additional purification can be provided by a small stream filled with sand, through which filtered water will flow before returning to the pool. It can flow into a pond over a small waterfall.
Pond filter
A small pond only needs to be cleaned manually once a season. To do this, you should completely pump out the water from it using submersible pump and remove accumulated dirt from the bottom. To clean the pond, you can also use a special vacuum cleaner equipped with a filter, which can be used to collect dirt from the bottom.

Vacuum cleaner for pond cleaning
Advice. If you place a vessel filled with charcoal at the bottom of a pond, the water in it will not bloom for a long time.
Fallen leaves can be collected from the surface of the pond using a net. In autumn, during heavy leaf fall, the pond can be covered with a special net. To prevent dirt from entering during the winter, the pond is covered with any covering material.
Advice. To prevent the film from cracking in cold weather, it is better not to drain the water during the winter. To compensate for the pressure generated when ice expands, you can throw several wooden planks or plastic bottles filled with water.
Planting aquatic plants
Aquatic plants serve not only original decoration pond. Marshwort, hornwort, elodea and other plants that can saturate the reservoir with oxygen will help protect the water surface from greening.Naturally, only those plants that can develop well in a given climatic region should be planted. To decorate the pond, you can use traditional plants: reeds, sedges, reeds. Large plants (lilies, water lilies) can cover the water surface from the bright scorching sun and reduce the heating of the water. TO flowering plants Those that prefer to settle near bodies of water include arrowhead, kupena, weeping grass, fern, bergenia, lungwort, water iris, etc.
Advice. To plant plants, you can use special containers that are placed along the bottom of the pit. In this case, caring for the plants will be much easier.

Planting aquatic plants
Video: Do-it-yourself pond at the dacha
An artificial pond is an effective component of landscape design, designed to give peace and tranquility. What could be more pleasant than sitting in a gazebo covered with roses and admiring mirror surface reflecting snow-white clouds and flowering shrubs? Have you been dreaming of a small pond for a long time, but don’t have enough money to equip it? No problem. You can do it yourself without the help of specialists. All you need to do is read this article carefully and apply the acquired knowledge in practice! So, how to make an artificial pond: instructions for creating it yourself.
Artificial pond on site
Choosing the right place for the pond
Choosing the right place for a pond is a guarantee that it will really please the eye. clean water, and not scare away others with the stormy summer “blooming”. An artificial pond should be illuminated by the sun 6-7 hours a day. It is important to find a middle ground, because... an excess of sun will lead to intensive reproduction of algae, and a lack of it will lead to the complete extinction of “ornamental inhabitants”.
The pond should be located on an open surface, at a relative distance from trees. Otherwise, you doom yourself to constantly fishing out branches and fallen leaves from it. In addition, as plant roots grow, they can damage the base or tear the film. Do not forget that your home lake needs to be cleaned and the water in it changed from time to time. It’s good if a source of clean water is nearby - this will solve the filling problem.

Design of a recreation area with a small pond
Dimensions and design
As for the sizes, everything, of course, is individual and depends on the area of your property. It is believed that the reservoir should occupy approximately 3% of the area land plot. But that's up to you to decide. Do not make the pond too deep - it will be difficult to care for. Provide three degrees of depth. The first will belong to coastal plants, the second to water lilies, the third to fish.
If we talk about the design of the future reservoir, then you should start from your preferences and the style of the existing landscape. Do you want to emphasize the rigor and geometric nature of your home? Square or rectangular pond - The best decision. Those who want to fill their space with oriental motifs should take a closer look at small tanks irregular shape, bordered by smooth boulders and low trees with bright foliage.

Original artificial pond
Round ponds on a green lawn, surrounded by original lanterns, are very popular. You can build a bridge across a pond from decking boards, create flower beds nearby, form stone paths, thus creating the ideal atmosphere for a good rest.

A perfectly round pond
Materials for artificial pond
You can make a pond with your own hands from different materials. The most commonly used films are film, butyl rubber, or ready-made containers. Which option to choose is up to you. But first, let's look at their advantages and disadvantages.
- PVC film. An excellent material for homemade ponds. You can easily build a structure of the desired shape. If dismantling is necessary, this will not be difficult. Affordable price film provides everyone with the opportunity to become the owner of a beautiful pond without significant financial costs. Among the disadvantages, it is worth noting the fragility of the material, i.e. After some time, you will have to worry about building a new reservoir.

The process of laying PVC film in a pit
- Butyl rubber. Like PVC film, it allows you to create ponds of any shape, but has a lot of additional advantages. Rubber can withstand high loads and maintain excellent strength characteristics for a long time. Of course, these advantages directly affect the cost - in this case it will be an order of magnitude higher.

Butyl rubber for pond construction
- Ready-made plastic tanks. Most quick way acquire an attractive lake. Plastic containers are durable and resistant to adverse weather conditions, but have a limited range of sizes and shapes.

A small pond from a finished tank
Some craftsmen build ponds from what they can find in the garage - from an old bathtub, a barrel, a basin of suitable size, a trough, and even a tractor tire. Well, it can be so. Original and well worthy of attention.
Sequence of work
Creating a pond using PVC film is considered the most common, so we will consider it.
- We make a plan. Before you begin work, sketch out a rough plan indicating the width and depth of the future pond. It is advisable to think about decoration in advance. This approach will allow you to avoid rework and, as a result, get what you wanted;
- We outline the contours of the pond. This can be done using an ordinary hose or simply by scattering sand along the expected boundaries of the reservoir. Think again whether everything suits you - at this stage you can change something;
- Digging a pit. Begin excavation. We form the first two tiers of the reservoir. Approximate depth - 30 cm, width - 20 cm. Then we dig out the main bowl. Please note that the total depth must be greater than 80 cm. Otherwise, your pond will be too hot in summer and too cold in winter. In such conditions, it is unlikely that anyone or anything will live there;
- We measure the dimensions. The pit is ready, now we measure its size and depth. It adds 50 cm at the edges, and with the obtained figures we can safely go to a specialized store to purchase the required amount of film;
- Line the bottom and walls with film. To extend the life of polyvinyl chloride, geotextiles, linoleum, roofing felt are laid under it, or at least sand is poured. If you do this on a hot sunny day, you can achieve maximum elasticity from the material and easily give it the desired shape;
- Fix the edge. To do this, we dig a trench, place the wrapped ends of the film in it and fill it with crushed stone for greater reliability. Plastic pipes nailed to pegs will help prevent the edges of the reservoir from crumbling;
- We decorate the pond. Decorate the edges of the pond with stones, install a backlit fountain, and place containers with plants in the bowl. In the coastal zone you can settle marigold and marsh iris. In shallow water there are reeds and calamus. Deep water will become great place for water lilies, water hyacinth, elodea, aponogeton;
- Fill with water. After graduation preparatory work, you can pour water into the pond. A stream that will ensure continuous circulation will help prevent stagnation. The source of the stream is raised above the level of the reservoir, and water is supplied using a pump resting at the bottom. Don't forget to install a cleaning filter.
Video: instructions for constructing a pond in a small area
The pond is ready. All that remains is to launch the fish. It is better to keep unpretentious crucian carp, koi carp and veiltails. The design of the surrounding area is a purely individual matter. Some will want to build a gazebo, others will want to create flower beds, and others will want to install a barbecue.

Koi carp in an artificial pond
How to properly care
Caring for an artificial pond does not require much effort or time. If the pond is dry, add water to it. In summer, remove string algae and weeds from around your home pond. In autumn, clear the pond of falling leaves. You can make your task easier and stretch a net over the water surface. With the onset of cold weather, the plants are transplanted into other containers and sent for the winter. The equipment is also removed. In the spring, the walls of the pond are scraped out of silt, and everything returns to normal.
As you can see, arranging a pond with your own hands is not such a difficult task. All you need is desire, a little free time and a little imagination. Go for it!