Often, home plants are placed on the windowsill - closer to natural light. If the window sill is very narrow and there is not enough space to accommodate house plants in flower pots, you can grow flowers together on hanging fixtures. In this case, the way out can be hanging basket
or pots
. A cache-pot is a hanging container in which a single flower pot is placed or green plant. More interesting option- This is a hanging basket in which several plants are planted at the same time, forming a flower arrangement.
There are a number of difficulties that can complicate the process of this method of growing plants. But thanks to our advice, you can choose appropriate place, correctly arrange the composition and competently care for flowers in hanging containers:
- Tip 1: It must be remembered that warm and dry air rises, so plants in a suspended structure will require more frequent watering.
- Tip 2: If you overfill the water, it may drip right onto the floor. It threatens to bloat wooden floor, therefore, the best place for hanging baskets is the kitchen or balcony, where the floors are usually laid with tiles.
- Tip 3: For baskets located indoors, polyethylene is sometimes placed inside the container so that water does not drip, but this creates a threat to flood the plants. The best decision is to place several plant pots in a waterproof container. The container itself can be hung on a wire, rope or twine from the ceiling. The principle of such placement is similar to the flower girl, which is described in the article about the home mini-garden.
- Tip 4: The gaps between the pots and the walls of the container are filled with wet peat. Peat is lighter than, for example, a mixture of peat and earth, and when hanging from the ceiling, unnecessary loads should be avoided.


- Tip 5: If you have chosen the option of planting plants in a common container, then the rules here remain unchanged: the plants must have the same watering regime, temperature regime and be equally sensitive to lighting. As for the soil, it is poured into a container on top of the drainage layer, which is also general rule for this method of growing plants.
- Tip 6: It is better to hang the basket in such a way that it can be reached by hand, that is, at the level of your height. If for some reason this option is not possible, then use not a simple hook, but a carabiner, this design will allow you to raise and lower the container.
- Tip 7: One last tip: check if your green "pets" are getting enough light and air at the chosen height. Flowering and variegated plants should be placed closer to the light - near the window.
Examples flower arrangements in a cache-pot:


Indoor flowers in flowerpots are a wonderful way to decorate an apartment or house, make the room more lively and cozy.
In this article, we offer you interesting ideas how to make beautiful hanging flower pots using a variety of materials such as wood, leather, twine and other improvised means.
Also 5 step-by-step master classes with diagrams and photos on how to weave flower pots quickly and easily with your own hands and create really beautiful decor interior.

Leather hanging planters are easy to manufacture, but look very original. Add some style to your home interior along with this wonderful leather planter. It can definitely become exactly the highlight that makes the interior unique.


Master class: leather hanging planter

Necessary materials:
- Distilled (purified) water
- Tracing paper (21x28 cm) and 4 pieces of strong rope (or leather laces), each approximately 90-120 cm long
- Leather dye (optional) and gloves
- Leather (30x30 cm square)
- Packing tape, a simple pencil and a stationery knife
- Computer and printer (for template printing) and template
- Sponge for wetting and coloring
Step 1: Preparation and placement
Print out the hanger plant template on tracing paper. Lay the template down on wrong side leather web and choose the ideal placement (not too close to the sides and to avoid any imperfections in the leather).

Step 3: Soften the skin
Dip the sponge into the purified water, and then evenly apply moisture to the skin. Repeat this step at least three times until the skin looks like it can't take in more water. This will soften the skin, and facilitate our work on weaving pots.

Step 4: Template transfer
Now place the template in the place you selected earlier and tape it on the sides so as not to move to the side. With a simple pencil direct the lines printed on the tracing paper by pressing the pencil with medium force. Be careful and don't miss any line.

Step 5. Cutting
Now peel off the template from the skin to see how the design has transferred to the surface of the skin. Using a utility knife, make cuts in place of the lines.
For convenience, you can first cut a circle along the outer contour. The cuts should be clearly drawn along the drawn lines.


Step 6. Coloring
Note: This step is optional, depending on the desired color and materials at hand. In our case, we dyed the skin dark brown.
After the skin is dry from moisturizing (at least one hour), apply the desired dye. Apply the paint with a sponge (wearing gloves) until the desired effect is achieved.

As the skin dries, pull it back a little to give it a voluminous shape. You will start to see the skin deform, keep going pulling and stretching it to create the shape of the pot as it should be when finished.

Step 8: Hang Up
- After that, how the skin is completely dry, and a planter shape is formed, punch four holes in the upper part to thread the ropes through them.
- You must place them evenly, at the same distance from each other, so that the suspended flower pot does not then lean to one side.
- Take four ropes (regular or leather) and on each of them tie a knot, tightening it tightly at the end.


Step 9: Decorate and Mount
Add tassels, beads, rivets- everything that is necessary to achieve the desired style in the end. At the top of the hanging cords, gather all four of them together and tie into a knot.

You can use this knot to hook onto a ceiling hook and/or ring. See if the length of the pendant suits you, if necessary, tie the knot at a different level.


Straw hanging planter
This planter will suit the interior with innovative notes. Transform and complete your home decor with their neon cocktail straws and strings. And for this, even 15 minutes will be enough for you!

Necessary materials:
- neon threads
- neon straws (8 pieces per pot)
- flower pots for indoor plants (we used white ones made of melamine)
- house plants (succulents)
- scissors

How to weave - instructions:

Step 1: Cut the threads
Cut eight pieces of neon cord, each 90-150 cm long, depending on how close to the ceiling you want to place the pots.
Step 2: Making a Knot
Take the newly cut threads together and tie a knot at one end, resulting in a tassel from a small excess of cord at one end.
Step 3: Divide the threads into sections
Lay out the rope in four sections (similar to the shape of a cross). That is, two ropes in each section.
Step 4: Cut the Straws

- Cut off in straws that small part that is separated by a spring. Then cut it in half. Take eight of these small pieces and stretch a thread into each of them.
- Move the straws to the center(knot) and on every two threads (in sections) make a knot. Here's what it will look like:
- Lay out the threads again in the shape of a cross, two threads per section. Only now, to form a section, take one thread from the previously adjacent sections.
- Cut the straws into pieces (total need 16), each of which should be the size of a piece of straw, which is separated by a spring.
- In each of 8 pieces of straws thread and make knots on the threads from one section.
- Similarly, lay out 2 strands in the shape of a cross, one each from adjacent sections.
Add a third and final set of straws to the strands and tie adjacent strands (similar to the previous set).
Step 5: Hang Up
It remains only to hang the pots and insert a flowerpot with indoor flowers into it. Make a few pieces, then together they will create a beautiful composition.

And neon straws will also glow a little at night, which will look very original.
Macrame flower pot
The macrame technique has, probably, the most variations in the manufacture of planters. They can be very simple, which can be done in just 10-15 minutes with your own hands, or complex with many hours of work. Practice weaving first on the lungs, hone your skills, and then improve.


Master class: DIY macrame weaving
Macrame is back in fashion, as is needlework in general. In this master class, you will learn how to make a hanging planter with your own hands using this technique. There is nothing complicated, just follow the instructions and you will succeed!

Necessary materials:
- 3 cords 2.5 m long and 0.5 cm thick
- Metal ring with a diameter of 2.5-3 cm
- Hook (on wall, slot) to hold macrame while working
- Scissors and colored rope
- Glass pot in the form of a ball with a diameter of 20 cm
- Drainage stones and soil
- House plants that climb (e.g. Stephanotis)
- Decorative moss (optional)
Step-by-step instruction:

Step 1: Thread the ropes into the ring
Pull all three ropes through the metal ring until the ring is in the middle of the ropes. Thus, you now have six ropes to work with, each 1.25 m long.
Step 2: Making a Knot
- Of all tie a knot with six ropes right next to the ring. Make it as tight as possible, for this, after forming the knot, tighten each rope separately.
- Hang the ring on a hook (if there is no hook, then tie it to a cabinet handle or anything like that with a separate small rope, the main thing is to fix it). This will allow you to use both hands while working.
Step 3: Divide the Cords into Groups
- Separate the cords into three groups, two in each. Tie a knot in each pair 45 cm below the ring. You will have three knots at the same level, make sure they are tight.
- Take one rope from two adjacent pairs and tie them together about 12 cm below the previous knot.
Repeat the previous step with the rest of the ropes so that they are all tied together. This will create a zigzag pattern between the cords.
Step 4: End Node
- Approximately 12 -15 cm below the second set of knots, gather all six ropes together to make one big final knot. Pull each cord individually to make the knot as tight as possible.
- See what the length you need to leave and cut the ropes to the right size.
- Wrap the multi-colored threads around the rope in several places, creating blocks a few centimeters long. This stage is decorative and is optional. Now the macrame pendant is ready and you can place the pot in it.
Step 5: Planting Indoor Flowers
At the bottom of the glass pot, place stones for drainage to make a layer about 2.5 cm high. Fill the rest of the bowl with soil.

- Remove the plant from the temporary pot and place in glass vessel. Pour water over and press down on the soil to compress it. On top of the soil you can place decorative moss , optional.
- Place the glass bowl with the flower over the bottom node And spread the ropes to the sides to fix well.
- Straighten the plant if it is tangled in the ropes. Hang and admire the beauty of the plant and your own product.

Macrame schemes for flowerpots
Here are a few more schemes for those who want to master the weaving of macrame. They are very simple - suitable even for beginners. Look at the photo and repeat. A clothesline or thin twine is perfect as a material. The minimum consumption for a hanging planter is 10 meters of rope.

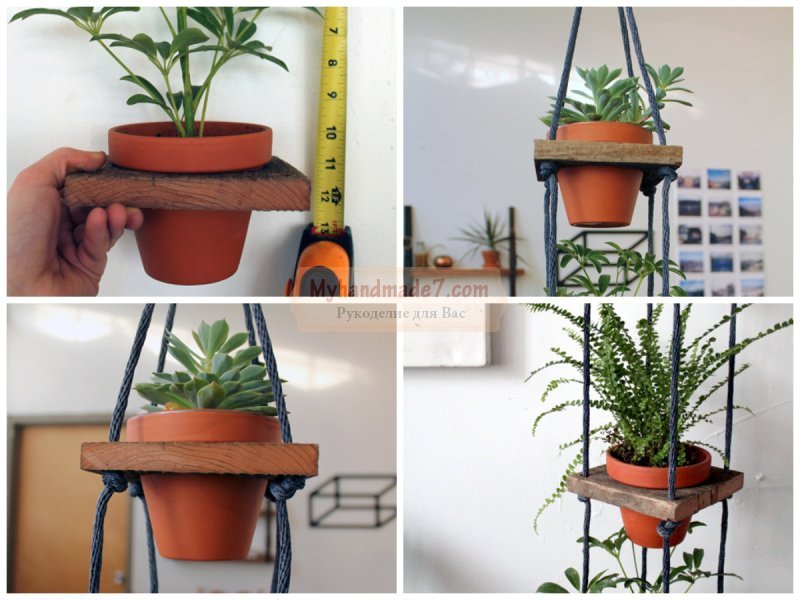
Wooden planter
The tree also gives a fairly wide range of actions, various shapes, colors. Choose what you like best and create.


Master class: hanging wooden planter
This hanging planter will wonderfully complement your home interior. It is done quickly and simply, the materials also will not take a lot of money. The best solution for an apartment.

Necessary materials:
- Wooden plate and saw
- Home plants and flowerpots
- Rope and metal ring
- Drill and sandpaper
- Paint and brush
Step-by-step manufacturing scheme:
Step 1: Making Wooden Squares

Consider how many tiers your flower stand will have ( there are 4 of them, but you can do more or less ). Choose the houseplants you want to place there.
Based on all this, cut out from wooden plate the right amount of squares.
- To do this, turn the pot upside down and place it on a plate, circle and leave on the sides about 5 cm, thus determining the size of the square.
- With a saw make squares.
Step 2: Making holes for the pots

- You already have a circle drawn on the tree from the top of the pot, now you need to draw another one in the middle of it so that their centers coincide, but the diameter of the new one was about 1-2 cm smaller.
- This value depends on how quickly the pot that you will place in the stand increases to the top, and also you want so that the wooden square is almost at the very top, or in the center of the pot.
- You can take another pot, suitable for the size of the stencil, and circle it.

- Cut out this new circle with a jigsaw. For convenience, you can first make a hole with a drill and, starting from it, work with a jigsaw.
- The pots should now fit inside the squares.
Step 3: Hanging Holes

At the corners of the squares you need to make holes for the rope so that they can be hung. To do this, use drill with a diameter of up to 1 cm.
Step 4: Paint the Tree

By using sandpaper remove the roughness and irregularities that have formed after sawing and drilling. Now the tree can be painted or simply treated with an antiseptic. In this case, dark brown paint was used.
Step 5: Paint the Pots

Pots can also be painted, if desired. Sloppy strokes of white paint look good on plain clay pots. This step can be skipped. 
Step 6: Putting it all together
In order to fasten the wooden squares together, we need a thick rope: cut 4 ropes of 180 cm each (for a given number of tiers). Pull one rope into each corner hole of one of the squares and tie a knot at the end, this will be the lower part of the structure.

Tie one more on each rope. knot at 25-30 cm above the previous one and thread the ropes into the holes of the next square. Check that everything is even, and the second tier is clearly horizontal above the first, correct the knots if necessary. The second tier is ready. Repeat these steps for the remaining tiers. 
Step 7: Plant Your Plants
A practical advantage of this hanging stand is that the water that may flow down after watering from the top plant will drip onto the bottom one. So a pot stand is needed only on the lowest tier (if you use it outdoors, you can do without stands at all).
You can also put coffee filters or similar absorbent materials in the bottom of the pots, so that water can flow out, but the earth will not fall out through the hole.
TIP: To prevent the bottom pot from falling out of the stand if someone accidentally catches the rope, glue it to the pot with superglue.
Step 8: Transplant the plants into prepared pots.
If you glue the base of the lower pot before inserting it into the wooden square, it will turn out like in the photo below. If you want the bottom pot to be inserted into the tree in the same way as the rest, then first transplant the plants, insert the pots into the holes in the tree, and only then glue the stand to the bottom one. 
Step 9: Hang Up
- To hang this structure, pull the ropes through the metal ring and tie a knot, or bend them over and tie them around with another thin rope.
- Adjust the rope so that all tiers are horizontal and even.
Such a stand is good, just do not forget that the flowers need a sufficient amount of light.
A hanging stand is a wonderful solution for those who love flowers but don't have enough space to place them.

Pots made of copper tubes
The manufacturing principle is similar to that described in the previous master class, only copper tubes are used here (and they fold into a slightly different pattern). Of course, these materials will be more expensive than straws, and cutting them is not so fast, but in general there is no difficulty, and it turns out beautifully and with high quality. 
TIP: If desired, copper pipes can be replaced with plastic straws for cocktails
Necessary materials:
- 2 m copper tube about 3 mm in diameter
- Mini pipe cutter
- Strong thread or fishing line
- Leather cord (length depends on how high you intend to hang the pot)
- small pot
- Plant

Step by step weaving:
Step 1: Cut the tubes
You need to cut the tube into the following pieces: 20 pieces 4 cm long and 5 pieces 24 cm long. Cut long pieces first, and then small ones, it will be more convenient. Use a measuring tape for measurements.

Step 2: Start folding the tubes
Tie a knot at one end of the fishing line, and thread the other through 5 small pieces of the tube so that you get a pentagon (that is, the line must be passed through the first piece of the tube twice).

Step 3: Continue making pentagons with small tubes

- Pass the line through 4 tubes of the same size, and then through the tube of the previously formed pentagon. Now the line is in the tube connecting the pentagons, and you need to bring it through the top tubes of the pentagon you just made to its left edge.
- Don't worry if they don't look perfect, everything will straighten out when you hang and place the pot.
- Then do it in the same way 2 more pentagons, in total there should be 4 pieces, and they should be located as in the photo below.
- Now bring the line through the tubes to the bottom of the extreme pentagon and put a tube on it. Then pass the fishing line through one edge of the other extreme pentagon.


Here's what should happen:
Pass the line through 2 more tubes, and then through the edge of the pentagon, as in the photo below. It should look something like a flower, or rather like this:


Step 4: Stringing Long Tubes


- Lead the fishing line to one of the highest points of the structure (between the two upper tubes of one of the pentagons). Now the fishing line needs to be threaded through a long tube.
- Pass the line through another long tube, and then direct it to the next highest point of the pentagon structure (any, not necessarily adjacent).

- Pass the wire through 2 small tubes to get to the next high point. Now pass through another long tube, the line will come out to the junction of the long tubes, return the line back down through one of the previous two long tubes. Attach the fourth tube in the same way.
- Now it remains for you to attach the last tube, but first place a pot in the middle of the structure, otherwise it will not fit through the honey tubes later.
- Now attach the last tube. Here's what should happen:


Step 5: Attaching the Leather Cord
Cut about 30 cm of leather cord and attach it to the connection point of the long tubes. You can tie a knot, but here, for aesthetics, hot glue was used, fastening it to a neatly folded end of the cord. Here's what it looks like:


To hide the glued area, cut another small piece of cord, secure with hot glue, and wrap around the cord to hang from.
Trim off excess line and cord. And the last step: plant your favorite houseplants!
![]()

Where to hang pots
Moreover, in summer, plants can be placed both inside and outside the house, but since it is cold now, we will focus on home ones. You can green any room of the apartment, kitchen or hallway, the main thing is to take into account the needs of plants, the right amount of light. In fact, each version of the hanging planter can be placed in any room of the apartment, so this is only your design decision.
Of course, you can just put a flower pot on a windowsill or bedside table, and it will already look good. But if you try a little more, then you can decorate appearance pots, and more optimally use the space of the apartment, at the same time arranging the plants and not taking up extra space with them (with hanging planters).
Above the workplace
Here, a hanging planter will not take up much space, especially since we always try to put the desktop closer to the window, which will be very popular with indoor flowers.


In the bedroom
The bedroom is not only beautiful, but also very useful to place plants. They enrich the room with oxygen. And how nice it is to wake up among the greenery. Try hanging plant pots in your bedroom.


In the kitchen
This perfect option, you will never hook or turn over a flowerpot. The planter looks very homely in the kitchen!


On the balcony or in the chill-out area
If the area of \u200b\u200bthe apartment allows, then with the help of flower hanging flower pots, you can plant trees in the whole room and make a mini-garden. But spruce squares are not enough - you can arrange a comfortable seating area on the balcony.


Planter ideas from improvised materials
If you show imagination, then a hanging planter can be made absolutely from any materials at hand. Starting from old cans, bottles to unwanted towels and T-shirts.
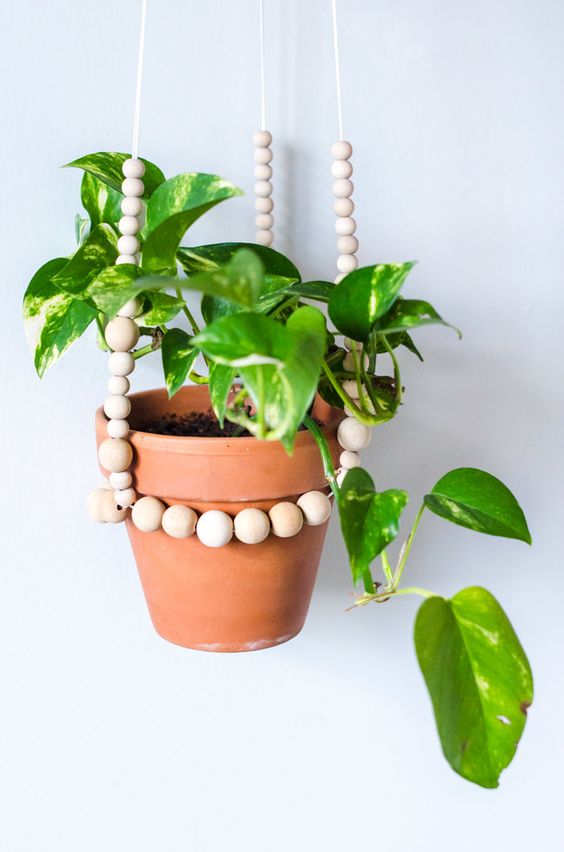
From beads
If you have old beads lying around and you don’t know what to do with them, then here is one of the options for solving the problem - we decorate the pots.


From baskets and pots
Such pots can be used both for a single pot, and for several at once. Such wicker baskets are sure to be found in many homes. They often lie idle, but in vain they will make an excellent suspension for flowers.


High-tech planter
Modern suspensions made of concrete or brass, will fit into modern style apartments.


From bottles
Probably the cheapest of all methods, but it looks no worse than the others. We collect empty plastic and glass bottles and make original flower pots.


From moss and shells
Many houses have shells brought from the seas, and if you drill a small hole and plant small succulents there, a mini-planter will learn. The main thing is the quantity, 3-8 pieces will create an excellent hanging garden.


Let's see how you can transform your favorite indoor flowers? For example, if you create a flower pot with your own hands, then such decor will please the eye and add zest to the interior. In addition, having equipped flower stands and / or shelves for flowers with your own hands, it will also become convenient for you to take care of your pets.
Pot design options for indoor flowers
What is the difference between a planter and a regular flower pot? Translated from French cache-pot means "to hide the pot". Thus, the planter is a decorative "wrapper". Certainly, best home there will be a clay pot for flowers, but it quickly loses its attractive appearance, since ceramics let water through and stains appear on its surface that cannot be removed. Often as protective film glaze is used, but it also cracks and crumbles over time, and then the pot will either have to be replaced or decorated. In this case, a planter comes to the rescue - with its help you can easily hide unsightly places and create decor in the same style.
If you have a couple or three pots, then the easiest way is to arrange them beautifully on the windowsill. But if there are more than a dozen colors, then placement can be a problem. The most common way to hang a planter is to use ready-made hanging hooks or make holes for a rope. But you can make the mounting method creative.
You can organize a simple crossbar or build a whole structure under the ceiling, on which, for example, hang several.

The design of a one-piece planter does not provide for drainage holes, and openwork ones do not hold excess moisture, so when watering this must be taken into account.
Or here is such an idea of \u200b\u200bhanging a planter, even those who can’t do it can implement it:
If you need to small space place a lot flower pots then this idea is for you!

With the help of simple tricks from wooden bars and rope, you can make a whole shelf for flowers with your own hands, equipping suspended structures. More detailed instructions in this video:
Imagine, combine different ways The more flowers you can place, the cozier your home will be.
Making flower pots with your own hands from scratch: materials and master classes
In this section, we will consider options for independent "cases", which are made separately, and then "populated" in them. flower pot. For indoor planters the choice of materials is unlimited and correlates only with overall design and your preferences. The most common and used for hand made:
- cardboard,
- paper tubes,
- felt,
- recyclables.
From felt
From simple materials for needlework and children's creativity wonderful things turn out, you just have to apply your imagination. Look, a charming planter from.


Do-it-yourself stands and shelves for pots
Making a planter or decorating a pot is not all. This beauty needs to be put somewhere! Here you can not do without special shelves and stands. You can build a structure on the wall.

And you can order a whole bookcase on the floor.

Or here is such a bookcase-ladder.

And it is not necessary to ask someone. If you buy blank parts sawn to size in a store, then even a gentle female hand can cope with the assembly. Like in this video:
But it is much more interesting to turn on the fantasy and adapt it to the shelves to accommodate the flower pots. unusual items. For example, pallets. Paint with a stain or dark paint and now - a great shelf is ready.

And in this tool cart they get along great various plants, creating a mini .

"Cross" will not advise bad! :)
Categories ,To decorate the garden and the house, gardeners often use hanging planters.
Baskets made of vines look very nice, which can be made in a wide variety of shapes, for example, in the form of a ball, cone or rectangular box.

Perhaps a harmonious decoration of any landscape design there will be flowerpots made of wire or forged metal. This option is especially attractive in that it creates the feeling of a certain complete "flight" of the flower bed.

In addition to the shape, material and design of the flowerpot itself, when choosing it, it is important to pay attention to the fastening. In addition, the fastening of containers for hanging flower beds must be very strong and reliable.

This is necessary so that when decorating a flower bed in the yard, you can rotate the plant from time to time to protect it from the sun's rays.


The specifics of planting suspended flower beds
Planting a hanging flower bed depends on the shape of the flowerpot. In simple flowerpots, reminiscent of potted plants, that is, those that have only one open surface, the plants are planted as usual.
It is a completely different matter if the flowerpot is designed to create a hanging ball. In this case, the walls of the frame are filled with moss, which is designed to retain moisture, and the entire basket is covered with a special film, which is most often sold complete with such flowerpots.

Then, in those places where the shoots should subsequently grow, it is necessary to make small holes. The seedlings should be carefully inserted into the holes made, and the soil should be poured into the flowerpot and the plants should be planted at the top.
Having planted flowers to create a hanging flower bed with your own hands, you should water the soil a little and hang the flowerpot in a cool place for several days.

Hanging flowers in the garden: which plants are suitable for hanging flower beds
To create hanging flower beds, it is better to choose plants that are unpretentious in care and do not have special requirements for the state of the soil.
In addition, when choosing inhabitants for such flowerpots, it is important to consider the ratio of the size of their root system to the size of the pot.
For example, petunia roots grow very quickly, and if the pot for this flower is less than 6-8 liters, then its root system will soon fill the entire volume of the container, due to which the plant may die.

Very beautiful decoration will have a do-it-yourself hanging flower bed when planting luxuriantly blooming annuals in flowerpots, for example, pansies, petunias, vervain, marigolds, etc.
Almost all domestic plants, including Kalanchoe, nasturtiums, daisies, rejuvenated, stonecrops, etc., also get along well and grow in a hanging planter or flowerpot.

Of course, bright colorful flowers will always become worthy decoration any garden or interior, but you should not think that in the design of hanging flower beds you can only use flowering plants. For example, flowerpots with herbs- mint, rosemary, etc.

And for those who love originality, we can advise you to make a very unusual, but very useful decoration - a hanging basket with small-fruited vegetables, for example, strawberries, which will bear fruit even on the veranda or balcony.
Specific care for hanging flower beds
Caring for plants planted in hanging pots depends on whether they have pallets.
Baskets without a pallet prevent stagnation of moisture in the soil, which, on the one hand, is good, since it slows down the decay of the root system of plants, and on the other hand, it can lead to a lack of moisture if the flower bed is in a sunny area.

If the flowerpot is equipped with a tray, then you should not water the plant too often, and also install it in darkened areas.
In addition, the soil in hanging flower beds must be periodically fertilized, because. during watering, minerals in it are washed out.

In all other aspects, caring for hanging plants garden beds is no different from caring for plants planted in open ground- They also need to be watered regularly, eliminate dried leaves and fight pests.

Hanging flower beds are exactly the addition that can give brightness and expressiveness to any suburban area They can be hung in arbors and pergolas, on fences and on poles, on garden benches, in the recreation area, on summer terrace, balcony and even on the walls of the house - everywhere they will look beautiful and harmonious.

However, when designing suspended street flower beds, it is also important to take into account the peculiarities of style. personal plot. You can beautifully emphasize the beauty of the landscape with the help of bright color solutions or unusual shapes, or you can focus on the natural beauty of plants.

If such hanging flower beds "settle" in your garden, be sure that this decision will not disappoint you. Beautiful flowers and plants, neat and well-groomed, always delight the eye and create an atmosphere of comfort, and if they are also hung in beautiful, original flowerpots, then such an arrangement of the site can only be envied.
Old enameled bowls, flower pots, buckets will be used to create planters. The containers are hung on chains and hung as high as possible so that any passer-by can see and appreciate this beauty.


It is such a pleasure to make simple things for the garden with your own hands. Please yourself with a hanging flower pot, it can perfectly decorate the porch of a private house or a balcony in a city apartment. And we will share with you a master class on its manufacture ...


What you will need:
- Wicker basket, you can use an old one or even weave it yourself
- Sphagnum is peat moss, it is used in gardening and construction, you can find and collect it in a marshy forest or purchase it in specialized stores
- Latex gloves
- land for landing
- Small plastic trash bag
- Bucket of water (for soaking the moss
- Beautiful flowers and plants for planting

Soak the sphagnum fibers in a bucket of water, wring out a little and lay out the bottom of the basket.

Once you've laid out enough moss, place a piece of polyethylene on top and poke small holes in it to help trap some of the moisture.

Fill the remaining space with potting soil.

Start planting your flowers and plants. It seems to me that ampelous petunias or other ampelous flowers will look great in this pot.

We decorate the garden with our own hands. Enjoy)))

wooden planter
For the original hanging planter, you will need 24 bars 15-20 cm long. Laying them in a checkerboard pattern, they form a square box with through holes.
Connect the bars with nails or screws. Ropes are tied to the bars, at the corners of the upper edge of the planter and a homemade planter is hung on any tree in the garden.
Wooden planter with viols:

Wooden planter similar to hanging swing, "keep" on itself a whole flower bed with pansies(viols)
burlap pots (tarpaulin, felt)
Thick fabric, such as burlap, is perfect for making planters in rustic style country. All that is needed for this is to cut two blanks from the fabric in the form of a semicircle or square, sew them like a pocket and hang them on the fence.
For hanging, you can use a fabric strip sewn to the upper edge of the planter or a wire threaded into the fabric.
Hanging planters for the garden made of felt

In a felt pot, you can put a pot with garden annuals.
New outfit for the watering can.
If you have old watering cans or buckets with basins lying around in your country house, do not throw them away, treat the surface with rust sandpaper and paint them in bright colors. Inside it is fashionable to put pots (or bags of soil) and flowers. And these items will turn into funny pots
You can hang them on racks, trees, fences

How to make a hanging flower pot from a plastic container
1. Materials and tools. Plafond itself. Galvanized wire with a diameter of 2 mm from the latest project. Key ring. Round nose and pliers.
2. We prepare three pieces of wire 25 cm long.
3. With the help of round-nose pliers at one end of each wire, we bend a round eye.
4. At the other end of each wire, we make a “P”-shaped bend. After all the modifications, the length of the three blanks should be the same.
5. Using an awl or the sharp end of scissors, we make three holes with our own hands in the area of \u200b\u200bthe neck of the ceiling.
6. Insert "P" -shaped hooks into the holes
7. We put wire blanks on the key ring. The pot is ready.
8. We plant plants. Plants can be varied, but it should be noted that drainage is not provided in the pot and, if the plant requires frequent transplant, in this pot design, it may be difficult to extract the plant.
A cache-pot can be built not only from cans, but also from plastic bottles (the most common source material. which is always at hand).
Paint the surface of the pots

You can decorate the pots with twine
To do this, we need a plastic bucket of ice cream or other products:  and you will also need jute twine


Glue the beginning of the skein together to fasten the handle.
And we begin to wrap the twine around the bucket. Make sure that each circle fits snugly together, without gluing the twine. When you have reached the bottom of the bucket, you can glue the last few circles, and also glue the end of the twine well.


Then it remains to make 4 holes and hang a bucket-planter decorated with twine.
Wicker flower pot
Braid a flower pot so you can hang it in a simple way imitating macrame.

In order to make a hanging planter, we need about 10 pieces of thick rope, about 90-120 cm long, several large buttons and a metal ring. And decide on the size yourself.

Instructions:
We fold our pieces of rope in half and fasten with a simple loop as shown in the figure:

Then select two loops located side by side and fasten their adjacent ends with a button, as shown in the figure. It is better to place buttons at a distance of 5-7 cm from the ring.


