It is difficult to imagine your favorite garden without flowers, as they are a stylish addition and an integral part. landscape design. Compositions planted in unusual, original pots for plants made by oneself look especially impressive. Creating beautiful flower pots for flowers with your own hands from improvised material is not only useful, but also very fascinating process. Step-by-step master class for making original planters with detailed description And visual photo, later in our article.
What can you make a pot with your own hands
Today, specialized stores offer a wide range of various decor and decorations for the garden for every taste, including original flower pots. However, even with such an abundance of goods, it is not always possible to find what you need exactly. There is only one way out of this situation - to try to make a pots yourself.
Oddly enough, but the most unusual decorative flowerpots are obtained from ordinary material. You just need to be smart and give free rein to your most bold ideas and fantasies. Planters from household items will look most harmonious in the garden. It is they who give a real zest to your yard, creating the effect of grace and refined nobility.

The second life of old shoes
Surely in the country you have old shoes that you haven’t worn for a long time, but you didn’t dare to throw them away either. The perfect way to breathe into her new life- make an original flower garden out of it.
To do this, you need an unnecessary pair of old shoes, help skillful hands and some free time.
Walkthrough
- Pour fertile soil (preferably black soil) into the bottom of the boot, then plant seeds or seedlings of your favorite plants in it;
- Pour the resulting decorative flower garden with warm water and place it somewhere in visible side Houses;
- To prevent excess moisture from accumulating inside, several small holes can be made in the sole;
- To give the composition more interesting view, boots can be painted in any color you like.


Decorate the shoe with your favorite flowers and plants - great idea for a creative gardener


Absolutely any footwear can be used as a mosnov: rubber boots, sneakers, sneakers, sandals, galoshes, low shoes, sandals, cloaks. As for flowers, it is better to give preference to bright, unpretentious, undersized plants.
Important! Planters from old shoes should have holes to drain excess water. Otherwise, the roots may rot, which will lead to the death of the plants planted in them.


Flower pot made of cement, rags and burlap (photo)
A flower vase made of cement and rags looks very original and spectacular. The method of manufacturing the product is quite simple and does not require special skills and tools. Enough to have on hand cement mortar and waste from textile production.
Important! Before drying, a rag soaked in a liquid cement mortar can take any shape, so such compositions can be made in any form.
So, for work we need:
- Cloths of rags of the required size. You can use ripped burlap from cereals or sugar;
- Components for the preparation of concrete (water, cement, seeded sand or fine gravel);
- Patterns made to your taste. You can use ready-made ones, such as a bucket, a saucepan, an old vase, etc.
Step-by-step master class for making planters
- Cook according to the required proportions. To make it easier to work with the material, the solution should have the consistency of liquid sour cream;
- Wrap the template around with a dry cloth. If the size is right, dip it in the solution and hold it there for about a minute;
- Throw a dampened rag over your workpiece and let it dry for 12 hours;
- After complete drying, remove the pattern. A cache-pot of cement and rags is ready.
Good to know! The setting and hardening time of cement in the sun is reduced to 2-3 hours.


If you don't like cold and grey colour concrete, or you are simply tired of it, dilute it with bright contrasting colors, so the planter will look more elegant and more fun.
Miniature garden from tin cans (photo)
One of the most popular materials for making flower pots are tin cans.
- Why are they so popular among art lovers? Everything is very simple. Metal cans come in many colors, shapes and sizes, so you can create a magnificent flower arrangement from them that attracts admiring glances.
The indisputable advantage of making such floral decorations is the minimum return of effort and time while obtaining the most creative result.

To make a pot from cans, usually the following materials are required for work:
- Cans;
- Nails and hammer;
- colored acrylic paints, fly brush;
- Wooden base for fixing jars
Manufacturing guide
- To give the composition certain outlines, all cans are painted in bright colors;
- After complete drying, a hole is made in the bottom of the jar to drain excess moisture;
- It remains to fix the jars to the selected base, pour soil into them and plant flowers.


To add more expressiveness to the product, patterns can be applied to a slightly dried surface or decorated with various buttons, ribbons, beads or beads.


An unnecessary teapot as a flower garden
Found an old kettle in the garage? Don't rush to throw it away. It can be made from beautiful decoration, which will look original in your garden. In addition, the creation of crafts with your own hands will help not only realize your creative potential, but also save money.
Return the product to its original appearance a can of acrylic or spray paint. Using a stencil, various patterns can also be applied to the surface of the teapot.
Important! So that the paint does not swell over time, the surface must be well prepared before application.

The planter from the teapot is mobile, and if necessary, it can be moved to another place
- For those who do not want to bother with painting kettle, you can leave everything as it is. The shabby and tarnished shade of metal with a slight touch of time has its own special charm. The cold shine of polished metal looks no less advantageous.

Using an old teapot as a flowerpot is quite a bold and creative decision.

Vase from improvised means: a step-by-step master class
Today, craftsmen and Hand Made masters make original planter from almost any material that comes to hand. Ideas for creativity and inspiration can be drawn from anywhere, including the Internet.
Photos of beautiful planters posted in our article once again proves that there is no limit to human imagination. Innovative solutions and unusual super ideas allow you to create real works of art.

- If wooden sticks glue together into a hollow cube, so that each new row forms a free space, and each subsequent one overlaps it, we get an unusual planter that is perfect for small plants. It can be placed anywhere, for example, on a windowsill or hung on a rope, after planting indoor flowers in it.

- Plastic bottles. Probably none garden craft or decoration is not complete without their participation. Working with this material is very convenient and simple, the main thing is to observe safety precautions. The simplest thing that can be made from is a hanging flower pot.
However, you can use plastic bottles not only in decorative purposes. Seedlings can be planted in them vegetable crops, so this material is also a favorite among amateurs.


- You can weave a flowerpot with your own hands from an ordinary rope. In this case, the shape of the product can be different: cylindrical, round or cone-shaped, the main thing is that the planted plant fits freely into it. As a material for weaving, some craftsmen use thin vine branches or artificial rattan threads.

- If you approach the creation of a decorative flower pot more thoroughly, you can make a more interesting and large-scale composition. Suspended old waste boiler over an impromptu fire of flowers and logs, you can get a very interesting result that will not go unnoticed by your guests.
Important! To highlight and emphasize the beauty of the composition you created, you can protect it with a border of ordinary stones, slightly drowning them in the ground.

Boxes for flowers and seedlings
- Summer residents are resourceful and thrifty people, so they never throw anything away, including cuttings from boards and other lumber. After all, they make excellent wooden boxes which can be used as flower pots.
In order to make planters from boards, you can get by with minimal carpenter skills, and only a hacksaw, nails and a hammer are needed as tools.


- Good to know! Wooden boxes can also be used for planting seedlings of various crops. Only for this, in the upper boards, it is advisable to make special holes for the hands so that they can be conveniently and safely carried.

Beautiful flower beds from old things
Oddly enough, but an old bicycle that has not been ridden for a long time can still be useful to you as decorative ornament. It is not necessary to violate the integrity of the structure. Just use it as a living flower bed. Additional contrasting elements in the form of flowers and plants will be made from an old bicycle real masterpiece art.

Planter from a bicycle - everything ingenious is simple
- Showing imagination, unique hanging decoration with flowers available from regular bird cages. Just place a pot or container with low plants in it and decorate with some decor.
Important! A planter from a cage will look more elegant and noble if you use a decorative vintage cage in the Provence style for it.

- For craftsmen with golden hands, make decorative planter for a summer residence with your own hands in the form of a cart, it will not be difficult. This will require a special tool and certain skills in handling wood and metal.
- To improve your mood and bring yourself a lot of positive emotions, you can quickly and efficiently make flower pots from ordinary trash cans made of shiny metal. For ease of movement, furniture wheels rotating in different directions can be screwed to the bins.


As you can see, having the right material at hand, it is very simple to make a flower pot for the garden with your own hands. For the manufacture of simple products, no skills required. Even a child can cope with this task. As for products more complicated, then you can’t do without the help of adults.
The creative process of creating a planter is not only creative, but also educational. Therefore to this exciting activity even the smallest children can be involved.
As many people know, any flowers bring to the atmosphere reigning in the house, not only a feeling of comfort, but also beauty. They serve as a delight for human eyes, fill the apartment with a wonderful aroma, and contribute to filling the room with pure oxygen.
Psychologists, in turn, do not get tired of reminding that they are very useful for the physical and mental health of a person.

They are able to fill a person with positive energy, energize, and also drive away bad thoughts. That is why people suffering from various sleep disorders are highly recommended to use flowers not only for decorating purposes.

Supporters of traditional medicine, in turn, remind that plants can serve as a medicine for various ailments. For example, primrose is usually used when skin diseases, and aloe is indispensable assistant when fighting a cold.

And if one of the household suffers from nervous disorders, then one cannot do without the help of geraniums. It will relieve the obsessive state in a short time, calm and have a beneficial effect on the body.

However, in order for the flowers to become a full-fledged decoration in the house and look quite harmonious, one cannot do without their correct location. Often, plants are placed on window sills, but such a decision is not always correct.
After all, in the hot summer, too much sunlight enters the flowers, and in the winter, an excess of cold causes irreparable harm to them.

That is why professional florists strongly recommend using floor stands for flowers. They will help you properly position the plants and become worthy decoration interior.
All about the types of stands for indoor flowers
Today, there are many models on the market that have a different price range and differ. The material taken as a basis can be not only wood or metal, but also plastic.
Note! decorative tree in the interior - 75 photos of design ideas for living spaces

And if you make your choice correctly, then without a doubt you will become the owner of not only a beautiful, elegant, but also a practical, multifunctional product.

They will be a great addition to your interior, ennoble it and give it more charm and grace. Let us consider in more detail what types of coasters can currently be found on the market:

Stationary floor stands. They are the most popular and have a fairly reasonable price. Their design is quite simple and is based on a solid vertical base.

The base may or may not be movable. It depends entirely on your preferences and does not affect the functionality of the product.
Shelf stands. Most often used in rooms with limited free space, in which it is necessary to accommodate a large number of plants.

Their design is quite interesting and unusual, so they can be seen not only in classically decorated rooms, but also in rooms with a more modern design.
Mobile. They can have a different shape, are equipped with movable parts and consist of two or more tiers. The main difference between this model and others is the presence of wheels.

Thanks to this, the home owner gets a unique opportunity to move the product around the house without any problems.


Non-standard coasters. Appeared on the market not so long ago, but have already managed to become quite popular. This is due to the fact that in our time an increasing number of people prefer modern styles.
Such styles are for the most part demanding on decorating items. That is why there is a need to acquire catchy and memorable interior items.

What coasters to choose?
When choosing coasters, you need to be guided not only by personal preferences and style requirements. Always remember that you need to consider which plants will be placed on stands. 
Do not forget that Standard products designed for only 1 flowerpot, and their height does not exceed 70 centimeters. There are also models that have a height of only 10 centimeters. Therefore, before purchasing one of these models, think about which one is more suitable.

For example, if you plan to purchase plants with rather long, thin or thick stems that hang down to the floor, it is completely unacceptable to order a product with a small height. And, conversely, you should not get too tall designs for flowers with short stems.

In the event that there is not so much free space in the room, you should think about buying corner tower structures. They can accommodate several flowerpots at once, but at the same time they do not take up as much space as ordinary floor products.


However, choosing this design, it is important to think in advance how the flowers will be arranged. They should not interfere with each other, as well as create an additional shadow.
To prevent this from happening, do not place plants with wide and large leaves on this stand.

Photo options for racks for flowers


Beauty and comfort in the house is not only perfect cleanliness And refined interior, consisting of expensive furniture and designer renovation. The harmonious design of the room consists of many details and decorative elements, which can often both attract attention and repel the lack of taste.
Indoor flowers are an invariable decoration of any home, giving the room a special aura. hearth and freshness. But sometimes, flower lovers do not have the opportunity to place the number of plants in the room that they would like. Or, due to a change in the style of the interior, indoor plants in simple pots do not harmonize with the rest of the details.
But do not be upset! After all, you can diversify the interior and place more flowers with the help of a cache-pot - a decorative item that will emphasize all the advantages of the situation and indoor plants. You can buy a flower pot, or you can create it yourself, which will give the interior individuality and originality.

Common types of planters
Before you start making flower pots with your own hands, it would not hurt to learn about its varieties. After all, today there is a huge choice flower pots, which are conditionally divided depending on the purpose:
- desktop planters - it is customary to place them on cabinets, tables, racks, taking into account the stylistic decision;
- floor planters - located in spacious rooms and used for tall indoor plants;
- wall planters - suitable for small rooms where it is important to save space;
- hanging planters - in addition to originality, this type of planter allows you to place indoor plants quite compactly;
- planters for the garden - perfectly enliven the space of the site and give the site a complete look.


What materials are used to make pots? A decorative floral item can be made from just about anything, especially when it comes to self made. During the creative process, all improvised means are used - starting from natural materials, and ending with old things or various small decorations.
- Tree. This is the most common material for creating decorative containers, when choosing which it is important to take into account its resistance to moisture, as well as the processing of the material itself.
- Glass. Planters from this material is a versatile and practical item, thanks to which you can track the moisture level of a plant.
- Plastic. Inexpensive and easy-to-care containers have long been in demand by many housewives due to their availability and a variety of colors.
- Ceramics. A more expensive option for pots, but also more diverse. Moreover, ceramics are easily amenable to some changes, for example, drawing a picture or glazing.
- Metal. Very unusual flower containers made of stainless steel or forged elements will give the interior a special expressiveness and emphasize the sophistication of indoor flowers.


Cache-pot in home decor with your own hands
Flower and hardware stores have a huge selection of flower pots. Here you can choose by size, color, and also depending on the location of the container.
But it so happened that each person is individual, and therefore in own house he expects to see only exclusive items that will emphasize the taste of the owner of the house. With some needlework skills, any housewife can create a real masterpiece that will refresh the interior.
So, let's begin.
Planters with lace
To diversify plain plastic pots, you can use pieces of bright fabric or lace. In addition, for work you will need:
- scissors;
- glue;
- pot;
- glue brush;
- material for gluing (lace, braid, ribbon).
Operating procedure:
- To begin with, the outer side of the pot should be wiped with alcohol in order to degrease the surface.
- Apply the necessary contours, in place of which the decor will be located.
- Lubricate this area with glue, without going beyond the contours of the pattern.
- Press well and leave to dry completely.

For a more durable fixing of decorative elements, you can use glue gun, which will give the decor strength. If desired, you can decorate the pots with braid, bright buttons, beads and other interesting little things.

Planters from branches
An equally interesting option for creating a flower pot is a planter made of wooden circles, the manufacturing principle of which is similar to the previous one. Only for this you need to use tree branches in the work, the diameter of which does not exceed 2 cm.
To prepare the material, you need garden scissors, with which we cut wooden mugs with a thickness of no more than 1 cm
Having previously degreased the surface, we attach the material to the pot one at a time, carefully applying a small amount of transparent Moment glue.
Having pressed it well, we leave it in a place inaccessible to children until it dries.
In order for the planter to serve for a long period, it is recommended to varnish the product for wood.
No less interesting options can be obtained by gluing river pebbles, shells, dry moss, cork, tree bark.

Wooden planter with twine
An old wooden pot will sparkle with new colors if it is decorated with twine. To do this, apply glue to the surface and slowly press the rope, wrapping it around the pot. It is very important to fasten the rope at the end so that the product does not lose its original shape.
By pre-drilling holes for the rope, you can build hanging planter with your own hands. To do this, carefully thread the twine into the holes and secure it well.

Branches or bamboo planters
Natural materials are the best way to decorate the interior, as they are distinguished by their natural beauty and environmental friendliness. One of the options for creating a planter is a planter made from cane or bamboo branches.
For this you need to prepare:
- chopped even branches or bamboo;
- twine;
- scissors;
- glue "Moment" transparent;
- dense coarse fabric (burlap, linen);
- plastic pot.
Operating procedure:
- Before you start tying the sticks together, they should be aligned so that the product looks aesthetically pleasing.
- Then we tie the branches together with twine along the edges (2-3 cm to the edge), tightly tightening so that the canvas does not crumble.
- Apply a layer of glue to the outer walls of the pot and evenly glue burlap or linen.
- We tie a cloth of sticks around the pot, and tightly tie the upper and lower parts.
- The cache-pot can be additionally decorated with flowers made of twine or burlap, which will give the product a special effect.

DIY hanging flower pots
Hanging planters are often used by those who need to free up more space in a house or apartment. This decor allows you to move around the house without obstacles, so this type of planter can be called the most popular.

In this way, you can perfectly decorate the garden with your own hands. But before that, it is worth remembering that the materials for hanging planters must be resistant to high temperatures and the adverse effects of precipitation. For such purposes, a planter from a plastic bottle will be suitable.

Cache-pot from a plastic bottle
For the manufacture of decorative containers plastic bottles there are many methods. One of them can be decorated using the decoupage technique.
Necessary materials:
- a plastic bottle with a volume of 1-1.5 liters and a flat bottom;
- scissors;
- basis for decoupage;
- napkins for decor;
- brushes;
- varnish.

Operating procedure:
- Prepare the bottle for work by thoroughly washing and wiping.
- Apply a thin layer of foundation, evenly distributing it with a brush.
- After the base dries, it usually takes 20-30 minutes, apply surfactant glue, also smoothing well.
- After separating the top layer of the napkin, apply it to the container and smooth it with a brush or fingertips.
- In order for the surface to dry well, it is better to leave the product overnight at room temperature.
- Then the pots are varnished and dried.
- We pierce holes on both sides of the pot with a hole punch and thread the rope with which the plant should be tied to the mount.

Features of vertical gardening
Fans of unusual plant decor will surely like “living walls”, or vertical gardening. Today it is a favorite technique of designers around the world, emphasizing the exclusivity of expensive interiors. Professional "living walls" are not cheap, especially if everything is done with the latest technology, including automatic watering.
Vertical gardening has a number of advantages:
- air saturation with oxygen;
- space saving;
- improves the appearance of the walls and complements the style of the interior;
- the abundance of plants on the wall are a source of additional air humidification;
- division of space into zones.

Despite the apparent difficulties in creating such walls, having become well informed with the necessary information, you can create an unusual structure on your own. It is worth recalling that this type of landscaping can be built both in the house and in the garden.

Planters for this type of landscaping can be wall-mounted and conventional, depending on the design and location of the plants. To create wall-mounted pots, containers from plastic bottles are suitable, which are easily attached to a vertical structure or wall with a rope. To make the container more aesthetically pleasing, you can decorate it with a braid to match the interior. This decor is a macrame or crocheted canvas.

No less interesting option - pockets from thick fabric in which to plant climbing plants. This option is good for decorating the garden, in which you can build metal grills or special racks.
On special frames made of stepped wood, you can place flowers in flowerpots, the surface of which is decorated with natural materials.
A great option is a planter decorated with moss. All you need is dry moss and clear glue. The process of creating such a pot will not take much time, but the result will exceed all your expectations - an original and exclusive decor item will become an unusual decoration for a garden or home.

A cache-pot decorated with river pebbles is an interesting option for vertical decoration. The process of creating such an item will take a little longer than in the case of moss, but it's worth the effort. This decor is distinguished by a non-standard approach and originality.

Equally successful in creating a beautiful flowering wall in the garden are suitable plants. Curly and ampelous flowers are ideal for this case, which, with proper care, in addition to landscaping, will create a whole riot of floral colors.
Home decoration is a laborious and interesting activity that requires creative inclinations and a desire to make interior decoration unique. To do this, they use all sorts of tricks and tricks, just to stand out with originality and non-standard solutions.
Making a planter with your own hands is one of the ways not only to refresh and diversify the interior, but also to prove yourself as a creator and artist who creates incredible masterpieces. After all, needlework has always been a part of art, which in turn contributed to the manifestation of human creative abilities.
So, create with pleasure!
Let's see how you can transform your favorite indoor flowers? For example, if you create a flower pot with your own hands, then such decor will please the eye and add zest to the interior. In addition, having equipped flower stands and / or shelves for flowers with your own hands, it will also become convenient for you to take care of your pets.
Pot design options for indoor flowers
What is the difference between a planter and a regular flower pot? Translated from French cache-pot means "to hide the pot". Thus, the planter is a decorative "wrapper". Of course, a clay pot will be the best home for flowers, but it quickly loses its attractive appearance, since ceramics let water through and stains appear on its surface that cannot be removed. Often as protective film glaze is used, but it also cracks and crumbles over time, and then the pot will either have to be replaced or decorated. In this case, a planter comes to the rescue - with its help you can easily hide unsightly places and create decor in the same style.
If you have a couple or three pots, then the easiest way is to arrange them beautifully on the windowsill. But if there are more than a dozen colors, then placement can be a problem. The most common way to hang a planter is to use ready-made hanging hooks or make holes for a rope. But you can make the mounting method creative.

You can organize a simple crossbar or build a whole structure under the ceiling, on which, for example, hang several.

The design of a one-piece planter does not provide for drainage holes, and openwork ones do not retain excess moisture, so this must be taken into account when watering.
Or here is such an idea of \u200b\u200bhanging a planter, even those who can’t do it can implement it:
If you need to small space place a lot of flower pots, then this idea is for you!

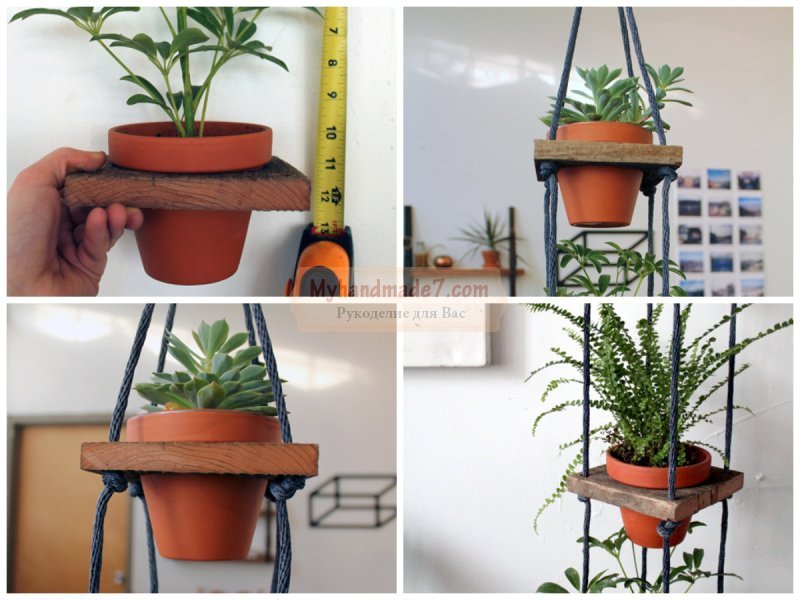
With the help of simple tricks from wooden bars and rope, you can make a whole shelf for flowers with your own hands, equipping suspended structures. More detailed instructions in this video:
Imagine, combine different ways The more flowers you can place, the cozier your home will be.
Making flower pots with your own hands from scratch: materials and master classes
In this section, we will consider options for independent "cases", which are made separately, and then a flower pot is "populated" in them. For indoor planters, the choice of materials is unlimited and correlates only with overall design and your preferences. The most common and used for hand made:
- cardboard,
- paper tubes,
- felt,
- recyclables.
From felt
From simple materials for needlework and children's creativity, wonderful things are obtained, one has only to apply imagination. Look, a charming planter from.


Do-it-yourself stands and shelves for pots
Making a planter or decorating a pot is not all. This beauty needs to be put somewhere! Here you can not do without special shelves and stands. You can build a structure on the wall.

And you can order a whole bookcase on the floor.

Or here is such a bookcase-ladder.

And it is not necessary to ask someone. If you buy blank parts sawn to size in a store, then even a gentle female hand can cope with the assembly. Like in this video:
But it is much more interesting to turn on the fantasy and adapt it to the shelves to accommodate the flower pots. unusual items. For example, pallets. Paint with a stain or dark paint and now - a great shelf is ready.

And in this tool cart they get along great various plants, creating a mini .

"Cross" will not advise bad! :)
Categories ,Indoor flowers in flowerpots are a wonderful way to decorate an apartment or house, make the room more lively and cozy.
In this article, we offer you interesting ideas how to make beautiful hanging flower pots using a variety of materials such as wood, leather, twine and other improvised means.
Also 5 step-by-step master classes with diagrams and photos on how to weave flower pots quickly and easily with your own hands and create really beautiful decor interior.

Leather hanging planters are easy to manufacture, but look very original. Add some style to your home interior along with this wonderful leather planter. It can definitely become exactly the highlight that makes the interior unique.


Master class: leather hanging planter

Necessary materials:
- Distilled (purified) water
- Tracing paper (21x28 cm) and 4 pieces of strong rope (or leather laces), each approximately 90-120 cm long
- Leather dye (optional) and gloves
- Leather (30x30 cm square)
- Packing tape, a simple pencil and a stationery knife
- Computer and printer (for template printing) and template
- Sponge for wetting and coloring
Step 1: Preparation and placement
Print out the hanger plant template on tracing paper. Lay the template down on wrong side leather web and choose the ideal placement (not too close to the sides and to avoid any imperfections in the leather).

Step 3: Soften the skin
Dip the sponge into the purified water, and then evenly apply moisture to the skin. Repeat this step at least three times until the skin looks like it can't take in more water. This will soften the skin, and facilitate our work on weaving pots.

Step 4: Template transfer
Now place the template in the place you selected earlier and tape it on the sides so as not to move to the side. With a simple pencil, direct the lines printed on the tracing paper by pressing the pencil with medium force. Be careful and don't miss any line.

Step 5. Cutting
Now peel off the template from the skin to see how the design has transferred to the surface of the skin. Using a utility knife, make cuts in place of the lines.
For convenience, you can first cut a circle along the outer contour. The cuts should be clearly drawn along the drawn lines.


Step 6. Coloring
Note: This step is optional, depending on the desired color and materials at hand. In our case, we dyed the skin dark brown.
After the skin is dry from moisturizing (at least one hour), apply the desired dye. Apply the paint with a sponge (wearing gloves) until the desired effect is achieved.

As the skin dries, pull it back a little to give it a voluminous shape. You will start to see the skin deform, keep going pulling and stretching it to create the shape of the pot as it should be when finished.

Step 8: Hang Up
- After that, how the skin is completely dry, and a planter shape is formed, punch four holes in the upper part to thread the ropes through them.
- You must place them evenly, at the same distance from each other, so that the suspended flower pot does not then lean to one side.
- Take four ropes (regular or leather) and on each of them tie a knot, tightening it tightly at the end.


Step 9: Decorate and Mount
Add tassels, beads, rivets- everything that is necessary to achieve the desired style in the end. At the top of the hanging cords, gather all four of them together and tie into a knot.

You can use this knot to hook onto a ceiling hook and/or ring. See if the length of the pendant suits you, if necessary, tie the knot at a different level.


Straw hanging planter
This planter will suit the interior with innovative notes. Transform and complete your home decor with their neon cocktail straws and strings. And for this, even 15 minutes will be enough for you!

Necessary materials:
- neon threads
- neon straws (8 pieces per pot)
- flower pots for indoor plants (we used white ones made of melamine)
- house plants (succulents)
- scissors

How to weave - instructions:

Step 1: Cut the threads
Cut eight pieces of neon cord, each 90-150 cm long, depending on how close to the ceiling you want to place the pots.
Step 2: Making a Knot
Take the newly cut threads together and tie a knot at one end, resulting in a tassel from a small excess of cord at one end.
Step 3: Divide the threads into sections
Lay out the rope in four sections (similar to the shape of a cross). That is, two ropes in each section.
Step 4: Cut the Straws

- Cut off in the straws that small part that is separated by a spring. Then cut it in half. Take eight of these small pieces and stretch a thread into each of them.
- Move the straws to the center(knot) and on every two threads (in sections) make a knot. Here's what it will look like:
- Lay out the threads again in the shape of a cross, two threads per section. Only now, to form a section, take one thread from the previously adjacent sections.
- Cut the straws into pieces (total need 16), each of which should be the size of a piece of straw, which is separated by a spring.
- In each of 8 pieces of straws thread and make knots on the threads from one section.
- Similarly, lay out 2 strands in the shape of a cross, one each from adjacent sections.
Add a third and final set of straws to the strands and tie adjacent strands (similar to the previous set).
Step 5: Hang Up
It remains only to hang the pots and insert a flowerpot with indoor flowers into it. Make a few pieces, then together they will create a beautiful composition.

And neon straws will also glow a little at night, which will look very original.
Macrame flower pot
The macrame technique has, probably, the most variations in the manufacture of planters. They can be very simple, which can be done in just 10-15 minutes with your own hands, or complex with many hours of work. Practice weaving first on the lungs, hone your skills, and then improve.


Master class: DIY macrame weaving
Macrame is back in fashion, as is needlework in general. In this master class, you will learn how to make a hanging planter with your own hands using this technique. There is nothing complicated, just follow the instructions and you will succeed!

Necessary materials:
- 3 cords 2.5 m long and 0.5 cm thick
- Metal ring with a diameter of 2.5-3 cm
- Hook (on wall, slot) to hold macrame while working
- Scissors and colored rope
- Glass pot in the form of a ball with a diameter of 20 cm
- Drainage stones and soil
- House plants that climb (e.g. Stephanotis)
- Decorative moss (optional)
Step-by-step instruction:

Step 1: Thread the ropes into the ring
Pull all three ropes through the metal ring until the ring is in the middle of the ropes. Thus, you now have six ropes to work with, each 1.25 m long.
Step 2: Making a Knot
- Of all tie a knot with six ropes right next to the ring. Make it as tight as possible, for this, after forming the knot, tighten each rope separately.
- Hang the ring on a hook (if there is no hook, then tie it to a cabinet handle or anything like that with a separate small rope, the main thing is to fix it). This will allow you to use both hands while working.
Step 3: Divide the Cords into Groups
- Separate the cords into three groups, two in each. Tie a knot in each pair 45 cm below the ring. You will have three knots at the same level, make sure they are tight.
- Take one rope from two adjacent pairs and tie them together about 12 cm below the previous knot.
Repeat the previous step with the rest of the ropes so that they are all tied together. This will create a zigzag pattern between the cords.
Step 4: End Node
- Approximately 12 -15 cm below the second set of knots, gather all six ropes together to make one big final knot. Pull each cord individually to make the knot as tight as possible.
- See what the length you need to leave and cut the ropes to the right size.
- Wrap the multi-colored threads around the rope in several places, creating blocks a few centimeters long. This stage is decorative and is optional. Now the macrame pendant is ready and you can place the pot in it.
Step 5: Planting Indoor Flowers
At the bottom of the glass pot, place stones for drainage to make a layer about 2.5 cm high. Fill the rest of the bowl with soil.

- Remove the plant from the temporary pot and place in a glass jar. Pour water over and press down on the soil to compress it. On top of the soil you can place decorative moss , optional.
- Place the glass bowl with the flower over the bottom node And spread the ropes to the sides to fix well.
- Straighten the plant if it is tangled in the ropes. Hang and admire the beauty of the plant and your own product.

Macrame schemes for flowerpots
Here are a few more schemes for those who want to master the weaving of macrame. They are very simple - suitable even for beginners. Look at the photo and repeat. A clothesline or thin twine is perfect as a material. The minimum consumption for a hanging planter is 10 meters of rope.

Wooden planter
The tree also gives a fairly wide range of actions, various shapes, colors. Choose what you like best and create.


Master class: hanging wooden planter
This hanging planter will wonderfully complement your home interior. It is done quickly and simply, the materials also will not take a lot of money. The best solution for an apartment.

Necessary materials:
- Wooden plate and saw
- Home plants and flowerpots
- Rope and metal ring
- Drill and sandpaper
- Paint and brush
Step-by-step manufacturing scheme:
Step 1: Making Wooden Squares

Consider how many tiers your flower stand will have ( there are 4 of them, but you can do more or less ). Choose the houseplants you want to place there.
Based on all this, cut out from wooden plate the right amount of squares.
- To do this, turn the pot upside down and place it on a plate, circle and leave on the sides about 5 cm, thus determining the size of the square.
- With a saw make squares.
Step 2: Making holes for the pots

- You already have a circle drawn on the tree from the top of the pot, now you need to draw another one in the middle of it so that their centers coincide, but the diameter of the new one was about 1-2 cm smaller.
- This value depends on how quickly the pot that you will place in the stand increases to the top, and also you want so that the wooden square is almost at the very top, or in the center of the pot.
- You can take another pot, suitable for the size of the stencil, and circle it.

- Cut out this new circle with a jigsaw. For convenience, you can first make a hole with a drill and, starting from it, work with a jigsaw.
- The pots should now fit inside the squares.
Step 3: Hanging Holes

At the corners of the squares you need to make holes for the rope so that they can be hung. To do this, use drill with a diameter of up to 1 cm.
Step 4: Paint the Tree

By using sandpaper remove the roughness and irregularities that have formed after sawing and drilling. Now the tree can be painted or simply treated with an antiseptic. In this case, dark brown paint was used.
Step 5: Paint the Pots

Pots can also be painted, if desired. Sloppy strokes of white paint look good on plain clay pots. This step can be skipped. 
Step 6: Putting it all together
In order to fasten the wooden squares together, we need a thick rope: cut 4 ropes of 180 cm each (for a given number of tiers). Pull one rope into each corner hole of one of the squares and tie a knot at the end, this will be the lower part of the structure.

Tie one more on each rope. knot at 25-30 cm above the previous one and thread the ropes into the holes of the next square. Check that everything is even, and the second tier is clearly horizontal above the first, correct the knots if necessary. The second tier is ready. Repeat these steps for the remaining tiers. 
Step 7: Plant Your Plants
A practical advantage of such a hanging stand is that water that may flow down after watering from the top plant will drip onto the lower one. So a pot stand is needed only on the lowest tier (if you use it outdoors, you can do without stands at all).
You can also put coffee filters or similar absorbent materials in the bottom of the pots, so that water can flow out, but the earth will not fall out through the hole.
TIP: To prevent the bottom pot from falling out of the stand if someone accidentally catches the rope, glue it to the pot with superglue.
Step 8: Transplant the plants into prepared pots.
If you glue the base of the lower pot before inserting it into the wooden square, it will turn out like in the photo below. If you want the bottom pot to be inserted into the tree in the same way as the rest, then first transplant the plants, insert the pots into the holes in the tree, and only then glue the stand to the bottom one. 
Step 9: Hang Up
- To hang this structure, pull the ropes through the metal ring and tie a knot, or bend them over and tie them around with another thin rope.
- Adjust the rope so that all tiers are horizontal and even.
Such a stand is good, just do not forget that the flowers need a sufficient amount of light.
A hanging stand is a wonderful solution for those who love flowers but don't have enough space to place them.

Pots made of copper tubes
The manufacturing principle is similar to that described in the previous master class, only copper tubes are used here (and they fold into a slightly different pattern). Of course, these materials will be more expensive than straws, and cutting them is not so fast, but in general there is no difficulty, and it turns out beautifully and with high quality. 
TIP: If desired, copper pipes can be replaced with plastic straws for cocktails
Necessary materials:
- 2 m copper tube about 3 mm in diameter
- Mini pipe cutter
- Strong thread or fishing line
- Leather cord (length depends on how high you intend to hang the pot)
- small pot
- Plant

Step by step weaving:
Step 1: Cut the tubes
You need to cut the tube into the following pieces: 20 pieces 4 cm long and 5 pieces 24 cm long. Cut long pieces first, and then small ones, it will be more convenient. Use a measuring tape for measurements.

Step 2: Start folding the tubes
Tie a knot at one end of the fishing line, and thread the other through 5 small pieces of the tube so that you get a pentagon (that is, the line must be passed through the first piece of the tube twice).

Step 3: Continue making pentagons with small tubes

- Pass the line through 4 tubes of the same size, and then through the tube of the previously formed pentagon. Now the line is in the tube connecting the pentagons, and you need to bring it through the top tubes of the pentagon you just made to its left edge.
- Don't worry if they don't look perfect, everything will straighten out when you hang and place the pot.
- Then do it in the same way 2 more pentagons, in total there should be 4 pieces, and they should be located as in the photo below.
- Now bring the line through the tubes to the bottom of the extreme pentagon and put a tube on it. Then pass the fishing line through one edge of the other extreme pentagon.


Here's what should happen:
Pass the line through 2 more tubes, and then through the edge of the pentagon, as in the photo below. It should look something like a flower, or rather like this:


Step 4: Stringing Long Tubes


- Lead the fishing line to one of the highest points of the structure (between the two upper tubes of one of the pentagons). Now the fishing line needs to be threaded through a long tube.
- Pass the line through another long tube, and then direct it to the next highest point of the pentagon structure (any, not necessarily adjacent).

- Pass the wire through 2 small tubes to get to the next high point. Now thread through another long tube, the line will come out to the junction of the long tubes, return the line back down through one of the previous two long tubes. Attach the fourth tube in the same way.
- Now it remains for you to attach the last tube, but first place a pot in the middle of the structure, otherwise it will not fit through the honey tubes later.
- Now attach the last tube. Here's what should happen:


Step 5: Attaching the Leather Cord
Cut about 30 cm of leather cord and attach it to the connection point of the long tubes. You can tie a knot, but here, for aesthetics, hot glue was used, fastening it to a neatly folded end of the cord. Here's what it looks like:


To hide the glued area, cut another small piece of cord, secure with hot glue, and wrap around the cord to hang from.
Trim off excess line and cord. And the last step: plant your favorite houseplants!
![]()

Where to hang pots
Moreover, in summer, plants can be placed both inside and outside the house, but since it is cold now, we will focus on home ones. You can green any room of the apartment, kitchen or hallway, the main thing is to take into account the needs of plants, the right amount of light. In fact, each version of the hanging planter can be placed in any room of the apartment, so this is only your design decision.
Of course, you can just put a flower pot on a windowsill or bedside table, and it will already look good. But if you try a little more, then you can decorate the appearance of the pots, and make better use of the space of the apartment, at the same time arranging the plants and not taking up extra space with them (with hanging planters).
Above the workplace
Here, a hanging planter will not take up much space, especially since we always try to put the desktop closer to the window, which will be very popular with indoor flowers.


In the bedroom
The bedroom is not only beautiful, but also very useful to place plants. They enrich the room with oxygen. And how nice it is to wake up among the greenery. Try hanging plant pots in your bedroom.


In the kitchen
This perfect option, you will never hook or turn over a flowerpot. The planter looks very homely in the kitchen!


On the balcony or in the chill-out area
If the area of \u200b\u200bthe apartment allows, then with the help of flower hanging flower pots, you can plant trees in the whole room and make a mini-garden. But spruce squares are not enough - you can arrange a comfortable seating area on the balcony.


Planter ideas from improvised materials
If you show imagination, then a hanging planter can be made absolutely from any materials at hand. Starting from old cans, bottles to unwanted towels and T-shirts.
From beads
If you have old beads lying around and you don’t know what to do with them, then here is one of the options for solving the problem - we decorate the pots.


From baskets and pots
Such pots can be used both for a single pot, and for several at once. Such wicker baskets are sure to be found in many homes. They often lie idle, but in vain they will make an excellent suspension for flowers.


High-tech planter
Modern suspensions made of concrete or brass, will fit into modern style apartments.


From bottles
Probably the cheapest of all methods, but it looks no worse than the others. We collect empty plastic and glass bottles and make original flower pots.


From moss and shells
Many houses have shells brought from the seas, and if you drill a small hole and plant small succulents there, a mini-planter will learn. The main thing is the quantity, 3-8 pieces will create an excellent hanging garden.


