A properly arranged chimney will ensure long-term preservation of heat and safety for visitors in the bathhouse, as it will remove the products of combustion of fuel in time, but at the same time will not allow the stove to cool too quickly. Is it possible to make a chimney for a bath with your own hands and save on the work of a master?
It must be said that doing this is quite realistic, especially What at present, in specialized stores, sales assistants can, according to the developed scheme and using a special software quickly and accurately select a set of elements necessary for the correct chimney. However, their varieties are not limited to metal structures at all, and it is worth taking a closer look at what types of chimneys there are in general, and how to optimally choose the appropriate scheme for a built sauna stove.
Types of chimneys
Furnace bath chimneys are distinguished according to several criteria.
- First of all, according to the material of manufacture. If earlier they were traditionally laid out from baked bricks, then in recent years metal chimneys have become more popular.

- According to their design and installation location, these elements of the sauna stove can be divided into two types: the one that passes inside the room, through the ceiling and roof, or, in another version, the chimney is led through the wall and rises along it from the outside of the building.
To make a choice, you need to consider all the pros and cons of each type of chimney.
brick chimney
Previously, chimneys were traditionally laid out only from bricks, since there simply were no other worthy alternative materials for the construction of this part of the furnace. The erection of brickwork is a rather laborious process, especially since it must be carried out according to a special scheme, with strict observance of all dimensions.

However, brick chimneys are just the option that has stood the test of time. They have higher strength and are much more durable than metal ones. In addition, brick, due to its structural structure, in itself has good thermally insulating and heat storage properties.
A brick structure is safer in terms of fire protection than a prefabricated metal chimney, even made using the most modern technologies.
However, a rather big disadvantage of brick chimneys is their inner surface, as it is rough and has corners. Soot deposits linger on it, clogging the smoke passage and reducing draft, which negatively affects the heating of the stove. In addition, the inside of the pipe, which is excessively overgrown with soot, can cause smoke in the bath rooms or even catch fire during the heating of the furnace from sparks that have fallen on it, which sometimes leads to very dangerous situations.
metal chimney

A metal chimney is much easier to install than a brick one and should be much cheaper. Modern sandwich constructions, made using insulation, are more practical than just single-wall metal pipes, but they do not give such an effect of preserving heat inside the furnace, like a real brick chimney.

The advantage of a metal structure can be considered an almost perfectly smooth inner surface that does not have edges, which allows the smoke to freely, directed by a turbulent flow, go outside. However, with sudden temperature changes, condensation may well form on the internal surfaces - this phenomenon will directly depend on the temperature in winter time on the street. If such a pipe is installed in a region with harsh winters, then it is necessary to choose pipes with the thickest heat-insulating layer.

Another criterion for choosing the type of chimney is its external or internal installation. Each type of accommodation has its own advantages and disadvantages, which you also need to know when choosing the right option for yourself.
The idea to put the chimney on the outer wall belongs to American architects. Such an installation has become popular in domestic buildings, thanks to its simpler device. The chimney connected to the stove does not rise to the ceiling of the room, but is led out through the wall.

The advantages of a metal chimney arranged in this way are increased safety, that it will not be necessary to attic floor and arrange isolated transitions for it in the roof. Such a chimney will save the building from the risk of rain or melt water leaking into the gaps between the pipe and the roofing.
The serious disadvantages of the appearance of the chimney device include its rapid cooling, which means the formation of condensate inside it, so such a chimney must be heavily insulated.
The second disadvantage is that the chimney, taken out, will not be able to give additional heat to the bathhouse, and this will increase fuel consumption.

There are also combined chimneys, which are brought out of knowledge. In this case, a metal pipe is removed from the stove, which is then led through the wall and into the brickwork of the chimney, which is built into the wall and rises to the desired height.
Internal chimney
The metal chimney passing inside is mounted on top of the sauna heater and raised to the ceiling, then carried through the attic and roof, then raised to a level corresponding to the relative position with the roof ridge. The advantage of this design is that all the heat that comes from the furnace, when passing through the pipe, will also warm the room of the bath and the attic, which means that the furnace will cool down longer. This has a positive effect on fuel economy.

If you properly plan and assemble the structure of the internal chimney, constantly keep the joints under control, then such a system will last without problems for many years.

The disadvantages of this design option include the fact that you have to run the pipe through the floors and through the roof.
Video: "short course" on the types of chimneys
Prices for various types of chimneys
Chimneys
Materials for the construction of the chimney
Materials are purchased after deciding on the chimney design option.
brick chimney
For brick building you need to purchase heat-resistant brick and masonry composition - this can be a special building dry mix designed specifically for laying chimneys and. Some masters prefer to use a well-chosen clay solution.
In addition, it will be necessary to provide material for the fungus above the pipe.
metal chimney

- For a metal chimney all necessary details are purchased after drawing up a detailed design diagram, taking into account all the angles and turns of the pipe.
The scheme can be drawn with one line, which will indicate the places where the chimney passes through the wall, ceiling and roof, and at the corners - the approximate value of the angle. With such a drawing, you can contact the store with a request to pick up everything you need for installation.
- In addition, two metal sheet with holes equal to the diameter of the pipe, which will be fixed on the ceiling of the bath and on the floor of the attic. Next, you need to think about a heat-resistant material that will be in the attic floor around the pipe, thereby creating protection for flammable materials.
- For waterproofing around the pipe on the roof, it will be necessary to have waterproofing in the form of adhesive sealant and a special rubber seal that is put on the chimney.

- Separately, it must be said about the parameters for choosing pipes. The first thing to consider when buying metal chimney pipes is their internal section. It is calculated taking into account the power of the furnace, and usually for the bath version, the inner diameter is taken equal to 150-200 mm. If the diameter is too large, the heat will not will linger in the furnace, and an excessively small cross-section pipe does not will create the necessary draft to remove the smoke. In any case, the diameter in any of the sections can in no way be less than that of the outlet pipe of the installed heater.
- The total height of the pipe must be at least 5 meters. And the exact value of this parameter will depend on its location on the roof. If the pipe comes out in the middle of the slope, then it must be raised above the level of the ridge, by about half a meter. The best option the location of the chimney on the roof is one and a half meters from the ridge, but this parameter is optional and depends on the location of the stove in the bathhouse. The quality of traction will also depend on the height of the pipe.
- The metal from which the pipes should be made must have a thickness of at least 1 mm, then the chimney will last a longer time.
- If it is planned to install a tank for heating water in the chimney system, then the drawn up diagram may look like this. It can be modified and adjusted for a specific version of the installed stove and chimney.

The tank shown in the figure works according to the "samovar" system, that is, it is tightly welded to the chimney. Some companies that manufacture this type of pipe produce such an element with a hot water tank already installed on it, which has two or three inlets for connecting water pipes - to fill the tank and to draw water at points of consumption.
Video: design features of bath chimneys
Installation of a bath chimney
After the sauna heater is finally installed, the installation of the chimney begins from the stove pipe. This may be the beginning of a metal chimney or a metal section that will connect the stove to a brick chimney.
metal chimney
Since there are two types of chimney, their installation takes place in different ways.
Internal construction
- If the pipe passes inside the bath building, then usually the whole system has an almost perfect vertical view. Installing a chimney individual elements, while each higher part of it is put on top of the lower one - installation "by smoke".
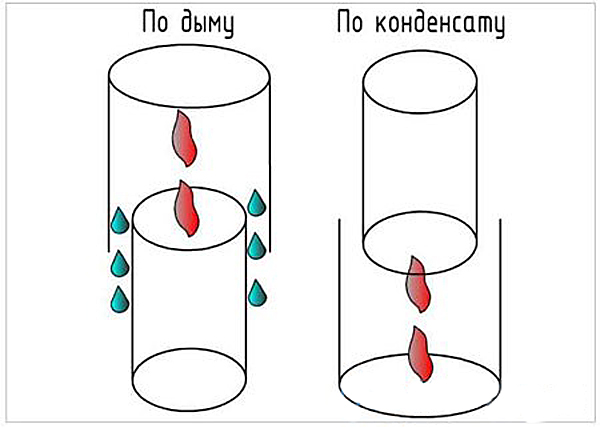
 The usual scheme for pairing sandwich pipes: the inner part is “through condensate”, the outer one is “through smoke”
 If sandwich pipes are used, the approach changes somewhat - the installation of their inner part is carried out “through condensate” (the upper pipe enters the socket of the lower one) and the outer part is “through smoke”. Such a system allows the accumulated moisture to flow freely inside the pipe down into condensate collector, without getting into the heat-insulating material, which from waterlogging loses its properties.
- It is very important to calculate the placement of the joints in such a way that the joints do not fall on the levels of the attic or floors as well as roofs.
- Provided that the stove is located next to wooden walls, they need to be protected from possible overheating and fire with heat-resistant materials, for example, it can be asbestos boards, which are best fixed in two layers.

- If a samovar-type hot water tank is installed, then a place is found for it not far from the firebox, placing it directly above it, or in the attic, if the distribution is heated water is coming in two rooms - in the washing room and in the shower room.
- Before installing the pipes, their joints are coated with a heat-resistant sealant, and after installation from above, they are additionally fixed with special wide clamps.

- If, when combining the individual elements of the chimney, sufficiently large gaps are found, then the inserted part is sealed with an asbestos cord, which is wrapped around the pipe. However, it is better to select elements that are ideally suited to each other in size.
- The first section of the chimney, fixed to the stove pipe, cannot be multi-layered, that is, it is an ordinary single-walled metal pipe with special connections. It usually has a valve installed, which is otherwise called a gate valve. This control is required in order to create and maintain desired level traction, for the period when the bath is warming up, and to keep the heat of the furnace as much as possible after the end of the furnace. The installation location of this element can be clearly seen on the chimney installation diagrams presented above.

- To pass the pipe through the floor, it is convenient to use a box with a wall height of 30 ÷ 40 cm greater than the thickness of the floor. The distance from the pipe to the walls of the box should be at least 180 ÷ 200 mm.
 Passage block - a special box for the ceiling
 A square hole is cut out in the ceiling, into which the main box will easily enter. Its bottom, that is, the lower part, is fixed on the ceiling. Through the hole in the bottom part, the chimney pipe is passed to the attic.
Then the box is filled with a light heat-resistant material - it can be medium-grained expanded clay or mineral stone wool. Similar thermal insulators the box is filled completely, to the top, with the maximum possible density.
 A box filled with thermal insulation material (in this case, expanded clay)
 In the attic, the box is closed with a metal lid with the same round hole, which is worn on the protruding part of the pipe.
- In the attic, the chimney usually runs smoothly, but if suddenly it hits the bars of the crate, then you can use the bends to make a slight bend.

- When the pipe passes through the roof, a metal or asbestos sheet with a hole is also fixed from the side of the attic. The hole can be round or oval, depending on the slope of the roof.

A safe heat-resistant insulation made of asbestos boards or mineral wool is laid around the pipe. Such a gasket or box will secure the combustible elements of the truss system.
Further, after laying the roofing material, it is necessary to carry out waterproofing work, since moisture can penetrate into the gaps between the pipe and the roof covering. To do this, a special elastic element is put on the pipe, which is glued to the roof surface using a moisture-resistant sealant, and then securely fixed with fasteners (for example, roofing, self-tapping screws).
 "Flash" - an elastic element for sealing the place where the pipe passes through the roof
 - It is imperative to install a protective umbrella on top of the pipe, which will protect the chimney from not only atmospheric precipitation, but also various debris or dust.

External construction
To install the chimney according to the scheme with its external placement, the pipe from the furnace is led out through the wall. To ensure safe operation in this case, it is best to use brickwork that will close brick wall behind the stove and isolate the wall from heating when the chimney passes through it.
The diagram clearly shows what the removal of the pipe through the wall looks like in section.
 One of the options for external placement of the chimney. Disadvantage - no condensate collection
 - In order to turn the pipe towards the wall, you will need an element of the system, which is called a bend or elbow. Such parts are produced with rotation angles of 90 or 45 degrees (sometimes there are others), so it can be selected for any arrangement of the structure.

- A pipe can also be passed through a wall through a metal box, just like through an attic floor. In this case, the box is filled with stone wool, and small gaps around the pipe are sealed with heat-resistant sealant.
- A tee is installed on the outer wall, from which further installation will proceed - up, along the wall, and down, to the condensate collector.
- Special fasteners-holders are installed on the wall, which will fix the chimney vertically. The pipe is raised above the height of the ridge by about half a meter - this is necessary to create good traction.
- A protective fungus is put on top of the pipe head.
It is explained very approximately, since in more detail, with all the nuances, it is described in a publication of our portal specially dedicated to this issue.
Video: a variant of a metal bath chimney with access to an external wall
brick chimney
Brick chimneys are divided into root and mounted. For baths, the first, root, which is located next to the stove, is ideal.
If the stove is also made of bricks, then the chimney is attached to general design. Well, if the stove is metal, then it is connected to a brick chimney with a metal pipe.

The figure shows an example circuit brick chimney, with all its departments:
- Closer to the ceiling, a smoke valve is installed on the pipe, which regulates the draft inside the furnace, on which both the intensity of combustion and longevity keeping the whole structure hot.
- Further, for the passage of the pipe through the attic floor, fluff is performed in the chimney structure. Fluffing or cutting is the thickening of the walls of the chimney while maintaining its internal section. This is provided in order to protect combustible floor materials from possible overheating and ignition.
 The scheme of the "classic" brick chimney
 - Above the fluff there is a straight pipe section that passes through the attic and is called the riser.
- Above, when passing through, an otter is laid out, which, in principle, “works” in the same way as fluff, protecting the rafter system from overheating. However, besides this, it closes the gaps between the roofing material and the chimney masonry protruding from the general structure with bricks.
- Then the pipe narrows to its original external size - this section is called the neck.
- Above the neck of the pipe there is a head, the bricks of which also protrude outward beyond the width of the walls, providing additional protection from precipitation.
- From getting inside the pipe of water and dirt, the chimney will protect its final element - a metal cap.
Chimney installation
From the foundation, the chimney is led out according to one row pattern, since the building must be even and not have any protrusions or windows, with the exception of leaving a hole in it for walling in a metal pipe from the furnace.

This chimney is built in the form of a square pillar with a well-shaped section inside. The section size can be “half-brick” - 130 × 130 mm, “brick” - 130 × 260 mm, or even two bricks - 260 × 260 mm. It all depends on the power of the sauna stove.
- The basis for the chimney will be the foundation - usually it is made the same thickness as for the sauna stove, and forms a single structure with it.
- Having raised the pipe to the desired row, a valve is installed in it, and then work proceeds according to a scheme that is suitable for both overhead and root chimneys.

- This diagram shows two options for the pipe. They are given as an example for masonry, therefore, given the size of the chimney, the number of bricks on each side may vary in one direction or another.
- The first row in the diagram is the final row of the pipe neck.
- In the second row, fluff begins to be laid out, so the bricks are laid with a shift to the outside, by about ⅓ of a brick. Here you will have to use not only whole bricks, but also their parts. To do this, with the help of a pick, they are carefully broken into the necessary fragments.
- Moving the bricks to the side, they need to be supplemented inside with additional fragments, since the internal section of the well should remain unchanged throughout the entire masonry. If this rule is not observed, traction can be significantly reduced.
- From the third to the fifth row of fluffing, the brick also shifts outward by ⅓ of the length, while still maintaining the size of the internal section.
- The sixth row has the same size as the fifth and is laid out without shifting to the side.
- The seventh and eighth rows correspond to the masonry of the first row.

- After the laying of the cutting is completed, it is the turn of the construction of the otter. This — quite a difficult task, since it is necessary with the help of each subsequent row to bring out a step that protrudes outward by ⅓ of a brick.

- The first row of the otter has the same size and shape as the last row of cutting.
- In the second row, the laying of steps begins, which expand the chimney to the outside also by 1/3 of the width of the brick.
- Further rows are laid out in accordance with the otter pattern.
- Then comes the neck of the pipe - it can be clearly seen in the diagram presented.
- Next, lay out the head, which consists of two rows, and at the same time the lower one should also protrude somewhat outward.
- The last step is to install the roof-cap.
In the attic floor, combustible elements in this case will be well protected by fluff, but you still cannot do without pipe waterproofing.
- Waterproofing of a brick pipe begins to be done before the roof is covered with roofing material. It can be done with the help of roofing material and mastic. After applying the mastic to the surface of the lower part of the pipe, it is heated with a burner, and then the roofing material is glued to it, firmly pressing it to the heated surface.
- Further, close to the pipe, roofing material is laid on top of the roofing material, and a roofing material is installed on top of it. decorative trim(apron). The remaining gaps must be tightly filled with sealant to prevent moisture from entering through the gaps between the roof and the brick pipe.

So, in principle, any of the chimneys can be built with your own hands. Probably the most difficult of all installations is to correctly mount the nodes for passing the pipe through various obstacles. Any problems can be solved if they are approached competently, having studied the instructions in this manual and choosing correct option. However, it is necessary to end the article with an important warning:
A chimney is a structure that directly affects the health and even life of people, the safety of buildings and all the property in them. There are no trifles in the process of building a chimney and there cannot be, no amateurish simplifications are unacceptable. If there is even the slightest doubt in one’s abilities or in the correctness of the structure being created, it is necessary to seek help from specialists. be ashamed of your ignorance or inexperience is not worth it - the stakes are too high!
find out available ways, from our new article.
The chimney for a bath should not only remove smoke well, but also be designed in such a way that the likelihood of a fire is reduced to zero. In addition, a good chimney perfectly retains heat - in this case, the high temperature in the steam room will be maintained for a long time, and you can save on fuel.
The main types of chimneys for a bath
| Characteristic | Kinds | Peculiarities |
|---|---|---|
| By material | Metal, brick, ceramic, asbestos-cement, polymer | Metal pipes are easy to install and most prefer this option. A brick chimney is more difficult to make, but it is more durable than a metal chimney and retains heat better. Ceramic pipe is more expensive, but it is easy to install, has good thermal insulation, heat resistance and durability. Asbestos-cement chimneys are very cheap, but do not withstand temperatures above 300 ° C, like polymer ones. |
| By design | External and internal | The external chimney exits through the wall and goes up outside the room, the internal one is led out through the ceiling and roof |


To get a high-quality brick chimney, it is very important to correctly build the masonry. This is a rather laborious process that takes a lot of time.
However, at the same time, a brick pipe has important advantages:
- it is stronger and more durable than metal;
- brick accumulates heat well and has excellent thermal insulating qualities;
- a bath with a brick chimney will be better protected from fire.
Since a brick chimney has all these advantages, this option is still worth paying attention to. There is nothing really complicated in the construction of a brick pipe for a bath.

But it must be borne in mind that a serious drawback is also inherent in brick chimneys. Soot deposits settle on the inner surface of such a pipe, since it has roughness and corners. Due to the accumulation of this soot, traction begins to decrease over time, and the bath warms up worse. If the inner surface of the chimney is clogged too much, this can lead to smoke in the bath, and the soot inside the pipe can also flare up.
However, to solve this problem is quite simple - you just need to clean the pipe in a timely manner. The cleaning process does not take much time, while this procedure is often not necessary.

Brick chimney - strengths and weaknesses
Features of a metal chimney

The best option for the construction of a metal chimney would be to use sandwich pipes. They are a three-layer structure:
- inner pipe;
- a layer of thermal insulation located on top of it;
- outer pipe.

Sandwich pipe has two very important advantages:
- it does not heat up too much outside, so it cannot spoil wooden floors in addition, its use will minimize the risk of fire;
- thanks to the three-layer design with the presence of a heat insulator inside the chimney, condensation will not form during the cold season;
- also due to the presence of a heater, the high temperature in the room is kept much better, however, such pipes also significantly lose in this characteristic to brick chimneys.

Scheme of installation of a sandwich chimney
In general, the main advantages of a metal chimney for a bath include:
- ease of installation - assembling such a structure will take much less time and effort than laying a brick pipe;
- smooth inner surface - soot and soot will settle on it in minimum quantities, the smoke will go out in a directed stream, and the draft will be good;
- cheapness - especially if you do not use ready-made sandwich pipes, but make them yourself.
Condensation appears on the inner surface of a metal chimney in the event of a sharp temperature drop. The use of sandwich pipes minimizes this problem. To further reduce it, you need to use pipes with the thickest possible layer of thermal insulation.
Chimney prices

Note! It is best to make a metal chimney, consisting of two main parts. In this embodiment, an ordinary single-layer pipe should depart from the furnace, it will warm up the interior. Sandwich pipes are put on top of it, it is they who will go further out. An important advantage of this option is its cheapness: the fact is that the pipe located near the furnace heats up more, so it quickly becomes unusable. When this happens, it can be replaced without having to buy a new sandwich pipe.


Outdoor chimney
In this version, the chimney does not pass through the ceiling - it is brought out through the wall, and then goes up. This design has significant advantages, including:
- ease of installation;
- safety;
- moisture protection.

During its construction in the attic and in the roof, it is not necessary to arrange isolated transitions. At the same time, the risk of water entering the premises will be minimized, since there will be no gaps between the pipe and the roofing.

However, moisture condenses quite quickly in such a chimney. To minimize the problem, the pipe must be very well insulated. Another disadvantage of an external chimney is that being outside the room, it does not warm up the interior of the bath. As a result, fuel consumption increases significantly.
Internal chimney
In this option, which we will consider in this article, the chimney rises from the furnace to the ceiling, and then goes outside. This design will be the best for capital construction, which is designed for long-term operation. Making it a little more difficult, but still worth doing if you want to get really good result. In the event that the chimney is arranged according to all the rules, it will last for many years without problems.

The pipe keeps heat well and warms the interior of the bath and the attic, besides, the stove cools longer, so you can save on fuel - this important advantage internal chimney. Significant disadvantages of the design include only a higher fire hazard compared to the outer pipe for removing smoke. However, if everything is done correctly and all recommendations are followed, the likelihood of an emergency will be reduced to almost zero, and you won’t have to worry about a fire.
Prices for sandwich chimneys
sandwich chimney

Safety
When building a chimney in a bath, first of all, you need to consider safety issues. Indeed, in the event that something is done incorrectly, wooden structures can flare up very easily. The problem must be approached carefully, then the bath will last a really long time, and there will be no risk to people's lives.
All necessary requirements that chimneys must meet are established by the relevant sanitary rules and regulations. They prescribe the distance that must be maintained between the pipe and the combustible parts of the roof slabs. This value depends on the parameters of the pipe. If you are going to make a chimney in a bath, you should familiarize yourself with SNiP 41-01-2003, which approves the rules for ventilation, heating and air conditioning. At the same time, pay Special attention to paragraph 6.6.22, where all the necessary information is contained.
To make the chimney completely safe, you need to use the appropriate materials for thermal insulation:
- mineral wool;
- basalt cardboard;
- minerite

Fire-resistant drywall and glass-magnesium sheet are also suitable for this purpose.


It is necessary to pay attention to some other points. So, it is important to choose the right materials from which the chimney itself will be made - they must be resistant to high temperatures. For example, if you decide to use a metal pipe to build a chimney, it must be made of non-galvanized material. The fact is that when heated to high temperatures, zinc begins to evaporate, and its evaporation is extremely harmful to health.
Brick chimney device
Unless you have much experience building brick chimneys, you'd better play it safe and opt for a simple, standard, time-tested design option.
Prices for a chimney kit
chimney kit

Such a chimney consists of five main parts:
- overhead pipe with a valve - that part of the chimney that goes straight from the stove;
- fluff - expansion of the chimney by 30-40 cm, which begins 5-6 rows before the ceiling;
- riser - part of the chimney that goes into the attic;
- otter - an expanded part that prevents precipitation from entering the gaps between the roofing and the pipe itself;
- a neck with a head - the upper part of the chimney.
A cap or deflector can be installed on top of the neck, which will protect the pipe from rain, snow and debris. Also, this design will improve traction.

For the construction of the pipe, refractory or ordinary solid bricks are suitable. You can put them on a composition made from a mixture of cement and sand or cement and lime. In the area where the temperature will be the highest, refractory clay should be used. To prepare such a composition, you need to take fireclay powder and dilute it with water and sand in a large container, a 10-15-liter tank is perfect for this. The consistency of the ready-to-use solution should be such that it does not drip from the trowel and does not stick to it, but slowly slides off without leaving marks.
Brick pipe laying

Step 1. First of all, find or prepare a detailed masonry scheme yourself.

Step 2 Then make a brick or reinforced concrete foundation for the stove, build the heater itself. The height of the foundation should be at least 30-40 cm, and the width should be 15-20 cm greater than the width of the chimney.
Step 3 After that, build the chimney itself, sequentially making all its parts - the overhead pipe, the fluff, the riser, the otter and the neck with the head. In this case, a valve must be installed in the overhead pipe.


Step 4 In areas where the chimney passes through the ceiling and through the roof, cut and lay one of the heaters that were listed above.

Video - Masonry fluff


Step 5 If the chimney is located near the wall, it should be fixed to increase the reliability and durability of the structure. Fasteners can be installed every 30 cm.
Step 6 It is better to finish the inner surface of the pipe with plaster. Thanks to this, it will become smooth, as a result, much less soot will settle on its walls. Also, after the completion of the main work, you can whitewash the chimney from the outside.
Step 7 The last upper section of the chimney, which rises above the roof level, must be insulated, and then finished. To do this, you can use a facing brick.
To get a quality result, carefully monitor the thickness of the seams. They must be the same throughout the pipe. The optimal thickness of such a seam when constructing a chimney in a bath is 15 mm. Experienced stove-makers can do the work quite quickly, but you don’t need to rush - carefully make sure that the laying takes place brick by brick according to the scheme you found or prepared in advance. Walls good chimney must be perfectly even, all corners must be perfectly straight. To get this result, you need to use a plumb line, level and other tools. If you approach the work seriously and do not rush, you will succeed, even if you have never done such work before.
Video - Laying the stove and chimney
The choice of a metal pipe for the construction of a chimney in a bath
To choose a suitable metal pipe for the construction of a chimney in a bath, you need to pay attention to two main points:
- diameter;
- wall thickness.
If the diameter is too small, the smoke will not be drawn out well, and some of it will begin to enter the room. If you choose too wide a pipe, smoke and warm air will go outside too quickly, as a result, the bath will cool down. To buy a pipe of the right size, you need to take into account the required length of the chimney and the number of bends. If the pipe will have two turns or more, a diameter of 110 mm will do.
The wall thickness must be sufficient for the metal chimney to last for many years. If the pipe is thin, it will soon become unusable, because when heated, the metal quickly corrodes. This happens primarily in those areas where the chimney heats up more. Therefore, the pipe that will move away from the stove must have thicker walls than the sandwich pipes located above it.

Installation of a metal chimney for a bath
The assembly of the chimney from sandwich pipes takes place in 7 main stages.
Stage 1. First of all, you need to cut a hole in the ceiling, which should be 15-20 mm larger than the outer diameter of the chimney.
Stage 2. You also need to make a similar hole in the roof.
Stage 3. From sheet metal a square is cut out that will close the hole in the ceiling, in this square you also need to cut a hole for the chimney, and drill holes along the edges for mounting on self-tapping screws.

Prices for a coaxial chimney
coaxial chimney


An example of insulation with expanded clay and asbestos cardboard

Stage 4. The first single-layer pipe must be installed on the furnace and put on a square of sheet metal, which will be fixed to the ceiling.
Stage 5. Then you need to insert the first sandwich pipe into the nozzle of a single-layer pipe.
Stage 6. Thus, it is necessary to completely assemble the chimney, installing and fixing one sandwich pipe after another.
Assembly of chimney elements "by smoke" and "by condensate"

Stage 7. A cap must be welded to the end of the last pipe, which will protect the structure from precipitation.


Video - Installation of a chimney sandwich
Thermal protection gasket
To insulate the ceiling of the bath near the pipe, any heat-resistant material will do. It can be:
- expanded clay;
- cellular concrete;
- clay.
Mineral wool should not be used - it absorbs water well, therefore, for rooms with high humidity does not fit. If you leave the ceiling near the chimney without insulation, the room will quickly cool down, and the cost of heating it will increase significantly, so this step should not be skipped.
Making sandwich pipes with your own hands

If you do not want to spend money on buying ready-made sandwich pipes for building a chimney in a bath, you can make them yourself. Then they are more likely to have a less presentable appearance, however, for the removal of smoke and protection from fire, these pipes are no worse. In addition, no one bothers you to make your own sandwich pipes that will look as good as the purchased ones - everything is in your hands.
To make them, you need:
- take two sheets of steel and roll them into pipes, while the diameters must be different - one will be internal and the other external;
- the inner pipe must be wrapped with thermal insulation;
- then you need to put a pipe on top larger diameter and connect the entire structure together by rolling;
- the next step is to cut clamps from the same sheet metal - strips 20 cm wide, they should be longer than the outer circumference of the chimney;
- these clamps connect the pipe from above and below;
- thus, it is necessary to make the required number of sandwich pipes for the construction of the chimney;
- a square sheet of metal must be fixed to the ceiling with self-tapping screws, after which it is necessary to place thermal insulation on it;
- a strip must be welded around the circumference to the end of one of the pipes to form a pipe.

Another option is not to roll the sheet metal pipes yourself, but to use ready-made ones. Also in the store you can buy ready-made clamps.
An easy way to install a chimney
There is an easier way to install a metal chimney in a bath, which is also much cheaper. It involves the use of exclusively ordinary single-layer pipes that go up from the furnace and go out through the roof.

The main features of this design:
- self-tapping screws can be used to fasten various elements;
- in the place where the pipe passes through the floors, it can be wrapped with any suitable insulation (for example, basalt wool) and asbestos cord.

However, such a chimney is neither durable nor fireproof, and if you want to get a quality result that will delight you for many years, you should still use one of the options above.
Brick and metal chimney maintenance
There are many different ways to clean a chimney. Perhaps the most popular of them is the cleaning of the pipe in winter with the help of snow, which must be thrown from above. However, the effectiveness of this method is low. It is better to use one of the methods that bring much more noticeable results.

Chimney cleaning - photo
| Way | Description |
|---|---|
| Brushing is an old and proven method that has been used since time immemorial. It allows you to achieve an excellent effect, but for this you will have to work hard. In addition, be prepared for the fact that a lot of soot will fall on you - this work is very dirty. |
| Cleaning the chimney with a weight on a cable is another mechanical cleaning method. Like cleaning the pipe with a pipe cleaner, it is effective, but it requires you to tinker with it, and along the way, get a good dirt on the soot. |
| You can also install a fan in the upper part of the pipe, which will work for suction. He will pull soot out of the chimney, but you need to prepare for the fact that the space around the bath after that will be contaminated with it. |
| There is an easier way - you need to throw aspen firewood into the oven. As a result, powerful traction will arise, and soot will be knocked out upward. In the dry and intense heat that aspen creates, the resinous substances that settle in the pipe quickly burn out if you heat the bathhouse with firewood from conifers tree. |
| Cleaning with chemicals. Here exist different variants, for example, you can throw special drugs into the sauna stove together with firewood that increase traction. A significant advantage of this method over cleaning with aspen firewood is that the compositions used contain special substances that further loosen the soot. As a result, it easily moves away from the inner surface of the chimney. |
Washing and heating the furnace | Another option is to pour several liters of water into the pipe, then you need to heat the stove for a long time. |


To prolong the life of the chimney, periodically it is necessary to control all joints and check general state designs to notice problems that may appear at an early stage. As noted above, if you install a metal chimney in your bath, its lower pipe will need to be changed periodically, as it heats up much more, and therefore becomes unusable faster.
If you strictly follow the technology, a do-it-yourself brick or metal chimney will remove smoke well and retain heat well. In this case, the risk of fire is reduced to almost zero. Both metal and brick structures are very durable, so you will not soon feel the need to build or install a new chimney in your bath.
Video - Typical mistakes when installing stoves and chimneys
A properly arranged chimney for a sauna stove ensures comfortable use of the sauna for a long time. But the main criterion in the selection of design and materials remains safety. Therefore, the choice and installation of the chimney should be given special attention, not forgetting to consult with specialists.
Basic requirements for sauna stoves
The chimney for a sauna boiler not only removes combustion products from the room, but also ensures optimal use of fuel in the heating unit. At the same time, a properly arranged channel for the removal of furnace gases should serve as a guarantee for the safe operation of the heater. This factor is ensured not only by the correct selection of materials and the design of the chimney, but also by the organization of the infrastructure of the boiler room. It must have sufficient supply and exhaust ventilation to ensure the supply of oxygen for the combustion of the furnace and the removal of combustion products or the gas itself that has entered the room.
To remove flue gases from the bath, an external wall-mounted chimney is often built, since it does not take up space in the room and provides better fire safety
Gas boilers are the safest and cheapest in comparison with other types of thermal units. They do not give off the smell of burnt fuel and do not leave debris in the form of ash or slag.
Gas boilers are more economical and safer than thermal units using other types of fuel.
When using a gas boiler in a bath, you need to follow some recommendations:
- If there is no gas supply from the central line, you can use fuel from cylinders. They must be placed outdoors in a specially equipped cabinet.
- For safe operation gas unit you need to use an automatic control system that will control the heating mode, as well as gas analyzer in case of leakage.
- The base of refractory materials for the furnace must be at least 10 centimeters larger than its external dimensions.
- For the installation of a gas pipeline, only steel or copper pipes should be used.
How to choose a chimney for a bath
Chimneys used in heating systems can be divided into two main types according to the installation site:
- Outdoor or wall. When using them, the pipe from the outlet pipe of the furnace is led out through the wall, and the vertical part runs along the outer main wall and is attached to it with brackets.
- Internal. The vertical part of the chimney is removed inside the building with the intersection of the ceiling and roof. In places of passage, fireproof inserts are made, which will be discussed below.
Each of the designs has its own advantages and disadvantages.
What are chimneys
Structurally, chimneys can be divided into the following main types.
brick chimneys
These are the most ancient types of chimneys that have not lost their relevance to the present. They are laid out of ceramic bricks, the cross section can be different in size, but the shape is always square or rectangular. This is the main disadvantage of brick pipes. The combustion products move along the helix of the smoke channel, and the cross-sectional angles are stagnant zones. In them, furnace gases move at a low speed, which contributes to the settling of solid particles with the formation of soot. Features of brick chimneys:
- The inner surface of the brick pipe is rough, and this also contributes to the formation of soot.
- The outer part of the chimney, if there is no insulating layer on it, is exposed to moisture and wind, which leads to its destruction. Experts estimate the service life of a brick chimney at 17–20 years.
- To improve the working conditions of a brick chimney, its sleeve is practiced with the installation of a metal or plastic pipe into the internal channel.
- The construction of a brick pipe requires certain skills of a bricklayer, not everyone can do this work correctly with their own hands.
The construction of a brick chimney has a significant weight, so a reliable foundation is required for its installation.
The outer part of the brick chimney is exposed to moisture, sunlight and large temperature differences, so it is desirable to protect it with finishing materials
Metal chimneys
For the manufacture of metal chimneys, single-layer or double-layer pipes are used. Black, galvanized or stainless steel sheet 0.4–1.2 mm thick can be used. The first of them quickly burns out, since sulfur dioxide is always present in the flue gases. Together with moisture, which is always present in the combustion products, during condensation, an aggressive substance based on sulfuric acid is formed, which destroys the pipe walls. A similar story is obtained with a galvanized pipe, because the protective layer of zinc is quickly damaged by condensate, and then everything happens in the same way as with a regular black steel pipe. The best material for a chimney is a product made of of stainless steel austenitic grade. It is easy to distinguish when buying, using a magnet - it will not be attracted to it. If you are offered a stainless chimney, and its material reacts to a magnet, there may be no guile in this. It's just a stainless steel of a ferritic or semi-ferritic class, which is not sufficiently resistant to aggressive environments.
A high-quality stainless steel pipe has a mirror surface, along which condensate flows down, against the flow of furnace gases. At the bottom of such a channel, it is necessary to arrange a condensate collector with a tap. It needs to be cleaned periodically. The accumulation of soot on the walls of a stainless chimney is much slower.
The stainless steel chimney has smooth round walls, so soot builds up in it much more slowly.
Ceramic chimneys
Ceramic pipes are made of refractory clay in pieces of 50 centimeters. The ends of each segment are formed for a tongue-and-groove connection.
Ceramic pipes serve for a very long time, because they practically do not react to the impact of aggressive chemical elements contained in the combustion products of heating oil
Ceramic pipes are mounted inside special expanded clay concrete blocks. A hole for installing a chimney is made along their axis. The diameter of the hole in the block is 50–70 millimeters larger than the outer size of the pipe - a non-combustible heat insulator is placed in this gap, which is used as mineral or basalt wool. At the corners in the blocks there are holes for installing reinforcing bars, which strengthen the structure.
IN expanded clay concrete blocks there are holes for installing chimney pipes, ventilation and reinforcement
A distinctive feature of ceramics is the high quality inner surface, which also prevents the rapid accumulation a large number condensate and soot. The material is chemically passive.
The disadvantages of such chimneys include their significant weight, which implies the manufacture of a foundation and the need for a strictly vertical installation.
In some cases, asbestos-cement pipes are used for chimneys. They attract attention with their low price and manufacturability of the installation. But it is hardly possible to recommend them for a bath. At temperatures above 300 o C they are destroyed, and this process is explosive. In addition, there is evidence that the material releases asbestos fibers into the air, and this is unsafe for humans. In any case, in Europe, such pipes for chimneys are not used.
The coaxial chimney is a pipe-in-pipe design. In this case, the inner part is designed to remove flue gases, and the outer part is to supply air to the furnace furnace. The inner tube is attached to the outer tube with three longitudinal ribs. Hot flue gases move along the chimney, creating a vacuum in the furnace. Due to this, air is sucked into the furnace through the outer pipe. At the same time, it heats up, activating the combustion of gas in the boiler furnace. . Obviously, such a chimney device is only possible in gas heaters. closed type . Thus, the boiler furnace is in no way connected with the room and the air in it always remains clean. As a result, the requirements for supply ventilation and its costs.
The coaxial chimney is very convenient and easy to install, but it can only be used with closed-type boilers
Given the data presented, it is clear that the best choice the chimney for the bath will be stainless pipes, especially since they are made specifically for this purpose and are equipped with all the necessary additional elements.
On sale you can find a wide range of different adapters, elbows, diverters and fasteners for the manufacture of a stainless steel chimney in any configuration
Installing a chimney in a bath
Before proceeding with the installation of a flue duct from a gas sauna stove, you need to draw up a project and coordinate it with a qualified specialist. All comments made must be taken into account before purchasing materials.
Installation of a chimney made of stainless pipes in a bath
It begins with the installation of a furnace or boiler at its permanent location. At the same time, it is necessary to take into account the requirements of the rules fire safety. Next you need:
- Install the adapter from the boiler to the chimney. It can be vertical or horizontal, depending on the design of the heating unit.
- Mount and fix a flat damper or an internal damper on the pipe to adjust the draft in the chimney.
A rotary damper is usually installed at the very beginning of the chimney channel and allows you to adjust the draft during the combustion process
- Connect the pipe of the hot water tank to the chimney pipe from the bottom and top sides. The heated gases pass through the pipe in the tank and heat the water needed for internal consumption in the bath. The water tank is attached to the building structure in accordance with the project.
- Mount the chimney section from the upper outlet of the tank to the ceiling. In it, you need to cut an opening three times the diameter of the pipe. A sheet of asbestos 6–20 millimeters thick is attached to the ceiling of the room with the stove, and a sheet of stainless steel of the same size is mounted on top of it. The choice of material is due to the low thermal conductivity of stainless steel. The sheet must be fixed with self-tapping screws in increments of 8-10 centimeters. The void in the opening from the attic is filled with insulation - basalt wool and closed from the side of the attic with the same stainless steel sheet, as well as from below, with an asbestos sheet gasket.
An opening is cut out in the ceiling 3 times the diameter of the pipe, filled with non-combustible insulation and closed on both sides with asbestos and stainless steel plugs
- Extend the chimney in successive sections (they are 50 and 100 centimeters long) until they reach the roofing pie. Connection of pipes to each other inside the transition through the ceilings is not allowed.
- In the same way, you need to cut an opening in the roofing pie and the roof finish, and then bring the pipe out.
- The height of the pipe from the burner to the upper end must be at least five meters. Its position relative to the skate is given by the following rules:
- the excess above the roof ridge is 50 cm if the pipe is located at a distance of up to 1.5 m from it;
- when the pipe exits at a distance of 1.5–3 m from the ridge, its upper part should be at the level of the highest point of the roof;
- if the pipe is located at a distance of more than three meters from the junction of the slopes, its upper end should be located at the level of an imaginary line drawn from the ridge at an angle of 10 o to the horizontal.
In order for the chimney to create good traction, its head must be at a certain height, which depends on the distance to the ridge
- The opening in the roofing cake from the outside on the pitched roof must be protected with a special apron. Its design depends on the angle of inclination of the slope and the material of the roofing.
To eliminate the possibility of leakage, a special apron is installed at the intersection of the chimney with the roofing cake
- Mount a protective cap or deflector on the upper end of the pipe.
- If the roof part of the chimney has a length of more than 1 m, it must be reinforced with braces using a special clamp with three brackets.
When the pipe passes through the room where the boiler is installed, single-wall pipes of the selected design are used; insulated double-layer pipes must be installed in the attic room and on the outside or thermal insulation of single-layer pipes must be performed. To switch from single-walled pipes to double-walled (sandwich pipes), there is a special adapter.
Video: how to arrange an internal stainless steel chimney in a bath
If it is decided to arrange an external chimney, the pipe is led out through the wall of the bath, for which a hole is cut in it. The rules for fire sealing are the same as when passing through the floor. It should be borne in mind that the length of the horizontal part of the pipe should not be more than one meter. If it is possible to arrange the output at an angle of 45 degrees, this solution should be preferred.
The next steps are:
- Install a tee, the upper branch pipe of which is the place for connecting the vertical part of the chimney, and the condensate collector is connected to the lower one.
A tee with a condensate collector and a wall bracket are installed at the exit point of the chimney from the wall, which takes on the load of the vertical section of the structure.
- Assemble the vertical section of the chimney to the required level. As the height of the chimney increases, brackets are attached to the wall along which it is installed and the pipe is fixed on them.
It is advisable to install the brackets for attaching the chimney to the wall at the junction of pipe sections
- Install a cap or deflector at the upper end of the pipe.
For the device of the chimney inside the boiler room, single-walled pipes are used, for the output through the wall using an adapter, double-walled sections are connected. The length of the sections is 50 and 100 cm.
Docking of individual sections of pipes is carried out "by smoke", that is, from the bottom up to specially made seats. Joints can be sealed with a special high-temperature sealant.
Video: stainless steel wall-mounted chimney in the bath
Installation of a coaxial chimney is very simple. It is necessary to punch a hole in the wall, remove and fix the pipe, and then close the opening.
Chimney insulation
The main adverse factor when using heating is the clogging of the chimney with soot. As a result, its cross section decreases and thrust decreases. But the main danger of soot lies in its ability to ignite and burn with the release of a very large amount of heat. At the same time, they often light up building construction Houses.
Over time, a thick layer of soot forms on the walls of the chimney, due to which the passage section of the channel narrows and the draft decreases noticeably
The reason for the formation of soot is condensation on the inner walls of chimneys, where solid combustion products are deposited, which are always contained in furnace gases. Condensation is formed due to the temperature difference between the inner surface of the chimney and its outer part. Therefore, chimneys must be insulated regardless of the type of material from which they are made. Warming can be done in the following way.
- Shelter of the chimney with a layer of rolled or slab insulation on the outer surface.
For warming chimney it can be wrapped with heat-insulating material and protected outer pipe larger diameter - you get a homemade sandwich chimney
- Installation of a protective coating for insulation made of foil or durable foil film. On the outer part of the pipe, the coating is installed from the bottom up in layers, fastening is done with a metal tape or construction clamps.
- Applying plaster on a brick chimney with the addition of reinforcing elements in the form of fiber shavings to the solution.
The easiest way to insulate a brick chimney is to plaster it
- IN additional insulation there is no need for ceramic chimneys, since their installation is carried out using a casing made of expanded clay concrete and an insulating layer of basalt wool inside the block.
Features of the operation of a bath chimney
The use of gas thermal units for heating baths is the best option in terms of chimney maintenance. There are several reasons for this:
- The temperature of the furnace gases in the chimney does not exceed 150 o C. With normal thermal insulation, especially in the case of using double-walled sandwich pipes, the temperature difference will be insignificant. The dew point (condensing temperature) is above the end of the chimney. In this case, the amount of condensate inside the pipe is reduced to a minimum.
- There are very few particulate matter in the composition of smoke from the combustion of gaseous fuels, therefore, little soot is formed.
- The level of automation of modern heating units allows you to set the optimal mode of fuel combustion, in which the most complete combustion occurs.
- Sauna stoves are switched on periodically, as a rule, no more than once a week, which increases the overhaul periods.
Therefore, the main chimney maintenance operations are timely draining of condensate from the storage tank and periodic checks of the chimney condition twice a year - before the start of the heating season and after it ends. Cleaning the chimney from soot is carried out as necessary and not after each inspection.
A wire brush is a reliable tool that allows you to clean the chimney efficiently
How to check the draft in the chimney of a sauna stove
The presence of draft in the chimney can be checked by the most simple ways- according to the deflection of the flame of a candle or match brought to the air intake window of a gas column or furnace. With normal draft, it is directed inside the unit. Before checking, the gate or damper must be fully opened.
Thrust is checked by the deflection of the flame of a match or candle.
A tissue or toilet paper strip is also good for checking the presence and direction of the thrust by the degree of its deviation from the vertical. This method can be recommended when monitoring a gas unit, it is safe even if there is gas inside the device. Draft in coaxial chimneys is not controlled, as it occurs only when the fuel is burning, and its strength depends on the intensity of combustion.
Draft adjustment in a gas oven
Signs of abnormal draft in the furnace are a change in the color of the flame and some other signs:
- The appearance of a smell of burning or unburned gas indicates a tipping of the draft and the occurrence of a reverse movement of air in the chimney.
- A color change to red indicates incomplete combustion of the fuel due to lack of oxygen in the air. You will need to adjust the thrust in the direction of its increase.
- The white flame of the burner and the buzzing of air in the chimney indicate excessive draft in the chimney, which must be reduced by the position of the damper or by turning the damper of the internal regulator.
The reason for the change in draft in the chimney may be weather conditions, in particular, changes in the strength and direction of the wind. In this case, the chimney is simply clamped by the force of the wind. You can eliminate such phenomena by installing a weather vane-deflector on the head of the chimney, which rotates in the wind and, by virtue of its design, creates a rarefaction above the pipe, improving traction.
Draft can be radically increased by special electrically driven devices installed on the chimney and forcibly creating a vacuum.
Photo gallery: ways to adjust the draft in the chimney of a sauna stove
 You can adjust the draft using a homemade damper
  The torsion stabilizer automatically adjusts the section of the chimney channel depending on the draft force
  Draft stabilizers can have different designsDevice for automatic draft control
  Automatic devices adjust traction depending on the readings of special sensors
How to clean a chimney from soot
Cleaning the layers inside the pipe is the most unpleasant, but, unfortunately, inevitable moment in the operation of heating units. For certain types of furnaces, it is produced more or less often. Least frequent cleaning of stainless steel chimneys gas ovens, but this work is done with special tools using cleaning agents that soften the soot layer. Cleaning agents for such chimneys must be gentle on the mirror-like inner surface of the pipes in order to preserve their most important quality - the minimum retention of condensate inside the pipes.
The chimney can be cleaned in two ways:
- From above - in this case, ruffs or hedgehogs with a load are used. They are moved down and up the chimney, achieving complete removal of carbon deposits. In this case, the oven must be carefully covered with a wet cloth so that soot does not enter the room.
- From below - they penetrate to the pipe through the furnace, the tool is fixed on a flexible shaft. With this method, the brushes are given rotation. Often this is done using a drive, such as an electric drill.
Cleaning is carried out mechanically from top to bottom with a soft spherical brush. If the walls of the wall pipes are heavily clogged with soot, you can dismantle them and clean each section separately.
Photo gallery: means for cleaning the chimney from soot
 metal brush do not clean stainless steel pipes
  Plastic brush cleans the chimney without damaging its surface
  homemade tool from improvised materials allows you to quickly clean the chimney
  For independent holding works, you can buy a ready-made set of tools for cleaning chimneys of any shape
Video: cleaning the chimney of a bath stove from soot
The chimney is the soul of the bath. The chimney can be safely called the "soul and heart of the bath" and this will not be an exaggeration. The quality of your future rest in the bath will largely depend on how competently and efficiently you equip it.
A well and smoothly functioning chimney is, firstly, an excellent park, and secondly, a guarantee of fire safety. The correct flue for 99 percent excludes a possibility of a smoke and pollution of the room.
Features of the construction of the chimney
Chimney types
Currently, several types of chimneys are in operation, which, in fact, are divided into two categories: root and mounted. Mounted chimneys are called chimneys, which are mounted directly on the furnace, indigenous - on the side of it. The choice of the chimney pipe will largely depend on what type of stove you are going to use when heating the bath. There is an option in which one chimney serves several stoves, but in this case the entire system must be equipped in such a way that the connecting links from the stoves to the chimney are cut at different heights at intervals of at least one meter from each other. In this case, the diameter of the chimney must correspond to the total power of all furnaces. The diameter is calculated in such a way that the smoke emitted by the operating furnace is fully ensured.
The height of the chimney mainly depends on the height of the building itself. We recommend that you immediately make sure that the gap between the roof ridge and the chimney pipe horizontally is at least one and a half meters (or more). If this distance is less, care must be taken to ensure that the level of the chimney is 50 centimeters higher than the level of the ridge. If the chimney is further from the ridge, they must be aligned vertically.

The internal chimney has a number of undeniable advantages and therefore is the most popular and sought-after option for arranging a Russian bath.
Advantages of an internal chimney
- Convenience during work (work is carried out in an already rebuilt building).
- Simplicity and convenience in service.
- Sufficiently powerful traction, which is provided, in many respects, due to the verticality of the pipe.
IN ideal the chimney pipe must be vertically directed. However, it often happens that for some reason (or a number of reasons) it is impossible to make the structure completely vertical. In this case, it is recommended to create a chimney project in such a way that the length of each of its non-vertical (diagonal) sections does not exceed one meter. Without this, it will be very difficult for you to get normal draft and prevent soot from depositing on the surfaces of the chimney - after all, hot air will rise vertically. Ideally, the use of horizontal pipe sections should be completely abandoned.

What and how to make a chimney?
Most often, Russian baths are equipped with stoves-heaters. The main options for a chimney for such a furnace are metal pipes. During the operation of such pipes, sooner or later, we are faced with their significant drawback - condensate that settles on the surfaces during cooling and flows down. As a result, the rate of kindling of the furnace decreases, in addition, enough bad smell. To avoid the above situation, place the pipe in a fireproof case of thermal insulation or overlay it with bricks. The second option can be considered more preferable due to the simplicity of the work process itself, for which, by the way, you can use an inexpensive brick.
There should be no extra holes in the walls of the chimney, any hole is a guaranteed penetration of cold air from outside, cooling the smoke. Pipes are not recommended. large diameter- this can also lead to cooling of the smoke and a decrease in its speed, the consequence of which is the formation of condensate. The thickness of the brick walls of the chimney must be at least 120 millimeters when inside the bath and at least 38 centimeters if it is located in the outer wall of the building.

It is desirable to make the inner surface of the chimney as smooth as possible. The more scratches and roughness, the worse the draft will be and the more soot can accumulate inside the chimney. Therefore, it is initially worth whitewashing the pipe and grouting it for the timely identification and elimination of possible defects.
Another popular option for arranging a chimney in a bath is a sandwich pipe. To use it, you do not need brickwork or a cover (case) made of thermal insulation, which will greatly facilitate the installation of the structure.
Fire safety
Fire safety is paramount! Arranging a chimney in the bath, do not forget about fire safety measures. It is important that there are as few docking points as possible in the pipe, and in areas where they pass through the roof and ceiling, they should not be categorically. Branch pipes should be installed in the passages between the ceilings, and a layer of non-combustible materials should be created between the chimney pipe and the ceiling (make a pipe cut). The thickness of such cutting should exceed the thickness of the ceiling. A similar layer (from thermal insulation) must also be created at the place where the pipe passes through the roof. The chimney must be located at a distance of at least 250 millimeters from unprotected rafters, battens and, in general, from combustible roofing materials. Any non-combustible layer must have a thickness of at least 120 millimeters.
From above, the chimney must be equipped with special protective equipment, in particular, a protective cap (mushroom) and a spark arrester, as well as a roof cut, which provides sealing when the pipe passes through the roof.

water tank
An important stage in the process of installing a chimney is installation of a heating water tank. There are various mounting options. For example, a tank can be attached to the wall of a pipe, in another embodiment, the pipe will pass directly through it (in this embodiment, water heating will be more efficient). The main criterion when choosing a tank is the size of your stove (direct proportionality). The best option- Stainless steel tank. When choosing a tank, it is necessary to take into account the size and diameter of the chimney pipes to ensure a tight connection between the components (good draft and optimal water temperature).

Let the bath bring you health, pleasure and good mood!
Video
With this material they read the same:
The basis of any bath or sauna is a stove. If you cannot create the required temperature in the steam room, the whole design will not give you the opportunity to get real pleasure.
Do not neglect the device either. furnace chimney, since it depends on its quality and material:
- fire safety of the premises;
- caring for him;
- microclimate in the steam room.
Therefore, when choosing chimneys for baths, approach this process responsibly.
You should have an idea about how to:
- install;
- isolate;
- clean.
General information about the sauna stove
The room of the bath or sauna should be heated for a short time. The stove is purchased compact, and its main function is to heat up the stones lying on it in a short time. They will serve as a kind of heat accumulators..
Flue gases have a very high temperature, approximately 800˚С. In addition, in the sauna and bath, it is especially important that there is good traction. Otherwise, a small amount carbon monoxide in a small room can be fatal. Furnaces and pipes for a bath must be fenced to prevent injury in the steam room.

- The pipe for the stove in the bath and the stove itself do not need a massive foundation. It is better to isolate it well from wooden structures.
- Make the first from thick metal without applying additional thermal insulation to it. After it, it is possible to install a sandwich chimney.
- Remember - the distance between the pipe and the structural elements of the bath unprotected from fire must be at least 350 mm.
- Close with your own hands all the gaps in the wall, ceiling or roof with galvanized sheet iron with an asbestos backing.
- Be sure to install the asbestos sheet in a place where the chimney for the hot gas bath can come into contact with the wall and ceiling.
Material
The industry today offers pipes for a furnace in a bath in a large assortment. Everyone will be able to choose exactly what he needs for his steam room.
For example, use chimneys for a bath:
- ceramic, the price of which is the most expensive;
- steel, the most versatile;
- thermoplastic;
- stainless acid-resistant and refractory steel (withstand temperatures up to 600˚С).
Stainless steel chimney installation
Below is an instruction on how to make a chimney for. Usually ready-made kits can be purchased in the distribution network.
Installing a chimney in a bath is not difficult, you can do it yourself, although an assistant will not hurt.
- Insert one pipe into the other by 5-7 cm. This will ensure complete tightness of the structure. Less soot and condensation will form. Cleaning such a pipe is not difficult.
- Lead the chimney 1 m above the ridge of the house to create the necessary draft.
- Fix the pipe to the ceiling of the steam room, protecting the wood from the metal with a fire-resistant material.
- Install a rain and snow cap at the end of the pipe.

In the photo - stainless steel chimney elements
Advice: use acid-resistant stainless steel chimneys with molybdenum addition where flue gases are highly acidic.
In other cases, brick does an excellent job.
Ceramics
A chimney for a ceramic bath is used extremely rarely, as it has a solid weight, but the service life is quite long. Its weight can only be supported by a massive stationary stove that will be used to heat the house.
Advantages of steel pipes
- Perfectly round section, which creates excellent traction;
- The bath stove pipe is light and easy to maintain;
- The “dew point” is quickly overcome, due to which condensation does not form, thereby the effect of acid on them is minimal.

Asbestos-cement pipes
Reviews about such chimneys are the most negative. They should not be used in a bath or sauna, as they can simply burst from the temperature and lead to a fire. It is better not to save and not risk your own safety.
Sauna pipe insulation
Today best material for insulating bath pipes is foilizol. It does not emit any harmful substances due to high temperatures.
It is also used to protect:
- pipelines;
- heating mains;
- air ducts.
If you do everything thoroughly, you need to create a “sandwich” from the pipe:
- the first layer is the stainless pipe of the sauna stove;
- the second layer is basalt;
- the third layer is the outer contour.
Such a chimney will heat up much less than a traditional one. This will prevent the possible formation of condensation.

More
- The fact is that basalt-based insulation:
- withstands high temperatures;
- does not ignite when seriously heated;
- does not emit unpleasant odors.
Therefore, such chimneys are called "warm", since the insulating layer does not allow metal pipes to cool quickly from outside air. As a result, all the water vapor that is necessarily present in the smoke will not cool down and will not appear in the form of condensate along with soot on their inner walls. Because of this, flue gases easily escape to the outside without experiencing resistance.
- The outer pipe, due to the inner layer of insulation, remains cold, practically without heating up, ensuring complete fire safety of the sauna.
- Such a chimney improves the operation of the furnace, which warms up quickly and immediately enters the operating mode.
- Traction improves due to the absence of various turbulence barriers that brick pipes have.

Tip: If you want to check the temperature of a chimney, it's best to check it against the material surrounding the chimney.
To do this, you can touch the boards with your hand or sprinkle water on the apron.
Optional: wrap the pipe with a layer of flexible asbestos at the point where it comes into contact with combustible elements. Protect the chimney from above with a “fungus” from moisture.
Sauna chimney cleaning
To clear bath pipe soot is used in many ways, using special brushes and aggressive chemicals. And if an adjustable chimney is installed?
The only option:
- Pour several liters of hot water directly into the pipe.
- Then heat the stove for a long time so that the pipe does not rust.
You will see how, after kindling, compacted and long-compressed soot will come out of the chimney in a thick cloud. But there will be no odors and residues, they will be destroyed by high temperature.

Should know
- Using a long and straight pipe allows you to create good traction. However, this will reduce the efficiency of the furnace, since the combustion products will not have time to give up all the heat.
- a deflector that will not only protect the chimney from snow and rain, but also help create the necessary traction. It is made of galvanized steel, preferably titanium or stainless steel.
There may be an opposite effect if the various "caps" and "umbrellas" are of the wrong configuration. In this case, smoke with a strong wind will begin to flow into the room. - Make sure that the stove pipe does not take all the heat from the stove gases. Otherwise, when the temperature of the combustion products drops to 150 ° C, condensate will begin to form in it.
- If you need to join the elements of a sandwich pipe or a ceramic pipe, use a high-temperature silicone sealant.
- Carefully use the valve on the pipe to prevent carbon monoxide from entering the room. It's better to dismantle it altogether.
Conclusion
Do not be dismissive of the pipes for sauna stoves. In fact, they make it possible to create the required temperature in the steam room and remove the burnt gases to the outside. Their quality and correct installation allow you to regulate the climate in the steam room, save firewood and provide comfortable conditions in the sauna and bath.
Each of the materials is interesting in its own way and can be used. But remember that you must definitely protect the hot elements from flammable ones, which are abundant in wooden steam rooms. In the presented video in this article you will find additional information on this topic.


