The process of laying bath floors is quite an important and crucial moment.
Depending on the floor material, we can talk about the service life of the entire floor.
The floor can be:
- concrete;
- wooden;
- clay;
- just earthy (with good tamping).

Wooden floor
This floor is considered very economical, therefore it is the most popular. When wooden floors are mounted, the most important thing is the right one. If this is not done, then such floors rot and collapse, exuding an unpleasant odor.

Before you make the floor in the washing bath, a special impregnation is required, which processes all the boards lying on the floor. At the end of the procedure, the room must be thoroughly ventilated. At high humidity, the wood becomes soft and wears out quickly, so it is recommended to change such a coating after 5 years.
clay floor
Clay does not let water through, but it swells from it, and then, when it dries, it cracks. Water can accumulate in cracks. There will be an unpleasant musty smell in the bath. That is, this option also not the best.

Concrete floor
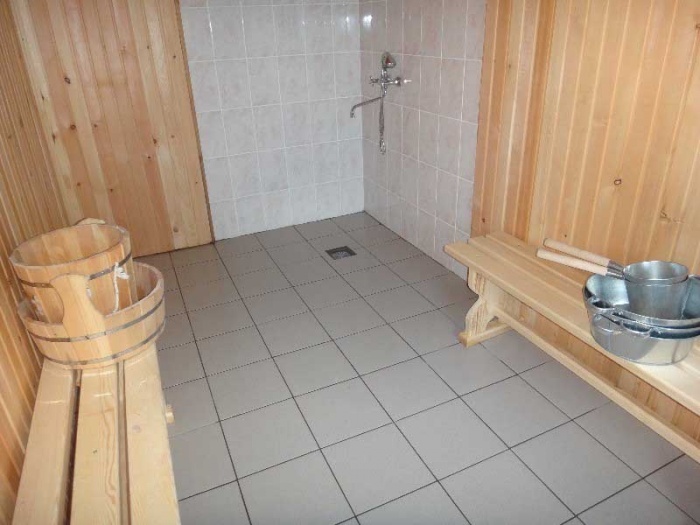
The optimal solution for . In fact, its price is relatively low, and its service life is long. To make it easier to wash, floor tiles are laid on top.

Before you make the floor in the concrete washing bath, please note that it must be sloping towards the drain pit. Wooden gratings are laid on top of the tiles so that the legs do not burn on the hot tiles and do not slip on it. At the end of the “bathing day”, the grates are removed to dry.

Baths are built on the foundation.
The drain is done like this:
- dug up in the soil drain hole half a meter deep;
- the finished pit is covered with masses of gravel or sand.
To prevent runoff water from getting inside bath room, the pit is being built a few meters from the buildings themselves. The bath is connected to it by a branch.

Floor types
The floors in the sink of the bath are leaking and those that do not leak. In the first case, moisture freely passes through the cracks in the floor. In another embodiment, the floorboards are stacked so tightly together that water flows over the surface towards the drain.

Both types have both positive and negative sides. Leaking floors are good because the boards are simply laid on the logs, which means that they can always be dried and ventilated.
The downside is the labor-intensive maintenance of such facilities. The insulation between them is removed every time regular cleaning is carried out.
First option
Do-it-yourself flooring of leaking floors in the bath is carried out as follows:
- a dug hole, the depth of which is 50 cm, is poured with concrete;
- brick pillars (25x25 cm) are erected on top of the concrete layer, logs are laid on top;

- boards are laid on the logs, the thickness of which exceeds 2 cm. In this case, the boards are taken up to 15 cm wide, and the distance between the logs is 60 cm. In some cases, the boards are attached to the beams;
Advice!
The flooring is carried out in such a way that the patterns of growth rings of wood are located in opposite directions.
Due to this, the floor plane will become more even.
- the logs are hoisted 10 cm above the gravel / sand. The instruction categorically prohibits laying the boards tightly, otherwise the floors will swell. The boards are laid so that the convex side lies on top. To form small gaps between the boards, galvanized nails are driven in.

Second option
Unlike the leaky type, non-leaking structures are used continuously until the tree rots completely. After that, a complete replacement of the coating is carried out.

For the manufacture of such a floor, a grooved board is taken. The segments are laid in the direction of the drain (ladder). The slope is mounted in two or four slopes, the latter variety is used more often.
For a tight connection, the boards have a special tongue-and-groove profile. A standard screed with wedges is used. The general slope is directed to the drain hole to which the siphon is connected.

It happens that the system is supplemented with a special gutter through which water flows. The space under the non-leaking version is filled with insulation (ordinary foam), sometimes it is replaced with perlite or expanded clay. You can use any insulation, because the space below always remains dry.

Moisture, flowing to the drain, is in the sewer. The warm floor in the bath sink should be soundly insulated. Sheets of water-retaining material are wound onto the walls and pressed against the skirting boards, so moisture will flow down them into the drain. Expanded clay is considered the best insulation in this case.
Important!
Properly bedded does not let moisture out.
To prevent rotting of the subfloor and lag, the foundation is equipped with holes (vents), which are closed for the winter and remain open in the summer.
Floors in washrooms
The floors in the washing department of the bath are equipped before the wall decoration begins. To prevent falls in the bath (the consequence of which can be serious injuries), you need to mount it very carefully, and lay a ladder on top, which is made of wooden slats.

When funds are not enough, a set of rubber bath mats is used, they should be in harmony with overall design. Sometimes it is acceptable to use carpets or special light mats. However, they need to be constantly monitored, taking them out each time after use to dry.
For the arrangement of a wooden floor, moisture-resistant rocks are needed that can easily cope with a significant load. In the presence of wooden floors, ventilation in the room is especially effective.

Conclusion
Bath or sauna is impossible to imagine without washing room. The floors in it are made with special care, here everything should be thought out to the smallest detail. If everything is done correctly and competently, the floors will serve faithfully for a long time. The video in this article will help you get more information on this subject.
So, you are thinking about how and from what it is better to make the floor in the steam room. Great! We will tell you about all options, and then choose for yourself. If only because "better" for each his own.
What and from what is better to make
Part of your choice will depend on , which you laid under the bath. This will be partly determined the purpose of the building- a seasonal bath is much less demanding in all respects than a year-round bath.
The floors themselves are of two types: torrential And dry.

Pouring the floor is boards with slots, which means the following: the level on which you walk "hangs" above another level, on which the flowing water falls. And this basic floor level is of two types.
More precisely, there are two ways to solve the problem of waste water disposal: it is either diverted or not diverted, but flows directly under the bath, where it goes into the soil and is distributed by the soil itself.
The last case is demanding soil type, because the water will leave only if the bath is on sandy or soils close to them in terms of drainage properties.
But if she stands on clay, then even for a summer bathhouse, the losing option is - the water will not leave, it will stagnate, and its only way to leave is evaporation into the atmosphere. If the summer is wet and cold, then evaporation will be a problem.
But it is assumed that you learned the geology of the site at the time when the house was being built. Therefore, you will be able to choose both suitable for the bathhouse and the appropriate type of floor.
Back to torrential semi. Under the boards with slots, we can have not only open ground, and normal sloped concrete screed, which allows used water to drain to the drain leading to the bath sewer. The sewer itself is a pipe that leads outside the bath - into a septic tank or into a drainage field.

In addition to the concrete screed, which is financially expensive, the owner has the opportunity to make a simple clay castle- the same, in fact, a floor with a slope, but not from concrete, but from clay. We have already said that clay does not let water through, so it is the cheapest to use it.
So, main floor- this is concrete or clay with a slight (just a few degrees) slope to the drain, which can be located both in the middle and at one of the walls of the steam room. The logs on which the boards will lie are attached to the foundation strapping. Boards are placed on top of the log in a perpendicular direction.
The design of the pouring floor is very simple. If you forgot to do vents in the walls of the foundation, it is not difficult to ventilate it.
BY THE WAY! Under no circumstances will such a floor differ in special warmth. And you need to make sure that during the procedures in the steam room, the ventilation from the side of the floor is hermetically covered.
The advantage for those who decide to make the floor in the steam room torrential will be that water will not accumulate in the unevenness of the wooden part, and therefore, there will be no rot. As in the short video below.
However, timely treatment with the same water-repellent compounds can solve this problem for a dry floor.
Now oh dry field. Roughly speaking, this is absolutely the same design with a slope and a drain that was hidden under the pouring boards. Only in this case, you walk on it, so it is made of wood, the boards of which are tightly fitted one to the other, so as not to let water go down to the insulation.
May or may not be used tree, and put on the floor of the steam room ceramic tiles. And here, too, two options - you can do under it warm floor, but you can put wooden lattices over the tile (it's warmer and less likely to slip).
(The pouring floor can also be insulated - for this, a layer of insulation is placed under concrete screed. More details below or see a separate one about insulation.)
the best lumber for a dry floor will probably grooved board, that is, a board that has a spike on one end along the long side, and a groove on the other side. Such a connection is not only strong, but also quite tight.

material, what is better to make the floor in the steam room, we think larch- it's a little expensive, but there will be no problems with rotting. Yes, and it will not have to change in the near future. After all, larch from water only becomes stronger and harder, and the resins in it successfully resist bacteria and fungi that destroy wet wood.
Bath: draining water in a steam room or sink
Let us explain how exactly the system for removing used water is arranged. It has already been said above that in order to simplify the draining of water in the steam room or sink, you need to make a small bias floor towards the drain hole.
If the floor is pouring, then you can bring the angle of inclination of the lock or screed to 5-10 degrees, because no one will walk on it. If the floor is dry, then you can limit yourself to 2-3 degrees.
Again, the location of the drain hole is a matter of taste. Someone is fine when it is located in the center someone prefers to do it near the wall.
IMPORTANT! In any case, be guided by the fact that you will have to clean it from time to time. Therefore, access to it should not be hindered - for example, to make a drain under the shelves.
When the floor is pouring, and the steam room and sink are separate, but adjacent, the space under the floor can be general, with one output. In this case, two slopes and a drain between them are made.
It is worth saying that the drain device depends on how often the bath is used, how many people bathe and wash in it. If it is operated rarely, for example, once a week, and a couple of people wash there, then you can do pit- this is a drainage device, a pit or groove under the bath, filled with stones or sand, or both (layers). But the ground must be sandy.
You can take it out of the bath - in drain or filtration well. The difference is that from the first waste is periodically pumped out by sewers, and in the second, the liquid is filtered and goes into the soil.
If your home has a large enough septic tank, then the used water from the bath can be sent to it.
How to do: instruction
This instruction depends on what type of foundation you have. If you are making a pouring floor, then it will be attached to the foundation.
Let's assume you have tape foundation. Then there is two options: either put the logs directly on the tape, or the strapping beam is first placed on the tape, and the logs are already attached to it. But for laying the strapping beam, it is first necessary to provide for the installation of anchors directly into the not yet hardened concrete of the tape. The timber is planted on anchors and tightened with bolts.
If the foundation pile or columnar, then it is connected by a grillage, which can be wooden or metal. In both cases, the logs will be attached to the grillage in approximately the same way (taking into account the material of the grillage) in the previous version.
ADVICE! It is clear that boards with a gap of, say, 1 cm are placed on the logs. But do not forget that you need to leave a gap between the boards and the wall, and its value is 1-1.5 cm.
How to make a concrete screed and drain. You have to start by creating drainage system or digging a trench through which water will be discharged either into a septic tank or into a drainage field.
drainage system under the floor is a sand cushion, on top of which gravel is poured. However, on clay soils, this will not help much.
If the water will be diverted, then first you need to completely delete soil layer from the ground, pour sand 10 cm, then gravel.
Under the future sink to be done pit- a concrete tank into which the used water will drain and leave through the pipe.

The simplest drainage scheme with a pouring floor
The sand and gravel cushion is covered with a layer of waterproofing (roofing material, for example). Then comes a layer of insulation (often foam), on which a reinforcing mesh is laid. Everything is filled with concrete.
A slope is made over the rough screed, which converges to the pit.
This option is suitable for owners of baths with tape or columnar foundation.
Technology doesn't change if you decide to make a waterproofed (dry) floor covered with ceramic tiles.
How to paint
Let's start with the fact that we do not have many options for what the floors in the bath are like so that they need to be painted. First, this tree. Secondly, many times less, it concrete, and besides, not everyone knows about the possibilities of its painting. A ceramic tiles we will not name, because it does not need dyeing at all.
How to process or cover the floor in the steam room of the bath
Now about the distinction: painting the floor in the bath and steam room is worth different compositions, if you want to save a little. Because in the steam room on the floor, although it’s not so hot, preference should still be given to the most humane compositions in relation to human health - acrylic varnishes and paints, for example. This is if the floor is wooden, of course.
However, we would recommend treating the floor in the steam room of a bathhouse or some Finnish impregnation, about which the manufacturer says that it is guaranteed not to slip, or yacht varnish, but with measures against possible slipping.
After all, the main function of floor treatment is to protect it from water. Wood is damaged by water- rots, cracks. And who wants to change floors regularly? This is not the easiest job. Therefore, I want them to last longer without repair.

Yacht varnish The name itself says that it is intended to protect wooden ships from water. A impregnation for wood contain fats that eliminate the wettability of the wood.
In the rest of the bath, there is less moisture, more permeability, so you can paint or varnish with any composition you like, and if the bath is visited often, then the composition should be additive, which reduces its abrasion. Usually this polyurethane or urethane.
Useful video
Almost half an hour useful information from RusPara:
Well, and one more role in pursuit, only here about mistakes - the floor in the bath is 12-15 cm above the ground, these are just boards that were not protected by anything. As a result, everything rotted:
***
Well, now that it has become more or less clear which floors are best done in the steam room, you may be interested in other materials about its arrangement: what, tips on, steam rooms and what, what compositions can be, how and what walls, floor and the ceiling, in the steam room.
In contact with
Competent organization of the floor in the washing department of the bath is the key to its long and uninterrupted operation. All about the types of floors, their installation and the most common mistakes read our article.
Content:
Washing (sink, washing) - the main room in any Russian bath. It is in it that visitors spend most of their time between short runs to the steam room. In the washing room, water is constantly pouring in a significant amount, which means that it must be equipped to the highest standard. Maximum attention should be paid to the floors. Throughout the year, they are exposed to aggressive moisture and strong temperature changes. Depending on the choice of the type of floor and the quality of its installation, the washing room will be either warm and comfortable, or cold and uncomfortable.
Features of the floor in the washing bath

Any little thing in the arrangement of the washing room should be carefully considered. There is a list of features that are specific to this zone in the bath. Here the floor is given the utmost attention, as excessive moisture constantly exposes it to rapid decay. In addition to moisture, the floor in the washing room is constantly affected by sharp global temperature changes.
In this regard, the floors must fully comply with all the requirements put forward to them:
- Dry quickly;
- Resist sharp thermal surges;
- Easy to pass air;
- Have allowable temperature coatings;
- Do not create drafts;
- Have adequate ventilation.
Installation of a concrete floor in a washing bath
Often, the floors in the bath are equipped with a concrete screed, since the installation of such a floor is considered the fastest and most hassle-free. The only difficulty in such a case is the organization of the drain. In a washing bath, a concrete floor can be arranged in three common ways: screed on the ground, on a wooden floor, on concrete floor. Any of these methods has a place to be, but at the same time it has some more or less significant drawbacks.
Traditional floor screed in the washroom

Traditionally, the concrete floor in the washing room of the bath is arranged as follows:
- First of all, it is necessary to carefully compact the soil.
- Then pour a layer of gravel, 15 cm thick. Broken brick or crushed stone can be used instead. Thus, a ready-made basis for the first layer of the screed is obtained.
- Pour the first layer of concrete. Remember that unlike wood floors, in concrete floors, the angle of inclination is formed already at the initial stages.
- In rooms with small area the screed is poured in one step. If the area is large-scale, wooden guides are laid on the floor, and then it is filled with the resulting stripes. In any case, the concrete floor can be called the most durable, durable and practical option.
- Most milestone in the installation of a concrete floor - the product of an insulating layer. An insulating pillow is essential, because it protects the floor from freezing during the cold season and, accordingly, saves heating resources. Therefore, after the first layer of the screed has completely hardened, the floor is covered with a layer of expanded clay no thinner than 7 cm.
- Lay on top metal fittings- reinforcing mesh to enhance rigidity and strength.
- After that, lay the next layer of screed and carefully align it with the rule.
- A well-aligned screed will go perfectly as finish coat. If you want to give the floor more aesthetics, you can cover it with beautiful non-slip tiles.
Warm floor in the washing department of the bath

Despite a decent layer of insulation, a concrete floor will never be pleasant enough to the touch. Cold concrete surface in the winter season, it often annoys the owners of the bath. In order to eliminate this drawback, the "warm floor" system is used. As a rule, electric, water or infrared heating is laid under a layer finishing.
For the washing area, the device of a system of warm water floors, powered by a heating device for the general supply of water in the bath room, is optimally suited. Installing a water floor is not much different from laying an electric one. The only difference is the thickness, commensurate with the height of the pipes being laid.
IN Lately Increasingly, 3D solid floors are being used, ideal for washing baths.
The floor on a concrete floor is the least common, since it involves the use of concrete slabs. This option is not very popular in the construction of small buildings.
Installation of a wooden floor in a washing bath
Do-it-yourself wood flooring in a washing bath is being equipped more and more often due to its many advantages, such as ease of installation, attractive appearance, aesthetics and a special unique smell that wood gives off when heated.
Types of wooden floor for the washing room

There are two popular types of wood floors:
- Non-leaking. Structures made of tightly laid boards with a certain angle of inclination, which contributes to the flow of water into a special hole.
- Leaking. Covering consisting of boards laid with gaps to drain water.
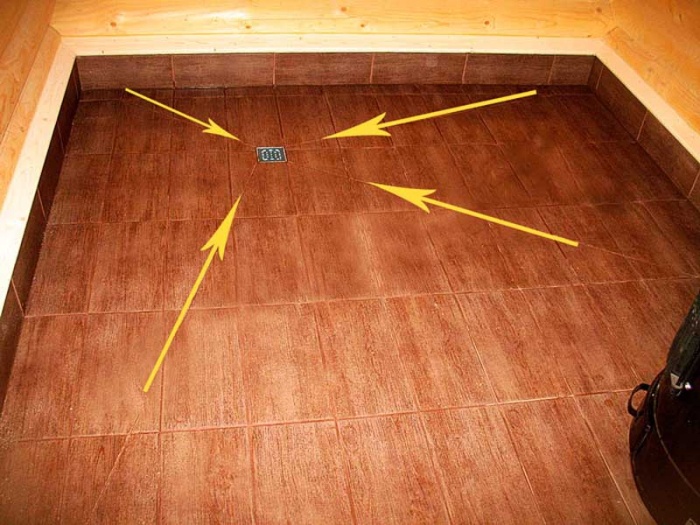
Note! The wooden floor in the washing bath must be laid at an angle for the natural flow of water. Ideally, the slope should be in two directions from the center.
Wooden non-spill floor for a washing bath

This design is not removable, therefore, before the installation of a wooden floor in the washing department, it is necessary to organize a ventilation system. The base under the wooden non-drip floor should be mounted with a slight slope for the natural flow of water. It is also necessary to equip a water receiver and a ditch for it to go into the sewer.
Installation of a wooden non-leaking drain is carried out in several stages:
- Lags are mounted on the top of the foundation.
- Waterproofing is laid on top, carefully sealed with sealant.
- Layers of insulation are tightly laid between the lags.
- On the insulating layer, waterproofing and a vapor barrier film are re-laid.
- The next layer prepares a subfloor with a slope for drainage in the right direction.
- The finished draft floor is covered with a continuous layer of polyethylene. It turns out a design that looks like a huge container with a ladder for water care.
- Mounted at the end upper layer wooden non-drip floor.
Wooden pouring floor in the washing department of the bath

Regardless of the type of foundation (tape, pile, columnar, etc.), a pouring wooden floor can be installed by hand. This design is quite simple and does not require special construction and repair skills. At the beginning it creates concrete base, on which logs are attached to hold the plank rough floor. The boards are laid with a distance of 6-8 mm for an unhindered flow of water into the receiver. From the water intake underground, all water descends through a pipe into the sewer.
In most cases, pouring floors are removable. At the end of the procedures, the structure is removed and taken out to dry. And since this type of floor is completely impossible to insulate, it is used only for those baths that are used exclusively in the warm season.
One more significant drawback of such floors can be distinguished: the top flooring quickly loses operational properties because it is not protected from moisture. Thus, wooden floor have to be replaced from time to time. It is equally important to avoid the formation of a draft through the pouring floor. To do this, the underground and the drain must be organized in the right way.
Arrangement of wooden floors of pouring type is carried out as follows:
- First, determine the type of soil under the washing compartment. If the earth is loose, dig a hole no deeper than 0.5 m.
- The bottom and edges of the pit are tightly rammed and covered with a mixture of fine gravel, sand and gravel. The layer thickness should exceed 2-3 cm. Thus, a filter for waste water is organized.
- For clay and swampy soil create hydraulic structure drainage system: they dig under the washing pit, from which a pipe is laid at a slope towards the sewer to drain water.
- The next step is to install logs, on which the wooden plank structure is attached.
During operation, such a device is periodically cleaned and treated with an antiseptic to eliminate blockages and musty odors. For the same purpose, a siphon sewer device is installed.
Protecting the floor in the washing bath from water and dampness

A bath is a zone for which moisture, steam and dampness are quite natural things. Therefore, waterproofing in such a room is very necessary and important. Thermal insulation materials laid only on a layer of waterproofing. This way they can last longer.
In addition, special antiseptic treatment with various means of protection is required. Otherwise, the floors will forever make friends with fungal infections, especially if they are mounted from wood. Any underground space, partitions, boards, logs must certainly be treated with a reliable antiseptic and moisture-repellent composition, which are easy to find in any building materials store. Ideally, the treatment procedure should be carried out at least 2-3 times after a few hours.
If, for certain reasons, at the stage of construction and arrangement of the bath, the processing and installation of waterproofing was not carried out, a number of actions can be taken to help prevent the deplorable damage caused by dampness and moisture:
- Any wooden floor components must be carefully dismantled and left in the sun until completely dry.
- Then all the places that have undergone decay should be cut off, and the nearby ones should be cleaned.
- After that, you need to treat all the elements with antiseptic agents and dry them again.
- In the end, it is worth waxing or water-repellent each board and installing them in their places.
Mistakes in arranging the floor for the washing department in the bath

Equipping the floor in the washing department of the bath, you can not miss the flaws or oversights. Subsequently, they will lead to the need for dismantling and alterations. If the recommendations are not followed, novice masters run the risk of making a number of mistakes.
Some of them are more common than others:
- Saving money is not allowed insulating materials. It is not recommended to lay too thin a layer of thermal insulation or replace the vapor barrier membrane film with ordinary polyethylene.
- We must not forget about the extremely important layer of vapor barrier. You can't do without it.
- It is unacceptable to finish the floors with a washing smooth tiles. Such material in a company with high humidity can cause unwanted falls.
- It is forbidden to use any plastic components in the installation and finishing of washing floors.
- The lack of a ventilation system is a big unacceptable mistake, which entails negative consequences for the entire room.
Be that as it may, everyone can make mistakes, especially in such a complex and labor-intensive process. The main thing is to recognize and correct them in time. In this case, the floor in the washing room will be reliable, durable, durable and safe.
Design modern bath provides for the presence of several rooms: a steam room, a dressing room, a rest room, a shower room (washing room). The washing room in the bath is of particular importance, everything here should be as comfortable and functional as possible.
The main feature of this room is active use water. That is why the arrangement of floors and drainage is of particular importance here.
Features of the floor in the washroom
floors in washing bath must meet several basic requirements:
- security;
- strength;
- ventilation;
- heat resistance;
- moisture resistance.
Floors in the washroom must be permeable to water and dry quickly. It is important that the coating is warm so that you can walk on it without shoes. Temperature fluctuations and high humidity can provoke the formation of fungus and mold, so the floor covering must be resistant to these processes.

What are the floors
There are several options for flooring in the washing room. The coating can be: concrete with ceramic tile lining, wooden with grating, solid with water outlet.
In public baths and saunas, the floors are often made of concrete, using a glass wool insulation system. In small home baths, they usually install wood flooring floors from conifers wood. Larch has proven itself especially well.
For the installation of wooden floors between the lags for insulation, it is laid mineral wool. Used for flooring ordinary boards, they are covered with a polyethylene sheet with high edges and a drain hole.
Wooden floors in the washroom are easy to install and do not require special costs but are not durable.
Concrete-ceramic flooring will not be as warm, but will last for several decades.
Pros and cons of ceramic tile floors
Tiled flooring has a number of undeniable advantages:
- the tile is not afraid of moisture, fungus and mold;
- tiled flooring makes it possible to make a floor slope for water drainage;
- tile floors can be heated modern system"warm floor";
- ceramics is different long term operation;
- the cost of the material is relatively low;
- tiles are distinguished by a variety of colors and shapes;
- ceramic flooring is easy to wash and clean;
- laying tiles on a concrete screed does not require special professional skills and can be done by hand.
disadvantage ceramic coating in the bath, its fragility is considered. If a glass shampoo bottle or a metal basin falls in the wash basin, the tile may crack. Experts recommend making a small margin when buying tiles for subsequent repairs.
Owners of a home bath, which is heated once a week, should take into account that in winter it is quite difficult to heat the bath so that the ceramic floor in the washing room warms up. To solve this problem, you can apply the technology of "warm floor" or cover the floors in winter with rubber mats.
Concreting the floor of the washing room under the tiles
The quality of water drainage from the washing room depends on the correct concreting of the floor. For these purposes, the floor must be poured with a slope for drainage and a water receiver connected to a sewer pipe should be provided. Considering that in the future the floor will be covered with tiles, it is necessary to provide for its insulation.
At the place of water flow, a water seal will be required so that odors from the sewer do not enter the room and there is no draft.
Stages of concreting the floor in the washroom:
- A sand and gravel cushion 15 centimeters high is poured onto the compacted soil. A layer of heat and waterproofing material is laid on it. The material is filled with sand.
- A reinforcing mesh is laid at the bottom of the future floor to give the future structure additional strength. Before pouring concrete, a wooden box is installed at the junction with the sewer, which is subsequently removed and the necessary connection is mounted in its place.
- On the first layer of a cement mortar screed, made with a slope, a layer of dry solid insulating material is poured. A second layer of screed is poured onto it and leveled with a metal rule.

With strict adherence to this technology, the floors in the washroom, covered with tiles, will not be icy. The surface of the screed will warm up quickly and retain heat for a long time. Water with the right slope will be able to completely leave, and the water seal will not allow the appearance of foreign odors.
Important! bias on concrete floors mounted from the moment of pouring.
In order to tiled floor it was possible to walk barefoot, install the "warm floor" system. Such a design will save on heating the bath room. For a washing bath, any type of floor heating is suitable: infrared, water or electric. The heating system is installed directly under the floor tiles.

For your information! Underfloor heating is ineffective with wooden flooring. Wood does not conduct heat well and retains it, preventing it from penetrating into the room.
The most economical is considered to be a warm floor, based on water heating pipes, which are heated by sauna stove, simultaneously heating water for washing. The thickness of the filling of such a floor must correspond to the thickness of the heating pipes.
How to make a slope
The optimal angle of inclination of the floor in the washing room is 1:100 to the center of the room. A ladder is installed in the center for arranging a drain in sewer pipe. Alternative places for draining can be a platform at the entrance or in the corner.
To comply with the slope when pouring the floor, beacons are installed. The easiest way is to make a bias towards the center of the room. For other options, an “envelope” fill is used:
- after calculating the height difference between the drain and the edges of the room, height marks are set;
- beacon cords are pulled from the edges of the room to the drain hole;
- beacons are filled;
- tile laying is carried out taking into account the fact that the sides parallel to the drain lie horizontally, and the perpendicular ones repeat the slope.
Tools and materials for laying tiles in the washroom
Required to work the following materials: floor tiles, limiters-crosses for even joints between the elements of the coating, specialized waterproof tile adhesive, waterproof grout.
Styling tools:
- spatula with a comb;
- ordinary spatula;
- rubber spatula for grouting;
- rubber mallet;
- container with water for wetting tiles;
- grinder or machine for cutting ceramic tiles;
- cord and building level.
Tile installation technology
Facing the floor in the washing bath with ceramic tiles has some features:
- the concrete screed should dry well, it must be thoroughly cleaned of construction debris and dust;
- the tile before laying is soaked in water for 3-4 minutes, so it will not take moisture from the glue;
- tile laying starts from the most prominent place in the room.
The order of work on facing;
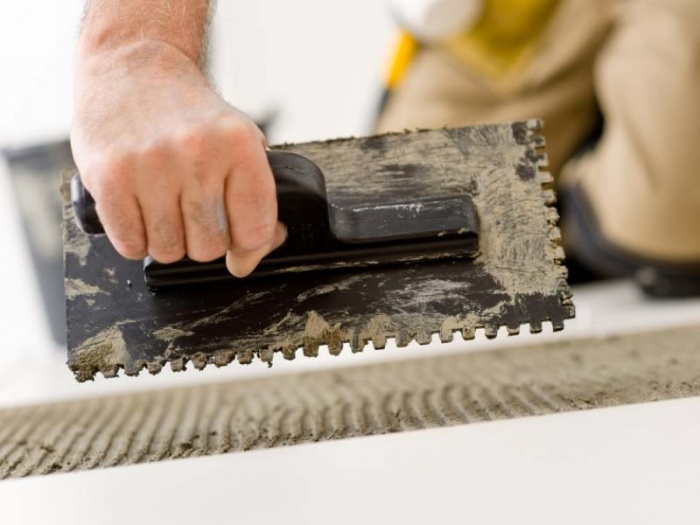
- Tile adhesive is applied to the tile with a notched trowel. This method of application increases adhesion to the screed.
- The tile is applied to the place of attachment and leveled with a mallet.
- Excess glue is removed with a spatula.
- To maintain even gaps between the elements of the coating, plastic crosses are used.
- To comply with the horizontal direction, the laying is checked with a building level.
- Glue on the front of the styling elements is immediately washed with a wet sponge.
- Twelve hours after the end of the work on the lining of the cross, the seams must be removed and wiped. Polymer grout will protect the joints from moisture. So that the grout does not stand out against the background of the coating, color is added to it. Excess mixture is removed with a damp sponge.

How to choose the right tile for your bathroom
The washing room in the bath is a room with specific requirements, so it is important to choose the right tile for flooring. Floor tiles it can be glazed, double-fired, and unglazed. In the first case, the material is resistant to sudden temperature changes.
What you should pay attention to when buying material:
- the surface of the tile must be rough, non-slip;
- the reverse side of the elements should be embossed for better adhesion to the screed;
- for laying tiles with your own hands, it is better to purchase rectangular tiles; multifaceted elements are difficult to install;
- when buying, it is worth considering a margin of ten percent for trimming elements and repairing the coating.

Common mistakes when installing a washing machine
From misses to construction work no one is insured, especially if the case is taken House master. It is worth learning from the experience of others and avoiding the main mistakes:
- No need to look for benefits in purchasing cheap materials for moisture and heat insulation. This approach will lead to involuntary expenses later on.
- It is important to provide in the washing good ventilation without drafts. Thus, the formation of fungal growths and mold can be avoided.
- In the washing room, as in the whole bath, you should not do plastic ceilings. From the temperature difference, they are deformed and release toxic substances into the air.
- The floors in the shower room, around the pool, in the washroom are not finished with smooth glazed tiles. This coating can cause serious injury.
- For the floor and walls in the washing compartment, a tongue-and-groove board is not used. This material has the ability to collect dirt and gain moisture.
An important part of any Russian bath is the washing room. It is here that the hosts and their guests spend time relaxing after their next visit. And it is here that there is always a lot of water, which means that special requirements are placed on the elements of this room. This is especially true for gender. After all, it must ensure the drainage of water and at the same time withstand its harmful effects for a long time. In this article, we will talk about how to make the floors in the sink of the bath with your own hands.
Gender Requirements
In this part of the bath, always special conditions. First, there is always high humidity. Secondly, there are sharp temperature drops. The user can enter and exit adjacent rooms, visit the steam room. At this time, cold or hot air enters the washing room.
All these factors can ruin even a solid floor in a short time. To prevent this from happening or happen as late as possible, the following characteristics should be taken into account during construction:
- the floor covering and its components must dry quickly;
- the floor should easily withstand temperature changes;
- have the ability to pass air;
- the underground space should be ventilated, but not create drafts.
The choice of material and floor design

Considering all these factors, you can proceed to the choice of the material used and the floor structure itself. There are three main options to consider in this regard:
- Clay floor. This design was quite common until recently. Clay flooring is easy to install and cheap. But recently, due to its impracticality and unaesthetic quality, it is becoming a thing of the past.
- The use of concrete. practical, long-lasting and also do not entail too much expense. But such a coating looks unattractive, besides it is cold.
- Plank floor. It is this option that can be considered the most suitable for installation in wooden bath. First, it is warm. Secondly, the tree looks beautiful, and it is easier to work with it.
Which option to choose will depend on you. Wood can cost more than concrete structures. And the latter are more labor-intensive during construction, and it can take a lot of time. The concrete screed gains full strength only after 4 weeks.
Concrete floor

Now let's talk about how to make a concrete floor in a washing bath. This method will require physical effort from you, but it is done quite simply and quickly. The workflow itself will look like this:
- First of all, the soil under the soaked room is carefully compacted. Next, a layer of gravel, crushed stone or broken brick at least 15 m thick. Then a layer of concrete is poured, which will serve as the basis for the finishing floor. All these procedures are done if the subfloor was not made at the construction stage of the bath.
- Next, the first layer of screed is laid. If the area of \u200b\u200bthe room is small, then everything can be done at one time. If this cannot be done in one go, then the floor is divided into sections using wooden bars and filled with stripes. It should be borne in mind that the desired slope to the drain must be started at this stage.
- The next layer should be insulation. This stage is very important, because concrete in winter time it gets very cold, and it will be very unpleasant to walk on it. As an insulating pillow, you can take expanded clay or another bulk material not afraid of moisture. If there is a need to lay communications for the removal of wastewater, then this is done at this stage.
- After laying the insulating pillow, the entire surface is covered with a reinforcing mesh. After that, you can fill in the second screed, not forgetting the necessary slope.

Note! Since concrete, even with insulation, still remains cold, many bath owners are satisfied with and. In washing it is better to use water heating. Since it will be constantly humid here, it is undesirable to use electric heating elements.
Wooden floor

It is this type of flooring that today can most often be found in the bath and in the washing room. The tree has an attractive appearance, it is warm and smells when heated, which creates a pleasant atmosphere.
Before starting work, it is worth deciding on the type of floor. With your own hands, you can make two varieties of it:
- flowing structure. Such a floor is laid from boards that do not fit snugly against each other. As a result, gaps are formed through which water flows into the underground space, and then is discharged into the sewer system.
- Leak-proof construction. In this case, the boards are stacked tightly, with an inclination towards the drain. Such .
Note! by the most the best option considered to be a non-leaking structure. It does not create drafts, which means that the floors will be warm. For greater effect in underground space you can lay a heater, protected by a layer of waterproofing.

When building a non-leaking wooden floor, the following work must be done:
- Logs are laid on the foundation or brick pillars, to which the subfloor is attached.
- Then a layer of waterproofing, insulation is laid, and again a layer of waterproofing and vapor barrier.
- Next, another layer of boards is attached. This creates the desired bias. It is better that the slope is from the center in two directions (especially if the washing is large). Can be placed on top polyethylene film, For better protection from moisture;
- After that, you can lay the boards of the finishing floor, tightly fitting them to each other.

If there is no desire to build such a complex "pie", you can simplify the task and build a leaky floor. First of all, it is worth deciding where the water will flow. If the soil under the bath is sandy, then you can simply dig a hole and strengthen its walls. In the event that the soil on the site does not pass water well, it is necessary to build a water inlet to drain wastewater. You can make a concrete screed with a slope or place a metal pallet.
The process of building a leaky floor does not take much time and does not require you to have great building skills. First of all, as in the previous case, the lags are laid. Then boards are nailed to them. At the same time, a space of 6–8 mm is left between them so that water can freely and quickly penetrate into the underground space.

Note! In order for the tree to serve as long as possible, it must be pre-th.
It is worth remembering that the leaking floors are quite cold, because there is no insulation under them and the wind “walks” freely. To somehow reduce this effect, it is necessary to insulate the basement of the bath. Make sure that the wind does not get into the underground space.
Video
This video will answer questions about the floor in the bath:


