About the construction of washing compartment floors and the most common mistakes made when installing concrete floors and detailed video on how to install drainage drains.
The construction of a bathhouse involves the arrangement of several rooms under one roof. A dressing room, a relaxation room, a steam room and a wash room, as a rule, make up the main premises of the building. Some projects include a bathroom and a swimming pool area. Often they all form a single whole, but in some cases they are separated, which is also permissible according to building codes. and design completely depend on the individual wishes of the customer.
Each of the few compartments in the bath structure is considered significant, both in its principle and in the functional load it bears. In the relaxation zone they relax, in the steam room they take a steam bath, and in washing department take a break from the steam and pour a huge amount of water on themselves, washing off the sweat.
Floors in the washroom
Every little detail in this department must be thought out very carefully. There are a number of features that are unique to the washing section of a bathhouse. Genders are given Special attention, since all the main moisture falls on the washing compartment. Accordingly, the installation of floors in this area should be carried out in full accordance with the functional load on the room.
In addition to a large amount of moisture, there is a constant temperature difference in the washing room. Based on these reasons, the floors must fully comply with the basic requirements for the installation of floors in the bathhouse washroom:
- freely pass water flows;
- have high-quality ventilation;
- dry quickly;
- have an acceptable coating temperature;
- resist environmental temperature changes;
- not be a source of through movement of air masses.
When installing a concrete floor, it is necessary to create a high-quality insulation system that allows the use of a double layer insulation material. Mineral or basalt wool can be used as insulation; expanded clay is often used as an insulation material.
The concrete base is usually covered with ceramic tiles. Often, a removable wooden flooring is used in the washing department. It is made from pine or larch wood, as the most moisture-resistant material. Spruce is extremely rarely used as flooring for bathhouse floors. The tree is resinous and includes a large number of knots, which when exposed high temperatures fall out, destroying the floorboards.
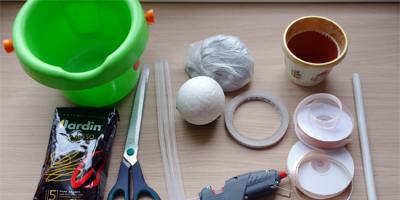
Materials required for installing a wooden floor in the washing compartment:
- steam and waterproofing;
- cement and sand;
- wood beams, size 150x150 mm;
- floorboard, thickness from 35 to 50 mm;
- antiseptic as the main means of protecting wood from microorganisms and putrefactive bacteria.
The insulation cushion includes several layers that guarantee high-quality functioning and long-term operation of the room. According to their type, wooden floors are divided into two categories - pouring, or leaking floors, and non-leaking floors.

Creation of pour-type floors
This type of construction is the simplest and can be constructed with any foundation, be it strip, slab, or the building rests on concrete supports or is brought under it concrete base. Logs are attached to the base, supporting the plank structure of the rough floor. Boards are laid with gaps of 5-7 mm so that water does not linger on the surface and flows freely into the underground water intake, from where it is discharged into the sewer system.
As a rule, the design of pouring floors is removable. She is taken out of the room every time after receiving procedures. The most significant drawback is that such a floor cannot be insulated. The design is used mainly in seasonal baths, or structures located in warm regions where the average annual temperature rarely drops to negative levels.
In addition, the flooring very quickly becomes unusable and requires replacement, since the water protection system does not apply to it. The most important thing when installing a leaking floor is to avoid the formation of drafts. They can be prevented by proper drainage and underground construction.

The beginning of the installation of flood-type floors should be the arrangement of a pit where water from the bathhouse will be collected. You can, of course, install some kind of trough under the entire room, from which waste water will be drained by gravity.
It is necessary to arrange the underground in such a way that drainage does not cause unnecessary trouble when using the bathhouse. For these purposes, determine what type of soil makes up the soil under the building. And, if it turns out to be loose - sandstone, or from light sedimentary rocks, then a hole is dug in the washing department, no more than half a meter deep. Its edges and bottom are carefully compacted and filled with a filter - a mixture of coarse sand with fine crushed stone, broken brick or medium fraction of gravel. The thickness of the filter should be at least 200 mm, since at the same time it will act as a vapor barrier, retaining the steam output in the form of condensate on its surface, and not on the inner surface of the floor. 
If the soil is swampy and heavy, with a clear clay content, then it is necessary hydraulic structure drainage system. A pit 300 mm deep is dug under the washing compartment and taken downwards towards the foundation, where a pipe leading to the storage pit and septic tank is built. The soil around the structure is compacted tightly. Device drain hole involves periodic cleaning and treatment with antiseptic agents, since the pit has a musty smell. To isolate it, siphon sewer devices are used to prevent stale air from entering the room.
Installation of non-flow type floors
Before you begin assembling the lower floor of the washing compartment, it is necessary to ensure timely drainage of water and provide the room with a ventilation system, since floors of this type are not removable.
It is important to know that:
The concrete base should be made with a slight slope, ensuring natural drainage of water. It is also necessary to arrange a reception Wastewater to drain them into a drainage ditch or sewer system.
The installation of floors of this type is relatively difficult to install, but allows you to avoid the main disadvantages of spill-type floors. The installation diagram includes the creation of a layered insulation pad and a drainage system under tightly laid floorboards:
- Installation of logs is carried out on the top of the foundation.
- The surface is lined with waterproofing sheets, which are carefully sealed with sealant.
- The insulation is laid out in the cavities between the joists.
- The upper part of the insulation is laid with a second layer of waterproofing and covered with a vapor barrier film.
- A subfloor is installed on the top of the insulation pad with a slight slope towards the drainage system.
- The subfloor is covered with a continuous sheet of polyethylene. The design externally resembles a large trough, equipped with a ladder for draining water.
Video of installation of drains into the structure of drainage trays:
The most common mistakes
When installing the floor in the washroom, a number of shortcomings may be made, which subsequently result in the dismantling and alteration of some structural components. Unfortunately, this picture is observed in cases where sufficient attention is not paid to the basic recommendations of specialists.
The five most common mistakes made during the construction of the lower ceiling of the washing compartment of the bathhouse:
- Savings on insulating materials:
- replacement of a special membrane-type vapor barrier film with polyethylene;
- laying waterproofing with vents without appropriate soldering with sealants;
- laying a thin and loose thermal insulation layer.
- Lack of vapor barrier layer.
- Lack of ventilation system.
- Availability plastic elements in the decoration of the room - plastic skirting boards, plastic lining and ceiling.
- Flooring tiles with a smooth surface.
Providing a slope for a wooden floor
Creating floors for the washing compartment is no different from floors in other rooms of the bathhouse. They are mounted in exactly the same way as the others.
Prepare the subfloor. Expanded clay crumbs are poured onto it and a double layer of waterproofing is lined. Roofing felt or roofing felt is used as an insulating material. In some cases, an insulating polymer sheet is used. The canvases are laid with an overlap of at least 50 mm and carefully sealed with sealant.

Logs are attached to the upper part, avoiding slopes. Their horizontality is verified building level. Thermal insulation is laid between the joists. Mineral or basalt wool, ecowool, well beaten using special attachments on a drill, or polystyrene foam can be used as insulation.
It is important to know that:
Using polystyrene foam as an insulating material in any room is fraught with the risk of rodents settling in it. Therefore, when using this material, it is necessary to provide grilles for air ducts and ventilation openings along the foundation of the room.
To create a slight slope of the floor towards the wastewater receiver, skull blocks are placed on the logs laid at the base of the floor. Their thickness gradually decreases as they approach the drainage point. An additional layer of waterproofing is attached to the bars, on which a finishing flooring is made from tongue-and-groove or edged boards tightly fitted to each other.
In order to provide the underground with ventilation, small holes are made in the rough ceiling into which plastic pipes with a diameter of at least 50 and no more than 100 mm are inserted.
Concrete floor in the washing area of the bathhouse
In a washroom, a concrete floor can be arranged in three ways:
- on wooden floors;
- screed, directly on the ground;
- By concrete floor.
Each of the methods is not bad, but each has its drawbacks. We do not consider concrete flooring, since it uses concrete slabs, which are extremely rarely used for such purposes in private construction.
Stages of laying a concrete floor
The most important point in creating concrete floors, is the creation of an insulating layer, or insulation cushion, without which in winter the floors will begin to freeze and heating costs will be very high.
To prepare the base for laying concrete using the screed method directly on the ground, the soil is initially compacted, onto which 150 mm of crushed stone, gravel or broken brick is poured. This is the basis for the first layer of screed.
It is important to know that:
The slope of concrete floors towards the pit is installed from the very beginning, in contrast to the installation of wooden floors.
After the first layer of concrete has hardened, a layer of at least 70 mm is poured onto it and a special reinforcing metal mesh is laid, which can be replaced with a chain-link mesh. Then it is poured again with concrete, the surface of which must be leveled according to the rule.

Concrete floors are considered cold, and no insulation can make them a pleasant surface for bare feet. For this purpose, artificial heating is used - the “Warm Floor” system. Infrared, electrical or water heating will allow you to provide significant savings on energy costs and not spend additional energy on heating the bath. The system is installed under the cladding ceramic tiles. Under wood covering the system becomes ineffective because natural wood is a poor heat conductor - it will hold it in the middle, not allowing it to escape outside.
The most the best option for the washing compartment, as well as in - this is the device of a water-heated floor system, which is powered by a heating device installed inside the bathhouse for the general supply of water to the washing room and for shower installations.
Installation of a water floor is carried out similarly to the installation of an electric floor, only its thickness will be greater, commensurate with the cross-section water pipes. Recently, the method of solid filling with a 3D image has become very popular. This method of flooring is perfect for the washing compartment of any bathhouse.

How to make floors in a bathhouse with a slope? A sloped floor base is an ideal solution for areas with intense exposure to water. Such designs allow you to quickly evacuate liquid from the bath and prevent spoilage flooring. However, from a technical point of view, making inclined floors is quite difficult. In the article we will look at the design features of foundations with ramps, and also pay attention to important technical nuances.
Why is tilt necessary?

Tilt of the base towards the drain allows you to quickly remove water from the washing room or steam room in the bathhouse. Enough complex design performs several tasks:
- Prevents fluid accumulation;
- Prevents damage to floor materials;
- Provides quick drying of floors;
- Significantly reduces the chances of developing fungus and mold.
The design of a rough foundation with a slope must take into account many technological nuances. If the degree of inclination is too small, not all the water accumulating on the surface will enter the drainage system. If you make the floor slope too large, this will affect the material component of the issue, since it will lead to unnecessary expenses.
Features of concrete floors

In the process of arranging an inclined base in a bathhouse, in most cases concrete is poured. This material has good frost resistance and pliability, so it is the easiest way to fill floors with a slope. How to pour the solution correctly?
- First, a pit and a sewer pipe are installed, with the help of which waste water will be removed from the bathhouse;
- Then concrete mortar pour in two layers, controlling the horizontal level of the screed;
- The thickness of the bottom layer of the mortar must be at least 50 mm;
- After this, a layer of expanded clay is laid on the dried concrete floor and a second layer of mortar is poured;
- Then the reinforcing mesh is installed and the finishing screed is made.
As a rule, laying the mortar is not the final step in the construction of sloped floors. When arranging such a covering in a sink, it is advisable to cover the base with tiles, otherwise it will very quickly become unusable due to the influence of moisture. Laying wooden floors will be no less profitable.
Non-leakage floors

Laying wooden floors on a slope is only required if a leak-proof base is installed. How to lay floorboards at a certain angle to the drain?
- The rough coating is cleaned of dirt and a drainage system is installed;
- Then it is supposed to be filled concrete screed, which is performed using the technology described below;
- After the screed hardens, the tongue and groove board is laid;
- The finished floorboards are positioned at a slight angle to the drainage system due to the previously formed screed slope.
Unlike pure concrete, wooden floors can be installed in a sink, steam room or shower, as they are not prone to dust formation.
Options for installing inclined floors

Designing a base with a ramp always begins with choosing the type of slope, which can be of two types:
- “Envelope” is a special type of base cladding in which the drainage system is located in the center of the room. For normal water drainage, the base is conventionally divided into 4 parts in the form of an envelope, making a slight slope towards the ladder;
- From two planes- a structure in which the base is divided into two parts and made with a slight slope relative to each other. At the lowest point of such a system, a drain is installed into which liquid from the floor covering flows by gravity.
The first type of base slope is used quite rarely nowadays, while structures with a slope from two planes are at the peak of popularity. Designing a second type of floor is much more profitable financially. In addition, during the installation of a water drain, you can install point drains or make a single elongated drain pit.
Features of coatings with ramps

The degree of deviation of the horizontal base is largely determined by the type of room and the concentration of water in it. The SNiP standard defines the average value of this indicator as 1 cm per meter of length. Designing floors involves placing the drain either in the center of the room or closer to the entrance to the bathhouse.
The center drain system involves constructing the floors as an “envelope”. In order to carry out the work efficiently and ensure normal flow of water into the sewer, the following points should be taken into account:
- The first step is to pour the cement screed along the pre-installed beacons;
- When tiling a floor with a slope, it is better to use small-caliber tiles;
- The minimum slope of the base towards the drain should be 1 cm per meter of length.
Pouring concrete floors
To make a base with a slight slope, you need to do the following:
- Clean the rough base from dirt and dust;
- Waterproof the base using coating or pasting materials: bitumen mastic, self-adhesive film etc.;
- Choose a place to organize the drain: the distance from the walls to the drain must be chosen as a multiple of its size;
- After installing the drain, the drain hole is covered with film to prevent cement mortar into the sewer;
- After this, beacons are placed on the coating to control the inclination of the screed;
- Pouring concrete is done so that the solution fills the entire space of the base to the top points of the exposed beacons;
- Using the rule, the mortar mixture is leveled, after which it is “rolled” with a roller with needles to eliminate air bubbles;
- After the screed has hardened, install the siphon cup.
Tiling
 Tiling a floor with an envelope type drain is a complex procedure
 Laying tiles on a concrete floor using the “envelope” technique should take into account some nuances, namely:
- First, a decorative frieze is laid around the perimeter of the walls;
- Then beacons are installed near the ladder to control the horizontal level of the laid tiles;
- After this, lay the tiles so that they converge in triangles towards the drain hole;
- First you need to make a hanging row, which should go from the drain to the decorative frieze;
- The tiles are laid in such a way that the seams are oriented parallel to the decorative frieze;
- During the ramp lining process, the concrete floor will consist of tile triangles;
- Then the tiles are laid along the left and right sheets of the “envelope”.
The described option for installing tiles in a bathhouse is quite complex and therefore is not often used. It is much easier to make floors with a drain between two inclined planes. In this case, design comes down to a simple choice of the slope of the planes, which should be 1-1.5 cm per 1 m. The fracture line of the planes will lie exactly at the level of the ladder, which contributes to the effective outflow of water from the bathhouse.
What to consider?
Sloped floors in the bathhouse allow you to quickly dry the surface of the floor materials. To properly organize your work, you need to adhere to the following recommendations:
- First of all, you need to calculate the height difference between the drain and the contour coverage area;
- To ensure the correct degree of inclination of the ramp, cords are pulled from the corners of the room to the ladder;
- The tiles are laid according to the following principle: its perpendicular side must correspond to the direction specified by the cord, and the horizontal side must be parallel to the ladder.
Pipeline slope calculation

To achieve normal drainage of water from the room, it is not enough to lay the tiles at an angle to the drain hole. Designing floors with a ramp also involves calculating the optimal slope of the water supply system. This parameter determines whether the water will flow into the sewer by gravity or not.
During the construction of a bathhouse, the degree of inclination of the sewer pipe is often determined by the values recommended in SNiP. However, in some cases, the standard proposed by SNiP is not suitable for arranging floors. In such situations, additional calculation and design of the pipeline slope is required.
The required parameter is determined using the following formula:
D*√L/H ≥ M, where:
- M – slope coefficient;
- D – speed of water movement through the pipe;
- L – liquid filling level of the pipeline;
- H is the diameter of the sewer pipe.
The ratio of the speed of water outflow from the pipe to the level of its filling cannot be greater than the value M. The SNiP standard determines the minimum slope of a pipeline with a diameter of 0.5 m, which is 30 mm per 1 m of length. To make a high-quality drain, it should be taken into account that the speed of water outflow cannot be less than 0.7 m/sec.
What is affected by the slope of the pipe and floor?
Designing the base with a slope towards the drain allows you to create a gravity-flow sewer system. To prevent the pipeline from becoming clogged over time, you need to pay special attention to the choice this parameter. The slope of the sewer pipes and the floor base should not be small or very large, as this affects the performance of the pipeline.
The floor in the bathhouse warms up the slowest, and often remains cold, even when the steam room is heated hotly. It is especially uncomfortable to feel this in the washroom, where you have to leave the hot steam room with your bare feet. And the sharp difference in temperature in the lower and upper parts of the room does not have the best effect on the body. In addition, such conditions negatively affect the indoor microclimate and contribute to wood rotting. It is not difficult to get rid of these problems - it is enough to perform high-quality thermal insulation.
Let's look at how to insulate the floor in a bathhouse in a washroom and what is needed for this.
The washing compartment is exposed to moisture and temperature changes more than other rooms in the bathhouse, especially in frosty winters. While bathing, a person can go from the steam room to the wash room several times and vice versa, letting hot air into the room. A lot of water is used for dousing, and all of it goes through the floor, simultaneously penetrating into the pores of the wood.

Since the bathhouse is heated only periodically, the water remaining in the floor boards or concrete base either freezes or melts again, gradually destroying the materials.

Such features of the room determine certain requirements for floors:
- they should facilitate efficient drainage of water - by sloping towards the drain or by allowing moisture to pass through themselves;
- have increased strength and low absorbency;
- be resistant to rotting and sudden temperature changes;
- not be slippery when wet;
- heat up and dry quickly.

To ensure the necessary conditions, even at the construction stage it is necessary to provide correct device floor structures, ventilation of the entire room and underground space, perform high-quality thermal insulation and select materials correctly.
Types of floors in the washroom
Three types of floors are optimally suitable for a washing room: solid wood, leaking wood and concrete tiled. The insulation of each of them has its own nuances, due to the design features.
This is the most traditional option for a bath, and also the warmest. Natural wood has a pleasant texture, environmental safety and low thermal conductivity, which means a lot for such a room. Wood is mainly used coniferous species: it is least susceptible to rotting and other negative influences. The resin contained in the boards does not protrude outward, since the air in the washing room does not heat up as much as in the steam room.

Installing a solid floor is quite labor-intensive. There are no removable elements provided here, and therefore special requirements are put forward for the organization of the ventilation system. The base of the floor can be compacted soil or concrete screed.
The floor system consists of joists, sheathing and the flooring itself, with mandatory waterproofing between these elements. The insulation is located between the logs, which are installed strictly in a horizontal plane, and the required slope is created using the sheathing.

Expanded clay, dense foam plastic, mineral wool can be used as insulation - the hygroscopicity of the material does not play a special role if it is reliably waterproofed on both sides. To prevent water from penetrating through the flooring, it is recommended to use tongue-and-groove boards and treat them with a water-repellent compound before using the floor.

To ventilate the underground space, a plastic pipe with a diameter of 50 to 100 mm is installed from the outside.
Leaking floor
A leaking, or pouring, floor is easier to make and will cost less. Unlike solid floors, the floorboards here do not slope, and water flows over the entire area through narrow gaps between the floorboards. To drain used water, a pit is made at the base under the floor, from which a pipe is laid at a slope towards the sewer.

If the bathhouse is used irregularly, the base of the floor can be compacted soil or a sand-crushed stone cushion through which water will seep into the ground. Floor joists are laid on concrete pillars to protect the tree from negative influences.

With frequent use, the floor structure must be more reliable, so the base is filled with a concrete screed with a slope towards the drain.

The flooring itself cannot be insulated, because there must be space under the boards for water to drain, but if desired, you can insulate the base of the floor. To do this, use concrete with a heat-insulating filler or fill it with expanded clay under the screed.

Only a few vents are left around the perimeter of the base for ventilation; the rest of the space is closed to prevent drafts.
If the bathhouse is built on pillars or piles, insulation is carried out without adding expanded clay. To do this, make a rough flooring from boards and lay mineral wool or other insulation between the joists, which must be covered on both sides with waterproofing material. Next, install the sheathing at a slope towards the drain, and fix the sheets on top of stainless steel with an overlap, and then the leaking flooring is installed. This design requires more cost and effort, but the floor is reliably protected from blowing and cold.
Concrete floors with lining
This option is the most durable and reliable. The tiles are excellent for washing, they are easy to clean and do not require special care and always looks aesthetically pleasing, and the concrete screed provides the necessary strength to the floor. The disadvantage of these materials is that they are cold, so you can’t do without insulation.


Traditionally, such a floor is installed in the following order:
- a layer of broken brick, crushed stone or gravel at least 15 cm thick is poured onto the compacted soil;
- pour the rough screed;
- lay a layer of waterproofing and insulation;
- cover the insulation with another layer of waterproofing and lay the reinforcing mesh;
- pour the finishing screed;
- tiling is carried out.


Organization of drainage is carried out at initial stage arrangement of the screed, and the foundation is poured at a slope towards the drain. Expanded clay or penoplex are most often used as insulation, mineral wool not intended for such loads.
Choice of insulation
The choice of insulation for a washroom should be approached very responsibly, taking into account specific conditions operation of the premises. Preference should be given to materials with low hygroscopicity and resistance to decay, even if the device reliable waterproofing. There are several types of insulation that are best suited for bathhouse floors.
| Material | Characteristics |
|---|---|
| This slab insulator is suitable for both wood and concrete floors. It is moisture resistant, easy to style, different affordable price. Polystyrene boards have very low thermal conductivity, so the floor does not freeze and warms up quickly when the bathhouse starts to be heated. The only negative is that this material is easily damaged by mice, so if there are rodents, you should use a different insulation |
| This material is an improved version of foam plastic, therefore it is significantly superior to it in all respects. It is absolutely not afraid of moisture, retains heat perfectly, has a long service life and does not emit harmful substances. It is more expensive than polystyrene foam, but the cost of the material is fully compensated by its reliability and durability |
| Applicable this material when insulating wooden structures. For greater effect, it is recommended to use foil-coated cotton wool. Since cotton wool tends to absorb water, special attention should be paid to waterproofing the insulating layer. It must be completely sealed, otherwise the material will lose its heat-insulating properties |
| Bulk insulation, often used as a filler for concrete screed. Has high thermal insulation properties and low weight, which allows you to effectively insulate a concrete floor without large loads on the base. Not subject to rotting, not damaged by rodents, different long term services |
| The most environmentally friendly insulation. Available in the form of porous granules of various fractions, suitable for both concrete and wooden floors. Needs high-quality waterproofing. This insulation does not burn, does not rot, and is not damaged by mice. When installing a floor with a slope, it is backfilled using guides |


Prices for thermal insulation penoplex
Penoplex thermal insulation
Even at the planning stage of the bathhouse, I wanted it to become a place as comfortable as possible. So that no little thing interferes with enjoying the bath procedures. And I understood that the floor in the bathhouse is a detail of no small importance. I obviously didn’t want to see damp, rotting floors in my bathhouse with fungi and mold spreading in the corners. I also thought that it would be nice for the washing area, where you go to rinse off after the heat of the steam room, to be warm. Therefore, I decided to make the floors in this part of the bathhouse warm, that is, lay them in upper layer floor screeds heating cable.
The stages of installing a heated floor with waterproofing are as follows:
1. Installation of a sand cushion on the ground
I want to make a reservation right away that I made the floors directly on top of the ground - inside strip foundation. In principle, for baths most often they make strip or columnar foundations, where the floor is initially a ground covering.
So, first we remove the fertile layer of soil, preferably down to the clay, that is, 15-20 cm. Pour sand into the resulting hole and lay a drain pipe. Make sure that the drain pipe has a water seal, otherwise there will still be odors in the sink! Also, be sure to provide a plug with which you could close the pipe outlet in winter.
The sand cushion should be spilled with water and compacted thoroughly.
2. Hydro- and vapor barrier
A layer of insulation should be laid on the sand cushion - I used roofing felt, a thick film would also work. Under no circumstances should you think of placing roofing felt under a sand cushion, because inside the “pie” you will end up with a swamp, and this can lead to cracks and breaks in the floor.
3. Thermal insulation
On a layer of roofing material I laid out sheets of EPPS (extruded polystyrene foam) 50mm thick. You can replace them with foam plastic, but it should be thicker - at least 100mm. Insulating sheets will retain the heat coming from the underfloor heating cable, which we will place above. This means that the cable will not heat the ground, but will direct the energy in the right direction, that is, up to the floor covering.
4. Pouring concrete
We lay out reinforcing mesh on sheets of PPS or polystyrene foam for rigidity and pour concrete on top with a layer of 7-10 cm. It turns out that a reinforced concrete slab will lie on the thermal insulation layer.
5. Cement screed and laying of underfloor heating cable
After the concrete has hardened, you can begin leveling the surface. cement screed thickness 30-50mm. By the way level screed there shouldn't be. In order for water to flow freely along the surface to the drain, provide a screed slope of approximately 1 cm per 1 running meter. We lay the electrical cable for the heated floor under the screed.
6. Porcelain tiles
The final layer of flooring in my bathhouse is porcelain tiles. I chose porcelain stoneware because of its special strength and frost resistance, as well as resistance to temperature changes. In general, I am sure that my tile will not burst if I decide to heat the bathhouse on a frosty day.
As for the surface of the tile, it must be rough - this is a prerequisite for your safety. Although, soapy water will still do its job and even such a rough surface may turn out to be slippery. In this case, place wooden gratings made from beams on the floor. They can be dried after each visit to the bathhouse, so they will serve for a very long time.
7. Wall edging
The edging is necessary so that during the washing process water does not flow under the lower crown of the frame and does not lead to rotting of the wooden walls of the bathhouse. However, edging must be done in any case, even if the bathhouse is brick, so that water does not fall directly on the walls.
I made the edging the height of the tile - this is the most optimal. You can make the base higher, but there is no particular point in this.
First to wooden walls baths we fix several bars 2-3 cm thick to provide a ventilation gap. It is necessary so that the space between the wall of the bathhouse and inner surface the flanges could dry out during the washing period. We fix the bars vertically according to the height of the future base. We attach pieces of DSP or moisture-resistant plasterboard to the bars, and then glue the tiles onto them. We seal the joint between the flange and the floor with sealant so that water does not flow out beyond the resulting “trough”. We also coat all tile seams with sealant to retain moisture. The top of the plinth is covered with tiles to prevent water from getting behind the wall of the plinth.
Now you can splash around in the sink and pour water onto the floor to the height of an entire tile! And the water will not leak out!
The floor design I proposed, firstly, does not absorb moisture and is not the cause unpleasant odor in the sink, secondly, it is as hygienic as possible, thanks to porcelain tiles, and, thirdly, it additionally warms the room with the energy of the electric cable.
I hope my tips will be useful.
Sincerely, Vladimir
Proper organization of the floor in the washing department of the bathhouse is the key to its long-term and uninterrupted operation. All about the types of floors, their installation and the most common mistakes read our article.
Content:
The washing room (sink, washing room) is the main room in any Russian bathhouse. This is where visitors spend most of their time between short runs to the steam room. Significant quantities of water are constantly flowing in the washing room, which means it must be equipped to the highest standard. Maximum attention should be paid to the floors. Throughout the year, they are exposed to aggressive moisture and strong temperature changes. Depending on the choice of floor type and the quality of its installation, the washing room will be either warm and comfortable, or cold and uncomfortable.
Features of the floor in the washing bath

Every little detail in arranging a washing room should be carefully considered. There is a list of features characteristic of this particular area in the bathhouse. Here the floor is given the closest attention, since excessive humidity constantly exposes it to rapid destruction. In addition to moisture, the floor in the washing room is constantly affected by sudden global temperature changes.
In this regard, floors must fully comply with all the requirements put forward for them:
- Dry quickly;
- Resist sudden thermal shocks;
- Easy to pass air;
- Have an acceptable coating temperature;
- Do not create drafts;
- Have normal ventilation.
Installation of a concrete floor in a washing bath
Bathroom floors are often installed using a concrete screed, since the installation of such a floor is considered the fastest and most trouble-free. The only difficulty in this matter is organizing the drainage. In a washing bath, a concrete floor can be constructed in three common ways: screed on the ground, on a wooden floor, on a concrete floor. Any of these methods has a place to be, but at the same time it has some more or less significant disadvantages.
Traditional floor screed in a washroom

Traditionally, the concrete floor in the washing room of a bathhouse is arranged as follows:
- First of all, you need to thoroughly compact the soil.
- Then add a layer of gravel 15 cm thick. You can use it instead broken brick or crushed stone. Thus, a ready-made base for the first layer of screed is obtained.
- Pour the first layer of concrete. Remember that, unlike wooden floors, in concrete floors the angle of inclination is formed already at the initial stages.
- In rooms with small area The screed is poured in one stage. If the area is large, wooden guides are laid on the floor, and then the resulting strips are poured over it. In any case, the concrete floor can be called the most durable, durable and practical option.
- Most important stage in the installation of a concrete floor - the product of an insulating layer. An insulating cushion is extremely necessary because it protects the floor from freezing during the cold season and, accordingly, saves heating resources. Therefore, after the first layer of screed has completely hardened, the floor is covered with a layer of expanded clay no thinner than 7 cm.
- Lay on top metal fittings- reinforcing mesh to enhance rigidity and strength.
- After this, lay the next layer of screed and carefully level it with the rule.
- A high-quality leveled screed will work perfectly as a finishing coating. If you want to make the floor more aesthetically pleasing, you can cover it with beautiful non-slip tiles.
Warm floor in the washing compartment of the bathhouse

Despite a decent layer of insulation, a concrete floor will never be pleasant to the touch. Cold concrete surface in the winter season it often annoys bathhouse owners. In order to eliminate this drawback, a “warm floor” system is used. As a rule, electric, water or infrared heating is placed under a layer finishing.
For the washing area, it is optimal to install a system of warm water floors, powered from a heating device for the general water supply in the bathhouse. Installing a water floor is not much different from installing an electric one. The only difference is the thickness, commensurate with the height of the pipes being laid.
IN Lately Continuous filling of floors with 3D images is increasingly being used, ideal for washing baths.
Concrete flooring is the least common type of flooring, as it involves the use concrete slabs. This option is not very popular in the construction of small buildings.
Installation of a wooden floor in a washing bath
Do-it-yourself wooden floors in washing baths are being installed more and more often due to its many advantages, such as ease of installation, attractive appearance, aesthetics and the special unique smell given off by wood when heated.
Types of wooden floors for a washroom

There are two popular types of wooden floors:
- Leak-proof. Structures made of tightly laid boards with a certain angle of inclination that facilitates the flow of water into a special hole.
- Leaking. A covering consisting of boards laid with gaps to drain water.
Note! The wooden floor in the washing bath must be laid at an angle for natural water drainage. Ideally, the slope should be in two directions from the center.
Wooden non-spillable floor for washing bath

This design is not removable, so before installing the wooden floor in the washing compartment, it is necessary to organize a ventilation system. The base for a wooden non-spillable floor should be installed with a slight slope to allow natural water drainage. It is also necessary to equip a water receiver and a ditch for its discharge into the sewer.
Installation of a wooden non-leakage drain is carried out in several stages:
- The logs are mounted on the top of the foundation.
- Waterproofing is laid on top, carefully sealed with sealant.
- Layers of insulation are tightly laid between the joists.
- Waterproofing and vapor barrier film are re-laid on the insulating layer.
- The next layer is to prepare a subfloor with a slope for drainage in the desired direction.
- The finished subfloor is covered with a continuous layer of polyethylene. The result is a structure that looks like a huge container with a ladder for draining water.
- At the end, the top layer of a non-spillable wooden floor is installed.
Wooden pouring floor in the washing area of the bathhouse

Regardless of the type of foundation (strip, pile, column, etc.), a poured wooden floor can be installed with your own hands. This design is completely simple and does not require special construction and repair skills. First, a concrete base is created, onto which logs are attached to hold the plank subfloor. The boards are laid at a distance of 6-8 mm for unhindered flow of water into the receiver. From the water intake into the underground, all the water goes down the pipe into the sewer.
In most cases, poured floors are removable. At the end of the procedures, the structure is removed and taken out to dry. And since this type of floor is completely impossible to insulate, it is used only for those baths that are used exclusively in the warm season.
One more significant drawback of such floors can be identified: the top flooring quickly loses operational properties, since protection from moisture does not apply to it. Thus, the wooden floor has to be replaced hour by hour. It is equally important to avoid the formation of drafts through the pouring floor. To do this, the underground and drain must be organized in the correct way.
Arrangement of poured wooden floors is carried out as follows:
- First, determine the type of soil under the washing compartment. If the ground is loose, dig a hole no deeper than 0.5 m.
- The bottom and edges of the pit are compacted tightly and filled with a mixture of fine crushed stone, sand and gravel. The thickness of the layer should exceed 2-3 cm. Thus, a filter for waste water is organized.
- For clayey and swampy soil, a hydraulic structure for a drainage system is created: they dig under the washing pit, from which a pipe is laid towards the sewer at a slope to drain water.
- The next step is to install the logs onto which the wooden plank structure is attached.
During operation, such a device is periodically cleaned and treated with an antiseptic to eliminate blockages and musty odors. For the same purpose, a siphon sewer device is installed.
Protecting the floor in the washing bath from water and dampness

A bathhouse is a zone for which moisture, steam and dampness are completely natural things. Therefore, waterproofing in such a room is very necessary and important. Thermal insulation materials lay only on a layer of waterproofing. This time they will be able to last longer.
In addition, special antiseptic treatment with various protective agents is required. Otherwise, the floors will forever become susceptible to fungal infections, especially if they are made of wood. Any underground space, partitions, boards, logs must certainly be treated with a reliable antiseptic and moisture-repellent composition, which can be easily found in any building materials store. Ideally, the treatment procedure should be carried out at least 2-3 times after several hours.
If, for certain reasons, at the stage of construction and arrangement of the bathhouse, the treatment and installation of waterproofing was not carried out, you can take a number of actions that will help prevent disastrous destruction caused by dampness and moisture:
- Any wooden components of the floors must be carefully dismantled and left in the sun until completely dry.
- Then all areas that have rotted should be cut off, and nearby areas should be cleaned.
- Afterwards, you need to treat all elements with antiseptic agents and dry them again.
- At the end, it is worth covering each board with wax or water-repellent and installing them in their places.
Mistakes when arranging the floor for the washing compartment in the bathhouse

When arranging the floor in the washing department of a bathhouse, you should not overlook any shortcomings or oversights. Subsequently, they will lead to the need for dismantling and alterations. If the recommendations are not followed, novice craftsmen risk making a number of mistakes.
Some of them are more common than others:
- It is unacceptable to skimp on insulating materials. It is not recommended to lay too thin a layer of thermal insulation or replace the vapor barrier membrane film with ordinary polyethylene film.
- We must not forget about the extremely important vapor barrier layer. There is no way to do without it.
- Finishing floors with washable smooth tiles is unacceptable. Such material in company with high humidity may cause unwanted falls.
- The use of any plastic components in the installation and finishing of washroom floors is prohibited.
- The lack of a ventilation system is a big unacceptable mistake that entails negative consequences for the entire room.
Be that as it may, everyone can make mistakes, especially in such a complex and labor-intensive process. The main thing is to recognize and correct them in time. This way the floor in the washing room will be reliable, durable, durable and safe.