An arched vault gives the room elegance, looks modern and stylish - they are classified depending on the shape, material, style.
Material

Style

Form

Interior arches are used to create the effect of a seamless space - this is a current trend modern design interior
note! Arched vaults are used in small apartments: they visually make the room more spacious and freer.
The most popular are plasterboard arches:

- The material allows you to realize any, even complex and asymmetrical, shape.
- Drywall can be handled by a person who does not have a narrow knowledge of construction - the material is easy to process.
- Drywall does not create additional load on the structure of the house.
- Such an arch can be decorated with all kinds of decorative elements: shelves, niches, spotlights.
- Drywall is an environmentally friendly, safe material. You can even use it in children's rooms.
- Compared to other materials for installing arches, plasterboard is the most affordable.
Attention ! To install an arched vault, you need to buy special drywall. It is distinguished by its smaller thickness, the presence of special reinforcing fibers, and high quality. For ease of installation, it is recommended to buy ready-made sets of arched frames. Lighting must be done at the stage of frame installation.
Stages of installation of arched plasterboard vaults

A popular design option for a doorway is an imitation arch. This design option can be used in the case of a high doorway. Pseudo-segments of the structure are attached to the edges of the opening and in the corners. The imitation is suitable for oriental-style rooms.

note! A common way to decorate arched openings is polyurethane stucco. An interior in classic, baroque, and empire styles will be decorated with such stylish decorative elements. The stucco molding is attached using special glue. The polyurethane decor is made in the form of overhead strips - moldings, protruding parts - sandriks, artificial columns.
The choice of arch option for a doorway depends on:
- Doorway parameters;
- Ceiling heights;
- The style in which the room is made.
In the field of interior design, the interior arch occupies a special place. Replacing the usual doorway, it can not only attract attention, but also become the main detail of the interior. The use of a beautiful arch in design has long been not uncommon; with its help, the interior acquires elegance and nobility.
Depending on the interior design, you can choose the arch according to its shape and design. Subject to stylistic transformations in various design directions, the arch itself invariably remains the main alternative to interior doors. With the help of an arch, openings are made not only in living rooms, but also in office and many other premises.

photos
Types and forms
Let's consider the types of interior arches:
- Classic. The classic opening is a semicircle, the radius of which is equal to 1/2 of its width. This form is the embodiment of strict elegance and purity of lines. The construction of this arch is possible only in a room with ceilings of 3 meters and above.
There is a version that the semicircle is a distinctive feature of the oriental and antique style, capable of adding weight and significance to the interior.


- Arch portal. This is a rectangular opening without doors; it does not require additional labor during installation, but it is not suitable for every room. This form will fit perfectly into a laconic, simple interior with linear decor. The effectiveness of the result depends on the materials chosen for decoration.
One of the most spectacular examples is a portal made of wood with lighting along the arch.

- Modern. This form is something between classic and portal. The vault of the arch is less round, but far from straight; its upper part is presented in the form of a circle segment. The radius of curvature can be anything, the main requirement is that it does not exceed half the width of the portal itself.
Modern is suitable for decorating openings in rooms with low ceilings, for example, in apartments of standard high-rise buildings. The design gives the room an elegant, discreet look.


- Ellipse. This shape differs from the previous one only in the larger radius of rounding the corners. The elliptical model is the most versatile; it fits perfectly into absolutely any interior design and is appropriate for any ceiling height. The height and shape of the bend depends only on your wishes and the initial data of the room. Also, the elliptical arch is ideal in combination with columns.
- Romance. The romantic design is rectangular arch, rounded at the edges. It is ideal for decorating wide openings, as well as rooms with low ceilings. This form will look equally impressive both in a small, modest room and in a spacious one, made in a palace style.


- Trapezoid. A very non-standard solution for designing a doorway in the form of a trapezoidal arch is guaranteed to add exoticism to your room. Proper presentation with the help of correctly selected interior items, harmoniously combined with the shape and material of the arch, will arouse genuine interest and delight. This arch is simple to make and no less impressive than rounded openings.


- Half-arch. A semi-arch is an example of asymmetrical openings that combine 2 forms at the same time. For example, it could be a portal and romance, a portal and classic, a portal and an ellipse. The design of this shape is based on a quarter circle. Asymmetry will help hide errors in calculations if they arose during installation.
In addition, the non-standard shape will decorate the doorway, add sophistication to the room and allow you to bring any original idea to life.


- Copyright. Thanks to a wide range of finishing materials, the arch can be made of absolutely any shape and bend. This is a solution for those who want to make their home unique and inimitable.
Non-standard arches can have broken lines, combine several styles at the same time, and be supplemented with windows, lighting and other details.


- Construction features. When building a private house, arched openings are designed and built initially, whereas in apartment buildings the presence of arches is the exception rather than the rule. It should be remembered that the arch is a curved ceiling between the supports and has a functional meaning: it carries the load of the wall.
When remodeling an apartment with the introduction of arches, their location is absolutely appropriate in interior walls, if they are not load-bearing.


- Arches in load-bearing walls. Right above door frame there is a lintel, if the wall is load-bearing, then you cannot remove the lintel, this can lead to unpredictable consequences. In a load-bearing wall, the arch can only be the height and width of the doorway. In this case, the height of the opening cannot be increased, you can only expand it.
- Arches in panel house. The same applies to using an arch instead of a door in a panel house. Doorways in the panels are recesses made in advance according to GOST and it is not recommended to violate the integrity of the panel.
In these two cases, romantic-style arches with a small radius of rounding corners, ellipsoidal or portal are made.


- Arched opening in a solid wall. Converting a doorway into an arch is not difficult, but punching a passage in a solid wall where there has never been one is a very labor-intensive process. It is much easier to remove the partition wall completely and build a new one with an opening.

The structure of the arch and its design
The device directly depends on what tasks this design will perform:
Zoning of premises when dividing rooms
An interior arch is an elegant and stylish solution for open-plan zoning. It divides the home into functional zones and is used if there is a need to visually divide the space. Arches, custom-made or ready-made, are designed to mark the boundaries of two or more zones, but not to separate them, but to visually unite them, thereby expanding the space.


Some rooms can do just fine without classic doors and will only benefit if they are replaced with an arched opening. Usually this is the kitchen and dining room, dining room and living room, living room and hallway, bedroom and living room. When they are combined, the space expands and the feeling of enclosure goes away.

A bright accent in the overall design of the space
If you are the owner of a strict and laconic interior in classic style or, on the contrary, you have furnished your home in the Empire style, but you are missing an unusual detail that can attract all the attention and amaze with luxury; an arch will help with this.
It should be rich, decorated with elegant stucco with floral patterns running in an arc. If the arch is high and classic, it is better to order full-fledged columns of the Corinthian order, the most luxurious and majestic. The Corinthian column is decorated with carved flutes along its height. Its elegant capital with carved grape leaves and curls will become the most significant element in the interior.


For arches of a lower profile, romantic, elliptical, modern and even semi-arched, columns of the simplest and most devoid of frills Doric order will be a good choice. Its discreet architecture will nevertheless create an antique accent in the room.
Wanting to give the opening the main role in the decoration of the rooms, it is highlighted due to the contrast of color or material, decorating it with colored mosaics and enamel.

Elimination of defects during construction
If your room has unattractive ceiling beams or ventilation pipes, they can be sheathed with plasterboard and an arch of a non-standard shape can be completed. In addition, in old houses it is often necessary to mask uneven ceilings and walls.
By hiding construction defects under the arch, you will not only eliminate the imperfections of your interior, but also with the help of non-standard beautiful design give it a new sound.


Utilitarian purpose
If the arch is installed in load-bearing wall, its panels are quite wide, they have recesses in them, which are used as bookshelves, as well as niches for decoration. In round arches with great depth, recesses are made, poufs are installed and seating areas are organized.
A group of through windows is often built next to the arch itself, which increases the passage of light between rooms. The windows can be decorated with stained glass motifs or be through and serve as shelves for souvenirs and decorations.


Dimensions
The parameters of the arches directly depend on the architectural specifics of the room. The width is limited by the preference of the owner, the height is determined only by the ceiling level. In a room with a height of 2.5-3.2 m, an arch with dimensions of up to 2.2-2.6 m, respectively, will fit perfectly. However, these numbers are relative. There is no point in adjusting the vault of the arch to the very ceiling, it will ruin the whole look.
A small opening in a large, wide wall will create dissonance, so it is important to carefully measure the room and calculate the parameters of the future arch. It should fit organically into the interior.


Materials
The following materials are used in the manufacture of arched structures:
- Brick. To make a brick arch, you need to mount a frame from reinforcement, drill holes in the wall and drive in metal pins and weld the frame to them. The whole process is very labor-intensive and the resulting structure is heavy, which is why the “brick” finish, made from various types artificial facing stone.


- Drywall. This material is universal and pliable for the construction of rounded arches. The construction of any interior solutions from plasterboard is quick and easy to implement. The weight of such structures is small and will not put additional load on the wall. Moreover, this good decision For one-room apartments, in which there is not enough space to install doors.


- Tree. Often, when choosing a material for decorating an arched opening, they choose wood. Designs made from this noble material will add status to your interior. Openings built from wood are very beautiful and durable.
Arches made of solid oak are a luxurious pleasure that you can easily make with your own hands, with minimal skill in working with this wonderful material.


- Laminated MDF. This material has rightfully become widespread and has received consumer recognition due to its low cost, variety of textures and colors, and attractive appearance. Also, laminated MDF is very practical and versatile. You can use it to assemble complex designs, as well as order standard models. In addition, the ability to order products of non-standard sizes and configurations makes this material especially attractive.
- Veneered MDF and eco-veneer. An MDF veneered arch looks stylish and expensive, as the material most accurately conveys the texture and shades of solid wood. It is made of MDF board and lined with oak veneer. Possible shades: wenge, bleached oak, walnut, oak with patina, ivory color. Eco-veneer arches are also beautiful in appearance and have high performance qualities.


- Polyurethane. Polyurethane is an elastic polymer that is widely used in finishing and construction. Possessing high strength and resistance to external influences, it is durable, and most importantly, has a very low cost. This polymer makes it possible to make products from it with the maximum complexity of details, and in decorating arches it successfully replaces gypsum.


- Plastic. Plastic products are very popular and allow you to replicate non-standard arch shapes that cannot be made from wood without great expense. Plastic panels have not only a decorative function, but also a functional one. They protect the edges of the opening from damage and are moisture-resistant, durable and fire-resistant. Plastic, unlike other finishing materials, melts and does not burn.
- Tile. A simple arched opening of a classical shape without any details, lined with tiles, is very impressive. Particularly impressive are tiles that imitate the surface and texture of stone. Its advantages: low cost, wide range of colors, moisture resistance and durability.


These are not all possible materials for making and decorating arches, but they are the most common and effective.
How to make an arch with your own hands?
To make an arch with your own hands, you need to have basic skills in working with building materials, choose easy-to-install material and get competent instructions. Let's look at a simple and easy-to-use way to build an arch in your home.

Drywall arch
We will need:
- Drywall of 2 types. For walls with a thickness of 12 mm and for the arch arch - 6 mm.
- Profile for racks 60x27 mm, and for the contour of the arch 28x27 mm.
- Self-tapping screws and screwdriver.
- Fiberglass mesh.
- Putty.


Stages of work:
- First you need to measure the opening into which the arch will be built. Standard height doors are 2 m, to build an arch we need to raise the height of the arch to 2.5 m by removing part of the wall above the opening.
- Many types of arches significantly reduce the opening, so in some cases it needs to be slightly widened. We select in advance the shape of the arch that will organically fit into the parameters of the room.
- To do this, we attach paper above the door, on which we outline the height and bend of the arch. If the width is more than 120 cm, it would be better to make a slight bend, choosing the modern shape, with its small radius of curvature. If the width of the opening is larger, then it would be more correct to choose a romantic shape; it does not require raising the height and rounding its corners will be enough to design an arched opening.


- Having measured the parameters of the opening and calculated the length of the radius, using a compass we draw a semicircle on the drywall and cut it out with a jigsaw.
- Then we build a frame from timber or metal profile.
- We assemble a rectangular opening from a rack profile.
- We cover the structure with plasterboard with a cut out circle using self-tapping screws, slightly recessing their heads into the surface.
- We make cuts on the walls of the arched profile with metal scissors every 3 cm. Then we fasten the profile along the arch arch with self-tapping screws, bending it in the shape of a semicircle. This needs to be done from both ends.


- Next, we make the lintels of the vault. We measure the depth of the arch and subtract 1.5-2 cm. This will be the length of the jumpers.
- We cut them from the profile and put them on self-tapping screws. Jumpers are necessary for the strength and stability of the structure.
- From thin drywall you need to cut out a part that will cover the vault from below. This is a rectangle, the width of which is the length from one edge of the end to the other, that is, the depth of the arch.
- We measure the length using a tape measure or sewing measuring tape, from one lower point of the arch to the other.
- We also attach the resulting sheet to self-tapping screws.

The topic of this article is the manufacture of arched doors, their installation and the intricacies of these processes. We will talk about the types of doors with arches, note their varieties and the features of each type. We will also give recommendations on self-production entrance door in the form of an arch made of solid wood.
Today, arched openings of various shapes and styles are used in the construction and decoration of most premises. They are used as entrance and interior doors.
From the whole variety of doorways in the form of arches (see), the following classification can be made:
- Semicircular arches. They are the most common and are also divided into subtypes:
- Classic (semicircular) - they have a smooth radial shape.
- Ellipsoidal - made in the shape of an elongated oval.
- Modern - have intricate shapes with various protrusions.
- Romantic - shaped more like a rectangle, with the upper edges slightly rounded.
- Horseshoe arches. They are shaped like a horseshoe. They can have not only a smooth semicircle, but also an elongated, pointed top. Most often, openings of this type are used to decorate premises in national styles.
- Gothic (pointed) arches. These structures have an elongated, pointed shape, without smooth transitions.
What types of arched doors are there?
Arched doors have many varieties and are classified according to various factors: installation location, material of manufacture, design features
Types of arched doors at installation site
There are two main categories here:
- Arched interior doors- located inside residential and other types of premises. Most often they are made of wood and have glazing. Stained glass compositions are often used for glazing such structures (see).
- Entrance doors in the form of arches- mainly used in entrance groups ah establishments: shops, organizations, shopping and entertainment centers. Made from plastic profile.
What are arched doors made of?
Due to the complexity of manufacturing this type of door leaf, the variety of material for their production is not very abundant:
- Plastic. This material is used for the production of profiles, from which not only entrance doors, but also windows.
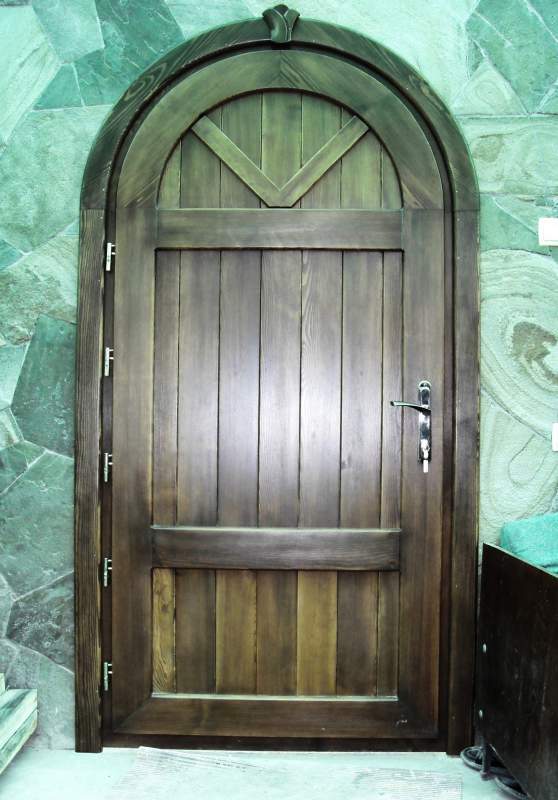
- Solid wood. Wooden door leaves in the shape of arches are used for entrance areas in the private sector, as well as inside any type of premises.
Structural features of arched doors
Based on operating features, installation complexity and cost finished product The following arched door structures can be distinguished:
- Canvases that repeat the contours of the opening one to one. The peculiarity of such doors is that their production takes a long time. They stand quite high. Such models are made from wood (see), since they are arched plastic doors made using a different technology.
- Standard canvases with an arched part fixed above them. Such doors are somewhat cheaper, since their arched part is mounted separately and does not open together with the door leaf. It also becomes possible to use not only hinged, but also sliding versions of the canvases.
Important! The opening height for such doors should be large enough. It is calculated by the formula: Vpr = 210 cm + half the width of the opening.
- Single doors. They are usually used as interior spaces, as well as input options for private homes and public spaces.
- Double doors. For wide openings it is advisable to use two sashes. One of them can be fixed in the opening using a latch. Relevant for entrance groups. In this case, more often than not, the “working” part of the door is 2 times wider than the fixed part.
Making an arched door yourself
Despite the difficulty of making such canvases, it is possible. Now you can see for yourself. You and I will learn how to make wooden arched entrance doors.
It is better to order the box part according to your dimensions, and we will make the canvas with our own hands (see).
We prepare everything you need
First you need to prepare tools, boards and available materials.
We will need:
- Jigsaw with wood saws.
- Electric milling machine with two types of cutters: disk (for grooves) and cylindrical.
- Sanding machine with sandpaper of different grain sizes. The best one is tape.
- Boards, 5 centimeters thick.
- Wooden wedges.
- Two small blocks and 4 wood screws. The length of the screws should be 30mm greater than the thickness of the bars.
- Carpenter's waterproof glue. PVA is possible.
Making a blank for the arched part of the canvas
To make the arched part of the door leaf, we first need to measure the final width of the opening. That is, from the total width we subtract the thickness of the “box” part and a 2mm gap between the door and the opening (frame).

After this we do the following work:
- In order for the arch to turn out beautiful, its radius must be made equal to half the width of the doorway. Based on the width of the prepared boards, we calculate how many pieces will be needed. The boards will be positioned horizontally.
Important! Before you do arched door you need to choose well-dried boards. Since if they are damp, the canvas will warp over time.
- Now, using an electric router, we make grooves for a tighter connection. To do this, we take a disk-slot cutter. We make the grooves in such a way that the protruding part is about half the thickness of the board. That is, 2.5 millimeters. The same goes for the internal groove.
- Next, we clean the entire surface of the grooves from dust and apply wood glue to them. After this, we connect all the boards and leave them to dry.
Important! In order for gluing to occur better, you need to take a board and attach pre-prepared bars to it with self-tapping screws. The distance between the bars should be 10–20 mm greater than the width of the glued workpiece. Place the workpiece between the bars and spread it apart with wedges.
Cut out a semicircle from the blank
For this operation, we recall the experience of installing plasterboard arches.
We use one of two options to outline the arched shape:
- If the arch has an even semicircle. Mark the middle at the bottom of the workpiece. Then we take a pencil and tie a non-stringent thread to it. Cut the thread exactly to the length of the arch radius. Apply one end of the thread to the mark and draw a semicircle with a pencil.
- If the shape of the arch (as in the photo) has an elongated semicircular or pointed shape, then we use a different method. To outline the boundaries of the bend contour it is very convenient to use a long metal ruler. We also make a mark for the middle and draw a line from it strictly vertically to the length of the radius of the arch. Next, we place the ruler on the edge and bend it so that one edge touches the radius mark, and the other coincides with the edge of the workpiece. After this, draw a line with a pencil. On the second side we follow the same steps.
Important! Make sure you get a symmetrical arched neckline.

Next, take a jigsaw and carefully cut the workpiece according to the markings. After that we take grinding machine with the coarsest sandpaper and process the surface of our arched part of the door on both sides. After this, we repeat grinding with a finer abrasive.
Now the most beautiful part of our door is ready. Arched interior doors can be decorated with the same elements. However, it is worth considering that for interior spaces glazed arches will be more elegant. And their manufacture requires carpentry skills.
Finishing the door leaf
Now we have to make the rest of the door. It will be assembled according to the same principle as the previous part. The only difference will be that the boards will not be positioned horizontally, but vertically.
You should also provide a horizontal part at the very bottom of the canvas. This will help extend the life of the door.
As a result, our door leaf will consist of 3 parts:
- Horizontal bottom cross member.
- Shield made of vertical boards.
- Upper cross member. It is also the arched part.
After all 3 parts of the door are ready, we connect them using the tenon method. To do this, we use a milling cutter to perform the appropriate operations and place all 3 parts on glue. Don't forget to support the canvas with wedges.
The final stage is treating the entire surface of the door with a protective agent and finishing coat. Pinotex or any other wood protection is suitable for this.
If the door will always be on the sunny side, it is not recommended to cover it with laminating coatings. In this case, it is better to use ordinary colorless varnish for exterior use.
Often the interior passage in an apartment is not closed with a door, but left open. This allows you to elegantly unite the space and make the interior design of the rooms more elegant. To do this, you can purchase a ready-made structure from assembled elements or cut out individual parts with your own hands and then assemble everything in the doorway. But how to make an arch yourself so that it looks smooth and beautiful? After all, there are a lot of materials and technologies for installation; you need to choose wisely.
Designer arch
What arches can be installed in an apartment?
Installation of the arched structure on site interior door can be done without the involvement of professional builders. You just need to choose the type of arch and materials for its manufacture. Following the step-by-step instructions below will help you avoid mistakes and make an arch with your own hands.

Arch curves can be the most bizarre
Design features and significant differences
In construction, arched structures are supports for overlying elements of walls and structures. But in apartments, doorways to the corridor and between rooms are not load-bearing. In the first case, construction materials are selected based on serious external loads, and in the second they must withstand only their own weight along with the finishing.
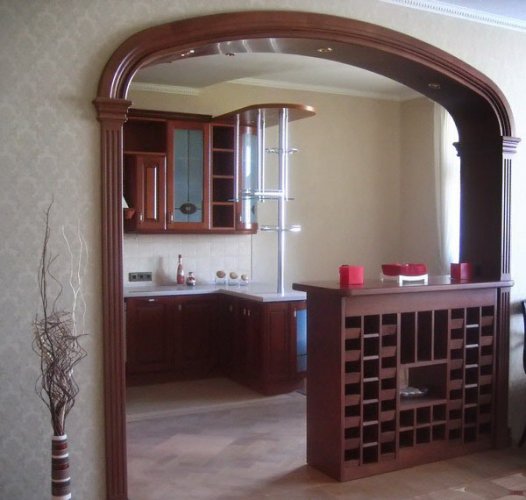
Arch with bar counter
An apartment door arch, installed instead of a door, is an element of interior design. Its frame can be made from a lightweight profile for gypsum boards or bars with a cross-section of 20–30 mm. This design can easily withstand the weight of finishing materials. You just need to firmly fix it on the walls so that the decor doesn’t warp or fall off after a couple of weeks.
Reference! In private houses and city apartments, an open door arch between rooms serves exclusively decorative functions. Bearing loads in this case are placed on concrete walls on the side or a lintel above the opening.

Finished plastic arch
Shapes of arched openings and their capabilities
There are many options for arranging interior arches in shape:
- "Classic".
- "Romance".
- "Modern".
- "Ellipse".
- "Trapezoid".
- "Portal".

The most popular types of interior arches
The first option at the top has the shape of a regular semicircle, and the last one has strict rectangular outlines throughout its entire height. The rest are intermediate versions between them. But other variations are also possible with one side “support” or two curved posts.
The shape of the door arch and its design are chosen to match the design style of the room. This takes into account the height of the ceiling, the size of the opening and the features of the premises on both sides. They will look perfect in some homes classic shapes with a regular bend in the form of a semicircle, and in others - a rectangular portal. This is more a matter of the taste of the home owners and the general style of interior decor. Some people even prefer cone-shaped contours.

- It is recommended to choose the classic option only for high ceilings in the region of 3 meters and above.
- In typical panel high-rise buildings, it is better to design the entrance to the kitchen with a “MODERN” arch.
- For a wide doorway from the hall to the corridor, “ROMANTIC” with large wide racks is more suitable.
- The rectangular “PORTAL” looks best in an interior where clear horizontal and vertical lines predominate in the decoration. This type of doorway design is ideal for houses made of timber or logs. In such a home, its rectangular corners will look elegant and fit the theme as much as possible.

Classic in the interior
What to build a designer doorway from with your own hands
To quickly make an arch in the doorway of an apartment, it is enough to purchase a set of prefabricated elements made of plastic or laminated chipboard lumber. They must be cut to the desired height and then secured in the places specified according to the instructions. But such options are standard and quite expensive. Plus - not every opening can be fitted with a ready-made model with the right sizes.

Components of an interior arched system
To make panels of arched posts and arches you will need one of the following materials:
- drywall;
- plywood;
Advice! It is better to choose plasterboard sheets for covering the frame. GCR can be further finished with more various materials. However thin plywood much easier to bend.

Finished veneered arch
The frame for an interior arch can be made:
- from a metal profile;
- from wooden blocks 20x20 and 30x30 mm.

Brick decoration is ideal for connecting a balcony
You can also make an arch instead of a door from concrete, brick or aerated concrete blocks, and only then decorate them with one or another finishing material. But these options are more for those who like capitalism and solidity. Plus, they weigh a lot; it is impossible to build anything from them in the apartments of old apartment buildings.
The use of metal is limited not only by its weight, but also by its high cost. Manufacturing metal structures of complex shapes at home is a very difficult project to implement in practice. The easiest way to do it yourself is to work with drywall and its profile.
Step-by-step instructions for self-installation
The photos and recommendations below will allow even a novice master to cope with the improvement of a doorway. To do this, you first need to create a frame, and then sheathe it and decorate it. You can do everything yourself, you just need to do everything consistently and without mistakes.

Scheme of a plasterboard arch
Preparing the doorway
- First, the leaf and frame of the existing door (if it exists and is in place) are dismantled.
- Then the opening is expanded to the planned dimensions.
- There is no need to plaster the cut walls under the frame; they will still be covered with sheathing. It is enough to straighten them and remove everything that can fall off (plaster, pieces of concrete, falling bricks). The main thing is that the supporting profile can be secured securely and in a strictly vertical position without tilting.
- If you are planning a backlit design, then you need to install the wiring in advance.
- Measurements are always taken at several points in the opening so as not to miscalculate the dimensions.
- If the walls are uneven, then the thickness of the racks (depth of the arch) is selected according to the thickest point.
- To simplify marking and cutting sheet material To cover the arched frame, you need to make a life-size template from cardboard. This will allow you to avoid mistakes and preview how the contours of the structure being formed will look.
Important point! The upper part of the arch takes about 10–15 cm away from the height of the doorway. At least 20 cm should remain from it to the ceiling. When calculating and marking, these numbers must be taken into account.

Fastening the guides
Creating a load-bearing frame
- To make a frame for an arch, you first need to create a main contour from a profile around the perimeter of the opening, fixing it to the walls.
- Then the top curved part will be attached to it frame system. Sometimes only a curved element is made on top, but this is only possible with perfectly smooth slopes.
- Vertical guides in the doorway are attached with an indentation from the plane of the interior wall by the thickness of the plasterboard sheet plus 2 mm for subsequent plaster on top of it.
- After plastering you should get a single Smooth surface.
- On each side and at the top of the arch being created, you will need to secure two such profiles parallel to each other.
Advice! If the walls are made of wood, then self-tapping screws are sufficient to attach the guides, but in the case of concrete or brick, dowel screws will be required. The spacing between fasteners should not exceed 30 cm.


If the columns of the arch are made of small thickness, then two arches can be easily replaced with a wide profile. All cutting and bending manipulations in this case are carried out according to a similar pattern. However, transverse installation will no longer be necessary. When using wooden blocks instead of a profile, the frame for the arch is made using a similar technology. Only the original carrier material changes frame structure.

Two ways to bend plasterboard sheet
Rough sheathing of the frame
After completing the assembly of the arch frame, all that remains is to mount the gypsum board or wood board on it. To give plywood or fiberboard the desired shape, they will have to be pre-moistened, fixed on a template and steamed with a hot iron.
Ideally, you need to use special arched plasterboard, reinforced on both sides with non-woven fiberglass. It is enough to stretch it in the longitudinal direction and give it the required form.
Bend regular plasterboard sheet There are two ways: wet and dry.
- Wet technology involves soaking the back side of the plasterboard with water and gradually bending it onto a template of the required shape and fixing it on it. This process is lengthy; haste can lead to rupture of the cardboard layer of the sheet. And the resulting part can be installed and secured with self-tapping screws on the arch frame only after the plaster has completely dried.
Advice! It is possible to speed up the process of moistening gypsum board to give it elasticity using a needle roller.
- The dry method involves making parallel cuts on one side of the sheet, which affect the plaster and the upper outer layer of cardboard. But the front cardboard layer remains intact. The bend is smooth and of the correct shape.

Installation of the main element of the arch
Cutting sheet material is best done with a jigsaw. When using a hacksaw, the cutting edges will certainly be less even. The sheathing is fastened with self-tapping screws in increments of 5–6 cm. After fixing it, the edges of the plasterboard and plywood sheets. And then a special plastic corner with perforation is attached to the curved edge to protect it from chips.

GKL fastening
Putty for perfect surface leveling
The next stage of finishing a plasterboard arch is primer and putty. After applying the first one, you need to wait until it dries. And fiberglass mesh is used to reinforce the second layer. The corners are also reinforced and leveled using a mesh.

The edges must be smooth

Surface putty

Putty joint with wall

Mesh reinforcement

Edge reinforcement with mesh
Next, apply the third finishing layer. The putty, hardened after 10-2 hours, is sanded sandpaper to remove excess and make the surface as smooth as possible. There should be no protruding screw heads or dents left on it.

This is what the arch should look like
Decoration of the structure and design techniques
You can finally decorate the arch in the apartment with your own hands and make it beautiful:
- painting in color with the walls;
- wood paneling or plastic panels;
- wallpapering or veneering;
- finishing with decorative stone on a gypsum base;
- decoration with mosaics and mirrors;
- decorating using stucco or ready-made columns.

Simple finish with backlight
Materials in finishing Interior arches are used both natural and artificial. The choice here depends on the overall design idea for the interior design of the apartment. To improve the doorway, you can use polyurethane stucco molding and even textiles. All options are acceptable, the main thing is that they are in harmony with the surrounding decor.

Shelves in the design of an arched passage to the corridor
Framing columns made of clinker or decorative stone looks original and stylish. Manual installation will require time and diligence, but the result will certainly please the master. The uniqueness of the apartment in a similar way decoration guaranteed.

Decor artificial stone
Arch finishing natural wood will bring solidity and grace to the house, and the mosaic pattern invented by the owners will make the decor unique. The main thing is not to overdo it with the design, making the design a tasteless heap of elements. different styles. All interior details should be in harmony with each other and complement each other.

Stucco columns in arched doorway with wide walls
Often conventionally painted white or Brown color It’s quite enough to complete the design, making the arch with your own hands beautiful and elegant. However, some require built-in lighting and additional decorative elements in accordance with the style chosen for the apartment. It will take more time to finish the arched opening, but it will be worth it.

Decor with corner and wallpaper
Install and design yourself interior arch instead of a door it's easy. For work, it is enough to have metal scissors, a screwdriver and a hacksaw in the house. But if you have no experience in handling these tools, it is better to trust professional installers.
The arch is considered one of the key architectural forms. Moreover, despite their long history, vaulted structures remain more of a decoration and are not found in homes as often as before. Rounded openings have always been theirs characteristic feature, and now the diversity is limited only by technological capabilities. Nowadays, the use of round elements is relevant for tall bulky doors, gates, entrance areas, and transitions between rooms. The shape of the vault is also typical for the windows of public buildings and houses with improved layouts. In general, there is a trend towards more frequent use of arches elsewhere. At the same time, they become less and less elegant. Designers continue to introduce the arch design into the doorway. Vaults without doors have their own strengths, A practical designs With door leaves not only comfortable, but also retain an attractive pattern.
Arch - origin and history
The oldest ruins with arches are about 4 thousand years old. Thus, the date of appearance of vaulted structures is considered to be the beginning of the 2nd millennium BC. e. The impetus for the development of architecture was given by technology Ancient Egypt and Mesopotamia. The peoples of these very civilizations built the first arches from bricks. They knew how to build not only open, but also more complex closed structures. The techniques were mastered by other states, including Greece and Rome. Architecture that has survived to this day Ancient Greece and its colonies are represented by countless buildings. When Roman times arrived, much was destroyed, but new structures also appeared. The peak of development of ancient architecture occurred precisely during the period of the Roman Empire. Arches were erected everywhere, and the engineering complexity of the structures increased significantly. The environment for the development of architecture was Gothic and Renaissance architecture.
Features of rooms with arches
Rooms with arches are often left without doors, but given the practical inconvenience of such a layout, residents have to use alternatives. In places with high traffic, structures with an empty door are designed, and doors are installed for private rooms. In large houses, the arches of the guest rooms are decorated with curtains. The side racks are made of improved materials, ideally from rounded logs. A simple, flat box doesn’t look the best. The vaults are made more decorative against the background of other elements. All these features do not apply to the arched entrances to the kitchen or the passages in the Brezhnevka corridors. They can be simple and fit harmoniously into the decor. At the same time, the vast majority of structures are characterized by the absence of a threshold, although theoretically it can even improve the appearance of the arch. Vaulted openings can be active, that is, connecting several rooms, and passive, opening views of several rooms at once.
Advantages and disadvantages of arched structures in a doorway
An arched span in a wall is primarily a decorative technique. Moreover, the very idea of design is often developed, and instead of an arch, housing gets something else, for example, doors with a blank glass transom. In addition to aesthetic advantages, the increased stability of vaulted openings is noted. They crack less often, warp to a lesser extent and do not shrink. The frame of arched structures, in turn, has greater strength. Don’t forget about additional ventilation options. Additional square meters in doorways will improve ventilation during the hot season. At the same time, the disadvantages of the design are felt even at the installation stage, because the assembly technology is more complex than that of square boxes. This disadvantage is also associated with a high price. You should also understand the practical inconvenience of open arched passages in terms of sound and heat insulation, and visual accessibility of the room.
Several Yet useful qualities arches:
- zoning;
- visual expansion of space and raising of ceilings.
Types and shapes of arches
Distributed:
- Classic.
- Romance.
- Trapezoid.
- Portal.
- Modern.
- Ellipse.
- Half-arch.
Each version of the arch has its own name, most often logically related to the shape. A classic is an ordinary arch with a rectangular span and a semicircular ceiling. They blend harmoniously into the interior or exterior and make the space more perfect from a geometric and aesthetic point of view. Romance is a rectangular vault with rounded upper corners. Suitable for wide openings. The name “trapezoid” was assigned to the arches with the corresponding intrados. But a span like a portal is almost no different from a rectangular opening. Moreover, its name is the same as that of the ceiling - the latter is also called a portal. Arched structures of the “modern” type act as a transitional form between classic and portal. An ellipse is practically no different from it, having a slightly larger radius of curvature. It should also be noted that semi-arches are a small architectural form in which an arch and a straight wall are adjacent.
Round
This is the name for arches with a semicircular or rounded ceiling, as well as different variants with a pronounced “circle” pattern, and even buildings that exactly repeat this figure. Round vaults have become popular recently, as they are increasingly used in various ceremonies and processions. They are collected and decoratively decorated for events in the spirit of an “English wedding.” We are talking about a round metal structure with supports and openwork shapes that cover flower arrangements. Round arches become the backdrop for the bride and groom. However, round vaults are the same round ceiling openings that people see almost every day. Arches with a rounded entablature were widespread in Ancient Greece, Egypt and Rome. If in our time arches have portals only with inside(intradosomes), then at that time they often also had an external (extradosomes).
Rectangular
Rectangular arches are a solution to the problem of design incompatibility. They are appropriate in almost any interior, and especially in a technological and modern one, where semicircular arches may be meaningless. Straight lines will correctly complement the decor with the same smooth furniture and transitions. Portal-type structures are formed with four right angles, but the top two are sometimes slightly rounded. The platbands are made wide, with a pronounced volume, and glued lumber is suitable for this. It is also cheaper when compared to solid wood. Systems are also assembled from plasterboard. Working with these materials is carried out according to a simple scheme, and the frame turns out neat and perfectly flat. The finished passage would benefit from some decor, but again with straight lines. Among the door models, the most suitable are sliding and folding.
Forged arches are suitable for delimiting zones in a summer cottage.
Arches in the shape of an ellipse
Elliptical openings have more stylish qualities than other options - the owners will be able to emphasize their good taste. Elliptical designs are a kind of intermediate version between round vault and a portal. Elements are sometimes erected right up to the ceiling, because the larger it is, the better the appearance of the room becomes. An arched opening with an elliptical top also goes well with doors. The shape has a place in an antique setting like a castle interior or in something reminiscent of a loft with an industrial finish. There are options with shoulders, horseshoe arches and other varieties with a special surroundings. The elliptical arches are in many ways similar to the Romantic version with a flatter top and the Art Nouveau version with a pointed top. Without ellipsoidal shapes, masterpiece interiors in the Art Nouveau style - the Art Nouveau movement - would be impossible.
Trapezoidal arches
The advantage of this option is that it is easy to implement, and at the same time, this shape is more perfect than a simple rectangle. The trapezoidal passage contains a certain geometry that would not hurt to play with other lines. Elements like the shape of the ceiling, different angles, countertops and columns. In terms of decorative capabilities, trapezoids are slightly inferior to rounded versions, but much still depends on the configuration of the upper element, its size, expression and proportions. The bottom or top corners of the intrados can be rounded. The trapezoidal arch can even be converted into a more complicated version with an abstract angular pattern. Increased upper stability cross beam used in long corridors, passages and structures made of heavy building materials, and these include houses made of logs and timber.
Figured arches
When creating something like this, you should “weigh” all the points regarding the decorative component and compatibility with the design and furniture. Bold and interesting solution in reality may look out of place and strange in the sketch. This is especially true for cascade options with several slots. In practice, arches with a discreet patterned design and without additional holes have proven themselves well. Compositions are formed in studio apartments with a distinct design direction, in a retro or space style, for example. Many people try to repeat the idea in a less accentuated interior, and sometimes it doesn’t work out. And yet, adherence to simple design principles opens up opportunities for universal application. You should start by adding one, maximum two elements to the arc: an even figure or curved lines. It is better to maintain symmetry. The compositions are equally good both asymmetrical and balanced.
Figured structures are transformed with the help of stained glass windows in some segments.
Dimensions
The height is limited only by the ceiling level - there must be a margin. The parameter is also agreed upon with others doorways so as not to violate the integrity and organic nature of the design. For round and curly shapes, an exception is actually possible, since this is a prominent element. The width is selected in connection with the main idea interior decoration, her message. We are talking about the expression of interior space and openings between rooms. As for the exact parameters, the height of the top of the arch (lifting boom) should end at a level no higher than 2.9 m for a room with a height of 3.2-3.3 m and up to 2.2 m for a room with a height of 2.5 m For an ordinary arch, the ratio of height and width is considered harmonious: 2:1 or 3:1. For design ideas the indicator doesn't matter. If it was not possible to choose an individual option, then it is better to settle on the proportion of 1.6:1 - a ratio calculated back in the Middle Ages.
Materials for making arches
Apply:
- tree;
- beam;
- drywall;
- stone;
- brick.
The first arches were assembled only from stone, and this is how the famous masonry techniques appeared. Nowadays stone is used only with highly effective fastening and adhesive materials. IN last years Drywall is popular. The structure is assembled on metal carcass and are often supplemented with shelves and niches. The resulting systems are suitable for organizing built-in lighting. The low cost, combined with all this, explains the high demand among consumers. Wooden options, in turn, have advantages in terms of environmental friendliness and durability. At the same time, mold can ruin the appearance of the box. For simpler interiors, arches are assembled from lightweight materials that imitate stone, wood or anything else. The last option, brick arch, it will not be easy to assemble, and even above it appearance it will take a lot of work.
Materials for decorative finishing
On budget options install plastic corners, sometimes covered facing material, and the ends are trimmed with decorative molding. In the most expensive interior options, stucco is added. The area of the castle stone is often emphasized. They also resort to finishing with valuable rocks and minerals. For example, travertine, marble, granite, malachite and the like. In a luxurious interior, the opening and platbands must be decorated. In this sense, a win-win option would be Venetian plaster. If the design corresponds to a less “flashy” style, then you can work on the geometric component. In the Art Nouveau style, decorative strips and overlays and glass are used. A simple setting does not require any decorative ideas. It is enough just to emphasize the texture of the arch material, and decorate the space near it with flexible acrylic tiles.
Arch design and objectives
The element performs the following functions:
- Aesthetic: masking imperfections, visually expanding space, improving the interior.
- Practical: strengthening walls, storing things (shaped compositions), dividing zones, combining rooms.
Vaulted passages are usually incised and shaped. The second subtype includes options with side columns, original ceilings, additional figured holes, and a sectional structure. Intrados and racks are decorated with decorative relief. Without beautiful arches it is hard to imagine classic interior with 18th century motifs, which remains relevant for large private estates. You can use a vault to strengthen the partition or organize new passages/corridors between rooms at a convenient angle. Arched compositions become a new storage place: the surfaces of the room can be freed from excess load, for example, from unnecessary decorative items. The arch system will combine several rooms into one thoughtful composition. In large studios, these structures are used as space delimiters.
Room zoning element
The object performs the zoning function in two senses: as a way to unite space and as a separator. Apartments with a modern layout have many combined rooms and short hallways. Therefore, their space should be divided into segments for relaxation, lunch, cooking, working at the computer, and watching TV. In addition to such ideas for application, the arch will come in handy in vestibules, which are increasingly “appearing” next to living rooms. Vaulted structures easily solve the problem of inefficient use of space near doors: just remove them and make a free passage or hang curtains. Arches also regulate the level of isolation. A narrow arch in the wall gives a high indicator, and a wide one reduces it. An opening of more than half a wall will connect two rooms into one, removing the feeling of a boundary.