That's all today more people prefer to install water heated floors. If you are among this number, then, most likely, ceramic tiles were chosen as the facing material.
This material has excellent specifications. For example, tiles have a high level of thermal conductivity. Thanks to this, the heat is not retained, but quickly enters the room.
However, many are interested in the question of how to lay tiles on a warm floor. The technology is practically no different from laying on a regular floor. Moreover, laying tiles on a heated electric floor is similar to how to lay tiles on a heated water floor.
The only difference is that the water circuit is immediately hidden by the floor screed, and electric heating may be open. Therefore, the tiles are placed directly on electric heating. In this article we will tell you about the technology of this process.
Features of tile laying
Installation of tiles on a heated floor requires knowledge of some points:

- Height finishing coating must coincide with the floor level of the remaining rooms. Similar calculations are performed at the stage of pouring the screed onto the heated floor.
- Laying tiles on an electric or water-heated floor requires compliance with the thickness of the tile adhesive. Ideally, tile adhesive should have a thickness of up to 10 mm. With a larger layer, thermal energy will not be dissipated over the entire area of the laid tile, but will be concentrated directly near the pipe or cable.
- You need a special adhesive for tiles on warm floors. It must cope with sudden temperature changes. On the glue packaging, the manufacturer must indicate information about the compatibility of the mixture with heated floors.
- It is important to have a design or photograph of the installed underfloor heating circuit. If in the future you need to drill a hole in the field, the photo will help you avoid the mistake of punching a heating circuit.
- Turning on the heating when the tile adhesive is drying is prohibited. The glue should dry at natural temperature. Laying on water heating requires starting and filling the system with coolant under pressure.
- The heating circuit must be securely fixed to the floor. Pipes or cables must not extend from the base. The pipes are held well by the screed, and the wires should be securely fixed.
These are the main nuances that are taken into account when laying tiles and making a heated floor with your own hands.
Instructions for laying tiles
A set of the following tools is prepared for work:

- Level small and large.
- Crosses to form an identical seam.
- Rule.
- Three spatulas, serrated, regular and rubber.
- Yardstick.
- A device for cutting tiles.
- Chop cord.
- Drill or hammer drill.
- Bucket for mixing tile adhesive.
- Construction mixer for mixing glue.
- Pencil.
- A rag for removing adhesive from tiles.
- Construction corner.
- Masking tape.
- Tiled floor.
- Primer brush.
To lay tiles on a warm water floor, the following material is required:
- Ceramic tile.
- Special tile adhesive.
- Grout.
All work consists of several successive stages:
- Surface preparation.
- Marking.
- Primer.
- Preparation of glue.
- Laying tiles.
- Grouting joints.
The technology for laying tiles on a heated floor is no different from laying them on a regular floor. Let's consider each of the listed stages separately.
Surface preparation
Make sure that the installation work of the heated floor has come to an end. The system is working properly and has been tested/pressurized. The base for the tiles must be dry and level.

Laying tiles on a screed is much easier. To do this, try to fill it level. In this case, the tiled layer will be minimal. Any contaminants and solution build-ups are removed.
The cleaned and prepared screed is coated with a primer. The use of a deep penetration primer is recommended. After two hours, the surface is primed again for better adhesion of the tile adhesive.
Important! Don't forget to turn off the underfloor heating. Otherwise, the glue will dry out quickly and it will not hold the tiles..
Marking
Before laying the tiles on the heated floor, markings are made. It is necessary to decide on what pattern to lay it. For example, there will be a lot of trim along the diagonal. You can lay them staggered so that the vertical seams do not coincide. With normal masonry, all seams, vertical and horizontal, will coincide.

Important! The choice of installation scheme does not affect the quality of floor heating. You need to navigate based on personal preference..
Having decided on the layout scheme, markings are applied to the floor. Using a beating cord with paint, beat off the line of the first row. This guide will help you lay out all the tiles evenly. If there is a pattern, lay the coating on the floor dry. This will help you make the markings correctly.
Preparation of glue
After marking, tile adhesive is prepared. The kneading is done based on the manufacturer's recommendations. Pour water into the mixing container. Add a mixture of a given proportion to it.

If you do the opposite, the glue will form a lump that is difficult to break. The tile adhesive is mixed with a construction mixer. The finished consistency should resemble a creamy mass.
Check the quality of the glue: put the mixture on a spatula; it should not flow or fall when the spatula is tilted. The mixture should be held on the spatula.
note
After preparing the tile adhesive, allow it to rest for 15 minutes. After this time, re-mix the glue.
Without practice, the speed of laying tiles will be low. Therefore, do not mix glue in large quantities. Calculate the batch for 30 minutes of work. During this time, the glue will not dry out and a crust will not form on it.
Tile laying
- The prepared adhesive is applied with a notched trowel to the tile and base.
- The resulting grooves will give better adhesion.
- Apply the glue to the floor immediately onto 1 m2 with an even spatula in a thin layer.
- The adhesive mass is applied to the tiles with a notched trowel.
- The edges and middle are coated well.
- Place the tiles on the floor according to the markings.
- With little effort, press the tile to the floor.
- A level is required. The level measures the tiles in all positions: horizontally, vertically and diagonally.
- Lay a few more tiles nearby. You set them strictly horizontally.
- Place crosses between the tiles to form a uniform and uniform seam.
- When you press on the tile, some of the glue will come out into the seam. It must be removed immediately.
- If adhesive gets on the front side of the tile, remove it with a damp cloth.
note
A gap of up to 20 mm is left between the wall and the cladding. It is necessary as an expansion joint.

After laying the tiles and the glue has hardened, all crosses are carefully removed. Before the glue has completely set, make sure there are no remaining mixtures in the seams. Otherwise, the grout will not hold well.
When laying near walls, pipes and other elements, trimming is necessary. For cutting, a manual or automatic tile cutter is used. All cuts must be smooth and without jagged edges.
Grouting joints
A special mixture is used for grouting. It is recommended to purchase moisture-resistant grout for the floor. Fill all the seams evenly with the prepared mixture. Do not leave sagging on the front side of the cladding.

Once dry, it will be difficult to wash. After 30 minutes, wash the surface with a damp cloth and cold water. There should be no stains or other dirt on the floor.
At this point, laying tiles on the heated floor can be considered complete. This coverage:
- tolerates numerous cleaning cycles well;
- upon contact with chemicals does not change color;
- complies with established hygiene rules;
- distributes evenly thermal energy warm floor throughout the entire area.
When the lining has dried, you can turn on the heated floor. The drying period of the adhesive mixture can be determined according to the instructions on the bag from the manufacturer.
Conclusion
So, from this article you could learn how to install tiles on a heating surface. Taking into account all the tips in this article, you will be able to do the job perfectly.
We hope you received healthy food for thought. Share your experience in the comments at the end of the article. Your experience will be useful for beginning craftsmen.
Laying tiles on a heated floor - video
obplitke.ru
How to properly lay ceramic tiles on a heated floor?
Underfloor heating is becoming increasingly popular. For its finishing coating a laminate is used, parquet board or ceramic tiles. Each material has its own advantages and disadvantages. Ceramic tiles are often used to install floors in the bathroom, toilet, kitchen, and hallway. Proper laying of tiles on a heated floor is the key to its reliability and durability.
 General view of the heated floor, lined ceramic tiles
Types of floors for tiles
First of all, you need to understand what a heated floor is, what types there are, and how they are installed. This information will help you lay it out correctly.
A warm floor is a multilayer system consisting of insulation, a heating element, a load-bearing cement-sand screed and a finishing coating.
There are two types of heated floors suitable for laying ceramic tiles:
- electric;
- water.
Electric
It is worth considering the features of installing an electric heated floor under ceramic tiles. This suitable system for ceramic cladding.
There are two types of heating:
- Heating with cables. First of all, the base is inspected. If it is without obvious potholes, then the cable is laid on it. The base is leveled using a cement-sand screed. Then a layer of insulation 50-70 mm thick is laid. It is waterproofed. After this, heating elements are installed, which are filled with cement-sand screed or a ready-made mixture for heated floors. Then ceramic granite is laid on a special adhesive for underfloor heating. Such a system “eats” up to 100 mm of the room’s height.
 Electric cable for underfloor heating laid on a metal mesh
- Heating with mats. To lay them you need a flat surface. Any unevenness or sharp chip can cause damage to the wire insulation and subsequently failure of the entire system. If there are cracks or potholes on the rough foundation, they are repaired. Then the mats are installed and connected into a single system. After this, their performance is checked. At the final stage, ceramic granite is laid on a special adhesive for underfloor heating. The thickness of such a base is only 40-50 mm, which is significantly less than that of a similar system with cable heating.
Infrared mats for tiles
This is a type of electric heating. The infrared floor consists of bimetallic or carbon plates sewn into polyethylene film.
 Installation of infrared mats on heated floors
For porcelain stoneware bases, it is better to use carbon plate mats. Bimetallic – susceptible to corrosion.
First of all, the surface for laying mats is checked. All irregularities are sealed, or a leveling screed is poured. Then a layer of heat-reflecting material is laid. A fiberglass mesh with a cell size of 30x30 mm is mounted on it.
Rolls of infrared flooring 1000 mm wide are rolled out onto the finished base. The entire system is then connected to electrical circuit. Ceramic granite is laid on the finished floor using a special adhesive.
The power cable must be located directly under the tile.
Water
It has not found application in apartments. Suitable for heating large areas in private homes and public buildings.
 Installation example polypropylene pipes on a prepared base
First of all, the base is leveled. The screed is poured over the entire surface of the floor. Then a damper tape is laid, on which a layer of insulation 50-70 mm thick is mounted. The most common heat-insulating material is mineral wool or expanded polystyrene.
Pipes for hot water are mounted on the prepared base and connected to common system heating. A cement-sand screed is poured on top. You can use a ready-made self-leveling floor. At the final stage, ceramic granite is laid. Water floor heating “eats” up to 150 mm of the room’s height.
The optimal base for laying ceramic granite is an electrically heated floor. It is suitable for small living spaces, baths, toilets, hallways. The technology for tiling electric and water heated floors is the same.
Finishing heated floor with tiles
The rules for laying it on a warm floor do not differ from the rules for cladding a regular surface. The exception is the choice of tile adhesive. For heated floors, there is a special adhesive that has increased ductility. It contains thermoregulating additives.
Materials and tools
- Tile adhesive for heated floors;
- Grout for joints;
- Deep penetration soil or concrete contact;
- Comb spatula, 100-150 mm;
- Rubber spatula, 50-70 mm;
- Crosses for seams;
- Electric drill:
- Rubber hammer;
- Mixer attachment;
- Construction level, 700-1000 mm;
- Tile cutter or glass cutter;
- Mastic;
- Paint roller, 250 mm;
- Protective rubber gloves and glasses;
- Thin cord and chalk.
Calculation of material quantity
First of all, the area of the room is calculated. Then the number of boxes with tiles is determined. The area is indicated on each of them. A margin of 10% for trimming and fitting is added to the result obtained.
The volume of glue depends on the unevenness of the base and the thickness of the layer. Average consumption values per square meter are given on the packaging. The soil norm is 200-300 g/m2.
Preparation
Before laying the tiles, preparatory work is carried out. Most often, the base of a heated floor under tiles is a cement-sand screed. It is impregnated with deep penetration soil or concrete contact. Concrete heated floors are covered plastic film or impregnated with bitumen mastic.
 Application of deep penetration soil onto a cement-sand screed
The drying time for the soil is 2-3 hours. To improve adhesion, the floor can be treated 2 times.
Room layout
 Drawing guide lines for installation tiles
There are two main ways to lay tiles on a heated floor: in rows or staggered. In the first case, all horizontal and vertical seams of the rows coincide. In the second, the heated floor is laid in a checkerboard pattern. The installation method does not affect performance characteristics.
The layout of the room starts from the longest wall. Using chalk and a thin cord, the first row is beaten off. The rest of the room is marked off from it. This method is suitable for classic styling without additional patterns.
When it is necessary to lay ceramic granite with a pattern, diagonals are beaten off. This is done using rope and chalk. The intersection point is the center of the room. The whole drawing is laid out from him.
If you plan to lay out a pattern or diagonal, then first lay out the entire tile “dry”. This is done to check the calculations and the actual layout.
Laying technology
- Preparation of tile adhesive for heated floors. To knead it, use a plastic or metal bucket. The glue is prepared in two stages. At the first stage, part of the water is poured in, and the dry mixture is poured in. The components are mixed using electric drill with a nozzle for solution. On the second, the remaining water and dry mixture are added to the bucket. Everything is thoroughly mixed. The finished consistency should be slightly thicker than sour cream.
 Mixing tile adhesive in a plastic bucket using a drill
Pilot glue sets quickly. Therefore, a small volume is mixed at a time - for 30-40 minutes of work.
- The adhesive is applied either to the base or to the tiles. When applying to the base, a regular and comb spatula is used. Conventional - the mixture is leveled, comb - furrows are made for better adhesion to ceramic tiles. The size of the surface to be coated with glue at a time should not exceed 1 m2. When applying to tiles, a trowel and a comb spatula are used. The craftsman applies glue to the back side of the ceramic tile. Using a comb spatula, it is stretched over the entire surface.
- Laying. In both cases, each element is applied to the base and slightly pressed in with smooth wave-like movements. Then tap it with a rubber mallet. The action is repeated with the next element. Using a building level, the horizontalness of the surface is checked. If the tile has sagged or heaved, it is removed and the defect is corrected. Then she returns to her place. To maintain an equal distance between the tiles, crosses are inserted into them: two on each side of the tile. A gap of 10-20 mm is left between the wall and the tile. It plays the role of an expansion joint. After the glue hardens, all crosses are removed.
The setting time for tile adhesive for heated floors is 24 hours. After 72 hours, the floor can be loaded with furniture.
- Trimming and laying tiles. If possible, uneven and cut pieces are placed in corners or under furniture. To frame the areas around the pipes, use a template made of cardboard or paper. It is made for each element. The shape is then transferred to the tile and cut out. The finished pieces are placed in their place. Depending on the strength, ceramic granite is cut with a glass cutter, tile cutter or grinder with a ceramic saw blade. The grinder is used for cutting durable types of flooring, which are rarely installed at home. A tile cutter is used to cut large quantities of ceramic tiles. A glass cutter is necessary for curly trimming of small areas. However, many professional floor tile installers use a glass cutter as their main tool.
 Using a glass cutter to cut porcelain stoneware
Ceramic granite is cut only from the smooth front side.
Seam processing
They come in two types:
- Installation – between tiles. Their width varies from 1.5 to 3 mm. Less than 1.5 mm is considered seamless installation. The seams are sealed 24 hours after the installation of the flooring is completed. First of all, all the crosses are removed. Then all the seams using rubber spatula sealed with grout. The movement of the spatula is strictly along the seam.
 Sealing joints between tiles using a rubber spatula
30-40 minutes after grouting, the seams are washed with cold water.
- Perimeter - between the tiles and the wall. These are expansion joints. They're closing up silicone sealant or rubber gasket. Then they are covered with a plastic plinth.
This completes the work on laying ceramic tiles. This is a durable and reliable coating that:
- withstands hundreds of cleaning cycles;
- does not change color when exposed to chemicals;
- complies with all hygiene standards and rules;
- distributes heat evenly throughout the room;
- pleasing to the eye.
Video
Useful facts
- In Soviet times, tiles were soaked in water before laying. Nowadays, many “old school” finishers continue to perform this action, although this is no longer necessary.
- The problem with slippery tiles is solved by purchasing a special composition. It is applied to the surface and protects it for a long time. A budget option for the bathroom - this is an ordinary rubber mat.
- All modern floor tiles manufactured industrially. There is one company in the world that produces and paints ceramic granite by hand. Price square meter Such coverage is not available to the average person. Therefore, we must remember that all sellers’ assurances hardware store The exclusivity of the collection is most likely a PR stunt.
teplota.guru
Laying tiles on a heated floor (electric, water) with your own hands
Heated floors are one of the types of modern heating equipment, used, depending on the region of residence, as the main or additional means of heating residential buildings or apartments.
The so-called heated floors are divided into electric and water - according to the design of the heating circuit included in their design, mounted under the finishing of the base. IN electrical systems the circuit is made of a self-heating cable or infrared film elements, and in water ones it is a hollow tube with a coolant (water, antifreeze) circulating through it. The installation of the circuits of these types of underfloor heating is carried out using technologies that are tied to a wide range of factors - the characteristics of the base and the room, and therefore differ from each other, but upon completion of installation, the heating elements of any of these devices need protective coating and finishing.

The task of this heating system is to heat what is located on top of the circuit flooring and then maintain the temperature of its surface at a certain level, so that heat from the floor is transferred to the air in the room, and contact with the structure, previously always cold to the touch, becomes comfortable for residents. To ensure these functions, the floor cladding must be made of materials with a sufficient degree of thermal conductivity, so the best option is finishing Warm floors are covered with ceramics.
Let’s take a closer look at how to properly lay tiles on a heated floor, taking into account the most common situations and factors.
The rationale for using ceramics for cladding heated floors
Most tiles are made from materials that are less dense than concrete. The difference in density causes different coefficients of thermal expansion of the finished base and tiles, which is fraught with peeling of the cladding upon the onset and end of the heating season - during temperature surges caused by turning on or off the heating equipment. Accordingly, concentrated heating floor structure underfloor heating system causes even more significant thermal expansion of these materials. Considering these factors, the question of whether it is possible to lay ceramic tiles on a warm floor is quite logical.
The answer is clear - yes, it is possible. And that's why:
- To finish heated floors, it is advisable to use high-density (low porosity) tiles, the thermal insulating properties of which are therefore low - natural stone, porcelain tiles, brooms, monocottura. In terms of density, these materials are close to concrete floor slabs, so the difference in the magnitude of their thermal expansion is insignificant.
- The efficiency of heating a room with a heated floor system is achieved due to the large heat transfer area, so the temperature of the heating elements used in them is low. Accordingly, the magnitude of temperature expansion of materials in contact with each other is insignificant and, what is important, there is no danger of burns.
- The elasticity of modern tile adhesives and grouts allows them to maintain solidity even with significant deformations of the glued surfaces and thereby prevent the tile cladding from peeling off from the base.
Thus, laying tiles on a warm electric floor or a water-heated base is a completely reasonable and justified decision.
Installation of ceramics on a warm floor
The technology for laying tiles on a heated floor is selected depending on how the heating elements were installed - “wet” or “dry”.
With the “wet” method, a screed of cement-sand mortar is made over a heating circuit, water or electric. The question of how to lay tiles on a heated floor, in this case, is solved in the same way as tiling a floor surface without heating.

There are several “dry” methods for installing heated floors. Here are the most common ones:
- Special mats with grooves for the heating circuit are placed on the supporting base. After installing the tubes or cables into the grooves, a GVP (gypsum fiber board), DSP (cement particle board) or multilayer plywood with hydrophobic impregnation is laid on top of the mats, on which ceramics are placed.
- A layer of fine granular filler with good thermal conductivity (slag) is placed on top of the heating circuit, which is also covered with GVP or DSP.
- Using a milling cutter, grooves are cut out in wooden floorboards to accommodate the heating circuit, after installation of which it is also necessary to lay pressed structure slabs on the floor.

In the listed “dry” methods of installing heated floors, the material for arranging the heating circuits is different, but in all three cases, the base to be tiled is not concrete, but an organic material, the finishing of which with tiles is carried out using special technologies.
It doesn’t matter whether the “wet” method was used for laying heating elements or the “dry” method - laying tiles on a warm water floor is done in the same way as on an electrically heated base.
Tiling heated floors under cement screed
The main point in preparing for this work is the choice of material - ceramics and adhesives.
Natural stone, porcelain stoneware, monocottura are facing materials of high density and hardness that meet all the requirements for heated flooring. But ceramic tiles should also not have geometric defects. Any deviation of the sheets from the configuration and dimensions declared by the manufacturer will result in visual finishing defects - protruding or recessed corners of the ceramics, differences in the width of the seams.
When choosing between suture or seamless methods of laying ceramics, it is better to choose the first option - the grouting material will partially absorb the thermal expansion of each cladding element, and the total increase in the size of the decorative shell with this finishing method will be less than with seamless installation.
Laying and grouting compounds for ceramics on heated floors must have sufficient elasticity, good thermal conductivity and high adhesion to the materials being bonded.
- “Ceresit” (SM-14 EXTRA, SM-16, SM-17) – for porcelain stoneware tiles, monocottura, broom.
- "Ceresit SM-115" - for cladding made of natural stone (marble, limestone).
- Bergauf Ceramic Express – for large-format ceramics (up to 1 m2).
- Knauf Flex - for finishing rooms with high humidity with ceramic and granite tiles.
Adhesive compositions produced by Knauf, Starateli, Unis, Litokol are no less in demand. Selecting the required material is not difficult - the characteristics, scope and consumption of each type of adhesive mixture listed are described in detail on the packaging.
Before laying the ceramics, the levelness of the supporting screed is checked using bubble level and a flat strip 2 m long - at this length the differences in height should not exceed 5 mm. If unevenness exceeding this value is detected, the screed is leveled using a wide spatula; tile adhesive can be used for this purpose.

Having decided on the method of laying the tiles (straight, diagonal), it is better to make a preliminary marking of the location of the ceramics on the floor. This is done so that the trimmed elements, if present, are located symmetrically relative to the selected symmetry axes of the room - diagonals or lines connecting the middles of opposite walls. In some cases, when decorating an artistic floor, installation of ceramics begins from the middle of the floor or its most open area.
If the walls of the room are also tiled, then the tiles of the vertical surfaces should rest on the ceramics of the floor - such a joint forms a “lock” that ensures that the interface is impenetrable to water.
To summarize the above, we note that all the rules used when laying ceramics on conventional bases must also be followed when finishing heated floors. But, in addition to these rules, there are also specific nuances that must be taken into account when laying tiles on a heated floor:
- Within 28 days after laying the load-bearing screed, the underfloor heating system should not be switched on in a mode in which the laid concrete warms up to a temperature above 28 0 C.
- After the final curing of the concrete, it is necessary to warm the floors by turning on the heating in normal mode for 2-3 days.
- Laying ceramic tiles on a heated floor should also be done at a screed surface temperature of 25-28 0 C.
- Heating the floor to a temperature above 28 0 C is not allowed for 12-14 days after the installation of ceramics on it is completed. During this time, the tile adhesive should completely cure and dry, after which the joints should be grouted. Turning on the heated floor after laying the tiles in the room heating mode is carried out with the grout composition dry.
Installation of ceramics on dry-heated floors
Laying ceramic tiles in this case requires more complex and time-consuming preparation of the base.
The joints of GVP, DSP or multilayer plywood, under which the heating circuit is mounted, are sealed with silicone. Along the perimeter of the room along the sheet flooring, a damper tape 5 cm wide is attached to the wall - it will take on the temperature expansion of the future cement screed.

A day later, after the silicone has cured, a reinforcing mesh is mounted to the sheet flooring. Reinforcement will allow the concrete layer to work better in bending and tension.
It is better to use a steel mesh, with a cell size from 20x20 to 50x50 mm and a wire thickness of 1.5-2.0 mm. The mesh is attached to the slabs with self-tapping screws in a checkerboard pattern with a step of 150-200 mm. Then a screed must be made on top of the mesh - put a cement-sand mortar in a layer of 3-4 cm. After laying the concrete, the room is closed to avoid drafts, and, starting from the 4th day , the screed is moistened with water daily without flooding. In 4 weeks, the screed should completely harden and dry, acquiring a light gray color over the entire surface. Before laying ceramic tiles, the screed is primed with an aqueous solution of latex in a ratio of 1:4 or one of the ready-made primer compositions. The tiles should be laid on tile adhesive, the layer of which after correcting the tiles should be no more than 1 cm.
A base made of GVP or CSP is inferior in strength characteristics to concrete, so cladding made of heavy natural materials should not be laid on them.
And, accordingly, on the contrary - laying mosaics on a warm floor mounted under sheet flooring is a reasonable solution, since specific gravity This type of finishing is small, the small size of the mosaic elements determines their strength, and the large area of the seams compensates for a significant portion of the thermal expansion of the cladding.
Conclusion
Laying tiles on a heated floor with your own hands is an operation whose complexity is not much higher than finishing a conventional floor base. Its main feature is right choice materials that you shouldn’t be afraid of if there are detailed instructions on modern packaging.
zonaplitki.ru
Laying tiles on a heated floor
Ceramic tiles are most often used to finish floors in which heated floors are concreted. This material is great solution, since it has high level thermal conductivity. Thus, the heat passing through it will practically not be retained or lost. However, before you start tiling the floor, there are some details you need to understand. In this article, we will tell you how to lay tiles on a heated floor.

What you need to know
When laying tiles on the floor, it is important to understand that in the case of heated floors, a special approach is required. Moreover, the technology directly depends on the installation method. For example, when installing a water heated floor, concreting is carried out. On smooth screed Laying tiles is very easy. It's a completely different matter when it comes to electric heating. The screed is not always filled. So, you can immediately lay tiles on the laid heating mats. It turns out that the heating element will be located directly in the tile adhesive. In the first and second cases, it is quite possible to do all the work yourself.
Features of the floor device

So, if you decide to carry out the work yourself, then you need to consider several important nuances, which will be described in this article. The first thing you need to remember is that the height of the finish tiles should be at the same level as all other rooms. Therefore, even at the stage of manufacturing the heated floor, you should make the appropriate measurements.
Advice! If the floor height of other rooms is initially much higher, then the heating cake may be thicker. For example, you can increase the layer of thermal insulation, but not only due to the screed. In this case, the heating efficiency will be reduced to zero.
If the screed is already ready, then when laying tiles the minimum layer of tile adhesive should be at least 10 mm. Otherwise, the generated heat will not be dissipated over the entire surface of the floor, and the floor heating will be in stripes, only in those places where the heating cable or pipe is laid. Therefore, you should not strive to make as small a layer of tile adhesive or floor screed as possible. So, if you have already taken into account all these details, you can start working directly. Next we provide you step by step instructions all the work.
Instructions for laying tiles

First of all, you need to choose a special adhesive for combination with underfloor heating. The adhesive packaging must have a corresponding sign indicating the possibility of using the mixture with underfloor heating.
So, for work you will need the following set of tools and materials:
- Drill.
- Construction mixer.
- Rubber spatula.
- Grout for seams.
- Spatula with teeth.
- Floor primer.
- Special tile adhesive.
- Crosses to form a uniform seam.
- Rubber hammer.
- Tile cutter for cutting tiles.
- Roulette.
- Pencil and marker.
- Building level.
- Container for mixing tile adhesive.
First of all, you need to make the calculation correctly required material. To do this, you need to know the floor area. Remember that you should not buy tiles and tile adhesive back to back. Be sure to make a small reserve of up to 10% of the amount received.
After this, the base is prepared. We will consider the option when the heated floor is already covered with screed. Considering that in most cases the screed is made on the basis cement-sand composition, its surface must be impregnated with a primer. You can use a deep penetration primer, for example, concrete contact. It would also be useful to do waterproofing. In order not to create an additional barrier to overcome thermal energy, it is better to use coating waterproofing.

After applying the primer, the floors should dry for about three hours. After this, apply a coat of primer again. This will increase the quality of adhesion of the tile adhesive to the floor. The next step is marking the floor. Here you should immediately decide according to what pattern the tiles will be laid. For example, diagonally, staggered, or simply in a straight line, seam to seam. Having decided on the scheme, you can apply markings to the floor to make laying tiles on the heated floor easier. Remember that the quality of heated floor heating does not depend on the method of laying tiles you choose. Now let's look at the technology of laying tiles on a warm floor.
Stages of tile installation
So, first of all, prepare the tile adhesive. Mix according to the manufacturer's instructions. There is a recipe on the glue packaging. By sticking to it, you will be able to prepare glue with the ideal consistency. Kneading is carried out using a drill and a construction mixer.
Advice! When the adhesive has been thoroughly mixed, leave it for 15 minutes. After this, stir again and it is ready to use.

If you do not have experience in laying tiles, then do not make a large batch. So, the glue must be applied to the tile itself. It is leveled with a notched spatula. Glue should also be applied to the floor. Apply glue to one square meter at a time. Additionally, apply adhesive to the edges and corners of the tiles.
One of the main features of laying tiles is that the space between the tiles and the floor must be completely filled with adhesive. There should be no voids. Therefore, you should strictly control this moment. Some experts deliberately put a few millimeters more glue on the tile, and then press it in. Due to these actions, excess glue comes out through the seam, which will indicate that the glue has completely filled the entire space.
So, according to the markings, lay the tiles on the floor. Press it in moderately. Immediately place a few more tiles. This will allow you to apply a level and level them on all sides of the plane. By lightly pressing the tiles, glue will come out of the seams. It should be removed immediately, as special grout will be placed in the seams. To form an identical seam, be sure to use crosses. When laying, glue may get on the front side of the tile. It must be removed immediately with a damp sponge or soft cloth. If you leave the glue on, it will dry out and then there is a risk of damaging the flooring.

Important! It is necessary to leave a small gap of up to 20 mm between the tiles and the wall. This gap will serve as an expansion joint. When exposed to thermal energy, the surface can expand. For this reason, this gap should be carefully monitored.
When the floor surface is completely tiled, it is unacceptable to turn on heated floors. Tile adhesive must acquire the required hardness under natural conditions. This is the only way to achieve ideal quality. During the laying process, you will also need to trim the tiles; for this, a special tile cutter is used; it can be mechanical or automatic.
After completing the masonry, when the tile adhesive has dried, all you have to do is grout the joints. For heated floors, it is necessary to use a special grout that does not allow moisture to pass through. This will be an additional barrier to moisture penetration. When grouting joints, do not rush. It is extremely important to carefully fill all seams so that there are no voids. When grouting is completed, the tiles must be thoroughly washed. But this should not be done immediately after grouting, because it can be washed all over. Wait a short time for the grout to set.
Advice! The resulting gap between the tiles and the wall should not be filled with grout. This expansion joint should be filled with silicone sealant.
Conclusion
So, here we have looked at all the features of how tiles are installed on heated floors. There are no special differences from ordinary masonry, however, there are some small nuances. If you listen to the advice from the article, you will be able to do high-quality coating on top of the heated floor. As a result, during the heating season you will enjoy warmth and comfort indoors. We hope this article has helped you figure out how to handle all the DIY jobs. In addition, we invite you to watch the prepared video material. It will help you consolidate all the provided theory from this article. And if you have already had experience in similar work, then share it by leaving comments at the end of the article.
bouw.ru
Laying tiles on a heated floor: instructions and preparation steps
Laying tiles on a heated floor requires certain knowledge and preparation. The technology is not particularly complicated, but there are certain points, failure to comply with which will negate all efforts and lead to damage to expensive material.
Types of floors for tiles
Before you begin installation work, you need to understand the specifics of each type of heated floor, what it consists of and what types there are. Such home insulation is not expensive and almost everyone can afford it.
First you need to decide which type of heating is most suitable:
- Electric.
- Water.

Types of heated floors
Electric
An electric heated floor is a multi-layer complex consisting of insulation, a heating element, a screed and a finishing coating. For the final layer, especially in the bathroom or kitchen, tiles are most suitable.
Depending on the heating element used, the electrical coating can be of the following types:
- Wired.
- Infrared.
- Using electric mats.

Types of electric heated floors
Each type has its own characteristics and characteristics. To determine the type of floor, the consumer most often starts from two aspects - the initial costs of its installation and subsequent operating costs.
Infrared heating is the most beneficial. At the initial stage you will have to spend a little more than for the installation of other coatings, but subsequently the family budget will be seriously saved when paying for electricity.
This coating is the least “capricious” and fits under any ceramic tile or laminate.
Water
Installing a water floor is very expensive, but it pays off in subsequent use. Experts believe that such coating is not very effective and unsafe.
To lay it, a set of pipes of a certain cross-section is used. The principle is the same as for a central heating system. Only in this case the heating device is mounted not on the wall, but on the floor. Circulates through the pipes hot water. They can be filled with screed or a dry installation system can be used, and then the final layer – ceramic tiles – can be placed.

Instructions for laying tiles
Of course, it is better to entrust the laying of tiles to specialists, but this is associated with large financial costs. Therefore, with some preparation and study of the rules, this task will be within the power of everyone.
Before starting work, you should consider the following points:
- The warm floor should be at the same level as the rest of the surfaces in the house.
- The screed layer should not be less than one centimeter, otherwise heat will not dissipate over the entire surface of the tile.
- An electric floor cannot be placed under furniture or covered with anything; if these requirements are not followed, all elements will burn out very quickly.
Stages of laying tiles
Laying tiles begins only after complete completion of all installation work and fixing elements. Actions are carried out in the following sequence:

Step-by-step tile laying
- Dilute the glue according to the instructions, apply it to the area in a square, the sides of which are equal to 4 ceramic tiles stacked side by side.
- A layer of tile adhesive is applied to the back side of the tile using a spatula.
- Carefully place the tiles on the surface, lightly pressing them to the floor in the middle, each time you need to ensure that the laying is even.
- To maintain an even seam between the tile squares, it is necessary to use plastic crosses.
- Crosses can be removed only after the surface is completely leveled.
- After the fixing composition has dried, you can begin grouting the joints.
Before starting work, you must carefully read the instructions for use adhesive composition. The main point is the drying time.
While the glue has not dried, you can remove the curvature in the installation and pull out the cross. After it has completely dried, this will be impossible to do.
For professional performance of work on our own You will need the following tools and materials:
Necessary tools for laying tiles
- Adhesive intended for laying tiles on heated floors.
- Grout for seams.
- Soft rubber spatula.
- Metal toothed spatula.
- Plastic crosses.
- Level.
- Tile cutter.
- Ceramic tile.
When buying tiles, you should add 15% to the surface area to be covered. Since part of the purchased volume will be used for pruning or scrapping.
When choosing a grout color, you should start from the tone of the tile. The grout should be slightly darker.
Until all components are completely dry, heating system It is strictly forbidden to include gender. It takes up to three weeks to dry completely.
How to prepare tiles for laying on a heated floor
Before you start laying the tile layer, you need to make sure that the “warm floor” system is working properly. All wires and communications must be completely hidden.

Installation of cement floor screed
Typically, a cement-sand screed is used to hide the elements. It should be smooth, even and completely dry.
Any contaminants from the surface are removed, irregularities are rubbed down. The main thing is that the screed is filled level, then laying the tiles will be much easier.
The screed must be covered with a layer of deep penetration primer or concrete contact. It will take two hours for the compositions to dry. Then the procedure should be repeated to ensure better adhesion of the tiles.
No priming or tiling work should be carried out immediately after checking the system. You need to turn it off and wait until the surface cools down completely. Otherwise, the adhesive base will dry out and will not hold the top layer.
Marking the room for laying tiles
Before laying tiles, you need to mark the floor.
It’s even worth drawing a layout diagram. This is especially important when using multi-colored tiles or laying patterns or edging.
Tile laying scheme
There are three main installation schemes:
- Diagonally.
- Horizontally.
- Take a running start.
In the first case, a large amount of material goes to waste. You can generally use squares different sizes and put them in a running start.
All this needs to be clearly marked on a piece of paper, where the marking scheme should be displayed in a reduced size.
Then the scheme is proportionally transferred to the floor. Beginners should completely mark the entire surface, clearly highlighting the points. Marking is carried out using a tapping cord with paint or chalk.
The main thing is to determine the line of the first row. It is measured from the longest wall. Then the rest of the surface of the room is marked. This method is relevant for tiles without a pattern.

Tile laying options
For a tiled layer with a pattern, you need to draw a diagonal rather than a horizontal line.
Using a long tape measure or rope, we connect the corners of the room diagonally. The point of intersection of the lines is the center of the room. It is from this place that the marking begins.
After completing the marking, it is worth laying out the tiles and checking how correctly the main lines are drawn.
The method of laying tiles does not at all affect the functional features of the heated floor. Therefore, you can follow your individual preferences.
Glue preparation stage
After marking and laying the tiles dry, you can begin the main work. It all starts with preparing tile adhesive.
To do this you will need:
- Basic mixture.
- Capacity.
- Drill or hammer drill (used to better mix the glue).
Cooking rules are displayed in the manufacturer's instructions. Strict adherence to it will ensure the receipt of a good adhesive substance. Do not mix the entire composition at once. It is better to do this in small portions, since after drying, it can no longer be used.
Preparing tile adhesive
Pour into the prepared container required amount water. Then the mixture is added and mixed thoroughly. If you do the opposite, you will end up with a large number of lumps that will be difficult to break. The finished glue has the consistency of thick sour cream.
A small amount of the mixture can be mixed manually using a regular stick. This will take longer. It is better to use a drill, hammer drill or construction mixer.
The composition should not be liquid. This is checked this way: you need to put a small amount of the prepared mass on a spatula and tilt it. If the mixture holds and does not run or drip, you have a quality adhesive.
After kneading, the mixture should stand for 10–15 minutes. Then it is mixed again. After this, the composition is ready for use.
Seam processing process
After laying the tiles and allowing them to dry completely, the joints are processed. For this, a special moisture-resistant grout is purchased. It can be sold in a store ready for use.
The mixture is applied to a rubber spatula, with which all joints are evenly filled. The grout should be slightly below the main tile covering, that is, not protrude above the surface.

Diagram of the location and movement of a rubber spatula when grouting joints
Do not wait for the grout to dry completely. No later than half an hour later, excess stains must be washed off using warm water and a soft cloth. If you delay a little, the dirt will dry out and it will be very difficult to remove it.
Laying ceramic tiles with your own hands does not require any in-depth knowledge. You need some skill and free time.
Subsequently, you can get an ideal ceramic surface that will adhere firmly to the warm floor for many years.
Video: Laying tiles on a warm floor
promzn.ru
Is it possible and how to install an electric heated floor on tiles » Aqua-Repair
Is it possible to install an electric heated floor without dismantling the tiles and cover it with ceramic tiles?
Marina
Expert answer
Good afternoon, Marina!
Laying new ceramic coating on top of an electric heated floor laid on old tiles is allowed. It is important to follow several rules.
- It is necessary to carefully analyze whether increasing the floor height by 20–25 mm will prevent the doors from opening or hide engineering Communication etc.
- The old foundation must be monolithic. To get information about its quality, tap the entire tile wooden hammer. If necessary, individual tiles are removed and the voids are filled with cement-sand mortar.
- To increase the adhesive ability of the old coating, it is recommended to walk over it with a grinder with diamond blade, make notches, drilling, etc. Less effective way is the treatment of the base with primers of the “Betonkontakt” type.
- Some of the glue is applied to the old tiles, after which heating mats are laid. After this, new ceramic tiles are laid using conventional technology. The total thickness of the adhesive layer should not exceed 10–15 mm.
- The seams of the new and old coating are not allowed to match.
As you can see, the difficulty lies only in preparing the base of the floor. However, if possible old tiles It’s better to remove it and put a layer of thermal insulation in its place. This will prevent heat leakage into the ceiling and reduce energy costs.
Thanks to my varied hobbies, I write on various topics, but my favorites are engineering, technology and construction. Perhaps because I know many nuances in these areas, not only theoretically, as a result of studying at a technical university and graduate school, but also from the practical side, since I try to do everything with my own hands.
aqua-rmnt.com
Laying tiles on a warm floor with your own hands (photo, video)
IN modern home a warm floor is not a luxury, but an objective necessity. Especially if the family has small children. It makes your home feel cozy and can help reduce heating costs.
“Warm floor” systems, based on the type of heating element, are divided into water and electric. Each of them has both advantages and weak sides, analyzing which each person makes his choice.
Having decided on the type of heating, the owner of the house again finds himself in a dilemma - which type of flooring is best suited to his new floor.
What is this article about?
Which flooring is best for heated floors?
Of all the known coating options for heated floors, linoleum is the least suitable. After all, when heated, it becomes soft and can easily deform with the least mechanical impact. Besides, inexpensive types linoleum have a large proportion of synthetic components and can release toxic substances when heated.

It is acceptable to cover the TP with carpet. It is good to use laminate for these purposes, but when choosing it you need to pay attention to the markings. On many brands of material in Lately began to point out permissible temperature heating
The most suitable flooring in this case is ceramic tiles, porcelain stoneware and stone. This is due to the fact that these types of materials have a high degree of thermal conductivity and thermal inertia; in terms of these indicators, they are many times superior to all other types of flooring.
Before you figure out how to lay tiles on a heated floor, you should find out which type of tiles from those listed above is preferable for your home.
Choosing tiles for heated floors
If you choose a coating for a living space between ceramic tiles, porcelain stoneware and stone, it is worth analyzing them in different aspects. From the point of view of thermal conductivity, stone wins slightly, porcelain stoneware comes in second place and tiles lag somewhat behind, since this characteristic depends on the porosity of the material - the higher the porosity, the lower the thermal conductivity. But the difference in indicators is small.

Wear resistance in our case is not of significant importance, because even the smallest indicator that ceramics has is sufficient for non-commercial premises. And if you compare the price, then ceramic tiles definitely win.
In any case, it is up to the customer to decide based on financial capabilities.
Laying tiles on different types of electric heated floors
Depending on the type of flooring, there are some differences in the technology of laying tiles. If we take into account all the possible nuances, then laying tiles on a warm floor with your own hands will be within the power of every person, and not just a tiler.
Tiles for infrared floor
On a warm electric floor mounted using infrared film, tiles can be laid in two ways:
- using gypsum fiber (GVL) or glass magnesium (SML) sheets;
- with a concrete screed device.

In the first option, a hydrobarrier should be placed on the heating film, then a sheet of GVL or SML. And the tiles are already being laid on top of the sheets. These materials are good because they have ideal flat surface, so the tile lays without flaws.
It is worth noting that this method is faster, because you do not have to wait for the screed to dry before laying the tiles. But there are also disadvantages - a layer of sheets will prevent the floors from warming up, and the heating process of the tiles will take longer.
In the case of pouring a wet screed, the technological process is longer, but such installation will cost slightly less. For greater strength, the screed should be reinforced. It is important to use plastic mesh rather than metal for this. The concrete layer in this case can be small - about 5 mm, you can replace it with liquid tile adhesive. After the screed has dried, the tiles are laid.
Laying tiles on electric mats
This type of heated floor is the easiest to install and does not require any special knowledge or skills. In addition, there is no need to make a sand-cement screed before laying the tiles. The laid mat is covered with a thin layer of tile adhesive and the tiles are laid.
Cable floor

This type of heated floor is least often used in apartment buildings. The reason for this is the need to lay a fairly thick cement-sand layer (4-5 cm) under the tiles. As a result, the entire structure “steals” about 8 cm of the room’s height.
Water floor
Water floors are more often used in private homes, since for its installation it is necessary to deepen the floors. This is due to the fact that the screed with this option requires at least 8 cm, plus the pipes themselves in the heated floor system add height. Thus, the floor can be raised by more than 10 cm. But this type of TP is the cheapest to operate, therefore it is quite popular.

The process of laying tiles on a warm water floor is the same as when laying it on ordinary floors. The only difference is that glue must be applied to both the base and the back side of the tile.
As can be seen from the information presented in the article, laying tiles on a heated floor is no more difficult than on a regular one. The main thing is to follow some simple rules:
- When laying any type of tile on a warm floor, you should use tile adhesive specially designed for this type of work;
- For between tile joints It is better to use two-component epoxy grout;
- If a sand-cement screed was poured under laying the tiles, then you should wait for it to dry completely and only then start working with the floor covering.
izplitki.com

The tiles are wonderful finishing material, which looks beautiful and is not afraid of moisture, dirt and dust. Due to its technical properties, tiles are often used for tiling work, which makes the premises attractive and easy to use. But before tiling the walls, it is often necessary to lay electrical wiring for various household appliances. Tips for correct laying electrical wires or cables are given in this article.
Regardless of the room in which it will be performed laying ceramic tiles, if you need electricity in your room, it is better to take care of this in advance. Electrical sockets and switches may be needed in the bathroom and kitchen, in the boiler room and on the balcony. And before doing this, it is recommended to route the wiring correctly so that it is not damaged during operation.

Quite often renovation work are done with your own hands, which allows you to significantly save money, since the services of craftsmen are not cheap. But homeowners do not always know how to do certain jobs correctly, which can lead to disastrous results. Due to the fact that it is often necessary to drill a hole in the tile, and you do not remember where the electrical wiring is located, the wire or cable is damaged by a drill or drill and the wiring becomes unusable.
When laying horizontal wiring in a room where the walls will be tiled, it is best to choose a height where you cannot damage the wires in any way when drilling. For example, if you need to lay wires along the wall, lay them at the very top, as high as possible, wherever it is convenient to make grooves for the wire/cable. But even in this case, it is advisable to remember well, or even better, draw and save a drawing with the wiring drawn, in order to avoid damage to the wires when you need to hang any cabinets on the wall.

If possible, for example, you will install a hanging or suspended ceiling, then it is better to lay the wiring in this void and this way you will make the job easier and protect yourself from damage to the electrical wires. Vertical electrical wiring is even more often damaged when the wires descend from the ceiling to sockets and low switches. In order to reduce the likelihood of damage to the wires when drilling holes in the tiles, you need to lay the wires strictly vertically.
Due to this, when you need to drill a hole and fasten something, you will know for sure that the wire/cable runs strictly vertically and you need to drill by moving three to five centimeters to the left/right. Then you will definitely not disturb the wiring, and you will not need to lay new wires in the baseboards or use an extension cord. If you do not require greater fastening strength, then it is better to use good glue, which can be used to glue a shelf in the bathroom or hooks for towels/robes.

If you need to mount something heavy on the wall, which will require drilling holes in a wall lined with ceramic tiles, then choose the mounting location so as not to damage the wiring. Try to move cabinets, boiler and other heavy objects away from the place where they are laid wires under the tiles. Otherwise, the electric cable can be damaged with a drill or hammer drill and then part of the electrical wiring will not function. And in order to repair it, you will have to either remove and repair the wire, or lay new wiring, which is also troublesome and time-consuming.
Just 15 - 20 years ago, the load on the power grid was relatively small, but today there is a large number of household appliances provoked a significant increase in loads. Old wires are not always able to withstand heavy loads and over time there is a need to replace them. Laying electrical wiring in a house or apartment is a task that requires certain knowledge and skills from the master. First of all, this concerns knowledge of electrical wiring rules, the ability to read and create wiring diagrams, as well as electrical installation skills. Of course, you can do the wiring yourself, but to do this you must adhere to the rules and recommendations outlined below.
Electrical wiring rules
All construction activities and Construction Materials are strictly regulated by a set of rules and requirements - SNiP and GOST. As for the installation of electrical wiring and everything related to electricity, you should pay attention to the Electrical Installation Rules (abbreviated PUE). This document describes what and how to do when working with electrical equipment. And if we want to lay electrical wiring, then we will need to study it, especially the part that relates to installation and selection of electrical equipment. Below are the basic rules that should be followed when installing electrical wiring in a house or apartment:
- key electrical wiring elements such as distribution boxes, meters, sockets and switches must be easily accessible;
- Switches are installed at a height of 60 - 150 cm from the floor. The switches themselves are located in places where opened door does not prevent access to them. This means that if the door opens to the right, the switch is on the left side and vice versa. The wire to the switches is laid from top to bottom;
- It is recommended to install sockets at a height of 50 - 80 cm from the floor. This approach is dictated by flood safety. Also, sockets are installed at a distance of more than 50 cm from gas and electric stoves, as well as heating radiators, pipes and other grounded objects. The wire to the sockets is laid from bottom to top;
- the number of sockets in the room must correspond to 1 pc. for 6 m2. The kitchen is an exception. It is equipped with as many sockets as necessary to connect household appliances. Installation of sockets in the toilet is prohibited. For sockets in the bathroom, a separate transformer is installed outside;
- wiring inside or outside the walls is carried out only vertically or horizontally, and the installation location is displayed on the wiring plan;
- wires are laid at a certain distance from pipes, ceilings, etc. For horizontal ones, a distance of 5 - 10 cm from the floor beams and cornices and 15 cm from the ceiling is required. The height from the floor is 15 - 20 cm. Vertical wires are placed at a distance of more than 10 cm from the edge of the door or window opening. Distance from gas pipes must be at least 40 cm;
- when laying external or hidden wiring it is necessary to ensure that it does not come into contact with metal parts of building structures;
- when laying several parallel wires, the distance between them must be at least 3 mm or each wire must be hidden in a protective box or corrugation;
- The wiring and connection of wires is carried out inside special distribution boxes. The connection points are carefully isolated. Connecting copper and aluminum wires to each other is strictly prohibited;
- grounding and neutral wires are secured to the devices with a bolted connection.
Electrical wiring design and diagram
Electrical wiring work begins with the creation of a project and wiring diagram. This document is the basis for future wiring of the house. Creating a project and diagram is quite a serious matter and it is better to entrust it to experienced specialists. The reason is simple - the safety of those living in a house or apartment depends on it. Project creation services will cost a certain amount, but it's worth it.

Those who are accustomed to doing everything with their own hands will have to, adhering to the rules described above, and also having studied the basics of electrical engineering, independently make a drawing and calculate the load on the network. There are no particular difficulties in this, especially if there is at least some understanding of what it is electricity, and what are the consequences of careless handling of it. The first thing you need is symbols. They are shown in the photo below:

Using them, we make a drawing of the apartment and mark lighting points, installation locations for switches and sockets. How many and where they are installed is described above in the rules. The main task of such a diagram is to indicate the location of installation of devices and routing of wires. When creating an electrical wiring diagram, it is important to think in advance where, how much and what kind of household appliances will be installed.
The next step in creating the diagram will be to route the wires to the connection points on the diagram. It is necessary to dwell on this point in more detail. The reason is the type of wiring and connection. There are several such types - parallel, sequential and mixed. The latter is the most attractive due to the economical use of materials and maximum efficiency. To facilitate wiring, all connection points are divided into several groups:
- lighting for the kitchen, hallway and living rooms;
- toilet and bathroom lighting;
- power supply for sockets in living rooms and corridors;
- power supply for kitchen outlets;
- power supply socket for electric stove.
The above example is just one of many options for lighting groups. The main thing to understand is that if you group the connection points, the amount of materials used is reduced and the circuit itself is simplified.

Important! To simplify wiring to sockets, the wires can be laid under the floor. Wires for overhead lighting are laid inside the floor slabs. These two methods are good to use if you don’t want to scratch the walls. In the diagram, such wiring is marked with a dotted line.
The electrical wiring project also indicates the calculation of the expected current in the network and the materials used. The calculation is performed using the formula:
I=P/U;
where P is the total power of all devices used (Watt), U is the network voltage (Volts).
For example, a 2 kW kettle, 10 60 W light bulbs, a 1 kW microwave, a 400 W refrigerator. Current strength is 220 Volts. As a result (2000+(10x60)+1000+400)/220=16.5 Amperes.
In practice, the current strength in the network for modern apartments rarely exceeds 25 A. Based on this, all materials are selected. First of all, this concerns the cross-section of electrical wiring. To make your choice easier, the table below shows the main parameters of the wire and cable:

The table shows extremely accurate values, and since the current strength can fluctuate quite often, a small margin will be required for the wire or cable itself. Therefore, it is recommended that all wiring in an apartment or house be made from the following materials:

- wire VVG-5*6 (five cores and cross-section 6 mm2) is used in houses with three-phase power supply to connect the lighting panel to the main panel;
- wire VVG-2*6 (two cores and cross-section 6 mm2) is used in houses with two-phase power supply to connect the lighting panel to the main panel;
- wire VVG-3*2.5 (three cores and cross-section 2.5 mm2) is used for most of the wiring from the lighting panel to the distribution boxes and from them to the sockets;
- wire VVG-3*1.5 (three cores and cross-section 1.5 mm2) is used for wiring from distribution boxes to lighting points and switches;
- wire VVG-3*4 (three cores and cross-section 4 mm2) is used for electric stoves.

To find out the exact length of the wire, you will have to run around the house a little with a tape measure, and add another 3 - 4 meters of reserve to the result obtained. All wires are connected to the lighting panel, which is installed at the entrance. Circuit breakers are installed in the panel. Typically these are 16 A and 20 A RCDs. The former are used for lighting and switches, the latter for sockets. For an electric stove, a separate 32 A RCD is installed, but if the power of the stove exceeds 7 kW, then a 63 A RCD is installed.

Now you need to calculate how many sockets and distribution boxes you need. Everything is quite simple here. Just look at the diagram and make a simple calculation. In addition to the materials described above, you will need various consumables, such as electrical tape and PPE caps for connecting wires, as well as pipes, cable ducts or boxes for electrical wiring, and socket boxes.
Electrical wiring installation
There is nothing overly complicated about electrical wiring installation work. The main thing during installation is to adhere to safety regulations and follow the instructions. All work can be done alone. Tools for installation will require a tester, a hammer drill or grinder, a drill or screwdriver, wire cutters, pliers, and a Phillips and slotted screwdriver. It won't be amiss laser level. Since without it it is quite difficult to make vertical and horizontal markings.
Important! When carrying out repairs and replacing wiring in an old house or apartment with hidden wiring, you must first find and, if necessary, remove the old wires. For these purposes, an electrical wiring sensor is used.
Marking and preparing channels for electrical wiring

We begin installation with markings. To do this, use a marker or pencil to place a mark on the wall where the wire will be laid. At the same time, we follow the rules for placing wires. The next step is to mark the installation locations lighting fixtures, sockets and switches and lighting panel.
Important! In new houses, a special niche is provided for the lighting panel. In the old ones, such a shield is simply hung on the wall.

Having finished with the markings, we proceed either to the installation of wiring open method, or to groove walls for hidden wiring. First, using a hammer drill and a special bit, holes are cut for installing sockets, switches and distribution boxes. For the wires themselves, grooves are made using a grinder or a hammer drill. In any case, there will be a lot of dust and dirt. The depth of the groove of the groove should be about 20 mm, and the width should be such that all the wires fit into the groove without obstruction.

As for the ceiling, there are several options for solving the issue of placing and securing the wiring. The first is that if the ceiling is suspended or suspended, then all the wiring is simply fixed to the ceiling. The second is to make a shallow groove for wiring. Third, the wiring is hidden in the ceiling. The first two options are extremely simple to implement. But for the third one you will have to make some explanations. IN panel houses ceilings with internal voids are used; it is enough to make two holes and stretch the wires inside the ceiling.
Having finished with the gating, we move on to last stage preparation for wiring installation. Wires must be pulled through the walls to bring them into the room. Therefore, you will have to use a hammer drill to punch holes. Usually such holes are made in the corner of the room. We also make a hole for running the wire from the distribution panel to the lighting panel. Having finished gating the walls, we begin installation.
Installation of open electrical wiring

We begin the installation by installing the lighting panel. If a special niche was created for it, then we place it there; if not, then we simply hang it on the wall. We install an RCD inside the shield. Their number depends on the number of lighting groups. The assembled and ready-to-connect panel looks like this: there are neutral terminals at the top, grounding terminals at the bottom, and automatic circuit breakers are installed between the terminals.

Now we insert wire VVG-5*6 or VVG-2*6 inside. On the switchboard side, the electrical wiring is connected by an electrician, so for now we will leave it unconnected. Inside the lighting panel, the input wire is connected as follows: blue wire we connect to zero, the white wire to the top contact of the RCD, and the yellow wire with a green stripe to ground. We connect the RCD circuit breakers to each other in series at the top using a jumper from the white wire. Now we move on to open wiring.

Along the previously outlined lines we fix boxes or cable channels for electrical wiring. Often, with open wiring, they try to place the cable channels themselves near the baseboard or vice versa, almost under the ceiling. We secure the wiring box using self-tapping screws in increments of 50 cm. We make the first and last hole in the box at a distance of 5 - 10 cm from the edge. To do this, we drill holes in the wall using a hammer drill, drive a dowel inside and secure the cable channel with self-tapping screws.
One more distinctive feature exposed wiring includes sockets, switches and distribution boxes. All of them are hung on the wall, instead of being built inside. Therefore, the next step is to install them in place. All you have to do is place them on the wall, mark the mounting locations, drill the holes and secure them in place.

Next we proceed to wiring the wires. We start by laying the main line and from the sockets to the lighting panel. As already noted, we use wire VVG-3*2.5 for this. For convenience, we start from the connection point towards the panel. At the end of the wire we hang a label indicating what kind of wire it is and where it comes from. Next, we lay the wires VVG-3*1.5 from switches and lighting fixtures to distribution boxes.

Inside the distribution boxes, we connect the wires using PPE or carefully insulate them. Inside the lighting panel, the main wire VVG-3*2.5 is connected as follows: brown or red wire - phase, connected to the bottom of the RCD, blue - zero, connected to the zero bus at the top, yellow with a green stripe - grounding to the bus at the bottom. Using a tester, we “ring” all the wires to eliminate possible errors. If everything is in order, we call an electrician and connect to the distribution panel.
Installation of hidden electrical wiring
Concealed electrical wiring is quite simple. The only significant difference from the open one is the way the wires are hidden from view. Otherwise the actions are almost the same. First, we install the lighting panel and RCD circuit breakers, after which we start and connect input cable from the distribution board side. We also leave it unconnected. An electrician will do this. Next, we install distribution boxes and socket boxes inside the made niches.

Now let's move on to wiring. First we lay the main line from VVG-3*2.5 wire. If it was planned, then we lay the wires to the sockets in the floor. To do this, we insert the VVG-3*2.5 wire into the pipe for electrical wiring or special corrugation and lay it to the point where the wires exit to the sockets. There we place the wire inside the groove and insert it into the socket box. The next step will be to lay the VVG-3*1.5 wire from the switches and lighting points to the junction boxes, where they are connected to the main wire. We isolate all connections with PPE or electrical tape.

At the end, we “call” the entire network using a tester for possible errors and connect to the lighting panel. The connection method is similar to that described for open wiring. Upon completion, we seal the grooves with gypsum putty and invite an electrician to connect it to the distribution panel.
Electrical installation in a house or apartment for experienced craftsman- the matter is quite easy. But for those who are not well versed in electrical engineering, they should take the help of experienced professionals from start to finish. This, of course, will cost money, but this way you can protect yourself from mistakes that could lead to a fire.
The technology of laying electric heated floors under tiles is quite labor-intensive, but even an inexperienced person can do it. So that readers of “” can independently install a heating cable (or thermomat), we will next consider detailed instructions with connection diagram and video!
Which option should you prefer?
Heating of the floor covering from the network can be represented by a heating cable or thermomat. We discussed the advantages and disadvantages of each in detail in the corresponding article. Now let’s talk briefly about which option is better to choose.
An electric heated floor made from cables under tiles is cheaper, but at the same time, calculating its length and the installation itself are more difficult. It is recommended to use it if you can sacrifice the height of the ceiling (since the screed will be thicker).
As for the heating mat, it has a number of advantages, because... in essence, it is an improved version of the explorer. The peculiarity of the design is that the same cable is already placed on a special fiberglass mesh, which allows you to maintain an even pitch between turns. 
In addition, the convenience of a thermomat is that to calculate the material you just need to calculate the area of the room and based on this parameter choose a roll of the appropriate size.
It’s up to you to decide which option you prefer, but we still recommend using an electric mat; besides, this option has many positive reviews on the Internet.
If you decide to choose heating mats for installing a heated floor, we advise you to pay attention to the products of the EKF company, and in particular to the “COMFORT” heated floor system. You can choose heating mats exactly to suit your conditions - ready-made kits vary in size and power. Choose from a mechanical or electronic thermostat with weekly programming function. Speaking about the thermomats themselves, I would like to highlight the full shielding of the current-carrying conductors, which ensures uniform heating of the floor surface. You can find out more about EKF heating mats by clicking on the link: https://ekfgroup.com/catalog/sistemy-obogreva/sistema-teplyy-pol.
Laying technology
In this article we will look at laying a warm electric floor under tiles using a heating cable, as well as a special mat. Preparatory work will be similar, the only difference will be in the main process.
Preparing the surface
First you need to remove the old flooring and clean the surface of debris. If there are no defects, you can do without a screed (rough). If the floor has uneven surfaces, it is necessary to initially level them with a solution 3 to 7 cm thick.

Create a schema
Before the calculation work, it is necessary to draw up a diagram for connecting an electric heated floor under the tiles, on which to mark the step of laying the wires or heating mat.
- It is necessary to retreat at least 10 cm from the walls;
- In places where furniture without legs is installed, as well as household appliances, laying material is prohibited (heat transfer will be difficult, and all warm air will return back to the conductor, which will cause it to overheat and fail);
- It is not necessary to lay the material straight; you can carefully trim the mesh to bend the path in the desired direction (this option allows you to reduce energy consumption by focusing heating only on the necessary areas).
Material calculation
If you decide to make a heated floor under the tiles with your own hands as the main heating, you must carry out the calculation taking into account that per 1 m2 you will need a heater with a power of at least 140-180 W. For an auxiliary heating system, you can use a power of no more than 140 W/m2 (80 W is possible, it all depends on how well the room is insulated).
All you need is to calculate the area of the room (length*width) and subtract from this value the area occupied by furniture without legs and household appliances(since it is prohibited to lay material under them). As a result, you will get a useful heating area. After this, based on the result obtained, the required total power of the heating element and its length are determined. The linear power of one meter of heating cable can vary from 16 to 21 W/m.
For example, if the room area is 10 m2 and you choose a heater with a power of 100 W/m2, then the total power required will be 1 kW. We select a 20 W/m cable, the length of which should be 50 m (1000/20).
The thermomat is selected according to the same principle, based on the usable area and required power. Additionally, you need to purchase mounting tape, which will be used to attach the heater to the concrete screed.
Checking old electrical wiring
As you understand, for a room with an area of 25-30 m2 you will need a fairly powerful electric heated floor under the tiles, which will put a noticeable load on. You must carry out and determine if your wiring is suitable for the new heating system. If it turns out that the diameter of the cores does not match, it is necessary to get a new, more powerful one. Also check that circuit breaker and the RCD corresponded to the new current load.
Surface thermal insulation
Now we move on to installation and the first thing to do is to properly insulate the surface for laying the electric heated floor. The efficiency of using the system, as well as its cost-effectiveness, will depend on this. The best insulation in this case, penofol is considered - a rolled material with a self-adhesive layer and a foil coating. All you need is to glue the entire concrete surface end-to-end, then seal the joints with foil tape. It should be noted that penofol should extend several centimeters onto the walls to increase the thermal insulation of the room.
If you want to slightly reduce the height of the room, then instead of penofol you can put other insulation, for example, polypropylene or polystyrene foam.
Upon completion, it is recommended to glue a damper tape around the perimeter of the walls on top of the insulation, the purpose of which is to compensate for the expansion of the coating when heated. You also need to put a metal mesh on top of the heat-insulating layer, which will prevent direct contact with the heater and will simplify the process of installing an electric heated floor under the tiles. 
Installing a Temperature Sensor
To monitor and control the system, it is necessary to install a special thermostat and temperature sensor. The thermostat is a regulator (mechanical or electronic) with which you can set the optimal temperature regime, as well as the system on/off time. It is mounted in the wall, next to the sockets.

As for the temperature sensor, it must be installed in the floor itself. To do this, a special groove is created in the wall from the thermostat, which is directed strictly vertically to the ceiling. Next, the sensor is placed in corrugated pipe and leads to the temperature control point for the electric heated floor under the tiles. This place is the middle between two turns of the cable, and there should be no intersections nearby. The corrugation protects the sensor from damage and also allows access to it at any time (for example, when it fails). For reliability, it is recommended to fill the end of the corrugation that will be in the screed with sealant so that the solution does not get inside. 
Heater check
Before laying the cable (or mat), it is necessary to measure its resistance. This value should not differ from the passport data by more than 10%. To do this, you need to use a special device - a multimeter (shown in the photo below), which also determines where the phase is, if missing. If the resistance corresponds to the nominal value, then you can install an electric heated floor under the tiles. 
Fastening the cable (or thermomat)
Now that the surface is completely prepared, it is necessary to secure the heating element. If you are using a cable, fasten it using mounting tape, as shown in the photo:


The distance between the turns must be the same over the entire area, otherwise the electric heating of the floor will be uneven. Heating mats are easier to install because... the distance between the turns is maintained along the entire length. All you need to do is spread the material according to the diagram and connect it correctly to the thermostat.
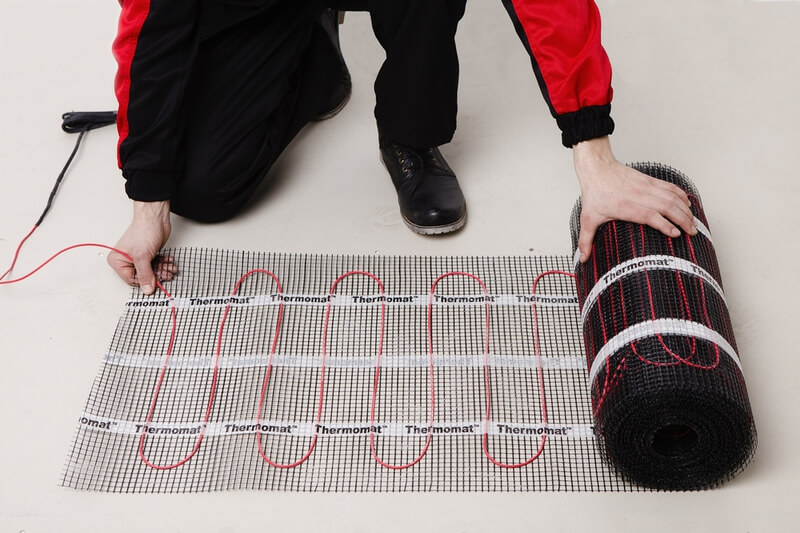
When the installation of the electric heated floor under the tiles is completed, you must check the correct connection by measuring the resistance with a multimeter. The resulting value should match the one you measured before installation.
Filling the screed
In order to do concrete mortar You need to prepare the following ratio of materials:
- 4 parts sand;
- 1 part cement;
- 5 parts crushed stone;
- 0.6 parts water;
- 1% by weight of cement special plasticizer (gives the solution elasticity).
It should be noted that the amount of water should be small, otherwise cracks may occur in the screed. As for expanded clay and perlite, it is strictly forbidden to add them to the solution, because These materials disrupt heat transfer and are one of the reasons for overheating of the conductor.
The thickness of the screed cake should be from 3 to 5 cm. It is not recommended to go beyond these values. After pouring, you must wait until the solution has completely hardened. Despite the fact that the screed will harden in a couple of days, it will dry completely only after 4 weeks (or maybe more). Until this time, it is prohibited to turn on the electric heated floor.
We also draw your attention to the fact that a tie is only required if a heating cable is used. The thermomat can immediately after installation serve as a base for tile adhesive.

Laying tiles
After the screed has set (2-3 days), you can proceed without wasting time to finishing the floor with tiles. It is recommended to do this only if you have experience, because you need to ensure that the surface is strictly horizontal. The tile “sits” on a special glue, after which the installation of an electric heated floor under the tile is considered complete! 
That's the whole do-it-yourself styling technology. We recommend that you watch the video in which you can see some of the nuances of the event:
Video instructions for installing heated electric floors
Laying the heating cable
Also read:
During finishing work, when installation is carried out ceiling tiles, it is important to properly hide the electrical wiring. This will require the services of an electrician. Solve the issue of concealment electrical wiring possible in several ways.
Method No. 1. If the selected tile is two or more millimeters thicker than the cable itself, you should create a groove on the back side of the covering. Need to cut a groove V-shape. It will hide the wire when the tiles are being installed. In order for the wire to fit correctly into the groove, it must be tensioned.
Method No. 2. In the place where the electrical wire is laid, you need to install a special plastic box. It's called a cable channel. Its thickness should correspond to the thickness of the tile. It must be secured using dowels and self-tapping screws. After this, the wiring is laid in the box. Next, all that remains is to install the tiles directly.
Method No. 3. Here, as in the first case, grooves are made, but not in the tiles, but in the ceiling itself. This procedure must be carried out before installation work begins. Such electrical installation work in Chelyabinsk requires certain skills, since a hammer drill is used. When laying corrugated hose in the groove, it is necessary to turn off the power supply.
The depth of the groove must be at least 20 millimeters, and the width must be at least 12 millimeters. At the bottom of the groove, fasteners are mounted, consisting of dowels and self-tapping screws with wire, which will press the electrical wiring to the ceiling.
Method No. 4. This is not the most convenient or aesthetic method. The wires are laid between the ceiling tiles: either in the place where the tiles are joined together, or in grooves that are cut out on the front surfaces. To prevent the wiring from being noticeable, the junction points can be painted in color ceiling covering. In addition, if the electrical cable is rigid enough, if it is laid only at the joints, it will not be particularly noticeable anyway.
Related materials:

Every owner of his own private home always wants to have his own well-kept yard. And the greenery growing everywhere, no matter how hard you try to care for it, will not...

In any business, caution and a responsible approach are important, especially when it comes to repairs, finishing or other similar work. Also, you probably...

Tiles are considered a universal material and can be installed in many rooms. She is very beautiful, reliable, attractive and at the same time...

Today you can find many videos online that will tell you how to avoid mistakes when laying tiles, how to lay out patterns, and in general...