It is very important that at the dacha the eye enjoys not only the plantings, but also the surrounding environment. About, and we have already talked about, it’s time to talk about how to make fences for your dacha with your own hands. The arrangement of a dacha area cannot be done without them, and therefore it is better to take care of creating a strong and good fence. And it’s even better that it fits into the overall picture of what you create on your site.
DIY garden fences cheap
Don’t let the length of the fence or its height bother you. Let's start with the fact that it is easy to make a fence with your own hands and quite inexpensively, because if you have the desire and basic knowledge of the “fence theory”, then you can safely move on to the next stage - the choice of materials.
Country fencing can be made from:
- wood;
- picket fence;
- metal profiles;
- grids;
- yes everything, anything!
You just have to choose what you like best and fits into the overall design.

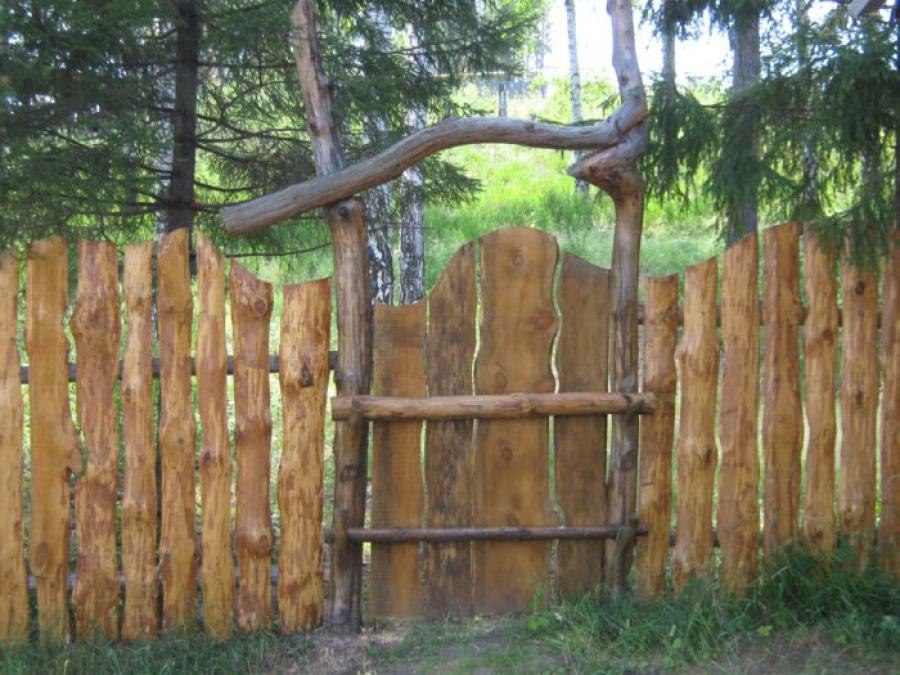
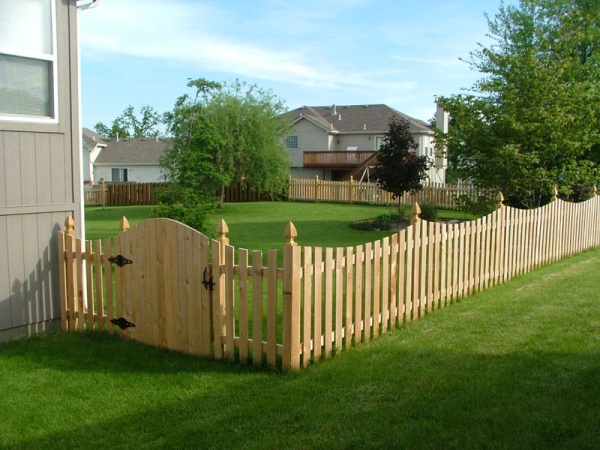
Wooden garden fence
Wood is one of the the best materials. It looks noble, can withstand bad weather, can be purchased without problems, and at the same time it is environmentally friendly.

It is not necessary to purchase a pre-prepared board. Just take out the supplies and scraps that have accumulated in the backyard and are still suitable for use - for example, ranch fences allow the use of uncut and uneven boards. All you need to do is dig in the wooden posts along the intended path and nail the boards to them in a horizontal position.

It's quite simple and cheap fence for a summer residence, and if you take into account its environmental friendliness, then you should give preference to just such fencing.
In addition, depending on the length of the board, you choose its direction yourself, so you can build either a ranch fence or a simple vertical or horizontal fence, which has long proven itself.


To install a wooden fence with your own hands you will need:
- beam;
- boards;
- nails;
- hammer;
- shovel;
- sand.
If desired, you can add cement and bitumen to this list if you want the timber to be installed as stably as possible.
The principle of installing a wooden fence is very simple. You dig holes to install the support beam and fill them with cement or cover them tightly with sand, compacting it. This way the supports will not deform under the load of the boards and will become more stable.

Next, all you have to do is nail the boards to the posts. If you want to attach the boards vertically, then you will have to stretch and nail two planks between the supports, onto which the boards will then be attached. If you still want to see a ranch fence on your property, then it is enough to immediately attach the boards from post to post. More details in the video Ivan Galkin:
Just don’t forget that wood has its own shelf life and doesn’t like moisture. Therefore, be sure to paint the fence after construction and periodically inspect it for damage in order to repair or replace the board in time.

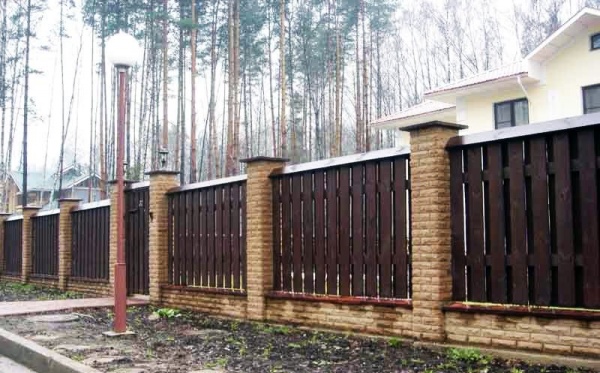
Picket fence
Picket fences are the most popular type of wooden fence. And no wonder, because the picket fence is so easy to install, economical to purchase and beautiful when finished.


Before starting construction, it is necessary to mark the area where the building will be located, determine its height and the frequency of installing the picket fence. Although we install a fence for protection, if we close the area tightly, we can deprive the plants of light, which will lead to crop failure.

The set of materials for building a picket fence is similar to what we presented above:
- timber for supports;
- board for horizontal screed;
- cement;
- sand;
- nails or screws.
Tools can be different - from a shovel with a hammer to a screwdriver and an electric drill. Only the speed of construction will depend on this, but not the quality of the fence.

First you need to install the pillars, which will become the basis of the fence. Therefore, dig holes for the timber at an equal distance from each other, but no further than the length of the board that will serve as a screed. After this, install the supports and fill them cement mortar.
While the solution hardens (and this will take at least 3 days), you can proceed to the installation of sections. To do this, we cut the board to a length sufficient to attach its ends to the support. We place the sections on supports using nails or self-tapping screws and then attach a picket fence to them at an equal distance.
As you can see, the process of building a fence is quite simple and does not require any special construction skills - just patience to wait for the solution to harden. Then you can create a fence to your liking.


Well, to understand the intricacies of working with a picket fence and its installation, we recommend watching a video master class Andrey Krylov:
Metal profile fence
And yet, despite the beauty and cheapness of the picket fence and wood in general, it has one drawback - such a fence is short-lived and its maximum service life is only 15 years. Therefore, many, wanting to save money, are looking for a more durable, affordable and strong material- metal profile.

Due to its durability and availability, corrugated sheeting has long been widely used among summer residents. It is used for garden beds, roofing and, of course, fencing.
Metal profiles do not have the most aesthetic appearance, so most designers categorically bypass corrugated sheets when creating beautiful and original fences. But its accessibility and ease of use plays into the hands of summer residents, allowing them to good fence for a do-it-yourself dacha.
The construction of such a fence is not much different from others. You will need the same support posts and boards for the horizontal screed, on which the profile itself will be attached.

And since metal profiles are still not the most popular material for creating a fence, it’s worth dwelling a little on basic requirements for its installation:
- The distance between supports should not exceed 2.5 meters. It’s better to stick to a more frequent, half-meter installation. This is due to the fact that the profiled sheet is quite flexible and will be deformed under the pressure of the wind, losing its beauty and, most importantly, strength. Therefore, the shorter the sections, the better the quality of the fence.
- The supports must be buried at least 1.5 meters into the ground. Despite the flexibility of the metal profile, the sheet itself is quite heavy and requires stable support. That is why it is recommended to cement all supports at the base.
- It is best to use not a beam as a post, but a pipe with a diameter of 6-8 cm and a wall thickness of at least 2 mm; such supports will definitely become a good basis for a stable and strong fence.
- It is recommended to use 3 horizontal logs when installing the profile - top, bottom and middle. This way the fence will be more resistant to deformation and will better hold its shape under any pressure.

And so that you can be convinced of the simplicity of building such a fence, we invite you to watch the channel’s video master class We do it ourselves 36, where they share with us all the tricks of working with metal profiles:
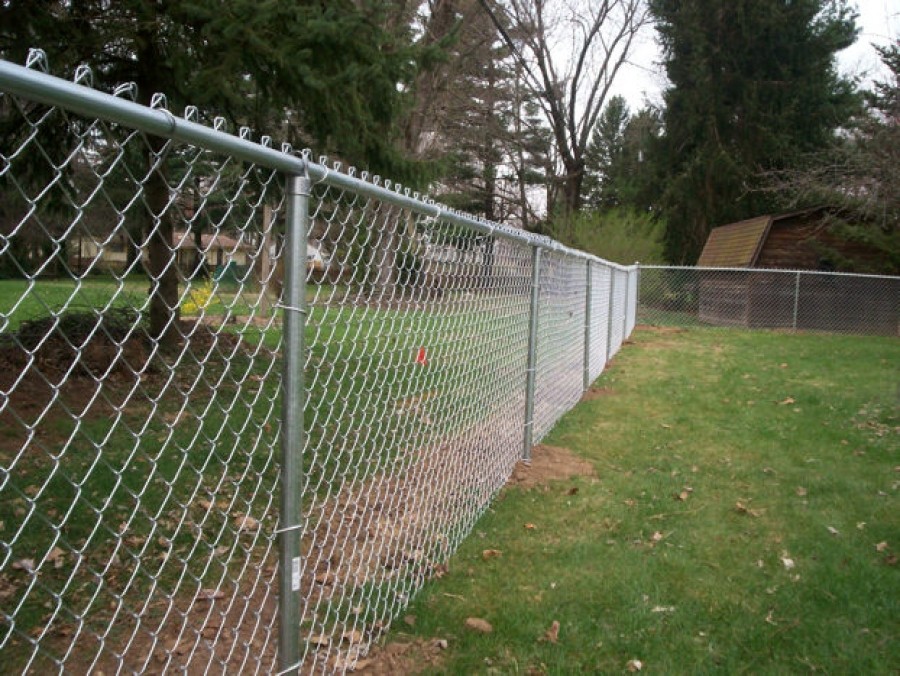
Mesh fence for a summer residence
And yet, one of the most budget-friendly options is a mesh fence. Like any metal product, the mesh perfectly withstands most natural phenomena. And even rust can be prevented by timely treatment. Therefore, fences made from it are quite durable.

Fence mesh comes in several types:
- Chainlink, which is sold in rolls, treated with polymers to prevent corrosion and can be easily installed between posts without unnecessary partitions,
- Grooved, formed from wire with a cross section of 6-7 mm and bent by a wave. It has a strong weave. And thanks to it, it keeps its shape well.
- Welded, has a smaller wire cross-section than in the case of corrugated wire, but due to welding it is stronger. True, using it for a fence will be more expensive than in the case of chain-link.
A fence from any mesh can be made in two different ways:
- Stretch the fabric around the perimeter and attach it to the support posts.
- Stretch the mesh over the frame, and then assemble the fence from the resulting sections.


Allows you to keep track of your pets
Both methods have their own characteristics, so it is impossible to single out one of them as more profitable or simpler.
So, for example, by simply stretching the mesh from pillar to post, you will reduce the time for preparing materials. After all, you will only need to drive in the support, determine the height of the future fence and stretch the mesh, attaching it to the posts with wire.
This method is easy to implement and practical if you are short on time and want to make a temporary fence.
And yet it is worth considering that for a chain-link mesh, the posts will have to be placed at intervals of 1.5-2 meters, and this will increase the budget for the material. While for a corrugated mesh a distance of 3-4 meters is sufficient.

But if there are differences in height on your site, then this is the only solution if you have chosen mesh as the material. Sections are already prepared frames from metal profile, which brings us to the limitation - if you install them in a descending manner, there will be open space under the fence, which does not add either safety or aesthetic beauty to the site.
Installation of sections is simpler than stretching the mesh fabric. The finished frames are simply attached to pre-installed poles equipped with the necessary anchors, or even welded to them.

As you can see, the choice of grid and method depends entirely on your desire to improve the area, the time you have and, of course, the budget allocated for this.
To figure out which material is right for you, you can take a look at a detailed master class on selecting materials and installing them in a fence.
If you want more clarity and understanding of how to do everything correctly, with explanations from an experienced master, then you should watch the video tutorial from the channel RemontHelp.com:
The grid itself consists of cells, i.e. your area will be clearly visible from the street. Therefore it is usually recommended to use this material only between areas, so as not to block the plantings from light.

Original ideas for a fence at the dacha from scrap materials
Every practical summer resident will consider it his duty to save as much as possible and use everything that remains from other projects. Therefore, before you start building a fence with your own hands, we suggest you think about whether it’s worth rushing to the store to buy a mesh or picket fence? Maybe we can make do with improvised materials?
Then let's see what we have accumulated over the entire time we owned the dacha? And is it possible to make decent fences out of this trash?
There is only one answer - yes, you can.
AND car tires, and , and the covers from them can become a fence or its decoration. Moreover, it will be no worse or more boring than one assembled from high-quality materials.
Tire fence
Let's start with tires, for example. A lot of this stuff always accumulates, so over time the question arises of where to put it. Recycling costs money, but the fence will also bring benefits. The choice is obvious.

Somewhat eclectic

All that remains is to fill the area well and begin to install the tires on top of each other in a checkerboard pattern, as if laying out bricks, or secure them to a previously installed chain-link fence.
By the way, if you build a fence from tires according to the pyramid principle, then the soil in the protruding parts can be used for flower beds, thus creating an entire green wall.

Fence made of plastic bottles
Plastic can be considered an ideal material for a fence. After all, it decomposes in at least 60 years, which means that a fence made from it will not suffer from rain or sun. Although bottle plastic is still soft, and its shape at first glance is not suitable for building a fence, many began to give it a chance and use it for other purposes.
To enclose the whole country cottage area like this plastic fence", you will need to accumulate a lot of bottles to create a complete fence.
The low weight of the material makes it easily deformed from physical damage. In addition, if you have accumulated mostly transparent bottles, then such a fence will not provide protection from prying eyes. But the cost of the finished fence will be small.
If you combine bottles of different colors, you can assemble entire mosaics. Therefore, creative individuals agree to endure shortcomings for the sake of an original fence that attracts the attention of passers-by.
To create a full-fledged fence from plastic bottles, it is recommended to take the same size of material. And it can already be assembled into a wall, stringing it on a wire like a curtain, or placing it on top of each other, filling the voids with cement mortar. The result will depend entirely on your desire to strengthen the fence or make it more airy.

By the way, bottle caps will also be used. After all, you can make a movable fence from them, and even with any pattern.
This will require a lot of caps with four drilled holes and meters of wire. Based on the colors you have, choose a pattern, and better diagram for embroidery with beads, and then simply string the lids in order, as in embroidery, in rows. Then pass the wire through the vertical holes, thus connecting the rows.

If you're just bored old fence, and you still want to put the covers into use, then simply screw them on with self-tapping screws, creating a bright pattern-panel on the fence. And now you already have interesting wall on the site, attracting the attention of kids and pleasing your eyes.
A master class from Soloremont.
However, an ordinary picket fence or an old picket fence can simply be painted in an original way.


Fun pencils


You create your own mood and desire to visit the dacha more often!
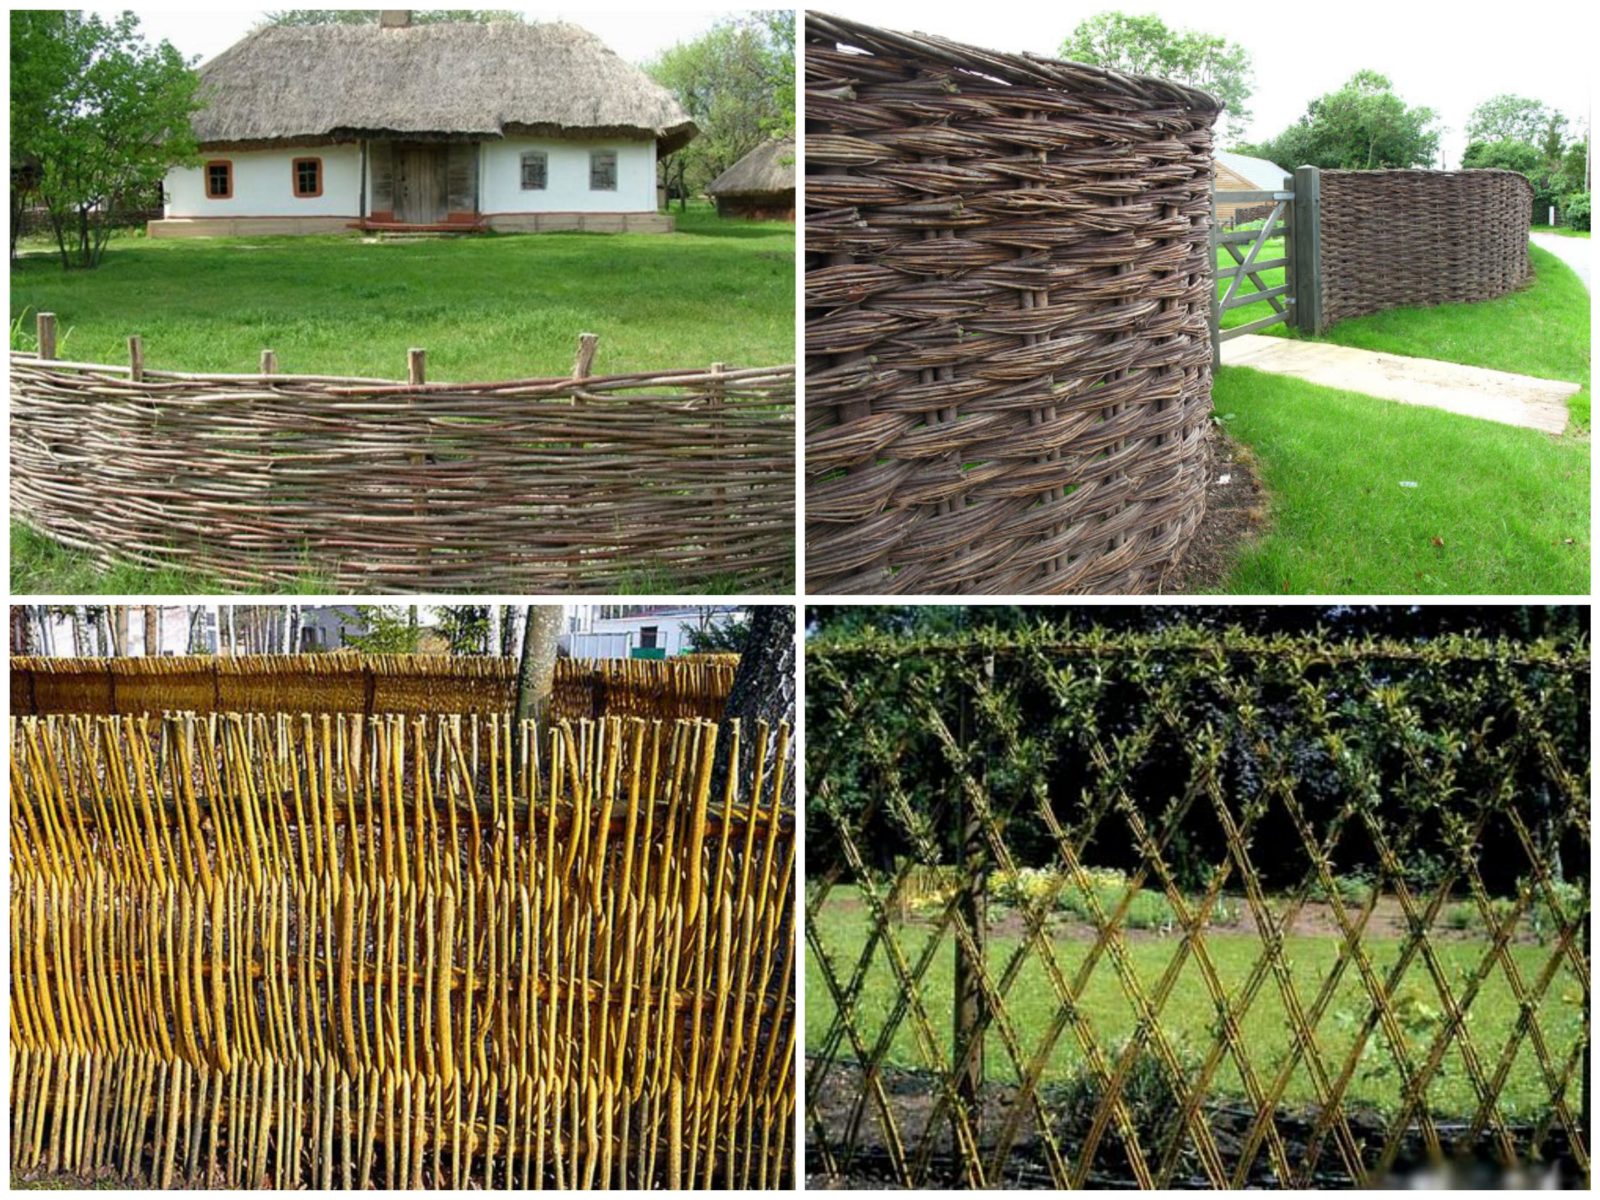
Do-it-yourself wattle fence in the country: a master class for lovers of rural romance
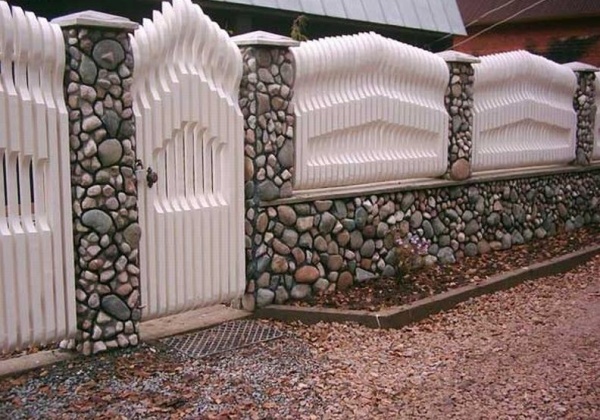
And if you have ever seen a Ukrainian farm or met huts in the south of Russia, then your heart could not remain indifferent to this peaceful romance. And it’s not even these dear ones that sink into your soul, as if toy houses, with a thatched roof and whitewashed walls, and wicker fence with clay hanging on it upside down.

And yet, in addition to the decorative component, wicker is an excellent solution even for a modern dacha. Such a fence is not inferior in strength to either wood or metal. And in terms of beauty and attractiveness it will rank first among them.
And from the point of view of economy, it fits well into our criteria. After all, weaving such a fence will allow you to realize your creative side, and will also save your budget.

Flowers are clearly visible
But first, it’s worth preparing the material:
- timber or logs as a support and basis for weaving;
- material for weaving (preference is given to willow twigs, although twigs of other trees are also suitable, the main condition is their plasticity);
- gloves;
- shovel;
- sand.
If you are going to weave along already driven posts, then first dig them in and cover them with sand and compact them. After that you can start working on the rods themselves. It is necessary to steam the rods so that they become more flexible and do not break when deformed.

You can weave in different ways:
- horizontally, passing the rods in a figure eight between the pillars. This method was borrowed from weavers;
- vertically, between horizontally located logs. This weaving turns out to be more decorative than practical. That is why it is used for fences between adjacent areas, but not external ones;
- diagonally, forming an original wooden mesh. This type of weaving is the most labor-intensive, because the rods must be long for the fence to be at least of medium height. In addition, it is recommended to dig each rod into the ground for greater stability.
To understand the intricacies of simple weaving and try to make your first wattle fence, we recommend taking a look at the video tutorial Oleg Bryukhanov, where he shares the secrets of creating a simple but beautiful fence.
If you prefer sectional fencing, then the master class will be useful for you Yury Kulakevich, where he shows how to create a wicker wicker base.
As you can see, a fence is not just a protective structure that hides a summer cottage from prying eyes, lovers of other people's crops and stray dogs. A fence created with your own hands is also a decoration of the territory, allowing you to enjoy every day spent in nature, among the plants we planted with great love.
The organization of garden space can be different, but fencing for beds, bushes or flower beds will easily fit into landscape design. The designs are practical, you can create them yourself using suitable technology and choosing materials.
Types and features of fencing
The fences used in the garden area are varied and differ in appearance, design, and materials. The main purpose of any option is to provide plant protection from weeds or flooding and crop separation. From an aesthetic point of view, fences are also important, because they allow you to properly organize garden space, decorate the area.
Fences help maintain order in a summer cottage
For beds
Beds are present in many garden plots. To separate garden crops and ensure order in the dacha, you need borders for the beds. They can be made from various materials, but all designs are easy to do with your own hands. It is important to use high-quality and environmentally friendly materials. Otherwise, the plants will not develop as efficiently as possible, because many artificial materials unsafe for them.
Wooden sides
Fences for plant beds are often made of wooden borders. This option is practical, easy to create and allows you to neatly divide the beds. The structures must have parameters equal to the parameters of the bed. Wooden crafts in the form of a box, they are made from boards with a thickness of 2 cm. The elements are fastened with self-tapping screws, treated with a wood antiseptic or painted. When choosing a material, it is best to give preference to larch, as it is more durable. Pine or other elements will also work, but processing is always necessary.
Wooden fencing is practical, environmentally friendly and simple, but has the disadvantage of fragility. Under the influence of moisture, ultraviolet radiation, and temperature changes, wood becomes cracked, deformed, or rots. Therefore, the boards need to be treated with antiseptics or painted.
Slate
Simple slate products are easy to make with your own hands if you already have the material. Old slate removed from the roof when replacing the roof is often used to create edges. The canvases are cut into long elements, the height of which corresponds to the thickness of the soil layer of the bed. The main advantage of this option is the availability of the material. The disadvantages are that old slate is very fragile and releases harmful components into the soil.
When creating sides, you need to additionally strengthen the slate elements with reinforcing angles or rods. They are installed along the length of the bed every meter; the rods seem to support the slate parts. The appearance of such fences is quite laconic; the structures can be painted with compounds intended for outdoor use.
Metal fencing
Reliable fences for garden beds can be made from corrugated sheets or sheet metal with galvanized or polymer coating. The cost of such structures is high, but if such material exists, it is important to know its features. The sides are strips of metal that are fastened with special corners. The top edge is also fixed protective corner, making the operation of the structure convenient, because the edges of the sheets are sharp.
Metal structures quickly heat up in the sun and contribute to the heating of the soil. This should be taken into account when using metal to separate beds.
Video: beautiful fences for garden beds, a selection of ideas
For bushes
Bushes of raspberries, currants or other crops need additional support, as their branches spread widely and lose their shape. For this purpose, fencing made of wooden blocks is used, water pipes PVC, metal and metal-plastic pipes. In any case, the structure consists of supports that go deep into the ground and provide stability to the fence. The branches of the bushes are supported using the upper part in the form of a hoop. This option is universal, in demand and easy to use.
As an easy option, pegs are often used and strong rope. Supports are installed in the ground around the circumference of the bush, and then the rope is pulled. The height of such a structure should be slightly less than half the bush. The structure allows you to raise the lower branches and make caring for the plant simple and easy.
The advantages of bush stands are as follows:
- preventing crop rotting, since the lower branches of the bushes do not touch the soil;
- ease of watering and caring for plants;
- more convenient harvesting;
- simplicity of designs from various materials;
- preventing the growth of bushes;
- the ability to form the required shape of the bush.
The disadvantage of this design is that it cannot be used for very voluminous bushes with heavy branches. In this case, more reliable options with reinforced supports and a square shape are preferable. Similar products can be made of metal or wood, metal-plastic pipes.
Fencing front gardens and flower beds
A front garden or flower garden can be open or closed. In the first case, fences are not used, and in the second, a fence is necessary. In this case, the design separates ornamental plants from the rest of the site and complements the landscape design of the area.
You can separate ornamental plants using a variety of wooden structures. The classic low picket fence is universal option for any area. Metal fencing, which is made from strips of metal coated with a polymer colored coating, is also effective. Wrought iron fences for the front garden look beautiful, but are expensive.
Any option for fencing a flower bed or front garden must be beautifully designed, because the decorative function is important when using such structures. The height is calculated depending on the size of the plants that need to be separated from the main area.
Supports for grapes
Grapes are often grown with decorative purpose. For this you need pergolas or horizontal trellises. Such structures can be in the form of a gazebo, bowl-shaped or arched. Wood is often used as a material for manufacturing, as it is environmentally friendly and easy to use.
It’s easy to make trellises from wood with your own hands, but when using metal elements you need welding machine, fastenings with anti-corrosion coating and other parts. Wooden elements treated with stain and varnish are fastened with nails or self-tapping screws, creating a structure of the required shape. In any case, the sizes of the trellises are selected depending on their location. It is possible that the finished gazebo on the site will serve as a support for the grapes.
Video: making trellises with your own hands
Preparation for installation
To create any fence or small enclosure, it is important to calculate its parameters. Dimensions depend on the type and purpose of the structure. For example, fences for flower beds often do not exceed 50 cm in height, but for ornamental shrubs taller structures are needed. The length of the fence depends on the perimeter or circumference of the flower bed, but you should not place the structure close to the outermost plants in the flower garden. You need to step back about 30 cm from them, which will ensure comfortable care and proper development of greenery.
Before constructing the fence, you can draw a diagram showing the shape and design parameters. And also the diagram shows the location of the main supports in the form of columns, the distance between them. This will allow you to calculate the required amount of material and determine installation features.
How to choose material
Sides or a small fence can be made from a variety of materials. When choosing, you should be guided by the purpose of the fence. For example, laconic, easy-to-use and environmentally friendly wooden borders are best suited for arranging beds. You can separate the shrubs or flower garden with brighter and original options. Available elements are also suitable for this purpose. In any case, the quality of the material must be high, and installation technology should also be taken into account.
The base for the fence can be made of the following materials:
- Plastic bottles. Will need a large number of parts, which depends on the length of the fence. The bottles should have approximately the same bottom size, and for installation they just need to be deepened into the ground around the perimeter of the flowerbed. The containers should be filled with sand for greater strength. Pre-painting in bright colors will make such a fence unusual and beautiful.
- Polycarbonate. It is easy to make a fence for a flower bed from pieces of cellular polycarbonate, colored or transparent. The ends of the elements must first be coated with transparent sealant or silicone, and after drying, the parts must be deepened into the ground along the perimeter of the flower bed. The pieces are glued together transparent glue for outdoor work.
- Wooden boards, picket fence. There are many options for fences made of wooden elements. Designs of any shape can be easily made bright and original, or you can create practical borders for a garden bed.
- Concrete slabs are convenient for durable fencing. Elements of the same size are deepened into the soil along the perimeter of the flower bed. The soil around the fence should be compacted well.
Before choosing any material, it is important to pay attention to its quality. Polycarbonate and concrete products are expensive, but reliable and durable. Boards and metal profiles require anti-corrosion treatment, which will make them more practical. Therefore, it is worth familiarizing yourself with the features of the material, its advantages and disadvantages.
Table: pros and cons of materials
| Material | pros | Minuses |
| Plastic bottles | Availability, easy installation and operation, possibility creating any garden bed design. | Low strength, large quantities required elements, reinforcement for bottles is necessary. |
| Polycarbonate | Practicality and accessibility, simple mounting, variety colors, durability and comfort. | It is important to process the ends of cellular polycarbonate, high price. |
| Wood | Possibility of creating any fencing option, accessibility, ease of installation and operation, versatility for any climatic conditions. | Antiseptic treatment or staining is required, fragility in the absence of treatment. |
| Concrete or stone slabs | Reliability and durability, simple installation, practicality and convenience in operation. | High cost, requires a large number of elements. |
Calculation of quantities of materials and tools
When constructing a fence from boards for a flower garden, you need to determine the height of the structure, which depends on the size of the plants. A fence about 40 cm high is suitable for most flowers. After this, you need to retreat 30 cm from the outer plants and measure the perimeter of the flowerbed. The resulting indicator is the length of the fence. A picket fence requires support posts, cross slats and slats. The distance between the pillars is 1 m, and between the planks is about 5 cm. In this case, the width of the plank should be about 10 cm. For a structure with a height of 50 cm, two transverse logs are required. Thus, for every 100 cm of fence, approximately 7 slats are needed.
A fence for a flower garden can be made from ready-made picket fence sections, which can be wooden, plastic or metal. To do this, you need to determine the length of the fence and, depending on this, select the number of finished sections.
For self-installation wooden fencing you will need the following tools:
- tape measure and building level;
- shovel and crushed stone;
- nails or screws;
- hammer or screwdriver;
- brush, wood preservative, paint.
Before work, you need to prepare the picket fence by sawing the strips into elements of the required length. The transverse logs should be a little more than 1 meter long, since the distance between the supporting posts is 100 cm, but the bars must be attached to supports.
Installation of fencing for a flower garden
Before work, apply to everything wooden elements antiseptic intended for wood. This will preserve the quality of the material and make the work easier. For this purpose, you can use stain, which can be of various shades of natural wood. If the boards are very rough, then they need to be sanded before processing. sandpaper with medium size coating. After this, you need to remove the dust and apply a protective agent.
Drying of the product takes several hours, and the exact time is indicated in the instructions. After this period, you can begin installation, which includes the following steps:
- With pegs and rope we mark the line of the future fence and the place for support pillars. Using a shovel, we make 40 cm deepenings for supports, the height of which should be about 1 m. We pour sand in a 5 cm layer at the bottom of the holes, install pillars, fill them with crushed stone, and compact them with soil on top.
- You need to attach the fence slats to the transverse joists, maintaining the distance between them. Nails or self-tapping screws are used for fixation, and the evenness is checked. building level. It is worth considering that the fence is assembled in sections, installing each section one by one. The planks must be attached to the joists with a distance of approximately 5 cm from the edge.
- The prepared sections are fixed to the installed posts using self-tapping screws. Levelness is checked using a building level. In this case, the lower edges of the planks should not come into close contact with the soil. The distance between the soil and the sections should be about 3–5 cm.
Bush fences
Raspberry bushes, currants and other garden crops need fencing or convenient support to allow the plants to develop comfortably. One of the simplest options is the design from PVC pipes, which has a rectangular shape. For work, pipes with a diameter of about 20 mm are required, as well as corner fittings that allow you to connect all the elements.
You can make a fence for bushes with your own hands using a welding machine for PVC pipes. And also pieces of products are needed. Their length corresponds to the height of the structure (depending on the parameters of the bush). The diameter of the fittings is selected depending on the parameters of the pipes. After cutting the elements, you need to make holes near the bush, in the corners, up to 30 cm deep. The frame of the future fence is welded using a machine, connecting long sections with fittings. The structure is installed in the holes, compacting the soil.
Grape support
Growing decorative or actively fruiting grapes requires the creation of supports or trellises. In the first case, any structures that allow the vines to grow easily are appropriate. For example, a small gazebo with lattice walls will provide beautiful weaving stems.
Installation simple option The trellis involves the installation of two supports made of 50x50 mm beams, the distance between which is determined depending on the required width of the structure. A fixing block is attached to the upper ends, and then thin slats are mounted in the form of a lattice. All parts are pre-treated with stain or other antiseptic. The finished structure can be varnished for exterior use.
Video: how to make a simple fence for a garden bed or flower bed
Fences or fences will provide anyone garden plot order and aesthetics. Simple designs easy to do with your own hands by choosing high-quality materials.
Summer residents and estate owners are constantly striving to improve local area. A reasonable layout of the site plays an important role in this, and clear delimitation of land using fences helps resolve the zoning issue. You can build a decorative fence with your own hands using inexpensive construction material, but improvised means.
Functions and features of using a decorative fence
First of all, you should decide what purpose the installation of such a fence serves: protection of seedlings and flower beds, zoning of the territory, or purely decorative?
The first function is to divide the area, highlight flower beds and flower beds, and define garden paths. All this can be achieved using a low picket fence.
The second function of decorative fences is to prevent unwanted intrusion into the “sacred” territory of the owner - beds and flower beds. In addition, a clear definition of boundaries is not only functional, but also aesthetically pleasing.
So, if the area is small, then you can opt for a wicker fence - it looks beautiful, and special costs does not require, is easy to create, since it is made from durable flexible branches.
Advantages of installing decorative fencing yourself
The first advantage of erecting a fence is the originality of the idea, which can be realized using one of the inexpensive materials - wooden slats or branches. In addition, the advantages are:
- delimitation of space - the entire site will be divided into separate functional zones;
- safety of vegetation - the first shoots grown with such love can be damaged by carelessness of pets or guests, and the fence, even if low, will save your seedlings;
- well-groomed - especially for summer residents, whose main hobby is flower beds and flower beds;
- unity of style - decorative fences that are the same for all zones will emphasize the concept of landscape design.
Types of decorative fences made from scrap materials for cottages and country houses
There are a lot of them, and you can use almost any available material: plastic, brick, wood, stone, rubber.
Plastic
The most popular material for a decorative fence is a plastic bottle, which we often simply throw away. It can be placed both vertically and horizontally, thanks to which entire compositions can be created on a personal plot.
It is one of the available and practically free building materials. The simplest type of decorative fencing is bottles of mineral water, carbonated drinks or beer buried upside down to the base of the neck.
Perhaps the only thing that needs to be taken into account when choosing this type of fencing is the same shape of the bottles. But you can choose the color yourself.
Advice: in order for such a fence not to be blown away by the first strong wind, the bottles must be filled with any bulk material- sand, small gravel, earth.
Besides plastic bottles you can delimit the direction of garden paths.
Rubber
This “building material” is considered the second most accessible. And all because old car tires are used as fencing!
They will look good as borders for flower beds - whitewashed, painted, painted. And if you have a lot of tires, you can use them to build a real high fence for your local area.
The advantage of such fences is their durability, moisture and frost resistance, accessibility and the ability to be used as a “green fence”. However, if there are not so many tires, then instead of a whole fence you can make separate flower beds or even beds.
Advice: the lower crowns should be tightly packed with soil so that the fence does not sag or fall to one side over time.
Wood: picket fence, fence
To make a wooden fence, it is not necessary to purchase lumber; it is enough to use boards, slats and even branches that are on hand.
Tip: wood deteriorates faster than plastic, so before installing the fence you need to coat the wood with a special antiseptic to prevent rot and insect pests. The treatment can also be done with hot bitumen, covering the part of the tree that will be buried in the ground.
In addition to a decorative picket fence, you can make a fence from slats, simulating a mesh or a decorative fence with your own hands, for example, from a grapevine.
Brick
He is another one inexpensive material for the construction of a fence. If brick and its fragments remain after construction, then the problem with fencing the flower bed area will be solved.
Tip: A flower bed laid diagonally with bricks looks best.
However, such a fence serves only as a decorative fence - it cannot provide protection against intrusion by domestic animals.
Glass
Glass bottles can also be used as decorative fencing for flower beds and flower beds. It looks neat, doesn’t require any special expenses, and will last longer than plastic and rubber.
Stone
Fences from natural stone, for example, granite, fit into any landscape design because the material itself is natural. Pieces of material can be laid out in flower beds and designated garden paths In addition, the path itself is laid out with it, which creates a unity of design style.
Advice: to increase its performance characteristics, a stone fence should be fastened with cement mortar, and luminescent paint should be used as decoration, with the help of which an ordinary fence will turn into a luminous one after dark. Such an idea will great solution for decorating borders along garden paths.
Among the advantages of stone fencing, it is worth noting the possibility of erecting a fence of completely different heights, the strength of the fence and the durability of the structure.
Metal
For those who have a welding machine in their working arsenal, building metal fences on the site will not be difficult. You can weld scraps of pipe or reinforcing rod onto a pre-prepared frame. True, this option cannot be classified as a budget option; here you will have to fork out for both cooking material and high-quality fasteners so that the fence lasts a long time.
There are more budget option metal fence - a DIY decorative wire fence.
In addition to the above fences, you can also use a hedge - the bush grows quickly, serves as a decorative decoration, and fencing the area from the curious glances of passers-by.
DIY decorative fence made of branches
You can make a decorative fence with your own hands from scrap materials in several stages.
Preparatory work
Preparatory work includes several stages, which should be considered step by step.
Main works
Before making the fence itself, you need to prepare tools and materials:
- hand drill;
- wire for fastening;
- small carnations;
- pliers;
- hammer;
- willow branches;
- pruner;
- supporting material (fittings, pieces of metal pipes, wooden beams or even thick branches).
Now you can begin the actual construction of the fence:
- Installation of support pillars. Pegs are installed in the dug trench (you can use a hand drill to deepen it). The step between them will depend on the height of the fence. So, for small fences for a flower bed or flower garden, a fence 0.5 m high is sufficient. Therefore, the distance between the supports should be at least 0.5 m.
- After the reinforcement has been dug in, you should begin weaving the fence. To strengthen the structure with the first rod, you can stretch wire between the supports. It can also serve as a guide for young rods. The first row must be fixed with the ends of the wire.
- Subsequent rows are woven in the same way. It is important to remember that they must go in a checkerboard pattern. And, of course, to strengthen the weaving, you can periodically pass a thin wire through.
- At the end of the process, it is recommended to fix the ends of the rods using the same wire or nails (if wooden beams were used as supporting elements).
Video: instructions for making your own fence from a grapevine
"Store" options
If the budget allows, then available materials can be replaced with purchased ones. Thus, construction and garden supply stores sell various decorative fencing, which will not be difficult to assemble yourself on site.
Fence made of plastic elements
- availability of ready-made parts and ease of installation;
- the ability to construct fences as flat surface, and on a site with a slope;
- flexibility of elements, variety of shapes, colors and the ability to imitate any natural material(stone, wood, brick);
- light weight, allowing you to easily carry parts around the site.
- impossibility of production individual elements independently, so you will have to buy everything in the store;
- if some parts are damaged, they will also need to be replaced with custom ones in order to maintain the unity of the design;
- poor frost resistance - at low temperatures the plastic is destroyed, but this can be avoided by removing the decorative fencing in the barn for the winter until spring.
Fence made of polymer products
These are polycarbonate sheets attached to a metal frame.
- aesthetic appearance;
- variety of sizes and colors;
- high quality material.
- high cost.
Concrete fence
Decorative concrete fencing is very popular today and fits any style in which the house and outbuildings on the site are decorated.
- durability, strength;
- variety of shapes, types of products;
- Possibility of painting in any color, decoration in any style.
- high price.
Despite the so-called budget, decorative fences made by yourself will also require some care (stone and brick structures are not considered).
Yes, a fence from car tires It is necessary to restore it once every year or two - remove the old peeling paint and cover the rubber with new one in order to extend the service life of the fence for several more years.
If your fence is made of picket fence, then the wood, just like rubber, needs additional care, namely:
- timely treatment with antiseptic compounds that protect wood from insect pests;
- new painting of the fence.
Repairing the paintwork is necessary to extend the life of wire or other metal fencing. This means that it will have to be sanded and degreased before applying new paint. In addition, as you know, any surface cleaned of old coating “grabs” new layers of paint much better (and faster).
As for the hedge, everything is clear. Timely watering, pruning and crown formation will help to grow a real “green fence” on the site.
The methods discussed above for constructing decorative fences for country and garden areas are budget-friendly. Owners of private houses, as a rule, whenever possible, purchase ready-made decorative fences that simply need to be assembled on site. However, it is worth remembering that a purchased factory product will not replace the original designer one.
Wooden fences have undeservedly faded into the background. And completely in vain! Of course, in terms of stability and reliability, fencing made of boards is significantly inferior to its brick and concrete counterparts, but a minimum of time, effort and money is spent on erecting a wooden fence.
At the same time, you can handle all the necessary activities yourself. By showing a little imagination and doing everything according to the instructions, you will create a truly original and interesting design.

What to build a fence from?
Before starting construction, we pay due attention to the choice of source material. For the construction of the fence we use only high-quality dense wood. The wood of oak, aspen, ash, Siberian larch, alder, and mulberry is perfect.

Among all the listed options, the most interesting is Siberian larch. A fence built from it will last as long as possible. If one of the main enemies of most wood species is moisture, then larch only becomes stronger from contact with water.


We limit the use of pine only to the construction of a fence panel; in the event of breakage or wear of the fence, such material can be replaced without special financial costs and effort.
 Picket fence - pine
 Important! And under no circumstances do we use birch to build a fence - it is extremely unstable and short-lived.
It is also important to choose quality material for the manufacture of supports. Wooden pillars will be best combined with wooden spans. You can either dig them into the ground or attach them to special metal stands (consoles) concreted in pre-created recesses.
Important! To extend the service life of wood, it must be pre-impregnated. It will reduce the intensity of the harmful effects of moisture, air, fungus and other harmful microorganisms on the building material.

To consolidate the effect, it is recommended to treat the wood with a special dye, for example, Swedish paint. It will give the material a very beautiful shade. If desired, a different color dye can be applied over the dried Swedish paint.

To prepare Swedish paint we will need:
- copper sulfate– 250 g;
- salt – 250 g;
- red lead - 250 g;
- drying oil – 230 ml;
- flour – 570 g;
- water - about 4.5 liters.
Following the given proportions, you can prepare any required amount dye.

The paint is quite economical. About 200-250 ml of dye is spent to cover 1 m2 of surface. The given recipe allows you to prepare golden-colored paint. If you want to get a different shade, replace red lead with manganese peroxide, ocher, or another component of your choice.
Swedish paint is prepared in the following order:
- the paste is cooked. To prepare it, stir the flour in 3 liters of water;
- the finished paste is passed through a sieve - this allows you to remove lumps from the mixture;
- the strained paste is put back on the fire. Salt and copper sulfate are added to the mixture. Constantly stir the mixture until the vitriol is completely dissolved;
- While continuing to stir the paste, add drying oil to it, and then pour in a certain amount of water (usually about 1.5 liters) until a homogeneous liquid composition is obtained.
Apply the finished paint to the wood in a double layer.

Table. How to paint wooden fence
| Paints | Binder | Life time |
|---|---|---|
| Acrylic | Polyacrylate | 6-20 years |
| Water-dispersed | Organic solvents | >20 years |
| Oily | Drying oil | 2-3 years |
| Silicate | Liquid incandescent glass | 20 years |
| Silicone | Silicone resins | 20 years |
| Enamel | Alkyd resin | 10 years |
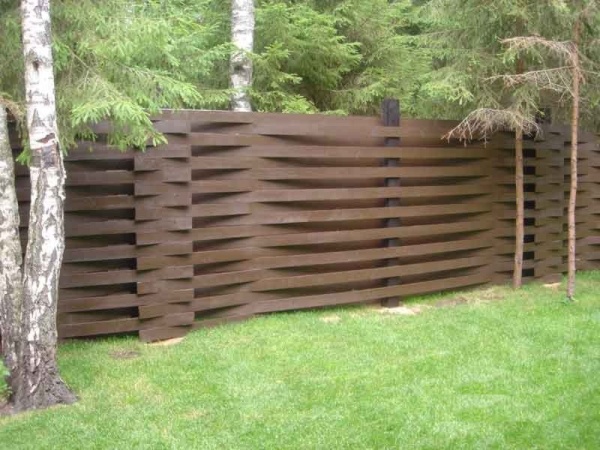
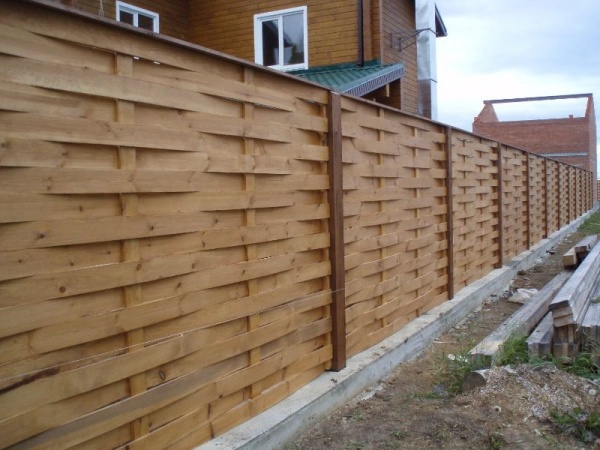
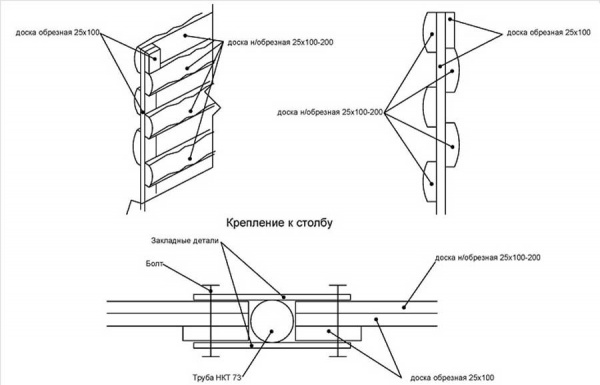
For example, you can assemble a fence using the wattle fence principle. The boards are attached in a curved state. Trying to straighten out, they will fit quite tightly to the support pillars.
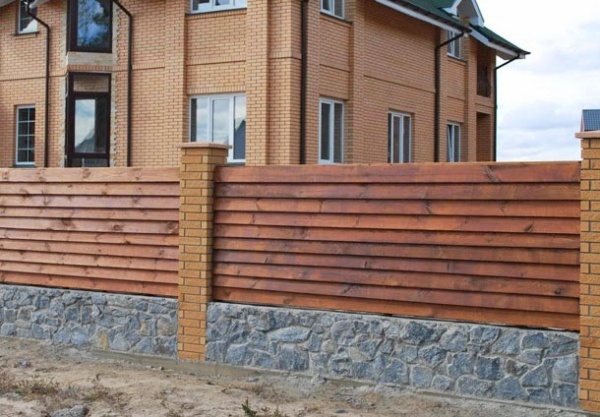
Another great option– filling the space between the supports with wooden siding. We fasten the sheathing boards starting from the bottom, maintaining a 25 mm overlap.
Fences made in the form of blinds look no less original. By laying the boards with a downward slope towards the street, you will create an invisible fence that is resistant to wind loads.
The boards can also be nailed at the ends. To perform the highest quality cladding, we first make markings on each rack.
In case of installation metal poles they can be hidden by covering the posts on both sides. We close the metal supports on top with wooden plugs.
If desired, you can make the fence more original using wooden support posts. We make inclined cuts-grooves in the supports, and then insert the ends of the lamellas into them. Additionally, we fasten each strip with self-tapping screws. To hide the fastening points, we cover the screws with wooden covers. We crown the upper part of the supports with plugs.
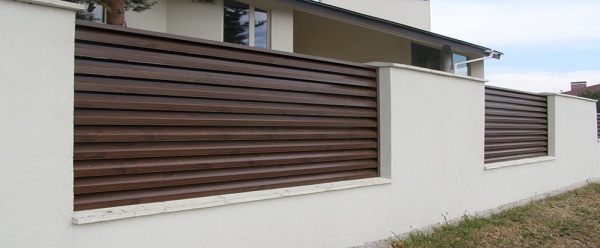
To make the fence look more original and modern, we can fill the boards with a small gap (up to 15 mm). At the same time, the narrower the boards are (of course, within reasonable limits), the more interesting the fence design will be.
You can also use boards of different widths. When choosing this cladding method, be sure to ensure that the pattern on adjacent sections matches.
There are a lot of wooden design options. Choose the one you like and start building the fence. You already have all the knowledge necessary for this.
Prices for various types of construction boards
Construction boards
Good luck!
Video – DIY wooden fence
DIY decorative fence. Photo


Today, wooden fences are gaining popularity again. Modern analogues made from other materials, of course, are no worse, but from time immemorial, humanity has valued and still values naturalness. Nothing beats the naturalness of solid wood. Our website presents several types of wooden fences and fences for the home and detailed instructions on how to make them yourself.
Main types of wooden fences
For any owner of a private home, a fence made with your own hands is a special pride. But before you begin its construction, you need to choose the type of structure. Types of wooden fences for private houses and photos for them:
Wattle
Wooden wicker fence. By type, this is the most ancient variety - rods intertwined with each other in a special way and knees driven into the ground. An antique wicker wooden fence (you can see it in more detail in the photo below) is very unusual; making it with your own hands is not at all difficult, but, unfortunately, it has a short service life.

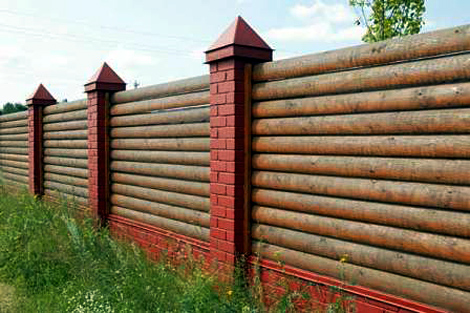
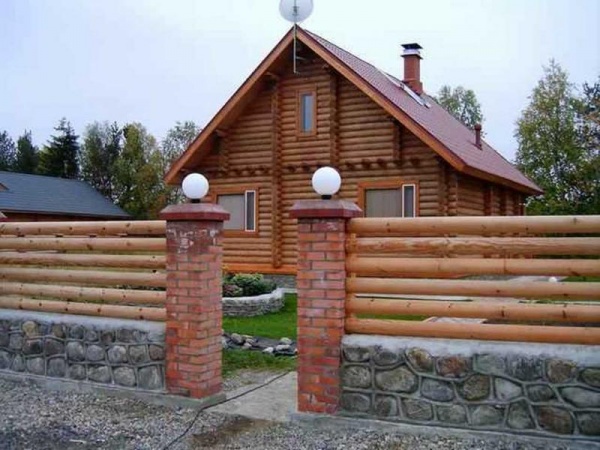
Ranch
Although this name is reminiscent of American films about cowboys, it should be noted that in our country, such structures were erected a long time ago. They were used to fence gardens, orchards, agriculture animal grazing areas. By design, these are several boards (poles) nailed to a wooden beam.

Palisade
This is also a type of antique fencing that you can make yourself. The stakes are pointed at the top at an angle of 40 degrees. Has an impressive appearance

Lattice
Attractive appearance, such an openwork wooden one is easy to make with your own hands, most often serves as a decorative element personal plot or for its zoning. A decorative wooden fence is not particularly durable. It can be made by crossing straight or diagonally slats or narrow boards.

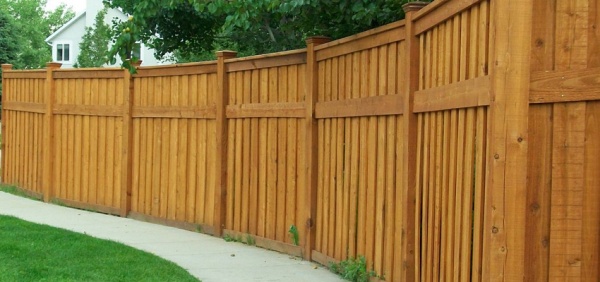
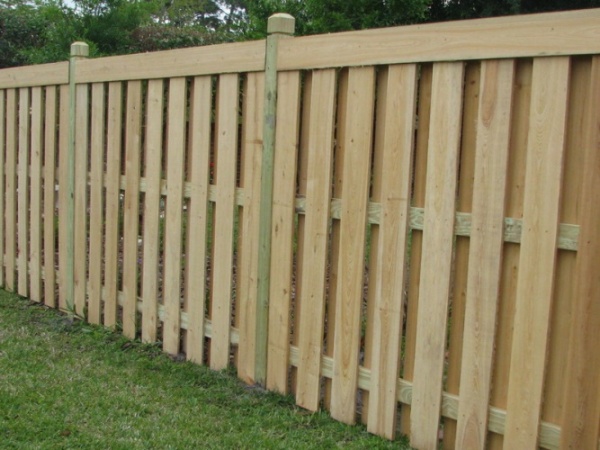
Fence
The traditional type of wooden fencing is a picket fence. The simplest manufacturing option: the boards are attached in a vertical position to the veins, and those, in turn, to wood posts driven into the ground. This is the most economical and quickly erected way to fence your site. Apparently that's why it became so popular. Easy to use, making it yourself is simple and quick, and with proper care it will last a long time.

Another distinctive feature of this fence is that it clearly outlines the boundaries without obscuring the area itself.


Separation of wooden fences according to installation technology
Wooden fences, as you can see in the photo above, are:
- Without foundation. In this case, only wooden poles or metal supports will be needed.
- On the foundation. The above-ground part of the foundation is made simultaneously with the wooden beam.
As for finishing, it can be done using any material, taking into account your preferences: stone, corrugated board, brick. A solid wooden fence with a base always looks respectable, stylish, and solid. To make it you need to spend a lot of money, there is an option to reduce the cost of the design - this is to make a wooden fence with your own hands from start to finish.
Stages of installation of wooden fences
Rustic style (Country) has always been and remains at its peak fashion trends. Wooden picket fences- his bright element, and the simplicity of the lines, even without decorations, always looks modern and elegant. Do with my own hands not difficult at all. How to make a wooden fence more complex design? First you need to decide on the material of manufacture.
Important ! When choosing a material for a wooden fence, make sure that the solid wood is free from rot and other damage. Treat the wood with an antiseptic. Or buy ready-made material.

Step-by-step instructions for installing a wooden fence
If you have already decided on the material, choose the proportions: shape, height of the wooden fence. Only after this will it be possible to begin construction directly. How to make a wooden fence with your own hands, drawings and detailed instructions see below.
- The first step is marking the territory.

- Next, you need to calculate the number of wooden pillars, picket fences and veins.
- The ground part of the timber must be treated with tar.
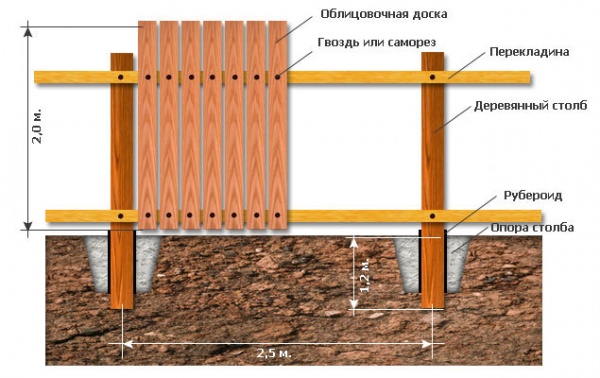
- Then marking is done along a pre-tensioned cord under the beam (recommended distance is 3 meters).
- Holes are being dug out. The depth of the holes should be equal to the depth of the soil - this is about 1.5 meters. Holes can be dug with a drill.
- Think carefully about one nuance: if you are planning to make a high and heavy wooden fence, then in this case be sure to attach a metal plate to the base of the support. This is necessary for stability and to prevent the fence from twisting under the influence of gravity.
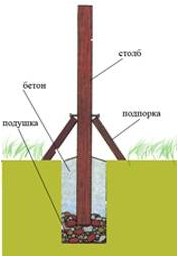
- Wooden supports are installed vertically on a 12 cm sand cushion, after which the hole is filled with small portions of soil and sand. Compact thoroughly. To make the structure more durable, the hole can be filled with concrete.
- After installing the supports, you need to calculate and determine the attachment points for the wood veins at the top and bottom.
- The picket fence is selected according to a pre-selected template, but you can make it even by cutting it along a stretched cord.

To simplify the work, you can purchase a ready-made picket fence with or without drawings.


We invite you to watch a short video with a selection of beautiful wooden fences:
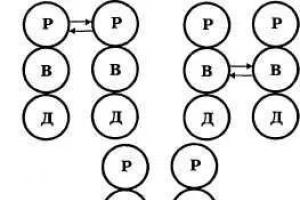
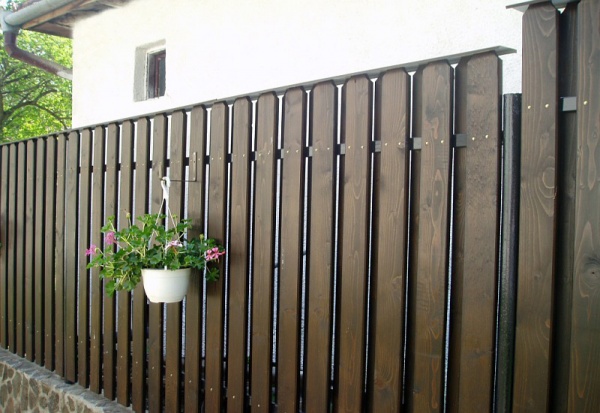
How to make a checkerboard fence with your own hands
The next type: do-it-yourself wooden fences, checkered in the photo, you can clearly see the difference with the previous one.
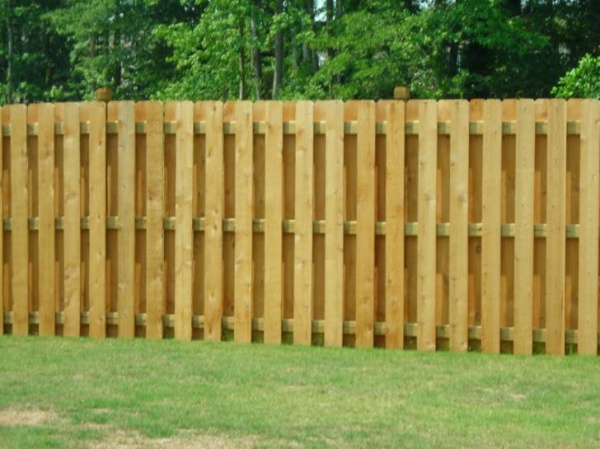

Compared to the previous one, the wooden chessboard looks more decorative. The main feature of installation is that you can do it in any design: dense or with gaps.
The pillars are installed similarly to the option described above. After installation, you need to attach the beams. Can be cut into wooden pillars grooves, in metal ones it is necessary to weld the corners on which the beams will be located.

Decide in what position you want to make the checkerboard: horizontal or vertical, set the guides. With a vertical checkerboard they are made horizontal and, conversely, with a horizontal checkerboard they are made vertical.
Next, after installing the guides, you can begin installing the boards. Place them in a checkerboard pattern as shown in the picture above (one on each side). They can be secured either with nails or self-tapping screws.
Very important ! Clearly measure and mark the attachment points, because small irregularities will create gaps, and this will significantly spoil the appearance of your fence.
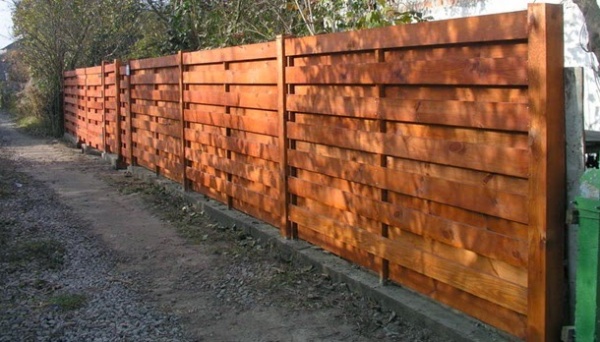
Do-it-yourself wooden ladder fence
A wooden horizontal ladder fence is also very popular, so we will dwell on it in more detail. Making such a structure with your own hands is as easy as the previous ones. Install supports according to a similar principle (described above).

Next, you need to secure decorative wooden overlays on both sides - these will be the guides. As a rule, a channel is used for this purpose; it is easier and easier to insert the board into it at an angle. In this case, it’s up to you to decide at what angle you want to make the Christmas tree. The position is also selected according to preference. The direction can be either vertical or horizontal.
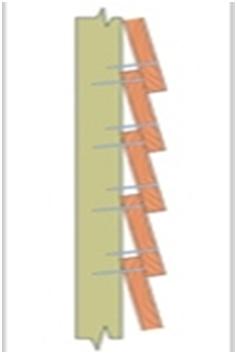

Important ! Do not forget to install cushioning material between them along with the boards. This is necessary for ventilation and to preserve the material from rot.
Do-it-yourself wooden fence for a summer cottage. The photo shows some models of finished works.

Upon completion of work, treat the fence with an antiseptic and paint the structure.
The key to the longevity of a solid wood fence
As a material for making wooden fencing you need to choose those wood species that are characterized by strength: ash, mulberry, acacia, oak, aspen, Siberian larch.
By the way, the last option is a truly eternal material; when exposed to water, it does not deteriorate, but, on the contrary, strengthens. It is also worth limiting the use of pine trees to create wooden blocks. You should not use birch if you do not want to change it often; it has the lowest density among all others.

Bars for fencing are used from wood and metal, or as an alternative to wood - overlays. The tree should not be discounted. Today thanks modern technologies There are special metal consoles. Therefore, solid wood supports do not have to be dug deep. The consoles are concreted, and then a wooden beam is attached to them.
The most vulnerable areas of wood are those where the cut is made across the grain. To extend the life of wood in fence blocks, lay the boards horizontally or make canopies. Wood is vulnerable if it comes into direct contact with air:
- At high humidity swells and is affected by fungal deposits.
- If the air is too dry, it dries out and cracks.
How to treat a wooden fence to reduce the risk of damage and deterioration? This can be done by impregnation with an antiseptic and painting with special materials: Swedish paint, soaked in hot drying oil, yacht varnish.
You can prepare Swedish paint yourself at home. To do this you need to mix the following ingredients:
- Iron sulfate - 260 grams.
- Iron minium - 260 grams.
- Regular table salt - 260 grams.
- You will need 580 grams of rye flour.
- Drying oil, can also be used linseed oil- 240 grams.
- About 4.5 liters of water.
The consumption of this mixture will be approximately 200÷300ml/m2. The expected color is golden. If you need a different color, then replace the lead with ocher or manganese peroxide.