Grinding a log house is an operation carried out in order to remove the remnants of the bark from the logs, which begin to rot and darken over time. This type of processing allows you to give the wooden dwelling an attractive appearance, make the house more durable and thereby significantly increase its service life. Sanding is a simple process. If you have a special tool, you can do it yourself.
When and why do you need to sand a wooden house?
The log house is constructed from timber or rounded logs with a natural moisture index. The latter at the time of construction of the house are raw. If you try to process them immediately after construction, the effect of the operation will be negative. The wood will be even more “shaken”, and the erected dwelling will become less attractive in appearance. For this reason, the polishing of the log house is carried out 10-12 months after the completion of all construction work. Processing is allowed to be done earlier. But only in cases where the house was built from well-dried timber.
Sanding solves a lot of problems. After such an operation, their natural woody structure is clearly visible on the logs, mold and fungus do not form on them, the walls of the log house completely get rid of small cracks and roughness. Grinding prevents early aging wooden elements and enhances the adhesion of the latter to paints and varnishes that apply to finishing Houses.
The described processing method is performed strictly after the building is covered. If the logs have darkened during shrinkage, they are pre-treated with special bleaching solutions. Direct grinding is carried out after complete drying of such compounds. Another important point. After grinding, the wooden dwelling must be treated with an antiseptic or applied to it with a paint and varnish coating within 4–7 days. If this is not done, the log house will darken. The entire grinding operation will have to start from the very beginning.
Woodworking tools - which ones are suitable?
Professional builders prefer to grind a log house using special machines. Their price is very high. Home craftsmen do not use such units. High-quality grinding can be done using more affordable and easy-to-use tools:
- Belt grinder.
- Bulgarian, equipped with special nozzles.
Belt sanders are characterized by low weight. They are convenient to use. This tool is ideal for processing wooden products with a flat surface. Grinders do much worse with rounded logs. The processing of such materials is very laborious and not always of high quality. To facilitate the grinding process, belt units equipped with dust bags make it possible. After their application, there is no need for cleaning.

Faster and more efficient grinding is performed by a grinder with a set of special nozzles. The latter are made in the form of disks on which pieces (petals) of abrasive material (sandpaper) are fixed. Nozzles are used different:
- With sandpaper for 40. Such products are good for primary wood processing.
- With abrasive 80 and 100. These nozzles are designed for finishing grinding.
Abrasives with other grain sizes may also be needed. A number of sections of the log house are polished according to special schemes.

When choosing a grinder, pay special attention to two indicators - the power and weight of the tool. It is desirable to grind wood with installations of 750–900 watts. This power is enough to remove the bark and smooth out small defects on the logs. The weight of the tool must be kept to a minimum. Then the hands of a person will not get tired when performing a large amount of work. Experts say that a heavy grinding unit reduces labor productivity by 2.5–3 times. And when using low-power grinders, the time for processing the walls of the log house increases by 3-4 times.
Nozzles in the process of grinding surfaces have to be changed very often. Sandpaper is quickly erased due to the presence of resinous compounds in the wood. It is recommended to periodically clean the nozzle from dust and chips using metal brush. Note that a nozzle cleaned 2–3 times is erased much faster than a new one and does not provide high-quality processing of the log house.
Some plots wooden building are polished with a chisel with a width of the working part of about 2 cm. This tool is used for processing log joints in the corners of a log house and other hard-to-reach places where it is impossible to use a bulky grinder or grinder.
Order of work - how to make a house beautiful?
When processing the walls of the log house, the beam and logs are removed upper layer wood. This leads to the fact that in the air there is a large amount of sawdust, fine dust, resin. Such particles get into the eyes, nose, mouth of a person and can harm his health. It is easy to avoid such problems - all work must be done in protective clothing and a respirator (mask).
The grinding process is divided into several stages. First, a rough peeling of wood is done. For this, a coarse abrasive is used. With its help, hard bark is removed from the surface. The operation is carried out very carefully so as not to damage the fleecy part of the tree.

The pile is removed in the second step. It is produced with fine-grained abrasive. This part of the procedure is undesirable to perform with a grinder. Inexperienced craftsmen press too hard on the power tool, which leads to the formation of grooves on the logs, which spoil the appearance of the wall. It is better to use a tape machine. And the grinder should be used exclusively for grinding the end and groove sections of the walls.
It is recommended to process the grooves of a log house from a bar with a machine with a flat nozzle. The latter is made of rubber or plastic. The first type of nozzles have to be changed often. They fall into disrepair after just a couple of hours of operation. Plastic products much more durable. The cross section of the used grinding wheel is taken a little larger diameter nozzles.
Further polishing of a log house assumes carrying out final processing. It is required when varnish or paint is applied to the walls of the building. The operation is performed with a nozzle with a grain size of 58-68 microns. The final polishing is done most often by hand. Although large and even sections of walls can be processed and tape machine, and Bulgarian.

Advice. It is necessary to grind large walls in parts. The entire surface is divided into several separate sections and each of them is processed separately. Immediately cover the entire sanded wall with a special solution that will not allow it to darken.
How to process a log house after grinding?
Rounded logs and timber are treated with flame retardants, glazing compounds and antiseptics. The first increase the wood's resistance to fire. Glazing compositions improve the appearance of a residential building. Antiseptics do not allow the development of fungus and mold. All of these compounds have a protective function. In addition, they emphasize the beauty of natural wood. The compositions are applied in the following order:
- treatment of walls with an antiseptic;
- flame retardant impregnation;
- application of the glazing composition.
The walls of the log house can be painted. But then the natural appeal of the wood is lost, as its texture will not be visible. The coloring of log cabins from logs is carried out by means of a spray gun, from a bar - paint brush. The paint is always applied in two layers (the second is applied after the first has completely dried). It is desirable to paint the ends of the structure liquid glass or moisture resistant acrylic compounds. The rest of the areas are allowed to decorate with any paints on wood.
Grinding wooden frame- a rather laborious, requiring special endurance process. To do a good job, you need to have good tool and certain building skills. Many experts argue that it is impossible for a person who does not have a construction specialty to perform wall grinding work on their own. However, the presence of the Internet in our life, where you can find almost any step-by-step instruction for a particular job, allows you to think differently. This material is no exception. Here you can find the complete technological process polishing the walls of the log house and decide for yourself whether you can do the same, only with your own hands.
Why you need to grind a log house
Many of you have probably noticed that some houses built of wood have a darkened, not quite natural appearance. All because throughout all year round, the tree has been exposed to natural influences such as: snow, rain, wind and frost.
It is because of this that the wood darkens, while losing its excellent original appearance.
Grinding the surface of the log house with the subsequent application of various protective layers on it, it will help to preserve the natural texture and color of the log for many years.

You can grind a log house, both made of round logs and made of glued beams. The whole process of work is almost mechanized, as it is carried out manually using various electric tools for this.
When to Sand
The opinion on whether to grind the walls of the log house immediately or wait for it to completely shrink and dry is divided. Some believe that waiting until the log house shrinks and the wood shrinks is too long, because the process is quite lengthy, depending on many external factors such as:
- felling season;
- log manufacturing technologies;
- The type of wood, its density and humidity;
- Type of insulation used between the crowns;
- Climate data for the region.
In addition, during this period, the wood can become infected with a fungus and change its shade.
Others believe that it is impossible to hurry with this matter. The darkened color of the wood will disappear after grinding, and the fungus is easy to remove with the help of biological impregnation. All must be fully complied with the necessary conditions for efficient and high quality results.
To do this, the roof must be covered, the structure must completely shrink, but most importantly, the moisture content of the wood should not exceed 20% .
Despite the divergence of opinions, experts still recommend making their choice in favor of the second option. Premature processing and painting of damp walls can turn into big troubles for the owner.
Also, turn construction works, to wait for the log house to be ready for grinding, optional. During this period, you can engage in plumbing and electrical wiring, lay the floor, ceiling, insert windows and doors.

Necessary tool for work
The working tool must be selected based on what material the log house is built from (chopped log, rounded log, or is it a beam).
Only tools, or rather not even tools, but accessories for work, will be needed in all three cases - these are goggles and a respirator.
chopped log
For grinding the walls of a log house built from an ordinary log, you need ordinary grinder with special fittings. When purchasing a grinder, make your choice better in favor of a professional, well, or at least a semi-professional tool.
Since the walls will have to be sanded from the outside and from the inside, and these are very large areas for work, a cheap and low-quality tool will fail after the first or second wall. Moreover, wall grinding loads the tool very heavily, in view of the long-term ongoing process of work. 
The power of the grinder will be sufficient 800-1100 W. Of course, you can take a more powerful one, so to speak with a margin, but this one is more than enough for grinding. Bulgarian with big power, will be much harder to work with. This is due to the fact that it has considerable weight and enough high speed rotation. One wrong move and a hole appears on the log, which is then not so easy to smooth out. You should also pay attention to:
- The length of the electrical cable - too short is not very convenient to use;
- Power adjustment - in places that are inconvenient for work, for safety, you should slightly reduce the speed;
- The place of air intake into the engine - it is desirable that the air intake be from the back of the grinder, and not from its side walls, so it will be less clogged with dust, which will increase the life of the tool.

- A special screw-on nozzle for a grinder, on which a grinding disc is attached, can be purchased at any building supermarket. Grinding wheels are used with different grain sizes. from 40 to 60- for initial processing and from 80 to 100- for the finish line.

rounded log
Since the rounded log has a semicircular, perfectly flat surface, the use of a grinder will not be appropriate. With careless movement, you can make a recess or groove on a log, greatly spoiling the appearance. The ideal way to sand a log cabin is to use an eccentric sander.
Despite the fact that its performance is much lower, the principle of operation of this tool will make the surface of the log perfectly smooth. The machine uses a specially blocking element that turns it off when pressed hard, which allows a person who does not have experience in this matter to perform work.

Using an eccentric sander
The power of an eccentric sander is only 300-400 W., the number of revolutions 8,000 to 12,000 rpm. More expensive models are equipped with a special dust bag. It is very convenient for interior work.
The tool is selected according to the principle “Comfortable in the hand”, which means we take it. For primary processing, circles with graininess are used. 40-60 , for finishing 80-100 .

Glued or profiled timber
Grinding a log house whose walls are made of timber is done in two ways.
- First way- using the well-known grinder and grinding wheels. All work on giving the beam an ideally even and smooth shape, in comparison with a round log, can be done in a much shorter time.
This is due to the fact that the beam has flat surface which is much easier to work with. However, not everyone can cope with this task. This requires practice and good skill with the tool, as any error on the wall will be clearly visible. If there is no such practice, then it is better to resort to the second option.

Polished timber
There are two standard types of wooden beam:
- Profiled timber - is a solid log, passed through special equipment, giving it a certain shape (profile);
- Glued laminated timber - a pre-harvested log, sawn into boards, which are then dried in special cells before 10-14% humidity. Finished boards are tightly glued together in a pressing machine into a solid blank, from which the profile of the beam itself is then made.
Due to the fact that glued laminated timber is dried, practically does not shrink construction material, you can start grinding it immediately after the walls are erected.
With a profiled beam, everything is different, most often it is made from freshly cut wood, so you need to give the log house time to shrink and shrink, only after that start work. 
- Second way- use of a vibratory grinder. This method, though not as fast, but better. In addition, grinding wooden walls at home can be done with your own hands, without resorting to the help of an expensive team of specialists.
The machine should be purchased with a rectangular, not a round platform. It is easier to work with such a machine, a rectangular platform has a large coverage area, which will certainly affect the speed of work.

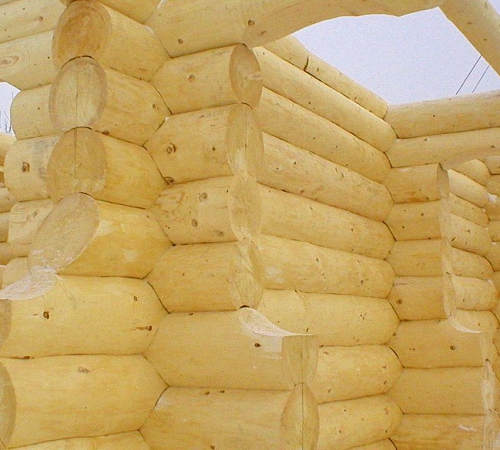
Grinding a log house with your own hands - process technology
The first thing to start with is to check all the walls of the log house for defects, such as "radial structure". What it is? Radial structure is the process of peeling the wood structure, as a result of poor-quality processing of the log in the machine.
If there are such places, the resulting cavities are filled with wood putty, which can be matched to the color of the wood. Allow time for the putty to dry completely. 10-24 hours., only then start work.

Existing wood putty colors
You can start grinding from the ends of the log house, any beginner “specialist” can cope with them, besides, the first training will help you feel a little more confident when moving to the walls.
While this will be your training ground, end sanding is not to be taken lightly. The fact is that they are the weakest point of the log house, these places are more prone to getting wet and cracking.
Advice! To minimize damage, after processing the ends with coarse-grained sandpaper, they should definitely be smoothed out with a finer one. This will help get rid of the fibrous surface and make the so-called blockage of the ends, which protects them from moisture.

Proper grinding of the ends of the log house
Working with a grinder
When grinding a beam with a grinder, it is necessary to keep the tool strictly parallel to the plane of the wall. The pressure on it should be minimal, this will avoid surface drops, making the walls perfectly even.
The grooves are ground with uniform, consistent movements, while firmly holding the tool in their hands. Care must be taken to ensure that the corners of the grooves are even and sharp, they cannot be rounded.
Grinding grooves is a rather laborious and complex process, even for specialists. Therefore, if you do not have enough experience and skills, you can purchase a grinder with a triangular groove nozzle.
Important! Remember that you must definitely give the grinder time to rest, like any electric tool, she is afraid of overheating. Otherwise, the imminent failure of your reliable assistant is a matter of time.
Working with the machine
The use of an eccentric or vibratory grinder for grinding a log house makes the work process less complicated, but longer. Special skills in the possession of the instrument are not required, it will be enough just to familiarize yourself with the instructions and make a trial test on an unnecessary board.
After that, with smooth movements, we drive the tool along the surface of the beam or log, until a perfectly smooth surface. The grooves need to be ground, holding the machine at an angle, parallel to the surface, giving their lines a clear geometric shape.
Conclusion
As you can see, sanding a log house is quite inexpensive, but a painstaking and requiring special care process. You should think very carefully before abandoning this venture, because the above arguments once again prove the usefulness of this procedure.
In addition, the attractive, aesthetic appearance of your building for many years should finally tip the scales in favor of the right decision.
After construction wooden house multiple Finishing work, and polishing a log house is no exception. What is it for and how to do it correctly?
Why do log cabins need to be sanded?
Sometimes people do not think that unsanded wood can quickly deteriorate. What is the purpose of grinding?
- The remains of the bark on the logs begin to darken over time. This is due to the influence of frost, temperature changes, numerous long-term precipitation and other external factors. The result of this influence is the loss of aesthetic appearance. Grinding the log house returns it, the tree becomes light (as if it had just been cut down).
- To protect the walls of the log house of a built house (saunas, baths). If the conditions of transportation or storage of wood are violated, fungal infection can occur. As a result, the bars may become covered with mold or dark spots. These biological damages can be repaired with proper resurfacing.
- The sanding of the log house is excellent preparatory stage before painting the wood. This is especially true if a person wants to emphasize its natural beauty. In addition, with the help of grinding, you can reduce the amount of primer and paint.

With the high-quality performance of this work, you can significantly extend the life of the wood.
To further prevent the occurrence of rot and reduce the fire hazard, the wood is coated with special compounds.
And how is the work of polishing the log house carried out?
What to do before sanding a log house
It is known that polishing a log house is a rather laborious work. Its implementation requires specialized equipment and a large number free time.

In order for the process to be completed as quickly as possible, people turn to specialists whose services are by no means cheap. On this moment the average price for work varies from 300 to 400 rubles per 1 polished square meter. That is why some prefer to perform this work on one's own.
Before proceeding with grinding, you should wait until the log house or beams shrink. This is done when all the wood has dried to such an extent that its total moisture content is no more than 20%. You can check the humidity with a moisture meter. If this condition is not taken into account, the walls of the building may crack or deform. And when sanding wet wood, burrs will form. Therefore, it will be almost impossible to achieve a perfectly smooth surface.

To start grinding, you need the following equipment:
- moisture meter;
- chisel (designed for grinding only in hard-to-reach places);
- belt sander (sometimes it does not reach in hard-to-reach places);
- or grinder with a special nozzle in the form of a grinding disc and other nozzles with different grain sizes.

The harm from the grinding process lies in the fact that wood dust enters the eyes, nose, and then into the respiratory tract. To protect themselves from such exposure, people use respirators and tight-fitting goggles for production.
Using the grinder also requires special care. This tool is traumatic, strong pressure on it can provoke a larger removal of the wood layer, and this lowers its protective functions.
The process of grinding a log house
Having familiarized yourself with all the nuances of the work, you can proceed to the primary grinding. First, the surface is treated with a grinder using a nozzle with a larger grain (40), then with an increasingly fine one (up to 100). The entire grinding process is carried out on the surface of the logs from top to bottom. During this process, it is worth remembering that the layer to be removed must be minimal, otherwise the life of the wood itself will be reduced.
If the work is done by a grinder, you should be aware of the possible backfire its incorrect use. It is also worth noting that its grinding wheels are quickly clogged with resin and wood dust. You can clean the nozzles with a special brush and white spirit, in which case its performance will be reduced.
The dust generated during grinding irritates the mucous membranes. Therefore, for convenience during work, people use special means protection (sealed goggles, transparent masks, etc.).
If there is no desire to work with a grinder, you can get by with other tools. The main rule for fast and high-quality work is the ease and efficiency of the grinding tool.
So, some builders prefer the use of tape grinding machines(grinders). The work is carried out in the same way as the grinder, according to the principle of "bottom up". The advantage is the fast grinding of flat wooden beams. Some grinders are equipped with special bags for collecting debris. For grinding rounded beams in hard-to-reach places, a chisel is required. Therefore, it is better to choose the use of a light grinder with a power of about 850 watts.

After all the log cabins are sanded, you should immediately start processing with special flame retardants, antiseptics and staining. The use of flame retardants improves fire-resistant qualities, and antiseptics - protective from the occurrence of rot on the wood surface. If polished log cabins are not painted in time, moisture can get on them, which will lead to slow, but destructive effects on the wood. Therefore, everything should be done in sunny weather.
More articles on this topic: 
The process of polishing a log house is quite laborious, but it is quite feasible at home. In order to perform high-quality grinding, it is necessary to have special equipment, as well as initial skills in working with it. Self-polishing a log house will help save material resources, while obtaining a high-quality result. We will learn more about how to properly sand a log house from a rounded log.
Sanding logs is not at all a mandatory process. However, after its implementation, the wooden surface acquires a more attractive appearance, it becomes resistant to external stimuli.
Most often, polishing the bath is necessary to get rid of the upper, dark layer of wood. In addition, with the help of grinding, it is possible to partially or completely remove the fungus. Further, by covering the wood with a special protective agent, it is possible to extend its service life by several more years.

In order for the grinding process to go quickly and efficiently, it is necessary to choose the right equipment. Most often, for these purposes, a grinder is used, on which a special nozzle is installed or grinding machine.
When choosing a grinder, pay attention to compact, small and lightweight models with a minimum set of functions. Also, the device should be distinguished by the presence of a function of smooth switching of operating modes. It is more convenient to perform grinding using two grinders, one of which has a fine and the second coarse abrasive. However, it is quite realistic to do the job with one device.
Choose plastic nozzles for abrasive elements, since rubber ones are left on wooden surface dark spots. Please note that prolonged use of the tool and the constant replacement of nozzles leads to its excessive heating. Therefore, if you work with only one grinder, then pause in its work. The initial sanding of the bath is done using a 40-60 grit abrasive. With the help of this abrasive it is possible to process about five meters of a log.
Please note that for grinding their log house coniferous trees, you will need to purchase more abrasive. Since these types of wood are different high content resins in their composition, this leads to premature deterioration of abrasive nozzles.

Secondary processing of bath logs is carried out using abrasives with a grain size of 110 units.
Please note that round logs are sanded exclusively with an eccentric sander. And with the help of a grinder, it is possible to grind the timber. However, please note that the power of the grinder is quite high, and pressing too hard will damage the wooden surface.
Before sanding the log house, it is necessary to carry out a series of preparatory work. The work is done before the installation of windows, as this type of work is characterized by the release of a large amount of dust and dirt. If the wood has a high moisture content, then it is necessary to wait for it to dry. Since sanding wet wood will be of poor quality. It is preferable to carry out the work after the roof has been installed.
Before starting work, inspect the surface of the log house for defects. If there are places where the surface of the wood has peeled off, then it must be smeared with glue and wait for it to dry.

How to sand a log house: instructions
Start sanding the log house from the bottom of it, gradually moving towards the top. The grinding process involves the following actions:
1. Grinding with a grinder to a coarse-grained nozzle.
2. Processing grooves with a grinder, the size of the disk should be 1-2 cm larger than the size of the tool itself. If you choose a large nozzle, then the tool may jam and cause injury.
3. The corner sections of the log house are processed with a chisel. This process is carried out either at the beginning of work or after the completion of the first grinding.
4. For grinding the ends, use only a coarse abrasive. To reduce the pile on the ends, use a soldering iron or a hammer.
5. Before further finishing, inspect the wood for gray spots. If they are present on the surface, apply bleach to them. Remember to remove dust with a vacuum cleaner and a damp cloth.
6. In order not to leave deep marks on the surface of the wood, do not use the grinder or grinder at too high a speed.

- apply a layer of primer, use a brush or spray gun;
- in order to emphasize the structure of the tree, bleach and paint the surface;
- apply a layer of protective impregnation.

How to sand a log house with your own hands: internal grinding
When performing internal grinding of a log house, there are several options for performing this process. If earlier the bath was amenable to grinding, then to update its upper layer, it is enough to use a large abrasive.
If no further wall cladding is planned, then the process of grinding them should be of high quality and lengthy. It is preferable to perform primary grinding before installing the finishing floors and ceiling ceiling. The work process is as follows:
- removal of a rough layer of wood bark, for this a grinder or grinder is used;
- using a grinder, process the groove and corner areas;
- sand the wood with fine abrasive materials;
- for grinding the joints of logs and the most inaccessible places, use hand tool This process is labor intensive and requires high labor costs.

After sanding one wall, remove dust from its surface and apply protective compound antiseptic action. This process is repeated each time after grinding is performed.
When applying an antiseptic to the wall, make sure that there are no caulks on it. Use sealant to remove them. To complete the finish, follow these steps:
1. Apply a protective layer of antiseptic. With it, it will be possible to prevent the development of mold and fungus on the walls.
2. After the antiseptic dries, treat the walls with a glazing solution. Thus, it will be possible to improve the aesthetic appeal of the room.
3. Treat the end sections with an acrylic composition with moisture resistant characteristics. After it is completely dry, apply another layer of the solution.
4. To improve the fire resistance of wood, apply a flame retardant to it.
How to quickly sand a log house: abrasive blasting
One more is enough simple option grinding is the use of abrasive blasting technology. To perform grinding, you will need a special apparatus that ejects sand under pressure. He, in turn, cleans the wood from dirt and mold. This method of wood processing is non-contact. However, wood, after processing, is particularly smooth and has an excellent texture.
The process of performing such grinding is easy and efficient, and the quality is impeccable. With the help of sandblasting, it is possible to create a certain natural texture on the tree. Appearance wood, after processing, is distinguished by exclusivity and high cost.
Benefits of using the sandblasting method:
- grinding wood of different structure and type;
- sanding wood with any contamination;
- the ability to highlight the fabulous texture of the tree;
- high speed of work;
- grinding in the most inaccessible places;
- the duration of the operation of the tree increases due to the fact that its upper layer is compacted;
- ease of doing the job.

This grinding method is characterized by a high speed of execution. There are no scratches or chips on the surface of the wood, and there is an excellent wood texture. In addition, it is possible to get rid of lint and additional elements degrading the quality of the wood. There is no need to grind the surface, after sandblasting. This process is quite easy to perform even for a beginner. The only thing that is required is the availability of special equipment and sand for work.
Therefore, when answering the question of how to polish the logs of a log house, first of all, pay attention to this processing method.
If you do not have the time and energy to perform grinding, then we recommend entrusting this process to professionals. When answering the question of how much it costs to polish a log house, it is necessary to take into account many factors, such as the quality of the wood, the size of the log house, the complexity of the work, etc.
The average cost of grinding one square meter log house is about 450 rubles. This process is quite expensive, however, in this way, you will save time and get a quality result from professionals.
When choosing a tool for self-processing wood, pay attention to grinders that have a dust bag. Thus, the work will be easier, and after its completion there will be no need for cleaning.
To process semicircular logs, belt grinders will not be able to; for these purposes, special equipment will be required. It is possible to use a grinder, but it must be equipped with a nozzle with special petals that will help grind hard-to-reach places. Optimal value grinder power is up to 1 kW. The use of more powerful equipment is fraught with the fact that on the second day your hands will be very sore, due to the severity of the instrument.
If you want perfect smooth surface, then sand the log house only after it has completely dried. Otherwise, worn fragments will be present on the wood.

There are four main ways to process wood with a grinder and abrasive materials:
- draft method - involves peeling the bark;
- medium processing option this stage small irregularities are removed from the tree;
- thin processing option involves final grinding;
- sanding wood before painting.
Please note that the abrasive wears out very quickly, and when doing the work yourself, you will have to change nozzles very often. To clean the nozzle from resin and dust, use a brush and thinner in the form of white spirit. However, in this case, to high performance work is harder to achieve.
The speed of the work is determined by such factors as previous grinding experience, equipment power, quality of nozzles, the amount of resin in the composition of the tree. Average duration grinding of one linear meter is about two minutes, with a log height of 300 mm.
Put on a respirator, goggles and gloves before you start sanding. Since in the process of work dust is released, which should not get into the eyes or respiratory tract.
Immediately after grinding the log house, it is covered with special compounds. If mold or fungus is present on the logs, then special bleaches are used to remove them. Next, you should protect the tree with the help of antiseptic glazing compounds.
To apply the composition, use a brush, and even better spray. Thus, it will be possible to evenly cover the surface. After applying paint or varnish to the surface of the wood, the pile begins to rise, to remove it, sand the surface again.

External polishing of the log house helps to restore the natural shade to the wood, which is lost under the influence of ultraviolet radiation. If you do not polish the log house before applying antiseptics to its surface, then you will not be able to achieve the optimal effectiveness of their impact.
Sanding the log house allows you to get rid of the top layer of mold and fungus, which appears from excessive moisture. In addition, with the help of grinding it is possible to remove all the bumps, dirt from the walls. At the same time, they acquire a pleasant color, excellent texture and a smooth surface. Sanding walls significantly increases the life of wood. In addition, with the help of grinding, it is possible to restore a tree that has previously lost its color.
Sand log house video:
Good health to everyone!
In this article I will talk about my modest experience of grinding logs inside the bath. I have to admit that I didn't originally intend to write about it. Since I didn’t see anything special in this, and the work is not difficult - just tedious and very dirty
But since I recently wrote an article about my bath, then in continuation of the bath topic I decided to write about the grinding of logs. And the very first advice - if finances allow, it is better to hire people for this work, seriously, this is really a long and dusty business.
Tools and clothes
It was the first time in my life that I carried out the grinding of logs; before that, I had never done such work. Therefore, professionals, please treat the beginner with understanding. So. The work of polishing inside the bath took me exactly 5 days (bath 3 * 4 meters). He worked alone, from early morning until late at night.
To be honest, I did not expect that it would take so long, it seemed that I slipped quickly with an angle grinder and that's it. Yeah, naive, no matter how
The following tools were used for this work:
- Angle grinder (or grinder in our opinion);
- Grinding petal disks (circle petal end grinding);
- Brush with iron bristles;
- Chisel or knife;
- Impregnation for a bath with wax (for use inside the bath) + brush;
- Stable and reliable bench, stool;
- Arms, legs, head - whatever one may say, but without it, nowhere
I will try to tell you more about the tools in the course of the article.
WITH special attention it's worth getting dressed, because work is going on indoors, fine and plentiful dust. I have a separate set of clothes for such work.
- Jeans, soft and strong. You have to work in different positions, and standing, and sitting, and on your knees, and lying down. Thank God, at least I haven’t had to sit on the twine yet
- Jacket, strong, made of dense material.
- Since it was cool outside, I had to put on two old T-shirts at the same time (I didn’t want to spoil the sweaters).
- Protective glasses.
- Closed shoes.
- Headdress.
- Gloves.
+ Hydrogen peroxide, band-aid, milk, raspberry jam.
Since the bath cannot be used for the grinding period. That and the work I decided to carry out, not being distracted by other things. I forgot to mention shorts and socks. Anyway, they also absorb dust. So my algorithm was as follows. In the morning I put on my work clothes. I work all day. In the evening I take off my clothes, take a shower (the season is not yet swimming, so you won’t go to the river), change into clean clothes.

Means of protection respiratory / nutritional / mumbling organs are also needed. The first day I worked in a cap and a mask - I refused the mask after an hour of work, because. impossible - the closed area heats up, sweats, and in general - did not like it. As a result: the cap does not cover the entire head, the ears are open, the nose and mouth too - it's all clogged with dust, then I got tired of washing myself in the shower, and then, not the first time I got rid of it.
On the second and subsequent days, I acted more carefully. Instead of a cap, he made himself a scarf from an old sheet. That completely covers all the hair and ears. I also made a strip from the same old sheet to cover the mouth and nose, and once again the ears. Those. the head was completely packed, and goggles were in front of my eyes (so that the glasses would not fog up, I lathered my fingers in the morning and with inside spent on all surfaces of the glasses - it helped).
By the way, why did I mention milk and raspberry jam earlier. Not for nothing. The fact is that in the bath, throughout the work, all windows and doors were open. Accordingly - a draft. There is really no heat in the street, when you work - you don’t feel the cold. But when he came home in the evening, he could not get warm - everything was pounding, despite the heat in the house. In order not to get sick, I drank tea with raspberry jam at night and still, all this time I passed with a sore throat.
click on the picture to enlarge

While working, the bitter taste of the bark in my mouth did not go away and the taste was very much like some kind of medicine that I was stuffed with as a child. To somehow soften this taste - drank milk, often.
Log sanding
Before work, you need everything that can be taken out of the bath. Namely, water containers, basins, washcloths, shampoos. And what cannot be endured - covered. For example, I had to cover the stove in several layers. Then, with an iron bristle brush, I walked over the entire surface of the logs to remove the remnants of the bark, in places of knots - removed, if possible, the remnants of resins. In general, he prepared the walls for work.
I started grinding from the dressing room and from the corner that is not striking at the entrance - in order to "fill my hand" and if something goes crooked, it will not be so noticeable. Traces of the disks remain in any case, no matter how hard you try - therefore, after cleaning one log - with light (brushing) movements of the grinder, he tried to get rid of these traces. In general, it turned out well. Although, if you look closely, you can find traces of the tool.
click on the picture to enlarge

Then 5 days of grinding, grinding and grinding. Again, there are no special tricks. You get used to it quickly. The only caveat is that it is better to pass difficult sections at the beginning of the day, in the morning. While the head is fresh, the hands are strong, there is no fatigue. At this time, we calmly go through corners, joints of logs, knots, and if there are defects in logs (for example, deep marks from an ax or saw, etc.)
There is one more thing, petal grinding discs are consumable. They "clog" fairly quickly. So, in order to save a little - with fresh, newly delivered disks, I went through even, relatively good sites logs. When the disc becomes clogged and begins to slowly "burn" the tree, before replacing such a disc, it went through areas with knots (resin could remain there).
click on the picture to enlarge

In the photo above, just the moment when, before replacing the grinding disc on the grinder, I walked through the knots. Also pay attention to the dust (on the left) on already polished logs - such a layer lays down in just 5-10 minutes of work. And since the disk is spinning, the dust is swirling around the room with air, like from a fan.
By the way, about the thin section. I mentioned disks (or rather, a flap end grinding wheel) in one of my articles, you can read it. And I think it's time to talk about job security. My grinder is designed for a circle measuring 125x22 mm. I only had two of them. I went to the store and there were no such sizes. I had to buy circles bigger size 150x22 mm (grain P80) and, accordingly, had to be removed protective cover. See photo below.
click on the picture to enlarge

If at first he carefully watched the position of the hands / fingers during work, then towards the end of the 4th day he lost his vigilance. First, on empty place, for no reason, slightly cut the glove - there was almost no blood, an ordinary trifle. On that day, in general, everything was “poorly glued” for me, I got up on the wrong foot. And also, not in vain, above, I mentioned hydrogen peroxide and a band-aid. Pictured below is a cut glove.
click on the picture to enlarge

And on the same day, before the completion of the work, instead of leaving the matter for the morning, it suddenly "impressed" to climb into the "difficult area". The bottleneck behind the stove, the lower joints of the logs can only be processed in the lying position. Lying, alone right hand tried to work. No matter how hard he tried, the disk was wedged at the junction and the working grinder rushed to the face.
Perhaps I had a premonition of this - because. Before that, he put the free left on his face. As a result, the disk slashed the outer side of the palm. If there were no hands, all this would have been on the face. Thank God it worked out - there really was a lot of blood, but the wound was not very deep, he treated it with hydrogen peroxide and stuck plasters on it. No photos - because. it wasn't before. In the photo below - the most ill-fated place.
click on the picture to enlarge

On the 5th day of work, having finished grinding, I was satisfied with the result. Yes, there are dark spots in some places. I was expecting a lot more black. But in the end it became lighter, happier and more pleasant. And I must admit, some in the village thought I was "odd" - they say, why waste time on this work. And indeed, many baths have been standing for 30-40 years, without any treatment and even without impregnation - and nothing, the only thing that has to be changed is the logs and the floor.
click on the picture to enlarge

click on the picture to enlarge

I spent the whole second half of the last day of work cleaning (the most disgusting stage for me in any job). How many buckets have removed the dust / garbage and do not count, a lot. Swept from the walls / ceiling. A lot got into the ground under the floor (I have a collapsible floor to dry). Having got rid of the garbage, he took the floorboards out into the street and washed them out from under the hose.
I took water with the "hose + pump" system from the well, about which I wrote in the article. Then he washed the entire bathhouse inside with the same hose, starting from the ceiling.
When the bath dried up, he heated the stove over the hot - in order to burn out the remnants of dust from the hard-to-reach places of the stove. And then it was time for the "bath" day. With what pleasure I steamed in the bath - neither to describe with a pen, nor to rap on the clave .... At the same time, I figured out the clothes - first I rinsed in the river, then in the bath in a basin with hot water I soaked it and only after that I threw it into the washing machine.
I covered the impregnation a little later. For what I used protective and decorative varnish for wood "Eurotex Sauna" with wax. It was he who was advised to me by the men who built the bathhouse. Then the neighbor said the same thing. The clerk at the store also pointed him out. And while I was reading the description on the jar, a woman bought a small jar of this impregnation in my presence. And in response to my "silent" question, she said that her bath has been covered with this impregnation for 4 years already and she is satisfied. And now I took it for new shelves in the bath.
click on the picture to enlarge

As you can see in the photo, the color of the impregnation is white - but in reality it turns out colorless. It soaks the wood well. At the same time, it turns out that the tree breathes. During the coating of the bath, the smell was present, but weak and somehow specific. Nothing like the smell of varnish or paint. Worked strictly according to the instructions. 3 days of drying, then heating the bath. And when I started using the sauna, there was no smell at all, or rather, the smell that was in the bath before, the smell of wood, remained.
By the way, I don’t recommend covering the inside of the bath with anything else. Really, the tree must breathe. But just in case, I’ll write the main characteristics of impregnation with wax (I write according to the label):
- Exceptionally high water and dirt-repellent properties;
- Reliably protects wood even with prolonged exposure hot water and high temperature;
- Protects wood from rot, fungus, and mold, strengthens its surface;
- Prevents the development of pathogenic microorganisms;
- Forms a silky matte finish;
- Safe at high temperatures.
And in fact, I could write another half an article about how I carried out the impregnation. But I won't bore you, I'll just say it. Ceiling, partitions, benches, shelves - covered in one layer. I covered the logs and the floor in 3 layers, as the most "water-contact" places. Well, they themselves covered the polished logs of the bath in 2 layers. I think this is enough. Maybe in a couple of years I will repeat the procedure just in case, we'll see


