Wallpaper appeared in the 16th century and is still a popular method decorations home interior, bringing personality to the living space.
To bring fresh breath into your interior, you need to approach the issue of wallpapering with skill and even a certain skill.
Let's figure it out how to glue wallpaper correctly.
What wallpaper is better to glue?
Non-woven wallpaper(non-woven wallpaper) are more environmentally friendly than vinyl wallpapers. At the same time, when gluing non-woven wallpaper glue is applied to the wall, whereas when gluing vinyl wallpaper The glue is applied to the wallpaper itself.
There are non-woven wallpapers that can be paint after pasting with water-dispersion paints.
When choosing wallpaper, you need to take into account the humidity of the rooms in which you are going to glue the canvas, as well as the condition of the walls.

Vinyl wallpaper can be used in the toilet, bathroom or kitchen. For minor stains, they can be wipe with a damp cloth, soaked in a weak solution with detergent. For dry rooms, such as a corridor, any type of wallpaper is suitable.
However, there are also expensive non-woven wallpapers that can also be wiped with a damp cloth.
If there are unevenness on the walls, then they can be covered embossed wallpaper, wallpaper with a dense pattern or with a large cell.

As you can see, there are many factors what wallpaper better to glue, Therefore, in each individual case you need to approach the issue individually.
Remember that there are several visual patterns of wallpaper patterns:
- If the pattern is in the form of vertical stripes, then visually the room becomes tall and narrow.
- Large patterns or cross stripes create a feeling low ceilings and a wide room.
- Rooms with dark ceilings make them look low.
Wallpaper in light colors gives a feeling of spaciousness.
How to properly glue paper wallpaper

It is very important when gluing wallpaper to comply with all technology. All tools must be cleaned and washed. Brushes must be absolutely clean.
We prepare the surface (walls) for gluing.
Some experts recommend gluing additional wallpaper or newspaper if there are uneven surfaces on the wall. to smooth out unevenness.
If your surface flat, then you can safely glue wallpaper on it.
If there are sufficiently large irregularities on the wall from paint, old wallpaper and other repair work should additionally level walls. This is done using a pointed object, such as a spatula or sandpaper.

You can use special solution for removing wallpaper. There is also a special steam cleaner for these purposes.
Cracks and large depressions are puttied or cemented.
Ideally, you need to plaster the surface to proper wallpapering.

After this it is better to saturate the walls special primer, which can be purchased at any hardware store, which will prevent the appearance of fungus and mold in the future. A primer is also necessary for good adhesion of the wallpaper to the surface.
After the walls are prepared for gluing, we move on to preparing the wallpaper itself. Firstly, you need measure surface to be glued and roughly calculate how many rolls of wallpaper you need.

The length of standard wallpaper is 10 m, therefore, each roll will need to be cut into approximately 3-4 parts (depending on the height of your ceilings).
If you have wallpaper with a pattern, then you need to purchase a canvas with reserve, because you will have to cut them to “fit” the drawing correctly.
Wallpaper glue

For each type of wallpaper it is necessary to select the correct glue. Paper wallpaper is glued universal glue.
For vinyl, embossed and heavy wallpapers used glue for vinyl wallpaper.
Non-woven wallpaper is glued glue for non-woven wallpaper.
It should also be noted that if you are going to paint the ceiling in addition to wallpapering, it is better to do this first.

Follow precise instructions on a pack of powder or concentrated wallpaper glue when diluted with water. If there is not enough water, the glue will be too thick and if there is a lot of water, the glue will become too liquid and as a result, the wallpaper will not stick to the wall.
Already exist ready-made adhesives. In this case, you only need to shake the glue and it is ready for use.
A few tricks on how to glue wallpaper on walls

Before you start gluing the first canvas, you should hang plumb to the ceiling, to draw an exact landmark.
A must prevent any drafts, so we close all the windows and doors.
At gluing vinyl (paper) wallpaper It will be more convenient to apply the glue on the table, but you can do this manipulation on the floor. We apply the glue with a brush or roller in a thick layer so that they can be moved on the wall. Excess glue already on the glued canvas can be squeezed out using a damp sponge.
After you have applied the glue to the wallpaper, you can fold the glued strip into two or three layers and let the glue soak in, and in the meantime apply glue to the next canvas. Wallpaper on paper based should be soaked for 5 minutes, and other types of wallpaper should be soaked for 7-10 minutes (depending on the density of the wallpaper).

It will be much more convenient for you to study sticky wallpaper with a partner. After all, it is much more convenient when one feeds the roll, and the other, standing on a stepladder, glues it, clinging the wallpaper from top to bottom and carefully applying it to the joints.
Here's another tip: glue the wallpaper from the windows to the doors on each side of the room so that the joints are less noticeable.
If you have thick wallpaper (no matter what type or material), then glue it end-to-end, and if thin - overlap

If there are bubbles on the wallpaper that cannot be squeezed out, then carefully pierce Place a pin in such places so that the air comes out. Perhaps your wallpaper will still have bulges - this is not a problem, because when the wallpaper dries, the bulges will disappear. If the bulges have not disappeared, you should re-glue such canvases.
After the wallpaper has already been placed on the walls, you need to smooth out the joints with a small roller. If you are dealing with textured wallpaper, then use a clean rag instead of a roller, which will prevent damage to the structure of the wallpaper.
Excess edges on the ceiling and curved walls should be trimmed with a knife until the glue dries. Over time, glue will harden and accumulate on your knife, so rinse the knife periodically in hot water.

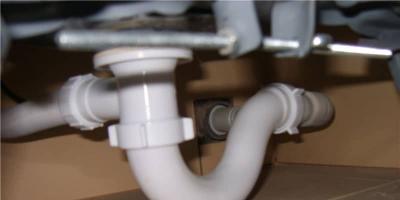
You may encounter a problem like gluing wallpaper near the radiator. Near the radiator mounts and pipes, you can simply cut the wallpaper and paste it in this way hard to reach places. To glue the canvas behind the radiator, you can use mop, having previously wrapped dry and clean material, such as a rag, around it.
Important! When performing wallpapering work, be sure to turn off the power supply in the room where the work is being carried out (sockets, switches).
Before wallpapering it is necessary Remove the housings from sockets and switches.

Wallpaper can be glued directly to the holes where the electrical wires are located, and after the canvas has dried, it can be done in the place of the electrical wires knife cut crosswise
Wallpapering is the most common option when renovating premises. Ease of installation and availability of materials allow you to do the work yourself. In this article we will tell you in detail how to glue wallpaper with your own hands, starting with the choice of materials and glue, ending with the tricks and advice of experienced experts.
Preparing the walls
The preparatory stage should begin with clearing the walls of all unnecessary objects. Sockets and switches, baseboards, as well as door panels must be dismantled to simplify the work.
Let's do everything ourselves!
We carefully prepared this article before publication, and therefore we will tell you about all the nuances of gluing walls yourself: how to choose glue, how to apply it, how to glue it, etc.
It is recommended to de-energize the room to prevent damage electric shock during wet work. If this is not possible, it is necessary to carefully insulate the wires of switches and sockets and hide them in socket boxes.
Old wallpaper
Then you should start preparing the walls. If the walls are decorated with old wallpaper, they will have to be torn off. First they are removed by hand, and if you're lucky, the strips will come off entirely, but usually they come off poorly, in separate pieces. It is recommended to moisten the remaining fragments on the walls with warm water and clean them off with a spatula.
Difficulties may arise with vinyl samples with a moisture-resistant coating on front side. It must be removed so that water can penetrate to the base and soak the glue. This will take a lot of time, but then the material will become more pliable and can be cleaned off with a spatula without much difficulty.
Paint Cleaning
If the walls are painted or whitewashed, the cleaning job becomes more difficult. The whitewash should be moistened generously with water and gradually removed with a spatula. Oil paint cleaning is more difficult and takes longer, but there are ways to speed up this process. Firstly, you can use special chemical compounds To remove paint, secondly, use construction power tools.

The chemical method of removing paint will be expensive and will require the use of personal protective equipment due to harmful fumes. As auxiliary tools for removing paint, a grinder or a hammer drill with special attachments in the form of metal brushes. In this case, a respirator and safety glasses are also necessary due to the abundance of dust.
Alignment
When the room is cleared of old finishing, they begin to level the base. The scope of work at this stage depends on the condition of the walls. A wall with a small number of chips and minor defects will require only local leveling. Minor defects should be corrected with finishing putty, having previously treated the wall with a primer for better contact.

Pronounced wall irregularities will require more attention. You will need to putty in two layers - a starting putty to correct the main defects, and a finishing putty for final leveling. At the end, the walls are sanded with an abrasive mesh and cleaned of a layer of dust.
Types of wallpaper
Nowadays, the finishing materials market offers many wallpaper options that have certain performance characteristics, advantages and disadvantages. Let's highlight the main types:
- Paper wallpaper. The most common type, characterized by low cost and ease of pasting. Paper wallpaper is environmentally friendly and great for bedrooms and children's rooms. On the other hand, they cannot be washed and do not retain their original appearance for long;
- Non-woven wallpaper is made from paper with the addition of non-woven fibers. They are durable, wear-resistant and not afraid of water. Gluing non-woven wallpaper is simple - the glue is applied directly to the walls. This finishing material is able to hide minor unevenness in the walls, which simplifies the process of leveling the base;
- Vinyl wallpaper consists of paper or non-woven backing covered with a vinyl coating. They are easy to clean and do not lose their brightness for a long time. Before gluing vinyl wallpaper on a non-woven backing, it is worth considering that they “do not breathe”, and it is not recommended to use them in children’s rooms and bedrooms;

- Acrylic finishing material is paper coated with an acrylic composition. Unlike vinyl wallpapers, they have a thin outer layer and are not as durable, but they allow air to pass through better;
- Natural. This type of wallpaper is environmentally friendly, exclusive and has a high price. They contain natural cork, straw, reed, etc. Application to walls requires some skill;
- Fiberglass material is ideal for office premises. It is durable and strong, is not afraid of water and does not burn. After application, it is painted with paints on water based, and this can be done dozens of times;
- Textile samples consist of natural fabric material, applied to a paper base. They look chic and expensive, and cost accordingly. They are sensitive to moisture and mechanical stress, and also absorb odors well;

- Metallized wallpaper has an outer layer of aluminum foil, are not afraid of external influences and are easy to clean. Ideal for modern interiors;
- Liquid wallpaper is the most unusual type of all listed. They are based on cellulose, supplemented with decorative dyes, fibers, and glitter. The walls may not be leveled before applying such a coating. It is not recommended to glue them in damp rooms due to their hygroscopicity;
- Photo wallpapers are self-adhesive film, on which a certain design is applied. You can depict everything on the wallpaper, from ornaments to photographs, which allows you to make the room unique.

As a rule, wallpaper for a room is selected based on taste preferences, but in order for it to last longer, it is also necessary to take into account its characteristics.
Wallpaper glue
Selecting glue causes difficulties for many who have started repairs with their own hands. In fact, the variety of options presented should not scare anyone, because in order to make right choice It is enough to focus on the type of wallpaper used. There are several types of wallpaper glue, differing in composition:
- methylcellulose glue;
- CMC glue, based on carboxymethylcellulose compounds;
- starch based glue.

The choice of glue is made based on the following features:
- type of wallpaper;
- room microclimate;
- wall material.
First of all, you should decide on the type of wallpaper. Manufacturers of adhesive compositions offer a wide range of products on the market, from which choosing the right option is not a difficult task. Depending on the type of compatibility with wallpaper, the glue can be:
- for light wallpaper (paper);
- heavy wallpaper (fiberglass, textile);
- non-woven wallpaper;
- vinyl samples;
- universal, suitable for all types.

How to choose the right glue taking into account the microclimate of the room? Materials for wet rooms must be resistant to moisture and retain their properties under all conditions. In addition, damp rooms contribute to the spread of fungus and mold. The adhesive composition must contain antiseptic substances to prevent their appearance.
How to glue wallpaper with your own hands
Decorating walls with wallpaper is a procedure that you can easily do with your own hands, but it is important to adhere to certain rules so that the result is of high quality and the process itself does not take a lot of time and effort.
Final preparations
Before gluing wallpaper you need to go through the last preparatory stage– priming the walls. Priming allows you to achieve better adhesion between the base and finishing material. To carry out the work, you can choose an acrylic primer or use glue. Manufacturers adhesive compositions indicate on the packaging how to dilute it correctly for gluing or priming walls.
The composition is applied to the walls with a roller, and the corners are treated with a brush. It is recommended to prime immediately before work, so that dust does not have time to settle on the walls, which can impair adhesion. It is also worth providing the necessary conditions in the room itself. During the work, until the glue has completely dried, the windows in the room must be closed.

The most optimal temperature indoors – 20 degrees. It is also necessary to restore order and wash the floor so that when manipulating the wallpaper, it does not spoil its appearance.
Where to start gluing
Which wall the gluing process will begin with is, by and large, unimportant. The main thing is to stick the first strip strictly vertically. If you don’t want to break the level, you can take some obviously vertical object (window slope or door jamb) as a reference point. You can start gluing in the corners. The remaining strips will be glued according to the first reference strip and the fitting process will be simplified.
How to prepare glue correctly
All modern adhesives have back side packaging instructions on how to glue wallpaper. It is necessary to study it carefully before gluing wallpaper and follow all recommendations. As a rule, the preparation process comes down to diluting dry glue in water in the proportions indicated on the package. To prevent the formation of lumps, it is necessary to add glue to the water in small portions, thoroughly stirring the resulting composition.

How to glue wallpaper
First of all, you need to find information on the rules for applying glue on the wallpaper packaging. If the glue should be applied directly to the strips, then they must be rolled up with the coated side inward. The edges are folded towards the middle several times. The folds should remain rounded and the strip of wallpaper should resemble a scroll.
If, according to the technology, glue is applied to the wall, then it is necessary to coat the base along the width of the glued strip with a margin. To apply glue in the corners under the ceiling and floor, use a brush.
Climbing onto a stepladder, you need to launch a few centimeters of the glued strip onto the ceiling. The edge of the strip must be aligned with the marked vertical or landmark. Then, using smoothing movements from the reference point to the opposite side, glue the strip near the ceiling.
 with a special soft spatula. When gluing wallpaper, you need to watch for the formation of air bubbles, be sure to expel them with excess glue to the edges.
The remaining parts are glued in the same way, you just need to focus on the already glued strip. Finally, you need to trim off the excess parts in the corners of the ceiling and floor. The easiest way is to use a wide spatula and a utility knife. The spatula is applied to the corner, and the resulting margin is trimmed along its edge. As a result, the edges are smooth.
Separately, it is worth mentioning how to paste wallpaper in the corners. There are two ways. The first one involves gluing one strip overlapping to the other side of the corner with a margin. The second strip is cut at the corner and pasted directly onto the stock. If the material is thick, the joint will be very noticeable, and it is better to use the second method.

To achieve a more invisible joint in the corners, the strips on both sides are glued overlapping and cut with a sharp knife using a spatula. If the corners were glued tightly, the stripes will fit perfectly evenly. External corners the premises are glued in the same way, using one of the methods.
How to glue wallpaper when there are obstacles
For those who understand how to glue wallpaper, difficulties may arise in areas near doors and windows. If the window or door is located flush with the wall, it is enough to trim the strip of wallpaper along the trim or jamb with a small margin. Then, up to the corner of the casing, the strip is cut at an angle of 45 degrees. The resulting parts must be hidden behind the structure of the door or window, and the excess remains must be cut off.
If the door or window is located in different planes with the wall, the work becomes somewhat more complicated. First, you need to seal the slope by placing a small margin on the wall, which is trimmed along the edge using a spatula. Next, you need to seal the wall in a similar way.
Difficulties may also arise when bypassing sockets and switches. If they were dismantled before carrying out the work, then only installation boxes with wires located flush with the wall, which will not interfere with the work.
If for some reason it was not possible to remove the electrical installation parts, then you need to apply the strip to the obstacle and mark its edges. Using a knife, cut out the required fragment according to the marks, leaving a reserve that can be hidden behind the overhead decorative frame.
If you need to seal the wall behind the battery, it is not necessary to remove it. It is enough to have a certain supply of wallpaper from all over the world. You may also need information on how to properly bypass heating pipes. If they hang on clamps, you can dismantle them for convenience and put them back in place after finishing the work. Holes in the walls will not be difficult to find.
How long does it take for wallpaper to dry?
The drying time of wallpaper depends on its type. Non-woven wallpaper takes at least a day to dry, and the thicker it is, the longer you need to wait. Vinyl wallpaper dries for about two days, provided the room humidity is no more than 60%. Drying time paper wallpaper varies from 24 to 72 hours. It is important to remember that you should not open windows at this time, and generally allow drafts in the room. By following these rules, you can hope for a high-quality result.

FAQ
- Is it possible to glue wallpaper onto wallpaper? - This is allowed to be done only in certain cases. If the old samples are thin, then most likely they sit firmly on the walls, therefore, they will be a good basis for a new finish. However, how long such wallpaper will last is a big question;
- How much do the services of craftsmen cost? - On average, finishers estimate their work from 150 to 170 rubles per glued square meter;
- What to do if the wallpaper peels off? — You can use a brush to glue the detached part with the remaining glue, or use special glue for seams;
- What happens if you ventilate the room during and after work? — It may happen that in a draft the glue dries too quickly and the material does not have time to stick.
Not only a professional can hang wallpaper correctly, but also a person without special construction knowledge and skills. The main thing in this is to follow a certain sequence, be patient and approach each stage with full responsibility. This is the only way you will get an excellent result.
As in any construction business, the first stage is rough preparatory work. Before you start creating, you need to well prepare your canvas, namely the wall for pasting; the accuracy and aesthetic appearance of your renovation will depend on this.

Step one - rid the walls of the old coating
If you are renovating a new building that has just been put into operation, you can skip this step. If there is old wallpaper on the walls, you will have to get rid of it.
It is not recommended to peel off old wallpaper on walls, since this creates a risk that under the influence of moisture and glue old layer will come off or blister. In addition, it is quite difficult to achieve a perfectly flat surface of the walls.
To remove old wallpaper we will need:
- Spatula or knife with a wide blade;
- Rags and sprays;
- Soap solution.
The process is very simple. Use rags and sprayers to thoroughly wet the walls ( soap solution will act as an adhesive solvent), and use a spatula or knife to remove a layer of old wallpaper. Once wet it will come off very easily.
Do not forget that painted walls are also not better surface for a new layer of wallpaper, so you will have to get rid of the paint. Sanding or priming are not the best best ways cleaning the surface, using a hair dryer or grinder- rather labor-intensive and “dirty” cleaning methods, not to mention the fact that you will have to breathe paint fumes or dust, which can cause poisoning. The ideal way to remove paint from walls is with a special remover.
Having cleared the walls of the old layer, you can see how suitable the wall is for pasting, what cracks and dimples need to be leveled and puttied, and this is the second step.
Step two - putty and leveling the walls
The second step depends entirely on the level of evenness of the walls. If the walls are completely crooked, then most likely you will have to resort to the help of professionals who will level the walls with plasterboard or plaster according to the beacons.
Even if the level of the walls is normal, only the surface itself leaves much to be desired (for example, it has small irregularities, chips or dimples), you still cannot do without putty or any leveling mixture.
For more information on how to prepare walls and level them, watch this video instruction.
Step three - sanding the surface
To prevent grains of sand and putty particles from appearing under the new layer of wallpaper over time, the leveled surface must be thoroughly sanded. This can be done by applying gentle pressure with a grater or sandpaper - with wide semicircular movements until visible flaws are eliminated. Residues should be removed with a long-bristled brush.
Step four - primer
It would seem that you can stop at the third step, but for better adhesion to the surface and greater stability of the putty, priming the walls is also necessary. In this capacity, either diluted wallpaper glue or a special primer solution can be applied. The primer is evenly applied with a roller to the entire surface of the wall and left to dry for about a day.
The third and fourth steps are described in detail in the following video:
This completes the preparatory work, and you can proceed directly to wallpapering.
We glue the wallpaper correctly
There is no identical pasting algorithm for all types of wallpaper; each has its own characteristics and nuances. Let's take a closer look at them.
Paper wallpaper
The classic option for cosmetic wall decoration is paper wallpaper. This is an inexpensive, environmentally friendly, breathable material that is not particularly difficult to apply. Paper wallpaper is glued as follows:
- The roll is rolled out on the floor with the wrong side up, the height of the wall + 10 cm (error) is marked with a pencil and tape measure;
- Use a knife or scissors to cut the roll into pieces; usually you get 4 strips per roll, if you don’t need to select a pattern. If there is a drawing on the packaging, as a rule, the tolerance is indicated in centimeters.
- The wall is marked with a pencil and tape measure so that the pasting is as even as possible.
- We dilute the glue according to the proportions indicated on the package and apply it evenly to the strip, focusing Special attention edges. Let it soak for a couple of minutes.
- Using a roller, carefully apply the strip to the wall without damaging the paper, which is particularly sensitive after it gets wet.
It is very important not to overexpose paper-based wallpaper, otherwise you risk getting bubbles and uneven pasting. The maximum time that wet wallpaper should remain is 5 minutes, then it must be quickly glued to the wall.
When gluing, do not forget to also close windows and doors to avoid drafts, which may prevent you from “grasping” the walls due to the glue drying quickly.


Vinyl wallpapers
Cutting rolls of vinyl wallpaper is no different from marking paper wallpaper, so we simply repeat the first 2 points of the previous section “Paper Wallpaper”. In the case of a pattern, you will have to glue one strip at a time, selecting the pattern of each subsequent strip. Next we glue the vinyl wallpaper like this:
- We prime or coat the wall with a thin layer of glue and let it dry for 15-20 minutes;
- We coat the cut strip and apply it to the wall using a roller;
- Subsequent strips, unlike paper wallpaper, are applied end-to-end, without overlapping one another.
All layers of glue - both on the wall and on the wallpaper - must be applied in a very thin layer so that when rolled out with a roller, its residue does not get onto the outer surface and leave marks, especially on light-colored wallpaper.
If bubbles appear, the wallpaper should be smoothed from the center to the edges.
The final touch will be trimming the excess wallpaper near the baseboard. This should be done with a sharp blade only when the wallpaper is dry to avoid “chewing” it.


Non-woven wallpaper
Wallpaper on a non-woven basis is glued in the same way as vinyl wallpaper, only for them you do not need to coat the strip itself, since it already contains a binding polymer; it is enough to moisten the wall well with a special glue.


Wallpaper for painting
There are 2 types - either vinyl, so we paste them according to the above instructions. Before applying paint, let the wallpaper dry perfectly, ideally for about a day. We select paint - for interior decoration At home, water-based acrylic ones are optimal. They do not smudge, fit perfectly and do not hide the texture of the wallpaper.
Pasting on gypsum board
One of the options finishing drywall is . They simply, easily and very evenly lie on the surface of the gypsum board if you first seal the seams between the sheets. However, those who decide to change their wallpaper in the future will be in for an unpleasant surprise. They lay down easily when pasting, but they are dismantled along with the layer, so it is advisable to treat the surface with plaster before application. For the rest, be guided by the type of wallpaper you will glue.


We glue unusual wallpapers
Pasting the ceiling
I would like to immediately note that alone better ceiling do not glue, especially if you are new to this matter. We prepare it in the same way as the surface of the walls before pasting, i.e. we clean off the old layer (paint, whitewash or wallpaper), putty any unevenness, if any, and be sure to prime the surface.
- It is advisable to draw a control line (the place where the first strip is applied) to which you will focus. To make the joints less noticeable, glue starting from the window and moving towards the opposite wall.
- To make the gluing process easier and not wash the glue out of your head later, when coating the strips, fold them in a snake shape, about 30-40 cm long, so that the coated folds touch each other. And then gradually unroll the wallpaper while gluing it.
- We level and remove bubbles in the applied strip with a roller from the center, moving towards the edges.
- After drying, cut off the excess on the wall with a sharp blade.
On a note! Before starting work, turn off the electricity, close the windows and put on clothes with wide pockets with everything you need (a roller, a knife, a rag) so as not to jump up and down on a stepladder for a tool.
Customizing the drawing

How to properly glue wallpaper with a pattern? There are two options.
- Paste the first sheet on the wall, and when measuring the second, combine the pattern directly on the wall;
- Combine two un-glued strips on the floor and only then glue.
It is advisable to glue the strips end-to-end so as not to disturb the geometry of the pattern.
We glue photo wallpapers
Photo wallpaper in the interior is not only original design solution, but also the opportunity to visually expand the space. With their help, you can “open” a window to a paradise garden full of flowers, create a delightful view of the cityscape, turn a doorway into an arch or change the ceiling to blue sky with clouds.
Examples of interesting interior solutions with photo wallpaper can be found in the video below:
Some tips for pasting photo wallpaper:
- It is better to glue photo wallpapers with special glue so as not to spoil the extremely thin canvas;
- We glue them onto a perfectly flat, prepared, puttied surface;
- Be sure to mark the surface of the wall by centimeters, as indicated in the instructions. We start from the window. Horizontal and vertical lines should form even right angles of 90°.
- We cut off the white stripes along the edges of the photo wallpaper;
- We coat parts of the photo wallpaper, do not wait, as is the case with other types, we immediately stick them on the wall.
- Gently smooth it with a roller and a rag, without damaging the fragile surface of the wallpaper.
Where to start and how to glue in corners


| In relation to the window | In relation to the wallpaper canvas | Relative to angles | |
| Wallpaper on the ceiling | We begin gluing from the window, moving towards the opposite wall so that there are no noticeable overlaps. | It is best to glue wallpaper to the ceiling, starting from the center and gradually moving to the edges, this way symmetry will be maintained and the final work will look neater. | It’s better not to start from the corners, because... there is a risk that the strip will go crooked. |
| Wallpaper | As a rule, they glue from the window, since the joints are not visible. | We start gluing from the ceiling, but we align it not along the ceiling line, but along the first strip of wallpaper. That's why it's so important to stick it evenly. | In the future, if the wall is not level, it is better to glue the corners with separate cut pieces of wallpaper. |
By adhering to these simple rules, you can carefully, quickly, and most importantly efficiently, make your own redecorating.
Number of repairs carried out on our own, behind last years increased significantly. This is due to the desire of people to save time and money. Very often the question of saving arises when gluing new wallpaper, since many apartment owners do not know whether such a saving option is possible, and how to properly glue wallpaper in this case.
We will try to give answers to these and other questions about this wallpapering in this article.
When is wallpapering acceptable?
Why do many people try to leave the old cladding? There are several situations in which people decide to glue wallpaper onto old ones:
- Some people try not to remove the old cladding, mistakenly believing that the wallpaper will hold up better.
- In some cases, it is very difficult to peel off old wallpaper, and then the apartment owner decides to simply paste the wallpaper onto the wallpaper.
- Another reason is ordinary human laziness. It takes a long time to fiddle with old decoration Not many people want it, especially when the repairs are done with their own hands.
- Trying to save money. For some reason, it is believed that a lot of financial resources are spent on dismantling the old cladding. When hanging new wallpaper, you only waste your time, warm water, putty and primer. But if you don’t want to incur even such minor costs, then you don’t have to remove the old wallpaper.
The advantages of such gluing include:
- you do not need to level the walls;
- saving time on stripping wallpaper.
The disadvantages of this idea are that:
- the walls will not be level;
- bubbles may appear;
- the service life of glued wallpaper is reduced;
- new wallpaper may simply not stick;
- new wallpaper may come off along with the old ones.
Features of the work
If you still decide to glue wallpaper onto wallpaper, then keep in mind that although this process is not considered too complicated, there are some nuances to which you must pay special attention.

There are a couple of very important points to consider:
The wall must be strong and very smooth, without any defects. If such defects are discovered, then there is no need to risk it; it is better to get rid of the old wallpaper. Therefore, you will have to carefully examine the walls before gluing in order to detect hidden and obvious defects:
- obvious defects - changes in plane, tears and peeling of part of the wallpaper, as well as abrasions;
- hidden defects - cracks and voids in the walls, which are easily detected by tapping the walls with a hammer.
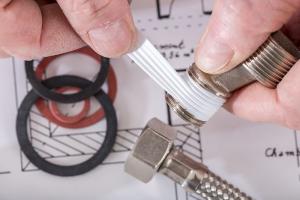
- Before gluing wallpaper onto old wallpaper, certain manipulations should be done, such as gluing up loose seams and sealing gaps and cracks using putty and primer.

Advice. You can wash the wall with an ammonia solution and then let it dry thoroughly.
If major defects have not been identified, and minor ones have been eliminated, then you can safely begin gluing new wallpaper onto the old ones. However, for this you need to first. You will have to glue new wallpaper in compliance with all technological rules, based on the requirements and standards of the repair process.
Tools and materials
Before gluing the wallpaper onto the wallpaper, we will carry out preparatory work so as not to be distracted by it later.

You will need the following tools:
- A tray and a roller with which we will apply glue to the back of new wallpaper or to walls with old wallpaper;
- Wallpaper or ordinary household scissors;
- A sharp knife for cutting corner joints;
- Rubber spatula for leveling wallpaper;
- Clean cloths for wiping off glue;
- Wallpaper table with a horizontal, flat surface. If such a table is not available, the floor can perform its function.
Important: Pasting wallpaper onto wallpaper is allowed only in the case of paper wallpaper.
Stages of gluing
- In order to paste wallpaper onto wallpaper correctly, first prime the surface of the walls. For the primer, you can use the same glue that is intended for the gluing process itself. We prepare the glue in a slightly more liquid version than for gluing, and then apply paint roller in one layer.
Once this primer has completely dried, you can prepare new wallpaper:
- if you have a standard roll, then you can simply cut it into 3 sheets;
- if your new wallpaper has a pattern, then you will have to trim the canvases so that the pattern on 2 adjacent canvases matches.
-
- when laying vinyl wallpaper, glue is applied to the wall;
- When laying paper wallpaper, the glue is evenly distributed on the back side of the canvas.
The further process is completely similar to the process of conventional wallpapering:
- Finishing can begin from any corner of the room;
- Installation of canvases starts from the ceiling;
- The wallpaper must be applied to the wall and then smoothed with a rubber spatula.
- We lay the second canvas according to the same pattern.


Laying different types wallpaper is significantly different:
- paper wallpapers are usually laid overlapping;
- - butt.
How to glue wallpaper in corners
The most difficult moment of the whole process is pasting the corners of the room. Here's how to do it right:
- One of the canvases is trimmed with an allowance of approximately 5-6 cm.
- The allowance is not processed with glue.
- The second canvas on the other wall is laid with the same allowance.
- Using a sharp knife in the corner, a vertical cut is made between these two canvases from ceiling to floor.
- The allowances are removed from them, and the joints are treated with glue with inside and smoothed with a spatula.


Advice: When gluing wallpaper onto wallpaper, the spatula is always carried out from the center to the joints.
“How to glue wallpaper” is a question asked by almost everyone who is about to renovate. Before gluing wallpaper, you still have to go through the process of selecting it, which is quite difficult, since nowadays there is a huge selection of wall coverings. Liquids are gaining popularity fabric And non-woven materials, classic paper options still remain in trend. Moreover, each type of this coating has its own characteristics, and therefore when pasting wallpaper you need to approach each type individually.
Preparatory stage before wallpapering
Whatever wallpaper you choose, first of all, you need to prepare it for pasting the wall. The task is simplified if you need to decorate the walls in a new building. If you are doing cosmetic repairs in an apartment or house, then first you need to remove the paint, if necessary. To summarize: the basis of this process is the removal of unnecessary elements.
The best way would be to buy a product for removing old wallpaper (see photo).
But repairs are already a costly thing, so if there is an opportunity to save on something without losing quality, then why not do it? To make it easier to remove old coatings, you can use a regular soap solution, which is easy to prepare with your own hands.
Advice! Add a little wallpaper glue to the resulting solution. Old wallpaper will be removed more efficiently.
If the old coatings were dense, then you will have to make a little more effort to remove them. Therefore, it is better to cut them first, and only then apply the prepared solution based on detergents. This is because the cuts improve absorption. After applying the solution, wait a little while the old wallpaper swells and absorbs the liquid. Now you can remove them using a spatula.
Advice! If the wallpaper is so thick that it was not possible to completely remove it, then the above procedure should be repeated one more time or even several times.
However, as often happens, simply removing old wallpaper is not enough. It is also necessary to prepare the walls so that there are no unevenness, and new material lay down evenly and smoothly. Therefore, all irregularities should be plastered and puttied. Before this, it is necessary to eliminate old enamel and paint.
| Condition of the walls | Proper surface preparation |
|---|---|
| New and porous walls (gypsum) | Apply plaster primer or adhesive primer 24 hours before wallpapering (this will allow you to protect the wall and subsequently remove the wallpaper without damaging the wall surface) Primer is required if the walls are made of gypsum boards. |
| Painted walls | Wash the walls with a special detergent and rinse them clean water. If the wall is painted with glossy paint, it is recommended to treat it with sandpaper in order to improve the adhesion of the glue to the surface. |
| Walls already covered with wallpaper | Remove old wallpaper. To do this, you can apply a special wallpaper remover compound to the wallpaper, which is diluted in warm water. Apply the solution to the wallpaper and let it sit for 10 minutes, then use a spatula to remove the wallpaper, starting from the top. You can also use a special steam cleaner to remove old wallpaper, except in cases where the wallpaper can be removed from the wall dry. |
| Damp walls | Treat the walls with a special primer for wet walls. It is necessary to observe the drying time indicated on the packaging for the primer. |
The stage of immediate preparation for wallpapering
There is no need to reinvent the wheel. You just need to strictly follow the already established instructions.
- Prevent possible drafts . To do this, close the windows and doors.
- Count the number of vertical stripes that will fit on the wall .
To quickly do this, you can simply measure the length of the wall and divide the result by the width of the wallpaper. If you get a fractional number, for example, 7.7, then this means that you will need seven full strips and one incomplete, trimmed. Then cut out 8 strips corresponding to the height of the wall. Add another 50mm for trimming at the ends.
- Next you need to make markings. It is better to start wallpapering with the second strip, leaving the first unused. After all, the first page is usually near the aisles. For better orientation of gluing the first strip, you should retreat 500 mm from the edge of the wall. Mark this line with a pencil. For this you will need building level. We apply the tool to the wall and align it with the mark. Draw a vertical line on the wall. From this place we will glue the next strip.
Advice! To do this, you can also use a simple thread and tie a weight to it.
- Let's start applying glue . They should lubricate both the wall and the strip. For this you will need a brush.
Follow these instructions and you shouldn't have any problems with gluing.
How to glue wallpaper correctly: the gluing stage
- Let's proceed directly to pasting. Where to start gluing wallpaper? We remember that you need to start from the second stripe. She will be our first. It is better to start gluing from the top, carefully applying the coating to the wall. The edge of the strip should be aligned with the vertical line marked on preliminary stage. You will need a wide roller to carefully adhere the covering. This will squeeze out any air bubbles.
- Since the length of our strip exceeds the necessary one, we mark the unnecessary length . It needs to be cut off by slightly tearing the strip off the wall. It's even easier to do this using a utility knife. In this case, there will be no need to tear off the strip that is already so well glued. The resulting joint will be covered with a plinth.
- We continue the sequence of actions described above in relation to the remaining stripes . Instead of a vertical stripe, we use the edges of the previous one.
To understand the nuances of wallpapering even better, watch the video at the end of the article.
How to glue wallpaper in corners? Photos and step-by-step instructions
Wallpapering directly flat wall If the technology is followed, it does not cause difficulties. However, this can cause difficulties even for experienced craftsman, if it collides with corners. The most difficult is situation if a window is adjacent to the corner .
Here are instructions on how to glue wallpaper in the corners. Paint and other coatings should be removed from them first.
- Most important point pasting is to determine the place from where to start gluing the wallpaper . We start gluing from the ceiling to the window sill. This should be done with a slight overlap on the adjacent wall.
- Carefully process the window sill.
- We carefully place the covering behind the battery, and if necessary, cut the strip to the pipes.
- We roll over the strip to smooth out all the wrinkles.
- Carefully mark a line along the corner. We cut off that unnecessary part of the strip that was overlapped onto the adjacent wall.
Advice! To do this, it is most convenient to use a ruler and a stationery knife.
- We proceed to pasting the strip on the adjacent wall. Again we begin to work from top to bottom, joining the new strip with the one that is adjacent to the adjacent wall. Leave a small overlap unattached.
- Cut off the unnecessary part by applying a ruler to the corner.
- Again, take a wide roller and process the freshly glued strip.
- Treat the space between the stripes with a smaller roller.
How to glue wallpaper on the ceiling: step by step
First of all, you should prepare the ceiling for pasting. The surface must be flat, otherwise the coating will not lie well. Therefore, the whitewash, previous coating and paint should be removed.
- Removing irregularities .
The length of the strips should be approximately 5-7 centimeters greater than the size of the plane.
- Apply glue to the ceiling with a roller .
- On the ceiling, measure the width of the wallpaper, fix this place with a line. Apply masking tape along the strip.
- With a folded sheet we climb onto the table . Peel off the corners, the sheet will open itself under the weight of its own.
- Glue the corners first, then the rest of the strip. .
Advice! Use a pin to pierce every 10-15 cm of wallpaper. Air will escape through these holes, preventing the wallpaper from coming off.
- Using a spatula, expel the air, moving from the middle .
- Roll the surface with a roller ;
- Repeat this procedure for the remaining sheets .
- Trimming the edges . Apply a putty knife and press it to the cutting area. Cut with a knife.
Based on these instructions, you can easily glue any coating.
What wallpaper is better to glue?
Nowadays, the choice of wallpaper is so large that this can become a real problem. Of course, you can focus only on aesthetic components and choose only those materials that you like best in appearance. But, perhaps, it would be much more reasonable to pay attention to the technical characteristics of the wallpaper. After all, if insurmountable difficulties arise during pasting, then you will not be interested in their beauty.
To make it easier to decide on the choice of wallpaper, let’s turn to their technical specifications, as well as the positive and negative aspects of their different types.
Currently, non-woven wallpaper is becoming increasingly popular (see photo). Largely because it is now fashionable to use only environmentally friendly materials. When gluing non-woven wallpaper, it is necessary to take into account such a nuance as gluing technology. Regarding the question of how to glue non-woven wallpaper: the glue should be applied not to the coating itself, but to the wall.
- When choosing wallpaper, you should take into account the humidity of the room and the condition of the walls. So, vinyl materials good for the bathroom or kitchen (see photo).
- This is because dirt can be removed with a damp sponge. At the same time, if you have a good budget, you can buy expensive ones. non-woven wallpaper , which can also be wiped with a damp sponge.
If you choose wall covering for the corridor, then focus on your taste. Any type of wallpaper is suitable here; the choice is yours.
How to glue liquid wallpaper and other non-standard materials
Liquid-based coatings are of particular interest, so the question of how to glue liquid wallpaper is becoming increasingly relevant.
Prepare a container in which you will mix the coating. And follow the instructions on the package. The process resembles conventional puttying. You will learn how to glue liquid wallpaper from the video at the end of the article.
- Another popular type of non-standard wallpaper is a meter covering. Therefore, the question of how to glue meter-long wallpaper on walls is also of great interest.
- Meter-long wallpaper should be especially carefully smoothed over the wall to avoid so-called “bubbles.” This is somewhat more difficult to do than when pasting with a regular width, so you will have to try. Some types of meter-long wallpaper can be painted.
- IN Lately It is becoming fashionable to apply paint to the coating. They are best suited for this. But some vinyl ones can also be painted. And, of course, you shouldn’t paint it regular paper wallpaper.
Which wallpaper is best to glue - liquid-based, paper, non-woven, meter - everyone decides for himself, taking into account the characteristics of the room. Take the above instructions as a basis - and you can easily make repairs.