Decorative plaster compositions - the most popular material for unusual finish walls. They allow you to create truly original interiors. The cost of such plasters is quite high. But we can quite save the budget for repairs if we apply them ourselves. It is not so difficult.
The main thing about decorative mixtures - what you need to know?
Decorative plaster(DSh) is a composition for finishing wall surfaces, consisting of a binder and special fillers. As the first, mineral (lime or cement) and synthetic (various resins - acrylic, polyvinyl acetate and others) components can be used. The function of fillers is usually performed by marble or granite chips, quartz, white sand, as well as combinations of these materials. LH with a mineral binder and coarse-grained additives are recommended for processing walls from the outside. But synthetic-based compositions and fine fraction fillers are more suitable for interior finishing activities.
Also in the described decorative compositions there is a pigment. It gives the mixture the desired color. The pigment is also synthetic and mineral (natural). Natural additives - indigo, ocher, cochineal, yellow minium, azurite, ground malachite, vivianite, charcoal and others, are prone to rapid burnout of LH. In addition, compositions with natural pigments are expensive. For this reason, plasters with synthetic coloring additives have become more widespread.
The texture of the described coating is formed using all kinds of granules, fibers, flakes, small gold balls. The most popular types of LH among home craftsmen are considered to be:
- Venetian compositions;
- flock mixes (coating with silk effect);
- bark beetle (walls after applying plaster become like tree bark);
- coatings with the texture of rain and rock;
- compositions with marble chips;
- texture compositions under the stone.
DSh is available in the form of dry mixes (they are diluted with water before use) or ready-to-use without any additional steps. The effect of using both types of plaster is the same. At the same time, ready-to-use compositions are more convenient for home craftsmen who decide to decorate the walls with their own hands.
Rules for processing walls with plaster - we are preparing thoroughly
Before using LH for its intended purpose, you need to understand the features of working with such compositions. First of all, let's find out what tools we need. Everything is simple here. We buy a scraper, a trowel, a drill with a mixing nozzle, a trowel, brushes, baths, rollers, combs, spatulas of various sizes. You may need other tools used for finishing work.
Then we proceed to prepare the walls for plastering. Their surfaces must be absolutely clean, dust-free and dry. If the walls are dotted with cracks, you will have to repair all existing defects. If necessary, knock down the protrusions on the surface to be decorated and fill suitable composition hollows. After that, we prime the cleaned base. This operation will protect the coating from moisture, deforming stresses, temperature changes, and strengthen the carrier layer.
We choose the primer taking into account what kind of decorative composition we use. Carefully read the instructions for the plaster! It indicates the recommended type of soil. Several Yet important points. The primer layer should have a thickness of no more than 20 mm. It should be very well compacted. If this is not done, the uniformity of the texture of the applied LH will be violated. In some cases, a layer of soil must be kept on the wall for several days, periodically spraying it with water.
If the plaster will be applied to drywall, wood, plywood sheets, wood-based panels (chipboard, OSB), they must be treated with deep penetration primers. Such bases are prone to deformation when decorative mixtures are applied to them. Also note that most modern LHs set within a few hours. However, they take 24-36 hours to dry. A complete hardening of the decorative composition is observed after 7-8 days.
How can a decorative composition be applied?
There are several options for processing the walls of the LH. The most popular ways of applying the composition are given below:
- spray technique;
- spraying;
- stretching (creating a relief with a trowel).
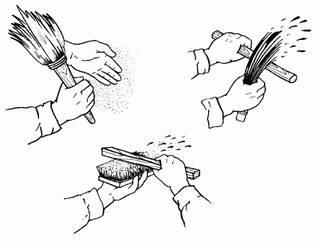
It is easiest for craftsmen to form the required spray coating. This technology is simple and clear. We take suitable tool(for example, a brush or even a regular broom) in one hand. We dip it in a decorative composition. In the second hand we take a stick. We bring a broom (brush) to the treated surface. We hit the tool with a stick. As a result of the impact, splashes of the decorative mixture fly onto the wall. We get a coating with splashes and flakes of various sizes. We are waiting for this layer to dry. Then repeat the above procedure. We impose as many layers as we need, smoothing each of them with a roller or other device.
A variation of the classic spraying technique is the so-called Italian plastering. The order of work will be similar to that described above. But when decorating in Italian, we do not need to wait for the previous layers to dry. The next portion of the solution is applied to a damp surface. Note! This method of decoration involves the application of layers different shades. That is, if we first use blue plaster, a mixture of a different color is applied on top of it. The result is an original decor that can decorate any home.
Spray technology – fast and effective method wall decoration with a decorative mixture. But for its implementation it is required to rent or purchase special installation. LH is poured into such equipment, and it applies plaster to the surface.
Spraying is carried out continuously. Work always starts at the top of the wall.
The spraying technique is indispensable when we use LH of different fractions and want to achieve a unique aesthetic effect. With its help, you can finish the walls in one tone, and the slopes on the windows and other architectural details - in another. Nuance. On the main surfaces, the composition is applied with a layer of about 3 mm, on auxiliary surfaces - no more than 1 mm in thickness.
Plaster mortar is often applied by pulling. This is an easy way to decorate walls. It is performed using a steel grater or a conventional trowel. Finishing is done strictly from the bottom up. We hold the tool in relation to the surface to be treated at a 60-degree angle. After applying the composition, we form the required pattern and texture using a plastic grater.
In the next section, we will look at common techniques for decorating walls with decorative mixtures. With their help, we can easily make the interior of your home individual and very attractive.
Rocks and rain on the walls of the dwelling - we will do it ourselves
Now let's see what techniques are used to create decorative relief surfaces using LH. There are many of them. A common option is the formation of a rock texture. This technique is ideal for beginners. The procedure is as follows:
- 1. We prepare the wall according to the algorithm we already know.
- 2. We process the surface with a decorative composition. We apply it with a layer of up to 3 mm using a trowel.
- 3. We distribute the LH along the wall (as evenly as possible). We create the drawing we need using the same ironing board.
The movements of the tool can be very different - horizontal, crosswise, herringbone, vertical and so on. We ourselves choose the appropriate relief and form it. In the case when the planned drawing does not work out, we quickly smooth out our art and try to create the original rock again. Note! The trowel should be rinsed after each individual section has been treated. Otherwise, it will simply stick to the plaster.

It is a little more difficult to apply LSH with rain. But this technique guarantees a more spectacular picture. The technology for creating rain is as follows. We mark the walls. We draw lines on them under a certain slope. They must have the same angle of inclination. And we take the distance between them within the size of three trowels. Stick masking tape on the line. We begin to apply plaster from the upper corner of the surface to be decorated with inclined stripes. We fill the space limited by two masking tapes. The working tool needs to be pressed against the wall a little.

As a result, we get a decor that looks like a hedgehog. But we want rain. Everything is elementary here. We wash the tool. We apply it to the plastered surface and smooth the mixture in one direction. Then, by analogy, we cover the remaining strips with a solution. When the LH dries, we remove the remaining minor defects and irregularities from the wall with a sandpaper or abrasive mesh. At the end of the work, we admire the rain that decorated our room.
5 Other Relief Image Techniques
The application of various types of decorative plaster can be performed using other methods. Let us briefly describe the commonly encountered types of wall treatment with the compositions in question:
- 1. Boulders. To create such a picture, we need to apply a trowel to the primed surface with a trowel. And then finish it with a brush. We hold the latter with respect to the wall at an inclination of 90 °. If you want to get sharply defined boulders, take a hard brush. The soft bristle tool allows you to make more blurry drawings.
- 2. Wave. We make notches on the wall, sprinkle it with water. We apply plaster in zigzag stripes. Then we smooth the resulting waves with a spatula or a trowel. This technique is often used when using Venetian plaster.
- 3. Travertine. We collect portions of the finishing tinted in specific color mixture on a spatula. We throw them on the wall. After that, smooth the surface.
- 4. Broken stones. We process the walls with plaster. We are waiting for it to harden. We drive the tongues into the coating, chipping off small pieces of it. We get stones with crevices.
- 5. Furrows. The technique involves the use of bevels with semicircular teeth. The distance between the latter should be 1.5 cm. Before applying the LH, we must sharpen the teeth. We apply the plaster composition to the wall. Smooth it out right away. We apply the rule to the mixture and at an angle of 45 ° the bevel (sharpened part). We create furrows. The type of the latter will depend on what kind of malka (with what shape of cloves we use).
You can try more complex methods of applying LH. For example, hatching-bouffant.

This technique is performed only on a fresh coating, which is processed with a metal brush. After using it, we wait a day and remove poorly fixed pieces of plaster from the wall. Remove excess parts with a rag, spatula or ordinary sponge.
We apply a decorative mixture with a roller - features of the operation
Wall decoration of the LH can also be done with a paint roller. Although this tool is rarely used for decoration. It is not used when working with Venetian plaster. But for other decorative compositions (structural, textured), it is quite suitable. The algorithm for finishing with a roller is as follows:
- 1. We repair and clean the walls. We prime them twice.
- 2. We prepare the solution. Pour it into a wide container.
- 3. Dip the roller into the bath with the solution.
- 4. With sliding smooth movements, we apply the composition to the wall. Be sure to leave small indents from the ceiling, adjacent walls and floor.
The plaster is applied in strips at a time. The movement of the roller is from top to bottom. If the LH does not adhere well to the surface being trimmed, we wet the painting tool with water. By pressing the roller with different efforts, we obtain one or another coating structure. Its final form, in addition, depends on the speed of movement of the tool on the surface.

choose suitable way and the technique of applying decorative compositions and feel free to get to work. You will succeed!
Wall decoration with decorative plaster is work that is carried out on internal or external surfaces. They are aimed at giving the walls or ceiling a certain texture and color. Depending on the composition chosen, different techniques application of this material. Only remain unchanged preparatory work.
To finish the walls with plaster with your own hands, you will need the following:
- spatulas of different sizes;
- graters and half graters;
- trowel;
- containers;
- brushes, rollers and sponges;
- drill with mixer nozzle;
- ladder or scaffolding;
- polyethylene film, masking tape;
- plaster mixture, wax, paint.

For the preparatory stage, the following tools and materials are needed:
- sandpaper, Sander;
- rule;
- level and plumb;
- spatulas;
- reinforcing mesh;
- deep penetration primer;
- starting plaster, putty.
Preparatory stage
Finishing with plaster requires a perfectly prepared surface. To do this, you need to carry out the following manipulations:

- Completely remove the old coating or clean it from traces of paint, wallpaper, and so on.
- Align the walls with starting plaster and reinforcing mesh or drywall sheets.
- Repair possible surface defects, such as potholes and cracks, with putty.
- Remove protruding fragments.
- Check the evenness of the walls with a level or plumb line.
- Apply two coats of primer to increase adhesion.
Structural plaster walls
With the help of this material, finishing work is carried out on external and internal surfaces. Finishing decorative plaster with your own hands does not require rich experience or qualifications - House master deal with it easily. Difficulties can arise only with applying the mixture to the ceiling.

Solution preparation
The modern construction market offers ready-made mixtures in plastic containers of various sizes or dry powders in bags that need to be diluted with water. If we are talking about saving the budget, then it is better to buy powdered material and prepare decorative plaster yourself. For this purpose, you will need an electric drill with a mixer attachment, water and a mixing container.
Important! Most structural plasters dry very quickly, and water should not be added to them after preparation, so it is not recommended to make large batches so as not to lose material.
The material consumption directly depends on the filler fraction:
- Coarse-grained material - 2 kg per square meter.
- Medium grain - 1.7 kg.
- Fine-grained - 0.7 kg.
First of all, you need to wash the breeding container and pour into it the amount of water indicated by the manufacturer on the package. The temperature of the liquid should be approximately 20 degrees. Then you should gradually add the solution to the water, stirring it with a mixer.

After that, you need to wait about 15 minutes and stir the plaster again. If the material is made on the basis of acrylic resins, then color is added to it, otherwise it is subject to subsequent coloring.
Application features
The prepared composition is collected on a spatula and applied to the wall, after which the plaster is stretched over the surface. Excess material is also removed with a spatula. During application, it is important to observe the thickness of the plaster layer, which must correspond to the fraction of the material, therefore it is not recommended to make it more than 3 mm. At the same time, too thin a layer will not be able to completely cover the walls, and after drying, a primer will appear on them.
As mentioned above, given material dries instantly, so a limited time is allotted for work. In order for the plaster layer to be uniform, it should be applied at a time. If the surface to be treated is too large, then you will have to divide it into sections with masking tape. Then apply plaster with an overlap, remove the tape until the material has hardened, and treat the rest of the area in the same way.
 The applied layer of plaster should not be thicker than the grain of the filler included in the composition.
 Rubbing plaster
This stage is considered the most responsible. The appearance of the resulting surface and its performance depends on its correct implementation. Work must begin immediately after the material has set. This usually takes 30 minutes. Checking the readiness of the wall is simple: just put your hand on it, if it does not stick, you can start.
The procedure is carried out using a plastic trowel. To achieve different effects, different rubbing techniques are used (see photo):

Should know! If for some reason it is not possible to process the entire wall at a time, then you do not need to grind exactly to the boundaries of the treated area. It is necessary to leave the plaster untouched along the edges, and after applying the entire layer, carefully wipe the joints.
VIDEO: applying decorative plaster "Lamb" (master class)
Coloring
A day after the main work, you can start painting the wall. The first step is to process the entire surface with sandpaper to even out minor defects. The wall is then painted dark color and wait for it to dry. The next coat of paint should be lighter by 1-2 tones. The work is carried out with an ordinary paint roller, and the joints of the wall with the floor and ceiling are treated with a brush. After the second layer has dried, it is recommended to apply a glossy varnish.

Wall decoration with textured plaster
First, a solution is prepared taking into account the manufacturer's recommendations, after which it is applied to the surface with spatulas. dries longer than structural, so you can safely process the entire wall. Excess material is also removed with a spatula. After processing the entire area of \u200b\u200bthe wall, you can begin to create a texture.

How to make a texture layer
Such coverage can be obtained using the following tools:
- roller;
- stencil-stamp;
- trowel and spatula.
Using a roller is the easiest and fast way. With this tool, you can create a surface that resembles velor. To do this, you need to forcefully pass them over the entire surface of the wall, while the movements should be directed in one direction. Then wait for the material to dry and remove the protruding fragments with a spatula blade.

If it seems too complicated a process, then you can purchase special stencil-stamps with embossed patterns in hardware stores. These products are simply pressed against fresh plaster, after which a relief remains on it. The main inconvenience is the need to constantly rinse the stencil with water in order to remove residual material from its surface.

On a note! When buying everything you need, you need to purchase several small stencils for the corners.
Using spatulas and trowels create patterns that resemble texture natural stone, suede or concrete. You need to work with them according to the same principle as with all the above tools. The brush, spatula or trowel is pressed against the surface and carried out over its entire area. If there was no construction tool at hand, then you can use an ordinary sponge or even a plastic bag. In general, anything that can leave relief on the surface will do.
VIDEO: wall decoration with textured plaster
How to stain
Such decorative plaster for interior work does not require mandatory painting, but to emphasize the texture, it is still better to carry it out. First, the surface is cleaned with fine-grained sandpaper, then the resulting dust is brushed off. The first layer of paint is applied with a long-haired roller, and the second with a short-haired one. Paint tones should be slightly different. They need to be applied at intervals of a day, while the plaster, after giving the texture, should dry for about 48 hours.

If there was no roller at hand, then the process of painting the decor plaster is as follows:
- Open a can of paint and pour it into a special container. The brush is completely dipped into it, for the entire length of the bristles. Then wring out the embossed edge of the container to remove excess paint. If there is no special container, you can squeeze the bristles of the brush on a piece of multilayer cardboard.
- Now you can start applying paint. It is not necessary to paint over every detail, you should apply a layer with sweeping movements, barely touching the surface. Thus, the paint will not rub into the texture, but will only touch the protruding fragments.
- Wait for the first layer to dry and apply a second, lighter one. In this case, the same technique is used as for the first layer.
- The last step will be the application of varnish. This material is first diluted with water in a ratio of 1:1, after which it is applied with a wide, clean brush. After some time (each varnish dries for a certain period), you can apply a second layer. After about 1-2 days, you can touch the plastered wall.

Some masters use the blur method. It involves applying only one layer of paint, which is then rubbed with a damp cloth. As a result, the texture remains saturated in color, and the protruding parts are lighter.
Drawings and panels
Before working with decorative plaster, you need to immediately determine the presence of additional design elements on the walls, for example, various drawings or panels. They are able to decorate and ennoble even the most ordinary interior, especially if they are combined with the right lighting.
What drawings can be used and where to place them
A win-win option is a separate wall, which is pre-finished with stone or stucco around the perimeter. It is also appropriate to place these elements between windows, near interior doors or along the edges of an arched passage.

If we are talking about a children's room, then here you can fantasize as much as you like. Drawings can be drawn to the theme of a child's favorite fairy tale or cartoon. For a children's room, it is permissible to apply drawings over the area of \u200b\u200ball walls.
As for bedrooms or living rooms, everything is much more complicated here. The first rule is that the drawing should not bring disharmony into the interior. Drawings on the walls are allowed only for classical decoration, baroque, empire, etc. It goes without saying that in modern or high-tech, drawings and panels will look superfluous.
 The bas-relief on the wall is perfect solution to create a stylish and unique interior
 The tone of the painted panel should either contrast with the tone of the adjacent wall, or differ from it by 2 tones. The combination of colorful and dark tones is unacceptable.
Application techniques
There are three main methods of surface decoration that require artistic taste. Therefore, it is better to trust professionals or get a master class on decorative plasters.
Working with a stencil
This creation option is the simplest. As a stencil, you can use fragments of plywood or drywall, after cutting patterns on them.

The application process is as follows:

Creating a bas-relief using construction tools
The relief graphics method is also considered one of the most popular. It involves the use of plastic fine-grained plasters based on synthetic binders, acrylic paints and colorless varnish. To carry out such operations, brushes of various shapes and sizes, spatulas from various materials, pointed wooden pegs.

The process goes like this:
- After applying the final layer of plaster, the master, using the selected tool, applies a relief pattern to the surface. by the most simple example are the waves drawn with a paint brush.
- The composition is completed with a decorated relief frame, which is created using a sponge or foam roller.
- After the drawing has completely dried, it is painted. There are also no clear recommendations here - it all depends on imagination and talent.
hand sculpting
The last method is considered the most difficult and without a profile education, sculpture, most likely, nothing will work out. The purpose of this operation is to create a relief on the wall being processed by hand modeling. Such panels can occupy only part of the wall, or they can occupy the entire area. After they dry, the surfaces are also treated with paint and varnish.
Do-it-yourself decorative plaster is applied quite simply, if you do not take into account the artistic aspects of the issue. The main thing is to follow the above tips and recommendations from manufacturers.
Finishing the house with decorative plaster is gaining more and more scope. Decorative wall plastering is done not only in private houses, but also in apartments. In this regard, many are interested in what kind of material it is and what it is intended for.
What is decorative plaster? This is a special, plastic mixture, often with the addition of various kinds of pebbles, mica, etc. It is intended for decorating and finishing walls, less often ceilings. How is it different from ordinary plaster? Let's take a look at its ingredients.
Decorative plaster is made from:
- Lime, cement, gypsum, acrylic, silicate and others - as a binder. It is they who ensure the adhesion of the plaster to the surface. Gypsum is used very rarely due to the fact that such a mixture will quickly harden. And there will be difficulties with drawing a picture or pattern.
- Fillers - in most types of decorative plaster there are fillers, such as sand, mica, marble chips, pebbles, etc. They serve to give the plaster that very decorative effect.
- Additives - these can be anti-foam agents, plasticizers, etc.
- Water - and finally, the solvent for this whole mixture.
Simply put, decorative plaster differs from ordinary plaster only in filler. But it is these components that make it unique. What distinguishes decorative plaster from traditional types finishing materials such as wallpaper.
Wallpaper or decorative plaster
If you are faced with a difficult choice of material for wall decoration, choosing between decorative plaster and wallpaper imitating it, we suggest that you compare them to make the right decision.
First, the price of the material. The simplest wallpaper for decorative plaster is cheaper than the plaster itself. However, not all so simple. If we calculate in total the preparatory work for wallpapering, puttying, stripping, glue, etc., then the benefit will not be so striking. The only exception is Venetian decorative plaster. Here, wallpaper under the "Venetian" will cost much cheaper than the original.
Secondly, the service life. Here, decorative plaster has a clear advantage. It will last you at least 30 years. And some of its species and up to 50-60 years. Wallpaper will have to be changed after a maximum of 15 years. And in most cases, after 5-10 years. By the way, calculate and include the wallpaper change in the paragraph above about comparing the price of materials.
Thirdly, finishing care. Decorative plaster is perfectly washed and cleaned. Wallpaper, not all types can boast of this.
Fourthly, this is the uniqueness of the resulting pattern of decorative plaster. Wallpapers have a finite number of types of patterns.
You can still list the advantages and disadvantages of both decorative plaster and wallpaper for decorative plaster for a long time, but the conclusions are already clear. If you need simplicity and cheapness, wallpaper is your choice. There is an opportunity to spend money, if you want originality in decor and durability - finish with decorative plaster.
Types of decorative plaster
All decorative plaster is divided into two large groups.
Types of decorative plaster.
- decorative plaster for interior work
- decorative plaster for outdoor use
These two types of plasters differ in that the external decorative plaster is more resistant to ultraviolet radiation, i.e. fade less in the sun. And also facade decorative plaster tolerates “wet” weather conditions much better. It is resistant to rain, snow, etc.
Due to its properties, decorative plaster for the facade of a house exists in fewer types. Therefore, we will consider options for decorative plaster for interior decoration. Because they also include options for the facade of the house.
Types of internal decorative plasters
1. Embossed - they are called so because the pattern they create is embossed. Subdivided into subspecies:
- Structural decorative plaster - the pattern is obtained mainly due to the composition of decorative plaster. The pebbles, quartz sand and the like in the mixture give the pattern a certain structure when applied. Typical representatives are decorative plasters "Bark beetle", "Fur coat", "Lamb".
- Textured decorative plaster - this type of decorative plaster is distinguished by its fine grain and plasticity. Here the pattern is obtained due to a special technique for applying plaster. To do this, they use both improvised means - brushes, film, sponges, etc., and industrial special products - rollers with a certain stencil pattern.
2. Smooth - accordingly, the pattern is smooth. The representative is "Venetian" decorative plaster imitating marble or onyx.
Decorative plaster for interior walls and for facade decoration also differs in its composition. Depending on the main connecting element, decorative plasters are divided into the following types:
- Acrylic decorative plaster - includes acrylic resins. It has good protection against water and moisture, but has poor breathability. Weak abrasion resistance compared to other types of decorative plaster. Low fire safety.
- Mineral decorative plaster - consists mainly of cement, lime and gypsum. Good, natural plaster, suitable for finishing rooms with normal humidity. On the facade, in the bathroom and kitchen requires additional protection in the form of painting, varnishing, etc. Good breathability makes the indoor climate healthy and pleasant.
- Silicone decorative plaster is a universal mixture for any premises and facade of a building. Good vapor permeability, moisture resistance and abrasion resistance make this type of decorative plaster suitable for any finishing work.
- Silicate decorative plaster is another versatile mixture for decorating indoors and outdoors. Not afraid of water, sunlight, antistatic. But the application requires skill, as the plaster quickly hardens.

We hope you have figured out the types and types of decorative plaster. Let's see a photo of decorative plaster in the interior.
Decorative plaster in the interior
By using various kinds decorative plaster and how it is applied, you can achieve very different design effects. Here everyone will find the pattern that he likes. However, keep in mind: often the samples of decorative plaster in the store and what you end up with on the wall may not match. After all, each application of decoration is different from the previous one. But despite this, it is possible to generalize the effects obtained.
Effects of decorative plaster
- Venetian plaster. It has the appearance of a polished stone or marble surface. Apply on any surfaces prepared for its application.

- Travertine effect. Complete imitation of stone, called travertine. The porous surface and light pale color make it an excellent room decoration.

- concrete effect. With the help of this type of plaster, there is an absolute imitation and creation of the effect of a concrete wall.

- Skin effect. For lovers of discreet luxury, this look is perfect. Thanks to its texture, it conveys well and creates the effect of a wall covered in leather. At the same time, thanks to the variety of tools, using decorative plaster in the interior of the room, it is possible to create an imitation of different types of leather.

- Tree effect. Incredibly accurately imitates the look of wood flooring, thanks to the accuracy of the reproduction of small details and plant patterns.

- Silk effect. To create it, a mother-of-pearl coating is used, which, smoothly shimmering, creates the feeling that the wall is covered with silk.

- Effect brickwork. Popular due to its low cost compared to real brick and accurate imitation of the presence of brick in the interior.

- The "bark beetle" effect. Using this technique, a pattern can be obtained that mimics the effect of a surface damaged by a bark beetle.

- The "orange peel" effect. Will ideal option for application under painting for interiors in oriental design.

- Wave effect. Simulates the view sea wave. With the right choice of paint, it looks very nice on the surface.

- Flowers effect. Decorative plaster "flowers" is used in frequent cases and stands out among the general variety of styles of decorative plaster. When creating a pattern, the shape and appearance of the flower depends solely on the spatula used and its movements. In this case, there is no binding to color and shape. You can decorate and paint the finished wall both in one color and using different techniques.

Types of finishing with decorative plaster are very diverse. Some use ready-made, template forms, while others can create their own art and create patterns that are pleasing to his soul.
The use of decorative plaster in the interior of rooms
Decorative plaster in the apartment performs one of the main functions of the decor of the premises. Properly selected design of decorative plaster will make the interior even more beautiful and perfectly complement the style taken as a basis. Also, each room of the apartment requires an individual approach due to the peculiarities of its location and external characteristics.
Using this type of finishing material in the kitchen will be an excellent choice, as it washes well and looks decent enough on the wall surface. Types of plaster used for decoration: Venetian, with imitation of marble or stone surface; silk imitation, plaster with small or large chips, etc.

The main thing worth emphasizing is that decorative plaster should be applied only to one wall of the room, so as not to make the kitchen too “heavy” and spoil the design of the room.

Often, when finishing with decorative plaster, Venetian plaster or various textured types are used for the bathroom, which are easy to clean.
Decorative plaster in the hallway, as well as in the corridor, form the main impression of the design of the apartment. Speaking about the types of decorative plaster in rooms of this type, we can name the main ones that most of all meet the requirements (resistance to cold, moisture and good operation): the effect of velvet and silk, the effect of "bark beetle" and Venetian plaster.

Finishing the balcony with decorative plaster allows you to maintain the harmony of design with all rooms of the apartment. Also, it performs an excellent heat-preserving function, is quite easy to operate and maintain, soundproofs and, at the same time, allows the walls to breathe. To decorate the walls, various types of plasters are used, from textured, with imitations of different plants and reliefs, to, for example, imitations of stone or brick.

DIY decorative plaster
If for some reason store-bought decorative plaster options do not suit you, you may be wondering how to make decorative plaster with your own hands. Well, it is quite within the power of everyone. In addition, you can decently save on materials. Let's make a reservation right away, decorative plaster made independently will not be as high-quality and durable as factory material. But the service life of such decor in 10-15 years is quite suitable for most people. Especially considering the relative cheapness of such finishes.
So, how to make decorative plaster? It all depends on what kind of room you want to decorate with decorative plaster. self-manufacturing. Or maybe you want to finish the facade? In these cases, the material used will be different.
Do-it-yourself decorative plaster for interior decoration is made either from gypsum or cement putty or plaster.
For finishing residential premises with normal humidity, do-it-yourself decorative plaster from ordinary putty is suitable. It is made like this:
- We take the same amount of starting and finishing gypsum putty. Instead of starting putty, you can use gypsum plaster. Then you get the so-called decorative plaster from ordinary plaster. They usually mean gypsum plaster.
- In a bucket of water room temperature a mixture of putties is poured or make them alternately.
- You can add a little diluted wallpaper paste. This will improve mold and mildew resistance. And slightly increase the time of use of the mixture.
- Mix everything well with a mixer or a drill with a nozzle.
- The resulting mixture should be the consistency of ordinary sour cream.
- Do-it-yourself decorative plaster from ordinary putty is ready!
Important! The decorative plaster prepared in this way dries quite quickly. Prepare as much solution as you can apply in 10-15 minutes. It would be even better if two people apply the plaster: one applies the base layer, the second immediately performs the drawing.
Such decorative plaster can also be used in rooms with high humidity such as kitchen and bathroom. But it will definitely need to be protected with a water-repellent varnish.
For finishing the facade, this version of the plaster is not suitable. But you can replace gypsum putty with ordinary tile adhesive. Suitable for any cement adhesive mortar for gluing ceramic tiles. For greater plasticity and increased adhesion, add a little primer to the water.
From such a mixture, for example, do-it-yourself decorative bark beetle plaster is obtained if a small stone of a fraction of about 2 mm is added to it.
Important! Do not forget that the decorative plaster that you have made will need to be protected from moisture with facade paint.
How to apply decorative plaster
Regardless of whether you made decorative plaster yourself or bought it ready-made in the store, applying decorative plaster is the same.
First, you need to learn how to properly apply decorative plaster. This knowledge will help you get to know the process better and control the workers. And even more so, they will come in handy if you do the finishing with decorative plaster with your own hands.
Let's prepare the necessary tool for decorative plaster:
- Construction bucket
- Trowel for decorative plaster
- Spatulas
- ironing board
- Rollers for decorative plaster
- Masking tape (tape)
- Wax for decorative plaster
- Mixer or drill with attachment
- Lacquer for decorative plaster
- Stencils for decorative plaster
It is possible that not everything from the list is necessary for you. It depends on the type of your plaster and on what technique of applying decorative plaster will be used. For example, if decorative plaster is expected to be applied with a roller, then you need it. If the decoration will be done by improvised means, then add them to the appropriate list.
So, how to apply decorative plaster on the walls? Or maybe you need decorative plaster on the ceiling? Let's try to summarize the processes that need to be performed, regardless of the type of plaster and the place of its application.
- preparation for decorative plaster - includes preparing walls or ceilings, preparing tools, gluing contours for decorative plastering with masking tape.
- preparation of decorative plaster - be sure to read the manufacturer's instructions, if any. It contains such useful information as the consumption of decorative plaster per m2, required amount water and other proportions, the time of work with the mixture, the drying time of decorative plaster and much more.
Let's consider some of the nuances in more detail. Do-it-yourself wall decoration with decorative plaster begins with the preparation of the base. Whether it is walls or ceilings, they should be without large potholes, cracks or sagging. Old finish must be cleaned and the surface primed. If you want to do the application of decorative plaster with your own hands on drywall, then putty the joints and caps from self-tapping screws. Walls for decorative plaster are not prepared as carefully as the ceiling. The thing is that a slightly larger layer of decorative plaster is usually applied to the walls than to the ceiling. And it perfectly hides minor imperfections: scratches, loose putty, etc.
The exception is the application of Venetian plaster. In this case, the walls, like the ceiling, should be as smooth and clean as possible.
Methods for applying decorative plaster
Decorative internal plaster with your own hands on the prepared surface with a spatula and trowel. You can use an ironing board. In some cases, a spray gun is used if spray application is intended. In any case, the technology of applying decorative plaster on initial stage is the same. First, apply the base layer, the foundation. This layer is made continuous. Then it is decorated until it dries. The way of decorating depends on the type of your plaster and your imagination.
If you are doing decorative wall plastering with your own hands for the first time, practice on a piece of drywall or on that part of the wall that will be covered by furniture. As you gain experience, move on to other areas.
The technology for applying Venetian decorative plaster is somewhat different. It is applied in thin layers with a rubber spatula with neat multidirectional strokes. There can be 5-8 such layers. Before applying the next layer, the previous one is allowed to dry well.
Decorative facade plaster
Finishing the facade with decorative plaster on your own is a simple task. The main difficulty is working at height if your house is higher than one floor. The very same decorative plaster of the house outside, practically does not differ from the technology of applying decor inside the room. Let's look at the decorative plastering of the facade of the house using the most popular type as an example: applying decorative bark beetle plaster.
How to apply decorative bark beetle plaster
To begin with, prepare the surface as described above: level out large differences in height and clean. Then apply primer. It is better if it is soil with quartz sand. Prepare a mixture of decorative plaster. Apply plaster with a trowel in a small layer. Let the "bark beetle" dry a little and start decorating.
Move the trowel over the plaster in a rotating motion. Or you can only make vertical or horizontal movements. It all depends on what kind of picture you want to end up with. Movement should be without strong pressure.
Painting decorative plaster
There are no special secrets in painting decorative plaster. We think that everyone will cope with this task. Just choose the right paint for facade or interior work, as well as the hairiness of the roller. A solid background is made with a long pile roller. If you only want to paint the top exposed layer, use a foam roller and paint without pressing the foam roller hard against the wall.
Repair of decorative plaster
Decorative plaster periodically requires repair or restoration. Cracks, swellings, delaminations and chips appear on it. It is easy to repair the damaged area with your own hands.
If you notice plaster swelling, go over the entire surface of the wall with a wooden mallet and listen to how it sounds. A dull sound will tell you which area has peeled off. This area of damaged plaster should be removed with a perforator, chisel, hatchet, etc. Then clean the wall with metal brush and prime. Before applying a new composition of decorative plaster, moisten well warm water not only the cleaned area, but also the adjacent plaster for better adhesion of materials to each other.
Try to apply decorative and repeat the pattern that was previously. In order for the difference in the pattern not to be so noticeable, repair the plaster by beating off a rectangular area.
After the plaster has completely dried, it must be repainted. So you mask the joints and the heterogeneity of the layers.
Cracks in decorative plaster are repaired in a similar way. The crack should be expanded and all the measures described above should be carried out.
How much does decorative plaster cost
The price of decorative plaster varies greatly from manufacturer, country of origin and type of plaster itself. The cheapest decorative plaster costs about 2 US dollars per kg/l. The best decorative plaster known Italian manufacturers can reach up to a hundred or more dollars per kilogram or liter.
On average, you can voice the following prices: simple relief plaster will cost about $ 5, and Venetian about 15 per kg / liter.
Prices for work with decorative plaster have a smaller spread and depend on the type of plaster and the qualifications of the master. The average price for work with decorative plaster is 10-30 dollars per square meter. "Venetian" is more expensive than working with textured plaster. However, take into account the work on surface preparation and subsequent protection of decorative plaster with wax, varnish, paint, etc.
Decorative plaster reviews
Our description of decorative plaster should have helped you decide whether you need such a finish, whether it suits your home. And if you answered “Yes” to these questions, then most likely you asked yourself: decorative plaster, which is better?
An important role in the choice of decorative plaster is played by reviews of real buyers and users. Those who have lived with decorative plaster for several years and can tell you what nuances should be taken into account. Or warn against buying this or that type of decorative plaster, from buying from a certain manufacturer or distribution network.
Here are some typical decorative plaster reviews:
We made ourselves a Venetian in green tones in the bathroom. Looks great. Tiles wouldn't be the same. And the decorative without seams already changes color from lighting, a feast for the eyes. True, and the cost was considerable. But they were willing to pay for beauty.
He trimmed his toilet with textured plaster. I did it myself after reading articles on the Internet and watching master classes. It lay perfectly on the plastered walls, but the LSU box could not be finished. Glass-magnesium sheets had to be plastered on the floor, because there are streaks from decorative plaster.
I made my own plaster and applied it myself. The whole family decorated and are very pleased with the result. No one else has such patterns and never will. And it turned out very budget, did not expect.
The thing is certainly remarkable, but the price is exorbitant. I'll stick wallpaper for myself under the decor. Cheaper and more practical.
Made decorative plaster in the kitchen. The walls look very interesting. But it would be better if the apron was made of tiles. Tired of laundering fat near the stove. Don't repeat my mistakes.
The desire of many owners of private houses to give their home a completely unique look is quite understandable. Relief plasters come to their aid, which are made from solutions on various bases and applied to the surface of the walls either with special tools, or with improvised, sometimes completely unexpected objects, depending on what effect is planned to be obtained.
Do-it-yourself decorative wall plastering is a great way to stand out from the crowd. Before deciding on the choice of the desired pattern and the technique of its reproduction, it is necessary to consider various options finishes. After the desired relief is determined, it is advisable to conduct a practical lesson, and plastering it in accordance with the plan.
Some techniques for working with decorative plaster can be called art, as they are molded from it three-dimensional paintings with various plots that can become an exclusive decoration of the wall of an apartment or a country mansion. Experienced craftsmen, using them, create real works from ordinary plaster mass that set the style for the entire design of a room or facade.
Decorative plaster - what is it?
For a long time, decorative plaster was used to decorate walls, and with a change in interior styles, its plot patterns and relief changed, becoming more complex or, conversely, for the sake of fashion, simplifying. It has not lost its relevance to this day - in our time, with the help of a similar technology, both the facade parts of buildings and the interior walls of the room are finished.

Most often, a plaster coating is used, which, in addition to being decorative, also performs a protective function, preventing moisture and dust from penetrating to the main wall.

For interior walls, a finish with a uniform pattern or a relief plot panel can be used. Having chosen a relief in the form of a picture to decorate your home, you can be sure that it will be guaranteed to be original, since it is almost impossible to depict the same drawing twice in this technique in exactly the same way.
Reliefs applied to the wall are usually covered with one or more shades of color, which give them a deeper volume. If desired, when the original color of the decorative plaster gets tired, it can be easily changed to another. Moreover, this process can be carried out both on a homogeneous coating and on a panel. The paint is applied to relief panels with a brush and sponge, and on a homogeneous surface - using a spray gun or roller.
Decorative plaster can have a deep relief, which is called a bas-relief - it protrudes 8 ÷ 15 mm above the wall surface, or it can be almost smooth and stand out only in color. Today, in construction stores, you can find compositions that, when applied with a conventional spatula, can form a relief surface, and for some of them special nozzles are used that are installed on rollers. They are able to imitate tree bark, tall grass, layered rocks and many other three-dimensional drawings.
The plaster mixtures used to create the relief are quite plastic. They are easy to apply on a pre-prepared wall surface and transform into various patterns.
Fundamentals of technology for applying textured plaster

The work on finishing the walls with decorative plaster is carried out in stages, in accordance with the requirements of the developed technology. It includes several stages.
- The first step is to determine the pattern that will have to decorate the walls, as well as the tools needed to reproduce it. The relief sample during work should be in front of the eyes so that its contours can be repeated. This is especially important if the plot version of the panel is chosen.
- Next, you need to prepare the tools that will knead the plaster composition, apply it to the wall and create a relief pattern.
- When everything is ready, you can proceed to the preparation of the walls. This process is carried out in almost the same way for both facade and indoor walls - it includes cleaning surfaces from old coatings, rough leveling, and then their primer. It is better to choose the composition of the primer with antiseptic additives, then the walls will be protected from damage by mold, fungus, moss, etc., as well as from the creation of nests by insects.
- Then, a starting leveling layer of plaster is applied to the prepared, well-dried surface - it will become the basis for the textured finish layer.
- After the starting layer is well dried, the wall surface is recommended, once again, to create a higher adhesion between the layers of the plaster composition.

- The next step, again, after the soil has completely dried, a finishing textured plaster is applied, from which the relief is formed. In some of the techniques used, the upper part of the applied plaster is compared to one plane, and textured recesses remain inside, creating a uniform but chaotic relief.

- When reproducing some drawings, the application of several layers of decorative plaster is required, in which case each of them requires good drying.
- Further, if the color has not been added to the plaster mixture, the paint is applied on top of the textured layer. If the surface is given a uniform pattern with recesses, then it is best to carry out this process with a spray gun. If it is planned to produce an uneven color, then you can use a sponge or a brush for tinting. The paint should be applied in such a way that it emphasizes the beauty of the relief decorative coating. When tinting a panel, the paint is applied in several stages to create a visual perception of its depth.
When performing work, you must strictly adhere to step by step instructions. Making any changes to the relief manufacturing technology can adversely affect the design result. Therefore, do not rush - it is necessary to thoroughly dry each of the layers, observing their order. It is better to immediately prepare for the fact that it will take more than one day to create a high-quality relief wall covering.
Now that the general principles of decorating a wall by applying decorative embossed plaster to it are known, it makes sense to consider the tools that can be used for these technological operations.
decorative plaster
Tools for working with relief plaster

Finishing the wall with decorative plaster and forming a relief pattern with it, use the following tools:
- To mix the plaster mortar, you will need a drill and a mixer nozzle. With their help, you can easily and quickly enough, without much effort, make the mixture plastic and homogeneous.

- Spatulas of various sizes - these tools can be called the main ones in working with any plaster, since they are indispensable when applying any of the layers of the finish.
- or a trowel are also quite often used to cover surfaces with plaster solutions.
- A special mitten, which is used both to create a relief and to color it.

- Brush with hard or soft bristles, plastic wrap, rubber gloves, sponge or plastic dishwashing net.
- The use of a roller and rubber nozzles for it can be called the most popular way to make a wall embossed. The variety of these devices allows you to choose one of the many textured patterns offered by the manufacturer.
In addition, using this technique, the work is faster, and the print on the wall is neat and aesthetic, however, such reliefs cannot be called exclusive. Nozzles for rollers can have patterns of floral patterns, waves, various curls, geometric shapes and others.

Reliefs imitating the texture of leather or tree bark, as well as other natural materials, look especially impressive.

Nozzles can create a textured pattern, located vertically or horizontally, chaotically or perfectly correctly - this factor will depend on the preference of the owner of the finished housing.

Textured plaster expands the possibilities of transforming walls, and the presence of a variety of tools opens up scope for creating numerous drawings. It should be noted that craftsmen who are professionally engaged in this art, when making reliefs, often use completely unexpected tools and household items, for example, wood cutters, spatulas for manicure, or even ordinary teaspoons.
Materials for decorative plaster
In addition to well-chosen tools, it is necessary to choose the optimal plaster composition. The range is quite wide, as many well-known manufacturing companies offer special ones that allow you to easily transform the facades and premises of houses.
Starting plaster
In addition to the decorative mixture, it is necessary to purchase starting plaster, with which it will be possible to level the surface of the wall, preparing it for relief design. For this purpose, it is better to purchase formulations made on the same basis as finishing, then we can say with confidence that a good adhesion will be created between the base and the outer plaster layer. So, for the starting, leveling layer, fit:

- Starting plaster on a plaster basis. A distinctive feature of this mixture is a short time before setting, so you need to work with it very quickly. If there is no experience in leveling walls, then it is better to choose a mixture that will allow for longer work.

- For example, a cement-based mortar is perfect for both experienced craftsmen and beginners. It can be bought ready-made, or you can make it yourself from cement and well-sifted sand, taken in a 1: 3 ratio. For the plasticity of a home-made mixture, PVA glue is often added to it or liquid soap. Thanks to these components, the solution will become softer and at the same time “sticky” to the walls, and it will be easy to work with.
- Sometimes clay is used for the starting layer, which can also be purchased at a hardware store in an already prepared form. Most often, clay mortar is used for plastering wooden surface, but in Lately masters still prefer more modern materials for work. Although clay has numerous positive qualities, such as elasticity, good adhesion to the surface, environmental friendliness, and in addition, it is a "breathable" material.
Decorative plaster compositions
For decorative finishes special plaster compositions are used, which are also made on different bases. They are intended for a variety of relief patterns, so some of them are equipped with various additives. On the packaging, the manufacturer indicates the name of the relief for which this mixture is intended, since solid crumbs from different materials can be used as additives, which have a large and small fraction and give various finishing effects.
The proposed table presents some types of decorative plaster, which are most often used for finishing the facade of the house and walls inside the premises.
| Appearance of the package | Embossed pattern on the wall | The basis of decorative plaster | Additive fraction size, mm |
|---|---|---|---|
| Mineral Ceresit CT 35 | "Bark beetle" 2.5÷3.5 |
||
| Mineral Ceresit CT 137 | "Pebble" 1.0÷2.5 |
||
| Polymer Ceresit CT 77 | Mosaic 0.8÷2.0 |
||
| Acrylic "Ceresit CT 60, CT 63, CT 64" | "Pebble" 1.5÷2.5; "bark beetle" 2.0÷3.0 |
||
| Silicate-silicone Ceresit CT 175 | "Pebble" 1.5÷2.0; "bark beetle" 2,0 |
||
| silicate Ceresit CT 73 | "Pebble" 1.5÷2.5; "bark beetle" 2,0 |
||
| Texture acrylic "Capital" | "Quartz coat" | ||
| Based on white cement Master | "Lamb" 2,0 |
||
| Acrylic "Optimist Elite" | "Venetian plaster" white thick homogenous paste |
As can be seen from the presented table, plaster mixes are produced in a dry and pasty state. Ready-made pastes, diluted to the desired consistency, will usually cost a little more than dry mixes, but they are much easier to use, since you do not have to calculate the proportions when kneading.
Ready-to-use plasters can be used immediately after the primer dries on the prepared wall. Upon completion of the work, the rest of the mixture is closed in the packing bucket, and during the next stage, the paste can be reused, since it can be stored for quite a long time in the closed state.
If desired, create plaster own production, you can take as a basis the recipes given in the table below:
| Components of the solution | Appearance and color of plaster | |||
|---|---|---|---|---|
| Under white marble | Like yellow marble | Under red granite | Under gray granite | |
| Quantity in parts by volume | ||||
| Portland cement M400 | 1 | 1 | 1 | 1 |
| lime dough | 0.5 | 0.25 | 0.1 | 0.1 |
| marble flour | 0.5 | 0.25 | - | - |
| Marble chips | 3 | 3 | 3 | 3 |
| Mica (from cement volume) | 0.5 | 0.5 | 0.5 | 0.5 |
| Pigment in % by weight of cement | - | Ocher 3÷5 | Iron Minium 5÷10 | Manganese peroxide 1÷5 |
Priming compositions
Wall primers used on preparatory stage, are sold in pasty and liquid consistency.
plaster
- To treat the wall for applying the starting layer, it is recommended to use deep penetration liquid compositions, including antiseptic additives.

- After the starting plaster has dried, it should also be primed, thereby creating good foundation for the final decorative layer. For this process, it is best to use a primer that has a thicker, closer to pasty consistency.

Each of the layers applied to the wall must be completely dried, and only after that the next one can be applied. Otherwise, the plaster may begin to crack or peel off the surface.
Coloring compositions for decorative plaster
They can be tinted, or they are painted before starting work. Sometimes the color is applied by the manufacturer to the plaster, in other cases color additives are purchased separately and also added to the paste or dry mix before kneading or applying it.
Another option for giving the finished decorative plaster the desired color is to paint it with a spray gun, roller or brush. In this case, a white or gray composition is applied to the wall, and then, after it dries, it is given a uniform or three-dimensional coloring.

For painting textured plaster applied to the wall, paints made on water based- these are emulsion and water-dispersion. Such paints are produced in various colors, but if you wish, you can give them a shade yourself, by purchasing a separate white “base” and the color you like. Their mixing is done immediately before applying to the wall, in which case you can achieve a darker or, conversely, lighter shade, which will help give the pattern on the wall volume and depth.
Lacquer for decorative plaster
For textured plasters that have a shallow relief or a relatively smooth surface structure, a varnish or wax protective decorative coating is usually used.

Varnishes can be matte or glossy, and can significantly enrich the color of the wall finish. Thanks to even one layer of varnish, the plaster will retain its original appearance much longer.
In some cases, in order to achieve desired effect varnish is best applied to the surface of the wall in several layers. For example, if an imitation of polished stone or crocodile skin is reproduced on the wall.

Wax is most often used as a protective agent for Venetian plaster, which can acquire a matte or even mirror shine after application. Wax has no smell and is an environmentally friendly material. It is able to protect the wall covering from dust and yellowing, and besides this, it creates a water-repellent layer, and at the same time it has good vapor permeability, that is, the walls do not lose the ability to “breathe”. Due to these qualities, the wax coating can be applied in living rooms and in rooms with high humidity.
Wax is produced in a colorless version and retains the color of decorative plaster in its original state. In addition, it can be tinted with metallic pigments or pearlescent additives. For example, the CERA wax shown in the illustration is available in three color options - colorless, silver and gold, which allows you to enrich the decorative finish with a pleasant soft sheen.
masking tape

In some finishing work You can't do without masking tape. It is used to protect adjacent surfaces when working on one of them, as well as in cases where it is necessary to separate different textured or color patterns from each other. The tape is easy to stick to any surface and can be removed without leaving marks. It has a low price, so in any case, stocking up with all the materials necessary for finishing, it should be purchased as an aid.
When buying any finishing materials, it is very important to pay attention to the manufacturer's clarifications, which are placed on the packaging - about what kind of work they are intended for, internal or external. Many compositions for external use are also well suited for decorating the walls of rooms, but materials for internal use when applied to the facade, alas, will not last long.
Versailles plaster
Wall surface preparation
Now, having figured out how to choose a material, and what tools will be needed for work, we can proceed to consider the process of preparing walls for applying plaster solutions.
Preliminary preparation of wall surfaces
To get a quality result, it is very important to clean the wall well from old coatings, and such actions are performed as in outer walls, as well as internal ones. It is imperative to remove old wallpaper, paint or whitewash from them, otherwise the starting layer of plaster will have insufficient adhesion to the surface.
The main measures for the preparation of wall surfaces are shown in the table below:
| Illustration | |
|---|---|
 | Removal of the old layer of plaster from the walls. This process is especially important to carry out very carefully if the old decorative coating has begun to peel off from the main surface. If you need to remove a thin plaster layer, then for this purpose you can use a grinder or a construction grater with coarse-grained sandpaper installed on it. |
 | In the event that the walls are covered with wallpaper, the old canvases must also be removed. Usually pasted old wallpapers are moistened with a spray gun, and this process is carried out several times, since the canvases should get wet up to the wall itself. After that, the finishing material is removed with a spatula. |
 | Another option for cleaning walls from wallpaper is steaming. For this purpose, a special tool is used or steam iron, and besides this, an air humidifier can be used, which is directed towards the wall that needs to be cleaned of wallpaper. |
 | If the wall is painted, then the paint layer must also be peeled off, otherwise the plaster layer simply will not lie on the wall. Paint removal is done with a scraper, softening the old paint with a hot stream from a building hair dryer. You can also apply the abrasive method using a grinder with an iron brush or an electric drill with an abrasive nozzle. |
 | After the old decorative coating is removed from the wall surfaces, a leveling plaster layer or simply the capital concrete base itself will open. On concrete, depressions and irregularities are often found, which will have to be leveled by applying a putty layer. |
 | If plaster is found good quality, not separated from the main wall, then it can not be cleaned off. In this case, notches with a depth of 5 ÷ 7 mm are made on the surface of the wall with an ax or a chisel. They will be necessary to ensure better adhesion of the leveling starting layer to the wall. However, they often do without them, using modern primers of the "betonokontakt" type, which provide excellent adhesion of the applied plaster compositions. |
 | However, quite often the situation is such that the old plaster has to be removed completely, as it crumbles and does not adhere securely to the surface. This flaw can be detected when notches are applied, since when tapping in some areas of the wall, the plaster layer can “bump”, or even just fall off. If a layer separation occurs on a large section of the wall, then it is best to remove the old coating completely - the process, as they say, has already begun, and no one can guarantee that the remaining areas will be stable. |
 | After the old plaster layer is removed, serious damage can be found on the wall in the form of deep cracks. They must be repaired, otherwise they will eventually appear on new plaster layers, and the work will be spoiled. |
 | The detected cracks are embroidered, that is, they are made wider and deeper. Then they are cleaned and treated with a deep penetration primer. Their filling is carried out with a plastic repair compound. Special repair solutions are on sale, and for interior work, you can use the usual starting putty. The repair mortar must fill the entire volume of the cut crack, to the full depth or width. If a wide crack is found, it can be filled mounting foam with little extension. Its excess, which came out after the material hardened, is cut flush with the wall. In some cases, to strengthen the crack and avoid its manifestation through new finishing layers, a reinforcing serpentine mesh is glued on top of it on the putty mortar. |
 | After the repair “patches” on the cracks dry out, they must be cleaned with a construction grater with an abrasive mesh installed on it first, and then with sandpaper. |
 | The next step is to coat the wall with a deep penetration antiseptic primer. If the first layer of primer is absorbed into the wall surface without a trace, then one or even two more layers of primer are applied. The primer will penetrate into the pores of the plaster or wall material, strengthen its surface and create good conditions to bond materials. The solution can be applied with a roller or with a wide brush. Each subsequent layer is applied only after the previous one has completely dried. |
On a primed and dried wall, plastering can be done.
Applying a base leveling layer of plaster
Next milestone- these are plastering works that finally prepare the surface for further application of decorative plaster. Alignment is carried out on a primed and well-dried wall.
Methods of plaster leveling of surfaces may vary somewhat - depending on the material of the wall and the quality of the surface. But general technology nevertheless general, and more about it - in the table below:
| illustration | Brief description of the operation to be performed |
|---|---|
 | If, when performing a wall test with building level it turned out that it requires major alignment, then the first step is to put beacons made of special metal profiles on the surface. They are fixed on the wall with a step of 1000 ÷ 1200 mm, controlled vertically and horizontally using a building level and a long rule. The fixing of these profiles is carried out using a cement mortar with the addition of gypsum or only a gypsum mixture, since this material sets quickly and will not delay the subsequent work. Between the slides of the solution, on which the beacon profiles are attached, they maintain a distance of the order of 400 ÷ 500 mm. |
 | Having set the beacons, you can proceed to mixing the plaster. It must be homogeneous, without hard inclusions, otherwise it will be problematic to align it to the ideal, since voids can form near large hard fractions, which will weaken the coating. Before applying the solution, the wall can be slightly moistened by spraying it with a spray bottle or a brush. The next step is to throw a thick layer of plastic solution onto the surface, which should be 30 ÷ 50 mm higher than the beacons. Excess mortar will be removed by the rule when leveling the plaster. |
 | Further, the wet solution applied to the wall is leveled with a rule that moves along the beacon guides. Work begins from the bottom of the wall - as a rule, slowly, it rises up, while it is slightly moved from side to side for a better distribution of the solution in the space between the beacons. At the same time, excess plaster mixture is collected as a rule, which can later be used for application to adjacent sections of the wall. |
 | After plastering the surface, it should be left for 2-3 days to set. At the same time, it is recommended to spray the wall periodically with water to obtain greater strength of the applied layer. Further, the still wet plaster is overwritten, throwing cement milk over it. These works are carried out using a plaster trowel or grout, which is lightly pressed against the wall and the surface is rubbed in a counterclockwise circular motion, making it even. The worn surface is left to dry completely, which depends on the thickness of the layer and can take from 5 to 15 days. |
 | The dried plastered wall should be well primed using a paste-like thick primer, which is applied with a roller. Hard-to-reach areas of the wall are processed with a narrow brush. A water-based primer dries quickly enough, so very often after 2-3 hours it becomes possible to proceed to the next stage of work. |
 | If we are talking about interior work, then in order for the result of wall finishing to be of high quality, it is recommended to apply a thin, 1.5 ÷ 2.0 mm, layer of gypsum-based plaster to the leveling plaster layer. It will make the surface smooth, correcting all the shortcomings of the base layer. The plaster is applied with a metal trowel or with a wide spatula, making semicircular movements. It must be remembered that the gypsum mixture quickly sets and hardens, so knead a large number of the solution is impossible, since it will no longer be possible to “revive” it by adding water. It should be noted that as this starting layer for decorative plaster, you can also use a ready-made cement-based mixture, or one of the common putty compositions. After drying this layer, it must be primed. |
Decorative plaster - application and painting
When all leveling layers are dry and the wall is fully prepared, you can proceed to finishing stage works - applying a decorative plaster layer.
Several popular embossing methods
This is perhaps the most interesting creative process, after which the wall will take on a completely updated look. For this stage, a decorative pasty plaster mass or a dry mixture is used, which is kneaded independently, in the same way as the base solution, that is, using a mixer mounted on an electric drill.
In any case, the mass should be plastic and homogeneous, unless, of course, such a coating as "bark beetle" or "lamb" is chosen, which contains additives from stone chips. But even with such a solution, the solid fractions should be distributed in the plastic mass quite evenly.
| Illustration | Brief description of the operation to be performed |
|---|---|
 | Venetian plaster can have a different relief pattern, but it is always shallow and chaotic. However, sometimes it is the background for clear geometric or floral patterns. Decorative plaster is applied using a metal or rubber spatula thin layers, the number of which can be from 5 to 8. Despite such a considerable number of layers, the total thickness of the plaster made using this technique is only 3 ÷ 4 mm. |
 | To reproduce Venetian plaster, an already tinted composition is most often used, otherwise it will be necessary to color it after completion of its application and drying, and in this case, part of the intended effect will be lost. The desired effect of the "silk" surface is achieved by the presence of several layers of the same color, each of which is applied and rubbed in different directions. Thanks to this technique, strokes that differ in direction give a different reflection of the light hitting the wall. Thus, the surface shines with a silky sheen. In some cases, in order to create the effect of a deeper spatial volume, translucent from the inside, several color shades close to each other are taken. |
 | Each of the layers of the plaster composition applied with strokes is smoothed out, but this process is carried out with tangential movements with the application of certain efforts. For each of the layers, professional craftsmen use spatulas and trowels of different thickness and width, creating a multilayer chaotic relief pattern from the solution. With the help of this plastering technique, it is possible to imitate the pattern structure of various finishing stones on the wall. To enhance the imitation effect, after completion of the plaster application, after waiting for it to dry, the surface is polished with wax or covered with matte varnish. |
 | A more affordable option for a non-professional embossed plaster. The composition is applied with a conventional spatula in one or more layers, each of which must be dried. The relief of each layer can be smoothed out, or its protruding fragments can be left in their original form. Smoothing the solution is carried out with a metal trowel, with gentle touches. Using this technique, you can create various reliefs, and their shape and direction will depend on the creative mood of the master. |
 | If you intend to create a relief that has the correct smooth shapes and lines, you can use a notched trowel (trowel), which is usually used to apply glue when finishing surfaces, to reproduce it. ceramic tiles, or a special comb. |
 | This type of embossed pattern will be easy to reproduce for the master who first picked up a plastering tool. The first step is to apply a layer of plaster on the wall using a conventional wide spatula, and it is not necessary that it be perfectly even. Then it displays a relief in the form of semicircles, checkerboard lines or other patterns that you can come up with on your own. |
 | Another version of the relief, available for reproduction for any creative person, is an impression from an ordinary polyethylene film on wet plaster applied to the wall. In this case, fantasy can also not be limited, since the film can be used unfolded or rolled into a roller, as well as simply crumpled it randomly. In addition, you can come up with your own version of the use of this material, since, achieving the desired pattern, you can safely experiment with a solution and a film. |
 | When removing the film, after it has been pressed against wet plaster, it will inevitably pull the solution along with it, and as a result, peculiar relief protrusions are formed that can be smoothed with a spatula or trowel. Using this method of creating decorative plaster, you can use a tinted solution, or paint it after the wall dries after applying the relief. |
 | Quite popular for decorating both internal and external surfaces of walls is such a textured pattern as "bark beetle". For this, a special plaster composition is used, which includes hard stone fractions with a size of 1.5 ÷ 3 mm. Such a solution is applied using a metal trowel, and it can be distributed on the surface in different directions, depending on what relief is intended to be obtained. Rigid fractions when applying plaster leave furrows that mimic damage to the surface by insects. These in-depth stripes can be arranged vertically, horizontally, diagonally, in the form of a semicircle or whole circles - the direction of the relief pattern will depend on the preference of the master and the intended design. |
 | A frequently used tool for applying relief is a roller, which leaves a textured pattern on the surface of the wall. This method of recreating the volume can be used by any homeowner, even if he has never been engaged in plastering works. It is enough to purchase a roller with a relief you like on its rubber nozzle and leave an imprint on a fresh solution applied to the wall. The choice of nozzles is so great that they can be chosen for any, even the most sophisticated taste. If desired, the nozzle on the roller can be made independently, using pieces of foam rubber, wound coarse rope, plastic wrap, fur, fabric with a deep relief or other materials that can leave the necessary impression on wet plaster. |
 | If it is planned to create the correct floral pattern on the walls, in the form of grass and leaves of various shapes and sizes, then a roller with such a pattern will have to be purchased ready-made. The work on decorating the walls using this technique takes place quite quickly, since there will be no failures in the process - the plaster mixture is applied and distributed on the surface with a spatula, and while it remains wet, it is passed over with a roller, which will leave the selected pattern on the surface. |
 | And this is a completely simple way that does not require special costs for the purchase of a tool for reproducing the relief. For the finishing process, a regular flat brush with soft or hard bristles is used, depending on how clear the pattern is to be obtained. The relief is recreated according to the same principle as when using a spatula with a notched comb - according to a fresh plaster mortar applied to the wall. |
 | Another technique of decorative plaster, which is not performed over the entire surface of the wall, but only in its individual areas. One of the above-described types of shallow relief can serve as a background for it. Panels are usually made from gypsum plaster. The composition is applied in slides to the marked area of \u200b\u200bthe wall according to the drawing and left to dry. After drying, cutting tools are used - it can be a knife, cutters of various shapes and a spatula - with their help, the necessary forms are created. In addition to the incisors, you will need sandpaper with fine and medium grain, which smooths out the cut out elements of the three-dimensional pattern. In order not to spoil the wall, it is recommended to experiment by creating a small panel or its individual parts on plywood sheet. Only after making sure that everything works out, you can proceed to reproduce the intended relief pattern on the wall. |
In addition to those listed above, there are other items that can be used to create relief patterns on the surface of the wall. For this purpose, not only professional tools are widely used, but also improvised devices or even fragments of plants, for example, tree leaves or branches of various thicknesses.
Painting decorative plaster
As mentioned above, you can buy colored decorative plaster in hardware stores, but working with it is much more difficult, since it is necessary to reproduce all complex ones with one color. Therefore, most often a white plaster mixture is chosen, which, after final drying, is covered with selected shades, which significantly expands creative possibilities home master.
In addition to applying color to a finished relief wall, there is another technique for creating a colored surface. In this option, a certain color scheme is added to white plaster before it is applied, and then a relief on the wall is made from material of different shades. This is a fairly complex technique, and a professional artist or a person with the appropriate talent can handle it. Therefore, the most the best option remains the coloring of the finished relief.
Usually, water-based paints are used to paint decorative plaster, to which the desired color is added. It is recommended, when choosing a color, to make it one or two shades darker, since when the paint dries, it will brighten.
| Illustration | Brief description of the operation to be performed |
|---|---|
 | The most used technique when giving color to relief plaster is to cover it light tone, the selected shade. Such coloring will become unifying for the whole composition. The paint is applied to the entire plane using a roller, after squeezing it out on the ribbed surface of the paint tray. If the relief has a depth of more than 5 mm, then a long-haired roller is used to tint it, or especially deep fragments are tinted with a soft brush. |
 | The first paint layer is applied in one go, otherwise the coloring will turn out to be uneven. Therefore, if the paint is tinted on its own, it must be kneaded so much that it is enough for the first layer for all the walls in the room or at least for one wall, but always for its entire area. This is especially important if the surfaces will be painted in one color without additional shades and streaks. Staining is carried out different ways, depending on the depth of the relief and the desired end result. |
 | One of the options for uneven staining is done with a sponge. Then, on the still wet painted surface, soft cloth or with a dry sponge, barely touching the protruding relief elements. This execution technique is aimed at enhancing the “depth of space” of the relief not only with the help of volume, but also with the use of color play. |
 | This method of finishing decoration consists of two stages - painting and cleaning the protruding elements of the relief with sandpaper. In the first step, the entire area of the walls is painted with a common color - this process can be carried out using a roller or spray gun. The second stage is done after the paint is completely dry. Fine-grained sandpaper is installed on a construction grater, after which this tool is passed along the protruding parts of the relief. In this way, paint is removed or lightened from the surface, thereby showing a three-dimensional pattern. If desired, the cleaned surfaces can be covered with paint close in tone to the main color, darker or lighter than it, depending on what effect you want to get. A light shade is usually chosen, as it visually increases the volume of the relief. |
 | A relief panel can only be done experienced master, but you can try to paint it yourself. However, you need to take into account the fact that this process is quite complicated and lengthy, since it will have to be done with thin brushes, so the work will take a lot of time. It is recommended to cover the finished plaster relief panel with a primer, dry it, and only then proceed to painting. You should not take pure bright colors, as the relief will not be visible behind them. Therefore, they are diluted to the state of shades of the selected color, or a certain amount of them is added to white paint. |
 | In this variant of painting decorative plaster, two colors are used - one is the main one, and the second is an auxiliary one, which will highlight the relief pattern. The work is carried out in two stages. First, the entire surface is covered with one, primary color. This process can be carried out with a roller, a wide brush or a spray gun. Then this layer should be well dried. The second stage consists in applying paint with tangential movements to the protruding parts of the relief with a soft brush, foam sponge or mittens worn on the hand. The applied paint should be thick enough, and the brush or sponge should be dry. |
Video: an interesting example of painting a wall finished with embossed plaster
The final stage of work on decorative plaster is coating the walls with varnish or wax. This process must be carried out carefully, as by applying the final layer carelessly, you can spoil the whole work.
In conclusion, I would like to say that if there is little or no experience in performing decorative plastering, then it is not recommended to choose too complex design techniques. In the same case, when a specific drawing is selected and a decision is made to reproduce it on the wall at all costs, you should carefully study the instructions and practice on a small section of the wall or plywood shield.
Video: demonstration of various techniques for applying and decorating decorative plasters
"Versailles plaster": technology available to everyone - step by step
In the final section, as an example, the design of the wall with the so-called "Versailles plaster" will be considered. In the proposed finishing technology, instead of the plaster composition, two types of putty are used - starting and finishing, which allows you to save a decent amount on finishing. In addition, the advantage of this method of original decorative wall decoration is that even a novice master can do it. The main thing is to acquire high-quality material and use it correctly.

In addition to two types of putty, to obtain the desired result, you will need "Quartz-primer" to be applied to the wall under decorative cladding, which creates increased adhesion between materials, and also prevents the putty from drying too quickly. The presence of this material is a prerequisite for decorating a wall using this technology.

In order for the plaster layer to turn out to be aesthetic, it is necessary to purchase two more components, without which the desired effect will not work.

This is, firstly, a decorative coloring coating of the "Adagio Silver" type - on an acrylic binder, containing small metal particles various forms. Gives a very interesting iridescent effect, giving the wall a silky look.

Secondly, the so-called glitter is used, consisting of the smallest particles of a polyester film of various shapes. This component is also added to one of the decorative wall trim layers.
| Illustration | Brief description of the operation to be performed |
|---|---|
 | The first step is to knead the model mass, consisting of starting and finishing putty in a 1: 1 ratio. Mixing takes place as follows: Part of the starting and part of the finishing putty is poured into the container with water in turn, then the sequence is repeated, and so on until the required amount of dry mix is filled. If necessary, a little water is added to the bucket, and then the mass is mixed with a mixer attachment. Further, the finished solution is left for 10 ÷ 12 minutes - this time is necessary for it to "ripen". After this time, the mass is mixed again until a homogeneous state. It should be very well mixed and have a consistency of medium density, that is, not very liquid, and not thick. |
 | The finished putty composition is applied to the prepared, leveled, treated with "Quartz-primer" and dried wall surface. If the mass is applied not from the ceiling, but below, along the broken line on the wall, then it is recommended to first stick masking tape on it, which will help keep the upper part of the wall clean and keep the upper border of the decorative finish smooth. Work starts from the top line. First of all, the putty mixture is distributed along the masking tape. |
 | The applied layer should have a thickness of 2÷3 mm. Particular attention should be paid to filling the joints of the planes, for example, if the putty will be applied from the ceiling line. The mixture is applied to the wall with a trowel, in a relatively even layer. This work can also be done with a spatula having a width of 300÷350 mm. It should be noted that in this finishing option, you don’t have to try too hard, leveling the solution to perfect smoothness, the main thing is that the material layer has the same thickness over the entire plane of the wall and is fairly even. The smoother the putty layer, the easier it will be to see the flaws in the relief pattern. |
 | An even facing layer is applied to a height of 1000÷1500 mm from the top down the wall. Then a relief pattern is formed on the wet putty. For this, a plastic trowel with a plate pointed in front is used - in shape it resembles an iron. Work starts from the corners or the top line of the wall. The master makes wave-like movements, stretching the mass, at the same time creating a chaotic pattern in the form of stripes going in different directions. With the help of a trowel, the mass, as it were, rises above the surface, creating a larger volume of decorative coating and leaving behind furrows of different widths, most often located diagonally on the surface. The convenience of creating a relief in this way is that the drawing applied to the solution can always be corrected if the master does not like it in some way. |
 | Having developed the first batch of putty, and having reached approximately the middle of the wall in height, the next portion of the mortar is made. During this time, the mass applied to the wall will already have time to grab. Therefore, many craftsmen have the problem of combining the plastered area of \u200b\u200bthe wall with the already set mortar and the fresh, just mixed mass that will be applied below. The joint between the two areas of the wall should be completely invisible. |
 | In order for the merging to go smoothly and become completely invisible, a fresh solution is applied with an overlap on the already applied layer by 150 ÷ 200 mm, and then the overall layer is smoothed out. This process must be carried out along the entire line of the union of the two zones - the upper and lower. |
 | The overlap line must be smoothed out well, and then a general relief pattern should be applied to it. |
 | The embossing starts from the area where the drawing has already been applied. It turns out that it is, as it were, “picked up” with a trowel and extended to a uniformly applied unifying putty layer along its entire length. |
 | Combining the two zones of the wall, it is important to ensure that there are no deep dents or pronouncedly even stripes from the trowel on it. Such defects must be smoothed out and these areas should be given a general relief, since in these areas they will be especially noticeable. When working on the connecting line, it is recommended to step aside and inspect the work area from a distance. So you can more clearly identify the shortcomings and immediately correct them. |
 | Then, the model mass is applied to the entire lower part of the wall in an even layer, and a relief is formed on it, in exactly the same way. When the wall is completely covered with this primary layer of embossed putty, it is left to dry completely for two days. |
 | When the wall dries, a spatula is passed along its surface, with which it is necessary to clean the protruding sharp edges of the relief stripes, since they must be rounded. |
 | Then, the entire surface is processed with a construction grater, with sandpaper No. 60 installed on it. Grouting is carried out with a slight pressure, in a circular motion counterclockwise. |
 | After processing, a relief surface with smoothed protruding edges of the pattern should be obtained. An additional check of the surface, that is, its smoothness, can be made by running the palm of your hand over it. If untreated areas are found that scratch the palm, then this flaw must be corrected immediately. The treated surface must be thoroughly cleaned of putty dust - this process is done with a soft wide brush or brush. |
 | The next step is to treat the surface with a deep penetration primer. The soil is applied with a roller with a pile nozzle. The composition must be well distributed over the wall, collecting all the resulting smudges. This layer dries in 1.5÷2 hours. |
 | Next, a white water-based paint is taken, a color scheme of the selected shade is added to it (in this case, the master used a beige dye), and the mass is well mixed until smooth. The paint should be applied easily and not be too thick, therefore, if necessary, the solution is diluted to the desired consistency with water. The relatively liquid composition of the paint, when applied to the wall, will become translucent, which, in combination with other layers of different shades, will create the illusion of space. |
 | The paint is first applied to the edge of the wall with a brush, and then the main part of the surface is tinted using a roller with a pile nozzle. It distributes the mass well over the relief surface, filling all the recesses of the pattern with paint, and when rolling out the composition, it collects its excess. As a result, the surface should be neat and evenly painted, without smudges. After the entire surface is covered with a tinting composition, it is left to dry completely. Water-based paint, applied in a thin layer, will dry for about two hours. |
 | Further, a composition made of a conventional primer and "silver" - the dye "Adagio Silver" is applied to the surface using a foam roller. The mixture is prepared in a 1:1 ratio, that is, in this case, the master took 250 × 250 grams of these materials. The resulting mixture should have a fairly thick consistency and not smudge at all. The mass is applied to the wall without pressure, so that only the upper protruding elements of the relief are covered with it. Recesses should not be painted with this composition. |
 | The mixture is gently rolled over the entire surface of the wall, highlighting the relief with color. |
 | Next, you will need to prepare a finishing composition that will transform the surface of the wall beyond recognition. It consists of a water-based varnish and a small amount of glitter. The varnish is diluted with water, in proportions of approximately 1: 3, and mixes well. The addition of water is necessary so that a hard uneven glossy crust does not form on the surface of the wall after its coating. |
 | A small amount of glitter is added to the varnish, about a tablespoon per 0.5 liter of composition. The solution is then thoroughly mixed by vigorous shaking. Before you start shaking, the lid of the container with the composition must be tightly closed. |
 | Next, ready varnish composition applied to relief plaster with a foam roller and well distributed by rolling over the surface of the wall. After completing this stage of work, the finish can be considered complete. It remains only to wait for the wall surface to dry, and then remove the masking tape limiting the wall. |
 | The last illustration shows the result of this enough long work above the wall decoration. But then, you see, the technology is not so complicated, and the resulting finish looks very original. |
Do-it-yourself decorative plaster is not as difficult as it might seem at first glance. Wall decoration with decorative plaster is now gaining great popularity. This option for repairs has become a serious competitor regular wallpaper. Exist different types plasters for interior decoration. The main difference is the texture and method of application.
Types of decorative plaster can be as follows:
- structural, which contains inclusions of a certain size;
- textured, which allows you to form a smooth relief surface;
- Venetian, imitating marble.
Before applying decorative plaster, you need to carefully study the features of each option and the application technology.
Structural
Methods for applying decorative plaster to obtain a structure involve the use of heterogeneous granular compositions. A variety of material is obtained by adding small pebbles, fragments of quartz, wood fibers, etc. to the plaster. Finishing material is made on the basis of cement and limestone. Synthetic latexes or silicates are also added to the composition. It is better to select the composition from ready-made mixtures. This is the only way to achieve good results. If you mix the components yourself, a good result is not guaranteed.
For cooking quality plaster it is better to use ready mixes
Wall decoration with textured plaster is easier if you use compositions on aqueous solvents. This is due to the fact that before applying decorative plaster with your own hands, you do not have to “evacuate” the residents of the apartment. The water-based material does not have a strong odor.
Wall decoration with plaster of this type is easy. This is justified by the high plasticity of the material and its obedience during operation. The technology of applying decorative plaster is simple and convenient. Work can be done immediately. There is no need to prepare the mixture, since it is already sold in liquid form in jars or buckets.
 With the help of decorative plaster, you can create any structure of different shades.
 The application technique is as follows:
- It is necessary to prepare materials and tools for decorative plaster. For structural composition you will need a roller, trowel or spatula.
- Before laying decorative plaster, you need to prepare the surface. A perfectly flat base is not needed. The thickness of the plaster layer and its structure can hide small defects. First, the surface is cleaned of dirt, dust and grease. After that, the bulges are knocked down and large cracks and potholes are covered up.
- A clean and dry base is strengthened with a primer. With him decorative paints and plasters will adhere better to the surface. Such a layer also prevents the exchange of moisture between the base and the finishing material. The application of decorative plaster with your own hands can only be started after the primer for the walls has completely dried.
- The principle of the work performed is suitable for all compositions: on a mineral, silicone or silicate basis. Plastering is carried out with a trowel or spatula in one layer. The coating is applied to the wall in circular or rectilinear movements.
- After application, the layer must be allowed to dry. At the same time, it is necessary to control that the room maintains a constant temperature and humidity, there are no drafts. Failure to comply with these rules can lead to a deterioration in the quality of the decorative layer, the appearance of cracks.
 To apply the composition and create a structure, use a roller or spatula
 Do-it-yourself structural decorative wall plastering is perfect for finishing common areas, such as a hallway, kitchen or corridor. In some interiors, it can harmoniously fit into the space of a bedroom or living room.
Before starting work, be sure to read the manufacturer's instructions. It indicates a more specific application technique and how to use the material correctly.
Textured
The method of applying decorative plaster with your own hands allows you to get the original texture. The boundary between textured and structural plasters is quite arbitrary. Methods for applying the composition in question make it possible to obtain complex options. For example, imitation of wood, crumpled paper, natural stone.
 imitation stone
 The option is suitable for almost any room. The implementation of textured decorative plaster allows you to support any design.
Most often, lime flour is introduced into the composition as the main ingredient. But you can also find polymer-based plasters. Polymers improve performance. Such a composition does not crack when dried. In work, polymers allow you to create a more embossed and interesting pattern.
Finishing properties largely depend on fillers. Fibers of different materials, crumbs of granite or marble are introduced into the textured solution. The consumption of decorative plaster largely depends on the complexity of the selected pattern.
 Textured plaster can be chosen for any design
 How decorative textured plaster is applied:
- Before you can properly apply the solution, you will need to prepare the base. Inner surface handled in almost the same way in all cases. Here the requirements are the same as for the structural composition: the absence of pollution and strong irregularities.
- Before working with decorative plaster, you need to cover the wall with a primer. This layer must be allowed to dry.
- After priming, a base paint is used, which is applied with a brush. On sale there are compositions that combine two functions: a primer and a substrate. They are worth buying to reduce time costs and simplify the process.
- Decorative wall plaster, the application technology of which involves the use of a spatula, trowel or brush, is laid in 1-2 layers. The thickness depends on the complexity of the relief. The more interesting it is, the more solution will be required. It is not recommended to apply a layer with a thickness of more than 20 mm at a time.
- A master class on decorative plaster should be completed with a finishing layer. As such a composition, transparent paints are used, which are also called glazing. They not only protect the surface, but also give it a pleasant pearly sheen. Options for applying decorative plaster can also consider using paint, impregnation or special wax as a final layer.


Decorative plaster, with the pros and cons of which you should read separately, will give the premises a complete and unique look. The advantage of this composition is its high plasticity and the ability to give the finished surface a rather complex texture. But the medal also has a downside: the complexity of application. Getting the original drawing is not so easy. You may first have to take a master class on applying decorative plaster from an experienced craftsman.
This will help you understand how to properly and efficiently plaster brick walls inside the house and surfaces made of other materials.
Venetian
This type of decorative plaster for interior work allows you to get an imitation of marble. The texture is very beautiful. The material is perfect for almost any room.
 imitation marble
 The composition is sold in ready-made liquid form. The mass of a can or bucket is usually from 7 to 25 kg. The plaster contains marble flour and slaked lime. An aqueous emulsion is used, which avoids an unpleasant odor during application.
Before plastering brick walls, they will need to be leveled. It is possible to apply decorative plaster on the walls only after the base is perfect. This type of material does not suffer from shortcomings. This is the difficulty of working with Venetian plaster.
If necessary, the solution can be painted in any color. With such plaster with your own hands, you can create amazing mosaics or whole paintings. Also, the benefits include environmental friendliness and safety. The composition is suitable even for the bedroom. The surface is fireproof and wear-resistant. After application, the layer dries fairly quickly.
 Venetian plaster allows you to finish the walls like marble
 A decorative technique training might look like this:
- First you need to prepare materials and tools for applying decorative plaster. Here you will need a medium-sized spatula and sandpaper with very small particles.
- After cleaning the surface, proceed to leveling the base. It must be perfect. First of all, get rid of chips. After that, you need to level the cracks and depressions with a cement-sand mortar or putty. For maximum elimination of defects, a leveling layer of plaster based on Portland cement is applied. The thickness of the layer is assigned depending on the severity of the base defects. On average, 20 mm will be enough. Evenness is controlled using the beacon rule. To do this, before starting work, special strips are installed on the wall with certain step. Another option for leveling is drywall sheets.
- The leveling layer must be allowed to dry. After that, you can apply a primer. It will allow the finishing material to better grab the wall.
- Venetian plaster is tinted before application. After that, they take a spatula and begin to apply the mass to the base with thin strokes. The entire surface needs to be treated. If necessary, the solution is applied in several layers. The maximum thickness in one application cannot exceed 12 mm.
- Allow time to dry after application. It is important to control the temperature and humidity conditions. Close doors and windows to prevent drafts. Violation of this rule will lead to the fact that when drying, cracks may appear on the surface.
- When the surface is dry, start cleaning. This will require sandpaper. The work is done in a circular motion. Everything must be done very carefully.
- The last step is protection. Finished layer should be covered with special white wax in one layer.
 The technique of finishing with Venetian plaster involves applying the mass in small strokes.
Which is better?
There is no exact answer to this answer. Each case must be considered separately. In one case, the plaster will be better structural, and in the other textured. The choice should be made depending on the interior of the room. But at the same time, it is worth considering the experience of the master and his skill. Before choosing a decorative plaster, you need to objectively assess your capabilities. For example, such an option as a Venetian coating is not for everyone.
 Creation of the texture of marble chips
 Application on ceilings
When renovating your home, you need to take care of more than just the walls. Performing work on the ceiling is more labor intensive. Here you have to constantly raise your head, which can be very tiring.. General principle practically does not differ from technology for walls.
 The thickness of the plaster layer on the ceiling is 5 mm
 There is only one difference. If on the wall the maximum layer thickness for the structural and texture mixture is 20 mm, then on the ceiling it is reduced to 5 mm. To level the base, it is recommended to use drywall, and not special compounds.


